Haier HCW2460AES Manuel utilisateur
- Catégorie
- Cuisinières
- Taper
- Manuel utilisateur
Ce manuel convient également à

30” Built-in Oven
Four à convection simple de 30”
Horno de convección simple de 30”
User Manual
Guide de l’utilisateur
Manual del usuario
HCW3460AES


1
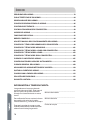
TABLE OF CONTENTS
OVEN SAFETY INSTRUCTIONS ...........................................................................2
FEATURES OF YOUR OVEN .................................................................................6
GENERAL OVEN INFORMATION ..........................................................................7
GENERAL OVEN TIPS ..........................................................................................8
ELECTRONIC CONTROL ...................................................................................10
COOKING WITH THE CONVECTION OVEN .......................................................12
OVEN MODES ................................................................................................... 13
COOKING FUNCTIONS .....................................................................................14
QUICK TIPS ....................................................................................................... 15
SETTING AN OVEN FUNCTION MANUALLY ...................................................... 16
CONVECTION BAKE TIPS AND TECHNIQUES ...................................................18
BAKE TIPS AND TECHNIQUES ..........................................................................20
CONVECTION BROIL TIPS AND TECHNIQUES .................................................. 21
BROIL TIPS AND TECHNIQUES ......................................................................... 22
CONVECTION ROAST TECHNIQUES ................................................................. 24
OVEN CARE AND CLEANING ............................................................................ 26
SETTING THE SELF-CLEANING MODE ............................................................. 28
GENERAL OVEN CARE ...................................................................................... 29
OVEN FINISHES / CLEANING METHODS ...........................................................30
OVEN DOOR REMOVAL .................................................................................... 31
REPLACING AN OVEN LIGHT ............................................................................32
TROUBLESHOOTING ........................................................................................ 34
LIMITED WARRANTY ........................................................................................ 37
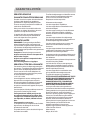
RECORD KEEPING
Thank you for purchasing this Haier
product. This user manual will help you
get the best performance from your
new oven.
For future reference, record the model
and serial number located on the inside
frame of the oven, and the date of
purchase.
Staple your proof of purchase to this
manual to aid in obtaining warranty
service if needed.
___________________________________
Model number
___________________________________
Serial number
___________________________________
Date of purchase

2
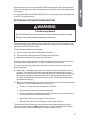
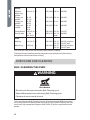
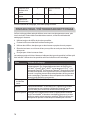
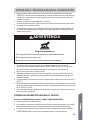
OVEN SAFETY INSTRUCTIONS
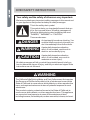
Your safety and the safety of others are very important.
We have provided many important safety messages in this manual and
on your appliance. Always read and obey all safety messages.
DANGER
WARNING
CAUTION
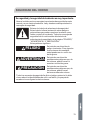
This is the safety alert symbol.
This symbol alerts you to potential hazards that can
kill or hurt you and others. All safety messages will
follow the safety alert symbol and either the word
“DANGER,” “WARNING” or “CAUTION.”
These words mean:
An imminently hazardous situation. You
could be killed or seriously injured if you
don’t immediately follow instructions.
A potentially hazardous situation
which, if not avoided, could result in
death or serious bodily injury.
A potentially hazardous situation
which, if not avoided, may result in
moderate or minor injury.
All safety messages will tell you what the potential hazard is, tell you
how to reduce the chance of injury, and tell you what can happen if the
instructions are not followed.
WARNING
The California Safe Drinking Water and Toxic Enforcement Act requires
the Governor of California to publish a list of substances known to the
State of California to cause cancer, birth defects, or other reproductive
harm, and requires businesses to warn of potential exposure to such
substances.
This product contains a chemical known to the State of California to
cause cancer, birth defects, or other reproductive harm. This appliance
can cause low-level exposure to some of the substances listed,
including benzene, formaldehyde, carbon monoxide, toluene, and soot.

3
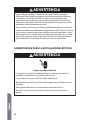
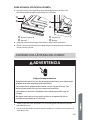
WARNINGS FOR ELECTRIC INSTALLATION
WARNING
Electrical Shock Hazard
Installation and service must be performed by a qualified installer or
service agency.
The models may be powered at 240V or 208V.
Always disconnect the power before servicing this unit.
This appliance must be properly grounded.
Failure to do so could result in death or serious injury.
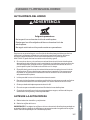
IMPORTANT SAFETY
INSTRUCTIONS
WARNING: To reduce the risk of re, elecrical shock, injury to persons,
or damage when using the oven, follow basic precautions, including the
following:
Proper Installation
•
This appliance must be
properly installed and
electrically grounded by a
qualied technician. Connect
only to properly grounded
outlet. See “Grounding
Instructions” found in the
Installation Instructions.
•
This appliance should
be serviced only by a
qualied service technician.
Contact the nearest
authorized service center
for examination, repair or
adjustment.
•
Do not repair or replace
any part of the oven unless
specically recommended.
Refer service to an authorized
servicer.
•
Do not operate this appliance
if it is not working properly or
if it has been damaged, until
an authorized servicer has
examined it.
•
Install or locate this appliance
only in accordance with the
Installation Instructions.
•
Use this oven only as intended
by the manufacturer. If you
have any questions, contact
the manufacturer.

4
IMPORTANT SAFETY
INSTRUCTIONS
•
Do not cover or block any
openings on this appliance.
•
Use this appliance only for
its intended use as described
in this manual. Do not use
corrosive chemicals, vapors,
or nonfood products in this
appliance. This type of oven is
specically designed to heat
or cook. It is not designed
for industrial or laboratory
use. The use of corrosive
chemicals in heating or
cleaning will damage the
appliance.
To reduce the risk of re in the
oven cavity:
•
Do not store ammable
materials in or near the oven.
•
Do not use water on a grease
re. Smother re or use a
dry chemical or foam-type
extinguisher.
•
It is highly recommended that
a re extinguisher be readily
available and highly visible
next to any cooking appliance.
•
Do not overcook food.
Carefully attend oven if paper,
plastic or other combustible
materials are placed inside
the oven.
•
Do not use the cavity for
storage purposes. Do not
leave paper products, cooking
utensils or food in the cavity
when not being used.
•
If materials inside the oven
should ignite, keep oven door
closed. Turn oven o and
disconnect the circuit at the
circuit breaker box.
•
Be sure the blower fan runs
whenever the oven is in
operation. If the fan does not
operate, do not use the oven.
Call an authorized service
center.
•
Never use the oven to warm
or heat a room.
Personal Safety
•
Do not allow children to use
this appliance unless closely
supervised by an adult.
Children and pets should not
be left alone or unattended in
the area where the appliance
is in use. Never allow children
to sit or stand on any part of
the oven.
•
Do not store items of interest
to children above the oven.
If children should climb onto
the appliance to reach these
items, they could be seriously
injured.
•
For personal safety, wear
proper clothing. Loose tting
or garments with hanging
sleeves should never be worn
while using this appliance.
•
Tie long hair so that it doesn’t
hang loose.
•
Do not touch heating
elements or interior surfaces
of oven.
•
The heating elements may be
hot even though they are dark
in color. Interior surfaces of
an oven become hot enough
to cause burns.

5
IMPORTANT SAFETY
INSTRUCTIONS
•
During and after use, do not
touch or let clothing or other
ammable materials contact
the heating elements or the
interior surfaces of the oven
until they have had sucient
time to cool.
•
The trim on the top and sides
of the oven door may become
hot enough to cause burns.
•
Use care when opening the
door. Open the door slightly
to let hot air or steam escape
before removing or replacing
food.
•
Do not heat unopened
food containers. Build-up
of pressure may cause the
container to burst and cause
injury.
•
Always place oven racks in
desired location while oven is
cool. If a rack must be moved
while oven is hot, do not let
potholder contact the hot
heating elements.
•
Use only dry potholders.
Moist or damp potholders
on hot surfaces may result in
burns from steam. Do not let
potholder touch hot heating
elements. Do not use a towel
or other bulky cloth.
Safety for the Self-cleaning
Oven:
•
Before self-cleaning the oven,
remove the broiler pan, oven
racks (only when not made of
porcelain), other utensils and
excess soft spillage.
•
Conrm that the door locks
and will not open once both
selectors are in CLEAN
position and the door lock
icon appears. If the door
does not lock, turn the cook
mode selector to OFF and
do not run Self-Clean. Call an
authorized servicer.
•
Do not clean the door gasket.
It is essential for a good seal.
Care should be taken not to
rub, damage, move or remove
the door gasket.
•
Do not use commercial
oven cleaners or oven liner
protective coatings of any
kind in or around any part of
the oven.
•
Clean only oven parts listed in
this manual.
•
Other surfaces of the
appliance may become hot
enough to cause burns -
among these surfaces are for
example: oven vent openings
and surfaces near these
openings, oven doors, and
windows of oven doors.
READ AND SAVE THESE
INSTRUCTIONS

6
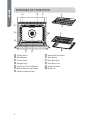
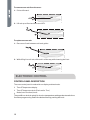
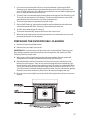
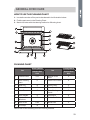
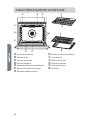
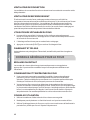
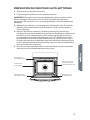
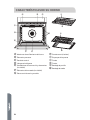
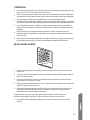
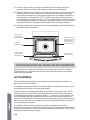
FEATURES OF YOUR OVEN
i
h
d
g
a b c
f e
j
l
k
m
a Cooling Vents
b Broil Element
c Control Panel
d Halogen Light
e Convection Fan and Element
f Bottom Element (not visible)
g Model and Serial # Plate
h Meat Probe (if present)
i Door Gasket
j Oven Rack Back
k Oven Rack Front
l Broiler Pan Racks
m Broiler Pan

7
GENERAL OVEN INFORMATION
WARNING
Fire Hazard
Remove all packing and foreign materials from the oven. Any material
of this sort left inside may melt or burn when the appliance is used.
Failure to do so can result in death or fire.
240 V VS. 208 V CONNECTION
Most oven installations will have a 240 V connection. If your oven is installed with
208 V, the preheat time may be slightly longer than with 240 V. The oven is designed
to assure the same clean time at 208 V.
HEATING FIRST TIME
Heat the empty appliance to the maximum temperature in order to remove any
manufacturing residues, which could aect the food with unpleasant odors.
HIGH ALTITUDE BAKING
When cooking at high altitude, recipes and cooking time will vary from the standard.
POWER FAILURE
After the power returns to the oven, the clock displays the time 12.00.
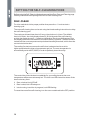
E - ERROR NUMBER CODES
If E codes are displayed when the electronic control detects a problem in the oven or
in the electronics.
SQUEAK NOISE
You may hear a squeak from the oven due to heat warping, but this is not a
malfunction.
FLASHING SYMBOLS OR NUMBERS
Signal an incomplete action that is in progress (locking the door, preheat, etc.).
BEEPS
Signal that the set temperature has been reached. Beeps also signal the end of a
function or an oven fault.

8
CONVECTION FAN
The convection fan operates during any Convection Mode and Defrost Mode.
COMPONENT COOLING FAN
Activates during any cooking or Self-Cleaning mode to cool inner components and
outer door surfaces. This air is exhausted through the vent located above the oven
door. It continues to run until components have cooled suciently. The cooling
fan operates at double speed (or RPMs) in self-cleaning and whenever the internal
components’ temperature becomes high.
USING OVEN LIGHTS
•
When the oven is in use, oven lights turn on automatically when a mode is
started. Oven lights will turn o automatically when nished and the oven mode
is cancelled.
•
The lights do not operate in the Self-Cleaning Mode.
•
“Light” knob to activate the lights in the oven
FAHRENHEIT AND CELSIUS
The temperature is preset in Fahrenheit, however it can be changed to Celsius.
GENERAL OVEN TIPS
DEFAULT SETTINGS
The Cooking Modes automatically select a suitable temperature. These can be
changed when a dierent one is needed.
OVEN CONDENSATION AND TEMPERATURE
•
It is normal for a certain amount of moisture to evaporate from the food during
any cooking process. The amount depends on the moisture content of the food.
The moisture may condense on any surface cooler than the inside of the oven,
such as the control panel.
•
Your new oven has an electronic temperature sensor that allows maintaining
an accurate temperature. Your previous oven may have had a mechanical
thermostat that drifted gradually over time to a higher temperature. It is normal
that you may need to adjust your favorite recipes when cooking in a new oven.
OPERATIONAL SUGGESTIONS
•
Use the Cooking Charts as a guide.
•
Do not set pans or any weight on the open oven door.
•
Use the interior oven lights to view the food through the oven door window
rather than opening the door frequently.

9
UTENSILS
•
Glass baking dishes absorb heat. Reduce oven temperature 25 °F (15 °C) when
baking in glass.
•
Use pans that give the desired browning. The type of nish on the pan will help
determine the amount of browning that will occur.
•
Shiny, smooth metal or light non-stick /anodized pans reect heat, resulting
lighter more delicate browning. Cakes and cookies require this type of utensil.
•
Dark, rough or dull pans will absorb heat resulting in a browner, crisper crust. Use
this type for pies.
•
For brown, crisp crusts, use dark non-stick/anodized or dark, dull metal utensils
or glass bake ware. Insulated baking pans may increase the length of cooking
time.
•
Do not cook with the empty Broiler Pan in the oven, as this could change cooking
performance. Store the Broiler Pan outside of the oven.
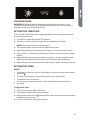
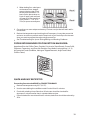
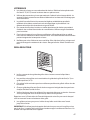
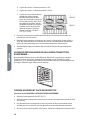
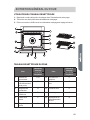
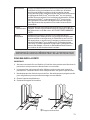
OVEN RACKS
4
6
5
3
2
1
•
The oven has rack guides at six levels as shown in the illustrations.
•
Rack positions are numbered from the bottom rack guide (#1) to the top (#6).
•
Check Cooking Charts for best rack positions to use when cooking.
•
Each level guide consists of paired supports formed in the walls on each side of
the oven cavity.
•
Always be sure to position the oven racks before turning on the oven. Make sure
that the racks are level once they are in position.
Please refer to illustration on “Features of Your Oven” if there is any question as to
which side is the front or top of the rack.
•
The racks are designed to stop when pulled forward to their limit.
IMPORTANT: Never use aluminum foil to cover the oven racks or to line the oven. It
can cause damage to the oven liner if heat is trapped under the foil.
IMPORTANT: Make sure you do not force it to avoid damage to the enamel.

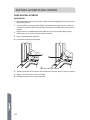
10
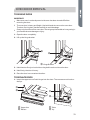
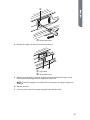
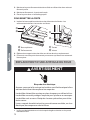
To remove oven rack from the oven:
1. Pull rack forward.
2. Lift rack up at front and then remove it.
To replace an oven rack:
1. Place rear of rack between rack level guides
2. While lifting front of rack, slide rack in all the way while lowering the front.
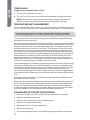
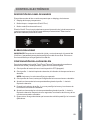
ELECTRONIC CONTROL
CONTROL PANEL DESCRIPTION
The oven control panel is made with one display and two knobs.
•
Time & Temperature display.
•
Time & Temperature knob (Push and/or Turn)
•
Mode (oven functions) knob.
The push & turn knob is mainly for clock or temperature setting and automatic time
functions programming. Select the desired item by pushing the knob.

11
+
-
Convect
Roast
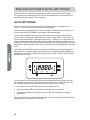
THE OVEN CLOCK
IMPORTANT: Following initial installation and power failures, the time-of-day
(12:00 a.m.) will blink to alert you to set the correct time of day. The oven will not
operate until the time-of-day has been set.
SETTING THE TIME OF DAY
Push in on the Time/Temp knob to toggle between the time-of-day and the timer,
and to view the set times.
1. Turn the Oven Mode knob to the OFF position.
2. Turn the -/+ knob to the left or right, the time display starts to ash.
NOTE: Hours and minutes are set separately.
3. Turn the knob again, until just the hour digits start to ash.
4. Adjust the ashing hour numerals by turning the -/+ knob to the left or right.
5. Push in on the -/+ knob once to set the hours and the minute numerals will begin
to ash.
6. Adjust the ashing minute numerals by turning the -/+ knob to the left or right.
After a few seconds both the hour and minute numerals will start ashing.
7. Wait another 10 seconds until the new time of day is steady. The time is now set.
SETTING THE TIMER
NOTES:
•
The display will show the time-of-day (default), until you push the knob to select
the timer .
•
The timer can be set for an amount of time from 0 to 240 minutes.
•
The default time is 30 minutes.
•
The oven timer may be used to time other activities even when the oven is
turned o.
To Adjust the Timer:
1. Push in on the knob to select the timer.
2. Turn the knob right or left to select the time.
3. When the time expires, the
ashes and the timer sounds with two short beeps
repeated every 3 seconds.
4. Push in on the knob to stop the timer alarm.

12
TIMER ALARM
To adjust the volume of the timer alarm:
1. Turn the Oven Mode knob to Light.
2. Turn the Time/Temp knob to the left to select between 3 available volumes.
NOTE: The timer alarm will sound two short beeps every 3 seconds at the
selected volume level until the alarm is either turned o or times out.
TEMPERATURE UNIT MEASUREMENT
To select Fahrenheit or Celsius press +/- knob twice, when the display shows F or C
turn +/- knob to change the unit on measurement, press again +/- knob to conrm.
COOKING WITH THE CONVECTION OVEN
In a conventional oven, the heat sources cycle on and o to maintain an average
temperature in the oven cavity.
As the temperature gradually rises and falls, gentle air currents are produced within
the oven. This natural convection tends to be inecient because the currents are
irregular and slow. In this convection system the heat is “conveyed” by a fan that
provides continuous circulation of the hot air. This European Convection system
provides state-of-the-art engineering and advanced design to create the nest
convection oven. In standard convection ovens, a fan simply circulates the hot air
around the food. The system is characterized by the combination of an additional
heating element located around the convection fan and the venting panel that
distributes heated air in three dimensions: along the sides, the top, and the full
depth of the oven cavity. This European Convection system aids in maintaining a
more even oven temperature throughout the oven cavity.
The circulating air aids in speeding up the baking process and cooks the food more
evenly. By controlling the movement of heated air, convection cooking produces
evenly browned foods that are crispy on the outside yet moist inside. Convection
cooking works best for breads and pastries as well as meats and poultry. Air-
leavened foods like Angel food cakes, soués, and cream pus rise higher than in
a conventional oven. Meats stay juicy and tender while the outside is avorful and
crisp.
By using European Convection, foods can be cooked at a lower temperature and
cooking times can be shorter.
When using this mode, the standard oven temperature should be lowered by 25 °F
(15 °C). Foods requiring less cooking time should be checked slightly earlier than
normal. For best results, foods should be cooked uncovered, in low-sided pans
to take advantage of the forced air circulation. When using the Convection Roast
mode, the standard oven temperature does not need to be reduced.
ADVANTAGES OF CONVECTION COOKING
•
Baking on multiple racks at the same time is possible with even results.
•
Multiple-rack baking saves time.
•
Prepare whole meals at once with no avor transfer
•
Requires no specialized bakeware.
•
Dehydrates herbs, fruits and vegetables
•
Saves time and energy.
•
Convection broiling allows for extraordinary grilling with thicker cuts of food.

13
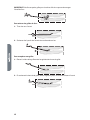
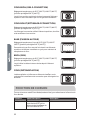
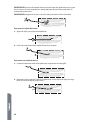
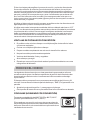
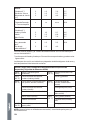
OVEN MODES
The following illustrations give an overview of what happens in the oven with each
mode setting. The arrows represent the location of the heat sources during each
modes. The lower heating element is concealed under the oven oor.
The maximum time the oven will remain on is 11 hours and 59 minutes. After this
amount of time has elapsed, “END” will appear in the display.
•
Adjust the time by turning the +/- knob to add more time.
•
Turn the Oven Mode knob to select the desired oven function.
CONVECTION BAKE (CONV BAKE)
Set temperature: from 120 °F (50 °C) to 480 °F (250 °C)
(preset position 375 °F [190 °C])
Convection Bake cooks with heat from ring elements behind
the back wall of the oven. The heat is circulated throughout
the oven by the convection fan.
CONVECTION BROIL (CONV BROIL)
Set temperature: from 120 °F (50 °C) to 485 °F (250 °C)
(preset position 445 °F [230 °C])
Convection Broil combines the intense heat from the upper
element with the heat circulated by the convection fan.
CONVECTION ROAST (CONV ROAST)
Set temperature: from 120 °F (50 °C) to 480 °F (250 °C)
(preset position 375 °F [190 °C])
Convection Roast uses the upper and lower elements and
convection fan.
BAKE (BAKE)
Set temperature: from 120 °F (50 °C) to 485 °F (250 °C)
(preset position 410 °F [210 °C])
Bake cooks with heated air. Both the upper and lower
elements cycle to maintain the oven temperature.

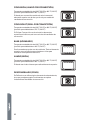
14
BROIL (BROIL)
Set temperature: from 120°F (50°C) to 485°F (250°C)
(preset position 445°F [230°C])
Broiling uses intense heat radiated from the upper element.
DEFROST (CONV)
Does not used any heating element, only the convection fan is
used to defrost foods.
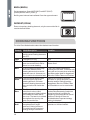
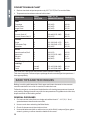
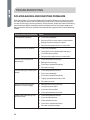
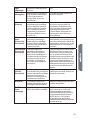
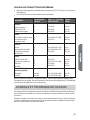
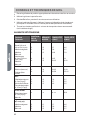
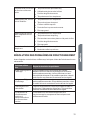
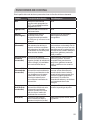
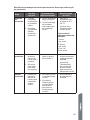
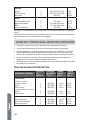
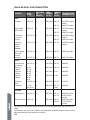
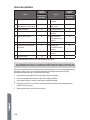
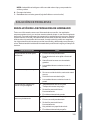
COOKING FUNCTIONS
Turn the Oven Mode knob to select the desired oven function.
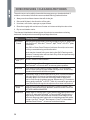
Control Mode Description Used for:
OFF
All the cooking modes are OFF
and the oven heating elements
are OFF.
N/A
Light
The light is on only. N/A
Defrost
In this mode only the internal
oven convection fan is ON i.e.
there is no oven heating.
This mode is used to defrost deep
frozen food.
Bake
In this mode both upper (top)
and lower (bottom) oven
heating elements are used to
heat the oven air. However, no
fan is used to circulate the heat.
This is the traditional mode of
cooking on one shelf. Therefore only
one rack can be used when selecting
the Bake mode. Ideal for Appetizers,
Biscuits, Coee Cakes and Cookies.
Convect
Roast
The Convection Roast mode
uses the upper (top) oven
heating element, the lower
(bottom) heating element and
the convection fan inside the
oven.
Ideal for the roasting of whole
chickens or turkey and pizza. It can
also be used for baking/cooking
Appetizers, Biscuits, Coee Cakes
and Cookies on one or more levels.
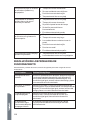
Convect
Bake
The Convection Bake mode
uses the circular or third
heating element hidden behind
the bae at the back wall of
the oven. The heat is circulated
throughout the oven by the
oven convection fan.
Consequently dierent foods can be
cooked simultaneously (maximum
three levels) and is suitable for
preparing a complete dinner (small
portions). Mixing of avors is
avoided and an important energy
saving is obtained.
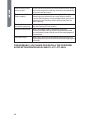
Convect
Broil
Suitable for preparing a
complete dinner (small
portions). Mixing of avors
is avoided and an important
energy savings is obtained.
Ideal for steak, hamburgers, chicken
quarters or chicken breasts.

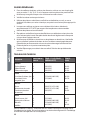
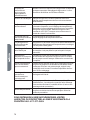
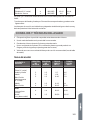
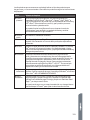
15
Broil
The Grill mode uses intense
heat radiated from the upper
(top) heating element.
Ideal for preparing toast, browning
and grilling.
Self
Clean
The standard time is 1.30 h and
can be changed.
Self-cleaning mode. Here the
oven is automatically cleaned by
burning-o cooking residue at high
temperature (about 460 °C) from 1h
to 3h. During the self-cleaning cycle
all fumes produced are ltered and
then expelled to ambient.
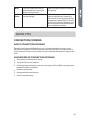
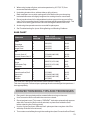
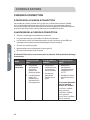
QUICK TIPS
CONVECTION COOKING
ABOUT CONVECTION COOKING
Standard cooking modes (Bake, Broil, etc.) use heat radiated from one or more
elements to cook food. Convection modes use both heat from the elements and
fans in the back of the oven to continuously circulate the heated air throughout the
oven.
ADVANTAGES OF CONVECTION COOKING
•
Even baking, browning and crisping.
•
Juices and avors are sealed in.
•
Foods requiring heated air to rise such as cream pus, soués, meringues and
breads are higher and lighter.
•
Multiple rack cooking.
•
No special bake ware required.
•
Saves time and energy.

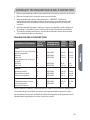
16
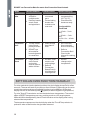
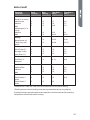
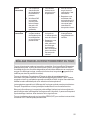
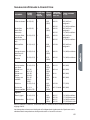
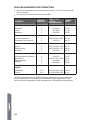
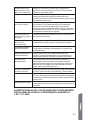
DO NOT use Convection Bake for meats. Use Convection Roast instead.
Mode Use this mode for: For Best results Quick Cooking Tip
Convection
Bake
•
Large quantities
of food on
multiple racks.
•
Pastries, breads,
snack, foods
and appetizers.
•
Use low-sided,
uncovered
pans.
•
Center baking
sheets side
to side on the
oven rack.
•
Reduce recipe
temperature by
25°F (15 °C).
•
Check food for
doneness early:
If recipe calls for
Check food
1 - 15 min. - 3 min.
early
6 - 30 min. - 5 min.
early
31 min.-1hr. - 10 min.
early
Convection
Broil
•
Thicker, tender,
cuts of meat,
poultry and sh.
•
DO NOT use
this mode for
browning breads
or casseroles.
•
Meats should
be at least 1”
thick.
•
No conversion
from standard
Broil is necessary.
•
Refer to
Convection Broil
Chart in this
Manual for cooking
times.
Convection
Roast
•
Large, tender
cuts of meat
and poultry
such as roast or
whole chicken.
•
DO NOT cover
meat or use
cooking bags
•
Refer to
Convection
Roast Chart in
this Manual for
cooking times
•
Do NOT
change recipe
temperature
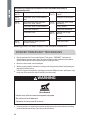
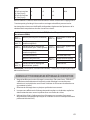
SETTING AN OVEN FUNCTION MANUALLY
Turn the mode knob into the desired position, the clock display shows On for a few
seconds. The oven will work for a maximum time (12hours). Depending on the oven
model, the number and type of available functions can be dierent. If the clock
display function is active the symbol appears (it doesn’t appear in light position).
Turn the Temp & Time selector and set the desired oven temperature. The control
oers a PRESET temperature per every cooking mode or a full range between
MIN and MAX to be adjusted by hand. Check the value on the display after having
selected the temperature.
The temperature appears on the clock display when the Time & Temp selector is
pushed or when a new function has just been selected.

17
As soon as the oven starts, the preheat LED (indicated by the bars) on the bottom
of the clock display starts ashing and becomes steadily on when the preheat ends
with a beep.
Turn the mode selector to ZERO (OFF) position to stop any activity, the display will
show OFF for a few seconds.
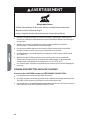
SETTING AN AUTOMATIC OVEN FUNCTION
Food Poisoning Hazard
Do not let food sit in oven more than one hour before or after cooking.
Doing so can result in food poisoning or sickness.
WARNING
After selecting an Oven Mode, you can program the oven for Timed cooking. The
Timed cooking program will remain set even if you change the Oven Mode with the
exception of the Self-Clean mode.
The following possibilities are available:
1. Timed cooking setting the cooking time (duration).
2. Timed cooking setting the end of cooking time (stop time).
3. Delayed cooking setting duration and stop time.
Push the knob to toggle between cooking duration (cook time) and end of cooking
time (stop time): the words “dur” or “End” are displayed respectively.
Turn the knob left/right to adjust the duration or the stop time when the proper
word is displayed:
1. When “dur” is displayed, the control shows 30 minutes as the default cooking
duration. Turn the knob left/right to set the desired cooking time in a range
between 0 and 240 minutes. The display will ash “dur” and its value alternately
for a few seconds then it will show the time-of-day, the pot symbol and the
“A” letter to indicate that a timed cooking is active. The end of cooking time is
updated automatically.
2. When the word End is displayed, the control shows the current time as the initial
stop time. To set the desired end-of-cooking time:
•
Turn the +/- knob left/right and the hours will ash.
•
Adjust the hours by turning the knob left/right.
•
Push in on the knob to toggle back and forth between hours and minutes or
wait a few seconds until the minutes ash.
•
Adjust the minutes by turning the knob left/right.
•
Wait until the new End of Cooking time value stops ashing.
The display will ash End and its value alternately for a few seconds, and then it
will show the time of day, the
symbol and the “A” letter to indicate that a timed
cooking is active. The cooking duration is updated automatically.

18
3. Follow the instructions for setting the cooking duration (Number 1), and then
push the knob until End appears. The control shows the “current time + cooking
time” as the initial stop time. It is not possible to lower the end of cooking time
below this value. To set the desired actual End-of-Cooking time:
•
Turn the +/- knob left/right and the hours will ash.
•
Adjust the hours by turning the knob left/right.
•
Push in on the knob to toggle back and forth between hours and minutes or
wait a few seconds until the minutes ash.
•
Adjust the minutes by turning the knob left/right.
•
Wait until the new End-of-Cooking time value stops ashing.
The display will ash End and its value alternately for a few seconds then it will
show the time of day and the “A” letter to indicate that a delayed cooking has been
programmed. As soon as the delay time expires, the oven turns on and heats for the
programmed cooking time. The
symbol is displayed.
At the end of any timed activity the control turns o the oven, the timer alarm
sounds (two short beeps repeated every 3 seconds), for a maximum time and makes
the time related icons
ash on the display. Push the knob to turn o the timer
alarm and reset the display.
Turn the Oven Mode knob to the OFF position before reusing the oven.
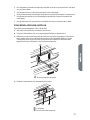
CONVECTION BAKE TIPS AND TECHNIQUES
Reduce recipe baking temperatures by 25°F (15°C).
•
For best results, foods should be cooked uncovered, in low-sided pans to take
advantage of the forced air circulation. Use shiny aluminum pans for best results
unless otherwise specied.
•
Heatproof glass or ceramic can be used. Reduce temperature by another 25 °F
(15 °C) when using heatproof glass dishes for a total reduction of 50 °F (30 °C).
•
Dark metal pans may be used. Note that food may brown faster when using dark
metal bake ware.
•
The number of racks used is determined by the height of the food to be cooked.
•
Baked items, for the most part, cook extremely well in convection. Do not try to
convert recipes such as custards, quiches, pumpkin pie, or cheesecakes, which
do not benet from the convection-heating process. Use the regular Bake mode
for these foods.
•
Multiple rack cooking for oven meals is done on rack positions 1, 2, 3, 4 and 5. All
ve racks can be used for cookies, biscuits and appetizers.
•
2 rack baking: Use positions 1 and 3.
•
3 rack baking: Use positions 2, 3 and 4 or 1, 3 and 5.
La page est en cours de chargement...
La page est en cours de chargement...
La page est en cours de chargement...
La page est en cours de chargement...
La page est en cours de chargement...
La page est en cours de chargement...
La page est en cours de chargement...
La page est en cours de chargement...
La page est en cours de chargement...
La page est en cours de chargement...
La page est en cours de chargement...
La page est en cours de chargement...
La page est en cours de chargement...
La page est en cours de chargement...
La page est en cours de chargement...
La page est en cours de chargement...
La page est en cours de chargement...
La page est en cours de chargement...
La page est en cours de chargement...
La page est en cours de chargement...
La page est en cours de chargement...
La page est en cours de chargement...
La page est en cours de chargement...
La page est en cours de chargement...
La page est en cours de chargement...
La page est en cours de chargement...
La page est en cours de chargement...
La page est en cours de chargement...
La page est en cours de chargement...
La page est en cours de chargement...
La page est en cours de chargement...
La page est en cours de chargement...
La page est en cours de chargement...
La page est en cours de chargement...
La page est en cours de chargement...
La page est en cours de chargement...
La page est en cours de chargement...
La page est en cours de chargement...
La page est en cours de chargement...
La page est en cours de chargement...
La page est en cours de chargement...
La page est en cours de chargement...
La page est en cours de chargement...
La page est en cours de chargement...
La page est en cours de chargement...
La page est en cours de chargement...
La page est en cours de chargement...
La page est en cours de chargement...
La page est en cours de chargement...
La page est en cours de chargement...
La page est en cours de chargement...
La page est en cours de chargement...
La page est en cours de chargement...
La page est en cours de chargement...
La page est en cours de chargement...
La page est en cours de chargement...
La page est en cours de chargement...
La page est en cours de chargement...
La page est en cours de chargement...
La page est en cours de chargement...
La page est en cours de chargement...
La page est en cours de chargement...
La page est en cours de chargement...
La page est en cours de chargement...
La page est en cours de chargement...
La page est en cours de chargement...
La page est en cours de chargement...
La page est en cours de chargement...
La page est en cours de chargement...
La page est en cours de chargement...
La page est en cours de chargement...
La page est en cours de chargement...
La page est en cours de chargement...
La page est en cours de chargement...
La page est en cours de chargement...
La page est en cours de chargement...
La page est en cours de chargement...
La page est en cours de chargement...
La page est en cours de chargement...
La page est en cours de chargement...
La page est en cours de chargement...
La page est en cours de chargement...
La page est en cours de chargement...
La page est en cours de chargement...
La page est en cours de chargement...
La page est en cours de chargement...
La page est en cours de chargement...
La page est en cours de chargement...
La page est en cours de chargement...
La page est en cours de chargement...
La page est en cours de chargement...
La page est en cours de chargement...
La page est en cours de chargement...
La page est en cours de chargement...
La page est en cours de chargement...
La page est en cours de chargement...
La page est en cours de chargement...
La page est en cours de chargement...
La page est en cours de chargement...
La page est en cours de chargement...
La page est en cours de chargement...
La page est en cours de chargement...
La page est en cours de chargement...
La page est en cours de chargement...
-
 1
1
-
 2
2
-
 3
3
-
 4
4
-
 5
5
-
 6
6
-
 7
7
-
 8
8
-
 9
9
-
 10
10
-
 11
11
-
 12
12
-
 13
13
-
 14
14
-
 15
15
-
 16
16
-
 17
17
-
 18
18
-
 19
19
-
 20
20
-
 21
21
-
 22
22
-
 23
23
-
 24
24
-
 25
25
-
 26
26
-
 27
27
-
 28
28
-
 29
29
-
 30
30
-
 31
31
-
 32
32
-
 33
33
-
 34
34
-
 35
35
-
 36
36
-
 37
37
-
 38
38
-
 39
39
-
 40
40
-
 41
41
-
 42
42
-
 43
43
-
 44
44
-
 45
45
-
 46
46
-
 47
47
-
 48
48
-
 49
49
-
 50
50
-
 51
51
-
 52
52
-
 53
53
-
 54
54
-
 55
55
-
 56
56
-
 57
57
-
 58
58
-
 59
59
-
 60
60
-
 61
61
-
 62
62
-
 63
63
-
 64
64
-
 65
65
-
 66
66
-
 67
67
-
 68
68
-
 69
69
-
 70
70
-
 71
71
-
 72
72
-
 73
73
-
 74
74
-
 75
75
-
 76
76
-
 77
77
-
 78
78
-
 79
79
-
 80
80
-
 81
81
-
 82
82
-
 83
83
-
 84
84
-
 85
85
-
 86
86
-
 87
87
-
 88
88
-
 89
89
-
 90
90
-
 91
91
-
 92
92
-
 93
93
-
 94
94
-
 95
95
-
 96
96
-
 97
97
-
 98
98
-
 99
99
-
 100
100
-
 101
101
-
 102
102
-
 103
103
-
 104
104
-
 105
105
-
 106
106
-
 107
107
-
 108
108
-
 109
109
-
 110
110
-
 111
111
-
 112
112
-
 113
113
-
 114
114
-
 115
115
-
 116
116
-
 117
117
-
 118
118
-
 119
119
-
 120
120
-
 121
121
-
 122
122
-
 123
123
-
 124
124


Haier HCW2460AES Manuel utilisateur
- Catégorie
- Cuisinières
- Taper
- Manuel utilisateur
- Ce manuel convient également à
dans d''autres langues
- English: Haier HCW2460AES User manual
- español: Haier HCW2460AES Manual de usuario
Autres documents
-
Bosch Appliances HBN 75 Series Manuel utilisateur
-
KitchenAid KERI500, KERC500, KERS507, KERC507, YKERI500, YKERC500, YKERS507, YKERC507 Manuel utilisateur
-
Jenn-Air JLRP430WP Mode d'emploi
-
Jenn-Air JDRP536WP Mode d'emploi
-
Maytag MET8775XB02 Manuel utilisateur
-
IKEA IBS324PSW1 Le manuel du propriétaire
-
Maytag MET8885XB Manuel utilisateur
-
Waring Commercial WCO250X Mode d'emploi