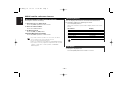
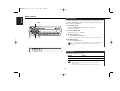
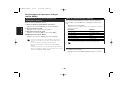
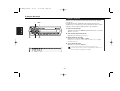
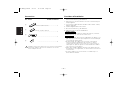
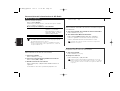
Kenwood KCA-CM50 Le manuel du propriétaire
- Catégorie
- Radios
- Taper
- Le manuel du propriétaire

©PRINTED IN JAPAN B64-2643-00/00 (K)(A)
DIGITAL RADIO CONTROLLER
INSTRUCTION MANUAL
CONTROLEUR DE RADIO NUMERIQUE
MODE D’EMPLOI
CONTROLADOR DE RADIO DIGITAL
MANUAL DE INSTRUCCIONES
KCA-CM50
Take the time to read through this instruction manual.
Familiarity with installation and operation procedures will help you
obtain the best performance from your digital radio controller.
For your records
Record the serial number, found on the back of the unit, in the spaces desig-
nated on the warranty card, and in the space provided below. Refer to the
model and serial numbers whenever you call upon your KENWOOD dealer for
information or service on the product.
Model KCA-CM50 Serial number
KCA-CM50/Cover for K 03.9.2 11:24 AM Page 1

— 2 —
English
Contents
Safety Precautions ..............................................3
SiIRIUS satellite radio tuner features ..................4
Power
Switching Seek Mode
Selecting the Preset Band
Channel Preset Memory
Preset Tuning
Channel Scan
Channel Search
Direct Access Tuning
Switching Display
Text Scroll
HD Radio tuner features ......................................7
Power
Tuning
Receive Mode
Station Preset Memory
Auto Memory Entry
Preset Tuning
Direct Access Tuning
Switching Display
Text Scroll
Menu system ......................................................10
Menu system
Text Scroll
SIRIUS ID (ESN)
Tuning Mode
Basic Operations of remote................................12
Installation..........................................................14
Accessories
Installation Procedure
Connecting Wires to Terminals
Installation
Troubleshooting guide........................................17
Specifications ....................................................18
KCA-CM50_U.S 03.9.2 11:20 AM Page 2

Reset button
— 3 —
Take the following precautions to
prevent fire and avoid personal injury:
• When extending the ignition wire, battery
wire, or ground wire, use 0.75mm
2
(AWG18)
or larger automotive grade wire to avoid wire
deterioration or damage to the covering.
• Check that no metal objects (coins, tools,
etc.) are left inside the unit to avoid short
circuits.
• If you smell or see smoke, turn the power
off immediately and consult your Kenwood
dealer.
• Do not touch the liquid crystal fluid if the
LCD is damaged or broken due to shock. The
liquid crystal fluid may be dangerous to your
health or even fatal.
If the liquid crystal fluid from the LCD
contacts your body or clothing, wash it off
with soap immediately.
Take the following precautions to
keep the unit in proper working order.
• Be sure the unit is connected to a 12V DC
power supply with a negative ground
connection.
• Do not open the top or bottom cover.
• Do not install the unit in places it is exposed
to direct sunlight, high heat or humidity,
water may splash over it, or dust exists.
2CAUTION
2WARNING
Cleaning the Unit
If the front panel gets dirty, turn off the
power and wipe the panel with a dry silicon
cloth or soft cloth.
Do not use hard cloths or paint thinner,
alcohol, or other volatile solvents. These may
damage external surfaces or remove
indicator characters.
2CAUTION
Safety Precautions
• When replacing a fuse, only use a new one
with the prescribed rating. Using a fuse with
the wrong rating may cause your unit to
malfunction.
•To prevent a short circuit when replacing a
fuse, first disconnect the wiring harness.
• If you have difficulty in installing this unit in
your vehicle, contact your Kenwood dealer.
• If it doesn’t seem to be working properly,
first press the Reset button. If the
malfunction persists, consult your Kenwood
dealer.
• Some car stereos cause the sound of the
tuner to make for a moment when an
engine is activated.
• Do not use your own screws. Use only the
screws provided. If you use the wrong
screws, you could damage the unit.
NOTE
KCA-CM50_U.S 03.9.2 11:20 AM Page 3

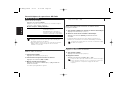
— 4 —
English
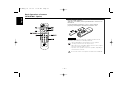
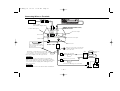
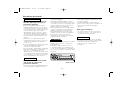
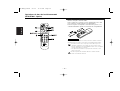
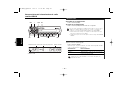
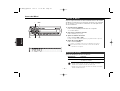
SIRIUS satellite radio tuner features
d
u
4
SRCH
¢
PWR
DISP
# 1-6
SEEK
Band display Channel number
Preset station number
Turning ON the Power
Press the [PWR] button.
Turning OFF the Power
Press the [PWR] button for at least 1 seconds.
•You need to subscribe to SIRIUS to receive the service by
SIRIUS Satellite Radio. Consult SIRIUS if "CALL 888-539 SIRIUS
TO SUBSCRIBE" appears.
• It may take a little time to start receiving after you selected the
SIRIUS source.
• If the signal receiving fails, "ACQUIRING SIGNAL" appears.
Power
Sets the seeking mode.
Press the [SEEK] button.
Each time the button is pressed the Seek mode switches as
shown below.
Display Operation
"SEEK 1" Normal manual seeking control.
"SEEK 2" Search in order of the channels in the
Preset memory.
This function cannot be used in the category and channel search
mode.
Switching Seek Mode
SCAN indicator
KCA-CM50_U.S 03.9.2 11:20 AM Page 4

— 5 —
Putting the channel in the memory.
1 Select the preset band
Press the [u] button.
2 Select the channel to put in the memory
Press the [4] or [¢] button.
3 Put the channel in the memory
Press the [#1] — [#6] button for at least 2 seconds.
The preset number display blinks.
On each band, 1 channel can be put in the memory on each [#1]
— [#6] button.
Only the channel number is stored. Category information is not
stored.
Channel Preset Memory
Calling up the channels in the memory.
1 Select the preset band
Press the [u] button.
2 Call up the channel
Press the [#1] — [#6] button.
Preset Tuning
A channel is searched within the selected category.
1 Enter Channel Search mode
Press the [SRCH] button.
2 Select the Category
Press the [u] or [d] button.
3 Select the Channel
Press the [4] or [¢] button.
Canceling Channel Search
Press the [SRCH] button.
You cannot operate this unit until all the Category information is
acquired.
Channel Search
Scanning for the channel you want to listen to.
1 Start Channel Scan
Press the [SEEK] button for at least 1 second.
"SCAN" indicator is ON.
2 Release it when the channel you want to listen to is received
Press the [SEEK] button for at least 1 second.
Channel Scan
Press the [u] button.
Each time the button is pressed the preset band switches
between the SR1,SR2,SR3, and SR4.
Selecting the Preset Band
KCA-CM50_U.S 03.9.2 11:20 AM Page 5

— 6 —
English
— 6 —
You can display various kinds of text data transmitted from
broadcasting stations by switching as follows.
Press the [DISP] button.
Each time the button is pressed the display switches as shown
below.
Information Display
Channel Number
Channel Name "CHANNEL NAME"
Song Title "SONG"
Artist Name "ARTIST"
Category Name "CATEGORY"
Composer Name "COMPOSER"
If text cannot be displayed, Channel Number will be shown.
Switching Display
Entering the channel and tuning.
1 Enter Direct Access Tuning mode
Press the [DIRECT] button on the remote.
2 Enter the channel number
Press the number buttons.
3 Do Channel Search
Press the [4] or [¢] button.
Canceling Direct Access Tuning
Press the [DIRECT] button on the remote.
• If you make no button operation for 10 seconds, the Direct
Access Tuning mode is automatically canceled.
•You can set up to Channel number 223.
• If there is no signal in the input Channel, "NO CHANNEL" appears.
• If you cannot receive any signal in the input Channel due to a bad
condition on radio wave or another problem, "ACQUIRING
SIGNAL" appears.
Direct Access Tuning (Function of remote)
SIRIUS satellite radio tuner features
Scrolling the displayed text.
Press the [DISP] button for at least 1 second.
Text Scroll
KCA-CM50_U.S 03.9.2 11:20 AM Page 6

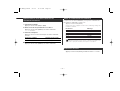
— 7 —
SEEK
SRCH
d
u
4
¢
PWR
DISP
# 1-6
MODE
Frequency
HD Radio tuner features
Selecting the station.
1 Select the HA band
Press the [d] button.
Select the HF band
Press the [u] button.
Each time the [u] button is pressed it switches between the
HF1, HF2, and HF3 bands.
2 Tune up or down band
Press the [4] or [¢] button.
• Using <Receive Mode> the modes can be switched to digital
broadcast automatic switching, analog broadcast only, or digital
broadcast only.
• When "Digital" has been set with <Receive Mode>, the seek time
will be longer to allow a check of whether the transmission is a
digital broadcast.
Tuning
Band display
Preset station number
Turning ON the Power
Press the [PWR] button.
Turning OFF the Power
Press the [PWR] button for at least 1 seconds.
Power
KCA-CM50_U.S 03.9.2 11:20 AM Page 7

— 8 —
English
HD Radio tuner features
Sets the receive mode.
Press the [MODE] button.
Each time the button is pressed the Receive mode switches as
shown below.
Receive mode Display Operation
Auto mode "Auto" Analog broadcasts and digital
broadcasts will be switched
automatically. When both are being
transmitted, the digital broadcast will
have priority.
Digital "Digital" Digital broadcasts only.
Analog "Analog" Analog broadcasts only.
• Even in the "Auto" setting, an analog broadcast will be received
during the reception of a ball game mode (non-delayed broadcast
program).
• When this button is pressed once, the current Receive Mode is
displayed. When it is pressed again, the Receive Mode is
switched over to another.
Receive Mode
Putting a station with good reception in the memory
automatically.
1 Select the band for Auto Memory Entry
Press the [u] or [d] button.
2 Open Auto Memory Entry
Press the [MODE] button for at least 2 seconds.
When 6 stations that can be received are put in the memory
Auto Memory Entry closes.
The receiving method can be switched with the setting of <Receive
Mode>.
Auto Memory Entry
Putting the station in the memory.
1 Select the band
Press the [u] or [d] button.
2 Select the frequency to put in the memory
Press the [4] or [¢] button.
3 Put the frequency in the memory
Press the desired [#1] — [#6] button for at least 2 seconds.
The preset number display blinks.
Station Preset Memory
Calling up the stations in the memory.
1 Select the band
Press the [u] or [d] button.
2 Call up the station
Press the desired [#1] — [#6] button.
When the preset broadcast station is transmitting either an analog
broadcast or a digital broadcast, the sound will not be output unless
the broadcast mode matches the setting of <Receive Mode>.
Preset Tuning
On each band, 1 station can be put in the memory on each [#1]
— [#6] button.
KCA-CM50_U.S 03.9.2 11:20 AM Page 8

— 9 —
When you are listening to the HD Radio, you can switch over the
display information as follows.
Press the [DISP] button.
Each time the button is pressed the display switches as shown
below.
Information Display
Station Name "STATION"
Song title "SONG"
Artist nam "ARTIST"
Album name "ALBUM"
Genre "GENRE"
Receive Frequency "FREQUENCY"
Displayed information except "FREQUENCY" are shown only when
you receive text in digital broadcasting. If text cannot be displayed,
frequency will be shown.
Switching Display
Entering the frequency and tuning.
1 Select the band
Press the [FM] or [AM] button.
2 Enter Direct Access Tuning mode
Press the [DIRECT] button on the remote.
"– – – –" is displayed.
3 Enter the frequency
Press the number buttons on the remote.
Example:
Desired frequency Press button
92.1 MHz (FM) [0], [9], [2], [1]
810 kHz (AM) [0], [8], [1], [0]
Canceling Direct Access Tuning
Press the [DIRECT] button on the remote.
Direct Access Tuning (Function of remote)
Scrolling the displayed text.
Press the [DISP] button for at least 1 second.
Text Scroll
KCA-CM50_U.S 03.9.2 11:20 AM Page 9

— 10 —
English
Menu system
The Menu system basic operation method is explained here. The
reference for the Menu items and their setting content is after
this operation explanation.
1 Enter Menu mode
Press the [MENU] button for at least 1 second.
"MENU" is displayed.
2 Select the menu item
Press the [u] or [d] button.
3 Set the menu item
Press the [4] or [¢] button.
You can continue by returning to step 2 and setting other items.
4 Exit Menu mode
Press the [MENU] button.
When other items that are applicable to the basic operation method
above are displayed afterwards their setting content chart is
entered.
Menu System
d
u
¢
4
MENU
Setting the displayed text scroll.
Display Setting
"SCROLL AUTO" Repeats scroll.
"SCROLL MANU" Scrolls when the display changes.
The texts scrolled are shown below.
• Channel Name/ Song title/ Artist name/ Composer name/
Category name
• Station Name/ Song title/ Artist name/ Album name/ Genre
Text Scroll
KCA-CM50_U.S 03.9.2 11:20 AM Page 10

— 11 —
SIRIUS ID (Electronic Serial Number) is displayed.
SIRIUS ID (ESN)
<When the KTC-SR902 is connected>
Sets the tuning mode.
Tuning mode Display Operation
Auto seek "SEEK AUTO1" Automatic search for a
station.
Preset station seek "SEEK AUTO2" Search in order of the
stations in the Preset
memory.
Manual "SEEK MANU" Normal manual tuning
control.
Tuning Mode
<When the KTC-HR100 is connected>
KCA-CM50_U.S 03.9.2 11:20 AM Page 11

A
T
T
TUNE
TRACK
DISC
4
¢
38
AM
–
SRC
FM
+
123
456
789
0
ABC DEF
GHI JKL MNO
PRS TUV WXY
QZ
DNPP/
SBF
DIRECT
OK
REMOTE CONTROL UNIT
Basic Operations of remote
(KCA-RC600 : Option)
— 12 —
English
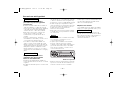
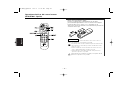
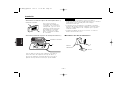
Use two "AAA" batteries.
Slide the cover while pressing downwards to remove it as
illustrated.
Insert the batteries with the + and – poles aligned
properly, following the illustration inside the case.
Store unused batteries out of the reach of children. Contact a doctor
immediately if the battery is accidentally swallowed.
• The provided batteries are intended for use in operation
checking, and their service life may be short.
• When the remote controllable distance becomes short, replace
both of the batteries with new ones.
•A portion of the operations may not be possible, depending on
the unit that is connected.
Do not set the remote on hot places such as above the dashboard.
2WARNING
Loading and Replacing the battery
KCA-CM50_U.S 03.9.2 11:20 AM Page 12

— 13 —
[FM] buttons
Select the band.
Each time the [FM] button is pressed it switches between the
SR1, SR2, SR3, and SR4 bands.
[4]/ [¢] buttons
Tune up or down the channels.
[#0] — [#9] buttons
Press buttons [#1] — [#6] to recall preset channels.
[DIRECT] button
Enters and cancels the <Direct Access Tuning> (page 6) mode.
[38] button
Enters and cancels the <Channel Search> (page 5) mode.
[
*
] buttons
Enters the <Channel Scan> (page 5) mode.
[DNPP]/ [SBF] button
Each time the button is pressed the display switches.
For the display switching order refer to <Switching Display>
(page 6).
In SIRIUS source
[AM] buttons
Select the HA band.
[FM] buttons
Select the HF band.
Each time the [FM] button is pressed it switches between the
HF1, HF2, and HF3 bands.
[4]/ [¢] buttons
Tune up or down band.
[#0] — [#9] buttons
Press buttons [#1] — [#6] to recall preset stations.
[DIRECT] button
Enters and cancels the <Direct Access Tuning> (page 9) mode.
[
*
] buttons
Enters the <Auto Memory Entry> (page 8) mode.
[DNPP]/ [SBF] button
Each time the button is pressed the display switches.
For the display switching order refer to <Switching Display>
(page 9).
In HD Radio source
KCA-CM50_U.S 03.9.2 11:20 AM Page 13

English
— 14 —
1. To prevent a short circuit, remove the key from the ignition and
disconnect the - battery.
2. Make the proper input and output wire connections for each unit.
3. Connect the wiring harness wires in the following order: ground,
battery, ignition.
4. Install the unit in your car.
5. Reconnect the - battery.
6. Press the reset button.
When drilling a hole in the car chassis to install the unit, check
first that nothing is on the other side.
• If the fuse blows, first make sure the wires aren’t touching to
cause a short circuit, then replace the old fuse with one with
the same rating.
• Do not let unconnected wires or terminals touch metal on the
car or anything else conducting electricity. To prevent a short
circuit, do not remove the caps on the ends of the
unconnected wires or the terminals.
• After the unit is installed, check whether the brake lamps,
blinkers, wipers, etc. on the car are working properly.
• Insulate unconnected wires with vinyl tape or other similar
material.
2CAUTION
2WARNING
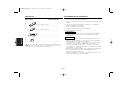
Accessories Installation Procedure
External view Number of items
................................................1
2
................................................1
3
The use of any accessories except for those provided might result in
damage to the unit. Make sure only to use the accessories shipped with
the unit, as shown above.
................................................1
1
................................................3
4
20 X 40 mm (13/16 × 1-9/16 in.)
20 X 60 mm (13/16
× 2-3/8 in.)
KCA-CM50_U.S 03.9.2 11:20 AM Page 14

— 15 —
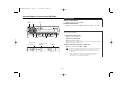
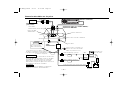
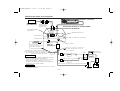
ANT CONT
ACC
BATT
SIRIUS Satellite Radio tuner /
HD Radio tuner
Controller unit input
Antenna input
(Front side)
(Rear side)
Car Audio unit
Audio output
(Left: White, Right: Red)
Power cable input
Audio input
Depending on what antenna you are using,
connect either to the control terminal of the
motor antenna, or to the power terminal for
the booster amplifier of the film-type antenna.
To prevent fire when the ignition wire (Red) or
battery wire (Yellow) is short-circuited by coming
into contact with the vehicle chassis (ground), only
connect the power supply after making the fuse
box connections.
Be sure to press the reset button after installation.
2CAUTION
2WARNING
Ground wire (Black) - (To car chassis)
Car fuse box
ACC
Ignition key
switch
Battery
Battery wire
+ (Yellow)
Ignition wire
+ (Red)
Connecting Wires to Terminals
Controller unit
Power cable
Not Used
If no connections are made,
do not let the wire come out
from the tab. 18a
When you connect the controller unit
to SIRIUS satellite radio tuner, don't
connect this wire.
KCA-CM50_U.S 03.9.2 11:20 AM Page 15

English
— 16 —
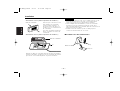
Installation
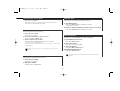
Installation of Controller unit
■
• Installation without using the trim mount plate 3
Attach one strip of Velcro to the
slanted-line of the controller
units as shown to the left, and
attach the other strip of Velcro
to the parts where you wish to
attach the controller units.
Then, put velcros together and
install the controller units.
• Installation using the trim mount plate 3
Controller unit
Controller unit
1
3
Pass the wire from the controller unit through the hole on
the trim mount plate and push fit the controller unit into
the trim mount plate until it locks.
• Be sure not to place the unit on such place as where it is
exposed to direct sunlight and temperature eventually rises.
It results in the deformation of the case.
• Depending on the installing location, the controller unit may
not be able to receive the signals from the remote controller
unit (Option). Install them after confirming that the signals
can be received.
• Install the unit in such a way that it does not disturb driving.
2CAUTION
Installation of Power cable
■
Carpet
Power cable
2
KCA-CM50_U.S 03.9.2 11:20 AM Page 16

— 17 —
What might seem to be a malfunction in your unit may
just be the result of slight misoperation or miswiring.
Before calling service, first check the following table
for possible problems.
SIRIUS source
? The power does not turn ON.01
✔ The fuse has blown.
☞ After checking for short circuits in the wires, replace the fuse with
one with the same rating.
✔ No ACC position on vehicle ignition.02
☞ Connect the same wire to the ignition as the battery wire.
✔ The SIRIUS satellite radio tuner is not connected properly.55
☞ Connect the SIRIUS satellite radio tuner directly to this unit.
? Nothing happens when the buttons are pressed.04
✔ The computer chip in the unit is not functioning normally.
☞ Press the Reset button on the controller unit (page 3).
? No sound can be heard, or the volume is low.58
✔ The input/output wires or wiring harness are connected incorrectly.
☞ Reconnect the input/output wires and/or the wiring harness
correctly. See the section on <Connecting Wires to Terminals>.
? No broadcast can be received2
✔ The SIRIUS antenna is not connected.
☞ Connect it properly.
✔ No subscription is established.53
☞ Subscribe to SIRIUS.
? No sound is heard even though the information concerning the
SIRIUS satellite radio tuner is displayed.67
✔ The microcomputer does not function correctly.68
☞ Press the Reset button of the controller unit.(Page 3)
✔ The system is not connected properly.69
☞ Connect the system properly. See <Connecting Wires to
Terminals>.
HD Radio source
? The power does not turn ON.01
✔ The fuse has blown.
☞ After checking for short circuits in the wires, replace the fuse with
one with the same rating.
✔ No ACC position on vehicle ignition.02
☞ Connect the same wire to the ignition as the battery wire.
? Nothing happens when the buttons are pressed.04
✔ The computer chip in the unit is not functioning normally.
☞ Press the Reset button on the controller unit (page 3).
? No sound can be heard, or the volume is low.
✔ The input/output wires or wiring harness are connected incorrectly.
☞ Reconnect the input/output wires and/or the wiring harness
correctly. See the section on <Connecting Wires to Terminals>.
✔ The preset broadcast station is not transmitting in the mode that was
set with <Receive Mode>.
☞ Please set <Receive Mode> to "Auto".
✔ In digital AM broadcasting, receive mode switches between stereo
and monaural too often.
☞ Receiving condition is bad or unstable. Stereo is chosen when
receiving condition is good, and it switches to monaural when the
condition becomes bad.
? Radio reception is poor.
✔ The car antenna is not extended.
☞ Pull the antenna out all the way.
✔ The antenna control wire is not connected.
☞ Connect the wire correctly, referring to the section on
<Connecting Wires to Terminals>.
Troubleshooting Guide
KCA-CM50_U.S 03.9.2 11:20 AM Page 17

English
— 18 —
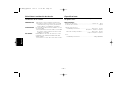
The messages shown below display your systems
condition.
ANTENNA ERR: The antenna is not connected correctly.E77
➪
Make sure the antenna is connected correctly
and then turn OFF/ON the SIRIUS source or
Controller unit.
TUNER ERROR: Broadcast cannot be received due to an error in
this unit.E77
➪
Turn OFF/ON the SIRIUS source or Control
unit, or press the reset button on the
Controller unit.
ESN ERROR: The ESN (Electronic Serial Number) is not
registered in SIRIUS satellite radio tuner unit.E77
➪
Consult your nearest service center.
Troubleshooting Guide
Specifications subject to change without notice.
General
Operating Voltage................................................14.4 V (11 ~ 16 V)
Current consumption ..............................................................0.5 A
Size (W × H × D)
Controller unit................................................154 × 43 × 17 mm
(6-1/16 × 1-11/16 × 11/16 in.)
Trim mount plate ..........................................188 × 58 × 18 mm
(7-3/8 × 2-5/16 × 11/16 in.)
Weight
Controller unit ......................................................220 g (0.49 lbs)
Specifications
KCA-CM50_U.S 03.9.2 11:20 AM Page 18

KCA-CM50_U.S 03.9.2 11:20 AM Page 19

— 20 —
Français
Table des matières
Précautions de sécurité......................................21
Caractéristiques du syntoniseur radio par
satellite SIRIUS ..................................................22
Alimentation
Commutation du mode de recherche
Sélection des gammes préréglées
Mémoire de canaux préréglés
Accord pré-réglé
Balayage de canal
Recherche de canal
Syntonisation à accès direct
Mode de commutation de l'affichage
Défilement du texte
Caractéristiques du syntoniseur HD Radio ........25
Alimentation
Accord
Mode de réception
Mémoire de station pré-réglée
Entrée en mémoire automatique
Accord pré-réglé
Syntonisation à accès direct
Mode de commutation de l'affichage
Défilement du texte
A propos du menu ..................................................28
A propos du menu
Défilement du texte
L'identification SIRIUS (ESN)
Mode d'accord
Opérations de base de la télécommande...............30
Installation..............................................................32
Accessoires
Procédure d'installation
Connexion des cables sur les prises
Installation
Guide de depannage ..............................................35
Spécifications .........................................................36
KCA-CM50_French 03.9.2 11:39 AM Page 20
La page charge ...
La page charge ...
La page charge ...
La page charge ...
La page charge ...
La page charge ...
La page charge ...
La page charge ...
La page charge ...
La page charge ...
La page charge ...
La page charge ...
La page charge ...
La page charge ...
La page charge ...
La page charge ...
La page charge ...
La page charge ...
La page charge ...
La page charge ...
La page charge ...
La page charge ...
La page charge ...
La page charge ...
La page charge ...
La page charge ...
La page charge ...
La page charge ...
La page charge ...
La page charge ...
La page charge ...
La page charge ...
La page charge ...
La page charge ...
La page charge ...
La page charge ...
-
 1
1
-
 2
2
-
 3
3
-
 4
4
-
 5
5
-
 6
6
-
 7
7
-
 8
8
-
 9
9
-
 10
10
-
 11
11
-
 12
12
-
 13
13
-
 14
14
-
 15
15
-
 16
16
-
 17
17
-
 18
18
-
 19
19
-
 20
20
-
 21
21
-
 22
22
-
 23
23
-
 24
24
-
 25
25
-
 26
26
-
 27
27
-
 28
28
-
 29
29
-
 30
30
-
 31
31
-
 32
32
-
 33
33
-
 34
34
-
 35
35
-
 36
36
-
 37
37
-
 38
38
-
 39
39
-
 40
40
-
 41
41
-
 42
42
-
 43
43
-
 44
44
-
 45
45
-
 46
46
-
 47
47
-
 48
48
-
 49
49
-
 50
50
-
 51
51
-
 52
52
-
 53
53
-
 54
54
-
 55
55
-
 56
56


Kenwood KCA-CM50 Le manuel du propriétaire
- Catégorie
- Radios
- Taper
- Le manuel du propriétaire
dans d''autres langues
- English: Kenwood KCA-CM50 Owner's manual
- español: Kenwood KCA-CM50 El manual del propietario
Documents connexes
-
Kenwood Car Satellite Radio System KCA-R71FM Manuel utilisateur
-
Kenwood C471FM Manuel utilisateur
-
-
-
-
-
-
-
-