IKEA IUD8500BX1 Le manuel du propriétaire
- Catégorie
- Lave-vaisselle
- Taper
- Le manuel du propriétaire

i
Thank you for Choosing IKEA®Appliances.
We hold our company to the highest quality standards and it is important to usthat you have a positive experience owning a IKEA®
product.
Foryour convenience, we have provided an easy to follow User Instruction Book. These instructions include a "Troubleshooting"
section to help you through any problems you may encounter.
Have your complete model and serial number ready.You can find your model and serial number on the label located near the door
on the right-hand or left-hand side of the dishwasher interior.
Forwarranty concerns, do not take the appliance back to the store. Please contact us in U.S.A. or Canada at 1-866-664-2449.
This product features a Limited Warranty - See the "Warranty" section for complete details. IKEA®appliances carry a 5-year warranty
(excludes LAGAN family - see warranty for coverage details).
NOTE: Proof of Purchase is required to obtain warranty service.
Tableof
WARRANTY...............................................2
ASSISTANCEOR SERVICE.....................3
DISHWASHERSAFETY............................3
WHAT'S NEW IN YOUR DISHWASHER. 5
QUICK STEPS...........................................6
DISHWASHERUSE..................................7
FILTRATIONSYSTEM..............................9
DISHWASHERCARE..............................10
TROUBLESHOOTING.............................11
Contents/ Indice/Tabledes
GARANTIA ...............................................13
AYUDA O SERVIClOTI=CNICO.............14
SEGURIDAD DE LALAVAVAJILLAS.... 15
QUleHAY DENUEVO EN SU
LAVAVAJILLAS.......................................17
PASOSRAPIDOS....................................18
USO DE LALAVAVAJILLAS..................19
SISTEMA DE FILTRACION....................21
CUlDADO DELA LAVAVAJILLAS.........23
SOLUCION DE PROBLEMAS................24
mafi res
GARANTIE...............................................26
ASSISTANCEOUSERVICE...................27
SECURITE DU LAVE-VAISSELLE.........28
QUOI DENEUF DANSVOTRE
LAVE-VAISSELLE...................................30
I=TAPESRAPIDES..................................31
UTILISATION DU
LAVE-VAISSELLE...................................32
SYSTI=MEDE FILTRATION...................35
ENTRETIENDU
LAVE-VAISSELLE...................................37
DlePANNAGE...........................................38
W10596256A

I WI J_'>'+_,+>,<I'%/;"_%_i
How long is the IKEA limited warranty valid?
This limited warranty is valid for five years from the date of purchase, when this major appliance is operated and maintained according to
instructions attached to or furnished with the product, unless the appliance is named LAGAN in which case this limited warranty is valid
for one year from the date of purchase. This limited warranty is valid only in the United States or Canada and applies only when the major
appliance is used in the country in which it was purchased. Proof of original purchase date is required to obtain service under this limited
warranty.
Which appliances are not covered by the IKEA five (5) year limited warranty?
For major appliances named "LAGAN," this limited warranty is valid for one year from the date of purchase.
Who will execute the service?
This limited warranty is provided by Whirlpool Corporation or Whirlpool Canada LP (hereafter "Whirlpool"). Service must be provided by a
Whirlpool designated service company.
What does this limited warranty cover?
The limited warranty will pay for factory specified parts and repair labor to correct defects in materials or workmanship that existed when
the major appliance was purchased. The exceptions are specified under the headline "What is not covered under this limited warranty?".
What will be done to correct the problem?
The designated service company will examine the product and decide, at its sole discretion, if it is covered under this limited warranty. If
considered covered, the designated service company will then repair the defect. Your sole and exclusive remedy under this limited
warranty shall be product repair as provided herein.
What is not covered under this limited warranty?
• Service calls to correct the installation of your major appliance, to instruct you on how to use your major appliance, to replace or repair
house fuses, or to correct house wiring or plumbing.
• Service calls to repair or replace appliance light bulbs, air filters or water filters. Consumable parts are excluded from warranty
coverage.
• Replacement parts or repair labor if this major appliance is used for other than normal, single-family household use or when it is used in
a manner that is inconsistent to published user or operator instructions and/or installation instructions.
• Damage resulting from accident, alteration, misuse, abuse, fire, flood, acts of God, improper installation, installation not in accordance
with electrical or plumbing codes, or use of consumables or cleaning products not approved for use.
• Cosmetic damage, including scratches, dents, chips or other damage to the finish of your major appliance, unless such damage results
from defects in materials or workmanship and is reported within 30 days from the date of purchase.
• Any food loss or medicine loss due to refrigerator or freezer product failures.
• Pick up and delivery. This major appliance is intended to be repaired in your home.
• Repairs to parts or systems resulting from unauthorized modifications made to the appliance.
• Expenses for travel and transportation for product service if your major appliance is located in a remote area where service by an
authorized servicer is not available.
• The removal and reinstallation of your major appliance if it is installed in an inaccessible location or is not installed in accordance with
published installation instructions.
• Replacement parts or repair labor on major appliances with original model/serial numbers that have been removed, altered or cannot be
easily determined.
The cost of repair or replacement under these excluded circumstances shall be borne by the customer.
Disclaimer of Implied Warranties
IMPLIED WARRANTIES, INCLUDING ANY IMPLIED WARRANTY OF MERCHANTABILITY OR IMPLIED WARRANTY OF FITNESS FOR A
PARTICULAR PURPOSE, ARE LIMITED TO FIVE YEARS (ONE YEAR FOR MAJOR APPLIANCES NAMED "LAGAN") OR THE SHORTEST
PERIOD ALLOWED BY LAW. Some states and provinces do not allow limitations on the duration of implied warranties of merchantability
or fitness, so this limitation may not apply to you. This warranty gives you specific legal rights, and you also may have other rights that
vary from state to state or province to province.
Limitation of Remedies; Exclusion of Incidental and Consequential Damages
YOUR SOLE AND EXCLUSIVE REMEDY UNDER THIS LIMITED WARRANTY SHALL BE PRODUCT REPAIR AS PROVIDED HEREIN.
WHIRLPOOL SHALL NOT BE LIABLE FOR INCIDENTAL OR CONSEQUENTIAL DAMAGES. Some states and provinces do not allow the
exclusion or limitation of incidental or consequential damages, so these limitations and exclusions may not apply to you. This warranty
gives you specific legal rights, and you also may have other rights that vary from state to state or province to province.
How to reach us if you need our service
If outside the 50 United States and Canada, contact your authorized IKEA retailer to determine if another warranty applies.
2/09

Ifyou do not have access to the Internet and you need assistance using your product or you would like to schedule service, you may
contact IKEA at the number below.
Have your complete model number ready. You can find your model and serial number on the label located near the door on the right-hand
or left-hand side of the dishwasher interior.
For assistance or service in the U.S.A. or Canada, call 1-866-664-2449.
Ifyou need further assistance, you can write to IKEA with any questions or concerns at the address below:
In the U.S.A.: In Canada:
Whirlpool Brand Home Appliances
Customer eXperience Center
553 Benson Road
Benton Harbor, MI 49022-2692
Whirlpool Brand Home Appliances
Customer eXperience Centre
200 - 6750 Century Ave.
Mississauga, Ontario L5N 0B7
Please include a daytime phone number in your correspondence.
Please keep this User Instructions and model number information for future reference.
Your safety and the safety of others are very important.
We have provided many important safety messages in this manual and on your appliance. Always read and obey all safety
messages.
This is the safety alert symbol.
This symbol alerts you to potential hazards that can kill or hurt you and others.
All safety messages will follow the safety alert symbol and either the word "DANGER" or "WARNING."
These words mean:
You can be killed or seriously injured if you don't immediately
follow instructions.
You can be killed or seriously injured if you don't follow
instructions.
All safety messages will tell you what the potential hazard is, tell you how to reduce the chance of injury, and tell you what can
happen if the instructions are not followed.
IMPORTANT SAFETY INSTRUCTIONS
WARNING: When using the dishwasher, follow basic precautions, including the following:
[] Read all instructions before using the dishwasher. [] Do not tamper with controls.
[] Use the dishwasher only for its intended function.
[] Use only detergents or rinse agents recommended for use in
a dishwasher, and keep them out of the reach of children.
[] When loading items to be washed:
1) Locate sharp items so that they are not likely to damage
the door seal; and
2) Load sharp knives with the handles up to reduce the risk
of cut-type injuries.
[] Do not wash plastic items unless they are marked
"dishwasher safe" or the equivalent. For plastic items not so
marked, check the manufacturer's recommendations.
[] Do not touch the heating element during or immediately after
use.
[] Do not operate the dishwasher unless all enclosure panels
are properly in place.
[] Do not abuse, sit on, or stand on the door, lid, or dish racks
of the dishwasher.
[] To reduce the risk of injury, do not allow children to play in
or on the dishwasher.
[] Under certain conditions, hydrogen gas may be produced in
a hot water system that has not been used for two weeks or
more. HYDROGEN GAS IS EXPLOSIVE. If the hot water
system has not been used for such a period, before using
the dishwasher turn on all hot water faucets and let the
water flow from each for several minutes. This will release
any accumulated hydrogen gas. As the gas is flammable,
do not smoke or use an open flame during this time.
[] Remove the door or lid to the washing compartment
when removing an old dishwasher from service or
discarding it.
SAVE THESE INSTRUCTIONS

GROUNDING iNSTRUCTiONS
For a grounded, cord-connected dishwasher:
The dishwasher must be grounded. In the event of a
malfunction or breakdown, grounding will reduce the risk of
electric shock by providing a path of least resistance for
electric current. The dishwasher is equipped with a cord
having an equipment-grounding conductor and a grounding
plug. The plug must be plugged into an appropriate outlet
that is installed and grounded in accordance with all local
codes and ordinances.
WARNING: Improper connection of the equipment-
grounding conductor can result in a risk of electric shock.
[]
Check with a qualified electrician or service representative
if you are in doubt whether the dishwasher is properly
grounded. Do not modify the plug provided with the
dishwasher; if it will not fit the outlet, have a proper outlet
installed by a qualified electrician.
For a permanently connected dishwasher:
The dishwasher must be connected to a grounded metal,
permanent wiring system, or an equipment-grounding
conductor must be run with the circuit conductors and
connected to the equipment-grounding terminal or lead on
the dishwasher.
SAVE THESE iNSTRUCTiONS
Tip Over Hazard
Do not use dishwasher until completely installed.
Do not push down on open door.
Doing so can result in serious injury or cuts.
State of California Proposition 65 Warnings:
WARNING: This product contains one or more chemicals known to the State of California to cause cancer.
WARNING: This product contains one or more chemicals known to the State of California to cause birth defects or other
reproductive harm.

Congratulationsonpurchasingyourwaterandenergyefficientdishwasher!Thisdishwashercleansbysprayingthe
disheswithwaterandpausestoallowthedetergenttosoakintoandreleasethesoilsonthedishes.Thecyclesare
longerduetothesoakandpausesforexceptionalcleaning.Severalmodelscontainanopticalwatersensor.The
opticalwatersensorisusedtodeterminetheoptimumwaterandenergyconsumptionforgreatcleaning
performance.Efficientdishwashersrunlongertosavewaterandenergy,justasdrivingacarslowersavesongas.
Thefirstcycleusingthesensorwillrunlongertocalibratetheopticalsensor.
Usingrinseaidwilloptimizeyourdryingandwashperformance.
Thisdishwasherisspecificallydesignedtobeusedwithrinseaid
forimproveddryingperformanceandcontrollingbuildupofhard
waterdeposits.Energyefficientdishwashersuselesswaterand
energy,sotheydependonthewater"sheeting"actionofrinse
aidfortotaloptimalperformance.
TheUnitedStateshaspassedarestrictionlimitingtheamountof
phosphorus(phosphates)inthehouseholddishwasher
detergentstonomorethan0.5%,wherepreviousdetergents
contained8.7%.Majormanufacturershavereformulatedtheir
dishwasherdetergentforthischangeindetergentsasanother
stepineco-consciousawareness.Withtheserecentchangesitis
recommendedtousetabletsandpacksforconvenienceand
improvedperformance.
Yourdishwasherhasthelatesttechnologyindishwasher
filtration.Thistriplefiltrationsystemminimizessoundand
optimizeswaterandenergyconservationwhileprovidingoptimal
cleaningperformance.Maintenanceofyourfiltersregularlywill
sustainpeakcleaningperformance.Wesuggestyoucleanboth
yourupperandlowerfilterandrinseunderrunningwateratleast
onceamonth.

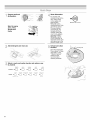
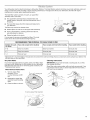
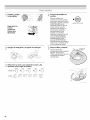
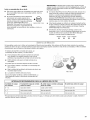
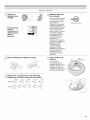
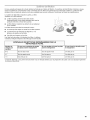
Prepare and load _
dishwasher, ff
Spin the spray
arms. They
should turn
freely.
Start dishwasher.
For models with
controls on top of the
door, select wash
cycle, option and
press START/
RESUME before
closing the door. Push
door firmly closed.
The door latches
automatically. For
models with front
controls, select the
wash cycle, options
and press START/
RESUME or press
START/R ESUME to
repeat the same cycle
and options as in the
previous wash cycle.
.@
REPEAT LAST CYCLE
Add detergent and rinse aid.
_- .\\
_.
Select a cycle and option (cycles and options vary
by model).
SENSOR HEAVY NORMAL LIGHT 1 HOUR
"O "O "O "O
HI TEMP SANI RINSE TOP RACK WASH HEAT DRY DELAY WASH CONTROL LOCK
o_,,o.s"O "O "O "O -O -O
sound o_,o_ -3 s_c HOL_s SEC
_i_ Unload and clean
_J the filter.
See "Recommended
Time Interval To Clean
Your Filter," in the
"Filtration System"
section for the
recommended
cleaning schedule.
Locating tab

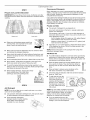
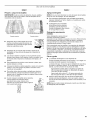
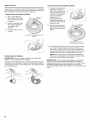
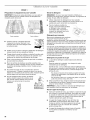
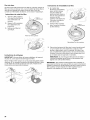
Prepare and Load the Dishwasher
IMPORTANT: Remove leftover food, bones, toothpicks and other
hard items from the dishes. Remove labels from containers before
washing.
Upper rack Lower rack
• Make sure nothing keeps spray arm(s) from
spinning freely. It is important for the water
spray to reach all soiled surfaces.
• Make sure that when the dishwasher door is closed no items
are blocking the detergent dispenser.
• Items should be loaded with soiled surfaces facing down and
inward to the spray as shown. This will improve cleaning and
drying results.
• Avoid overlapping items like bowls or plates that may trap food.
• Place plastics, small plates and glasses in the upper rack.
Wash only plastic items marked "dishwasher safe."
• To avoid thumping/clattering noises during operation: Load
dishes so they do not touch one another. Make sure lightweight
load items are secured in the racks.
When loading silverware, always place sharp
items pointing down. Mix other items
pointing up and some pointing down.
STEP2
Add Detergent
NOTE: If you do not plan to run a wash cycle soon, run a rinse
cycle. Do not use detergent.
• Use automatic dishwasher detergent only. Add powder, liquid
or tablet detergent just before starting a cycle.
• Fresh automatic dishwasher
detergent results in better cleaning.
Store tightly closed detergent
container in a cool, dry place.
Premeasured Detergents
Many detergents now come in premeasured forms (gel packs,
tablets, or powder packs). These forms are suitable for all hardness
and soil levels. Always place premeasured detergents in main
compartment and close lid.
Using dishwasher detergent tablets and packs have been proven
better than powder, liquid or gel detergents at reducing filming on
dishes. Using tablets and packs over time will start to reduce or
eliminate white film. Also, by using a rinse aid you can minimize
repeat buildup of white film.
Powder and Gels
• The amount of detergent to use depends on:
How much soil remains on the items - Heavily soiled loads
require more detergent.
The hardness of the water - If you use too little detergent in
hard water, dishes won't be clean. If you use too much in soft
water, glassware will etch.
Soft to Medium Water (0-6 grains per U.S. gallon) [typical
water softener water and some city water]
Medium to Hard Water (7-12 grains per U.S. gallon) [well
water and some city water]
• Depending on your water hardness, fill the Main Wash section
of the dispenser as shown. Fill the Pre-Wash section to the
level shown, if needed.
NOTE: Follow instructions on the package when using other
dishwasher detergent types.
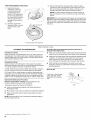
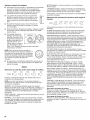
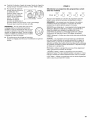
Add Rinse Aid
Your dishwasher is designed to use rinse aid for good drying
performance. Without rinse aid your dishes and dishwasher
interior will have excessive moisture. The heat dry option will
not perform as well without rinse aid.
Rinse aid keeps water from forming droplets that can
dry as spots or streaks. They also improve drying by
allowing water to drain off of the dishes after the final
rinse.
Rinse aid helps to reduce excess moisture on the
dish racks and interior of your dishwasher.
Full
Add
Check the rinse aid indicator. Add rinse aid when indicator
drops to "Refill" level.
To add rinse aid, turn the
dispenser cap and lift off.
Pour rinse aid into the
opening until the indicator
level is at "Full." Replace
the dispenser cap and turn
to "Lock." Make sure cap is
fully locked.
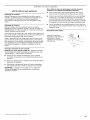
NOTE: For most water conditions, the factory
setting will give good results. If you have hard
water or notice rings or spots, try a higher
setting. Turn the arrow adjuster inside the
dispenser to change rinse aid settings.
• If you are experiencing poor dry
performance, you may want to try a higher
setting in your rinse aid dispenser.

STEP3
Select a Cycle (cycles vary by model)
SENSOR HEAVY NORMAL LIGHT 1 HOUR
"O "O "O .0
Pressand hold the desired cycle button untilthe corresponding
light is on.
NOTE:Heavier cycles and options affect cycle length. Some
cycles and options will take up to 31/2hours to complete.
SENSOR - The Sensor wash cycle senses the load size, soil
amount, and toughness of soil to adjust the cycle for optimal
cleaning, using only the amount of water and energy
needed.
HEAVY- Use for heavily soiled, hard-to-clean items.
NORMAL - This cycle is recommended to completely wash a full
load of normally soiled dishes. Selecting this cycle will default to
the options recommended for normal amounts of food soil. The
energy label is based on this cycle.
ECO - Use for lightly soiled items. It saves energy.
1 HOUR - Use for lightly soiled items. For fast results, 1 Hour
wash will clean the dishes using slightly more water and energy.
LIGHT - Use for lightly soiled items or china and crystal.
Select Options (options vary by model)
HI TEMP SANI RINSE TOP RACK WASH HEAT DRY DELAY WASH CONTROL LOOK
o ,,oos"O "O "O "O "0 "O
sou_o oN, oF==- 3 SEC _OLO3 SEC
You can customize your cycles by pressing the options desired.
HI TEMP - Raises the main wash temperature to improve cleaning
for loads containing tough, baked-on food.
SANI RINSE - Can be selected with Heavy, Sensor, and Normal
wash cycles. Select this option to raise the water temperature in
the final rinse to approximately 155°F (68°C). Sani Rinse option
adds heat and time to the cycle. This high temperature rinse
sanitizes your dishes and glassware in accordance with NSF/ANSl
Standard 184 for Residential Dishwashers. Certified residential
dishwashers are not intended for licensed food establishments.
TOP RACK WASH - Can be selected with any cycle for washing
a small load of dishes in the top rack.
HEAT DRY/HEAT DRY HIGH - Can be selected with 1 Hour, Heavy,
Sensor, and Normal wash cycles. When selected with the 1-Hour
Wash cycle, the time is increased by approximately 30 minutes.
HEAT DRY ECO - Can be selected with 1 Hour, Heavy,
Sensor, and Normal wash cycles for shorter heated dry
times and to use less energy.
DELAY WASH - Can be selected with any cycle. Offers the choice
to start the dishwasher automatically at a later time. Select a wash
cycle and options. Press DELAY WASH. If your model has a 2-4-8
option, repeatedly press the Delay Wash button until the desired
delay time is selected. Press START/RESUME. Close the door
firmly.
CONTROL LOCK - Use to avoid unintended use of your
dishwasher. When Control Lock is lit, all buttons are disabled. The
dishwasher door can be opened while the controls are locked.
To turn on Control Lock:
Press and hold CONTROL LOCK for at least 3 seconds. The light
glows. If you press any pad while your dishwasher is locked, the
light flashes 3 times.
To turn off Control Lock:
Press and hold CONTROL LOCK for at least 3 seconds. The
Control Lock light turns off.
STEP4
top of door, push door firmly closed within
3 seconds of pressing START/RESUME. If
door is not closed within 3 seconds, the
start button LED will flash, an audible tone
will be heard, and cycle will not start.
IMPORTANT: If anyone opens the door (such
Start
or Resume a Cycle
• Run hot water at the sink nearest your dishwasher until the
water is hot. Turn off water.
If the Start/Resume button is located on
.0
REPEAT LAST CYCLE
as, for adding a dish, even during the Delay Hours option), the
START/RESUME button must be pressed each time.
• If your Start/Resume button is located on front of door, push
door firmly closed. The door latches automatically. Select the
wash cycle, options and press START/RESUME or press
START/RESUME to repeat the same cycle and options as in
previous wash cycle.
• You can add an item anytime before the main wash starts.
Open the door slowly and add the item. Close the door firmly.
Press START/RESUME.
• The Clean indicator glows when the cycle is finished. Sanitized
glows when Sani Rinse option is selected and sanitization
levels occur.
WASHING DRYING CLEAN SANITIZED
® • ® ®

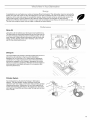
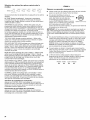
Yourdishwasherhasthelatesttechnologyindishwasherfiltration.Thistriplefiltrationsystemminimizessoundandoptimizeswaterand
energyconservationwhileprovidingsuperiorcleaningperformance.Throughoutthelifeofyourdishwasher,thefilterwillrequire
maintenancetosustainpeakcleaningperformance.
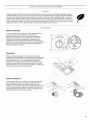
Thetriplefiltersystemconsistsof2parts,anupperfilter
assemblyandalowerfilter.
• Theupperfilterassemblykeepsoversizeditemsand
foreignobjects,alongwithveryfinefoodparticles,outof
thepump.
• Thelowerfilterkeepsfoodfrombeingrecirculatedonto
yourdishware.
Thefiltersmayneedtobecleanedwhen:
• VisibleobjectsorsoilsareontheUpperFilterAssembly.
• Thereisdegradationincleaningperformance(thatis,
soilsstillpresentondishes).
• Dishesfeelgrittytothetouch.
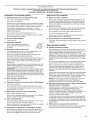
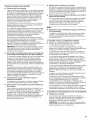
Itisveryeasytoremoveandmaintainthefilters.Thechart
belowshowstherecommendedcleaningfrequency.
ii
Lower Flter
Number of Loads If you only scrape before loading* If you scrape and rinse before loading
Per Week
8-12 Every two months Every four months
I
4-7 Every four months Once per year
1-3 Twice per year Once per year
If you wash before loading
Once per year
Once per year
Once per year
*Manufacturer's recommendation: This practice will conserve the water and energy that you would have used to prepare your dishes. This
will also save you time and effort.
Very Hard Water
Ifyou have hard water (above 15 grains), clean your filter at least
once per month. Building up of white residue on your dishwasher
indicates hard water. For tips on removing spots and stains, see
"Troubleshooting" section.
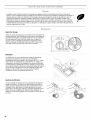
Filter Removal Instructions
1. Turn the Upper Filter
Assembly 1¼turn
counterclockwise and lift
out.
2. Separate the upper filter
assembly by gently pulling
apart.
3. Clean the filters as shown.
g tab
Cleaning Instructions
IMPORTANT: Do not use wire brush, scouring pad, etc. as they
may damage the filters.
Rinse filter under running water until most soils are removed. If you
have hard-to-remove soils or calcium deposits from hard water, a
soft brush may be required.
Toremove Upper FilterAssembly
'j _ _J ,

Filter Reinstallation Instructions
1. Noting the previous
illustrations, place the
Lower Filter under the
Locating Tabs in the
bottom of the dishwasher
so the round opening for
the Upper Filter Assembly
lines up with the round
opening in the bottom of
the tub.
2. Insert the Upper Filter
Assembly into the circular
opening in the Lower
Filter.
tab
3.
Slowly rotate the filter clockwise until it drops into place.
Continue to rotate until the filter is locked into place. If the
filter is not fully seated (still turns freely), continue to turn
the filter clockwise until it drops and locks into place.
NOTE: The Upper Filter Assembly arrow does not have to
align with the arrow in the Lower Filter as long as the filter is
locked.
IMPORTANT: Toavoid damage to dishwasher, do not operate your
dishwasher without the filters properly installed. Be sure the Lower
Filter is securely in place and the Upper Filter Assembly is locked
into place. If the Upper Filter Assembly turns freely, it is not locked
into place.
To replace Upper Filter Assembly
CLEANING THE DISHWASHER
Cleaning the exterior
Clean the exterior of the dishwasher with a soft, damp cloth and
mild detergent. If your dishwasher has a stainless steel exterior, a
stainless steel cleaner is recommended - Stainless Steel Cleaner
and Polish Part Number 31464.
Cleaning the interior
Clean the interior of the dishwasher, with a paste of powdered
dishwasher detergent and water or use liquid dishwasher detergent
on a damp sponge to clean the cooled-down interior.
A white vinegar rinse may remove white spots and film. Vinegar is
an acid, and using it too often could damage your dishwasher.
Put 2 cups (500 mL) white vinegar in a glass or dishwasher-safe
measuring cup on the bottom rack. Run the dishwasher through a
complete washing cycle using an air-dry or an energy-saving dry
option. Do not use detergent. Vinegar will mix with the wash water.
Dishwasher Maintenance Procedure
Removal of Hard Water / Filming: Recommended use of a
monthly maintenance product such as affresh ®t
Dishwasher Cleaner Part Number W10282479.
• Load your dishwasher (preferably with dishes affected by
filming/hard water).
• Place tablet in main wash compartment of detergent dispenser.
• Select cycle/option best for heavily soiled dishes and start
dishwasher.
NOTE: Recommended to use a premeasured detergent tablet or
pack for regular daily use.
To Reduce Risk of Property Damage During Vacation or
Extended Time Without Use
• When you will not be using the dishwasher during the summer
months, turn off the water and power supply to the dishwasher.
• Make sure the water supply lines are protected against freezing
conditions. Ice formations inthe supply lines can increase
water pressure and cause damage to your dishwasher or
home. Damage from freezing is not covered by the warranty.
• When storing your dishwasher in the winter, avoid water
damage by having your dishwasher winterized by authorized
service personnel.
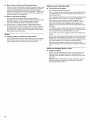
Drain air gap
If you have a drain air gap,
check and clean it if the
dishwasher isn't draining
well.
1-®affresh is a registered trademark of Whirlpool, U.S.A.
10

First try the solutions suggested here or visit our website and reference FAQs (Frequently Asked Questions)
to possibly avoid the cost of a service call.
In the U.S.A., www.ikea.com In Canada, www.ikea.com
Dishwasher is not operating properly
• Dishwasher does not run or stops during a cycle
Is the door closed tightly and latched?
Is the right cycle selected?
Is there power to the dishwasher? Has a household fuse blown,
or has a circuit breaker tripped? Replace the fuse or reset the
circuit breaker. If the problem continues, call an electrician.
Has the motor stopped due to an overload? The motor
automatically resets itself within a few minutes. If it does not
restart, call for service.
Is the water shutoff valve (if installed) turned on?
It is normal for certain cycles to repeatedly pause for several
seconds during the main wash.
• The Clean light is flashing
Call for service.
• Dishwasher will not fill
A z-)
Is the overfill protection float able to
move up and down freely? Press down
to release.
• Dishwasher seems to run too long
The dishwasher can run up to 31/2hours depending on soil
level, water temperature, cycles and options.
Is the water supplied to the dishwasher hot enough? The
dishwasher runs longer while heating water.
Is the dishwasher cycle time within the cycle times? See cycle
sections wash times. A delay automatically occurs in some
wash and rinse cycles until the water reaches the proper
temperature.
This dishwasher is equipped with an optical sensor wash that
detects water temperature, soil and detergent amount. Wash
cycles are adjusted based on what is sensed.
IMPORTANT: The very first wash cycle after installation in your
home will be adjusted to include an additional 2 rinses. This
cycle must not be interrupted for proper sensor adjustment. If
this adjustment cycle is canceled or stopped before the Clean
light comes on at the end of the cycle, the next wash cycle will
repeat this sensor adjustment.
• Water remains in the dishwasher
Is the cycle complete?
Detergent remains in the covered section of the dispenser
Is the cycle complete?
Is the detergent lump-free? Replace detergent if necessary.
Is the dispenser door blocked by dishes or cookware when the
dishwasher door is closed?
• White residue on the front of the access panel
Was too much detergent used?
Is the brand of detergent making excess foam? Try a different
brand to reduce foaming and eliminate buildup.
• Odor in the dishwasher
Are dishes washed only every 2 or 3 days? Run a rinse cycle
once or twice a day until you have a full load.
Does the dishwasher have a new plastic smell? Run a vinegar
rinse as described in "Dishwasher Care."
Condensation on the kitchen counter (built-in models)
Is the dishwasher aligned with the countertop? Moisture from
the vent in the dishwasher console can form on the counter.
Refer to the Installation Instructions for more information.
Dishes do not dry completely
• Dishes do not dry completely
Did you use a rinse aid? Your dishwasher is designed to use
rinse aid for good drying performance. Without rinse aid your
dishes and dishwasher interior will have excessive moisture.
The heat dry option will not perform as well without rinse aid.
• Dishes are not dry
Did you load your dishwasher to allow proper water drainage?
Do not overload. Use a liquid rinse aid to speed drying.
Are the plastics wet? Plastics often need towel drying.
Is the rinse aid dispenser empty?
Did you use an air-dry or energy-saving dry option? Use a
heated drying option for dryer dishes.
• Excess moisture on racks and dishwasher interior
Check the rinse aid indicator to see that there is rinse aid in the
dispenser.
Spots and stains on dishes
Spotting and filming on dishes
Is your water hard, or is there a high mineral content in your
water? Conditioning the final rinse water with a liquid rinse aid
helps eliminate spotting and filming. Keep the rinse aid
dispenser filled. Always use a high-temp option. If your water
hardness is 13 grains or above, it is strongly recommended that
you install a home water softener. Ifyou do not wish to drink
softened water, have the softener installed onto your hot water
supply.
Is the water temperature too low? For best dishwashing results,
water should be 120°F (49°C) as it enters the dishwasher.
Did you use the correct amount of effective detergent? Use
recommended dishwasher detergents only. Do not use less
than 1 tbs (15 g) per load. Detergent must be fresh to be
effective. Heavy soil and/or hard water generally require extra
detergent.
Is the home water pressure high enough for proper dishwasher
filling? Home water pressure should be 20 to 120 psi (138 to
828 kPa) for proper dishwasher fill. If you have questions about
your water pressure, call a licensed, qualified plumber.
NOTE: To remove spots and film from glassware, remove all
silverware and metal items and see the "Dishwasher
Maintenance Procedure" in the "Dishwasher Care" section.
• Silica film or etching (silica film is a milky, rainbow-colored
deposit; etching is a cloudy film)
Sometimes there is a water/chemical reaction with certain
types of glassware. This is usually caused by some
combination of soft or softened water, alkaline washing
solutions, insufficient rinsing, overloading the dishwasher, and
the heat of drying. It might not be possible to avoid the
problem, except by hand washing.
To slow this process use a minimum amount of detergent but
not less than 1tbs (15 g) per load. Use a liquid rinse aid and
underload the dishwasher to allow thorough rinsing. Silica film
and etching are permanent and cannot be removed. Do not use
heated drying.
• White spots on cookware with nonstick finish
Has the dishwasher detergent removed cookware seasoning?
Reseason cookware after washing it in the dishwasher.
11

• Brown stains on dishes and dishwasher interior
Does your water have high iron content? Rewash dishes using
1-3 tsp (5-15 mL) of citric acid crystals added to the covered
section of the detergent dispenser. Do not use detergent.
Follow with a Normal wash cycle with detergent. If treatment is
needed more often than every other month, the installation of
an iron removal unit is suggested.
Black or gray marks on dishes
Are aluminum items rubbing dishes during washing?
Disposable aluminum items can break down in the dishwasher
and cause marking. Hand wash these items. Remove
aluminum markings by using a mild abrasive cleaner.
Orange stains on plastic dishes or dishwasher interior
Are large amounts of tomato-based foods on dishes placed in
the dishwasher? It may be necessary to use a stain removal
product to remove stains from your dishwasher. Stains will not
affect dishwasher performance.
Noises
Grinding, grating, crunching or buzzing sounds
A hard object has entered the wash module (on some models).
When the object is ground up, the sound should stop. If the
noise persists after a complete cycle, call for service.
Dishes are not completely clean
• Food soil left on the dishes
Is the dishwasher loaded correctly?
Did you choose the cycle that describes the most difficult soil in
your dishwasher? If you have some items with heavier soils,
use a heavier cycle.
Is the water temperature too low? For best dishwashing results,
water should be 120°F (49°C) as it enters the dishwasher.
Did you use the correct amount of fresh detergent? Use
recommended dishwasher detergents only. Do not use less
than 1 tbs (15 g) per load. Detergent must be fresh to be
effective. Heavy soil and/or hard water generally require extra
detergent.
Is detergent caked in dispenser? Use fresh detergent only. Do
not allow detergent to sit for several hours in a wet dispenser.
Clean dispenser when caked detergent is present.
Is the pump or spray arm clogged by labels from bottles and
cans?
Is the home water pressure high enough for proper dishwasher
filling? Home water pressure should be 20 to 120 psi (138 to
828 kPa) for proper dishwasher fill. If you have questions about
your water pressure, call a licensed, qualified plumber.
Are high suds slowing the wash arm? Do not use soap or
laundry detergents. Use recommended dishwasher detergents
only.
Dishes are damaged during a cycle
Chipping of dishes
Did you load the dishwasher properly? Load the dishes and
glasses so they are stable and do not strike together from
washing action. Minimize chipping by moving the rack in and
out slowly.
NOTE: Antiques, feather-edged crystal, and similar types of
china and glassware might be too delicate for automatic
dishwashing. Wash by hand.
12

Leagradecemosporsuelecci6ndeloselectrodomesticosIKEA®.
NuestracompaSiamantienelasreglasmasestrictasdecalidad,yparanosotrosesimportantequeustedtengaunaexperiencia
positivacomopropietariodeunproductoIKEA®.
HemosprovistoparasuconvenienciaunManualdeinstruccionesparaelusuariofacildeseguir.Estasinstruccionesincluyenuna
secci6nde"Soluci6ndeproblemas"paraayudarloaenfrentarcualquierproblemaqueustedpuedatener.
TengalistosunQmerocompletodemodeloydeserie.PuedeencontrarsunQmerodemodeloydeserieenlaetiquetaubicada
cercadelapuerta,alladoderechooizquierdodelinteriordelalavavajillas.
Sitienedudasacercadelagarantia,nodevuelvaelaparatoalatienda.P6ngaseencontactoconnosotrosenlosEE.UU.oen
Canadaal1-866-664-2449.
Esteproductotieneunagarantialimitada-Consultelasecci6n"Garantia"paraobtenertodoslosdetalles.LosaparatosIKEA®
tienenunagarantiade5aSos(excluyendolosdelafamiliaLAGAN-consultelagarantiaparavetlosdetallesacercadelacobertura).
NOTA."Serequierelapruebadecompraparaobtenerserviciobajolagarantia.
&Durante cu&nto tiempo es v&lida la garantia limitada de IKEA?
Esta garantia limitada es valida durante cinco a_os a partir de la fecha de compra, siempre y cuando este electrodomestico principal haya
sido operado y mantenido segQn las instrucciones adjuntas o provistas con el producto, a menos que sea un aparato de nombre LAGAN,
en cuyo caso la garantia limitada sera valida durante un a_o a partir de la fecha de compra. Esta garantia limitada es valida solamente en
Estados Unidos o en Canada y se aplica solamente cuando el electrodomestico principal se use en el pals en el que se ha comprado. Se
requiere una prueba de la fecha de compra original para obtener servicio bajo esta garantia limitada.
&Qud electrodomdsticos no est&n cubiertos bajo la garantia limitada de IKEA de cinco (5) ahos?
Para los electrodomesticos principales cuyo nombre sea "LAGAN", esta garantia ser_ valida durante un a_o a partir de la fecha de
compra.
&Qui_n estar& a cargo de Ilevar a cabo el servicio?
Esta garantia limitada es provista por Whirlpool Corporation o Whirlpool Canada LP (en Io sucesivo denominada "Whirlpool"). El servicio
deberA ser suministrado por una compa_ia de servicio designada por Whirlpool.
&Qud es Io que cubre esta garantia limitada?
La garantia limitada pagara por piezas especificadas de fabrica y trabajo de reparacion, para corregir defectos en los materiales o en la
mano de obra existentes en el momento de la compra del electrodomestico principal. Las excepciones se especifican bajo eltitulo "6Qu_
es Io que no esta cubierto bajo esta garantia limitada?".
&Qud se har& para corregir el problema?
La compa_ia designada de servicio examinar_ el producto y decidira, a su exclusiva discrecion, si esta cubierto bajo esta garantia
limitada. Si considera que esta cubierto, la compa_ia designada de servicio reparara el defecto. Su Qnico y exclusivo recurso segQn los
terminos de esta garantia limitada serA el de reparar el producto segQn se estipula en la presente.
&Qud es Io que no est& cubierto bajo esta garantia limitada?
• Visitas de servicio tecnico para corregir la instalacion de su electrodomestico principal, para ense_arle a usar su electrodomestico
principal, para cambiar o reparar fusibles domesticos o para corregir la instalacion electrica o de la tuberia de la casa.
• Visitas de servicio tecnico para reparar o reemplazar focos para electrodomesticos, filtros de aire o filtros de agua. Las piezas de
consumo estan excluidas de la cobertura de la garantia.
• Piezas de repuesto o mano de obra si este electrodomestico principal se usa de un modo diferente al domestico normal de una familia,
o cuando se use de un modo contrario alas instrucciones publicadas para el usuario u operador y/o las instrucciones de instalacion.
• Da_os causados por accidente, alteracion, uso indebido, abuso, incendio, inundacion, actos fortuitos, instalacion incorrecta,
instalacion que no este de acuerdo con los codigos electricos o de plomeria, o el empleo de articulos de consumo o productos de
limpieza no aprobados para ser usados.
13

• Da_os esteticos, incluyendo rayaduras, abolladuras, desportilladuras u otro da_o al acabado de su electrodomestico principal, a
menos que el mismo sea debido a defectos en los materiales o la mano de obra y se informe en un lapso de 30 dias a partir de la fecha
de compra.
• Cualquier perdida de comida o de medicamentos debida afallas del refrigerador o del congelador.
• Recogida y entrega. Este electrodomestico principal se ha destinado para ser reparado en su hogar.
• Reparaciones de piezas o sistemas como resultado de modificaciones no autorizadas que se hayan efectuado en el electrodomestico.
• Gastos de viaje y transporte para obtener servicio para el producto, si su electrodomestico principal esta ubicado en un lugar remoto
en el cual no haya disponible un tecnico de servicio autorizado.
• La remocion y reinstalacion de su electrodomestico principal, si estuviera instalado en un lugar inaccesible o si no estuviera instalado
de conformidad con las instrucciones de instalacion publicadas.
• Piezas de repuesto o mano de obra en electrodomesticos principales con nOmeros de modelo/serie originales que se hayan removido,
alterado o que no puedan ser identificados con facilidad.
El costo de la reparacibn o el reemplazo bajo estas circunstancias excluidas correra por cuenta del cliente.
Exclusibn de garantias implicitas
LAS GARANTfAS IMPLfCITAS,, INCLUYENDO CUALQUIER GARANTfA IMPLfCITA DE COMERCIABILIDAD O GARANTfA IMPLfCITA DE
CAPACIDAD PARA UN PROPOSITO PARTICULAR, SERAN LIMITADAS A CINCO ANOS (UN ANO PARA LOS ELECTRODOMC:STICOS
PRINCIPALES DE NOMBRE "LAGAN") O AL PERIODO MAS CORTO PERMITIDO POR LEY. Algunos estados y provincias no permiten la
limitacion de la duracion de garantias implicitas de comerciabilidad o capacidad, de modo que la limitacion arriba indicada quizas no le
corresponda. Esta garantia leotorga derechos legales especificos, yes posible que usted tenga tambien otros derechos que varian de un
estado a otro o de una provincia a otra.
Limitacibn de recursos; exclusibn de dahos incidentales y consecuentes
SU 0NICO Y EXCLUSIVO RECURSO SEGON LOS T¢:RMINOS DE ESTA GARANT[A.LIMITADA SERA, EL DE REPARAR EL PRODUCTO
SEGUN SE ESTIPULA EN LA PRESENTE. WHIRLPOOL NO SE RESPONSABILIZARA POR DANOS INCIDENTALES O CONSECUENTES.
Algunos estados y provincias no permiten la exclusion o limitacion de da_os incidentales o consecuentes, de modo que estas
limitaciones y exclusiones quizas no le correspondan. Esta garantia le otorga derechos legales especificos, yes posible que usted tenga
tambien otros derechos que varian de un estado a otro o de una provincia a otra.
Cbmo puede ponerse en contacto con nosotros si necesita nuestro servicio
Si usted se encuentra fuera de los cincuenta Estados Unidos y CanadA, pongase en contacto con su vendedor autorizado de IKEA para
determinar si corresponde otra garantia. 10/09
Si usted no tiene acceso a internet y necesita ayuda al usar su producto, o si quisiera hacer una cita para obtener servicio, puede ponerse
en contacto con IKEA, en el nOmero que se indica a continuacion.
Tenga listo su nOmero de modelo completo. Puede encontrar su nOmero de modelo y de serie en la etiqueta ubicada cerca de la puerta, al
lado derecho o izquierdo del interior de la lavavajillas.
Si necesita ayuda o servicio tecnico en EE.UU. o en CanadA, Ilame al 1-866-664-2449.
Si necesita asistencia adicional, puede escribir a IKEA con sus preguntas o dudas a la direccion que aparece a continuacion:
En los EE.UU.: En CanadA:
Whirlpool Brand Home Appliances Whirlpool Brand Home Appliances
Customer eXperience Center Customer eXperience Centre
553 Benson Road 200 - 6750 Century Ave.
Benton Harbor, MI 49022-2692 Mississauga, Ontario L5N 0B7
Por favor incluya en su correspondencia un nOmero de telefono en el que se le pueda Iocalizar durante el dia.
Sirvase guardar estas Instrucciones para el usuario y la informacion con el nOmero de modelo, para referencia futura.
14

Su seguridad y la seguridad de los demos es muy importante.
Hemos incluido muchos mensajes importantes de seguridad en este manual yen su electrodom@stico. Lea y obedezca siempre
todos los mensajes de seguridad.
Este es el simbolo de advertencia de seguridad.
Este simbolo le llama la atenci6n sobre peligros potenciales que pueden ocasionar la muerte o una lesi6n a
usted y a los demas.
Todos los mensajes de seguridad iran a continuaci6n del simbolo de advertencia de seguridad y de la palabra
"PELIGRO" o "ADVERTENCIA". Estas palabras significan:
Si no sigue las instrucciones de inmediato, usted puede
morir o sufrir una lesibn grave.
Si no sigue las instrucciones, usted puede morir o sufrir
una lesibn grave.
Todos los mensajes de seguridad le diran el peligro potencial, le diran c6mo reducir las posibilidades de sufrir una lesi6n y Io que
puede suceder si no se siguen las instrucciones.
INSTRUCCIONES IMPORTANTES DE SEGURIDAD
ADVERTENCIA: Cuando use la lavavajillas siga precauciones basicas, incluyendo las siguientes:
[] Lea todas las instrucciones antes de usar la lavavajillas.
[] Use la lavavajillas Onicamente para las funciones que fue
dise_ada.
[] Use Onicamente detergentes o agentes de enjuague
recomendados para ser usados en las lavavajillas y
mant@ngalos fuera del alcance de los ni_os.
[] AI introducir los articulos para lavar:
1) Coloque los articulos puntiagudos de manera que no
da_en el sello de la puerta
2) Introduzca los cuchillos filosos con los mangos hacia
arriba para reducir el riesgo de cortaduras.
[] No lave articulos de plastico que no Ileven la indicaci6n
"lavables en la lavavajillas" u otra similar. Lea las
recomendaciones del fabricante para los articulos de
plastico que no Ileven tal indicaci6n.
[] No toque el elemento de calefacci6n durante o
inmediatamente despu@s de usar la lavavajillas.
[] No haga funcionar la lavavajillas a menos que todos los
paneles est@n colocados debidamente en su lugar.
[] No juegue con los controles.
[] No abuse, ni se siente ni se pare sobre la puerta, la tapa o
sobre las canastas de la lavavajillas.
[] Para reducir el riesgo de lesi6n, no permita que los ni_os
jueguen dentro ni sobre la lavavajillas.
[] Bajo ciertas condiciones, un sistema de agua caliente que
no ha sido usado pot dos semanas o mas puede producir
gas hidr6geno. EL GAS HIDROGENO ES EXPLOSlVO. Si
el sistema de agua caliente no ha sido usado por ese
periodo, abra todas las Ilaves de agua caliente y deje que
corra el agua por varios minutos antes de usar la
lavavajillas. Esto permitir_, que los gases acumulados
escapen. Debido a que el gas es inflamable, no fume ni
encienda ninguna llama abierta durante este tiempo.
[] Quite la puerta o la tapa del compartimiento de lavado
cuando remueva o deje de usar para siempre una vieja
lavavajillas.
GUARDE ESTAS INSTRUCCIONES
15

INSTRUCCIONES DE CONEXION A TIERRA
Para una lavavajillas con cable el_ctrico y conexi6n a
tierra:
La lavavajillas debe estar conectada a tierra. En caso de
funcionamiento defectuoso o averia, la conexion a tierra
reduce el riesgo de choque electrico al establecer una ruta
de menor resistencia para la corriente electrica. La
lavavajillas viene equipada con un cable electrico que tiene
un conductor para conexi6n a tierra y un enchufe con
conexi6n a tierra. El enchufe debe set conectado a un
contacto apropiado que este instalado y conectado a tierra
de acuerdo con todos los c6digos y ordenanzas locales.
ADVERTENCIA: La conexi6n inadecuada del
conductor de conexi6n a tierra puede resultar en riesgo
de choque electrico. Pregunte a un electricista
calificado o a un agente de servicio si no esta seguro si
la lavavajillas esta adecuadamente conectada a tierra.
No modifique el enchufe que viene con la lavavajillas. Si
no cabe en el contacto, pida que un electricista
calificado instale un contacto apropiado.
Rata lavavajillas con conexi6n permanente:
Esta lavavajillas debe estar conectada a un sistema de
cableado de metal permanente, conectado a tierra, o se
debe tender un conducto para la conexi6n a tierra del
equipo con los conductores de circuito y conectado a la
terminal de tierra del equipo o al conductor de
suministro de la lavavajillas.
GUARDE ESTAS INSTRUCCIONES
Peligro de Vuelco
No use la lavavajillas antes de estar completamente instalada.
No se apoye en la puerta abierta.
No seguir estas instrucciones puede ocasionar heridas serias o cortaduras.
Advertencias de la Proposici6n 65 del estado de California:
ADVERTENCIA: Este producto contiene una o mas sustancias quimicas identificadas per el estado de California come
causantes de cancer.
ADVERTENCIA: Este producto contiene una o mas sustancias quimicas identificadas per el estado de California como
causantes de defectos cong6nitos o algOn otro tipo de daSos en la funci6n reproductora.
16

iFelicitaciones por haber comprado la lavavajillas con bajo consumo de agua y energia! Esta lavavajillas limpia
rociando lavajilla con agua y hace pausas para permitir que el detergente remoje la vajilla y afloje la suciedad de
los platos. Para obtener una limpieza excepcional, los ciclos se hacen mas largos debido al remojo y las pausas.
Varios modelos tienen un sensor optico de agua. El sensor optico de agua se usa para determinar el consumo
optimo de agua y energia para un desempe_o de limpieza ideal. Las lavavajillas eficaces funcionan por mas tiempo
para ahorrar agua y energia, de la misma manera que se ahorra gasolina cuando se conduce un automovil m_s
despacio. El 3rimer ciclo con sensor durarA m_s tiempo para calibrar el sensor optico.
El uso del agente de enjuague hara 6ptimo el desempe_o de
lavado y secado. Esta lavavajillas ha sido dise_ada
especificamente para usarse en conjunci6n con agente de
enjuague, para obtener un mejor desempe_o de secado y
controlar la acumulaci6n de dep6sitos de agua dura. Las
lavavajillas con bajo consumo de energia usan menos agua y
energia, de modo que dependen de la acci6n de desplazamiento
del agua por obra del agente de enjuague para asegurar un
6ptimo desempe_o de secado.
Estados Unidos ha aprobado una restriccion que limita la
cantidad de fosforo (fosfatos) en los detergentes para lavavajillas
domesticas a no m_s de 0,5 %, mientras que los detergentes
previos contenian 8,7 %. Los principales fabricantes han
reformulado su detergente para lavavajillas de acuerdo a este
cambio, un paso mas en la conciencia ecologica. Con estos
cambios recientes, se recomienda usar pastillas y paquetes por
conveniencia y para mejorar el desempe_o.
\
\
Su lavavajillas cuenta con Io Oltimo en tecnologia de filtracion
para lavavajillas. El sistema de filtracion triple minimiza los
sonidos y optimiza el ahorro de agua y energia mientras
proporciona una limpieza optima. El mantenimiento periodico de
los filtros hara posible un rendimiento superior de limpieza. Le
sugerimos limpiar el filtro superior e inferior y enjuagarlos bajo
agua del grifo por Io menos una vez al mes.
17

Prepare y cargue
la lavavajillas.
Haga girar los
brazos
rociadores.
Deben girar
libremente.
_ Ponga la lavavajillas en
marcha.
Para los modelos con
controles en la parte superior
de la puerta, seleccione el ciclo
de lavado, laopcion y presione
START/RESUME (Inicio/
Reanudar) antes de cerrar la
puerta. Empuje la puerta
cerrandola con firmeza. La
puerta queda asegurada
automaticamente. Para
modelos con controles
delanteros, seleccione el ciclo
y las opciones de lavado y
presione START/RESUME
(Inicio/Reanudar) o bien
presione START/RESUME
(Inicio/Reanudar) para repetir el
mismo ciclo y opciones queen
el ciclo anterior de lavado.
REPEAT LAST CYCLE
Agregue el detergente y el agente de enjuague.
Seleccione un ciclo y una opcibn (los ciclos y las
opciones varian seg_n el modelo).
SENSOR HEAVY NORMAL LIGHT 1 HOUR
"O "O "O "O
Saque el filtro y limpielo.
Consulte "lntervalos
recomendados para la limpieza
del filtro" en la seccion
"Sistema de filtracion" para ver
el programa de limpieza
recomendado.
Leng_eta de
ubicaci6n
HI TEMP SANI RINSE TOP RACK WASH HEAT DRY DELAY WASH CONTROL LOCK
o_,,o._"0 "0 "0 "0 "0 "0
18

PASO1
Prepare y cargue la lavavajillas
IMPORTANTE: Quite los restos de alimentos, huesos, palillos y
otros articulos duros de los platos. Quite las etiquetas de los
recipientes antes de lavarlos.
Canasta superior
Canasta inferior
AsegQrese de que nada impida que el (los)
brazo(s) rociador(es) gire(n) libremente. Es
importante que el rociado de agua alcance
todas las superficies sucias.
• AsegQrese de que cuando este cerrada la puerta de la
lavavajillas no haya articulos bloqueando el deposito de
detergente.
• Los articulos deberAn cargarse con las superficies sucias
mirando hacia abajo y hacia adentro, hacia el rociador, como
se muestra. Esto mejorarA los resultados de limpieza y de
secado.
• Evite superponer los articulos como tazones o platos, que
pueden atrapar la comida.
• Coloque los plasticos, platos peque_os y vasos en la canasta
superior. Lave solo articulos de plastico marcados como
"lavable en la lavavajillas".
• Para evitar ruidos descomunales o estrepitosos durante el
funcionamiento: Coloque los platos de manera que no se
toquen entre si. AsegOrese de que los objetos livianos esten
firmes en las canastas.
Cuando cargue la canastilla de los cubiertos,
coloque siempre los articulos filosos
apuntando hacia abajo. Mezcle otros
articulos con la punta hacia arriba y algunos
con la punta hacia abajo.
Agregue detergente
NOTA: Si no va a hacer funcionar un ciclo de lavado de inmediato,
ponga un ciclo de enjuague. No use detergente.
• Use Onicamente detergentes para lavavajillas automaticas.
Agregue detergente en polvo, liquido o en pastilla justo antes
de comenzar un ciclo.
El detergente para lavavajillas
automaticas produce mejores
resultados cuando esta fresco.
Guarde el detergente bien cerrado
en un lugar fresco y seco.
• •-\\,,
Detergentes previamente
medidos
Varios detergentes vienen ahora en
formatos previamente medidos
(paquetes con gel, tabletas o paquetes con polvo). Estos formatos
son apropiados para todos los niveles de dureza y suciedad.
Coloque siempre los detergentes previamente medidos en el
compartimiento principal y cierre la tapa.
Esta comprobado que las pastillas y los paquetes de detergente
para lavavajillas son mas eficaces que los detergentes en polvo,
liquidos o en gel, para reducir las peliculas de residuos en la vajilla.
AI usar pastillas y paquetes, con el tempo, las peliculas blancas
comenzaran a reducirse o a eliminarse. Por otro lado, al usar un
agente de enjuague puede minimizar la acumulacion de peliculas
blancas.
Polvos y geles
• La cantidad de detergente a usar depende de:
Cuanta suciedad permanece en los articulos - Las cargas con
suciedad profunda requieren mas detergente.
La dureza del agua - Si usa muy poco detergente en agua dura,
los platos no quedaran limpios. Si usa demasiado en agua
blanda, ocurrirA corrosion en las piezas de cristal.
Agua blanda a medio dura (0 a 6 granos por galon de
EE.UU.) [agua tipica tratada con ablandador de agua y
cierto tipo de agua urbana]
Agua medio dura a dura (7 a 12 granos por galon de
EE.UU.) [agua de pozo y cierto tipo de agua urbana]
• SegOn la dureza del agua, Ilene la seccion de Main Wash
(Lavado principal) del deposito, como se muestra. Llene la
seccion de Pre-Wash (Prelavado) hasta el nivel mostrado, si es
necesario.
NOTA: Siga las instrucciones del paquete cuando use otros tipos
de detergente para lavavajillas.
19

Agregue el agente de enjuague
• Para obtener un buen secado, su lavavajillas ha sido disefiada
para usar un agente de enjuague. Si no usa agente de
enjuague, los platos y el interior de la lavavajillas tendrAn
demasiada humedad. La opcion de secado con calor no
funcionarA tan bien sin usar el agente de enjuague.
• Los agentes de enjuague evitan que el agua forme (_h Full
gotitas que pueden secarse como manchas o rayas.
IHI
Asimismo mejoran el secado pues permiten que el
agua se escurra de los platos despu6s del enjuague
final.
Add
El agente de enjuague ayuda a reducir el exceso de
humedad sobre las canastas de los platos y el interior
de la lavavajillas.
Revise el indicador del agente de enjuague. Agregue el agente
de enjuague cuando el indicador baje hasta el nivel "Refill"
(Volver a Ilenar).
Para agregar agente de
enjuague, gire la tapa del
deposito y levantela. Vierta
el agente de enjuague en la
abertura hasta que el nivel
indicador este en "Full"
(Lleno). Vuelva a colocar la
tapa del deposito y girela
hacia "Lock" (Seguro). AsegOrese de que la tapa este
asegurada por completo.
NOTA: Para casi todos los tipos de agua, la
seleccion de fabrica dara buenos resultados. Si
tiene agua dura o nota que hay aros o manchas,
pruebe con un ajuste mas alto. Gire el ajustador
en forma de flecha que esta dentro del deposito
para cambiar los ajustes del agente de
enjuague.
• Si experimenta un rendimiento insatisfactorio del secado, tal
vez desee probar con un ajuste mas alto en el deposito del
agente de enjuage.
Seleccione un ciclo (los ciclos varian seg_n el modelo)
SENSOR HEAVY NORMAL LIGHT 1 HOUR
"O -O "O "O
Presione y sostenga el boton del ciclo deseado hasta que se
encienda la luz correspondiente.
NOTA: Los ciclos mas intensos y las opciones afectaran la
duracion del ciclo. Algunos ciclos y opciones demorarAn hasta
31/2horas en completarse.
SENSOR - El ciclo Sensor Wash (Lavado con sensor)
detecta el tamafio de la carga, la cantidad de suciedad y su
resistencia para ajustar el ciclo para una limpieza 6ptima,
utilizando solamente la cantidad de agua y energia
necesarias.
HEAVY (Intenso) - 0selo para los articulos que esten muy sucios
y sean dificiles de limpiar.
NORMAL- Se recomienda este ciclo para lavar por completo
una carga Ilena de vajilla con suciedad normal. AI seleccionar este
ciclo, se fijaran por defecto las opciones recomendadas para
cantidades normales de suciedad. La etiqueta de energia esta
basada en este ciclo.
ECO (Ecol6gico) - 0selo para articulos con suciedad ligera.
Ahorra energia.
1 HOUR (Una hora) - Uselo para articulos con suciedad ligera.
Para obtener resultados rapidos, 1-Hour Wash (Lavado de 1 hora)
lavara los platos usando un poco mas de agua y energia.
LIGHT (Ligero) - Use este ciclo para articulos con suciedad ligera o
porcelana y cristaleria.
Seleccione las opciones (las opciones varian seg_n el
modelo)
HI TEMP SANI RINSE TOP RACK WASH HEAT DRY DELAY WASH CONTROL LOCK
oP,,o.s"0 "0 "O "0 "0 "0
souo ON_o_-3 SEC HO_O'_SFC
Usted puede personalizar sus ciclos oprimiendo las opciones
deseadas.
HI TEMP (Temperatura alta) - Eleva la temperatura del lavado
principal para mejorar la limpieza en las cargas que contienen
suciedad rebelde de los alimentos a causa del horneado.
SANI RINSE (Enjuague sanitario) - Puede seleccionarse con los
ciclos de lavado Heavy (Intenso), Sensor y Normal. Seleccione esta
opcion para aumentar la temperatura del agua en el enjuague final
a aproximadamente 155 °F (68 °C). La opcion Sani Rinse (Enjuague
sanitario) agrega calory tiempo al ciclo. Este enjuague a alta
temperatura desinfecta la vajilla y cristaleria de acuerdo con la
norma NSF/ANSI 184 para lavavajillas residenciales. Las
lavavajillas domesticas certificadas no fueron disefiadas para los
establecimientos alimenticios autorizados.
TOP RACK WASH (Lavado en la canasta superior) - Puede
seleccionarse con cualquier ciclo para lavar una pequefia cantidad
de vajilla en la canasta superior.
HEAT DRY/HEAT DRY HIGH (Secado con calor/Secado con calor
alto) - Puede seleccionarse con los ciclos de lavado 1 Hour
(1 hora), Heavy (Intenso), Sensor y Normal. Cuando se selecciona
con el ciclo de lavado de 1 hora, se aumenta la duracion en
aproximadamente 30 minutos.
HEAT DRY ECO (Secado ecol6gico con calor) - Puede
seleccionarse con los ciclos de lavado 1 Hour (1 hora),
Heavy (Intenso), Sensor y Normal para obtener un secado
con calor mas rapido y, ademas, consume menos energia.
DELAY WASH (Lavado con retraso) - Puede seleccionarse con
cualquier ciclo. Ofrece la opcion de poner en marcha la lavavajillas
automaticamente en otro momento. Seleccione un ciclo de lavado
y las opciones. Presione DELAY WASH (Lavado con retraso). Si su
modelo tiene una opcion 2-4-8, presione el boton Delay Wash
varias veces hasta seleccionar el tiempo de retraso deseado.
Presione START/RESUME (Inicio/Reanudar). Cierre la puerta con
firmeza.
CONTROL LOCK (Bloqueo de control) - 0selo para evitar el
uso accidental de la lavavajillas. Cuando el bloqueo del control
esta encendido, todos los botones quedan desactivados. La
puerta de la lavavajillas puede abrirse mientras los controles estan
bloqueados.
Para activar el bloqueo de control:
Presione y sostenga CONTROL LOCK (Bloqueo de control)
durante por Io menos 3 segundos. Se encendera la luz. Si usted
oprime cualquier boton mientras su lavavajillas esta con seguro, la
luz se enciende y apaga 3 veces.
Para apagar el bloqueo de control:
Presione y sostenga CONTROL LOCK (Bloqueo de control)
durante por Io menos 3 segundos. La luz de bloqueo de control se
apagar&
20
La page charge ...
La page charge ...
La page charge ...
La page charge ...
La page charge ...
La page charge ...
La page charge ...
La page charge ...
La page charge ...
La page charge ...
La page charge ...
La page charge ...
La page charge ...
La page charge ...
La page charge ...
La page charge ...
La page charge ...
La page charge ...
La page charge ...
La page charge ...
-
 1
1
-
 2
2
-
 3
3
-
 4
4
-
 5
5
-
 6
6
-
 7
7
-
 8
8
-
 9
9
-
 10
10
-
 11
11
-
 12
12
-
 13
13
-
 14
14
-
 15
15
-
 16
16
-
 17
17
-
 18
18
-
 19
19
-
 20
20
-
 21
21
-
 22
22
-
 23
23
-
 24
24
-
 25
25
-
 26
26
-
 27
27
-
 28
28
-
 29
29
-
 30
30
-
 31
31
-
 32
32
-
 33
33
-
 34
34
-
 35
35
-
 36
36
-
 37
37
-
 38
38
-
 39
39
-
 40
40


IKEA IUD8500BX1 Le manuel du propriétaire
- Catégorie
- Lave-vaisselle
- Taper
- Le manuel du propriétaire
dans d''autres langues
- English: IKEA IUD8500BX1 Owner's manual
- español: IKEA IUD8500BX1 El manual del propietario