Rotel T14 Le manuel du propriétaire
- Catégorie
- Équipement musical supplémentaire
- Taper
- Le manuel du propriétaire

Owner’s Manual
Manuel de l’utilisateur
Bedienungsanleitung
Manual de Instrucciones
Gebruikershandleiding
Manuale di istruzioni
Instruktionsbok
Инструкция пользователя
T14
Network/FM/DAB+ Tuner
Tuner Réseau/DAB+/FM
FM/DAB+/Netzwerk-Tuner
Sintonizador de radio de Internet/FM/DAB+
Netwerk-/FM-/DAB+-tuner
Sintonizzatore Rete/FM/DAB+
Nätverks/DAB/FM-radio
Сетевой/FM/DAB+ тюнер

2
T14 Network/FM/DAB+ Tuner
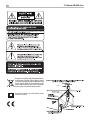
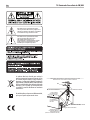
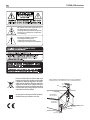
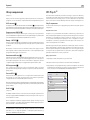
Rotel products are designed to comply with international directives
on the Restriction of Hazardous Substances (RoHS) in electrical
and electronic equipment and the disposal of Waste Electrical and
Electronic Equipment (WEEE). The crossed wheelie bin symbol
indicates compliance and that the products must be appropriately
recycled or processed in accordance with these directives.
This symbol means that this unit is double insulated. An earth
connection is not required.
DAB

3
English
Notice
The rear RS232 connection should be handled by authorized persons only.
WARNING: There are no user serviceable parts inside. Refer all servicing to qualified service personnel.
WARNING: To reduce the risk of fire or electric shock, do not expose the unit to moisture or water. Do
not expose the unit to dripping or splashing. Do not place objects filled with liquids, such as vases, on the
unit. Do not allow foreign objects to get into the enclosure. If the unit is exposed to moisture, or a foreign
object gets into the enclosure, immediately disconnect the power cord from the wall. Take the unit to a
qualified service person for inspection and necessary repairs.
Read these instructions.
Keep these instructions.
Heed all warnings.
Follow all instructions.
Do not use this apparatus near water.
Clean only with dry cloth.
Do not block any ventilation openings. Install in accordance with the manufacturer’s instructions.
Do not install near any heat sources such as radiators, heat registers, stoves, or other apparatus (including
amplifiers) that produce heat.
Do not defeat the safety purpose of the polarized or grounding-type plug. A polarized plug has two blades
with one wider than the other.
A grounding type plug has two blades and a third grounding prong.
The wide blade or the third prong are provided for your safety. If the provided plug does not fit into your
outlet, consult an electrician for replacement of the obsolete outlet.
Protect the power cord from being walked on or pinched particularly at plugs, convenience receptacles,
and the point where they exit from the apparatus.
Only use attachments/accessories specified by the manufacturer.
Use only with the cart, stand, tripod, bracket, or table specified by the manufacturer,
or sold with the apparatus. When a cart is used, use caution when moving the cart/
apparatus combination to avoid injury from tip-over.
Unplug this apparatus during lightning storms or when unused for long periods of time.
Refer all servicing to qualified service personnel. Servicing is required when the apparatus has been
damaged in any way, such as powersupply cord or plug is damaged, liquid has been spilled or objects
have fallen into the apparatus, the apparatus has been exposed to rain or moisture, does not operate
normally, or has been dropped.
The apparatus should be used in non tropical climate.
WARNING: The rear panel power cord connector is the mains power disconnect device. The device must
be located in an open area that allows access to the cord connector.
The unit must be connected to a power supply only of the type and voltage specified on the rear panel.
(USA: 120 V/60Hz, EC: 230V/50Hz)
Connect the component to the power outlet only with the supplied power supply cable or an exact equivalent.
Do not modify the supplied cable. Do not use extension cords.
The mains plug is the disconnect of the unit. In order to completely disconnect the unit from the supply
mains, remove the main plug from the unit and the AC power outlet. This is the only way to completely
remove mains power from the unit.
Power off the unit and allow the unit to cool before attempting to move to avoid injury.
The batteries in the remote control should not be exposed to excessive temperature such as sunshine, fire
or other heat sources. Batteries should be recycled or disposed as per state and local guidelines.
FCC Information
This equipment has been tested and found to comply with the limits for a Class B digital device, pursuant
to Part 15 of the FCC Rules. These limits are designed to provide reasonable protection against harmful
interference in a residential installation. This equipment generates, uses and can radiate radio frequency
energy and, if not installed and used in accordance with the instruction, may cause harmful interference
to radio communications.
However, there is no guarantee that interference will not occur in a particular installation. If this equipment
does cause harmful interference to radio or television reception, which can be determined by turning the
equipment off and on, the user is encouraged to try to correct the interference by one or more of the
following measures:
• Reorient or relocate the receiving antenna.(TV, radio, etc.)
• Increase the separation between the equipment and receiver.
• Connect the equipment to an outlet on circuit different from that to which the receiver is connected.
• Consult the dealer or an experienced radio/TV technician for additional help.
Caution
This device complies with part 15 of the FCC Rules. Operation is subject to the following to conditions: (1)
This device may not cause harmful interference, and (2) this device must accept any interference received,
including interference that may cause undesired operation.
NOTE TO CATV SYSTEM INSTALLER: Call the CATV system or antenna installer’s attention
to Article 820-40 of the NEC. This provides guidelines for proper grounding and, in particular, specifies
that the cable ground shall be connected to the grounding system of the building, as close to the point of
cable entry as practical. See installation diagram.
NOTE: This equipment has been tested and found to comply with the limits for a Class B digital device,
pursuant to Part 15 of the FCC Rules. These limits are designed to provide reasonable protection against
interference in a residential installation. This equipment generates and can radiate radio frequency energy
and, if not installed and used in accordance with the instructions, may cause interference to radio or TV
communications. There is no guarantee that interference will not occur in a particular installation. If this
equipment does cause interference to radio or television reception, which can be determined by turning
the equipment off and on, try to correct the interference by one or more of the following measures:
• Reorient or relocate the receiving antenna.
• Increase the separation between the unit and the television tuner.
• Connect the unit to an AC power outlet on a different electrical circuit.
• Consult your authorized Rotel retailer for assistance.
Important Safety Instructions

4
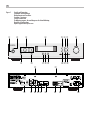
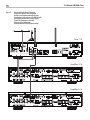
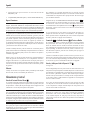
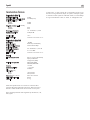
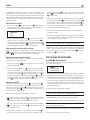
Figure 1: Controls and Connections
Commandes et Branchements
Bedienelemente und Anschlüsse
Controles y Conexiones
Controlli e connessioni
De bedieningsorganen, de aansluitingen en de afstandsbediening
Kontroller och anslutningar
Органы управления и разъемы
T14
NETWORK TUNER
R
ANTENNA
FM
DAB
L
OUTPUT
COAXIAL OUT
USB
RS232
12V TRIGGER
IN OUTOUT
ROTEL LINK
OUT
WIFI ANTENNA
WIFI ANTENNA
RP-571B
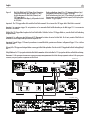
POWER
T 14
PUSH SELECT
2 3 4
7 8 9
5
0
FM MONOMEMORY
1
6
PLAY-FI FM DAB
1 2 3 4 5 6 7 8
rewq=-09
t t
y u i o p [ ] \ a

5
N
ENT
-
PRESET +
RR-T99
RDSRNDRPT MONO
- TUNE +
Play-Fi
FM
A
J
B
D
E
G
L
I
K C
F
H
N
M
Figure 2: RR-T99 Remote Control
Télécommande infrarouge RR-T99
Fernbedienung RR-T99
Mando a Distancia RR-T99
Afstandsbediening RR-T99
Telecomando RR-T99
RR-T99 fjärrkontroll
Пульт ДУ RR-T99

6
T14 Network/FM/DAB+ Tuner
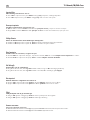
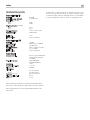
Figure 3: Antenna and Audio Output Connections
Connexions d’antennes et de sortie audio
Anschlüsse von Antennen und Audio-Ausgang
Las conexiones de las antenas y de salida de audio
Aansluitingen van antennes en audio-uitgang
Connessioni di antenne e uscita audio
Antenner och ljud Anslutningar
Подключения Антенны и аудио выходы
T14
NETWORK TUNER
R
ANTENNA
FM
DAB
L
OUTPUT
COAXIAL OUT
USB
RS232
12V TRIGGER
IN OUTOUT
ROTEL LINK
OUT
WIFI ANTENNA
WIFI ANTENNA
RP-571B
Tuner T14
Amplier A14
Amplier A14

7
English
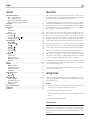
MODEL NO.: CD14
RP-572B
CD Player CD14
Amplifier A14
T14
NETWORK TUNER
R
ANTENNA
FM
DAB
L
OUTPUT
COAXIAL OUT
USB
RS232
12V TRIGGER
IN OUTOUT
ROTEL LINK
OUT
RP-571B
Tuner T14
WIFI ANTENNA
WIFI ANTENNA
Figure 4: Rotel Link (Black) and 12V Trigger (Gray) Connections
Connexions Rotel-Link (Noir) et Trigger 12 V (Gris)
Anschlussdiagramm für Rotel-Link (schwarz) und
12V-Trigger (grau)
Conexión del Rotel-Link (Negro) y el Disparador de Señal
de 12V (Gris)
De doorverbindingen (zwart). De +12V. triggeraansluitingen (grijs)
Collegamenti Rotel Link (Nero) e Trigger 12V (Grigio)
Rotel-Link-anslutning (svart) och 12 V-anslutning för styrsignal (grå)
Подключение интерфейса Rotel-Link (черный) и 12-В триггерного
сигнала – Trigger (серый)
Important! : The 12V trigger cables will override the Rotel Link commands. Do not connect the 12V trigger cable if Rotel Link is connected.
Important : Les connexions trigger 12v sont prioritaires sur les commandes Rotel Link. Ne branchez pas de câble trigger 12 V si une connexion
Rotel Link a été réalisée.
Wichtig! Die 12V-Trigger-Kabel umgehen die Rotel Link-Befehle. Schließen Sie kein 12V-Trigger-Kabel an, wenn die Rotel Link-Verbindung
hergestellt wurde.
¡Importante!: Los cables para señal de disparo de 12V bloquearán las órdenes de control vía Rotel Link. Por lo tanto, cuando el Rotel Link esté
conectado no conecte ningún cable para señal de disparo de 12V.
Importante! I segnali Trigger 12 V hanno la precedenza sui comandi Rotel Link, pertanto non effettuare i collegamenti Trigger 12 V se si utilizza
il bus Rotel Link.
Belangrijk: De 12V trigger aansluitingen hebben voorrang op de Rotel Link opdrachten. Sluit dus niet de 12V triggerkabel en Rotel Link tegelijkertijd
aan.
Viktigt! Kablarna för 12 V styrsignaler åsidosätter Rotel Link-kommandon. Anslut inte kablar för 12 V styrsignal om det nns en Rotel Link-anslutning.
Внимание! : 12-В триггерный сигнал имеет приоритет над командами шины Rotel Link. Не подсоединяйте кабель 12-В триггерного
сигнала, если уже сделано соединение по Rotel Link.

8
T14 Network/FM/DAB+ Tuner
Important Notes
When making connections be sure to:
4 Turn off all the components in the system before hooking up any components, including loudspeakers.
4 Turn off all components in the system before changing any of the connections to the system.
Remarques importantes
Pendant les branchements, assurez-vous que :
4 Tous les maillons sont éteints avant leur branchement, quels qu’ils soient, y compris les enceintes acoustiques.
4 Éteignez tous les maillons avant de modier quoi que ce soit au niveau de leurs branchements, quels qu’ils soient.
Wichtige Hinweise
Achten Sie beim Herstellen der Verbindungen auf Folgendes:
4 Schalten Sie alle Komponenten im System ab, bevor Sie Geräte (einschließlich Lautsprecher) anschließen.
4 Schalten Sie alle Komponenten im System ab, bevor Sie Anschlüsse im System verändern.
Notas Importantes
Cuando realice las conexiones, asegúrese de que:
4 Desactiva todos los componentes del equipo, cajas acústicas incluidas, antes de conectar cualquier nuevo componente en el mismo.
4 Desactiva todos los componentes del equipo antes de cambiar cualquier conexión del mismo.
Héél belangrijk
Bij het maken van de verbindingen:
4 Zorg dat niet alleen de T14, maar de gehele installatie uitstaat, als nog niet alle verbindingen gemaakt zijn.
4 Zorg dat niet alleen de T14, maar de gehele installatie ook uitstaat, als u verbindingen gaat wijzigen.
Note importanti
Quando effettuate i collegamenti assicuratevi di:
4 Spegnere tutti i componenti del sistema prima di collegare qualsiasi componente, inclusi i diffusori.
4 Spegnere tutti i componenti del sistema prima di modicare qualsiasi connessione nel sistema.
Viktigt
Tänk på följande när du gör anslutningar:
4 Stäng av alla apparater i anläggningen innan du ansluter nya komponenter eller högtalare.
4 Stäng av alla apparater i anläggningen innan du ändrar någon anslutning.
Важные замечания
Перед подсоединением обязательно:
4 Отключите все компоненты в системе перед подсоединением любых компонентов, включая акустические системы. .
4 Отключите все компоненты в системе перед изменением любых соединений в системе.

9
English
Contents
Important Safety Instructions ..........................................3
Figure 1: Controls and Connections 4
Figure 2: RR-T99 Remote Control 5
Figure 3: Antenna and Audio Output Connections 6
Figure 4: Rotel Link and 12V Trigger Connections 7
Important Notes ...................................................8
About Rotel .......................................................9
Getting Started ....................................................9
Features 9
A Few Precautions 9
Placement 10
AC Power and Control ..............................................10
AC Power Input
a
10
Power Switch and Power Indicator
1
A
10
12V Trigger Input and Output
\
10
Connection Overview ...............................................10
Wi-Fi Antenna
t
10
DAB/FM Broadcasting
y
10
Output
u
10
COAXIAL Output
i
10
USB Connection
p
10
RS232 Connector
[
11
Rotel Link
]
11
DTS Play-Fi
R
....................................................11
Play-Fi Connection 11
Play-Fi Audio Streaming 11
Resetting Wireless Conguration 12
WPS Activation 12
Spotify
R
........................................................12
FM RADIO .......................................................12
FM Radio Station Playing 12
Storing a radio station in a preset 12
Playing a preset radio station 13
FM Settings Menu 13
RDS Broadcast Reception ............................................13
RDS Button
G
13
MONO Button
G
13
DAB and DAB+ RADIO ..............................................13
DAB Radio Station Playing 13
Storing a DAB station in a preset 13
Playing a preset DAB station 14
DAB Settings Menu 14
Remote Unit Advanced Buttons ........................................14
Troubleshooting ...................................................14
Specications ....................................................15
About Rotel
Our story began over 50 years ago. Over the decades, we have received
hundreds of awards for our products and satised hundreds of thousands
of people who take their entertainment seriously - like you!
Rotel was founded by a family whose passionate interest in music led them
to manufacture high-delity components of uncompromising quality. Through
the years, that passion has remained undiminished and the family goal of
providing exceptional value for audiophiles and music lovers, regardless
of their budget, is shared by all Rotel employees.
Rotel’s engineers work as a close team, listening to, and ne tuning, each
new product until it reaches their exacting musical standards. They are
free to choose components from around the world in order to make that
product the best they can. You are likely to nd capacitors from the United
Kingdom and Germany, semiconductors from Japan or the United States,
while toroidal power transformers are manufactured in Rotel’s own factory.
We all have concerns about our environment. And, as more and more
electronics are produced it is especially important for a manufacturer to do all
it can to engineer products that have a minimum impact on the environment.
At Rotel, we are proud to do our part. We have reduced the lead content
in our products by using special lead-free ROHS solder and components.
Our engineers continually strive to improve power supply efciency without
compromise to quality. When in standby mode Rotel products use minimal
power to meet global Standby Power Consumption requirements.
The Rotel factory is also doing their part to help the environment through
constant improvements to product assembly methods for a cleaner and
greener manufacturing processes.
All of us at Rotel thank you for buying this product. We are sure it will bring
you many years of enjoyment.
Getting Started
Thank you for purchasing the Rotel T14 Network/FM/DAB+ Tuner. When
used in a high-quality music system, your Rotel product will provide years
of musical enjoyment.
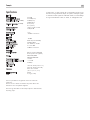
Features
• Wireless streaming audio via the Play-Fi / Spotify App supporting locally
stored music les and popular streaming music services.
• Listen to DAB, DAB+, FM broadcasting stations.
• 30 Station Presets for memorizing your favorite DAB/DAB+, and FM
stations.
• RDS (Radio Data System) capability.
A Few Precautions
WARNING: To avoid potential damage to your system, turn off ALL
the components in the system when connecting or disconnecting the
loudspeakers or any associated components. Do not turn the system
components back on until you are sure all the connections are correct
and secure.

10
T14 Network/FM/DAB+ Tuner
Please read this manual carefully. In addition to basic installation and
operating instructions, it provides valuable information on various T14
system congurations as well as general information that will help you get
the optimum performance from your system. Please contact your authorized
Rotel dealer for answers to any questions you might have. In addition, all
of us at Rotel welcome your questions and comments.
Save the T14 shipping carton and all enclosed packing material for future
use. Shipping or moving the T14 in anything other than the original packing
material may result in severe damage to your unit and void the warranty.
If included in the box please ll out and send in the owner`s registration
card. Also be sure to keep the original sales receipt. It is your best record
of the date of purchase, which you will need in the event warranty service
is ever required.
Placement
Place the unit on a solid, level surface away from sunlight, heat, moisture,
or vibration.
AC Power and Control
AC Power Input
a
Your unit is congured at the factory for the proper AC line voltage in the
country where you purchased it (USA: 120 volts/60 Hz, Europe: 230
volts/50 Hz). The AC line conguration is noted on a label on the back panel.
NOTE: Should you move your unit to another country, it may be possible
to recongure it for use on a different line voltage. Do not attempt to
perform this conversion yourself. Opening the enclosure of the unit
exposes you to dangerous voltages. Consult a qualied service person
or the Rotel factory service department for information.
NOTE: Some products are intended for sale in more than one country
and as such are included with more than one AC cord. Please use only
the one appropriate for your country/region.
The T14 should be plugged directly into a 2-pin polarized (where possible)
wall outlet or into the switched outlet on another component in your audio
system. Do not use an extension cord.
Be sure the POWER SWITCH
1
on the front panel of the T14 is turned off
(in the “out“ position). Then, connect the supplied power cord to the Power
Connector
a
on the rear of the unit and the AC power outlet.
If you are going to be away from home for an extended period of time such
as a month-long vacation, it is a sensible precaution to unplug the T14 (as
well as other audio and video components) while you are away.
Power Switch and Power Indicator
12
A
The power switch is located on the left side of the front panel. To turn the
unit ON, push the switch in. The power LED above the power switch will
be blue when the unit is powered on and red when in standby mode. To
turn the unit off, push the button again and return it to the “out“ position.
When the power switch is in the ON position, the remote control ON and
OFF buttons
A
may be used to activate the T14. In Standby mode the
power LED is red, but the display is turned OFF.
12V Trigger Input and Output
\
See gure 4
The jack labeled IN is for connecting the 3.5mm Plug/Cable carrying a +12
volt trigger signal from a preamp or surround sound processor to turn the
unit on and off. This input accepts any control signal (AC or DC) ranging
from 3 volts to 30 volts.
The jack labeled OUT is for connecting another 3.5mm plug/cable to
provide a 12V trigger signal to other components. Any 12V Trigger signal
at the INPUT jack will be passed through to the OUT jack.
NOTE: If you are using other units in the series with Rotel Link, please
use the Rotel Link connection to turn the units on or off. Do not connect
both the Rotel Link and 12V trigger cables. The 12V trigger’s power
on or off features will override the Rotel Link features.
Connection Overview
See gure 3.
Before continuing further to other sections in the manual, please make sure
all the cable connections are made properly.
Wi-Fi Antenna
t
Please use the supplied Wi-Fi antennas to connect to the Wi-Fi connectors
t
on the rear panel. This allows the T14 to connect to the Wi-Fi network.
To congure the Wi-Fi settings please see the Play-Fi section.
DAB/FM Broadcasting
y
Please use the supplied indoor antennas to connect the DAB and FM connector
on the rear panel. To receive the best FM signal, make sure there is enough
room for the T-shaped indoor antenna to fully extend. Eyelets at both ends
of the T allow tacking the antenna to a wall if desired. Experiment with
different positions to maximize reception.
NOTE: For improved reception performance, consider using an external
antenna for FM and DAB.
Output
u
A pair of standard RCA jacks supply an analog output signal from the T14 to
the source inputs of an audio preamplier, integrated amplier, or receiver.
Select high quality audio interconnect cables. Connect the left and right
channel outputs of the T14 to the corresponding inputs on the preamplier
or other component.
COAXIAL Output
i
If you are using an outboard D/A converter or other digital processor, you
will need an unprocessed digital data stream from the T14. Using a standard
75 ohm coax digital cable, connect the T14’s coaxial output to the digital
input connector on the outboard D/A converter.
USB Connection
p
This connection is used for service. For more information please contact
your authorized Rotel dealer.

11
English
RS232 Connector
[
The T14 can be controlled via RS232 for integration with automation systems.
The RS232 input accepts a standard straight DB-9 Male-to-Female cable.
For additional information on the connections, software, and operating
codes for RS232 control of the T14, contact your authorized Rotel dealer.
Rotel Link
]
See Figure 4.
The 2 ROTEL LINK OUT connectors can be used to connect to any Rotel
product with a ROTEL LINK IN connection, using the stereo 3.5mm cables
supplied.
This allows the attached Rotel products to communicate with each other and
be controlled via the Rotel App (available for download on the iTunes
®
store).
NOTE: Only the Rotel Link cables supplied with this product should be
used. These 3.5 mm cables have WHITE connector ends and should
not be confused with the 12 Volt Trigger cables that have BLACK
connector ends.
DTS Play-Fi
®
The T14 includes the DTS Play-Fi wireless streaming ecosystem to effortlessly
stream HiFi grade audio from network attached storage devices and
multiple Internet based audio streaming services. For more information
on supported Play-Fi services please visit the DTS Play-Fi website at
https://www.play-.com.
Play-Fi Connection
To utilize the Play-Fi enabled services you will need to do the following:
Connecting T14
Ensure the Wi-Fi antennas have been installed and power on the T14 unit.
The Wi-Fi LED on the T14 rear panel will blink quickly on and off, every
0.5 seconds for 20 seconds. After which it should change to pulsing slowly
on and off, glowing from bright to dim and then bright again. This means
the T14 is ready to connect to your Wi-Fi network.
From your devices (phones, tablets, computers), download the free Play-Fi
App from an App store, such as the Google Play store, Amazon app
marketplace, or Apple App store. After download, launch and run the
Play-Fi App on your devices, following the relevant steps below, dependent
on your device type:
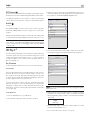
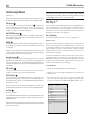
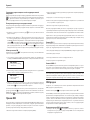
For the iOS devices:
1. Go to the SETTINGS menu on your iOS device.
2. Select the Wi-Fi settings menu and ensure Wi-Fi is enabled.
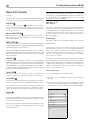
3. Wait for up to 90 seconds for the list of available Wi-Fi networks to be
refreshed and nd the T14 enabled Play-Fi device listed at the bottom of
the list under the “SET UP NEW AIRPLAY SPEAKER” option.
<
Settings Wi-Fi
Wi-Fi
√ Network
CHOOSE A NETWORK
Network
Other...
SET UP NEW AIRPLAY SPEAKER...
Play-Fi Device >
Ask to Join Networks
Known networks will be joined automatically. If no known
networks are available, you will have to manually select a
network.
i
i
10:17 AM
32%
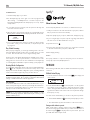
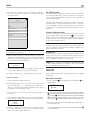
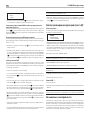
4. Select the new Play-Fi device and conrm to add to the current Wi-Fi
network by choosing the desired Network listed and selecting Next.
√
Cancel AirPlay Setup Next
Network
Show Other Network
Speaker Name Play-Fi Device
SPEAKER PASSWORD
Password Optional
Verify Verify Password
10:17 AM
32%
This AirPlay speaker will be set up to join “Network”.
NETWORK
NOTE: You can also rename the Play-Fi device by changing the Speaker
Name at this menu.
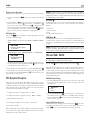
5. Wait for 60-90 seconds for the Play-Fi device to congure the settings
and attach to the wireless network. When connected, the rear panel
LED will stop ashing and be solid blue, the front display will indicate
“Connected”.
Play-Fi
Connected
6. Launch the Play-Fi App to conrm if any software updates are needed
and select the desired audio source.
7. You’re connected! From here, feel free to enjoy music.

12
T14 Network/FM/DAB+ Tuner
For Android device:
1. Launch the Play-Fi App on your device.
2. Run the Play-Fi App, tap on the “gear” icon in the top right, then tap
“More Settings...” > “Add Play-Fi Device” > “Search” in sequence. The
App will automatically nd the T14 and prompt you to set it up. Tap the
“Set-Up” button.
3. If your Wi-Fi network is protected, enter the password. The App will
connect the T14 to the network.
4. When the T14 is connected to the network, the rear panel LED will stop
ashing and be solid blue, the front display will indicate “Connected”.
Play-Fi
Connected
5. You’re connected! From here, feel free to rename your device with the
preset names, create your own custom name, or skip this and just start
enjoying music.
Play-Fi Audio Streaming
Once properly congured, you can begin streaming audio to the T14.
Launch the Play-Fi App and select the device or multiple devices you want
to control. Then select an audio service to begin streaming audio.
The Home menu of the Play-Fi App displays the available source options.
Select “Music“ to see all of your local music, or select from one of the
many great music service listed. For more information on the Play-Fi App
or controlling Play-Fi enabled devices please visit https://www.play-.com.
Resetting Wireless Conguration
To reset the Wi-Fi conguration settings on the T14, press and hold the Play-Fi
button
o
on the rear panel for 8 seconds until “Set-Up“ shows on the
display. This will erase all Wi-Fi conguration options, including attached
wireless network and encryption key, if any, stored in the T14.
NOTE: This clears all Wi-Fi configuration settings and requires following
the Wi-Fi setup steps again. This is useful if you change the Wi-Fi network
settings or install new wireless network equipment.
WPS Activation
To activate the WPS function of the T14, enable the WPS function on your
Wi-Fi router by following the instructions provided by the manufacturer.
Then press the rear panel Play-Fi button for 3 seconds. If not successful the
WPS process will reset after about 90 seconds.
NOTE: This is an automatic configuration option available on some
wireless networking equipment and should only be used if you are
familiar with this process.
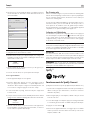
Spotify
R
How to use Connect
You’ll need Spotify Premium to use connect, see details as below steps:
1. Add your new device to the same wi network as your phone, tablet or
PC (see product user instructions for details).
2. Open the Spotify app on your phone, tablet or PC, and play any song.
3. If you’re using the app on a phone - tap the song image in the bottom
left of the screen. For tablet and PC move to step 4.
4. Tap the Connect icon .
5. Pick your device from the list. If you can’t see it, just check it’s connected
to the same wi network as your phone, tablet or PC.
All done! Happy listening.
Licenses
The Spotify Software is subject to third party licenses found here:
www.spotify.com/connect/third-party-licenses.
FM RADIO
Before listening to FM radio, make sure that the antenna has been properly
connected.
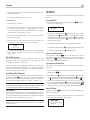
FM Radio Station Playing
1. Select the FM Button from the source button
=
I. The display will
show as below.
M 95.25 MHz
[RDS TEXT]
2. Turn the PUSH SELECT knob
8
on the front panel or use the up/down
arrow buttons on the remote control to change the frequency of radio
station. Turning the PUSH SELECT knob on the front panel or using the
up/down arrow buttons on the remote control one step at a time changes
the frequency one step.
3. To auto scan for an FM station, you can choose any of the steps below:
• Turn the PUSH SELECT knob
8
on the front panel quickly up or down.
• Press and hold the up/down arrow buttons on the remote control.
Storing a radio station in a preset
While a radio station is playing, push the memory button
9
E button,
then enter the 2 digit preset number where you want to save this station on
the numeric keypad
3
D, the display will show preset saved. Up to 30
preset FM radio stations may be stored.

13
English
Playing a preset radio station
Anytime you are on the FM source you can select a preset station for listening.
1. From the numeric keypad
3
D, press the preset number of the desired
station.
2. Press the PRESET +/- H buttons on the remote control to display preset
numbers. Press the up/down B arrow buttons or the PRESET +/- H
buttons on the remote control or turn the knob
8
on the front panel to
select the desired station, then press the PUSH SELECT
8 on the front
panel or the ENT button on the remote control
. Press the FM
=
I button
again to exit the preset menu and go back to playing status.
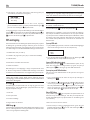
FM Settings Menu
Press the FM
=
I button and toggle to the FM settings Menu. There are
3 sub-menus under FM setting.
• SCAN SETTINGS: Select between ALL STATION or STRONG STATIONS
ONLY.
FM SETUP
> STRONG STATIONS ONLY
*
ALL STATIONS
• AUDIO SETTINGS: Select “STEREO OR MONO” or “MONO ONLY”.
FM SETUP
> STEREO OR MONO
*
MONO ONLY
• FM PRESET: Display all 30 of the FM preset stations and allows tuning to
the selected preset by pressing the PUSH SELECT
8
on the front panel
or the ENT button on the remote control.
To make changes in the FM settings menu, turn the PUSH SELECT knob
8
on the front panel or the up/down arrow buttons on the remote control. To
save a change, press the PUSH SELECT knob
8
on the front panel or the
ENT button on the remote control.
RDS Broadcast Reception
This Rotel unit is equipped with RDS (Radio Data Systems) reception
capabilities. The RDS broadcast system provides additional functionality
to FM radio reception by transmitting encoded information along with the
radio signal. This signal is decoded by an RDS receiver and can provide
a range of informational features including:
1. A display of the station’s identifying name (e.g. BBC1).
2. A display of the station’s program content (e.g. ROCK or NEWS).
3. Trafc information broadcasts.
4. A scrolling text display for announcements or information.
5. Current time and date.
RDS broadcasting has been widely available in many European markets
for years. There are a large number of RDS stations and most users will be
familiar with the features and operation.
NOTE: The RDS features are entirely dependent on the broadcaster
sending properly encoded signals. Thus, they will only be available in
markets where RDS is currently implemented and where stations are
broadcasting these data signals.
RDS Button
G
The RDS button on the remote control can step through the various displays.
Press the RDS button on the remote control to step through the following
displays.
1. Radio Text.
2. Name of station.
3. PTY.
4. Today’s date and current time.
MONO Button
G
The MONO button on the remote control changes the FM mode from stereo
reception to mono reception. In stereo mode, a stereo signal will be heard
if the station is broadcasting a stereo signal and there is sufcient signal
strength.
NOTE: Switching to mono mode can be a useful way to improve the
reception of weak or distant FM signals. Less signal strength is required
for clean mono reception than for stereo reception.
DAB and DAB+ RADIO
NOTE: Make sure that your local area can receive Digital Audio
Broadcast (DAB or DAB+) broadcasting signal.
Press the DAB
q
button on the front of the panel, or remote M.
DAB channels are categorized into ensembles, which are also known as
multiplexes. Each multiplex provides a number of stations and each service
contains a primary service that can contain secondary services. DAB
technology allows broadcasters to transmit additional data along with the
audio, which can include other audio channels, text and even images and
computer data in the future.
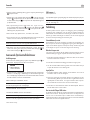
DAB Radio Station Playing
1. Select the DAB Button from the front panel or the remote control and
the unit will scan for available stations. After scanning you will see the
following menu.
Station List
> BBC 1
BBC 2
2. Turn the PUSH SELECT knob
8
on the front panel or use the up/down
arrow buttons on the remote control to see available stations and press
the PUSH SELECT knob
8
on the front panel or the ENT button on the
remote control to select.
Storing a DAB station in a preset
While a DAB station is playing, push the memory button
9
E, then enter
the 2 digit preset number where you want to save this station on the numeric
keypad
3
D. Up to 30 preset DAB radio stations may be stored.

14
T14 Network/FM/DAB+ Tuner
Playing a preset DAB station
When a DAB station is playing, you can switch to a preset station in one
of the following ways.
1. From the numeric keypad
3
D, press the preset number of the desired
station.
2. Press the PRESET +/- H buttons on the remote control to display preset
numbers. Press the up/down B arrow buttons or the PRESET +/- H
buttons on the remote control or turn the knob
8
on the front panel to
select the desired station, then press the PUSH SELECT knob
8
on the
front panel or the ENT button on the remote control.
DAB Settings Menu
Press DAB
qM
on the front panel or remote control, to toggle to the DAB
settings Menu. Turn the PUSH SELECT knob
8
on the front panel, or use the
up/down arrow buttons on the remote control to go through each sub-menu.
• <STATION LIST>: Shows stations list.
• <LOCAL SCAN>: Start a limited scan of available stations by pressing
the PUSH SELECT knob
8
on the front panel or the ENT button on the
remote control. (Not available in all markets.)
• <FULL SCAN>: Start a full range scan by pressing the PUSH SELECT
knob
8
on the front panel or the ENT button on the remote control.
• <MANUAL TUNE>: Press the PUSH SELECT knob
8
on the front panel
or the ENT button on the remote control and select stations manually by
turning PUSH SELECT knob
8
on the front panel or using the up/down
arrow buttons on the remote control.
• <DRC>: Dynamic Range Control, select between “off”, “high” and
“low”. Turn the PUSH SELECT knob
8
on the front panel or use the
up/down arrow buttons on the remote control to change and press the
PUSH SELECT knob
8
on the front panel or the ENT button on the
remote control to save.
• <STATION ORDER>: Display station order as either “Alphanumeric“,
“Ensemble” or “Valid”.
• <PRUNE STATION>: Select between “Yes” or “No”. The Prune setting
allows you to remove stations that are not active or can not be received.
NOTE: Prune will remove unavailable stations from both the Station
List and the DAB Preset List.
• <DAB PRESET>: Displays all 30 of the DAB/DAB+ preset stations and
allows tuning to the selected preset by pressing the PUSH SELECT knob
8
on the front panel or the ENT button on the remote control.
Remote Unit Advanced Buttons
MENU Setting
J
To enter the setup menu, press the MENU J button on the remote control
and you will see the following display to congure additional settings:
SETUP
> POWER OPTION
DISPLAY DIMMER
• POWER OPTION: In Normal mode, the network connection is turned OFF
when the unit is in standby mode. Setting this to Quick leaves the network
connection active during standby mode. Use Quick mode to reduce the
power on time allowing the network to stay connected. “Normal“ is the
factory default.
Valid settings include: Quick, Normal.
NOTE: When the POWER OPTION is configured to Quick, the T14
will consume additional power in standby mode.
• DISPLAY DIMMER: Changes the display brightness.
• POWER LED DIMMER: Changes the Power LED brightness.
NOTE: These settings are stored permanently even after the T14 is
powered off.
• VERSION: Shows the current software version.
• EXIT: Exits this setting menu.
DIM Button
C
Remote Only
Press the DIM button repeatedly to change the DISPLAY brightness.
NOTE: Adjustment made using the DIM
C
button is temporary only
and not saved after powering off the T14.
Troubleshooting
Most difculties in audio systems are the result of incorrect connections, or
improper control settings. If you encounter problems, isolate the area of the
difculty, check the control settings, determine the cause of the fault and
make the necessary changes. If you are unable to get sound, refer to the
suggestions for the following conditions:
Power Indicator Is Not Illuminated
The power Indicator should be illuminated, either Blue (on) or Red (standby),
whenever the unit is plugged into the wall power outlet and the power button
is depressed. If it does not illuminate, test the power outlet with another
electrical device, such as a lamp. Be sure the power outlet being used is
not controlled by a switch that has been turned off.

15
English
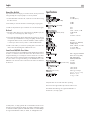
Specications
FM Tuner
Usable Sensitivity 22.2 dBf
50dB Quieting Sensitivity 27.2 dBf (mono)
Signal to Noise Ratio (at 70 dBf)
Mono: 65 dBf
Stereo: 60 dBf
Harmonic Distortion (at 70 dBf)
Mono: 0.2%
Stereo: 0.3%
Frequency Response 10 Hz - 15k Hz, ± 3 dB
Stereo Separation (100 Hz/1k Hz) 35 dB/30 dB
Output Level 1.4 V
Antenna Input 75 ohms F connector
DAB Tuner
Sensitivity - 80 dBm
Tuning Range Band III (174 - 240M Hz)
Audio Data Rate 224Kbps (Max)
Frequency Response 20 Hz - 20k Hz, ± 0.2 dB
Analog Output 2.1 V at 0 dBFS
Antenna Input 75 ohms F connector
General
Network Connection 802.11 b/g/a/n Dual Band
Push button set-up (WPS)
Security WEP, WPA/WPA2
WPA-PSK/WPA2-PSK
Power Consumption 16 watts
Standby Power Consumption (normal mode) 0.5 watts
BTU 55 BTU/h
Power Requirements (AC)
USA: 120 V, 60 Hz
Europe: 230 V, 50 Hz
Dimensions (W x H x D) 430 x 93 x 334 mm
(17 x 3
5
/8 x 13
1
/8 ins)
Front Panel Height 80 mm, 3
1
/8 ins
Weight (net) 5.1 kg, 11.3 lbs.
All specifications are accurate at the time of printing.
Rotel reserves the right to make improvements without notice.
Rotel and the Rotel Hifi logo are registered trademarks of
The Rotel Co., Ltd. Tokyo, Japan.
For DTS patents, see http://patents.dts.com. Manufactured under license
from DTS Licensing Limited. DTS, Play-Fi, the Symbol, and Play-Fi together
in combination with the Symbol are trademarks of DTS, Inc. DTS and Play-Fi
are registered trademarks of DTS, Inc. © DTS, Inc. All Rights Reserved.
Network Does Not Work
If you have trouble connecting to your wireless network, check your network
setting carefully, these steps may help to resolve the problem.
1. Conrm that a Wi-Fi network works, ie, PC can access the Internet using
the same network.
2. Check that your network’s rewall is not blocking any outgoing ports.
3. Make sure the placement of your unit allows it to receive the Wi-Fi signal.
No Sound
1. Check the cables between the output and the pre-amplier inputs, be
sure they are connected properly. Refer to Figure 3.
2. Music played from Play-Fi App are affected by the speed of your internet
connection. If you nd that music is cutting out regularly, check the signal
strength of the Wi-Fi network, consider the installation of Wi-Fi repeaters
or contact your Internet service provider or authorized Rotel dealer.
3. Make sure the station you selected is operating at the current hour. The
station can be broadcasting from a different time zone.
Cannot Tune to DAB/DAB+ Preset Station
Some stations may become unavailable and will be displayed in the Station
List with a “?“ character in front of the station name. These stations are no
longer broadcasting or received by the T14. Presets that are set to these
stations will not function and if selected the T14 will display the DAB menu.
To remove stations no longer transmitting, use the PRUNE function in the
DAB Menu. This will remove these stations from the Station List and from
the Preset list.

16
T14 Tuner Stéréo DAB/FM
Tous les appareils Rotel sont conçus en totale conformité avec les
directives internationales concernant les restrictions d’utilisation
de substances dangereuses (RoHS) pour l’environnement, dans
les équipements électriques et électroniques, ainsi que pour le
recyclage des matériaux utilisés (WEEE, pour Waste Electrical
and Electronic Equipment). Le symbole du conteneur à ordures
barré par une croix indique la compatibilité avec ces directives,
et le fait que les appareils peuvent être correctement recyclés
ou traités dans le respect total de ces normes.
Ce symbole signifie que cet appareil bénéficie d’une double
isolation électrique. Le branchement d’une mise à la masse ou
à la terre n’est pas nécessaire.
DAB
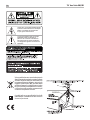
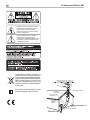
L’éclair dans un triangle équilatéral indique
la présence interne de tensions électriques
élevées susceptibles de présenter des
risques graves d’électrocution.
Le point d’exclamation dans un triangle
équilatéral indique à l’utilisateur la
présence de conseils et d’informations
importantes dans le manuel d’utilisation
accompagnant l’appareil. Leur lecture est
impérative.

17
Français
Remarques importantes concernant la sécurité
ATTENTION : Il n’y a à l’intérieur aucune pièce susceptible d’être modifiée par l’utilisateur. Adressez-vous
impérativement à une personne qualifiée.
ATTENTION : Pour réduire tout risque d’électrisation ou d’incendie, ne pas exposer l’appareil à une
source humide, ou à tout type de risque d’éclaboussure ou de renversement de liquide. Ne pas poser dessus
d’objet contenant un liquide, comme un verre, un vase, etc. Prenez garde à ce qu’aucun objet ou liquide ne
tombe à l’intérieur de l’appareil par ses orifices de ventilation. Si l’appareil est exposé à l’humidité ou si
un objet tombe à l’intérieur, débranchez-le immédiatement de son alimentation secteur, et adressez-vous
immédiatement et uniquement à une personne qualifiée et agréée.
Tous les conseils de sécurité et d’installation doivent être lus.
Conservez soigneusement ce livret.
Tous les conseils de sécurité doivent être soigneusement respectés.
Respectez les procédures d’installation et de fonctionnement indiquées dans ce manuel.
Ne pas utiliser cet appareil près d’un point d’eau.
L’appareil doit être nettoyé uniquement avec un chiffon sec ou un aspirateur.
Il ne doit pas être posé sur un fauteuil, un canapé, une couverture ou toute autre surface susceptible de
boucher ses ouïes d’aération; ou placé dans un meuble empêchant la bonne circulation d’air autour des
orifices d’aération.
Cet appareil doit être placé loin de toute source de chaleur, tels que radiateurs, chaudières, bouches de
chaleur ou d’autres appareils produisant de la chaleur.
Notamment, ne pas tenter de supprimer la prise de terre (troisième broche de la prise) si celle-ci est présente.
Si la prise n’est pas conforme à celles utilisées dans votre installation électrique, consultez un électricien agréé.
Prendre garde à ce que ce cordon d’alimentation ne soit pas pincé, écrasé ou détérioré sur tout son trajet,
et à ce qu’il ne soit pas mis en contact avec une source de chaleur. Vérifiez soigneusement la bonne qualité
des contacts, à l’arrière de l’appareil comme dans la prise murale.
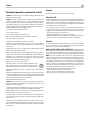
N’utilisez que des accessoires préconisés par le constructeur.
N’utilisez que des meubles, supports, systèmes de transport suffisamment solide pour
supporter l’appareil. Procédez toujours avec la plus extrême précaution lorsque vous
déplacez l’appareil, afin d’éviter tout risque de blessure ou des dommages à l’appareil.
Débranchez le câble d’alimentation en cas d’orage, ou si l’appareil ne doit pas être utilisé pendant une
longue période.
L’appareil doit être immédiatement éteint, débranché puis retourné au service après-vente agréé dans les
cas suivants: Le câble d’alimentation secteur ou sa prise est endommagé; Un objet est tombé, ou du liquide
a coulé à l’intérieur de l’appareil; L’appareil a été exposé à la pluie; L’appareil ne fonctionne manifestement
pas normalement; L’appareil est tombé, ou le coffret est endommagé.
L’appareil doit être utilisé dans un climat non tropical.
ATTENTION : La prise secteur en face arrière constitue le moyen principal pour connecter/déconnecter
l’appareil de son alimentation secteur. L’appareil doit donc être installé de telle manière que ce câble
d’alimentation soit accessible en permanence.
Cet appareil doit être branché sur une prise d’alimentation secteur, d’une tension et d’un type conformes à
ceux qui sont indiqués sur la face arrière de l’appareil (USA : 120 V/60 Hz, CE : 230 V/50 Hz).
Brancher l’appareil uniquement grâce au cordon secteur fourni, ou à un modèle équivalent. Ne pas tenter
de modifier ou changer la prise.Ne pas utiliser de cordon rallonge.
La prise d’alimentation secteur constitue le moyen radical de déconnexion de l’appareil. Elle doit donc
rester en permanence accessible, car sa déconnexion constitue la seule assurance que l’appareil n’est plus
alimenté par le secteur.
Éteignez l’appareil et laissez refroidir l’appareil avant de tenter de se déplacer pour éviter les blessures.
Les piles de la télécommande ne doivent pas être exposées à une température excessive, comme l’exposition
directe au soleil, au feu ou équivalent. Les batteries doivent être recyclées ou éliminées selon les directives
nationales et locales.
Remarque
La prise RS-232 à l’arrière ne concerne uniquement que des techniciens agréés.
Information FCC
Cet appareil a été testé afin de vérifier sa conformité avec les normes minima des appareils numériques
de classe B, suivant l’article 15 des normes FCC. Ces normes garantissent une protection suffisante contre
les interférences, dans le cadre d’une utilisation domestique. Cet appareil génère, utilise et peut rayonner
des fréquences radio et peut, s’il n’est pas utilisé selon les conseils prodigués dans ce manuel d’utilisation,
causer des interférences avec les communications radio.
Il n’y a cependant aucune garantie que ces interférences n’interviennent dans certaines installations. Si
vous notez la présence de parasites sur la radio ou la télévision (détectées par la mise sous et hors tension
de l’appareil), vous pouvez essayer d’éliminer ces interférences en essayant une des procédures suivantes :
• Réorientez ou déplacez l’antenne de réception (TV, radio, etc.)
• Augmentez l’éloignement physique entre le récepteur en cause et l’appareil.
• Branchez les autres maillons sur une prise secteur différente de celle sur laquelle est branché le récepteur.
• Consultez votre revendeur, ou un technicien spécialiste de ces questions de réception radio/TV.
Attention
Cet appareil répond aux normes de l’article 15 de la FCC sous les conditions suivantes : 1) Cet appareil
ne doit pas causer d’interférence très sensible. 2) Cet appareil doit pouvoir accepter n’importe quelle
interférence externe, y compris celles dues à une utilisation fortuite.
NOTE AUX INSTALLATEURS D’UNE ANTENNE CATV : L’installation d’un système
CATV doit être faite par un technicien qualifié, selon les normes de l’article 820-40 de la NEC. La mise à la
terre, notamment, doit être correctement effectuée, reliée au système de mise à la terre de l’immeuble, le
plus près possible du point d’entrée du câble correspondant. Voir le schéma d’installation page précédente.
NOTE: Cet appareil a été testé afin de vérifier sa conformité avec les normes minima des appareils
numériques de classe B, suivant l’article 15 des normes FCC. Ces normes garantissent une protection
suffisante contre les interférences, dans le cadre d’une utilisation domestique. Cet appareil génère, utilise
et peut rayonner des fréquences radio et peut, s’il n’est pas utilisé selon les conseils prodigués dans ce
manuel d’utilisation, causer des interférences avec les communications radio. Il n’y a cependant aucune
garantie que ces interférences n’interviennent dans certaines installations. Si vous notez la présence de
parasites sur la radio ou la télévision (détectées par la mise sous et hors tension de l’appareil), vous pouvez
essayer d’éliminer ces interférences en essayant une des procédures suivantes :
• Orientez convenablement ou changer l’emplacement de l’antenne de réception.
• Éloignez le plus possible l’appareil de votre récepteur de télévision.
• Utilisez une prise secteur murale indépendante pour l’appareil de réception.
• N’hésitez pas à contacter votre revendeur agréé Rotel si le problème persiste.

18
T14 Tuner Stéréo DAB/FM
A propos de Rotel
Notre histoire commence il y a environ 50 ans. Depuis, au l des années,
nous avons reçu des centaines de prix et de récompenses, et satisfait des
centaines de milliers de personnes – comme vous!
Rotel a été fondée par une famille passionnée de musique, qui a décidé
de fabriquer des maillons Haute Fidélité sans compromis aucun. Depuis sa
création, cette passion est restée intacte, et cette famille s’est xée comme
objectif de proposer à tous les audiophiles et mélomanes les meilleurs
appareils possibles, quel que soit leur budget. Une volonté partagée par
tous les employés de Rotel.
Les ingénieurs Rotel travaillent comme une équipe très soudée, écoutant,
peaunant chaque nouveau modèle jusqu’à ce qu’il atteigne exactement
leurs standards – très élevés – de musicalité. Ils sont libres de choisir des
composants en provenance du monde entier, an de concevoir le meilleur
produit possible. C’est ainsi que vous trouverez dans nos appareils des
condensateurs d’origine britannique ou allemande, des transistors japonais
ou américains, tandis que les transformateurs toriques sont toujours fabriqués
dans nos propres usines Rotel.
Nous sommes tous concernés par la qualité de l’environnement. Et, comme de
plus en plus de produits électroniques sont fabriqués puis éliminés quelques
années plus tard, il est désormais essentiel qu’un constructeur fabrique tous
ses produits en veillant à ce qu’ils aient un impact minimum sur la Terre et
les nappes phréatiques.
Chez Rotel, nous sommes très ers d’apporter notre pierre à ce nouvel
édice. Nous avons réduit la teneur en plomb de nos électroniques, en
utilisant notamment une soudure spéciale ROHS, tandis que notre nouvelle
gamme d’amplicateurs fonctionnant en classe D (non numérique) présente
un rendement cinq fois supérieur aux générations conventionnelles
précédentes, délivrant pourtant encore plus de puissance, avec une qualité
encore supérieure. Ces appareils ne chauffent pas, dépensent beaucoup
moins d’énergie, sont donc très bons pour l’environnement tout en étant
encore plus musicaux.
En plus, nous imprimons tous nos catalogues et manuels sur papier recyclé.
Ce ne sont certes que de petites étapes. Mais ne sont-ce pas justement les
plus importantes ? Nous continuons activement la recherche et la mise au
point de nouvelles méthodes, et l’utilisation de nouveaux matériaux pour
aboutir à un processus de fabrication général plus écologique et plus propre.
Tous les membres de l’équipe Rotel vous remercient pour l’achat de cet
appareil. Nous sommes persuadés qu’il vous offrira de nombreuses années
d’intense plaisir musical.
Sommaire
Figure 1 : Commandes et Branchements 4
Figure 2 : Télécommande RR-T99 5
Figure 3 : Connexions d’antennes et de sortie audio 6
Figure 4 : Connexions Rotel-Link et Trigger 12 V 7
Remarques importantes 8
Remarques importantes concernant la sécurité .............................17
A propos de Rotel .................................................18
Mise en route ....................................................19
Quelques précautions préalables 19
Caractéristiques principales 19
Installation 19
Alimentation secteur et commandes .....................................19
Prise secteur
a
19
Interrupteur de mise sous tension
1A
et indicateur Power
2
19
Entrée et sortie TRIGGER 12 V
\
19
Vue générale de la connectique . . . . . . . . . . . . . . . . . . . . . . . . . . . . . . . . . . . . . . . . 20
Antenne Wi-Fi
7
20
Réception radio DAB/FM
y
20
Sortie
u
20
Sortie Coaxiale
i
20
Connexion USB
p
20
Prise RS-232
[
20
Rotel Link
]
20
DTS Play-Fi
R
....................................................20
Connexion Play-Fi 20
Play-Fi Streaming Audio 21
Réinitialisation de conguration sans l 21
Activation WPS 21
Spotify
R
.......................................................21
RADIO FM .......................................................22
Lecture de stations de radio FM 22
Sauvegarder une station de radio dans une présélection 22
Ecoute d’une station de radio présélectionnée 22
Menu des Paramètres FM 22
Réception radio RDS ................................................22
Touche RDS
G
23
Touche MONO
G
23
RADIO DAB ......................................................23
Lecture d’une station de radio DAB 23
Sauvegarder une station DAB dans une présélection 23
Ecoute d’une station de radio présélectionnée 23
Menu des Paramètres DAB 23
Menu d’installation ................................................24
Problèmes de fonctionnement .........................................24
Spécications ....................................................25

19
Français
Mise en route
Merci d’avoir acheté ce tuner Rotel. Associé à un ensemble audio de qualité
ou au sein d’un système de home-cinéma, votre tuner Rotel vous offrira de
nombreuses années de plaisir musical.
Caractéristiques principales
• Streaming audio sans l via le Play-Fi / Spotify App supportant les
chiers de musique stockés localement et services de streaming de
musique populaire.
• Ecoute des stations de radio FM et DAB/DAB+.
• 30 mémoires de présélection pour pouvoir sauvegarder vos stations
DAB/DAB+ et FM favorites.
• Fonctionnalités RDS (Radio Data System).
Quelques précautions préalables
ATTENTION : Pour éviter tout dommage, mettez hors tension TOUS
les éléments de votre système audio lors de la connexion ou de la
déconnexion. Ne remettez pas les éléments du système sous tension
avant d’être certain que tous les branchements sont corrects et sécurisés.
Merci de lire soigneusement ce manuel. En plus de fournir des éléments
de base sur l’installation du produit, et les consignes d’utilisation, il vous
donne des renseignements utiles sur les diverses congurations possibles
ainsi que des informations plus générales qui vous aideront à obtenir le
meilleur de votre système. N’hésitez pas à contacter votre revendeur agréé
Rotel pour obtenir les réponses à toutes les questions que vous pourriez
vous poser. En outre, nous sommes toujours heureux chez Rotel de recevoir
vos remarques et commentaires.
Conservez soigneusement le carton de votre T14 et tous les éléments
servant à l’emballage pour un usage futur éventuel. En effet, expédier ou
déménager votre T14 dans quoique ce soit d’autre que son carton d’origine
peut avoir pour conséquence d’endommager gravement votre appareil et
annulerait la garantie.
Remplissez et renvoyez la carte d’enregistrement du propriétaire qui est jointe
à votre produit et conservez en lieu sûr la facture originale. Elle constitue
votre meilleure preuve de date d’achat au cas où vous auriez besoin de
faire appliquer la garantie constructeur.
Installation
Installez l’appareil sur une surface rigide et plane, éloignée des rayons
directs du soleil, de toute source de chaleur, d’humidité ou de vibrations.
Alimentation secteur et commandes
Prise secteur
a
Votre appareil est conguré en usine pour fonctionner avec la tension secteur
en vigueur dans le pays où vous l’avez acheté (États-Unis : 120 volts/60 Hz
ou Communauté Européenne : 230 volts/50 Hz). La conguration est
inscrite sur une étiquette à l’arrière de votre appareil.
REMARQUE : Si vous décidez de déménager dans un pays étranger,
il sera possible de recongurer en interne votre appareil pour qu’il
puisse fonctionner avec une autre tension d’alimentation. N’essayez
pas de réaliser cette opération vous-même. Le fait d’ouvrir l’appareil
vous expose potentiellement à des tensions dangereuses. Consultez
un technicien qualifié ou le service après-vente Rotel pour plus
d’informations.
REMARQUE : Certains produits sont destinés à être commercialisés
dans plusieurs pays et sont par conséquent fournis avec plusieurs
cordons secteur. Choisissez bien le câble secteur qui correspond à
votre pays de résidence.
Le T14 devra être branché directement dans une prise murale à deux
broches ou à la prise commandée de l’un des éléments de votre système
audio. N’utilisez pas de rallonge.
Assurez-vous que l’interrupteur de mise sous tension POWER SWITCH
1
sur le panneau avant est bien sur « off » (dans la position « out »). Puis,
branchez une extrémité du câble dans le connecteur d’alimentation « Power
Connector »
a
situé à l’arrière de l’appareil. Branchez l’autre extrémité
dans la prise secteur.
Si vous prévoyez de vous absenter pendant une période de temps assez
longue, une bonne précaution est de débrancher votre T14 (ainsi que vos
autres appareils audio et vidéo) pendant que vous n’êtes pas présent à
votre domicile.
Interrupteur de mise sous tension
1A
et indicateur Power
2
La diode indicatrice de mise sous tension se trouve sur le côté gauche du
panneau avant. Pour mettre l’appareil sous tension, appuyez sur l’interrupteur.
La diode indicatrice de mise sous tension va devenir bleu, signiant que
l’appareil est désormais en marche. En mode Standby la diode LED va
devenir rouge. Pour repasser l’appareil hors tension, appuyez de nouveau
sur le bouton pour le laisser revenir sur la position « out ».
Quand le bouton Power Switch a été mis sur la position ON, les touches
ON et OFF de la télécommande peuvent être utilisées pour activer le T14.
En mode Standby la diode LED est rouge, mais l’afcheur est éteint.
Entrée et sortie TRIGGER 12 V
\
Voir Figure 4
Une entrée de type jack libellée IN permet de connecter un câble transportant
un signal « trigger» + 12 V issu d’un préampli Rotel ou d’un processeur
surround, offrant la possibilité de mettre l’appareil sous tension à distance.
L’entrée TRIGGER accepte tous types de signaux (AC ou DC) dans une
gamme allant de 3 volts à 30 volts.
La prise jack repérée « OUT » permet de faire passer le signal de commande
à distance vers un autre appareil Rotel. Autrement dit, le signal Trigger 12
V présent à l’entrée IN est systématiquement dirigé vers la sortie jack OUT.
REMARQUE : Si vous utilisez d’autres éléments de la gamme équipés
de la liaison Rotel-Link, utilisez dans ce cas la liaison Rotel-Link pour
mettre vos appareils sous tension ou hors tension. N’utilisez pas
simultanément la liaison Rotel-Link et les câbles trigger 12V : en effet,
les liaisons marche/ arrêt trigger 12 V sont prioritaires par rapport
aux connexions Rotel-Link.

20
T14 Tuner Stéréo DAB/FM
Vue générale de la connectique
Voir Figure 3
Avant de continuer plus avant dans les autres sections de ce manuel, assurez-
vous que toutes les connexions soient réalisées correctement.
Antenne Wi-Fi
t
S’il vous plaît utiliser les antennes Wi-Fi
t
fournis pour se connecter
aux connecteurs Wi-Fi sur le panneau arrière. Cela permet au T14 de se
connecter au réseau Wi-Fi. Pour congurer les paramètres Wi-Fi s’il vous
plaît voir la section Play-Fi.
Réception radio DAB/FM
y
Veillez utiliser l’antenne intérieure qui vous est fournie et reliez là aux
entrées DAB et FM du panneau arrière. Essayez diverses positions pour
optimiser la réception.
Sortie
u
Votre appareil restitue un signal analogique stéréo. Utilisez le câble audio
fourni pour le relier aux entrées correspondantes de votre préamplicateur
ou amplicateur intégré/processeur surround. Prenez garde à bien faire
correspondre les branchements: le canal de sortie droit doit être relié au
canal droit du préamplicateur ou du processeur, respectivement le canal
de sortie gauche au canal gauche.
Sortie Coaxiale
i
Si vous utilisez un convertisseur numérique/analogique externe, ou un autre
processeur numérique, vous aurez besoin du ux numérique de sortie issu
du T14. Au moyen d’un câble standard de type 75 ohms coaxial, reliez la
sortie numérique du T14 à l’entrée numérique du convertisseur numérique
/analogique.
Connexion USB
p
Cette connexion est utilisée pour le service. Pour plus d’informations s’il
vous plaît contacter votre revendeur agréé Rotel.
Prise RS-232
[
Le T14 peut être piloté via RS-232 pour son intégration dans un système
domotique. La prise RS-232 permet de connecter un câble droit standard
mâle-femelle de type DB-9.
Pour des informations complémentaires sur cette connexion, les logiciels
associés ainsi que les codes de contrôles permettant le pilotage du T14 via
RS-232, merci de contacter votre revendeur agréé Rotel.
Rotel Link
]
Voir Figure 4
Les 2 connecteurs ROTEL LINK OUT peuvent être utilisés pour se connecter à
tout produit Rotel avec un LINK ROTEL IN connexion, en utilisant les câbles
de 3,5 mm stéréo fournis.
Ces branchements permettent d’interconnecter des appareils Rotel pour qu’ils
puissent communiquer entre eux et être pilotés par l’application Rotel App
(disponible en téléchargement sur la boutique en ligne iTunes
®
).
REMARQUE: Vous ne devez utiliser que les câbles Rotel Link fournis
avec l’appareil. Ces câbles 3.5 mm sont équipés de prises BLANCHES
et ne doivent pas être confondus avec les câbles pour liaison trigger
12 V qui sont eux dotés de prises NOIRES.
DTS Play-Fi
®
Le T14 comprend les DTS Play-Fi sans l en continu écosystème pour ruisseler
aisément HiFi audio de qualité à partir de périphériques de stockage en
réseau et de multiples services de streaming Internet basés audio. Pour plus
d’informations sur les services Play-Fi pris en charge s’il vous plaît visitez le
site Web DTS Play-Fi au https://www.play-.com.
Play-Fi Connexion
To utilize the Play-Fi enabled services you will need to do the following:
Connexion à T14
Assurer les antennes Wi-Fi ont été installés et la allumer l’appareil T14. Le
Wi-Fi LED sur le panneau arrière T14 clignote rapidement sur et en dehors,
toutes les 0,5 secondes pendant 20 secondes. Après quoi, il doit passer
à pulsant lentement sur et en dehors, rougeoyante du clair au sombre puis
brillant à nouveau. Cela signie que le T14 est prêt à se connecter à votre
réseau Wi-Fi.
A partir de vos appareils (téléphones, tablettes, ordinateurs), télécharger
gratuitement Play-Fi App d’un App Store, comme le Google Play Store,
Amazon Marketplace app, ou App Store d’Apple. Après le téléchargement,
lancer et exécuter l’application Play-Fi sur vos appareils, suivant les étapes
pertinentes ci-dessous, en fonction de votre type d’appareil:
Pour les appareils iOS:
1. Allez dans le menu SETTING sur votre appareil iOS.
2. Sélectionnez le menu des paramètres Wi et assurer Wi est activé.
3. Attendre jusqu’à 90 secondes pour la liste des réseaux Wi-Fi à rafraîchir
et trouver le T14 activé Play-Fi périphérique répertorié au bas de la liste
sous l’option “SET UP NEW AIRPLAY SPEAKER”.
<
Settings Wi-Fi
Wi-Fi
√ Network
CHOOSE A NETWORK
Network
Other...
SET UP NEW AIRPLAY SPEAKER...
Play-Fi Device >
Ask to Join Networks
Known networks will be joined automatically. If no known
networks are available, you will have to manually select a
network.
i
i
10:17 AM
32%
La page est en cours de chargement...
La page est en cours de chargement...
La page est en cours de chargement...
La page est en cours de chargement...
La page est en cours de chargement...
La page est en cours de chargement...
La page est en cours de chargement...
La page est en cours de chargement...
La page est en cours de chargement...
La page est en cours de chargement...
La page est en cours de chargement...
La page est en cours de chargement...
La page est en cours de chargement...
La page est en cours de chargement...
La page est en cours de chargement...
La page est en cours de chargement...
La page est en cours de chargement...
La page est en cours de chargement...
La page est en cours de chargement...
La page est en cours de chargement...
La page est en cours de chargement...
La page est en cours de chargement...
La page est en cours de chargement...
La page est en cours de chargement...
La page est en cours de chargement...
La page est en cours de chargement...
La page est en cours de chargement...
La page est en cours de chargement...
La page est en cours de chargement...
La page est en cours de chargement...
La page est en cours de chargement...
La page est en cours de chargement...
La page est en cours de chargement...
La page est en cours de chargement...
La page est en cours de chargement...
La page est en cours de chargement...
La page est en cours de chargement...
La page est en cours de chargement...
La page est en cours de chargement...
La page est en cours de chargement...
La page est en cours de chargement...
La page est en cours de chargement...
La page est en cours de chargement...
La page est en cours de chargement...
La page est en cours de chargement...
La page est en cours de chargement...
La page est en cours de chargement...
La page est en cours de chargement...
La page est en cours de chargement...
La page est en cours de chargement...
La page est en cours de chargement...
La page est en cours de chargement...
La page est en cours de chargement...
La page est en cours de chargement...
La page est en cours de chargement...
La page est en cours de chargement...
La page est en cours de chargement...
La page est en cours de chargement...
La page est en cours de chargement...
La page est en cours de chargement...
La page est en cours de chargement...
La page est en cours de chargement...
La page est en cours de chargement...
La page est en cours de chargement...
-
 1
1
-
 2
2
-
 3
3
-
 4
4
-
 5
5
-
 6
6
-
 7
7
-
 8
8
-
 9
9
-
 10
10
-
 11
11
-
 12
12
-
 13
13
-
 14
14
-
 15
15
-
 16
16
-
 17
17
-
 18
18
-
 19
19
-
 20
20
-
 21
21
-
 22
22
-
 23
23
-
 24
24
-
 25
25
-
 26
26
-
 27
27
-
 28
28
-
 29
29
-
 30
30
-
 31
31
-
 32
32
-
 33
33
-
 34
34
-
 35
35
-
 36
36
-
 37
37
-
 38
38
-
 39
39
-
 40
40
-
 41
41
-
 42
42
-
 43
43
-
 44
44
-
 45
45
-
 46
46
-
 47
47
-
 48
48
-
 49
49
-
 50
50
-
 51
51
-
 52
52
-
 53
53
-
 54
54
-
 55
55
-
 56
56
-
 57
57
-
 58
58
-
 59
59
-
 60
60
-
 61
61
-
 62
62
-
 63
63
-
 64
64
-
 65
65
-
 66
66
-
 67
67
-
 68
68
-
 69
69
-
 70
70
-
 71
71
-
 72
72
-
 73
73
-
 74
74
-
 75
75
-
 76
76
-
 77
77
-
 78
78
-
 79
79
-
 80
80
-
 81
81
-
 82
82
-
 83
83
-
 84
84


Rotel T14 Le manuel du propriétaire
- Catégorie
- Équipement musical supplémentaire
- Taper
- Le manuel du propriétaire
dans d''autres langues
- italiano: Rotel T14 Manuale del proprietario
- español: Rotel T14 El manual del propietario
- Deutsch: Rotel T14 Bedienungsanleitung
- Nederlands: Rotel T14 de handleiding
Documents connexes
-
Rotel T14 Le manuel du propriétaire
-
Rotel RT-11 Le manuel du propriétaire
-
Rotel T11 Le manuel du propriétaire
-
-
-
-
Rotel FR51744 Le manuel du propriétaire
-
-
Rotel A14 Le manuel du propriétaire
-
Rotel A12 Le manuel du propriétaire