Sony DVP-FX935 Mode d'emploi
- Catégorie
- Lecteurs DVD
- Taper
- Mode d'emploi

4-126-487-21(1)
Operating Instructions
Mode d’emploi
US
FR
© 2009 Sony Corporation
DVP-FX935
Portable
CD/DVD Player

2
US
WARNING
To reduce the risk of fire or
electric shock, do not
expose this apparatus to
rain or moisture.
To avoid electrical shock,
do not open the cabinet.
Refer servicing to qualified
personnel only.
The AC power cord must be
changed only at a qualified
service shop.
Batteries or batteries
installed apparatus shall
not be exposed to
excessive heat such as
sunshine, fire or the like.
CAUTION
The use of optical instruments
with this product will increase
eye hazard. As the laser beam
used in this CD/DVD player is
harmful to eyes, do not attempt to
disassemble the cabinet.
Refer servicing to qualified
personnel only.
This label is located on the
bottom of the unit.
This symbol is
intended to alert the
user to the presence
of uninsulated
“dangerous
voltage” within the product’s
enclosure that may be of
sufficient magnitude to constitute
a risk of electric shock to
persons.
This symbol is
intended to alert the
user to the presence
of important
operating and
maintenance (servicing)
instructions in the literature
accompanying the appliance.
Precautions
• Install this system so that the
AC power cord can be
unplugged from the wall socket
immediately in the event of
trouble.
• The player is not disconnected
from the AC power source as
long as it is connected to the
wall outlet, even if the player
itself has been turned off.
• To prevent fire or shock
hazard, do not place objects
filled with liquids, such as
vases, on the apparatus.
For customers in Canada
If this product is not working
properly, please call 1-877-602-
2008 for Peace of Mind Warranty
Replacement service.
For other product related questions
please contact our Customer
Information Service Center at 1-
877-899-7669 or write to us at:
Customer Information Service 115
Gordon Baker Road, Toronto,
Ontario, M2H 3R6
RECYCLING LITHIUM-
ION BATTERIES
Lithium-Ion
batteries are
recyclable.
You can help
preserve our
environment by
returning your used rechargeable
batteries to the collection and
recycling location nearest you.
For more information regarding
recycling of rechargeable
batteries, call toll free
1-800-822-8837, or visit
http://www.rbrc.org/
Caution: Do not handle damaged
or leaking Lithium-Ion batteries.
If you have any questions or
problems concerning your
player, please consult your
nearest Sony dealer.
IMPORTANT NOTICE
Caution: This player is capable
of holding a still video image
or on-screen display image on
your television screen
indefinitely. If you leave the
still video image or on-screen
display image displayed on
your TV for an extended period
of time you risk permanent
damage to your television
screen. Plasma display panel
televisions and projection
televisions are susceptible to
this.

3
US
US
Copyrights, licensing and
trademarks
• This product incorporates
copyright protection
technology that is protected by
U.S. patents and other
intellectual property rights.
Use of this copyright
protection technology must be
authorized by Macrovision,
and is intended for home and
other limited viewing uses only
unless otherwise authorized by
Macrovision. Reverse
engineering or disassembly is
prohibited.
• Manufactured under license
from Dolby Laboratories.
Dolby and the double-D
symbol are trademarks of
Dolby Laboratories.
• “DVD+RW,” “DVD-RW,”
“DVD+R,” “DVD+R DL,”
“DVD-R,” “DVD VIDEO,”
and “CD” logos are
trademarks.
• MPEG Layer-3 audio coding
technology and patents
licensed from Fraunhofer IIS
and Thomson.
• DivX, DivX Certified, and
associated logos are
trademarks of DivX, Inc. and
are used under license.
• THIS PRODUCT IS
LICENSED UNDER THE
MPEG-4 VISUAL PATENT
PORTFOLIO LICENSE FOR
THE PERSONAL AND NON-
COMMERCIAL USE OF A
CONSUMER FOR
DECODING VIDEO IN
COMPLIANCE WITH THE
MPEG-4 VISUAL
STANDARD (“MPEG-4
VIDEO”) THAT WAS
ENCODED BY A
CONSUMER ENGAGED IN
A PERSONAL AND NON-
COMMERCIAL ACTIVITY
AND/OR WAS OBTAINED
FROM A VIDEO PROVIDER
LICENSED BY MPEG LA TO
PROVIDE MPEG-4 VIDEO.
NO LICENSE IS GRANTED
OR SHALL BE IMPLIED
FOR ANY OTHER USE.
ADDITIONAL
INFORMATION
INCLUDING THAT
RELATING TO
PROMOTIONAL,
INTERNAL AND
COMMERCIAL USES AND
LICENSING MAY BE
OBTAINED FROM MPEG
LA, LLC. SEE HTTP://
WWW.MPEGLA.COM
About this manual
• In this manual, “disc” is used as
a general reference for the
DVDs or CDs unless otherwise
specified by the text or
illustrations.
• Icons, such as , listed at
the top of each explanation
indicate what kind of media
can be used with the function
being explained.
For details, see “Playable
Media” (page 28).
• NEED-to-know information
(to prevent incorrect operation)
is listed under the
b icon.
NICE-to-know information
(tips and other useful
information) is listed under the
z icon.

4
US
Table of Contents
WARNING . . . . . . . . . . . . . . . . . . . . . . . . . . . . . . . . . . . . . . . . . . . . . . 2
Guide to Parts and Controls . . . . . . . . . . . . . . . . . . . . . . . . . . . . . . . . . 5
Rotating and Folding Down the LCD Panel . . . . . . . . . . . . . . . . . . . . . 9
Preparations . . . . . . . . . . . . . . . . . . . . . . . . . . . . . . . . . . . .10
Checking the Accessories . . . . . . . . . . . . . . . . . . . . . . . . . . . . . . . . . 10
Charging the Battery Pack . . . . . . . . . . . . . . . . . . . . . . . . . . . . . . . . . 10
Using the Car Battery Adaptor . . . . . . . . . . . . . . . . . . . . . . . . . . . . . . 12
Connecting to Other Equipment . . . . . . . . . . . . . . . . . . . . . . . . . . . . . 13
Playback . . . . . . . . . . . . . . . . . . . . . . . . . . . . . . . . . . . . . .14
Playing Discs . . . . . . . . . . . . . . . . . . . . . . . . . . . . . . . . . . . . . . . . . . . 14
Playing MP3, JPEG, and Video Files . . . . . . . . . . . . . . . . . . . . . . . . . 17
Adjusting the Picture Size and Quality . . . . . . . . . . . . . . . . . . . . . . . . 19
Settings and Adjustments . . . . . . . . . . . . . . . . . . . . . . . . . . .20
Using the Setup Display . . . . . . . . . . . . . . . . . . . . . . . . . . . . . . . . . . . 20
Additional Information . . . . . . . . . . . . . . . . . . . . . . . . . . . . .23
Troubleshooting . . . . . . . . . . . . . . . . . . . . . . . . . . . . . . . . . . . . . . . . . 23
Precautions . . . . . . . . . . . . . . . . . . . . . . . . . . . . . . . . . . . . . . . . . . . . . 25
Playable Media . . . . . . . . . . . . . . . . . . . . . . . . . . . . . . . . . . . . . . . . . . 28
Specifications . . . . . . . . . . . . . . . . . . . . . . . . . . . . . . . . . . . . . . . . . . . 30
Index . . . . . . . . . . . . . . . . . . . . . . . . . . . . . . . . . . . . . . . . . . . . . . . . . . 31

5
US
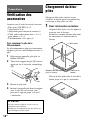
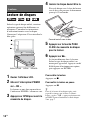
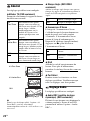
Guide to Parts and
Controls
For more information, see the pages
indicated in parentheses.
Player
Buttons B C D and E are also on the
remote.
Buttons B C D and E (but not C/X/x/
c/ENTER) can be operated with a single
touch.
The VOL+ and N (play) buttons have a
tactile dot. Use the tactile dot as a reference
when operating the player.
A LCD panel (page 9)
B VOL (sound volume) +/–
Operate with a single touch of + or –.
You can also adjust the volume by
sliding your finger along the touch
slider. Sliding toward + from center
increases volume; sliding toward –
from center decreases volume. (The
same operation in “LCD Mode” can be
used to adjust the picture quality level.
See page 19.)
Buttons on the remote adjust the
volume only.
C N (play) (page 14)
Starts or re-starts playback.
X (pause) (page 14)
Pauses or re-starts playback.
x (stop) (page 14)
Stops playback.
. (previous)
Skips to the beginning of the current
chapter/track/scene.
To go to the beginning of the previous
chapter/track/scene, press twice.
> (next)
Skips to the next chapter/track/scene.
CHARGEPOWER
HOLD
PHONES AUDIO VIDEO DC IN
9.5V
AB
POWER OFF ON
IN/
OUT
IN/
OUT
PUSH CLOSE
OPEN
OPTIONSDISPLAY RETURNMENU
VOL
,continued

6
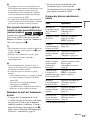
US
D DISPLAY
Displays the playback information.
• When playing a DVD: Displays the
playback information and changes
the playback mode. See page 16.
• When playing a CD: Each time you
press the button, the time
information switches.
• When playing a video file: Each time
you press the button, the time
information switches.
E MENU
Displays the menu or changes the
playback mode.
• When playing a DVD: Displays the
menu.
• When playing a CD: Each time you
press the button, switches Repeat
Play, Random Play, and Play.
• When playing a JPEG file: Displays
the list of thumbnails and plays a
slideshow. See page 18.
RETURN
Returns to the previous display.
C/X/x/c
Moves the highlight to select a
displayed item.
• When playing a DVD or CD: C/c on
the player works as the same as m/
M on the remote.
ENTER
Enters the selected item.
• When playing a DVD or CD:
ENTER on the player works as the
same as N.
OPTIONS
Displays the menu for adjusting the
LCD screen (page 19) and using the
setup display (page 20).
F (remote sensor)
When operating by the remote, point it
at the remote sensor .
G Speaker
H Disc Lid (page 14)
I OPEN button (page 14)
Opens the disc lid.
J PUSH CLOSE (page 14)
Closes the disc lid.
K POWER indicator (page 14)
L CHARGE indicator (page 11)
M POWER switch (page 14)
Turns the player on or off.
N HOLD switch
To avoid accidental button operation
of the player, set the HOLD switch to
the direction of the arrow.
All the buttons on the player are
locked, while the buttons on the
remote remain operable.
O PHONES (headphone) jack A, B
P USB jack (type A) (page 18)
Connect a USB device to this jack.
Q AUDIO IN/OUT jack (page 13)
R VIDEO IN/OUT jack (page 13)
S DC IN 9.5V jack (page 11, 12)
Connect the AC power adaptor or car
battery adaptor.

7
US
T INPUT button (page 13)
Each time you press the button, the
LCD screen image switches as
follows:
• Disc mode (default): When playing
an inserted disc.
• USB mode: When playing DATA
files on a connected USB device.
Appears “USB” on the LCD screen
when you select this mode.
• Line In mode: When inputting a
playback signal from connected A/V
equipment. Appears “Line In” on the
LCD screen when you select this
mode.
Remote
Buttons B C D and E are also on the
player.
The number 5, N and AUDIO buttons
have a tactile dot. Use the tactile dot as a
reference when operating the player.
U Number buttons
Enters the title/chapter numbers, etc.
• When playing a DVD VIDEO or
CD: Search directly by entering the
title/chapter/track number using the
number buttons, and press ENTER.
To switch a title or chapter, press C/
c.
CLEAR button
Clears the entry field.
123
456
78
0
9
,continued

8
US
V TOP MENU button
Displays the menu or changes the
playback mode.
• When playing a DVD VIDEO:
Displays the top menu.
• When playing a DVD VR: Switches
between “Original” and “Play List”
on the disc created Playlist. During
playback, you cannot switch. Press
x twice, and press TOP MENU.
W m/M (scan/slow) buttons
Fast reverses/ fast forwards when
pressed during playback. Press
repeatedly to change the speed.
• When playing a DVD: Slow
reverses/ slow forwards when
pressed during pause. Press
repeatedly to change the speed.
• When playing a video file: Slow
forwards when pressed during pause.
Press repeatedly to change the speed.
X ADVANCE button
Briefly fast forwards the current scene
(DVD only).
Y AUDIO button
Changes the audio signal.
• When playing a DVD VIDEO: Each
time you press the button, the
language of the sound track
switches. Depending on the disc, the
choice of language varies.
• When playing a DVD VR: Each time
you press the button, the type of
sound tracks recorded on a disc
switches between main, sub and
main/sub sound.
• When playing a CD: Each time you
press the button, the mode switches
between stereo and monaural (left/
right).
• When playing a DivX video file:
Each time you press the button, the
audio signal switches. If “No Audio”
appears, the player does not support
the audio signal.
SUBTITLE button
Changes the subtitle.
• When playing a DVD: Each time
you press the button, the subtitle
switches. Depending on the disc, the
choice of language varies.
• When playing a DivX video file:
Press the button during playback.
Press
X/x and ENTER while
displaying subtitle information.
ANGLE button
Changes the angle. When “ ”
(Angle Mark) appears, you can change
angles. Depending on the disc, you
may not be able to change the angle.
(DVD VIDEO only)

9
US
Rotating and Folding
Down the LCD Panel
Open the LCD panel to the vertical
position, then slowly rotate it 180 degrees
in the direction indicated by the arrow
(clockwise).
After rotating the LCD panel 180 degrees
clockwise, push the LCD panel down onto
the main body of the player. In this
position the panel is facing up.
To return the LCD panel to its original
position
Open the LCD panel to the vertical
position and rotate the LCD panel counter-
clockwise slowly.
b
• Do not rotate the LCD panel over 180 degrees.
In addition, do not rotate in the opposite
direction. Doing so will break the LCD panel.
• Return the LCD panel to its original positions
after use, so the LCD panel will not be
damaged by sudden shocks or rough treatment.
• Do not rotate the LCD panel while keeping it
closed or out of vertical. It may scratch the
player.

10
US
Preparations
Checking the
Accessories
Check that you have the following items:
• Battery pack (NP-FX110) (1)
• AC power adaptor (1)
• Car battery adaptor (1)
• Audio/video cord (mini plug × 2 y
phono plug × 3) (1)
• Remote (with battery) (1)
To replace the remote battery
When the battery becomes depleted,
operation is not possible. Change the
battery.
1 Prepare a new battery (lithium battery
CR2025).
2 Pull out the battery holder (2) while
pressing the lock lever (1).
3 Remove the old battery.
4 Insert the new battery in the battery
holder with the 3 side up and then
push the holder until it clicks.
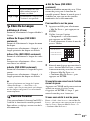
Charging the Battery
Pack
Charge the battery pack (supplied) before
using the player for the first time, or when
the battery is depleted.
1 Attach the battery pack to the
player.
Align the battery pack with the lines
on the bottom of the player.
Engage the hooks of the battery pack
into the holes on the bottom of the
player.
Slide the battery pack in the direction
of the arrow until it clicks into place.
CAUTION
Danger of explosion if battery is incorrectly
replaced.
Replace only with the same or equivalent
type.
Bottom of the
player
Battery pack
Attachment
reference marks

Preparations
11
US
2 Connect the AC power adaptor.
When charging begins, the CHARGE
indicator lights up in orange.
When charging ends, the CHARGE
indicator lights off.
Disconnect the AC power adaptor.
z
If the POWER indicator lights up instead of the
CHARGE indicator, the POWER switch is set to
“ON.” Set the POWER switch to “OFF,” and
make sure that the CHARGE indicator lights up.
b
Charge the battery in an ambient temperature of
between 5°C to 35°C (41°F to 95°F).
Charging time and playing time
Charging time: approx. 6 hours
Playing time: approx. 6 hours
Times indicated are under the following
conditions:
– Moderate temperature (20°C (68°F))
– Headphone use
– Backlight set to minimum
Depending on the ambient temperature or
battery pack condition, charging time may be
longer, or playing time may be reduced.
To check the battery level
When the player is stopped, the battery
indicator is displayed. When the battery is
empty, is displayed or the CHARGE
indicator flashes. Set the POWER switch
to “OFF,” connect the AC power adaptor,
and recharge the battery.
To remove the battery pack
Push the release knob and slide the battery
pack in the direction of the arrow.
INPUT
HOLD
PHONES AUDIO VIDEO DC IN
9.5V
AB
POWER OFF ON
IN/
OUT
IN/
OUT
DC IN
9.5V
AC power Adaptor
(supplied)
To a wall
outlet
Full Empty
Release knob

12
US
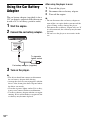
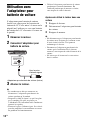
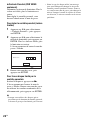
Using the Car Battery
Adaptor
The car battery adaptor (supplied) is for a
12V car battery, negative earth (do not use
it with a 24V car battery, positive earth).
1 Start the engine.
2 Connect the car battery adaptor.
3 Turn on the player.
b
• The driver should not connect or disconnect
the car battery adaptor while driving.
• Arrange the cord so as not to interfere with the
driver. Also, do not place the LCD panel where
the driver can watch.
• Clean the cigarette lighter socket. If it is dirty,
it may cause contact failure or malfunction.
• Use the car battery adaptor with the car engine
running. If it is used with the car engine off, the
car battery may become depleted.
After using the player in a car
1 Turn off the player.
2 Disconnect the car battery adaptor.
3 Turn off the engine.
b
• Do not disconnect the car battery adaptor or
turn off the car engine before you turn off the
player. Doing so may damage the player.
• Disconnect the car battery adaptor after use. If
it is left connected, the car battery may become
depleted.
• Do not leave the player or accessories in the
car.
INPUT
HOLD
PHONES AUDIO VIDEO DC IN
9.5V
AB
POWER OFF ON
IN/
OUT
IN/
OUT
DC IN
9.5V
To cigarette
lighter socket
Car battery adaptor (supplied)

Preparations
13
US
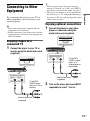
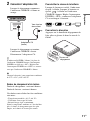
Connecting to Other
Equipment
By connecting the player to your TV or
other equipment, you can increase your
viewing options.
b
• Refer to the instructions supplied with the
equipment to be connected.
• Before connecting, turn off the player and the
equipment to be connected, then unplug from
their wall sockets.
Enjoying images on a
connected TV
1 Connect the player to your TV or
monitor using the audio/video cord
(supplied).
z
• When you play back a disc after enjoying
images by “Line In” or “USB,” press INPUT
repeatedly to select the disc mode. See page 7.
• The player can connect to an AV amplifier in
the same way as a TV. Although connecting is
the same as a TV, the yellow plug of the audio/
video cord is not used.
Enjoying optional connections
1 Connect the player to your video
player or camcorder using the
audio/video cord (supplied).
2 Turn on the player and press INPUT
repeatedly to select “Line In.”
INPUT
HOLD
PHONES AUDIO VIDEO DC IN
9.5V
AB
POWER OFF ON
IN/
OUT
IN/
OUT
INPUT
AUDIO VIDEO
IN/
OUT
IN/
OUT
To AUDIO/
VIDEO input
jacks of a TV or
monitor
Audio/video cord
(supplied)
INPUT
HOLD
PHONES AUDIO VIDEO DC IN
9.5V
AB
POWER OFF ON
IN/
OUT
IN/
OUT
INPUT
AUDIO VIDEO
IN/
OUT
IN/
OUT
Audio/video cord
(supplied)
To AUDIO/
VIDEO output
jacks of a
video player or
camcorder

14
US
Playback
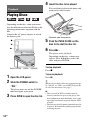
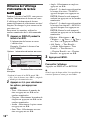
Playing Discs
Depending on the disc, some operations
may be different or restricted. Refer to the
operating instructions supplied with the
disc.
Connect the AC power adaptor or attach
the battery pack.
1 Open the LCD panel.
2 Slide the POWER switch to
“ON.”
The player turns on and the POWER
indicator lights up in green.
3 Press OPEN to open the disc lid.
4 Insert the disc to be played.
Place with the playback side down and
push gently until it clicks.
5 Push the PUSH CLOSE on the
disc lid to shut the disc lid.
6 Press N.
The player starts playback.
Depending on the disc, a menu may
appear. Press C/X/x/c to select the
item, and press ENTER.
To stop playback
Press x.
To pause playback
Press X.
z
When you play back a disc after enjoying images
by “Line In” or “USB,” press INPUT repeatedly
to select the disc mode. See page 7.
b
• Discs created on DVD recorders must be
correctly finalized to play on the player. For
more information about finalizing, refer to the
operating instructions supplied with the DVD
recorder.
• The disc may be still spinning when the disc lid
is opened. Wait until the spinning stops before
removing the disc.
CHARGEPOWER
OPTIONSDISPLAY RETURNMENU
VOL
P
O
W
E
R
O
F
F
O
N
OPEN
P
U
S
H
C
L
O
S
E
C
H
A
R
G
E
P
O
W
E
R
x
N
OPENPUSH CLOSE POWER
X
Playback side facing down

Playback
15
US
To resume playback from the point
where you stopped the disc (Resume
Play)
When you press N again after you stop
playback, the player starts playback from
the point when you pressed x.
z
• To play from the beginning of the disc, press
x twice, and press N.
• When turning power on again after power off,
resume play starts automatically.
b
• Depending on the stop point, Resume play
may not start from exactly the same point.
• The resume point is cleared when:
– you turn off the player (including standby
mode) for a DVD (VR mode).
– you open the disc lid.
– you press INPUT.
– you disconnect the adaptor or remove the
battery pack before turning off the player.
Notes on the screen saver
• A screen saver image appears when you
leave the player in pause or stop mode
without operation for more than 15
minutes. The image disappears when you
press N. For the setup of “Screen
Saver,” see page 21.
• The player goes standby, 15 minutes
after starting the screen saver function.
Press N to come out of standby mode.
About various playback operations
* DVD VIDEO only
To Operation
Change the LCD
picture size
Press OPTIONS to
select “LCD Mode”
(page 19).
Display the DVD
menu
Press MENU (page 6)
or TOP MENU
(page 8).
Check the DVD
playback
information
Press DISPLAY
(page 16).
Play DVDs*
repeatedly
(Repeat Play)
Press DISPLAY to
select “Repeat”
(page 16).
Play DVDs in
fast reverse or
fast forward
(Scan Play)
Press C/c repeatedly on
the player to select the
speed (page 6).
Switch between
original and
Playlist in DVD
(VR mode)
Press TOP MENU
repeatedly (page 8).
Change the CD
playback
information
Press DISPLAY
repeatedly (page 6).
Play CDs
repeatedly
(Repeat Play)
Press MENU
repeatedly (page 6).
Play CDs
randomly
(Random Play)
Press MENU
repeatedly (page 6).
,continued

16
US
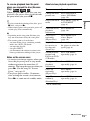
Using the Playback
Information Display
While playing a DVD, you can check the
current playback information. The
playback information display also allows
you to set a title/chapter or change sound/
subtitle, and so on.
When entering the numbers, operate the
number buttons on the remote.
1 Press DISPLAY while playing a
DVD.
The current playback information
appears.
Example: When playing a DVD
VIDEO
* When a DVD (VR mode) is played, “PL”
(playlist) or “ORG” (original) is displayed
next to the title number.
2 Press X/x to select items and press
ENTER.
• Title: Select the title number by
pressing X/x or number buttons.
• Chapter: Select the chapter number
by pressing X/x or number buttons.
• Audio: Select the sound by pressing
X/x.
• Subtitle: Select the subtitle by
pressing X/x.
• Angle: Select the angle by pressing
X/x.
• T.Time: Time appears while playing
a title. “00:00:00” will appear by
pressing ENTER. Enter the desired
time code by pressing the number
buttons.
• C.Time: Time appears while playing
a chapter. “00:00:00” will appear by
pressing ENTER. Enter the desired
time code by pressing the number
buttons.
• Repeat: Select “ Chapter,” “
Title,” “ All,” or “Off” by
pressing X/x.
• Time Disp.: “Title Elapsed” is
displayed. Select “Title Elapsed,”
“Title Remain,” “Chapter Elapsed,”
or “Chapter Remain” by pressing X/
x.
3 Press ENTER.
To turn off the display
Press DISPLAY or RETURN.
b
Depending on the disc, you may not be able to
set some items.
Menu
Title
Chapter
Audio
Subtitle
02/07
03/20
02 2CH DOLBY DIGITAL English
01 English
Title Elapsed 00:12:01
Current playback information*Items
Elapsed or remaining timeBattery status

Playback
17
US
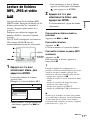
Playing MP3, JPEG,
and Video Files
You can play MP3, JPEG, and video files.
For details on playable files, see “Playable
Media” (page 28).
When you set a DATA media, a list of
albums appears.
DATA CDs recorded in KODAK Picture
CD format automatically start playing
when inserted.
1 Press X/x to select the album,
and press ENTER.
The list of files in the album appears.
Example: The list of MP3 files
• To go to the next or previous page,
press > or ..
• To return to the list of albums, press
X/x to select and press ENTER.
2 Press X/x to select the file, and
press ENTER.
Playback starts from the selected file.
To go to the next or previous file
Press > or ..
To stop playback
Press x.
The display will return to the list of files.
To pause playback (MP3 only)
Press X.
To restart playback, press X again.
z
If the number of viewing times is preset, you can
play the DivX video files as many times as the
preset number. The following occurrences will
be counted as one time:
– when x is pressed.
– when the player is turned off (including
standby mode).
– when the disc lid is opened.
– when another file is played.
– when INPUT is pressed.
– when the USB device is disconnected.
b
Depending on the file, playback may take time to
start or may not be able to start. For details on
playable files, see “Playable Media” (page 28).
Selecting a JPEG file
To rotate a JPEG image
Press C/X/x/c while viewing the image
file. Rotate every file.
c: Rotates the image 90 degrees
clockwise.
C: Rotates the image 90 degrees counter
clockwise.
X: Reverses the image vertically (up and
down).
x: Reverses the image horizontally (left
and right).
CHARGEPOWER
OPTIONSDISPLAY RETURNMENU
VOL
MENU
x
C/X/x/c
ENTER
X
N
./>
. .
MY BEST
Dir:001
03 Wing
02 Fire
01 Stardust
,continued

18
US
To display the list of thumbnails
Press MENU when an image file is
displayed.
The image files in the album appear in 12
sub-screens with the displayed file in the
lead.
• To go to the previous or next list of
thumbnails, select “bPrev” or
“NextB” at the bottom of the screen,
and press ENTER.
• To exit the list of thumbnails, press
MENU.
Playing a Slide Show
1 While displaying the image file you
want to start a slideshow, press
MENU.
The list of thumbnails appears.
2 Press C/X/x/c to select “Slide
Show” at the bottom of the screen,
and press ENTER.
A slideshow starts from the displayed
file.
To stop slideshow
Press x to return to the list of files.
Press MENU to return to the list of
thumbnails.
To pause slideshow
Press X.
Playing data on a USB device
You can play back DATA files on a USB
device.
1 Press INPUT repeatedly to select
“USB.”
2 Connect a USB device to the USB
jack.
To disconnect a USB device
1 Press INPUT to deselect “USB.”
2 Disconnect the USB device.
About supported Sony USB devices
The following Sony USB Memory Stick
reader/writer and USB flash drive “Micro
Vault” are supported: MSAC-US40,
USM-J series, USM-JX series, USM-J/B
series, USM-L series, and USM-LX series.
b
• Do not disconnect the USB device while its
access indicator is flashing. Doing so may
cause data corruption or loss of data.
• USB devices which can connect to the player
are flash memory and multiple card readers.
Other devices (digital still camera, USB hub,
etc.) cannot be connected. When an
unsupported device is connected, an error
message appears.
1234
5678
910
Slide Show
11 12
Prev Next
P
O
W
E
R
O
F
F
O
N
O
P
E
N
H
O
L
D
P
H
O
N
E
S
A
U
D
I
O
V
I
D
E
O
IN/
OUT
IN/
OUT
D
C
I
N
9
.
5
V
AB
O
P
T
I
O
N
S
D
I
S
P
L
A
Y
R
E
T
U
R
N
M
E
N
U
I
N
P
U
T
INPUT
USB device
USB jack

Playback
19
US
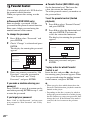
Adjusting the Picture
Size and Quality
You can adjust the picture displayed on the
LCD screen.
1 Press OPTIONS.
The menu display appears.
2 Press X/x to select “LCD
Mode” and press ENTER.
The “LCD Mode” display appears.
3 Press X/x to select items and
press ENTER.
• LCD Aspect: Change the picture size.
Select “Normal” or “Full” by pressing
X
/
x
*
1
.
• Backlight: Adjust the brightness by
pressing C
/
c or VOL +/–*
2
.
• Contrast: Adjust the difference
between light and dark areas by
pressing C
/
c or VOL +/–*
2
.
• Hue: Adjust the red and green color
balance by pressing
C/c
or VOL +/–
*
2
.
• Color: Adjust the richness of colors
by pressing C
/
c or VOL +/–*
2
.
• Default: Return all settings to the
factory defaults.
4 Press ENTER.
*
1
In “Normal,” pictures are displayed in their
original configuration, retaining the aspect
ratio. 4:3 pictures are displayed with black
bands on both sides of the screen. 4:3 letter
box pictures are displayed with bands on all
sides of the screen.
In “Full,” pictures are adjusted to fill the
entire screen. 16:9 pictures are displayed in
their original configuration. (Black band
recorded in a 16:9 picture cannot be erased.)
4:3 pictures appear stretched.
*
2
Operate with a single touch of + or – on the
player. You can also adjust the level by
sliding your finger along the touch slider. For
VOL +/–, see page 5.
To turn off the menu display
Press OPTIONS or RETURN twice.
b
Depending on the disc, the screen size you can
select differs.
CHARGEPOWER
OPTIONSDISPLAY RETURNMENU
VOL
C/X/x/c
ENTER
OPTIONS
RETURN
VOL +/–
ENTER RETURN
LCD Mode
Contrast
LCD Aspect
Hue
10
Backlight 10
Full
0
10Color
Select: Cancel:
Default
items

20
US
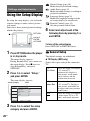
Settings and Adjustments
Using the Setup Display
By using the setup display, you can make
various settings to items such as picture
and sound.
Some discs have stored playback settings,
which take priority.
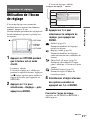
1 Press OPTIONS when the player
is in stop mode.
The menu display appears.
During Resume Play, you cannot use
the setup display. Press x twice to
clear Resume Play, and press
OPTIONS.
2 Press X/x to select “Setup,”
and press ENTER.
The setup display appears.
3 Press X/x to select the setup
category and press ENTER.
: General Setup (page 20)
Makes the player-related settings.
: Audio Setup (page 21)
Makes the audio settings according to
playback conditions.
: Language Setup (page 21)
Makes the language settings for the
on-screen display or sound track.
: Parental Control (page 22)
Sets the parental control limit.
4 Select and adjust each of the
following items by pressing X/x
and ENTER.
To turn off the setup display
Press OPTIONS or RETURN twice.
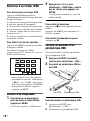
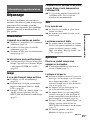
General Setup
The default settings are underlined.
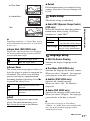
◆ TV Display (DVD only)
Selects the aspect ratio of the connected
TV.
CHARGEPOWER
OPTIONSDISPLAY RETURNMENU
VOL
C/X/x/c
ENTER
OPTIONS
RETURN
x
General Setup
TV Display
Angle Mark
16 : 9
On
OnScreen Saver
Select:
DivX
Default
ENTER RETURN
Cancel:
setup category items
4:3
Pan Scan
Select this when you connect
a 4:3 screen TV.
Automatically displays a
wide picture on the entire
screen and cuts off the
portions that do not fit.
4:3
Letter Box
Select this when you connect
a 4:3 screen TV. Displays a
wide picture with bands on
the upper and lower portions
of the screen.
16:9
Select this when you connect
a wide-screen TV or a TV
with a wide mode function.
La page est en cours de chargement...
La page est en cours de chargement...
La page est en cours de chargement...
La page est en cours de chargement...
La page est en cours de chargement...
La page est en cours de chargement...
La page est en cours de chargement...
La page est en cours de chargement...
La page est en cours de chargement...
La page est en cours de chargement...
La page est en cours de chargement...
La page est en cours de chargement...
La page est en cours de chargement...
La page est en cours de chargement...
La page est en cours de chargement...
La page est en cours de chargement...
La page est en cours de chargement...
La page est en cours de chargement...
La page est en cours de chargement...
La page est en cours de chargement...
La page est en cours de chargement...
La page est en cours de chargement...
La page est en cours de chargement...
La page est en cours de chargement...
La page est en cours de chargement...
La page est en cours de chargement...
La page est en cours de chargement...
La page est en cours de chargement...
La page est en cours de chargement...
La page est en cours de chargement...
La page est en cours de chargement...
La page est en cours de chargement...
La page est en cours de chargement...
La page est en cours de chargement...
La page est en cours de chargement...
La page est en cours de chargement...
La page est en cours de chargement...
La page est en cours de chargement...
La page est en cours de chargement...
La page est en cours de chargement...
La page est en cours de chargement...
La page est en cours de chargement...
La page est en cours de chargement...
La page est en cours de chargement...
La page est en cours de chargement...
La page est en cours de chargement...
La page est en cours de chargement...
La page est en cours de chargement...
-
 1
1
-
 2
2
-
 3
3
-
 4
4
-
 5
5
-
 6
6
-
 7
7
-
 8
8
-
 9
9
-
 10
10
-
 11
11
-
 12
12
-
 13
13
-
 14
14
-
 15
15
-
 16
16
-
 17
17
-
 18
18
-
 19
19
-
 20
20
-
 21
21
-
 22
22
-
 23
23
-
 24
24
-
 25
25
-
 26
26
-
 27
27
-
 28
28
-
 29
29
-
 30
30
-
 31
31
-
 32
32
-
 33
33
-
 34
34
-
 35
35
-
 36
36
-
 37
37
-
 38
38
-
 39
39
-
 40
40
-
 41
41
-
 42
42
-
 43
43
-
 44
44
-
 45
45
-
 46
46
-
 47
47
-
 48
48
-
 49
49
-
 50
50
-
 51
51
-
 52
52
-
 53
53
-
 54
54
-
 55
55
-
 56
56
-
 57
57
-
 58
58
-
 59
59
-
 60
60
-
 61
61
-
 62
62
-
 63
63
-
 64
64
-
 65
65
-
 66
66
-
 67
67
-
 68
68


Sony DVP-FX935 Mode d'emploi
- Catégorie
- Lecteurs DVD
- Taper
- Mode d'emploi
dans d''autres langues
Documents connexes
-
Sony DVP-FX955 Mode d'emploi
-
-
-
Sony DVP-FX770 Le manuel du propriétaire
-
-
-
-
-
Sony DVP-FX730 Le manuel du propriétaire
-