
Instruction #1035772D-1/6
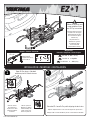
EZ+1
Weight limits
-JNJUFTEFDIBSHFNFOUt-ÓNJUFTEFQFTP
40lbs / 18.1kgPer Bike
=
$POUFOUTt$POUFOVt$POUFOJEP
4X
4X
4X
2X
1X
1X
1X
1X
1X
EZ+1 1X
21
Open Dr.Tray levers, slide both
wheeltrays back. Close the levers.
Ouvrir les leviers
des plateaux et
repousser les deux
plateaux. Rabattre
les leviers.
Abra las palancas
del Dr.Tray y deslice
ambas bandejas de
ruedas hacia atrás.
Cierre las palancas.
Place the EZ+1 onto Dr.Tray while aligning the four holes.
Déposer le plateau EZ+1 sur le cadre en alignant les quatre trous.
Coloque el EZ+1 encima del Dr.Tray con los cuatro orificios alineados.
A
C
B
B
Follow all warnings and
usage guidelines from
your Dr.Tray instructions.
Respecter toutes les mises
en garde et les consignes
d’utilisation figurant dans
les instructions du porte-
vélo Dr. Tray.
Respete todas las
advertencias y pautas
de utilización de las
instrucciones del
portabicicletas Dr.Tray.
*/45"--"5*0/t.0/5"(&t*/45"-"$*»/
wheel cup 1X
support de roue (x 1)
posarrueda 1X
40lb/18,1kgPor bicicleta
=
18.1kg/40lbs Par vélo
=

Instruction #1035772D-2/6
g. 1
3
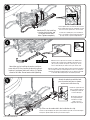
Attach the EZ+1 by installing
a washer, lock washer, and
screw into each of the 4
holes. Tighten completely.
Fixer le plateau EZ+1 en insérant une vis munie
d’une rondelle plate et d’une rondelle de sécurité
dans chacun des quatre trous. Serrer à fond.
Instale una arandela plana, una arandela de
cierre y un tornillo en cada uno de los 4 orificios
para fijar el EZ+1. Apriete completamente.
10 ft-lbs
4
5
Attach the wheel cup with the lock
post. Insert the lock post as shown,
and secure it with the e-clip.
Installer le support de roue.
Insérer l’axe tel qu’illustré
et le bloquer à l’aide de
l’anneau élastique.
Fije el posarrueda con
la espiga de bloqueo.
Introduzca la espiga
como se ilustra y
asegúrela con el clip E.
Tip: Pliers can be used to aid in the installation of e-clip.
Conseil: on peut employer des pinces pour faciliter la pose des anneaux élastiques.
Consejo: Es posible utilizar alicates para instalar el clip E.
Attach the arm by installing the washer and short
screw in the EZ+1 tray (ensure the plastic bushing is
in place, if not locate and install (see fig. 1)). Tighten
screw to 10-12 Nm. Do not loosen after tightening.
Monter le bras en posant la vis courte et sa rondelle dans
le plateau EZ+1 (vérifier que la douille en plastique est en
place, sinon, la trouver et la poser ; voir la fig. 1). Serrez
la vis à 10-12 Nm. Ne pas la desserrer après l’avoir serré.
Utilice la arandela y el tornillo corto para fijar el brazo a la bandeja
EZ+1 (asegúrese de que el buje de plástico esté en su sitio, de lo
contrario, localícelo e instálelo (véase la fig. 1)). Apretar el tornillo
a 10-12 Nm. No lo afloje después de haberlo apretado.
10-12 Nm

Instruction #1035772D-3/6
B
A
1
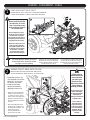
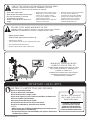
LOAD HEAVIEST BIKE FIRST.
CHARGER LE VÉLO LE PLUS LOURD EN PREMIER.
CARGUE PRIMERO LA BICICLETA MÁS PESADA.
If a fender prevents proper placement
of the wheel hook, remove the fender
for proper and safe loading.
Si la présence d'une aile empêche de
positionner le crochet correctement,
enlever l'aile pour pouvoir charger le
vélo de manière sécuritaire.
Si un guardabarros impide la colocación
correcta del gancho de rueda, saque el
guardabarros para cargar la bicicleta de
manera adecuada y segura.
%POPUJOTUBMMJGZPVSCJLF
IBTBnBUUJSFPSBTMPX
MFBL-PTUUJSFQSFTTVSF
BGUFSJOTUBMMNBZSFTVMUJO
BOJOTFDVSFMPBE
/FQBTFNQMPZFSTJMFQOFV
EVWÏMPFTUËQMBUPVQSÏTFOUF
VOFGVJUFMFOUF-BQFSUFEF
QSFTTJPOEBOTMFQOFVBQSÒTMF
DIBSHFNFOUQPVSSBJUSFOESFMF
DIBSHFNFOUOPOTÏDVSJUBJSF
/PJOTUBMFMBCJDJDMFUBTJÏTUB
UJFOFVOBSVFEBQJODIBEBP
VOBQFRVF×BQÏSEJEBEFBJSF
4JEFTQVÏTEFMBJOTUBMBDJØO
FMOFVNÈUJDPTFEFTJOnB
MBCJDJDMFUBQVFEFRVFEBS
DBSHBEBEFNBOFSBJOTFHVSB
C
B
A
2
t Rotate the pivot arm up
until the hook rests on the
bike tire 1” or less from
the brakes or the fork.
t Compress the hook
against the wheel by
applying firm pressure.
'BJMVSFUPQMBDF
XIFFMIPPLJOUIF
DPSSFDUQPTJUJPO
DBODBVTFZPVS
CJDZDMFUPFKFDU
BOEDBVTFQFSTPOBM
JOKVSZQSPQFSUZ
EBNBHFPSEFBUI
SWING PIVOT ARM INTO PLACE.
t Redresser le bras pivotant de
manière que le crochet porte
sur le pneu à 2,5cm (1po) ou
moins du frein ou de la fourche.
t Appuyer le crochet contre le
pneu en appliquant une bonne
pression.
BASCULER LE BRAS PIVOTANT EN PLACE.
4JMhPOOFQMBÎBJUQBTMF
DSPDIFUDPSSFDUFNFOU
MFWÏMPQPVSSBJUUPNCFS
FUQSPWPRVFSEFT
EPNNBHFTEFTCMFTTVSFT
PVNÐNFMBNPSU
t Gire el brazo de pivote hasta
que el gancho se apoye en el
neumático de la bicicleta, a 25
mm (1") de los frenos.
t Presione firmemente el
gancho contra la rueda.
LLEVE EL BRAZO DE PIVOTE A SU POSICIÓN.
4JOPTFDPMPDBFM
HBODIPEFSVFEBFO
MBQPTJDJØODPSSFDUB
MBCJDJDMFUBTFQVFEF
DBFSDBVTBOEPEB×PT
materiales, heridas
DPSQPSBMFTPJODMVTP
MBNVFSUF
-0"%*/(t$)"3(&.&/5t$"3("

Instruction #1035772D-4/6
3
t Rotate the wheel slightly, if necessary.
t Feed the strap through the spokes of wheel.
t Pull hard to tighten the wheelstrap.
SECURE REAR WHEEL STRAP.
ENFILER LA SANGLE DANS LA ROUE ARRIÈRE.
ASEGURE LA CORREA DE LA RUEDA TRASERA.
t Au besoin, tourner un peu la roue.
t Enfiler la sangle à travers les rayons de la roue.
t Tirer fort pour tendre la sangle.
t Gire un poco la rueda, si es necesario.
t Pase la correa entre los rayos de la rueda.
t Tire con fuerza para apretar la correa de la rueda.
B C
A
Access locking cables
near the pivot arms. Pull
the cable out, and pass it
through one wheel, around
the frame, through the other
wheel, and to the lock post.
Then lock it. Repeat for your
other bike if applicable.
Sortir le câble de verrouillage qui se trouve près du bras
pivotant. L’enfiler à travers une roue, puis le cadre, puis
l’autre roue pour le ramener à l’axe du support de roue.
Le verrouiller. Répéter au besoin pour l’autre vélo.
Access locking cables near the pivot arms. Pull the
cable out and pass it through one wheel, around the
frame, through the other wheel, and to the lock post.
Then lock it. Repeat for your other bike if applicable.
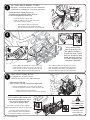
4
t Alternate bike direction.
t Refer to steps 2 through 5 to load your other bikes.
LOAD ADDITIONAL BIKES.
t Charger chaque vélo dans le sens inverse du précédant.
t Consulter les opérations 2 à 5 pour charger les autres vélo.
CHARGER LES AUTRES VÉLOS.
t Alterne la dirección de las bicicletas.
t Consulte los pasos 2 a 5 para cargar las otras bicicletas.
CARGUE LAS BICICLETAS ADICIONALES.
5
A
B
If you have bike to bike interference
when loading multiple bikes, adjust
trays as necessary to eliminate
interference between bikes.
Si les vélos se touchent, on peut régler les
plateaux pour éloigner les vélos les uns des autres.
Si una vez cargadas hay interferencia
entre las bicicletas, ajuste las bandejas lo
necesario para eliminar la interferencia.
Les plateaux doivent
obligatoirement être réglés
entre les lignes “max”.
Trays must be set
between max lines.
Las bandejas deben
quedar fijadas entre
las líneas MAX.

Instruction #1035772D-5/6
t Push hooks against tires.
t Rear wheels secured by ratchet straps.
t Be sure all hardware is secured
according to instructions.
t Always secure pivot arm when tray is
empty.
CHECK THE INSTALLATION BEFORE DRIVING AWAY.
t Appuyer les crochets contre les pneus.
t Vérifier que les roues arrière sont bien
retenues par les sangles crantées.
t S'assurer que le montage est solide et
conforme aux instructions.
t Toujours immobiliser le bras pivotant si
un vélo n'est pas chargé.
VÉRIFIER LE MONTAGE AVANT DE PRENDRE LA ROUTE.
t Empuje los ganchos contra los neumáticos.
t Las ruedas traseras deben estar
aseguradas por correas de cremallera.
t Cerciórese de que todo el equipo está
asegurado según las instrucciones.
t Siempre asegure el brazo de pivote
cuando la bandeja está vacía.
VERIFIQUE LA INSTALACIÓN ANTES DE PARTIR.
SECURE PIVOT ARMS WHEN NOT IN USE.
t Rotate pivot arm down.
t Slide the hook against the rear wheel cup.
IMMOBILISER LE BRAS PIVOTANT SI UN VÉLO N’EST PAS CHARGÉ.
t Rabattre le bras pivotant.
t Faire coulisser le crochet contre le support de roue arrière.
ASEGURE LOS BRAZOS DE PIVOTE CUANDO NO SE USAN.
t Gire el brazo de pivote hacia adentro.
t Deslice el gancho contra el posarrueda trasero.
WHEN NOT CARRYING BIKES
ALWAYS FOLD DR.TRAY UP.
CUANDO NO TRANSPORTA BICICLETAS,
SIEMPRE MANTENGA EL DR.TRAY
PLEGADO HACIA ARRIBA.
QUAND ON NE TRANSPORTE PAS DE VÉLO,
TOUJOURS RELEVER LE PORTE-VÉLO
CONTRE LE VÉHICULE.
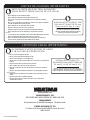
DR.TRAY IS LIMITED TO 40 LBS. PER BIKE.
IMPORTANT LOAD LIMITS:
%POPUVTFXJUIBIJUDIFYUFOEFS
%POPUVTFXJUIBwIJUDIBEBQUFS
%POPUJOTUBMMPOUSBJMFSTDBNQFSTPS37T
%POPUJOTUBMMJGTQBSFUJSFDBVTFTJOUFSGFSFODFXJUICJLFTPSGPMEFEDBSSJFS
/PUGPSVTFPOCJLFTXJUIGSPOUGFOEFST
/FWFSESJWFPGGSPBEXJUICJDZDMFTMPBEFE
%POPUQPTJUJPOCJDZDMFUJSFTOFBSWFIJDMFTIPUFYIBVTU
%POPUVTFBOBVUPNBUFEDBSXBTIXJUIDBSSJFSJOTUBMMFE
BIKES:
t.BLFTVSFZPVSUJSFTBSFmMMFEUPSFDPNNFOEFEQSFTTVSFGPVOEPOUIFUJSF
t%POPUDBSSZUBOEFNPSSFDVNCFOUCJLFT
t%POPUUSBOTQPSUCJDZDMFTXJUIBUUBDIFECBCZTFBUTQBOOJFSTXIFFMDPWFST
GVMMCJLFDPWFSTPSNPUPST
INSTALL THIS PRODUCT
ON 2" AND 1 1/4" HITCH
RECEIVERS ONLY.
In addition, some undersized
receivers may not accept this
product. If you do not know the
capabilities of your hitch receiver,
consult an automotive professional.

Instruction #1035772D-6/6
AVEC LE PORTE-VÉLO DR. TRAY, AUCUN DES
VÉLOS NE DOIT PESER PLUS DE 18,1 KG (40 LB).
LIMITES DE CHARGES IMPORTANTES
N’INSTALLER CE PRODUIT QUE
SUR UN ATTELAGE DE 51 mm
(2 po) ou de 32 mm (1 ¼ po).
Par ailleurs, il est possible que certains attelages
plus petits n’acceptent pas ce produit. Si l’on ne
connaît pas la solidité du tube d’attelage du véhicule,
consulter un professionnel de l’automobile.
EL PORTABICICLETAS DR.TRAY SE LIMITA
A 18,1 KG (40 LB) POR BICICLETA.
LÍMITES DE CARGA IMPORTANTES:
INSTALE ESTE PRODUCTO
SOLAMENTE EN RECEPTORES DE
51 mm (2”) O DE 32 mm (1 ¼”).
Además, ciertos receptores de menor tamaño pueden no
aceptar este producto. Si usted no conoce la capacidad de su
receptor de enganche, consulte un profesional en automóviles.
t
/FQBTFNQMPZFSBWFDVOFSBMMPOHFEBUUFMBHF
t /FQBTFNQMPZFSEBEBQUBUFVSQPVSBUUFMBHFEFøNNøøQP
t
/FQBTQPTFSDFQPSUFWÏMPTVSVOFSFNPSRVFVOFBVUPDBSBWBOFPVVOWÏIJDVMF
SÏDSÏBUJG
t /FQBTQPTFSDFQPSUFWÏMPTJMBQSÏTFODFEFMBSPVFEFTFDPVSTHÐOFMFDIBSHFNFOU
EFTWÏMPTPVFNQÐDIFEFSFMFWFSMFQPSUFWÏMP
t /FQBTFNQMPZFSBWFDEFTWÏMPTNVOJTEVOFBJMFBWBOU
t /FKBNBJTSPVMFSIPSTSPVUFTJEFTWÏMPTTPOUDIBSHÏT
t ²MPJHOFSMFTQOFVTEFTWÏMPTEFMBDIBMFVSEFMÏDIBQQFNFOUEVWÏIJDVMF
t /FQBTFOUSFSEBOTVOMBWFBVUPBVUPNBUJRVFTJMFQPSUFWÏMPFTUJOTUBMMÏ
VÉLOS :
t 4BTTVSFSRVFMFTQOFVTTPOUHPOnÏTËMBQSFTTJPOSFDPNNBOEÏFJOEJRVÏFTVSMFnBOD
t /FQBTUSBOTQPSUFSEFUBOEFNTPVEFWÏMPTTVSCBJTTÏTiDPVDIÏTw
t /FQBTUSBOTQPSUFSEFCJDZDMFUUFTNVOJFTEVOTJÒHFEFCÏCÏEFTBDPDIFTEF
IPVTTFTEFSPVFTEVOFIPVTTFEFWÏMPDPNQMÒUFPVEVONPUFVS
t /PMPVTFDPOVOBMBSHBEPSEFFOHBODIF
t
/PMPVTFDPOVOBEBQUBEPSEFFOHBODIFEFi
t /PMPJOTUBMFFOSFNPMRVFTDBTBTSPEBOUFTP37
t /PMPJOTUBMFTJMBSVFEBEFBVYJMJPJOUFSmFSFDPOMBTCJDJDMFUBTPFMQPSUBCJDJDMFUBT
QMFHBEP
t /PUSBOTQPSUFCJDJDMFUBTRVFUFOHBOVOBBMFUBEFMBOUFSB
t /VODBDPOEV[DBGVFSBEFMBSVUBDBSHBEPEFCJDJDMFUBT
t &WJUFRVFMPTOFVNÈUJDPTEFMBCJDJDMFUBRVFEFODFSDBEFMFTDBQFDBMJFOUFEFM
WFIÓDVMP
t /PFOUSFBVOMBWBEFSPBVUPNÈUJDPEFWFIÓDVMPTDPOFMQPSUBFRVJQBKFJOTUBMBEP
BICICLETAS:
t "TFHÞSFTFEFRVFTVTOFVNÈUJDPTFTUÏOJOnBEPTDPOMBQSFTJØOJOEJDBEBFOMPT
NJTNPT
t
/PUSBOTQPSUFCJDJDMFUBTFOUÈOEFNPQMFHBCMFT
t /PUSBOTQPSUFCJDJDMFUBTDPOBTJFOUPTQBSBCFCÏTDFTUBTDVCSFSSVFEBT
DVCSFCJDJDMFUBTPNPUPSFT
:",*."130%6$54*/$
4101 KRUSE WAY LAKE OSWEGO, OR 97035-2541 USA
www.yakima.com
:",*."&6301&
Archimedesbaan 25 3439 ME Nieuwegein, The Netherlands
:",*.""6453"-*"15:-5%
17 Hinkler Court Brendale QLD 4500 Brisbane, Australia
1800-143-548
-
 1
1
-
 2
2
-
 3
3
-
 4
4
-
 5
5
-
 6
6


dans d''autres langues
- English: YAKIMA EZ+1 User manual
- Deutsch: YAKIMA EZ+1 Benutzerhandbuch
Documents connexes
Autres documents
-
Electrolux EL4300B Manuel utilisateur
-
LG LRE6323SB Guide d'installation
-
LG DLEY1701V Le manuel du propriétaire
-
Reliable THE DIGITAL VELOCITY V100 Manuel utilisateur
-
Beko TSE 1260 - ANNEXE 22 Manuel utilisateur
-
Haier DWL3525DBBB Manuel utilisateur
-
Haier H CR1 7 Manuel utilisateur
-
Haier DWL4035 Guide d'installation
-