Coby TFTV791 - 7" Tft LCD Tv Manuel utilisateur
- Catégorie
- Téléviseurs portables
- Taper
- Manuel utilisateur

EN
Portable Digital LCD TV
Instruction Manual ............................................Page 2
ES
TV Digital Portátil con Pantalla LCD
Manual de Instrucciones ................................Pagina 36
FR
TV LCD Numérique Portable
Manuel D’instruction .......................................Page 68
Please read carefully before use • Léa el manual antes de usar • Veuillez lire ce livret avant utilisation
For Model No.
TFTV791

Page 2 Table Of Contents
English
Table of Contents Â
THANK YOU .....................................................................................................................................4
Package Contents ..........................................................................................................................4
Features ............................................................................................................................................4
UNIT AT A GLANCE .........................................................................................................................5
Front View ........................................................................................................................................5
Left View ...........................................................................................................................................6
Rear View .........................................................................................................................................6
Using the View Stand ...........................................................................................................7
Remote Control ...............................................................................................................................8
Using the Remote Control ...................................................................................................9
CONNECTIONS AT A GLANCE ....................................................................................................10
Power ..............................................................................................................................................10
Using the AC Adapter ........................................................................................................10
DC Car/Boat Adapter ........................................................................................................11
Using the Rechargeable Battery ......................................................................................11
Connecting the Antenna .............................................................................................................12
Using the Built-In Antenna .................................................................................................13
Using the External Antenna ..............................................................................................14

Page 3 Table Of Contents
English
Audio/Video Connections (optional) .........................................................................................15
Using Headphones or Earphones .....................................................................................15
Audio/Video (AV) Input .....................................................................................................16
GETTING STARTED .........................................................................................................................17
Using the TV for the First Time ......................................................................................................17
Step 1: Set the unit to TV mode. ........................................................................................17
Step 2: Perform a channel scan. ......................................................................................17
Basic TV Controls ...........................................................................................................................18
Changing Channels ..........................................................................................................19
Adjusting the Volume ........................................................................................................19
SYSTEM MENU ...............................................................................................................................20
System Menu Controls ..................................................................................................................20
Picture Setup .......................................................................................................................21
Audio Setup ........................................................................................................................22
Time Setup ...........................................................................................................................22
General Setup ....................................................................................................................23
Channel Setup ....................................................................................................................23
SAFETY NOTICES ...........................................................................................................................25
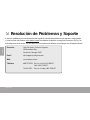
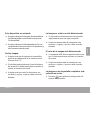
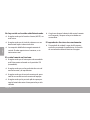
TROUBLESHOOTING & SUPPORT ...................................................................................................31
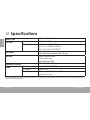
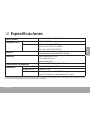
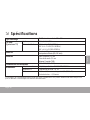
SPECIFICATIONS ...........................................................................................................................34

Page 4 Thank You
English
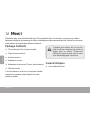
Thank You Â
Congratulations on your purchase of a Coby portable LCD television. This manual is designed to help you easily
set up and begin using your new TV right away. Please read this manual carefully and retain it for future reference.
Package Contents
Coby portable LCD TV (main unit)
AV connection cable
External antenna
AC power adapter
DC power adapter (for the car/boat)
Remote control
If any of the above items are missing, please contact
the dealer from whom you purchased this product.
This package may contain plastic bags or
other materials that pose a hazard to chil-
dren. Be sure to safely dispose of all pack-
ing materials after opening.
Features
to be added from Kat

Page 5 Unit At A Glance
English
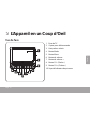
Unit at a Glance Â
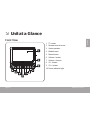
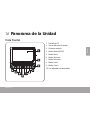
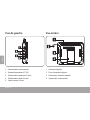
Front View
TV screen1.
Remote control sensor2.
Stereo speakers3.
Mode button4.
Menu button5.
Volume - button6.
Volume + button7.
CH - button8.
CH + button9.
Power indicator light10.

Page 6 Unit At A Glance
English
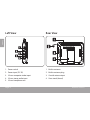
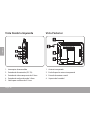
Left View
Power switch1.
Power input (DC 9V)2.
3.5mm composite video input3.
3.5mm stereo audio input4.
3.5mm headphone out5.
Rear View
Built-in antenna1.
Built-in antenna plug2.
Coaxial antenna input3.
View stand (closed)4.

Page 7 Unit At A Glance
English
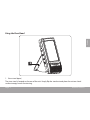
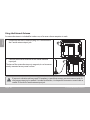
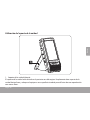
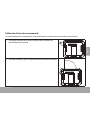
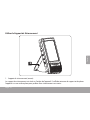
Using the View Stand
1
View stand (open)1.
The view stand is located on the rear of the unit. Simply ip the stand out and place the unit on a level
surface to enjoy hands-free viewing.

Page 8 Unit At A Glance
English
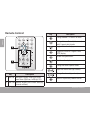
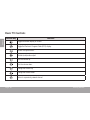
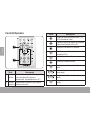
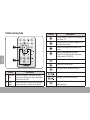
Remote Control
1
2
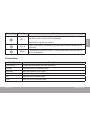
Key Description
1 Nav Pad Navigation keypad. Browse and select
menu items (Up/Down, Left/Right, OK).
2 Num Pad Numeric keypad. Enter numeric data (e.g.,
channel numbers).
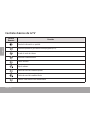
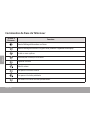
Key Description
Change between TV and AV IN mode.
Change between Normal (widescreen)
and 4:3 aspect ratio formats.
Toggle information display on screen.
Toggle the Electronic Program Guide
(EPG) display.
Access the system menu.
Disable audio output.
Change the audio equalizer mode.
Adjust the volume level (up or down).
Change the channel (up or down).
Return to a previously viewed channel.

Page 9 Unit At A Glance
English
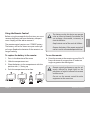
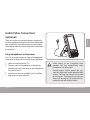
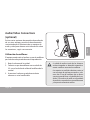
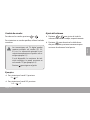
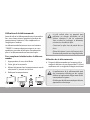
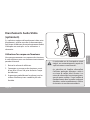
Using the Remote Control
Before using the remote for the rst time, you must
remove the plastic tab from the battery compart-
ment. Simply pull the tab to remove it.
The remote control requires one “CR” battery.
The battery will last for about one year under typi-
cal usage. Replace the batteries if the remote is no
longer working.
To replace the battery in the remote:
Press in the direction of the arrow1.
Slide the compartment out2.
Place the battery in the compartment with the 3.
positive side ( + ) facing up
Push the compartment in to close4.
2
1
4
3
The battery used in this device may present
a re or chemical hazard if mistreated. Do
not recharge, disassemble, incinerate, or
heat the batteries.
Keep batteries out of the reach of children.
Remove the battery if the remote control will
not be in use for an extended period of time.
To use the remote:
Point the remote at the remote sensor of the TV
from a distance of no more than ’ and at an
angle no greater than degrees.
Remote control performance may be ad-
versely aected by bright lights or the
placement of objects between the remote
and the sensor.
Do not use the remote control for other
equipment at the same time.

Page 10 Connections At A Glance
English
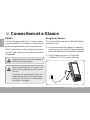
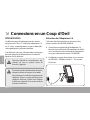
Connections at a Glance Â
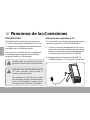
Power
The TV can be powered by AC or DC power sources
(use the included AC or DC adapters, respectively), or
by the rechargeable battery pack for portable use.
If the TV will not be in use for a long period of time,
turn the TV o, unplug it, and remove any batteries,
as applicable.
Complete all system connections (optional)
before connecting the power.
When disconnecting the AC power cord
(mains lead), grasp the plug itself and not
the cord.
To prolong the operating life of the unit,
avoid power-cycling the TV rapidly. When
turning the TV o, wait 30 seconds before
turning the TV on again.
Using the AC Adapter
This unit should be used with AC -V /Hz
wall outlets, only.
Connect one end of the supplied AC adapter to
the Power Input jack of the TV. Connect the other
end of the adapter to an AC -V wall outlet.
The AC adapter operates on AC -V
~/Hz (DC Out: V; current: .A max).

Page 11 Connections At A Glance
English
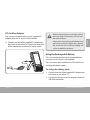
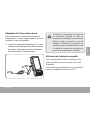
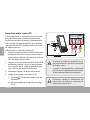
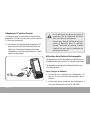
DC Car/Boat Adapter
This unit may be powered using the supplied DC
adapter when an AC outlet is not available.
Connect one end of the supplied DC adapter into
the Power In jack of the TV. Connect the other end
of the adapter into a car/boat DC power socket.
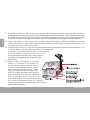
When using the player in a moving vehicle,
route the cords so that they will not inter-
fere with the driver.
Some states restrict the use of monitors and
televisions in vehicles. Where use is permit-
ted, install the unit so that the display will
not be viewable by the driver.
Using the Rechargeable Battery
This unit may be powered by a rechargeable bat-
tery when an AC outlet is not available.
This unit comes preinstalled with a .V lithium-ion
rechargeable battery pack.
To charge the battery pack:
Connect one end of the supplied AC adapter into 1.
the Power In jack of the TV.
Connect the other end of the adapter into an AC 2.
100-240V wall outlet.

Page 12 Connections At A Glance
English
A new or exhausted battery pack should be
charged fully (minimum 4 hours) before its
initial use to ensure optimum lifetime per-
formance.
The battery can be recharged approximate-
ly 300 times without a noticeable decrease
in performance.
If the integrated battery pack does not work
to your expectations, please contact Coby
Technical Support or a qualied service
technician.
Use only the battery supplied with this unit.
Do not disassemble, puncture, impact,
heat, or incinerate the battery.
Do not leave the unit in a car with its win-
dows closed or any place subject to direct
sunlight.
Keep the unit dry.
Dispose of this unit properly.
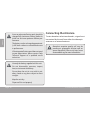
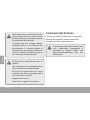
Connecting the Antenna
To view broadcast television channels, a signal must
be received by the unit from either the telescopic
antenna or an external antenna.
Broadcast reception quality will vary de-
pending on geographic location and an-
tenna orientation. Please visit http://www.
AntennaWeb.org for more information.

Page 13 Connections At A Glance
English
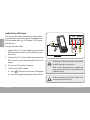
Using the Built-In Antenna
The built-in telescopic antenna is designed for outdoor broadcast reception.
Connect the Built-in antenna plug to the Coaxial antenna input 1.
jack.
Extend the antenna and adjust its orientation for best reception.2.

Page 14 Connections At A Glance
English
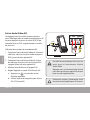
Using the External Antenna
An external antenna is included for indoor use, or for areas where reception is weak.
Disconnect the built-in antenna plug if it is connected to 1.
the Coaxial antenna input jack.
Connect the external antenna to the Coaxial antenna 2.
input jack.
The base of the external antenna is magnetic; it can be conve-
niently mounted on any metal surface.
If you are in a location with very weak TV reception, it is possible to connect your own antenna to the Co-
axial antenna input jack as needed. For indoor installations, it is also possible to connect a coaxial cable or
satellite TV line to the Coaxial antenna input jack.

Page 15 Connections At A Glance
English
Audio/Video Connections
(optional)
There are various connection options depending
on your equipment; please refer to the documenta-
tion supplied by the manufacturer of your Audio/
Video equipment for more connection information
as necessary.
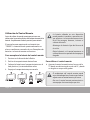
Using Headphones or Earphones
Your TV can output audio to a pair of headphones
or earphones for private listening during playback.
Lower the volume of the TV.1.
Connect a pair of headphones or earphones 2.
terminating in a 3.5mm plug to the Headphone
Out jack of the TV.
Increase the volume gradually until a comfort-3.
able level has been reached.
Audio output to the integrated stereo
speakers will stop automatically when
headphones are connected.
Hearing experts advise against the con-
stant use of personal stereos played at high
volume. Constant high volume use can lead
to hearing loss. If you experience ringing in
the ears or hearing loss, discontinue use im-
mediately and seek medical advice.

Page 16 Connections At A Glance
English
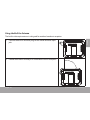
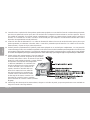
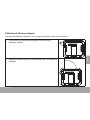
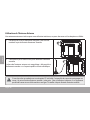
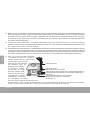
Audio/Video (AV) Input
This unit can be used as a monitor to display video
and audio from external AV devices equipped with
RCA AV output jacks (e.g., DVD players, VCRs, game
consoles, etc.)
Using an AV patch cable:
Connect the TV’s 3.5mm Video input jack to the 1.
RCA composite Video Out jack (yellow) of your
AV device.
Connect the TV’s 3.5mm Audio input jack to the 2.
RCA Stereo Out jacks (red and white) of your AV
device.
Turn on the TV and the AV device.3.
Set the unit to AV IN mode:4.
Press a.
. The Input Source menu will appear.
Use the navigation keypad to choose “AV IN”.b.
AUDIO
OUT
Signal
Yellow
Yellow
Black
VIDEO
OUT
White +
Red
An AV patch cable (included) is required for
Audio/Video input connections.
Refer to the documentation supplied by
your external AV device manufacturer for
additional help.
Always disconnect the power before con-
necting external AV devices.

Page 17 Getting Started
English
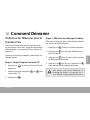
Getting Started Â
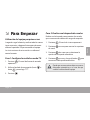
Using the TV for the First Time
After charging the battery and making all necessary
connections, set the Power switch to the ON posi-
tion to turn the TV on.
All instructions given refer to the remote control.
Step 1: Set the unit to TV mode.
Press 1. . The Input Source menu will appear.
Use the navigation keypad (2.
or ) to
choose “TV”.
Press 3.
.
Step 2: Perform a channel scan.
Perform a scan to nd channels that are within
range of reception.
Press 1.
. The System menu will appear.
Press 2.
once to display the Channel options.
Press 3.
twice to choose the Auto Scan option.
Press 4.
once, then press to start the
channel scan.
You may need to perform a channel scan
again if you change the location of the TV.

Page 18 Getting Started
English
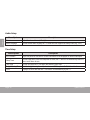
Basic TV Controls
Remote Key Function
Toggle information display on screen.
Toggle the Electronic Program Guide (EPG) display.
Access the system menu.
Disable (mute) audio output.
Turn the volume up.
Turn the volume down.
Change the channel up.
Change the channel down.
Return to a previously viewed channel.

Page 19 Getting Started
English
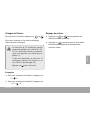
Changing Channels
To browse channels, press or .
To tune to a specic channel, use the numeric
keypad.
Digital TV broadcasts may contain multiple
sub-channels (5-1, 5-2, 5-3, etc). The primary
broadcast is usually carried on the rst sub-
channel (e.g., 5-1).
If available, analog TV broadcasts can be
found on sub-channel “0” (e.g., 5-0).
Press
to enter the dash.
Examples
To tune to channel -, press:
+ + .
To tune to channel -, press:
+ + + .
Adjusting the Volume
Press or to adjust the volume level up
or down, respectively.
Press
to disable the audio output complete-
ly; press again to restore the audio.

Page 20 System Menu
English
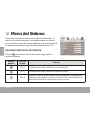
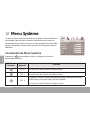
System Menu Â
The system menu allows you to adjust your TV’s options and access
advanced functions. Please read this section carefully before using the
system menu as adjusting options incorrectly may adversely aect the
operation of the TV.
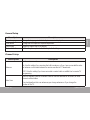
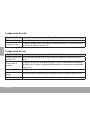
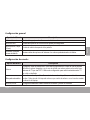
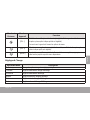
System Menu Controls
Press to access the System menu, then use the following controls.
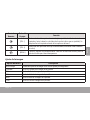
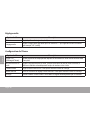
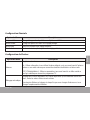
Remote Key Unit Key Function
[CH +] Browse up through the menu options.
[CH –] Browse down through the menu options.
[VOL +]
Increase the value of the selected option (if adjustable; left and right arrows before
and after an option indicates that it is adjustable),
Browse right through the menu options
La page est en cours de chargement...
La page est en cours de chargement...
La page est en cours de chargement...
La page est en cours de chargement...
La page est en cours de chargement...
La page est en cours de chargement...
La page est en cours de chargement...
La page est en cours de chargement...
La page est en cours de chargement...
La page est en cours de chargement...
La page est en cours de chargement...
La page est en cours de chargement...
La page est en cours de chargement...
La page est en cours de chargement...
La page est en cours de chargement...
La page est en cours de chargement...
La page est en cours de chargement...
La page est en cours de chargement...
La page est en cours de chargement...
La page est en cours de chargement...
La page est en cours de chargement...
La page est en cours de chargement...
La page est en cours de chargement...
La page est en cours de chargement...
La page est en cours de chargement...
La page est en cours de chargement...
La page est en cours de chargement...
La page est en cours de chargement...
La page est en cours de chargement...
La page est en cours de chargement...
La page est en cours de chargement...
La page est en cours de chargement...
La page est en cours de chargement...
La page est en cours de chargement...
La page est en cours de chargement...
La page est en cours de chargement...
La page est en cours de chargement...
La page est en cours de chargement...
La page est en cours de chargement...
La page est en cours de chargement...
La page est en cours de chargement...
La page est en cours de chargement...
La page est en cours de chargement...
La page est en cours de chargement...
La page est en cours de chargement...
La page est en cours de chargement...
La page est en cours de chargement...
La page est en cours de chargement...
La page est en cours de chargement...
La page est en cours de chargement...
La page est en cours de chargement...
La page est en cours de chargement...
La page est en cours de chargement...
La page est en cours de chargement...
La page est en cours de chargement...
La page est en cours de chargement...
La page est en cours de chargement...
La page est en cours de chargement...
La page est en cours de chargement...
La page est en cours de chargement...
La page est en cours de chargement...
La page est en cours de chargement...
La page est en cours de chargement...
La page est en cours de chargement...
La page est en cours de chargement...
La page est en cours de chargement...
La page est en cours de chargement...
La page est en cours de chargement...
La page est en cours de chargement...
La page est en cours de chargement...
La page est en cours de chargement...
La page est en cours de chargement...
La page est en cours de chargement...
La page est en cours de chargement...
La page est en cours de chargement...
La page est en cours de chargement...
La page est en cours de chargement...
La page est en cours de chargement...
La page est en cours de chargement...
La page est en cours de chargement...
-
 1
1
-
 2
2
-
 3
3
-
 4
4
-
 5
5
-
 6
6
-
 7
7
-
 8
8
-
 9
9
-
 10
10
-
 11
11
-
 12
12
-
 13
13
-
 14
14
-
 15
15
-
 16
16
-
 17
17
-
 18
18
-
 19
19
-
 20
20
-
 21
21
-
 22
22
-
 23
23
-
 24
24
-
 25
25
-
 26
26
-
 27
27
-
 28
28
-
 29
29
-
 30
30
-
 31
31
-
 32
32
-
 33
33
-
 34
34
-
 35
35
-
 36
36
-
 37
37
-
 38
38
-
 39
39
-
 40
40
-
 41
41
-
 42
42
-
 43
43
-
 44
44
-
 45
45
-
 46
46
-
 47
47
-
 48
48
-
 49
49
-
 50
50
-
 51
51
-
 52
52
-
 53
53
-
 54
54
-
 55
55
-
 56
56
-
 57
57
-
 58
58
-
 59
59
-
 60
60
-
 61
61
-
 62
62
-
 63
63
-
 64
64
-
 65
65
-
 66
66
-
 67
67
-
 68
68
-
 69
69
-
 70
70
-
 71
71
-
 72
72
-
 73
73
-
 74
74
-
 75
75
-
 76
76
-
 77
77
-
 78
78
-
 79
79
-
 80
80
-
 81
81
-
 82
82
-
 83
83
-
 84
84
-
 85
85
-
 86
86
-
 87
87
-
 88
88
-
 89
89
-
 90
90
-
 91
91
-
 92
92
-
 93
93
-
 94
94
-
 95
95
-
 96
96
-
 97
97
-
 98
98
-
 99
99
-
 100
100


Coby TFTV791 - 7" Tft LCD Tv Manuel utilisateur
- Catégorie
- Téléviseurs portables
- Taper
- Manuel utilisateur