HQ Power VDPLP1803RGB Manuel utilisateur
- Catégorie
- Stroboscopes
- Taper
- Manuel utilisateur
Ce manuel convient également à

VD
P
SMAR
T
LED P
A
PAR6
4
FOCO
10m
m
INTEL
DOPP
E
USER
GEBR
U
NOTI
C
MANU
BEDI
E
P
LP18
0
T
LED PAR
6
A
R64 - AB
S
4
LED - AB
S
PAR64 LE
D
m
LEDs
LIGENTER
E
LTE HALT
E
MANUAL
U
IKERSHAN
D
C
E D’EMPLO
I
AL DEL US
U
E
NUNGSANL
E
0
3RG
B
6
4 - ABS -
B
S
- ZWART
-
S
- NOIR -
D
D
INTELIGE
LED PAR6
4
E
RUNG - 1
8
D
LEIDING
I
U
ARIO
E
ITUNG
B
B
LACK - D
O
-
DUBBELE
D
OUBLE
É
T
R
NTE - ABS
4
-SCHEIN
W
8
0 x 10mm
3
9
15
21
27
O
UBLE BRA
C
BEUGEL -
1
R
IER - 180
- NEGRO -
W
ERFER - A
B
LEDs
C
KET - 180
1
80 LEDS
V
LED DE 1
0
DOBLE SO
P
B
S - SCW
W
x 10mm L
E
V
AN 10mm
0
mm
P
ORTE - 18
W
ARZ -
E
Ds
0 x

10.01.2
0
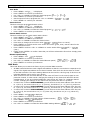
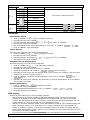
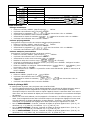
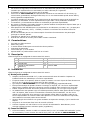
How to
t
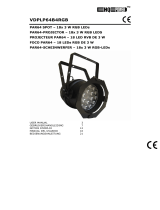
Controll
Modifie
r
Modific
a
Die Con
t
0
11
t
urn the cont
r
er line van 3-
p
r
la ligne du c
o
a
r la línea del
c
t
roller-Linie v
o
r
oller line fro
m
p
in naar 5-pin
o
ntrôleur de 3
c
ontrolador d
e
o
n 3-Pin nach
VDPLP18
0
2
m
3-pins into
5
aanpassen (
s
broches en 5
e
3 polos y 5
p
5-Pin anpass
e
0
3RGB
termi
n
eindwe
e
résista
n
termi
n
termi
n
Termin
5
-pins (plug a
n
s
tekker en co
n
broches (fich
e
p
olos (conect
o
e
n (Stecker u
n
n
ator
e
rstand
n
ce de
n
aison
n
ación
ierung
n
d socket)
n
tact).
e
et contact)
o
r y contacto)
n
d Buchse).
©Velle
m
m
an nv

10.01.2
0
1. In
t
To all r
e
Import
a
T
c
w
t
I
Thank y
o
service.
I
For mor
our we
b
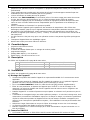
2. Sa
f
• This
quali
• Mak
e
man
u
• Do n
nece
• Resp
• Use
a
• Inst
a
subs
t
• Kee
p
3. Ge
Refer to
t
• Fami
by u
n
of th
e
• All
m
0
11
t
roduction
e
sidents of th
e
a
nt environme
T
his symbol on
c
ould harm the
w
aste; it shoul
d
t
o your distribu
t
I
f in doubt, c
o
o
u for choosing
I
f the device w
a
e info concer
n
b
site www.hq
p
f
ety Instru
c
Be ver
y
electro
s
Always
mainte
n
Indoo
r
liquids.
Keep t
h
Cautio
n
Do not
- ep
- te
m
- pe
There a
service
device falls un
d
fied person car
r
e
sure that the
a
u
al.
ot crimp the po
ssary.
ect a minimum
a
n appropriate
s
a
ll the VDPLP1
8
t
ances. Keep th
p
the air vents f
r
neral Guid
e
t
he Velleman
®
Keep th
are cle
a
the ope
Protect
liarise yourself
n
qualified peopl
e
device.
m
odifications of
t
e
European Un
ntal informati
the device or t
h
environment.
D
d
be taken to a
t
or or to a local
o
ntact your lo
c
HQ-power! Ple
a
a
s damaged in
t
n
ing this prod
u
p
ower.eu.
c
tions
y
careful during
s
hocks.
disconnect mai
n
ance activities
r
use only. Kee
h
is device away
n
: device heats
stare directl
y
ileptic seizure i
n
m
porarily loss
o
rmanent (irrev
e
re no use
r
-ser
v
and/or spare p
a
d
er protection cl
r
y out the elect
r
a
vailable voltag
wer cord and p
r
distance of 0.5
s
afety cable to
f
8
03RGB at a
m
e VDPLP1803
R
r
ee at all times.
e
lines
®
Service and
Q
is device away
a
r at all times.
F
nings.
this device fro
m
with the functi
o
e. Any damage
t
he device are
f
VDPLP18
0
3
User m
ion
on about this
h
e package indi
D
o not dispose
o
specialized co
m
recycling servi
c
c
al waste disp
o
a
se read the m
a
t
ransit, do not i
n
u
ct and the la
t
the installation
ns power when
are performed.
p this device a
w
from children
a
up during use.
y
at the light s
o
n
sensitive peo
p
o
f sight (flash bl
e
rsible) eye da
m
v
iceable parts i
n
a
rts.
ass I. It is ther
e
r
ic connection.
e does not exc
e
r
otect it agains
t
m between the
f
ix the device (
e
m
inimal distanc
e
R
GB at a mini
m
Never cover t
h
Q
uality Warr
a
from dust and
e
F
or sufficient ai
r
m
shocks and a
b
o
ns of the devic
e
that may occu
r
f
orbidden for sa
f
0
3RGB
anual
product
cates that disp
o
o
f the unit (or
b
m
pany for recycl
c
e. Respect the
o
sal authoriti
e
a
nual thoroughl
y
n
stall or use it
a
t
est version o
f
: touching live
w
device not in u
Handle the po
w
w
ay form rain,
m
a
nd unauthorize
o
urce, as this
m
p
le
indness)
m
age
n
side the device
e
fore essential
t
e
ed the voltage
t
damage. Hav
e
device’s light
o
e
.g. VDLSC7 o
r
e
of 0.5 m from
m
al distance of
1
h
e device, nor p
a
nty on the last
e
xtreme heat.
M
r
circulation, le
a
b
use. Avoid bru
t
e
before actuall
r
will most prob
f
ety reasons. D
a
o
sal of the devi
c
b
atteries) as un
s
ing. This devic
e
local environm
e
s.
y
before bringin
a
nd contact you
f
this user ma
n
w
ires can cause
se or when ser
v
w
er cord by the
m
oisture, splas
h
d users.
m
ay cause
. Refer to an a
u
t
hat the device
stated in the s
p
e
an authorised
o
utput and any
i
r
VDLSC8).
flammable and
1
m from the li
g
artially, nor co
m
pages of this
m
M
ake sure the v
a
ve at least 1” (
t
e force when
o
y using it. Do n
ably be due to
a
mage caused
b
©Velle
m
c
e after its lifec
y
s
orted municip
a
e
should be retu
ental rules.
g this device in
r dealer.
n
ual, please v
i
life-threatenin
g
v
icing or
plug only.
h
ing and drippi
n
u
thorized deale
r
be earthed. Ha
v
p
ecifications of
t
dealer replace i
lluminated surf
explosive obje
c
g
hted surface.
m
pletely.
m
anual.
entilation open
i
±2.5 cm) in fro
o
perating the d
e
ot allow operat
i
unprofessional
u
b
y user modific
a
m
an nv
y
cle
a
l
rned
to
i
sit
g
n
g
r
for
v
e a
t
his
t if
ace.
c
ts or
i
ngs
nt of
e
vice.
i
on
u
se
a
tions

VDPLP1803RGB
10.01.2011 ©Velleman nv
4
to the device is not covered by the warranty.
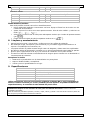
• Mechanical wear is not covered by warranty.
• Only use the device for its intended purpose. All other uses may lead to short circuits, burns,
electroshocks, lamp explosion, crash, etc. Using the device in an unauthorised way will void the
warranty.
• Damage caused by disregard of certain guidelines in this manual is not covered by the warranty and
the dealer will not accept responsibility for any ensuing defects or problems.
• A qualified technician should install and service this device.
• Do not switch the device on immediately after it has been exposed to changes in temperature.
Protect the device against damage by leaving it switched off until it has reached room temperature.
• This device is designed for professional use on stage, in discos, theatres, etc. The VDPLP1803RGB
can be used indoor (<35°C, <75%RH) with an alternating current of max. 240V AC/50Hz.
• Lighting effects are not designed for permanent operation: regular operation breaks will prolong their
lives.
• Use the original packaging if the device is to be transported.
• Keep this manual for future reference.
4. Features
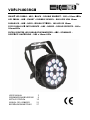
• PAR projector with tricoloured LEDs
• extremely slim design
• 3 smooth dimming modes for a perfect colour mixing
• DMX control via 3, 4 or 9 channels
• built-in programs
• double bracket: can be used as a floor spot
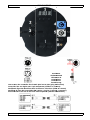
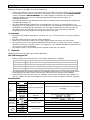
5. Overview
Refer to the illustrations on page 2 of this manual.
1 LCD display 5 power output (PowerCon)
2 DMX output 6 fuse holde
r
3 DMX input 7 attachment point for safety cable
4 power input (PowerCon) 8 GND
6. Installation
Refer to the illustrations on page 2 of this manual.
a) Overhead mounting
• Have the device installed by a qualified person, respecting EN 60598-2-17 and all other applicable
norms.
• The construction to which the device is attached should be able to support 10 times the weight of
the device for one hour without deformation.
• The installation must always be secured with a secondary attachment e.g. a safety cable [7].
• Never stand directly below the device when it is being mounted, removed or serviced. Have a
qualified technician check the device once a year and once before you bring it into service.
• Install the device in a location with few passers-by and inaccessible to unauthorised persons.
• Overhead mounting requires extensive experience: calculating workload limits, determining the
installation material to be used… Have the material and the device itself checked regularly. Do not
attempt to install the device yourself if you lack these qualifications as improper installation may
result in serious injuries.
• For truss-mounting, use an appropriate clamp (not incl.) and fit an M10 bolt through the centre of
the (folded) bracket.
• Adjust the desired inclination angle via the mounting bracket and tighten the bracket screws.
b) DMX-512 connection
• When applicable, connect an XLR cable to the female 3-pin XLR output of a controller (not incl.)
and the other side to the male 3-pin XLR input of the VDPLP1803RGB. Multiple
VDPLP1803RGB’s can be linked through serial linking. The linking cable should be a dual core,
screened cable with XLR input and output connectors.
• Maximum recommended serial data link distance is 500 meters (1640 ft). Maximum recommended
number of fixtures on a serial data link is 32 fixtures.
• A DMX terminator is recommended for installations where the DMX cable has to run a long distance
or is in an electrically noisy environment (e.g. discos). The terminator prevents corruption of the
digital control signal by electrical noise. The DMX terminator is simply an XLR plug with a 120Ω
resistor between pins 2 and 3, which is then plugged into the XLR output socket of the last device
in the chain.

VDPLP1803RGB
10.01.2011 ©Velleman nv
5
c) general
• Make sure there is no flammable material within a 50cm radius of the device and there is sufficient
cooling.
• Have a qualified electrician carry out the electrical connection.
• First connect the PowerCon plug to the power input [4], and then connect the device to the mains.
• All fixtures must be powered directly off a grounded switched circuit and cannot be run off a
rheostat or dimmer circuit, even if the rheostat or dimmer channel is used solely for 0% to 100%
switch.
• The installation has to be approved by an expert before the device is taken into service.
7. Operation
Refer to the illustrations on page 2 of this manual.
Control Panel Navigation
• Access the control panel functions using the four panel buttons located directly underneath the LCD
display.
button function
<MENU> used to access the menu or to return to a previous menu option
<ENTER> used to select and store the current menu or option within the menu
<UP> scrolls through the menu options in ascending orde
r
<DOWN> scrolls through the menu options in descending orde
r
• The control panel LCD shows the menu items you select from the menu map. When a menu
function is selected, the display will show immediately the first available option for the selected
menu function. To select a menu item, press <ENTER>.
• Use the <UP> and <DOWN> buttons to navigate the menu map and menu options. Press
<ENTER> to access the menu function currently displayed or to enable a menu option. To return to
the previous option or menu without changing the value, press the <MENU> button.
Menu Functions
menu sub-menu function description
built-in programs
select between switching and fading built-in
programs
speed
set speed of built-in programs (
~ )
address
set DMX address ( ~ )
channel mode
select 3-channel DMX mode
select 4-channel DMX mode
select 9-channel DMX mode
dimming speed
no dimming speed
fast dimming speed
middle dimming speed
slow dimming speed
red
select between 7 static colours
green
blue
cyan
magenta
yellow
white
red custom colour red ( ~ )
green
custom colour green ( ~ )
blue custom colour blue ( ~ )
strobe speed
add strobe effect (
~ )

VDPLP1803RGB
10.01.2011 ©Velleman nv
6
Stand-Alone Mode
Auto Mode
• Press <MENU> until is displayed.
• Press <ENTER> to confirm your selection.
• Use <UP> or <DOWN> to select the desired program (
~ ).
• Press <ENTER> to confirm your selection.
• Set the speed of built-in programs via <UP> or <DOWN> (
~ )
• Press <MODE> to confirm your selection.
Preset Colours
This device has pre-programmed static colours.
• Press <MENU> until is displayed.
• Press <ENTER> to confirm your selection.
• Use <UP> or <DOWN> to select the desired program (
~ ).
• Press <ENTER> to confirm your selection.
Custom Static Colours
This device allows you to create custom static colours.
• Press <MENU> until is displayed.
• Press <ENTER> to confirm your selection.
• Use <UP> or <DOWN> to select the desired colour.
• Press enter to change the red colour value (
~ , from 0 to 100%).
• Press <ENTER> to confirm and to move to the next colour (green, blue). Set the value for the
second and third colour.
• Press <ENTER> and use <UP> or <DOWN> to set the strobe effect (off) ~
(max.).
• Finally, press <ENTER> to confirm. Note that you will have selected the first colour. Simply press
<MENU> to exit.
Dimmer speed setting
• Press <MENU> until
is displayed.
• Press <ENTER> to confirm your selection.
• Use <UP> or <DOWN> to select the desired dimmer speed ( ,
~ ).
• Press <ENTER> to confirm your selection.
DMX Mode
This mode allows you to control the fixture by any universal DMX controller.
• All DMX-controlled devices need a digital start address so that the correct device responds to the
signals. This digital start address is the channel number from which the device starts to “listen”
to the DMX controller. The same starting address can be used for a whole group of devices or an
individual address can be set for every device.
• When all devices have the same address, all the units will “listen” to the control signal on one
particular channel. In other words: changing the settings of one channel will affect all devices
simultaneously. If you set individual addresses, each device will “listen” to a separate channel
number. Changing the settings of one channel will only affect the device in question.
• In case of the 3-channel VDPLP1803RGB, you will have to set the start address of the first unit
to 1 (CH1~3), the second unit to 4 (1 + 3) (CH4~6), the third to 7 (4 + 3) (CH7~9), and so on.
• In case of the 4-channel VDPLP1803RGB, you will have to set the start address of the first unit
to 1 (CH1~4), the second unit to 5 (1 + 4) (CH5~8), the third to 9 (5 + 4) (CH9~12), and so on.
• In case of the 9-channel VDPLP1803RGB, you will have to set the start address of the first unit
to 1 (CH1~9), the second unit to 10 (1 + 9) (CH10~18), the third to 19 (10 + 9) (CH19~27),
and so on.
• Press <MENU> until is displayed.
• Press <ENTER> to confirm your selection.
• Use <UP> or <DOWN> to set the number of DMX channels ( , or )
• Press <MENU> until is displayed.
• Press <ENTER> to confirm your selection.
• Use <UP> or <DOWN> to select the desired DMX starting address ( ~ ).

VDPLP1803RGB
10.01.2011 ©Velleman nv
7
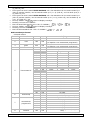
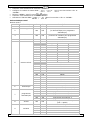
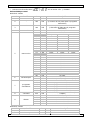
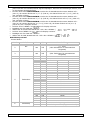
DMX Channel Values
9-Channel Mode
channel function from to description
1 master dimmer 000 255 0 ~ 100%
2 red 000 255
0 ~ 100%
(or step time for auto program)
3 green 000 255
0 ~ 100%
(or fade time for auto program)
4 blue 000 255 0 ~ 100%
5 colour macros
000 010 no function
red green blue
011 255 100%
S
0%
031 050
T
100% 0%
051 070 0% 100%
S
071 090 0%
T
100%
091 110
S
0% 100%
111 130 100% 0%
T
131 150 100%
S S
151 170
T T
100%
171 200 100% 100% 100%
white
201 205 3200K
206 210 3400K
211 215 4200K
216 220 4900K
221 225 5600K
226 230 5900K
231 235 6500K
236 240 7200K
241 245 8000K
246 250 8500K
251 255 10 000K
6 strobe
000 009 strobe off
010 255 strobe 0 ~20Hz (slow ~fast)
7 auto programs
000 051 no function
052 101 auto program 1
102 152 auto program 2
153 203 auto program 3
204 254 auto program 4
255 - auto program 5
8 speed 000 255 speed of auto programs (slow ~ fast)
9 dimmer
000 051 default dimmer speed
052 101 linear dimmer
102 152 non-linear dimmer 1
153 203 non-linear dimmer 2
204 255 non-linear dimmer 3
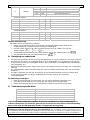
4-Channel Mode
channel function from to description
1 master dimmer 000 255 0 ~ 100%
2 red 000 255 0 ~ 100%
3 green 000 255 0 ~ 100%
4 blue 000 255 0 ~ 100%

VDPLP1803RGB
10.01.2011 ©Velleman nv
8
3-Channel Mode
channel function from to description
1 red 000 255 dimmer 0 ~ 100%
2 green 000 255 0 ~ 100%
3 blue 000 255 0 ~ 100%
Master/Slave Mode
This mode allows control several units simultaneously.
• Use standard DMX cables to daisy-chain your units together via the DMX connector on the rear of
each fixture. For longer cable runs we suggest using a terminator on the last fixture.
• Choose the first unit in the chain to function as the master fixture. Press <MENU> and choose a
mode (
, or ).
• On each of the connected slave units, set the same channel mode as the master (via ).
• Set the DMX address of all slave units to 1 ( ).
8. Cleaning and maintenance
• All screws should be tight and free of corrosion.
• The housing, the lenses, the mounting supports and the installation location (e.g. ceiling, suspension,
trussing) should not be deformed, modified or tampered with e.g. do not drill extra holes in mounting
supports, do not change the location of the connections …
• Mechanically moving parts must not show any signs of wear and tear.
• The electric power supply cables must not show any damage. Have a qualified technician maintain
the device.
• Regularly remove dust from the housing and the air vents using a slightly damp cloth.
• There are no user-serviceable parts inside. Refer to an authorized dealer for service and/or spare
parts.
Fuse Replacement
• Wedge the fuse holder out of its housing with a flat-head screwdriver.
• Remove the damaged fuse from its holder and replace with exact same type of fuse.
• Insert the fuse holder back in its place and reconnect power.
9. Technical specifications
power supply 240 VAC ~ 50 Hz
power consumption 45 W
LEDs 18x high-power 3W tri-colour LEDs
beam angle 20°
dimensions 255 x 255 x 80mm
weight 3.5 kg
Use this device with original accessories only. Velleman nv cannot be held responsible in the
event of damage or injury resulted from (incorrect) use of this device. The information in this
manual is subject to change without prior notice.
© COPYRIGHT NOTICE
The copyright to this manual is owned by Velleman nv. All worldwide rights reserved.
No part of this manual or may be copied, reproduced, translated or reduced to any electronic medium or
otherwise without the prior written consent of the copyright holder.

10.01.2
0
1. Inl
Aan all
e
Belangr
w
t
Hebt u
v
Dank u
v
toestel b
e
Voor m
e
www.h
q
2. Ve
i
• Dit t
o
gesc
h
• De b
han
d
• De v
o
kabe
• Zorg
opp
e
• Maa
k
• Inst
a
of st
o
• Zorg
bede
3. Al
g
Raadple
e
0
11
eiding
e
ingezetenen
v
ijke milieu-in
f
Dit symbool op
w
eggeworpen,
d
batterijen) niet
t
erechtkomen
v
recyclagepunt
b
v
ragen, conta
c
v
oor uw aankoo
p
e
schadigd tijde
n
e
er informatie
q
power.eu.
i
ligheidsin
s
Wees v
o
dodelij
k
Trek de
en als
u
Gebrui
k
opspatt
Houd di
Let op:
Kijk nie
t
- ep
- tij
d
- pe
te ver
m
Er zijn
g
reserve
o
estel valt ond
e
h
oolde technicu
eschikbare net
s
d
leiding.
o
edingskabel
m
l plaatsen.
voor een mini
m
e
rvla
k
k
het toestel va
s
a
lleer het toest
e
o
ffen. Houd het
dat de ventilat
i
kken.
g
emene ric
h
e
g de Vellema
n
Besche
r
gerake
n
GEBR
U
v
an de Europ
e
f
ormatie betr
e
het toestel of
d
d
it toestel scha
d
bij het gewone
v
oor recyclage.
b
rengen. Respe
c
c
teer dan de p
p
! Lees deze h
a
n
s het transpor
t
over dit prod
u
s
tructies
o
orzichtig bij d
e
k
e elektroshock
s
stekker uit het
u
het niet gebru
k
het toestel en
k
ende vloeistoff
e
t toestel uit de
dit toestel wor
t
rechtstreeks i
n
ilepsieaanvalle
n
d
elijke blindhei
d
rmanente en o
n
m
ijden.
g
een door de g
e
onderdelen, co
n
e
r bescherming
s
s moet de elek
t
s
panning mag n
m
ag niet bescha
d
m
umafstand va
n
s
t met een ges
c
e
l op een minim
toestel op een
i
eopeningen no
o
h
tlijnen
n
®
service- en
r
m tegen stof e
n
n
. Voorzie een r
VDPLP18
0
9
U
IKERSH
A
e
se Unie
e
ffende dit pr
o
d
e verpakking g
e
d
e kan toebren
g
huishoudelijke
U moet dit toes
c
teer de plaats
e
laatselijke au
t
a
ndleiding gron
d
t
, installeer het
u
ct en de me
e
e
installatie: ra
a
s
te vermijden.
stopcontact (t
r
ikt.
k
el binnenshu
e
n.
buurt van kind
e
dt zeer warm ti
j
n
de lichtbron
o
n
bij gevoelige
p
d
(flitsblindheid
)
n
herroepelijke
s
e
bruiker vervan
g
n
tacteer uw de
a
s
klasse I, wat
w
t
rische aansluiti
iet hoger zijn d
a
d
igd zijn of ing
e
n
0,5 m tussen
c
hikte veiligheid
umafstand van
minimumafsta
n
o
it verstopt zij
n
kwaliteitsgar
a
n
extreme hitte
uimte van min
s
0
3RGB
A
NDLEI
D
o
duct
e
eft aan dat, al
s
g
en aan het mil
afval; het moe
t
tel naar uw ver
e
lijke milieuwet
g
t
oriteiten bet
r
d
ig voor u het t
o
dan niet en ra
a
e
st recente ve
r
a
k geen kabels
a
r
ek niet aan de
is. Bescherm t
e
e
ren en onbevo
e
j
dens het gebr
u
o
m
p
ersonen
)
s
chade aan de
o
g
bare onderdel
e
a
ler.
w
il zeggen dat h
e
ng verzorgen.
a
n de spanning
e
kort worden. L
a
de lichtuitgang
skabel (bv. VD
0,5 m van ont
v
n
d van 1 m van
n
. U mag het to
e
a
ntie achteraa
n
. Zorg dat de v
e
s
tens 2,5 cm tu
s
D
ING
s
het na zijn le
v
ieu. Gooi dit to
e
t
bij een gespe
c
deler of naar e
e
g
eving.
r
effende de ve
o
estel in gebrui
k
a
dpleeg uw dea
l
r
sie van deze
h
a
an die onder s
t
kabel!) voorda
t
e
gen regen, vo
c
e
gden.
u
ik.
o
gen
e
n in dit toestel
e
t toestel geaa
r
in de specifica
t
a
at uw dealer z
o
van het toestel
LSC7 of VDLS
C
v
lambare en ex
p
het belichte op
e
stel nooit ged
e
n
deze handleid
i
e
rluchtingsope
n
s
sen het toestel
©Velle
m
v
enscyclus wor
d
e
stel (en event
u
c
ialiseerd bedrij
f
e
n lokaal
rwijdering.
k
neemt. Werd
l
er.
h
andleiding, z
t
room staan o
m
t
u het toestel r
e
c
htigheid en
. Voor onderho
u
r
d moet zijn. Ee
t
ies achteraan
d
o
nodig een nie
en het belicht
e
C
8).
p
losieve voorw
e
pervlak.
e
eltelijk of volle
d
i
ng.
n
ingen niet vers
t
en elk ander o
m
an nv
d
t
u
ele
f
het
ie
m
e
inigt
u
d of
n
d
e
uwe
e
e
rpen
d
ig
t
opt
bject.

VDPLP1803RGB
10.01.2011 ©Velleman nv
10
Bescherm tegen schokken en vermijd brute kracht tijdens de bediening.
• Leer eerst de functies van het toestel kennen voor u het gaat gebruiken. Ongeschoolde personen
mogen dit toestel niet gebruiken. Meestal is beschadiging het gevolg van onprofessioneel gebruik.
• Om veiligheidsredenen mag u geen wijzigingen aanbrengen. Schade door wijzigingen die de
gebruiker heeft aangebracht valt niet onder de garantie.
• Mechanische slijtage valt niet onder de garantie.
• Gebruik het toestel enkel waarvoor het gemaakt is. Andere toepassingen kunnen leiden tot kort-
sluitingen, brandwonden, elektrische schokken, enz. Bij onoordeelkundig gebruik vervalt de garantie.
• De garantie geldt niet voor schade door het negeren van bepaalde richtlijnen in deze handleiding en
uw dealer zal de verantwoordelijkheid afwijzen voor defecten of problemen die hier rechtstreeks
verband mee houden.
• Laat dit toestel installeren en onderhouden door een geschoolde technicus.
• Om beschadiging te vermijden, zet u het toestel best niet aan onmiddellijk nadat het werd blootgesteld
aan temperatuurschommelingen. Wacht tot het toestel op kamertemperatuur gekomen is.
• Dit toestel is ontworpen voor professioneel gebruik op podia, in disco's, enz. U mag dit toestel enkel
binnenshuis gebruiken (<35°C, <75%RH). Sluit aan op 240 VAC/50 Hz.
• Lichteffecten zijn niet ontworpen voor continue werking: regelmatige onderbrekingen doen ze langer
meegaan.
• Gebruik de oorspronkelijke verpakking wanneer u het toestel vervoert.
• Bewaar deze handleiding voor verdere raadpleging.
4. Eigenschappen
• PAR-projector met driekleurige leds
• zeer smal design
• 3 vloeiende dimfuncties voor een perfecte kleurenmenging
• ingebouwde programma's
• DMX-sturing via 3, 4 of 9 kanalen
• dubbele beugel: geschikt voor gebruik als vloerspot
5. Overzicht
Raadpleeg de figuren op pagina 2 van deze handleiding.
1 lcd-display 5 voedingsuitgang (PowerCon)
2 DMX-uitgang 6 zekeringhoude
r
3 DMX-ingang 7 bevestiging veiligheidskabel
4 voedingsingang (PowerCon) 8 GND-aansluiting
6. Installatie
Raadpleeg de figuren op pagina 2 van deze handleiding.
a) Het toestel monteren
• Laat een geschoolde technicus dit toestel installeren conform EN 60598-2-17 en andere
toepasselijke normen.
• De constructie waaraan het toestel wordt bevestigd, moet gedurende 1 uur 10 x het gewicht van
dit toestel kunnen dragen zonder te vervormen.
• Maak het toestel ook vast met een veiligheidskabel [7].
• Sta nooit recht onder het toestel wanneer u het monteert, verwijdert of schoonveegt. Laat het
toestel controleren door een geschoolde technicus voor u het in gebruik neemt en laat het 1 x per
jaar volledig nakijken.
• Installeer dit toestel op een plaats waar niemand langs moet lopen, kan neerzitten of het toestel
kan aanraken.
• Een degelijke praktijkervaring is vereist voor de plaatsing van dit toestel. U moet de
maximumbelasting van de draagconstructie kunnen berekenen, weten welk constructiemateriaal u
kunt gebruiken en u moet het gebruikte materiaal en het toestel af en toe laten nakijken. Monteer
het toestel niet zelf indien u er geen ervaring mee heeft. Een slechte montage kan leiden tot
verwondingen.
• Regel de gewenste invalshoek door middel van de montagebeugel en draai de regelschroeven
stevig aan.
• Een geschoolde elektricien moet het toestel aansluiten.
• Sluit het toestel via de stekker aan op het lichtnet. Sluit het niet aan op een dimmerpack.

VDPLP1803RGB
10.01.2011 ©Velleman nv
11
b) DMX512-aansluiting
Raadpleeg de figuren op pagina 2 van deze handleiding.
• Indien van toepassing, sluit een XLR-kabel aan de vrouwelijke 3-pin XLR-uitgang van een controller
(niet meegelev.) en de andere kant van de mannelijke 3-pin XLR-ingang van de VDPLP1803RGB.
U kunt verscheidene VDPLP1803RGB’s aan elkaar koppelen met behulp van een seriële
koppeling. Gebruik daarvoor een 2-aderige afgeschermde kabel met XLR ingang- en
uitgangsaansluitingen.
• De maximaal aanbevolen kabellengte is 500 meter, het aanbevolen maximumaantal toestellen op
eenzelfde aansluiting is 32.
• Een DMX eindweerstand is aanbevolen als de DMX-kabel vrij lang is of wordt gebruikt in een
omgeving met veel elektrische ruis (bv. een discotheek). De eindweerstand voorkomt corruptie van
het digitale controlesignaal door elektrische ruis. De DMX eindweerstand is niets meer dan een
XLR-stekker met een weerstand van 120 Ω van pin 2 naar 3. Deze XLR-stekker wordt dan
aangesloten op de XLR-uitgang van het laatste toestel in de reeks.
c) algemeen
• Verwijder alle brandbaar materiaal in een straal van 0,5 m rond het toestel en voorzie voldoende
koeling.
• Een geschoolde elektricien moet het toestel aansluiten.
• Steek eerst de PowerCon-stekker in de ingang [4] en koppel het toestel aan het lichtnet.
• Alle toestellen moet via een geaard stopcontact gevoed worden en mogen niet via een variabele
weerstand of dimcircuit gevoed worden, ook al gebruikt u de variabele weerstand of het dimcircuit
als een 0% tot 100% inschakeling.
• De installatie moet voor het eerste gebruik gekeurd worden door een expert.
7. Gebruik
Raadpleeg de figuren op pagina 2 van deze handleiding.
Het bedieningspaneel
• Bedien het paneel met behulp van de vier toetsen onderaan de lcd-display.
toets functie
<MENU> toegang tot het menu of terugkeer naar het vorige menu
ENTER> selectie en bevestiging van een optie
<UP> scroll door de verschillende menuopties in stijgende volgorde
<DOWN>< scroll door de verschillende menuopties in dalende volgorde
• De geselecteerde menufunctie wordt op de lcd-display weergegeven. De lcd-display geeft ook de
eerstvolgende menuoptie onder de functie weer. Selecteer een menuoptie met <ENTER>.
• Scroll doorheen het menu met <UP> en <DOWN>. Selecteer de menufunctie met <ENTER> en
druk op <MENU> om naar het hoofdmenu terug te keren zonder de waarde te hebben gewijzigd.
Menufuncties
menu submenu functie omschrijving
interne programma’s
interne programma’s met plotselinge of geleidelijke
overgang
snelheid
snelheid van interne programma’s
(
~ )
adres
DMX-adres ( ~ )
kanaalmodus
3-kanaals DMX-sturing
44-kanaals DMX-sturing
9-kanaals DMX-sturing
dimsnelheid
geen dimsnelheid
hoge snelheid
gemiddelde snelheid

VDPLP1803RGB
10.01.2011 ©Velleman nv
12
lage snelheid
rood
kies tussen 7 statische kleuren
groen
blauw
cyaan
magenta
geel
wit
rood schakering rood ( ~ )
groen schakering groen ( ~ )
blauw
schakering blauw ( ~ )
stroboscoopsnelheid
stroboscoopeffect (
~ )
Standalone
Automatische sturing
• Druk op <MENU> tot op de lcd-display verschijnt.
• Bevestig uw keuze met <ENTER>.
• Kies het gewenste programma (
~ ) met <UP> en <DOWN>.
• Bevestig uw keuze met <ENTER>.
• Stel de snelheid van de interne programma’s in met <UP> of <DOWN> (
~ ).
• Druk op <MODE> om te bevestigen.
Interne kleuren
Deze projector heeft een reeks statische presetkleuren.
• Druk op <MENU> tot op de lcd-display verschijnt.
• Bevestig uw keuze met <ENTER>.
• Kies het gewenste programma (
~ ) met <UP> en <DOWN>.
• Bevestig uw keuze met <ENTER>.
Aanmaken van een statische kleur
Met deze projector kunt u zelf kleuren aanmaken.
• Druk op <MENU> tot op de lcd-display verschijnt.
• Bevestig uw keuze met <ENTER>.
• Selecteer de gewenste kleur met <UP> of <DOWN>.
• Wijzig de kleurwaarde met <ENTER> (
~ , van 0 tot 100%).
• Bevestig uw keuze en ga naar de volgende kleur (groen, blauw) met <ENTER>. Geef nu ook de
waarde voor de twee volgende kleuren in.
• Druk op <ENTER> en stel het stroboscoopeffect in met <UP> of <DOWN> ( (uit) ~
(max.)).
• Bevestig vervolgens met <ENTER>. De eerste kleur is opnieuw geselecteerd. Druk op <MENU>
om het menu te verlaten.
Dimmer speed setting
• Druk op <MENU> tot op de display verschijnt.
• Bevestig uw keuze met <ENTER>.
• Kies de gewenste dimsnelheid met <UP> of <DOWN> ( ,
~ ).
• Bevestig uw keuze met <ENTER>.
DMX-sturing
Sturing van het toestel via een universele DMX-controller.
• Alle DMX-gestuurde toestellen hebben een digitaal startadres nodig, zodat het juiste toestel
reageert op de signalen. Dit digitale startadres is het kanaalnummer van waarop het toestel
‘luistert’ naar het signaal van de DMX controller. U kunt één enkel startadres gebruiken voor een
groep toestellen of u kunt per toestel een nieuw startadres ingeven.
• Wanneer u een enkel startadres instelt, zullen alle toestellen ‘luisteren’ naar hetzelfde kanaal. Met
andere woorden: wanneer u de instellingen voor 1 kanaal verandert, zullen alle toestellen er
tegelijk op reageren. Wanneer u verschillende adressen instelt, dan luistert elk toestel naar een
ander kanaal. Met andere woorden: wanneer u de instellingen van een kanaal verandert, zal enkel
het toestel op dat kanaal reageren.
• In het geval van de 3-kanaals VDPLP1803RGB, zult u het startadres van het eerste toestel op 1

VDPLP1803RGB
10.01.2011 ©Velleman nv
13
(CH1~3) moeten instellen, van het tweede toestel op 4 (1 + 3) (CH4~6), van het derde op 7 (4 +
3) (CH7~9), enz.
• In het geval van de 4-kanaals VDPLP1803RGB, zult u het startadres van het eerste toestel op 1
(CH1~4) moeten instellen, van het tweede toestel op 5 (1 + 4) (CH5~8), van het derde op 9 (5 +
4) (CH9~12), enz.
• In het geval van de 9-kanaals VDPLP1803RGB, zult u het startadres van het eerste toestel op 1
(CH1~9) moeten instellen, van het tweede toestel op 10 (1 + 9) (CH10~18), van het derde op 19
(10 + 9) (CH19~27), enz.
• Druk op <MENU> tot op de lcd-display verschijnt.
• Bevestig uw keuze met <ENTER>.
• Kies het aantal DMX-kanalen met <UP> of <DOWN> ( , of )
• Druk op <MENU> tot op de lcd-display verschijnt.
• Bevestig uw keuze met <ENTER>.
• Kies het DMX-startadres met <UP> of <DOWN> ( ~ ).
DMX-waarden per kanaal
9-kanaals modus
kanaal functie van tot
omschrijving
1 masterdimmer 000 255 0 ~ 100%
2 rood 000 255
0 ~ 100%
(of stapduur voor automatisch programma)
3 groen 000 255
0 ~ 100%
(of fadeduur voor automatisch programma)
4 blauw 000 255 0 ~ 100%
5 kleurenmacro’s
000 010 geen functie
rood groen blauw
011 255 100%
S
0%
031 050
T
100% 0%
051 070 0% 100%
S
071 090 0%
T
100%
091 110
S
0% 100%
111 130 100% 0%
T
131 150 100%
S S
151 170
T T
100%
171 200 100% 100% 100%
wit
201 205 3200K
206 210 3400K
211 215 4200K
216 220 4900K
221 225 5600K
226 230 5900K
231 235 6500K
236 240 7200K
241 245 8000K
246 250 8500K
251 255 10 000K
6 stroboscoop
000 009 stroboscoop uit
010 255 stroboscoop 0 ~20Hz (traag ~ snel)
7
automatische
programma’s
000 051 geen functie
052 101 automatisch programma 1
102 152 automatisch programma 2
153 203 automatisch programma 3
204 254 automatisch programma 4
255 - automatisch programma 5
8 snelheid 000 255
snelheid automatisch programma (traag ~
snel)

VDPLP1803RGB
10.01.2011 ©Velleman nv
14
9 dimmer
000 051 standaard dimsnelheid
052 101 lineaire dimmer
102 152 niet-lineaire dimmer 1
153 203 niet-lineaire dimmer 2
204 255 niet-lineaire dimmer 3
4-kanaals modus
kanaal functie van tot omschrijving
1 masterdimme
r
000 255 0 ~ 100%
2 rood
000 255 0 ~ 100%
3 groen
000 255 0 ~ 100%
4 blauw
000 255 0 ~ 100%
3-kanaals modus
kanaal functie van tot omschrijving
1 rood
000 255 0 ~ 100%
2 groen
000 255 0 ~ 100%
3 blauw
000 255 0 ~ 100%
Master-slavesturing
Simultane sturing van meerdere toestellen.
• Koppel uw toestellen aan elkaar met behulp van standaard DMX-kabels. Gebruik een
eindweerstand op het laatste toestel bij langere kabellengtes.
• Kies het eerste toestel in de reeks als mastertoestel. Druk op <MENU> en kies een
aanstuurmodus (
, of ).
• Kies dezelfde kanaalmodus op elk slavetoestel als die van het mastertoestel (via ).
• Stel het DMX-adres van alle slavetoestellen op 1 ( ).
8. Reiniging en onderhoud
• Alle gebruikte schroeven moeten goed zijn aangespannen en mogen geen sporen van roest vertonen.
• De behuizing, de lenzen, de montagebeugels en de montageplaats (bv. het plafond of het gebinte)
mogen niet vervormd zijn of aangepast worden (geen extra gaten in montagebeugels, aansluitingen
niet verplaatsen etc.)
• Mechanisch bewegende delen mogen geen sporen van slijtage vertonen en mogen niet onregelmatig
bewegen.
• De voedingskabels mogen niet beschadigd zijn. Laat het toestel onderhouden door een geschoolde
technicus.
• Verwijder regelmatig het stof van de behuizing en de ventilatieopeningen met een vochtige doek.
• U mag geen onderdelen vervangen. Raadpleeg uw erkende verdeler voor eventuele
reserveonderdelen.
De zekering vervangen
• Maak de zekeringhouder los met behulp van een schroevendraaier met platte punt.
• Verwijder de oude zekering en vervang door een zekering van hetzelfde type.
• Plaats de zekeringhouder terug in het toestel en koppel het toestel aan het lichtnet.
9. Technische specificaties
voeding
240 VAC ~ 50 Hz
verbrui
k
45 W
leds
18 driekleurige, high-power leds van 3 W
stralingshoe
k
20°
afmetingen
255 x 255 x 80 mm
gewicht
3,5 kg
Gebruik dit toestel enkel met originele accessoires. Velleman nv is niet aansprakelijk voor
schade of kwetsuren bij (verkeerd) gebruik van dit toestel. De informatie in deze handleiding
kan te allen tijde worden gewijzigd zonder voorafgaande kennisgeving.
© AUTEURSRECHT
Velleman nv heeft het auteursrecht voor deze handleiding. Alle wereldwijde rechten voorbehouden. Het is
niet toegestaan om deze handleiding of gedeelten ervan over te nemen, te kopiëren, te vertalen, te bewerken en
op te slaan op een elektronisch medium zonder voorafgaande schriftelijke toestemming van de rechthebbende.

10.01.2
0
1. In
t
Aux rés
i
Des inf
o
l’environ
n
Nous vo
u
l’apparei
l
revende
u
Pour pl
u
visiter
n
2. Co
n
• Cet
a
Un t
e
• La t
e
noti
c
• Le c
â
reno
u
• Resp
illum
• Fixe
r
• Inst
a
ou e
x
• Ne j
a
3. Di
r
Se référ
e
0
11
t
roduction
i
dents de l'Un
i
o
rmations env
i
Ce symbole su
r
peut polluer l'
e
éventuelles) p
a
l’appareil en q
u
recyclage local
n
ement. En ca
s
u
s remercions d
l
. Si l’appareil a
u
r.
u
s d’informati
o
n
otre site web
n
signes de
Ê
tre pr
u
électro
c
Débran
c
débran
c
Utiliser
projecti
Garder
Attenti
Ne pas
- de
- d’
a
- d’
e
Il n’y a
éventu
e
a
ppareil ressort
e
chnicien qualif
i
e
nsion réseau n
e
c
e.
â
ble d’alimentat
u
veler le câble
d
ecter une dista
n
inée.
r
l’appareil à l’ai
a
ller le VDPLP1
x
plosif. Installe
r
a
mais obstruer
l
r
ectives gé
n
e
r à la garanti
e
Protége
fentes
d
entre l
e
Protége
N
O
i
on européen
n
i
ronnemental
e
r
l'appareil ou l'
e
nvironnement.
a
rmi les déchet
s
u
estion. Renvo
y
. Il convient de
s
de question
s
e votre achat !
été endomma
g
o
n concernan
t
www.hqpow
e
sécurité
u
dent lors de l’i
n
c
hocs mortels.
c
her l’appareil
s
c
her l'appareil ;
cet appareil un
ons d’eau.
hors de la port
é
on : le boîtier
d
regarder direct
e
crise d’épilepsi
a
veuglement te
m
e
ndommageme
n
aucune pièce
m
e
lles chez votre
à la classe de
p
i
é doit établir la
e
peut pas dép
a
ion ne peut pa
s
d
’alimentation
s
n
ce minimum d
de d’un câble d
803RGB à une
r
le VDPLP180
3
l
es fentes d’aér
a
n
érales
e
de service et
r contre la pou
s
d
e ventilation n
e
e
projecteur et t
r contre les ch
o
VDPLP18
0
15
O
TICE D
n
e
e
s importante
s
emballage indi
q
Ne pas jeter u
n
s
municipaux n
o
y
er les équipem
e
respecter la ré
g
s
, contacter le
s
Lire la présent
e
g
é pendant le tr
t
cet article et
e
r.eu.
n
stallation : tou
s
’il n’est pas util
non pas le câb
l
iquement à l'i
é
e de personne
s
d
u spot chauffe
e
ment dans la
s
e chez les pers
o
m
poraire (aveu
n
t permanent e
t
m
aintenable par
revendeur.
p
rotection I, ce
connexion éle
c
a
sser la tension
s
être replissé o
s
i nécessaire.
e 0,5 m entre l
a
e sécurité adéq
distance mini
m
3
RGB à une di
s
a
tion.
É
viter de
de qualité Ve
s
sière. Protége
r
e
soient pas blo
out autre objet
.
o
cs et le traiter
a
0
3RGB
’EMPLO
I
s
concernant
c
q
ue que l’élimin
n
appareil élect
r
o
n sujets au tri
e
nts usagés à
v
g
lementation lo
c
s
autorités lo
c
e
notice attenti
v
ansport, ne pa
s
la version la
p
cher un câble s
isé ou pour le
n
l
e.
ntérieur. Prot
é
s
non qualifiées
pendant l’usag
e
s
ource lumineu
s
o
nnes sujettes
glement par éc
l
t
irréversible d
e
l’utilisateur. C
o
qui implique qu
c
trique.
mentionnée da
u endommagé.
a
sortie lumièr
e
uat (p.ex. VDL
S
m
ale de 0,5 m d
s
tance minimal
e
couvrir, entièr
e
lleman
®
à la fi
r
contre la chal
e
quées. Laisser
u
.
a
vec circonspe
c
I
c
e produit
ation d’un app
a
r
ique ou électro
n
sélectif ; une d
é
v
otre fournisseu
c
ale relative à l
a
c
ales pour éli
m
v
ement avant la
s
l’installer et c
o
p
lus récente d
ous tension pe
u
n
ettoyer. Tirer l
a
é
ger de la pluie
,
et de jeunes e
n
e
.
s
e afin d’éviter l
l
ai
r
)
e
l’œil
o
mmander des
p
e l’appareil doi
t
ns les spécifica
t
Demander à v
o
e
de l’appareil e
t
S
C7 ou VDLSC
e tout objet ou
e
de 1 m de la
s
e
ment ou parti
e
n de cette noti
c
e
ur extrême. Ve
u
ne distance d
e
c
tion pendant l’
o
©Velle
m
reil en fin de vi
n
ique (et des pi
é
chèterie traite
r
r ou à un servi
c
a
protection de
m
ination.
mise en servic
e
o
nsulter votre
e cette notice
,
u
t causer des
a
fiche pour
,
de l’humidité
e
n
fants.
es risques
p
ièces de recha
n
t
être mis à la t
e
t
ions à la fin de
o
tre revendeur
d
t
la surface
8).
produit inflam
m
s
urface illuminé
e
e
llement, l’appa
r
c
e.
iller à ce que le
e
minimum 2,5
c
o
pération.
m
an nv
e
les
r
a
c
e de
e
de
,
e
t des
n
ge
e
rre.
cette
d
e
m
able
e
.
r
eil.
s
c
m

VDPLP1803RGB
10.01.2011 ©Velleman nv
16
• Se familiariser avec le fonctionnement de l’appareil avant de l’utiliser. Ne pas permettre pas aux
personnes non qualifiées d’opérer cet appareil. La plupart des dégâts sont causés par un usage non
professionnel.
• Toute modification est interdite pour des raisons de sécurité. Les dommages occasionnés par des
modifications par le client ne tombent pas sous la garantie.
• L’usure mécanique ne tombe pas sous la garantie.
• N’utiliser votre VDPLP1803RGB qu’à sa fonction prévue. Tout autre usage peut causer des courts-
circuits, des brûlures, des électrochocs, etc. Un usage impropre annule d'office la garantie.
• La garantie ne s’applique pas aux dommages survenus en négligeant certaines directives de cette
notice et votre revendeur déclinera toute responsabilité pour les problèmes et les défauts qui en
résultent.
• Confier l’installation et l’entretien à un personnel qualifié.
• Ne pas brancher l’appareil après exposition à des variations de température. Afin d’éviter des
dommages, attendre jusqu’à ce que l’appareil ait atteint la température ambiante avant de l’utiliser.
• Cet appareil a été développé pour usage professionnel dans des discothèques, des théâtres, etc.
N’utiliser cet appareil qu’à l’intérieur (<35°C, <75°RH). Le raccorder à une source de courant CA de.
240 VCA/50 Hz.
• Un effet lumineux n’est pas conçu pour une opération continue. Des pauses régulières prolongeront
sa vie.
• Transporter l’appareil dans son emballage originel.
• Garder cette notice pour toute référence ultérieure.
4. Caractéristiques
• projecteur PAR à LED tricolores
• design ultraplat
• 3 modes de variation fluides pour un mixage de couleurs parfait
• programmes intégrés
• pilotage DMX depuis 3, 4 ou 9 canaux
• double étrier : peut être monté sur le sol
5. Description
Se référer aux illustrations à la page 2 de cette notice.
1 afficheur LCD 5 sortie d’alimentation (PowerCon)
2 sortie DMX 6 porte-fusible
3 entrée DMX 7 attache pour câble de sécurité
4 entrée d’alimentation (PowerCon) 8 connexion GND
6. Installation
Se référer aux illustrations à la page 2 de cette notice.
a) Montage de l’appareil
• Un technicien qualifié doit installer l’appareil en respectant EN 60598-2-17 et toute autre norme
applicable.
• La construction portante de l’appareil doit être capable de supporter 10 x le poids de l’appareil
pendant une heure, sans qu’une déformation de la construction en résulte.
• Fixer votre VDPLP1803RGB
à l’aide d’un câble de sécurité [7] (sécurité supplémentaire).
• Éviter de vous positionner en dessous de l’appareil pour l’enlever ou lors du montage ou du
nettoyage. Un technicien qualifié doit réviser l’appareil avant la mise en service. Organiser une
révision minutieuse annuelle.
• Installer l’appareil à un endroit où personne ne peut passer ou s’asseoir et où personne ne peut le
toucher.
• L’installation de cet appareil exige une solide expérience pratique : le calcul de la charge max. de la
construction, les matériaux d’installation requis etc. De temps en temps, un technicien qualifié doit
vérifier la construction portante et l’appareil même. Ne pas essayer d’installer cet appareil vous-
même si vous n’avez pas les qualifications requises ; une installation incorrecte peut entraîner des
blessures.
• Déterminer l’angle d’inclinaison au moyen de l’étrier de montage et serrer les vis de montage.
• Un électricien qualifié doit établir la connexion électrique.
• Brancher l’appareil sur le réseau électrique par la fiche d’alimentation. Ne pas le brancher sur un
bloc de puissance.
b) Connexion DMX512
• Si nécessaire, connecter un câble à fiche XLR à la sortie XLR femelle à 3 broches de votre

VDPLP1803RGB
10.01.2011 ©Velleman nv
17
contrôleur (non incl.) et l’autre fiche XLR mâle à 3 broches à l’entrée du VDPLP1803RGB. Il est
possible de relier plusieurs VDPLP1803RGB
à partir d’une connexion sérielle. Utiliser un câble de
connexion blindé à 2 conducteurs avec des connecteurs d’entrée et de sortie XLR.
• Longueur maximale de la connexion : 500 mètres. Nombre maximal d’unités sur une connexion
sérielle : 32.
• Une résistance de terminaison DMX est à recommander si le câble DMX doit couvrir une grande
distance ou s’il est utilisé dans un environnement avec beaucoup de bruit électrique (p.ex. une
discothèque). La résistance de terminaison prévient la corruption du signal de contrôle numérique
par le bruit électrique. La résistance de terminaison DMX n’est rien d’autre qu’une fiche XLR avec
une résistance de 120 Ω de broche 2 vers broche 3 (voir illustration à gauche). Cette fiche XLR est
connectée à la sortie XLR du dernier appareil de la série.
c) En général
• Enlever tout matériau inflammable dans un rayon de 0,5 m autour de l’appareil et assurer une
ventilation suffisante.
• Un électricien qualifié doit établir la connexion électrique.
• Insérer la fiche PowerCon dans l’entrée [4] et connecter l’appareil au réseau électrique.
• Tout projecteur doit être branché sur une prise de courant mise à la terre et ne peut pas être
alimenté depuis un rhéostat ou un circuit variateur, même si le rhéostat ou le circuit variateur est
utilisé comme un interrupteur marche/arrêt (de 0% à 100%).
• Un expert doit approuver l’installation avant qu’elle puisse être prise en service.
7. Emploi
Se référer aux illustrations en page 2 de cette notice.
Navigation dans le menu
• Accéder aux fonctions en utilisant les touches au bas de l’afficheur LCD.
touche fonction
<MENU> accès au menu ou retour vers le niveau précédent
<ENTER> sélection et sauvegarde d’une option
<UP> défilement du menu de bas en haut
<DOWN> défilement du menu de haut en bas
• L’afficheur LCD affiche les fonctions ainsi que la première option disponible dans la fonction
sélectionnée. Enfoncer la touche <ENTER> pour sélectionner une fonction.
• Faire défiler le menu avec les touches <UP> et <DOWN>. Enfoncer la touche <ENTER> pour
accéder à la fonction sélectionnée ou enfoncer la touche <MENU> pour revenir au niveau
précédent.
Fonctions du menu
menu sous-menu fonction description
programme interne sélection effet à transition subite ou graduelle
vitesse
vitesse de l’effet interne (
~ )
adresse
adressage DMX ( ~ )
mode canal
sélection mode DMX 3 canaux
sélection mode DMX 4 canaux
sélection mode DMX 9 canaux
vitesse de variation
pas de vitesse de variation
vitesse de variation élevée
vitesse de variation moyenne
vitesse de variation basse
rouge
sélectionner une des 7 couleurs statiques
vert
bleu

VDPLP1803RGB
10.01.2011 ©Velleman nv
18
cyan
magenta
jaune
blanc
rouge personnalisation rouge ( ~ )
vert
personnalisation vert ( ~ )
bleu personnalisation bleu ( ~ )
vitesse stroboscope
ajout effet stroboscopique (
~ )
Mode autonome
Pilotage automatique
• Enfoncer la touche <MENU> jusqu’à ce que s’affiche.
• Confirmer votre sélection avec la touche <ENTER>.
• Sélectionner le programme (
~ ) avec les touches <UP> et <DOWN>.
• Confirmer votre sélection avec la touche <ENTER>.
• Sélectionner la vitesse de variation (
~ ) avec les touches <UP> et <DOWN>.
• Confirmer votre sélection avec la touche <MODE>.
Couleurs préprogrammées
Ce projecteur intègre une série de couleurs statiques préprogrammées.
• Enfoncer la touche <MENU> jusqu’à ce que s’affiche.
• Confirmer votre sélection avec la touche <ENTER>.
• Sélectionner le programme (
~ ) avec les touches <UP> et <DOWN>.
• Confirmer votre sélection avec la touche <ENTER>.
Couleurs statiques personnalisées
Ce projecteur vous permet de créer vos propres couleurs.
• Enfoncer la touche <MENU> jusqu’à ce que s’affiche.
• Confirmer votre sélection avec la touche <ENTER >.
• Sélectionner la couleur avec les touches <UP> et <DOWN>.
• Modifier la valeur de la couleur rouge (
~ , de 0 à 100%).
• Confirmer et sélectionner la deuxième couleur (vert, bleu) avec <ENTER>. Configurer la valeur
de la deuxième et troisième couleur.
• Enfoncer <ENTER> et configurer l’effet stroboscopique ( (éteint) ~ (max.)) avec
les touches <UP> et <DOWN>.
• Enfin, confirmer avec <ENTER>. La première couleur sera sélectionnée. Quitter le menu avec la
touche <MENU>.
Vitesse de variation
• Enfoncer <MENU> jusqu’à ce que s’affiche.
• Confirmer votre sélection avec la touche <ENTER>.
• Sélectionner la vitesse de variation ( ,
~ ) avec les touches <UP> et
<DOWN>.
• Confirmer votre sélection avec la touche <ENTER>.
Mode de pilotage DMX
Ce mode permet de piloter votre projecteur sans contrôleur DMX.
• Tous les appareils pilotés par un signal DMX demandent une adresse de départ DMX pour assurer
que les appareils corrects réagissent sur les signaux de contrôle. Cette adresse de départ
numérique indique le numéro de canal sur lequel l’appareil écoute le contrôleur DMX. Vous avez le
choix entre une seule adresse de départ pour toute une série d’appareils ou une adresse de départ
par appareil.
• Dans le cas d’une seule adresse, tous les appareils « écouteront » les mêmes signaux, sur un seul
canal. Tous les appareils seront donc influencés lorsque vous changez les réglages d’un seul canal.
Avec des adresses de départ individuelles, chaque appareil « écoutera » son propre canal. Par
conséquent, un ajustement des réglages d’un canal n’influence que l'appareil sur ce canal.
• Pour le VDPLP1803RGB
à 3 canaux, l’adresse de départ du premier appareil est 1 (CH1~3), du
deuxième 4 (1 + 3) (CH4~6), du troisième 7 (4 + 3) (CH7~9), etc.
• Pour le VDPLP1803RGB
à 4 canaux, l’adresse de départ du premier appareil est 1 (CH1~4), du
deuxième 5 (1 + 4) (CH5~8), du troisième 9 (5 + 4) (CH9~12), etc.
• Pour le VDPLP1803RGB
à 9 canaux, l’adresse de départ du premier appareil est 1 (CH1~9), du
deuxième 10 (1 + 9) (CH10~18), du troisième 19 (10 + 9) (CH19~27), etc.

VDPLP1803RGB
10.01.2011 ©Velleman nv
19
• Enfoncer la touche <MENU> jusqu’à ce que s’affiche.
• Confirmer votre sélection avec la touche <ENTER>.
• Configurer le nombre de canaux DMX ( , or ) avec les touches <UP> et
<DOWN>.
• Enfoncer <MENU> jusqu’à ce que s’affiche.
• Confirmer votre sélection avec la touche <ENTER>.
• Sélectionner l’adresse DMX ( ~ ) avec les touches <UP> et <DOWN>.
Valeurs DMX par canal
Mode 9 canaux
canal fonction de à description
1 variateur maître 000 255 0 ~ 100%
2
rouge
000 255
0 ~ 100%
(ou durée d’étape pour programme
automatique)
3
vert
000 255
0 ~ 100%
(ou durée de variation pour programme
automatique)
4 bleu 000 255 0 ~ 100%
5 macros couleur
000 010 pas de fonction
rouge vert bleu
011 255 100%
S
0%
031 050
T
100% 0%
051 070 0% 100%
S
071 090 0%
T
100%
091 110
S
0% 100%
111 130 100% 0%
T
131 150 100%
S S
151 170
T T
100%
171 200 100% 100% 100%
blanc
201 205 3200K
206 210 3400K
211 215 4200K
216 220 4900K
221 225 5600K
226 230 5900K
231 235 6500K
236 240 7200K
241 245 8000K
246 250 8500K
251 255 10 000K
6 stroboscope
000 009 stroboscope éteint
010 255 stroboscope 0 ~20Hz (lent ~ rapide)
7
programmes
automatiques
000 051 pas de fonction
052 101 programme automatique 1
102 152 programme automatique 2
153 203 programme automatique 3
204 254 programme automatique 4
255 - programme automatique 5
8 vitesse 000 255
vitesse des programmes automatiques
(lent ~ rapide)
9 variation
000 051 vitesse de variation par défaut
052 101 variation linéaire
102 152 variation non linéaire 1
153 203 variation non linéaire 2
204 255 variation non linéaire 3

VDPLP1803RGB
10.01.2011 ©Velleman nv
20
Mode 4 canaux
canal fonction de à description
1
variateur maître 000 255 0 ~ 100%
2 rouge 000 255 0 ~ 100%
3 vert 000 255 0 ~ 100%
4 bleu 000 255 0 ~ 100%
Mode 3 canaux
canal fonction de à description
1 rouge 000 255 0 ~ 100%
2 vert 000 255 0 ~ 100%
3 bleu 000 255 0 ~ 100%
Mode maître/esclave
Ce mode permet le pilotage simultané de plusieurs projecteurs.
• Utiliser des câbles DMX standard et interconnecter vos projecteurs. Nous vous conseillons de
munir le dernier projecteur dans la série d’une résistance de terminaison.
• Configurer le premier projecteur de la série comme appareil maître. Enfoncer la touche <MENU>
et sélectionner un mode ( , ou ).
• Sélectionner le même mode de canal sur chaque appareil esclave comme sur l’appareil maître
(via ).
• Placer l’adresse DMX de tous les appareils esclaves sur 1 ( ).
8. Nettoyage et entretien
• Serrer les écrous et les vis et vérifier qu’ils ne rouillent pas.
• Le boîtier, les lentilles, les supports de montage et la construction portante ne peuvent pas être
déformés, adaptés ou bricolés p.ex. pas de trous additionnels dans un support, ne pas déplacer les
connexions, etc.
• Les parties mécaniques mobiles ne peuvent pas être usées ou bouger de manière irrégulière.
• Les câbles d'alimentation ne peuvent pas être endommagés. Un technicien qualifié doit entretenir
l’appareil.
• Dépoussiérer régulièrement le boîtier et les fentes d’aération avec un chiffon humide.
• Il n’y a aucune pièce maintenable par l’utilisateur. Commander des pièces de rechange éventuelles
chez votre revendeur.
Remplacement du fusible
• Retirer le porte-fusible de son emplacement à l’aide d’un tournevis à lame plate.
• Retirer le fusible usagé et le remplacer par un fusible du même type.
• Réinsérer le porte-fusible dans son emplacement et reconnecter l’alimentation.
9. Spécifications techniques
alimentation
240 VCA ~ 50 Hz
consommation
45 W
LED
18 LED tricolores high-power de 3 W
angle de rayonnement
20°
dimensions
255 x 255 x 80 mm
poids
3,5 kg
N’employer cet appareil qu’avec des accessoires d’origine. SA Velleman ne sera aucunement
responsable de dommages ou lésions survenus à un usage (incorrect) de cet appareil. Toutes
les informations présentées dans cette notice peuvent être modifiées sans notification
préalable.
© DROITS D’AUTEUR
SA Velleman est l’ayant droit des droits d’auteur pour cette notice. Tous droits mondiaux réservés. Toute
reproduction, traduction, copie ou diffusion, intégrale ou partielle, du contenu de cette notice par quelque
procédé ou sur tout support électronique que se soit est interdite sans l’accord préalable écrit de l’ayant droit.
La page est en cours de chargement...
La page est en cours de chargement...
La page est en cours de chargement...
La page est en cours de chargement...
La page est en cours de chargement...
La page est en cours de chargement...
La page est en cours de chargement...
La page est en cours de chargement...
La page est en cours de chargement...
La page est en cours de chargement...
La page est en cours de chargement...
La page est en cours de chargement...
La page est en cours de chargement...
La page est en cours de chargement...
La page est en cours de chargement...
-
 1
1
-
 2
2
-
 3
3
-
 4
4
-
 5
5
-
 6
6
-
 7
7
-
 8
8
-
 9
9
-
 10
10
-
 11
11
-
 12
12
-
 13
13
-
 14
14
-
 15
15
-
 16
16
-
 17
17
-
 18
18
-
 19
19
-
 20
20
-
 21
21
-
 22
22
-
 23
23
-
 24
24
-
 25
25
-
 26
26
-
 27
27
-
 28
28
-
 29
29
-
 30
30
-
 31
31
-
 32
32
-
 33
33
-
 34
34
-
 35
35


HQ Power VDPLP1803RGB Manuel utilisateur
- Catégorie
- Stroboscopes
- Taper
- Manuel utilisateur
- Ce manuel convient également à
dans d''autres langues
- English: HQ Power VDPLP1803RGB User manual
- español: HQ Power VDPLP1803RGB Manual de usuario
- Deutsch: HQ Power VDPLP1803RGB Benutzerhandbuch
- Nederlands: HQ Power VDPLP1803RGB Handleiding
Documents connexes
-
 HQ Power VDPLBTL TRUSSLED 33B Manuel utilisateur
-
HQ Power LX101 Manuel utilisateur
-
HQ Power PAR64 Manuel utilisateur
-
 HQ Power VDPLWB Manuel utilisateur
-
 HQ Power VDPLP64SB Manuel utilisateur
-
HQ Power LED FLOWER BATTEN Manuel utilisateur
-
HQ Power Astar III Manuel utilisateur
-
 HQ Power AGRONA 1203 Manuel utilisateur
-
HQ Power PAR56 Manuel utilisateur
-
 HQ Power VDPLP64B4RGB Manuel utilisateur


