OKI MPS6150C Le manuel du propriétaire
- Catégorie
- Imprimantes laser / LED
- Taper
- Le manuel du propriétaire

Handy Reference
Guide de référence pratique
Referencia Rápida
59402101 my.okidata.com
MPS6150c

2
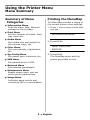
Using the Printer Menu . . . . . . . . . 4
Navigating . . . . . . . . . . . . . . . . . 4
Menu Summary . . . . . . . . . . . . . 5
Tray 1 and Optional Tray 2 . . . . . . 6
Multi-Purpose Tray . . . . . . . . . . . . 7
Exit Trays . . . . . . . . . . . . . . . . . . . 9
Print Media Settings . . . . . . . . . . 10
General Information . . . . . . . . . 10
Selectable Media Weight Settings 11
Print Media . . . . . . . . . . . . . . . . .12
Paper . . . . . . . . . . . . . . . . . . . 12
Transparencies, Labels . . . . . . . 13
Thick Paper, Envelopes . . . . . . . 14
Power Save Mode . . . . . . . . . . . . 15
Control Panel. . . . . . . . . . . . . . . .16
Clearing Media Jams . . . . . . . . . . 17
Duplex (370, 373) . . . . . . . . . . 17
Duplex (371) . . . . . . . . . . . . . . 18
Paper Feed (372, 380, 390). . . . 19
Internal (381) . . . . . . . . . . . . . 20
Paper Tray (391, 392). . . . . . . . 22
Common Error Messages. . . . . . .23
Ordering Replacement Supplies . 25
Service & Support . . . . . . . . . . . . 26
L'utilisation des menus de
l'imprimante . . . . . . . . . . . . . . . .27
Déplacement . . . . . . . . . . . . . . .27
Sommaire Menu. . . . . . . . . . . . .28
Bac 1 et bac 2 optionnel . . . . . . .29
Bac multifonction . . . . . . . . . . . .30
Bacs de sortie . . . . . . . . . . . . . . .32
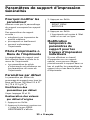
Paramètres de support
d’impression . . . . . . . . . . . . . . .33
Généralités . . . . . . . . . . . . . . . .33
Paramétrage de grammage de
support . . . . . . . . . . . . . . . . . . 34
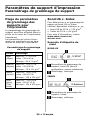
Supports d'impression. . . . . . . . .35
Papier . . . . . . . . . . . . . . . . . . . .35
Transparents, Étiquettes . . . . . . .36
Papier épais, Enveloppes. . . . . . .37
Mode d'économie d'énergie. . . . .38
Panneau de commande . . . . . . . .39
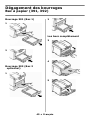
Dégagement des bourrages . . . .40
Duplex (370, 373) . . . . . . . . . . .40
Duplex (371) . . . . . . . . . . . . . . .41
Alimentation papier (372, 380, 390)
42
Interne (381) . . . . . . . . . . . . . .43
Bac à papier (391, 392) . . . . . . .45
Messages d'erreur courants . . . .46
Commande de fournitures. . . . . .48
Service et support . . . . . . . . . . . .49
Contents
Table des matières
59402101

3
Uso el menú de la impresora . . . 50
Navegar . . . . . . . . . . . . . . . . . 50
Resumen de la menú . . . . . . . . 51
Bandeja 1 y Bandeja 2 Opcional .52
Bandeja Multi-Uso. . . . . . . . . . . . 53
Bandejas de salida . . . . . . . . . . .55
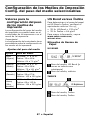
Configuración de los Medios de
Impresión . . . . . . . . . . . . . . . . . . 56
Información general . . . . . . . . . 56
Config. del peso del medio
seleccionables . . . . . . . . . . . . 57
Medios de impresión . . . . . . . . . . 58
Papel. . . . . . . . . . . . . . . . . . . . 58
Transparencias y Etiquetas . . . . 59
Papel grueso y Sobres. . . . . . . . 60
Ahorro de energía . . . . . . . . . . . . 61
Panel de contro . . . . . . . . . . . . . . 62
Solución de atascos. . . . . . . . . . .63
Duplex (370, 373) . . . . . . . . . . 63
Duplex (371) . . . . . . . . . . . . . . 64
Alimentación de papel (372, 380,
390) . . . . . . . . . . . . . . . . . . . 65
Interno (381). . . . . . . . . . . . . . 66
Bandeja de papel (391, 392) . . . 68
Mensajes de errores comunes . . 69
Cómo hacer sus pedidos de
suministros. . . . . . . . . . . . . . . . . 71
Servicio y Soporte . . . . . . . . . . . . 72
Contenido

4 • English
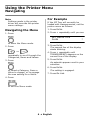
Note
Settings made in the printer
driver will override the printer
menu settings.
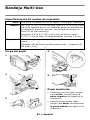
Navigating the Menu
1. Press
to enter the Menu mode.
2. Press
or
repeatedly to scroll through the
Categories, Items and Values.
3. Press
to select a Category, Item or
Value to change, or to engage
the new setting for a Value.
4. Press
to exit the Menu mode.
For Example
If the MP Tray will normally be
loaded with transparencies, set the
printer menu as follows:
1. Press E
NTER
.
2. Press + repeatedly until you see
MPT MEDIA TYPE
PLAIN *
3. Press E
NTER
.
The second line of the display
starts blinking.
4. Press + repeatedly until
TRANSPARENCY appears on the
second line of the display.
5. Press E
NTER
.
An asterisk appears next to your
selection.
6. Press E
NTER
.
The setting is engaged.
7. Press O
N
L
INE
.
Using the Printer Menu
Navigating

5 • English
Summary of Menu
Categories
Information Menu
Print the Menu Map, Network
settings or Demo page.
Print Menu
Set the number of copies, feed
tray used, etc.
Media Menu
Set media size and weight for
the various trays, etc.
Color Menu
Set color density, registration,
etc.
Sys Config Menu
Set power save, timeouts, etc.
USB Menu
Set parameters for USB.
Network Menu
Set network parameters.
Maintenance Menu
Enable power save, and set
other printer parameters.
Usage Menu
Indicates page counts and
remaining life for consumables.
Printing the MenuMap
The MenuMap provides a listing of
the current printer menu settings.
1. Press + one or more times until
you see
INFORMATION MENU
2. Press E
NTER
.
PRINT MENU MAP
EXECUTE
3. Press E
NTER
.
The MenuMap prints and the
printer goes back on line.
Using the Printer Menu
Menu Summary

6 • English
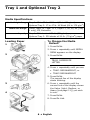
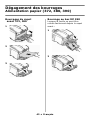
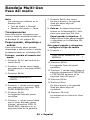
Media Specifications
Loading Paper
1
2
3
4
To Change the Media
Default
1. Press E
NTER
.
2. Press + repeatedly until MEDIA
MENU appears on the display.
3. Press E
NTER
.
TRAY1 PAPERSIZE
LETTER
4. Press + repeatedly until you see
•TRAY1 MEDIAWEIGHT, or
•TRAY2 MEDIAWEIGHT
5. Press E
NTER
.
The second line of the display
starts blinking.
6. Press + repeatedly until the
second line of the display shows
the Value (Light, Medium, or
Heavy [see page 11]) you wish
to use.
7. Press E
NTER
.
8. Press O
N
L
INE
.
Media Weight Range
Tray 1: 17 to 32 lb. US Bond (64 to 120 g/m
2
)
Optional Tray 2: 17 to 47 lb. US Bond (64 to 176 g/m
2
)
Media Size Range:
Letter, Legal-14, Legal-13.5, Legal-13, A4, A5, A6 [Tray
1 only], B5, Executive
Capacity:
Tray 1: 300 sheets of 20-lb. (75 g/m
2
) paper
Optional Tray 2: 530 sheets of 20-lb. (75 g/m
2
) paper
Tray 1 and Optional Tray 2

7 • English
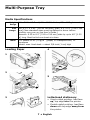
Media Specifications
Loading Paper
1
2
3
4
5
Letterhead stationery
• Single-sided printing: load face
up
, top edge
into
the printer.
• Double-sided printing: load face
down
with top edge
away from
the printer.
Weight
Range
20 to 54 lb. US Bond (42 to 113 lb. Index, 75 to 203 g/m
2
metric)
Size
Range:
Min. 4.13" x 5.83" [105 to 148 mm], max. 8.5" x 14" [216 x 356
mm] (Non-standard sizes must be defined in driver before
printing: see your on-line User’s Guide.)
Banners: 8.25 to 8.5'' [210 to 216 mm] wide by up to 49'' [1.22
m] long. Must be fed one sheet at a time.
Takes:
100 sheets 20-lb. (75 g/m
2
) paper, 50 transparencies, 10
envelopes
Labels: max. feed stack = about 3/8-inch (1 cm) high
Multi-Purpose Tray

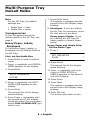
8 • English
Note
For the MP Tray, the default
settings are:
•Media Type = Plain.
• Media Size = Letter
Transparencies
To Set Transparencies as the
default media in the MP Tray, see
page 4.
Heavy Paper, Labels,
Envelopes
To Set Heavy Paper, Labels, or
Envelopes as the Default Media in
the MP Tray:
First, set the Media Size
1. Press E
NTER
to enter the Menu
mode.
2. Press + repeatedly until MEDIA
MENU appears on the display.
3. Press E
NTER
.
TRAY1 PAPERSIZE
LETTER *
4. Press + repeatedly until MPT
PAPER SIZE appears on the
display.
5. Press E
NTER
.
The second line of the display
starts blinking.
6. Press Press + repeatedly until
the second line of the display
shows the Value
(for envelopes,
select
COM-10 ENVELOPE)
you
wish to use.
7. Press E
NTER
twice.
The setting is engaged and the
second line of the display stops
blinking.
8.
Envelopes
: If you are setting
the MP Tray for envelopes, press
O
N
L
INE
and you are done.
Heavy paper / labels:
If you
are setting the MP Tray for
heavy paper or labels, keep
going.
Heavy Paper and Labels Only:
Set
the Media Type
9. Press +.
MPT MEDIATYPE
PLAIN *
10.Press E
NTER
.
The second line of the display
starts blinking.
11.Press + repeatedly until your
choice of CARD STOCK or
LABELS appears on the second
line of the display.
12.Press Enter.
13.Press Back.
The setting is engaged and the
second line of the display stops
blinking.
14.Press O
N
L
INE
.
The printer goes back on line.
Multi-Purpose Tray
Default Media

9 • English
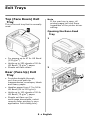
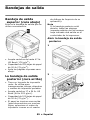
Top (Face Down) Exit
Tray
This is the exit tray that is normally
used.
• For papers up to 47 lb. US Bond
(176 g/m
2
).
• Holds up to 250 sheets of 20-lb.
US Bond (75 g/m
2
) paper.
•Sheets exit face down.
Rear (Face Up) Exit
Tray
• Provides straight-through,
curl-free print path for
transparencies, envelopes, labels
and heavy paper.
• Handles paper from 17 to 54 lb.
US Bond (64 to 203 g/m
2
).
• Holds up to 100 sheets of 20-lb.
US Bond (75 g/m
2
) paper.
• Sheets exit face up (for
multi-page documents, select
reverse order printing in your
application Print dialog box).
Note
If the rear tray is open, all
printed pages will exit there
regardless of the printer driver
setting.
Opening the Rear-Feed
Tray
1
2
Exit Trays

10 • English
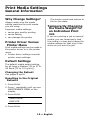
Why Change Settings?
Always make sure the media
setting matches the print media
you are using.
Improper media settings:
• cause poor quality printing
•cause flaking
• can damage the printer
Printer Driver Versus
Printer Menu
Print media settings can be made in
the printer driver or in the printer
menu.
• Printer driver settings override
printer menu settings.
Default Settings
The default media weight setting
for all trays is Medium (20 to 27 lb.
US Bond [75 to 101 g/m
2
]).
Changing the Default
See pages 6 and 8.
Resetting to the Original
Defaults
1. Press E
NTER
.
2. Press - repeatedly until you see
MAINTENANCE MENU on the
display.
3. Press E
NTER
.
MENU RESET
EXECUTE
4. Press E
NTER
.
The printer resets and returns to
the on-line state.
Temporarily Changing
the Media Weight for
an Individual Print
Job
If you are printing a job on special
media, you can temporarily load
the media in a tray and change the
media settings for that tray in the
driver as you print the job.
Print Media Settings
General Information

11 • English
Ranges for Printer
Media Weight
Media weight settings can be made
in the printer menu or the printer
driver.
Important!
Settings made in the printer driver
override the printer menu settings.
US Bond versus Index
To determine if a paper weight is
US Bond or Index, check the metric
equivalent. E.g.,
•35 lb. US Bond = 132 g/m
2
•35 lb. Index = 64 g/m
2
For more information, go to
www.paper-paper.com/
weight.html.
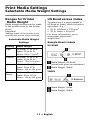
Sample Ream Labels
US BOND
Media Weight, US Bond
[sometimes given as substance]
Media Weight, Metric
INDEX
Media Weight, Index
Media Weight, Metric
Selectable Media Weight
Settings
Setting Media Weight
Light US Bond: 17 to 19 lb.
Index: 35 to 40 lb.
Metric: 64 to 71 g/m
2
Medium US Bond: 20 to 27 lb.
Index: 42 to 56 lb.
Metric: 75 to 101 g/m
2
Heavy US Bond: 28 to 32 lb.
Index: 58 to 67 lb.
Metric: 105 to 120 g/m
2
Ultra
Heavy
US Bond: 33 to 54 lb.
Index: 69 to 113 lb.
Metric: 124 to 203 g/m
2
Print Media Settings
Selectable Media Weight Settings

12 • English
Specifications
Caution!
The ink on pre-printed letterhead stationery must be able to withstand
446°F (230°C) for 0.2 second, including mechanical pressures to 25 psi
(1.8 kg/cm
2
).
Important!
If you experience curling when printing a file in duplex mode, switch to 28-lb. US
Bond paper.
Banner Paper__________________________________
• Width: 8¼ to 8½" (210 to 216
mm)
• Length: 14 to 48" (357.4 to
1220 mm)
• Paper Weight: up to 34 lb. US
Bond (128 g/m2)
• MP Tray Only
• Rear Exit Tray Only
• Simplex (1-sided) Only
Note:
Banner paper must be fed in
one sheet at a time.
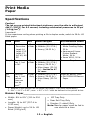
Feed Sizes Exit
Media Weight
1
Recommended Media
1
1. Weights in this column are US Bond (see page 11 for more information).
Tray 1 • Letter
•Executive
•Legal-14
• Legal-13.5
•Legal-13
• A4, A5, A6
•B5
•Top
•Rear
• Light (17- 19 lb.)
•Medium (20-27 lb.)
• Heavy (28-32 lb.)
• Oki 52206101 Bright
White Proofing Paper,
32 lb.
• Hammermill Laser
Printer Radiant
White, 24 lb.
• Xerox 4024, 20 lb.
Tray 2 Same as
Tray 1, but
no A6.
•Top
•Rear
• Light (17- 19 lb.)
•Medium (20-27 lb.)
• Heavy (28-32 lb.)
• Ultra Heavy (33-54
lb.):
limited to 47
lb. max.
Same as Tray 1
MP
Tray
Same as
Tray 1, but
custom
sizes can
also be
used.
2
2. Min. = 4.13" x 5.83"; max. = 8.5" x 14": must be defined in the printer driver.
•Rear
Only
•Medium (20-27 lb.)
• Heavy (28-32 lb.)
• Ultra Heavy (33-54
lb.)
Same as above, plus:
• Oki 52206002 Banner
Paper
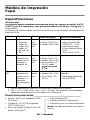
Print Media
Paper

13 • English
Caution!
Print media must be able to
withstand 446°F (230°C) for 0.2
second, including mechanical
pressures to 25 psi (1.8 kg/cm
2
).
General Parameters
• Size: Letter or A4
• Feed: MP Tray Only
• Exit: Rear Exit Tray Only
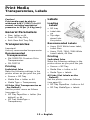
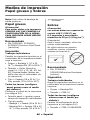
Transparencies
Important!
Use only recommended transparencies.
Recommended
Transparencies
• Oki 52205701 Premium Color
Transparencies
• 3M CG3720
Printing
Individual Jobs
Make the following settings in the
printer driver as you print the job:
•Source = MP Tray
• Media Size = Letter or A4
• Media Type = Transparency
All Jobs (Set Transparencies as
the Default)
Set the printer menu as follows
(see page 4):
• MP Tray PaperSize = Letter (the
default) or A4
• MP Tray MediaType =
Transparency
Labels
Loading
Labels
•MP tray
•Label side
up
•Top edge
aimed into
the printer.
Recommended Labels
• Avery 5161 White Laser Label,
Letter Size
• Avery 7162, 7664, 7666 White
Laser Labels, A4 Size
Printing
Individual Jobs
Make the following settings in the
printer driver as you print the job:
•Source = MP Tray
• Media Size = Letter or A4
• Media Type = Labels
All Jobs (Set Labels as the
Default)
Set the printer menu as follows
(see page 8):
• MP Tray PaperSize - Letter or A4
• MP Tray MediaType = Labels
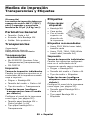
Print Media
Transparencies, Labels

14 • English
Note:
Use the rear exit tray only.
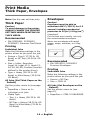
Thick Paper
Caution!
To avoid damage to the printer,
ALWAYS CHANGE THE PRINTER
SETTINGS WHEN PRINTING ON
THICK MEDIA.
Recommended
• Oki 52205601, 52205602,
52205603 Premium Card Stock
Printing
Individual Jobs
Make the following settings in the
printer driver as you print the job:
•Source = Tray1 (
17-32 l
b. US
Bond) or MP Tray (20-54 lb. US
Bond)
• Size = Letter, Executive,
Legal-14, Legal-13.5, Legal-13,
A4, A5, A6, B5, Custom (must be
defined in the printer driver).
• Type = Heavy (28-32 lb. US
Bond) or Ultra Heavy (33-54 lb.
US Bond).
All Jobs (Set Thick Paper as the
Default)
Set the printer menu to (see page
8):
•PaperSize = Same as for
individual print jobs.
•Media Type:
– Tray 1 = Heavy (28-32 lb. US
Bond)
– MP Tray = Heavy (28-32 lb. US
Bond) or Ultra Heavy (33-54 lb.
US Bond)
Envelopes
Caution!
Envelopes must be able to
withstand 446°F (230°C) for 0.2
second, including mechanical
pressures to 25 psi (1.8 kg/cm
2
)
Important!
For the best print results, use only
the recommended envelopes.
Never use envelopes with metal
clasps, snaps, windows, or V-flap
seals:
Recommended
• Oki 52206301, 52206302
Premium Envelopes .
Printing
Individual Jobs
Make the following settings in the
printer driver as you print the job:
•Source = MP Tray
• Size = COM-10
All Jobs (Set Envelopes as the
Default)
Set the printer menu to (see
page 8):
•PaperSize = COM-10 ENVELOPE
Print Media
Thick Paper, Envelopes

15 • English
Power Save sets how long the
printer waits before going into
standby mode. The default is 5
minutes.
This saves energy, but the printer
requires time to warm up when it
receives a print job or if you want
to enter the menu and change
settings.
For more information, see your
on-line User’s Guide.
Power Save Mode

16 • English
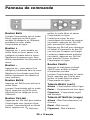
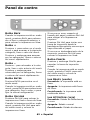
B
ACK
Button
In the Menu mode, press B
ACK
to
go back to the previous Item or
Category, or to place the printer
back on line.
+ Button
Press + to enter the Menu mode or
to go to the next Category, Item or
Value in the Menu.
Press and hold this button to
advance rapidly through the
entries.
– Button
Press – to go back to the previous
Category, Item or Value in the
Menu.
Press and hold – to rapidly advance
backwards through the entries.
E
NTER
Button
Press E
NTER
to enter the Menu
mode.
When the printer is in the Menu
mode, press E
NTER
to select a
Category or Item to change. Once
you have changed the setting to a
new Value, press E
NTER
to engage
the Value.
O
N
L
INE
Button
Press O
N
L
INE
to switch the printer
between on line and off line status.
When the printer is in the Menu
mode, press O
N
L
INE
to exit the
Menu mode and return the printer
to on line.
If there is a paper size mismatch
error, press O
N
L
INE
to force the job
to print.
Press O
N
L
INE
to start a manual
print job from the MP Tray once
paper has been loaded.
If there is a memory overflow,
press O
N
L
INE
to recover and place
the printer back on line.
C
ANCEL
Button
Press and hold C
ANCEL
to stop
printing the current job.
When the printer is in the Menu
mode, press C
ANCEL
to exit the
Menu mode and place the printer
back on line.
R
EADY
Light (Green)
On:
printer is on line.
Off:
printer is off line.
Flashing:
printer is receiving data.
A
TTENTION
Light (Red)
On:
Warning or Error status
Off:
Normal status.
Flashing:
Alarm status.
Control Panel

17 • English
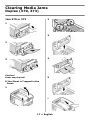
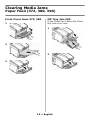
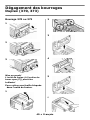
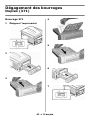
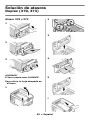
Jam 370 or 373
1
2
3
Caution!
Fuser may be hot!
If the Sheet is Trapped in the
Fuser:
1
2
3
4
5
6
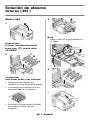
Clearing Media Jams
Duplex (370, 373)

18 • English
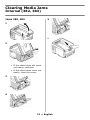
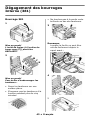
Jam 371
1 Power off!
2
3
4
5
6
7
Clearing Media Jams
Duplex (371)

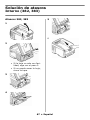
19 • English
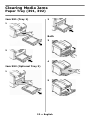
Front Cover Jams 372, 380
1
2
3
MP Tray Jam 390
If the Sheet Can’t Easily Be Pulled
Out from the Front:
1
2
Clearing Media Jams
Paper Feed (372, 380, 390)

20 • English
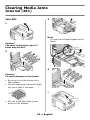
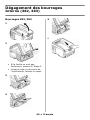
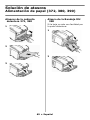
Jam 381
1
Caution!
The fuser behind the cyan (C)
toner may be HOT.
2
Caution!
To avoid damage to the drums:
• Be sure to set the drums on a
flat surface.
• Do not expose the drums to light
for more than 5 minutes.
• Do not touch the shiny green
area on the bottom.
3
Note
To remove a sheet trapped in the
fuser:
4
5
C
M
Y
K
Clearing Media Jams
Internal (381)
La page est en cours de chargement...
La page est en cours de chargement...
La page est en cours de chargement...
La page est en cours de chargement...
La page est en cours de chargement...
La page est en cours de chargement...
La page est en cours de chargement...
La page est en cours de chargement...
La page est en cours de chargement...
La page est en cours de chargement...
La page est en cours de chargement...
La page est en cours de chargement...
La page est en cours de chargement...
La page est en cours de chargement...
La page est en cours de chargement...
La page est en cours de chargement...
La page est en cours de chargement...
La page est en cours de chargement...
La page est en cours de chargement...
La page est en cours de chargement...
La page est en cours de chargement...
La page est en cours de chargement...
La page est en cours de chargement...
La page est en cours de chargement...
La page est en cours de chargement...
La page est en cours de chargement...
La page est en cours de chargement...
La page est en cours de chargement...
La page est en cours de chargement...
La page est en cours de chargement...
La page est en cours de chargement...
La page est en cours de chargement...
La page est en cours de chargement...
La page est en cours de chargement...
La page est en cours de chargement...
La page est en cours de chargement...
La page est en cours de chargement...
La page est en cours de chargement...
La page est en cours de chargement...
La page est en cours de chargement...
La page est en cours de chargement...
La page est en cours de chargement...
La page est en cours de chargement...
La page est en cours de chargement...
La page est en cours de chargement...
La page est en cours de chargement...
La page est en cours de chargement...
La page est en cours de chargement...
La page est en cours de chargement...
La page est en cours de chargement...
La page est en cours de chargement...
La page est en cours de chargement...
-
 1
1
-
 2
2
-
 3
3
-
 4
4
-
 5
5
-
 6
6
-
 7
7
-
 8
8
-
 9
9
-
 10
10
-
 11
11
-
 12
12
-
 13
13
-
 14
14
-
 15
15
-
 16
16
-
 17
17
-
 18
18
-
 19
19
-
 20
20
-
 21
21
-
 22
22
-
 23
23
-
 24
24
-
 25
25
-
 26
26
-
 27
27
-
 28
28
-
 29
29
-
 30
30
-
 31
31
-
 32
32
-
 33
33
-
 34
34
-
 35
35
-
 36
36
-
 37
37
-
 38
38
-
 39
39
-
 40
40
-
 41
41
-
 42
42
-
 43
43
-
 44
44
-
 45
45
-
 46
46
-
 47
47
-
 48
48
-
 49
49
-
 50
50
-
 51
51
-
 52
52
-
 53
53
-
 54
54
-
 55
55
-
 56
56
-
 57
57
-
 58
58
-
 59
59
-
 60
60
-
 61
61
-
 62
62
-
 63
63
-
 64
64
-
 65
65
-
 66
66
-
 67
67
-
 68
68
-
 69
69
-
 70
70
-
 71
71
-
 72
72


OKI MPS6150C Le manuel du propriétaire
- Catégorie
- Imprimantes laser / LED
- Taper
- Le manuel du propriétaire
dans d''autres langues
- English: OKI MPS6150C Owner's manual
- español: OKI MPS6150C El manual del propietario
Documents connexes
-
OKI C6150DTN Le manuel du propriétaire
-
-
OKI C 5650dn Le manuel du propriétaire
-
OKI C8800dtn Manuel utilisateur
-
OKI C7500DXN Le manuel du propriétaire
-
OKI MPS710C Le manuel du propriétaire
-
OKI C9650HDN Le manuel du propriétaire
-
OKI C830DTN Le manuel du propriétaire
-
-