Deni 2300 Instructions For Proper Use And Care Manual
- Catégorie
- Petits appareils de cuisine
- Taper
- Instructions For Proper Use And Care Manual

INSTRUCTIONS
FOR PROPER USE AND CARE
®
®
IMPORTANT!
Please keep these instructions and
your original box packaging.
Model #2300
www.deni.com
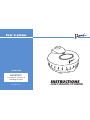
Pizza Oven

1
®
n Do not cut on the non-stick pan.
n Do not let cord hang over edge of table or counter. Do not let
cord come in contact with hot surfaces, including the stove.
n Do not place near hot gas, electric burner, in an oven, or in
a dishwasher.
n Never leave pizza oven unattended while it is operating.
n Extreme caution must be used when moving an appliance
containing hot oil or other hot liquids.
n Do not operate pizza oven near flammable objects or place
beneath a paper towel holder. A fire may occur if pizza oven
is covered or touching flammable materials, including cur-
tains, draperies, or walls when in operation.
n Do not use an extension cord with this pizza oven. However,
if one is used, it must have a rating equal to or exceeding the
rating of this appliance.
n The pizza oven should always be in the OFF position before
inserting or removing plug from a wall outlet.
n Do not pull on the power cord to disconnect, pull on the head
of the plug.
n This pizza oven should not be used for anything other than
the intended use.
n The pizza oven has a polarized plug (one blade is wider
than the other). This plug will fit in a polarized outlet only
one way, as a safety feature. Reverse the plug if the plug
does not fit fully in the outlet. Contact a qualified electrician
if it still does not fit. Do not attempt to defeat this safety
feature.
SAVE THESE INSTRUCTIONS
IMPORTANT SAFEGUARDS
When using this electrical appliance, safety precautions should
always be observed, including the following:
n Read all of the instructions.
n Do not touch hot surfaces. Use handles or knobs.
n Use extreme caution wen removing hot pizza pan.
n To protect against risk of electrical shock do not put pizza
oven in water, other liquid, or where water may flood the
area.
n Place the pizza oven securely in the center of the counter
or work space on a flat surface.
n Close adult supervision must be provided when this
appliance is used by or near children. Oven surfaces are hot.
This appliance is not recommended for children.
n Unplug from outlet when not in use, before cleaning, and
before attempting to move it. Allow to cool before putting on
or taking off parts and before cleaning.
n Do not operate with a damaged cord, plug, after the
appliance malfunctions, or if it is dropped or damaged in
any manner. Return the pizza oven to Keystone
Manufacturing Co., Inc. for examination, repair or electrical
or mechanical adjustment.
n Using attachments not recommended or sold by Keystone
Manufacturing Co., Inc. may cause hazards.
n Do not use outdoors, household use only.
n Do not clean with metal scrubbing pads. Pieces can break off
the pad and short electrical parts, creating a possibility of an
electrical shock.

2
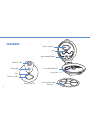
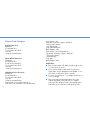
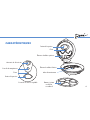
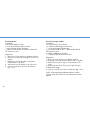
FEATURES
See-Thru Window
Vent
Upper Heating Element
Lower Heating Element
Drive Shaft
Non-Stick Removable
Pizza Pan
30 Minute Timer
Heating Dial
Vent
See-Thru Window
Stainless Steel Lid

3
®
Before First Use
While preparing the pizza oven according to the following
instructions, it may give off a slight burning odor. The pizza
oven is actually burning off excess lubricants found on the
units heating elements and will not recur. NOTE: This does
not effect the safety of your pizza oven.
n Remove all packing material
n Take everything out of the pizza oven
n Be sure to keep the unit unplugged
n Clean the pizza pan with warm soapy water
n Wipe the inner walls of the pizza oven with a damp
cloth or sponge
n Do not immerse in water
How To Operate
Cook more than just pizzas with your pizza oven. Use as a
portable oven for appetizers, grilled sandwiches and much
more.
Note: You do not need to preheat the unit.
1. Place the pizza oven on a flat heat resistant surface.
2. Be sure the timer and the heat dial are in the OFF
position.
3. Lightly coat the pizza pan with cooking spray,
especially when making a pizza crust from scratch.
4. If using a pre-packaged pizza be sure to remove all
pizza packing before cooking, including the cardboard
disc. Do not place foil or any other coverings on the
pizza while cooking. This could cause a fire.
5. Center your pizza on the pizza pan or make your pizza
directly on the pizza pan.
6. Open the lid. Place the pizza pan over the center of the
drive shaft.
7. Close the lid and plug in the unit.
8. Set the heating dial to the desired setting (upper, lower,
dual). NOTE: When using a frozen-rising crust, you may
want to put it on the lower setting for a few minutes and
then switch it to the dual setting.
9. Turn the timer clockwise to the desired time. Since every
pizza is different, there is no exact science as to how
long it will take to cook. (A pizza can take anywhere
between 5-25 minutes to cook depending on the kind
of pizza it is.) The pizza oven will cook your pizza
quickly, so begin to check if it is done after about 5
minutes. Continue cooking to your desired taste.
NOTE: If setting the timer for less than 5 minutes, turn
past the 5 minute mark, and then return to the desired
setting.

4
10. When the timer sounds, if you want the toppings
melted or browned more, set the upper heating element
for an additional 1-2 minutes. If you want the crust
to be crisper, set the lower heating element for an
additional 1-2 minutes.
11. When the cooking time is complete, turn all the controls
to the OFF position, unplug the unit, and lift the lid.
12. Carefully lift the edge of the pizza pan with a spatula
and grip with an oven mitt to remove the pan.
13. Carefully place the pizza onto a cutting surface that is
heat resistant. Never cut the pizza on the pizza pan.
This will damage the pan.
How To Clean
1. Turn all controls to the OFF position and unplug.
2. Completely cool the pizza oven and pan before remov-
ing or attempting to clean.
3. Wash the pizza pan in warm, soapy water. Rinse and
dry. Do not use abrasives.
4. Wipe the pizza oven and cord with a clean damp
cloth. Do not immerse the pizza oven in water or any
other liquid.
5. Dry all parts thoroughly before storing.
Hints and Tips
n Rising crust pizzas - over cooking a pizza may cause
the rising crust to touch the upper heating element. This
may cause the crust and toppings to scorch. Rising crust
pizzas must be carefully watched to prevent this from
happening.
n When making a fresh dough pizza, always oil the
pizza pan with vegetable oil or cooking spray to
prevent the dough from sticking.
n The largest crust the pizza oven will accommodate is 11
inches. Be sure that the crust does not hang over the
edge of the pizza pan. If the crust touches the sides of
the cover the pizza pan will not turn and the pizza will
not cook. (Trim or cut your pizza so that it fits properly
on the pan.)

5
®
Troubleshooting
The pizza or food is not cooking evenly.
You may have to experiment with the different element
settings and the amount of time you cook your pizza.
Every pizza is different and will require different settings.
The pizza pan is not turning.
n Check to make sure it is plugged into the wall outlet
and that the fuse has not been blown.
n Do you have the timer set? The pizza oven will not turn
on unless the timer is on and a heat setting has been
chosen.
n The pizza pan may not be centered over the drive
shaft. Turn all controls to the OFF position and allow
the pizza oven to cool down before readjusting
the pizza pan.
n Is the pizza crust too big? If the pizza crust is touching
the sides of the cover, the pizza pan will not turn. The
pizza pan will hold a maximum size of 11 inches.
(Trim or cut your pizza so that it fits properly on the
pan.)
n Is the pizza oven empty? Never turn the pizza oven on
when there is no food inside. This may damage the
pizza oven.
Homemade pizza crust is sticking to the pizza pan.
Always oil the pan with a little vegetable oil or cooking
spray before using. It is also helpful to use corn meal to
prevent the dough from sticking, and it also adds a nice
flavor.
Can the pizza oven reheat pizza?
Yes. Place the pizza on the pizza pan in a single layer
and set the heating dial to DUAL. Heat the pizza until
the toppings are melted and bubbly.
The pizza pan is rotating, but my pizza is not cooking.
You may have forgotten to select a heat setting. If the
heating dial is OFF, your elements will not heat. The
heating dial and the timer must be set before the pizza
oven will operate properly.

6
Pizza Crust Recipes
Regular Pizza Crust
Ingredients:
4 cups bread flour
12 oz warm water (90°F)
1 tsp salt
1 tbsp dry activated yeast
Whole-Wheat Pizza Crust
Ingredients:
2 cups bread flour
2 cups whole wheat flour
12 oz warm water (90°F)
1 tsp salt
1 tbsp dry activated yeast
Herbed Pizza Crust (Focaccia)
Ingredients:
4 cups bread flour
12 oz warm water (90°F)
1 tsp salt
1 tbsp dry activated yeast
Focaccia seasonings: select either dry or
fresh herbs or a combination of fresh and dried.
Spice mixture - dry
2 tsp each of parsley, oregano, and basil
1 tsp ground rosemary
1 tsp rubbed sage
1
⁄2 tsp granulated garlic
Black pepper to taste
Spice mixture - fresh (chopped fine)
1 tbsp each of parsley, oregano, and basil
1
1
⁄2 ground rosemary
1
1
⁄2 rubbed sage
1
⁄2 tsp garlic
Black pepper to taste
Helpful Hints:
n Each of these recipes will make enough dough for two
11-inch (14-16 oz) crusts.
n Crusts can be rolled out and frozen for future use.
Simply thaw at room temperature until pliable, or in a
microwave on defrost for about 2 minutes.
n For a thin crust pizza use 11 oz dough, thick crust use
14-16 oz dough.
n Each crust recipe can be prepared by any of the
methods described in the next section or topped
with any of the variations listed in the topping section.
Feel free to try your favorite combinations as well.

7
®
Preparation Methods
Hand Mixing:
1. Add yeast to water - mix together and allow to
dissolve.
2. Combine salt and flour in mixing bowl.
3. Add water/yeast mixture to flour - mix together using
a wooden spoon.
4. Turn out into a lightly floured surface and kneed for
about 5 minutes - or until the dough is very smooth and
elastic.
5. Place dough in a lightly oiled bowl - turning to coat all
sides. Cover the bowl and put in a warm place until the
dough rises and doubles in size.
6. To test the dough, press your finger into the dough ball.
If the dough springs back it has not risen long enough.
7. Once risen, press the dough firmly but gently to remove
all of the air.
8. Allow the dough to set for about 5 minutes.
9. Divide the dough into 12-15 oz portions.
10. Roll, press, or pull the dough into 11 inch circles.
11. The dough is ready to top and bake - or to be frozen
for use at a later time.
12. If frozen, allow the dough to thaw before baking.
Food Processor Using the Dough Blade:
NOTE: Remove
1
⁄3 cup water from selected crust recipe.
1. Combine the water and yeast - mix and allow to
dissolve.
2. Add flour/salt mixture to the bowl - lock cover.
3. While the machine is running, slowly add the
water/yeast through the feed tube.
4. Once the dough ball forms and is smooth and elastic,
remove and place in lightly oiled bowl. Rotate to coat
all sides evenly, cover and allow to rise in a warm
place until doubled in bulk.
5. Repeat steps 6-12 under hand mixing.
Machine Mixing Using a Dough Hook:
1. Combine the water and yeast in a bowl.
2. Turn on low speed to mix and dissolve yeast.
3. Slowly add flour/salt mixture while the machine is
running.
4. After the dough forms a ball, raise the speed to a
medium setting and allow to kneed for about 5 minutes
or until the dough ball is smooth and elastic.
5. Remove from the mixer and place in a lightly oiled
bowl. Rotate to coat all sides, cover and allow to rise
n a warm place until doubled in size.
6. Repeat steps 6-12 under hand mixing.

8
Pizza Topping Recipes
Cheese and Pepperoni:
Ingredients:
1 cup pizza sauce
10–12 thin slices of pepperoni
1
1
⁄2 cup shredded Mozzarella
Salt and black pepper to taste
Granulated garlic (optional)
2–3 tablespoons corn meal
Method:
1. Place crust on pizza pan.
2. Spread sauce on prepared crust to about
1
⁄2” from edge.
3. Season with salt, pepper and garlic to taste.
4. Spread cheese over sauce.
5. Top with pepperoni.
6. Bake per standard directions on pgs. 3-4.
Roasted Peppers and Asiago Cheese:
Ingredients:
1 cup coarsely chopped roasted peppers
1
1
⁄2 cup shredded Asiago cheese (any white cheese
combination can be successfully substituted)
1
⁄4 cup chopped red onion
2 tbsp chopped parsley
Salt and black pepper to taste
1 clove minced garlic in 1 tbsp oil
2–3 tbsp corn meal
Method:
1. Place crust on pizza pan.
2. Brush surface of the crust with garlic oil.
3. Spread chopped peppers and onions evenly.
4. Season with salt, pepper and parsley.
5. Top with shredded Asiago cheese.
6. Bake per standard directions on pgs. 3-4.

9
®
Pizza Hawaiian
Ingredients:
1 cup cream cheese
3 oz julienne ham slices
1
⁄2 cup drained crushed pineapple
1 tsp mint leaves finely minced
Salt and pepper to taste
Method:
1. Place crust on pizza pan.
2. Place bits of cream cheese over the surface.
3. Spread the ham slices and pineapple evenly over
the top.
4. Season with the mint, salt and pepper.
5. Bake per standard directions on pgs. 3-4.
Broccoli and Cheddar Cheese:
Ingredients:
1
1
⁄2 cups cooked chopped broccoli
1–2 tbsp finely diced onion
1
1
⁄2 cups shredded cheddar cheese
1 clove minced garlic in 1 tbsp oil
Salt and black pepper to taste
2 tbsp chopped parsley
2–3 tbsp corn meal
Method:
1. Place crust on pizza pan.
2. Brush surface of crust with garlic oil.
3. Spread broccoli and onion evenly over crust.
4. Season with salt, pepper and parsley to taste.
5. Top with cheese.
6. Bake per standard directions on pgs. 3-4.
NOTE: This recipe works equally well with cooked cauliflower
or a combination of both.

10
Pizza Florentine:
Ingredients:
1 cup julienne or fresh spinach
6 oz sun dried tomatoes packed in oil
4 oz portobello mushrooms thinly sliced
1 clove garlic finely minced
2 tbsp chopped parsley
1 tbsp balsamic vinegar
Salt and black pepper to taste
3 tbsp grated Romano cheese
2–3 tbsp corn meal
Method:
1. Place crust on pizza pan.
2. Combine the first seven ingredients in a bowl.
3. Spread the mixture evenly over the crust.
4. Sprinkle with cheese.
5. Bake per standard directions on pgs. 3-4.
Pizza Mexicana
Ingredients:
6 oz refried beans
4 oz chunky salsa
1
⁄2 tsp jalapeno pepper minced finely
2 tbsp chopped black olives
1
1
⁄2 cup shredded Montery Jack cheese
Salt and pepper to taste
2–3 tbsp corn meal
Method:
1. Place crust on pizza pan.
2. Evenly spread refried beans on crust.
3. Coat with salsa.
4. Add peppers and chopped olives.
5. Salt and pepper to taste.
6. Top with cheese.
7. Bake per standard directions on pgs. 3-4.

11
®
Ruben Pizza
Ingredients:
1
⁄4 cup well drained sauerkraut
4 oz Russian salad dressing
4 oz shredded corned beef
3
⁄4 cup shredded Swiss cheese
Black pepper to taste
2–3 tbsp corn meal
Method:
1. Place crust on pizza pan.
2. Spread dressing over surface.
3. Distribute sauerkraut on top.
4. Place corned beef over the sauerkraut.
5. Season with black pepper.
6. Top with cheese.
7. Bake per standard directions on pgs. 3-4.
Sicilian Pizza with Eggplant:
Ingredients:
1
1
⁄2 cups eggplant thinly sliced
1 cup thinly sliced onions
1 clove minced garlic in 2 tbsp oil
Salt and pepper to taste
1
⁄2 tsp ground rosemary
2 tbsp chopped parsley
1
1
⁄2 cups Mozzarella cheese
2 tbsp grated Romano cheese
2–3 tbsp corn meal
Method:
1. Lightly sauté garlic in oil.
2. Add eggplant, onion, and rosemary– sauté on high heat
allowing onions and eggplant to lightly brown.
3. Season with salt, pepper, and parsley– set aside.
4. Place crust on pizza pan.
5. Evenly spread eggplant mixture.
6. Top with Mozzarella and Romano cheese.
7. Bake per standard directions on pgs. 3-4.

12
Oriental Pizza
Ingredients:
8 oz chicken breast cut into thin strips
1
1
⁄2 cups thinly sliced mushrooms
1 cup thinly sliced onion
1
⁄4 cup thinly sliced red and green pepper
1 tsp chopped fresh ginger
2 tbsp peanut oil
1
⁄4 cup teriyaki sauce
3 tbsp honey
2 tbsp balsamic vinegar
Salt and black pepper to taste
2–3 tbsp corn meal
Method:
1. Heat oil in sauté pan - add mushrooms, onions, peppers
and ginger–sauté quickly for about 2 minutes.
2. Add chicken strips and teriyaki sauce - continue cooking
until almost cooked.
3. Place crust on pizza pan.
4. Spread sautéed mixture over crust.
5. Drizzle honey and balsamic vinegar over top.
6. Season with salt and pepper.
7. Bake per standard directions on pgs. 3-4.
Fresh Tomatoes and Mozzarella
Ingredients:
2–3 fresh ripe tomatoes sliced
1
⁄4” thick
1 finely minced clove of garlic in 2 tbsp olive oil
1 cup shredded Mozzarella
Freshly grated black pepper
Salt to taste
2 tbsp chopped parsley
1 tsp fresh rosemary–minced
2–3 tbsp corn meal
Method:
1. Place crust on pizza pan.
2. Combine oil, garlic, parsley, and rosemary.
3. Lightly brush
1
⁄8 of oil mixture on crust.
4. Spread tomato slices over oiled crust.
5. Fill in spaces around tomatoes with shredded cheese.
6. Season with salt and pepper.
7. Bake per standard directions on pgs. 3-4.

13
®
Pizza Caterina
Ingredients:
1
⁄2 cup chopped roasted peppers
1
1
⁄2 cup caramelized onions
2 tbsp roasted garlic
2 cups shredded Fontina cheese
2 tbsp chopped parsley
1 tbsp olive oil
Salt and pepper to taste
2–3 tbsp corn meal
Method:
1. Place crust on pizza pan.
2. Spread peppers, onions, and roasted garlic evenly
on the crust.
3. Season with the parsley, salt and
pepper.
4. Drizzle the olive oil over the toppings using a bit more
if desired.
5. Distribute the cheese over the top.
6. Bake per standard directions on pgs. 3-4.
Pizza San Jose
Ingredients:
3
⁄4 cup drained, quartered, oil-packed artichoke hearts
1
⁄2 cup reconstituted sun-dried tomatoes
1 tbsp roasted garlic
3
⁄4 cup shredded Fontina cheese
1 tbsp minced parsley
Salt and black pepper to taste
2–3 tbsp corn meal
Method:
1. Place crust on pizza pan.
2. Combine artichokes and garlic and spread over the
dough.
3. Distribute the tomatoes over the top.
4. Season with salt, pepper, and parsley.
5. Spread cheese over the top.
6. Bake per standard directions on pgs. 3-4.

©2005 Keystone Manufacturing Company, Inc.
All rights reserved.
®
ONE-YEAR LIMITED WARRANTY
Your Deni Pizza Oven is warranted for one year from date of purchase or receipt
against all defects in material and workmanship. Should your appliance prove defective
within one year from date of purchase or receipt, return the unit, freight prepaid, along
with an explanation of the claim. If purchased in the U.S.A. or other country, please
send to: Keystone Manufacturing Company, Inc. 33 Norris Street, Buffalo, NY 14207.
If purchased in Canada, please send to: Keystone Manufacturing Company, Inc., 151
Cushman Road, St. Catherines, Ontario L2M 6T4. (Please package your appliance
carefully in its original box and packing material to avoid damage in transit. Keystone
is not responsible for any damage caused to the appliance in return shipment.) Under
this warranty, Keystone Manufacturing Company, Inc. undertakes to repair or replace
any parts found to be defective.
This warranty is only valid if the appliance is used solely for household purposes in
accordance with the instructions. This warranty is invalid if the unit is connected to an
unsuitable electrical supply, or dismantled or interfered with in any way or damaged
through misuse.
We ask that you fill in the details on your warranty card and return it within one
week from date of purchase or receipt.
This warranty gives you specific legal rights. You may also have other rights which
vary from state/province to state/province.
www.deni.com
Deni by Keystone Manufacturing Company, Inc.
®
Monday through Friday
8:30 a.m. to 5:00 p.m.
(Eastern Standard Time)
1-800-DENI-VAC
1-800-3364-822
or E-mail us at
custser[email protected]
CUSTOMER SERVICE
If you have any questions or
problems regarding the operation
of your Deni Pizza Oven, call our
customer service department toll
free:

INSTRUCTIONS
MODE D’UTILISATION ET D’ENTRETIEN
®
®
IMPORTANT !
Conservez ces instructions et
l’emballage d’origine.
Modèle #2300
www.deni.com
Four à pizzas

16
n Il ne faut pas couper la pizza sur le plateau non adhésif.
n Ne laissez pas le cordon d’alimentation électrique pendre sur le
bord d’un comptoir ou d’une table ni toucher des surfaces chaudes,
y compris le poêle.
n Ne placez pas cet appareil à proximité de brûleurs au gaz ou à
l’électricité, dans un four ou au lave-vaisselle.
n Ne laissez jamais l’appareil sans surveillance lorsque vous l’utilisez
n Il faut toujours apporter une attention extrême lorsqu’un appareil
contient de l’huile ou d’autres liquides chauds.
n N’utilisez pas le four à pizzas à proximité d’objets inflammables
ou à des endroits comme sous un support à papier essuie-tout.
Un incendie pourrait se déclencher si le four à pizzas est couvert
ou s’il touche à des matériaux inflammables, comme des rideaux,
des draperies ou des murs lorsque vous utilisez l’appareil.
n N’utilisez pas de rallonge électrique avec ce four à pizzas. Mais
si une telle rallonge doit être utilisée, elle doit avoir des valeurs
nominales égales ou supérieures à celles indiquées pour cet appareil.
n Le four doit toujours être en position «OFF» avant l’insertion ou le
retrait de la prise de courant de la prise murale.
n Ne tirez pas sur le cordon d’alimentation pour débrancher
l’appareil. Débranchez l’appareil en tenant la prise plutôt que
le cordon.
n Ce four à pizzas ne doit pas être utilisé pour d’autres fins que ce
pour quoi il est conçu.
n Cet appareil comporte une prise de courant polarisée (l’une des
lames est plus large que l’autre). Comme mesure de sécurité, cette
prise ne peut être insérée dans une prise murale polarisée que d’une
seule manière. Si la prise ne peut pas être insérée complètement
dans la prise murale, inversez-la de 180 degrés. Si la prise ne peut
toujours pas être insérée, consultez un électricien qualifié. Ne
modifiez pas cette caractéristique de sécurité.
CONSERVEZ CES INSTRUCTIONS
MISES EN GARDE IMPORTANTES
Lorsque vous utilisez cet appareil électrique, observez toujours les
précautions de sécurité, y compris ce qui suit.
n Lisez toutes les instructions avant d’utiliser l’appareil.
n Ne touchez pas aux surfaces chaudes. Utilisez les poignées ou les
boutons.
n Il faut toujours retirer le plateau à pizza avec un soin extrême.
n Pour éviter les risques de chocs électriques, ne placez pas le four
à pizzas dans l’eau, dans un autre liquide ou à un endroit où l’eau
risque d’inonder le secteur.
n Placez le four à pizzas en toute sécurité sur une surface plate, au
centre du comptoir ou de la surface de travail.
n Un adulte doit toujours superviser cet appareil de près lorsqu’il est
utilisé ou lorsque des enfants sont à proximité. Les surfaces du four
sont chaudes. Les enfants ne devraient pas utiliser cet appareil.
n Débranchez l’appareil lorsque vous ne l’utilisez pas, avant de le
nettoyer et avant de le déménager. Laissez-le refroidir avant d’y
installer ou d’en retirer des pièces et avant de le nettoyer.
n N’utilisez pas l’appareil si le cordon d’alimentation ou la prise de
courant sont endommagés, si l’appareil ne fonctionne pas correcte-
ment, s’il a été échappé ou s’il est endommagé. Renvoyez-le à la
société Keystone Manufacturing Co. Inc. Pour qu’on en fasse l’inspec-
tion ou l’examen, qu’on le répare ou qu’on y fasse les ajustements
électriques ou mécaniques nécessaires.
n L’utilisation d’accessoires qui ne sont pas recommandés ou vendus
par le fabricant pourrait présenter des dangers.
n N’utilisez pas cet appareil à l’extérieur; cet appareil est réservé aux
applications domestiques.
n Ne nettoyez pas cet appareil à l’aide de tampons à récurer. Des
morceaux du tampon pourraient se casser et causer un court-circuit
au niveau des composants électriques et créer un risque de choc
électrique.

17
®
CARACTÉRISTIQUES
Fenêtre d’inspection
Évent
Élément chauffant supérieur
Élément chauffant inférieur
Arbre d’entraînement
Platerau à pizza
movible et
non adhésif
Minuterie de 30 minutes
Contrôle de température
Évent
Fenêtre d’inspection
Couvercle en acier inoxydable

18
Avant d’utiliser votre appareil
Lorsque vous préparez le four à pizzas conformément aux
instructions ci-dessous, vous sentirez peut-être une légère
odeur de brûlé. Le four à pizzas brûle alors l’excédent de
lubrifiant laissé sur les éléments chauffants; cette odeur ne
se répétera pas. NOTA : Cette odeur n’a aucune incidence
sur la sécurité de votre four à pizzas.
n Retirez tous les matériaux d’emballage et la
documentation.
n Sortez tout ce qui se trouve dans le four à pizzas.
n Assurez-vous que l’appareil est débranché.
n Nettoyez le plateau à pizzas avec de l’eau chaude
savonneuse.
n Essuyez les parois intérieures du four à pizzas avec
un chiffon ou une éponge humide.
n N’immergez pas l’appareil dans l’eau.
Mode d’utilisation
Vous pouvez cuire d’autres aliments que des pizzas dans
votre four. Utilisez votre four comme un four portatif pour
les hors-d’oeuvre, les sandwiches grillés et bien d’autres
choses.
Nota : Il n’est pas nécessaire de préchauffer l’appareil.
1. Placez le four à pizzas sur une surface plate résistant
à la chaleur.
2. Assurez-vous que la minuterie et le contrôle de la tem-
pérature sont en positon «OFF».
3. Enduisez légèrement le plateau à pizza avec un aérosol
de cuisine, notamment lorsque vous cuisez la pizza à
partir des ingrédients bruts.
4. Si vous utilisez une pizza pré-emballée, retirez tous les
matériaux d’emballage avant de passer à la cuisson.
Retirez le disque de carton. Ne placez pas de papier
d’aluminium ni rien d’autre sur la pizza pendant la
cuisson pour ne pas causer d’incendie.
5. Centrez votre pizza sur le plateau à pizza ou préparez
votre pizza directement sur le plateau à pizza.
6. Ouvrez le couvercle. Placez le plateau à pizza au
centre de l’arbre d’entraînement.
7. Fermez le couvercle et branchez l’appareil.
8. Réglez le contrôle de la température au réglage désiré
(élevé, bas, double). Lorsque vous utilisez une croûte
congelée, vous voudrez placer le réglage à bas pendant
quelques minutes avant de passer au réglage double.
9. Tournez la minuterie en sens horaire jusqu’au temps
désiré. Comme chaque pizza est différente, il n’y a pas
de science exacte quant à la durée de la cuisson. (Une
pizza peut prendre entre 5 et 25 minutes de cuisson
suivant le type de pizza.) Le four à pizzas cuira votre
pizza rapidement; vous devriez commencer à vérifier le
degré de cuisson après 5 minutes.

19
®
NOTA : Si vous réglez la minuterie à moins de 5 minutes,
tournez la minuterie au-delà de 5 minutes et ramenez
le cadran au nombre de minutes désiré.
10. Lorsque la minuterie se fait entendre, si vous voulez
faire fondre ou griller les garnitures, réglez le contrôle
de température à son degré le plus élevé pendant 1-2
minutes. Si vous voulez une pâte plus croustillante,
réglez l’élément chauffant inférieur pour qu’il chauffe
1-2 minutes additionnelles.
11. Lorque la cuisson est terminée, tournez tous les
contrôles en position «OFF»; débranchez l’appareil
et levez le couvercle.
12. Levez avec soin le bord du plateau à pizza à l’aide
d’une spatule; prenez le bord du plateau à l’aide de
poignées de poêle pour retirer le plateau du four.
13. Placez avec soin la pizza sur une surface de coupe qui
résiste à la chaleur. Ne coupez jamais la pizza sur le
plateau à pizza pour ne pas endommager le plateau.
Nettoyage
1. Tournez tous les contrôles en position «OFF» et
débranchez l’appareil.
2. Laissez le four à pizzas et le plateau refroidir
complètement avant de le retirer ou d’essayer de
le nettoyer.
3. Lavez le plateau à pizza avec de l’eau chaude et du
savon. Rincez le plateau et asséchez-le. N’utilisez pas
de matières abrasives sur le plateau.
4. Essuyez le four à pizzas et le cordon d’alimentation
électrique à l’aide d’un chiffon humide propre.
N’immergez pas le four à pizzas dans l’eau ou dans un
autre liquide.
5. Asséchez tous les composants à fond avant de les
remiser.
Conseils
n Pizzas à levure – Une cuisson excessive de la pizza
peut faire lever la croûte au point où elle touchera
l’élément chauffant supérieur. Cela peut brûler la croûte
et les garnitures. Les croûtes qui lèvent doivent être
surveillées de près pour éviter ce genre de situation.
n Lorsque vous préparez une pâte fraîche, il faut toujours
appliquer une pellicule d’huile végétale ou un aérosol
de cuisine pour que la croûte ne colle pas.
n La plus grande croûte que le four à pizzas peut recevoir
est de 11 po. Assurez-vous que la croûte ne pend pas
par-dessus le bord du plateau à pizza. Si la croûte
touche aux bords du couvercle, le plateau à pizza ne
tournera pas et la pizza ne cuira pas. (Coupez votre
pizza de sorte qu’elle soit bien placée sur le plateau à
pizza.)
La page est en cours de chargement...
La page est en cours de chargement...
La page est en cours de chargement...
La page est en cours de chargement...
La page est en cours de chargement...
La page est en cours de chargement...
La page est en cours de chargement...
La page est en cours de chargement...
La page est en cours de chargement...
La page est en cours de chargement...
-
 1
1
-
 2
2
-
 3
3
-
 4
4
-
 5
5
-
 6
6
-
 7
7
-
 8
8
-
 9
9
-
 10
10
-
 11
11
-
 12
12
-
 13
13
-
 14
14
-
 15
15
-
 16
16
-
 17
17
-
 18
18
-
 19
19
-
 20
20
-
 21
21
-
 22
22
-
 23
23
-
 24
24
-
 25
25
-
 26
26
-
 27
27
-
 28
28
-
 29
29
-
 30
30


Deni 2300 Instructions For Proper Use And Care Manual
- Catégorie
- Petits appareils de cuisine
- Taper
- Instructions For Proper Use And Care Manual
dans d''autres langues
- English: Deni 2300
Documents connexes
Autres documents
-
Dash DIGITAL FAMILY AIR FRYER Le manuel du propriétaire
-
Nesco 6 Qt. Roaster Oven Manuel utilisateur
-
Nesco Electric Roaster Oven Manuel utilisateur
-
Black & Decker B2250 Manuel utilisateur
-
Breville BOV650XLB Manuel utilisateur
-
Breville BOV650XL Manuel utilisateur
-
-