
701 S. RIDGE AVENUE
TROY, OHIO 45374-0001
937 332-3000
www.hobartcorp.com
F47504 (April 2016)
FT1000-SERIES DISHWASHERS
LAVE-VAISSELLE DE LA GAMME FT1000
LAVAVAJILLAS SERIE FT1000
MODEL
MODÈLE
MODELO
FT1000
FT1000-ER
FT1000-ER-BD
FT1000-ADV
FT1000S
FT1000S-ER
FT1000S-ER-BD

– 2 –
© HOBART 2016

– 3 –
TABLE OF CONTENTS
OPERATION ..................................................................4
Machine Preparation – Check before beginning operation ............................4
Tanklling .................................................................5
Dishwashing ...............................................................6
Empty Strainer Baskets As Necessary ........................................7
Loading ................................................................7
Unloading ..............................................................8
Recommended Minimum Temperatures ..........................................8
Conveyor Speed Adjustment ...................................................8
CLEANING ...................................................................8
Deliming(ManualprocessformachinesnotequippedwithAutoDelime) ................10
Automatic Soil Removal Section(When Equipped). . . . . . . . . . . . . . . . . . . . . . . . . . . . . . . . . 11
AutoClean(WhenEquipped) .................................................12
AutoDelime(WhenEquipped) ................................................12
DosandDon'tsforYourNewHobartWarewasher .................................13
Curtains:ModelsFT1000,FT1000-ER,FT1000-ER-BD,&FT1000-ADV ................14
Curtains:ModelsFT1000S,FT1000S-ER,&FT1000S-ER-BD .......................15
PROGRAMMING ..............................................................16
MachineOperationandProgrammingSecurityLevels ..............................16
Operator – O ...........................................................16
SuperOperator – SO .....................................................16
Manager – M ..........................................................17
User Programming Instructions ................................................17
MenuDisplayPrompts .......................................................18
Entering the Manager Menu ..................................................18
About Screen ..............................................................18
Actions Menu ..............................................................19
Logs Menu ................................................................19
Operation Parameters Menu ..................................................20
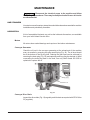
MAINTENANCE ..............................................................23
Line Strainers ..............................................................23
Lubrication ................................................................23
Motors ................................................................23
Conveyor Gearmotor ....................................................23
Conveyor Drive Chain ...................................................23
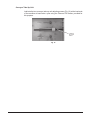
Conveyor Take-Up Unit ..................................................24
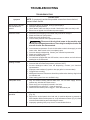
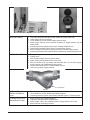
TROUBLESHOOTING .........................................................25

– 4 –
Operation and Care Of
FT1000 SERIES DISHWASHERS
SAVE THESE INSTRUCTIONS
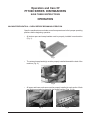
OPERATION
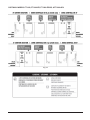
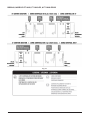
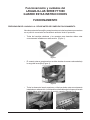
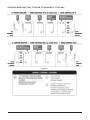
MACHINE PREPARATION – CHECK BEFORE BEGINNING OPERATION
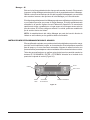
Openthemachinedoorsandmakesureallcomponentsareintheirproperoperating
positions before beginning operation.
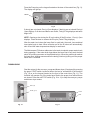
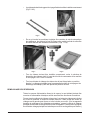
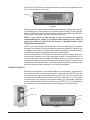
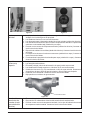
• Allstrainerpansandscrapbasketsmustbeproperlyinstalledineachsection
(Fig.1).
Fig. 1
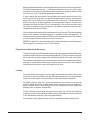
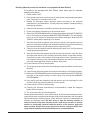
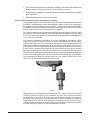
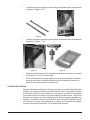
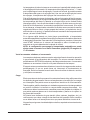
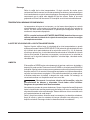
• Theexternalscrapbasket(s)mustbeproperlyinstalledbeneaththeloadofthe
machine(Fig.2).
Fig. 2
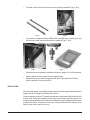
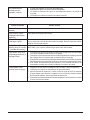
• Allupperandlowerwasharmsmustbeproperlyinstalledineachsection.Wash
armslidersmustalsobeplacedintheclosedposition(Figs.3&4).
Fig. 3 Fig. 4

– 5 –
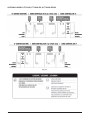
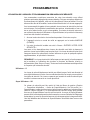
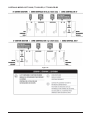
• Thedualrinseandnalrinsearmsmustbeproperlyinstalled(Figs.5&6).
Fig. 5 Fig. 6
• OnmachinesequippedwiththeASRsection,theASRarms,strainerpan,and
soilcollectorstandpipemustbeproperlyinstalled(Figs.7&8).
Fig. 7 Fig. 8
• Allcurtainsmustbeproperlyinstalledasshownonpages14-15ofthismanual.
• Alltankdrainsmustbeplacedintheclosedposition.
Masterdrain(onlymachinesequippedwithAutoCleanandAutoDelime)
mustbeplacedintheopenposition.
TANK FILLING
Allwater(andsteam,ifequipped)supplyvalvesmustbeopenedandtheelectric
supplyturnedonbeforethemachinewillfunction.
Closealldrainsanddoors.Thedrainhandlesarelocatedneartheooratthefront
ofeachtank.Swingdrainhandlestotherighttocloseandtothelefttoopen.(On
machinesequippedwithAutoCleanandAutoDelime,opentheMasterDrainlocated
ateithertheloadorunloadendoftheunit.SwingtheMasterDrainhandletothe
righttoopenandtothelefttoclose.)

– 6 –
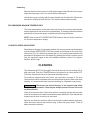
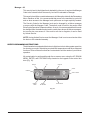
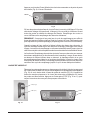
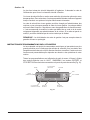
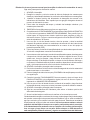
PressthePowerkeyonthekeypadlocatedonthedoorofthecontrolbox(Fig.9).
Thedisplaywilllightup.
POWER
Fig. 9
Ifdoor(s)arenotclosed,Door(s) Opendisplays.Ifdrain(s)arenotclosed,Drain(s)
Opendisplays.Ifalldoorsanddrainsareclosed,Tank(s) Fillingdisplaysandtanks
begintoll.
NOTE: Openingadoorduringthellcycleshutsoffthellvalves…Door(s) Open
displays.Closethedoortoresumethellcycle(Tanks Fillingdisplays).
Afterthewaterlevelraisestheloweroatineachtank,thewash,rinseanddual
rinsetanksbegintoheat.Whenalltanksarefullthellvalveswillautomatically
shutoffandthewatertemperaturesdisplayforeachtank.
TheMaintenanceFillfeatureaddswatertothetankstomaintainproperwaterlevels
duringoperation.Ifthewaterleveldropsbelowtheloweroatinanytank,theheat
shutsoffandllingresumesontheaffectedtank(s).Whenthewaterlevelreaches
theloweroat,heatingresumeswhilethetank(s)continue(s)llinguntiltheproper
waterlevelisreached.
DISHWASHING
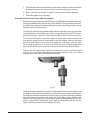
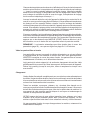
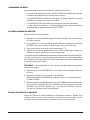
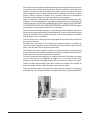
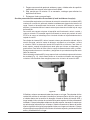
Startthemotorsfortheconveyor,pumpsandblowerdryer(ifequipped)bypressing
thegreenSTARTswitchlocatedateithertheloadorunloadendofthemachine
(Fig.10)oronthekeypadlocatedonthefrontofthecontrolbox(Fig.11).The
machinewilloperateonlyifthetankshavelledtotheproperlevelandalldoors
areclosed.PresstheredSTOPswitch(Fig.10or11)tostoptheconveyor,pumps
andblowerdryermotors.
STOP (red)
START (green)
START
STOP
Fig. 10 Fig. 11

– 7 –
Alltanktemperaturesdisplayonthekeypaddisplaywhenthemachineisinoperation.
FinalRinsetemperaturereads‘---‘untilwarereachestherinsezone.Whenware
reachestherinsezone,theFinalRinsewatertemperaturedisplays.Aftertheware
exitstherinsezone,FinalRinsetemperatureagainreads‘---‘.
Ifwarereachestheunloadendofthemachineandtripsthedishlimitswitch,the
conveyorandnalrinseshutoff,andthekeypaddisplaysthetanktemperatures
alongwithUnload Dishes across the bottom. After the ware is removed and the
dishlimitreturnstooperatingposition,normaloperationresumes.Ifwareisnot
unloaded,theDishLimitAuto-Timercountsdownforoneminute,andthenshuts
offpumpsandblowerdryer(ifequipped).Thedisplaycontinuestoshowthetank
temperatures and Unload Dishes.
Ifnowareentersthemachineforapresetamountoftime,theAuto-Timerautomatically
shutsoffthemachineandtankscontinuetomaintainrequiredtemperatures.To
resumeoperation,pressthegreenSTARTswitchlocatedateitherendofthemachine
oronthekeypadlocatedonthefrontofthecontrolbox.
NOTE: The Auto-Timer shut off setting can be adjusted as shown in the Parameters
Menu(page20);therangeisfrom1to30minutes.
Empty Strainer Baskets As Necessary
Thestrainerbasketscanllwithfoodsoilduringoperationwhichwillaffectdishwasher
operationandthereforemustbeemptiedperiodically.STOPthemachineandopen
theaccessdoors;strainerbasketsareimmediatelyinsideatthefrontofthetanks.
Theexternalscrapbasket(s)attheloadsectionneedstobeemptiedperiodically,
andcanbedonewithoutinterruptingmachineoperation.Removethebasket(s)
whenlledwithfoodsoil,emptyandreplacewhendone.
Loading
Pre-scrapdishesthoroughlytoremovelargefoodparticlesanddebris.Neveruse
steelwoolonwaretobeloadedintothedishwashingmachine;thiscouldintroduce
surfacecorrosionwhichcouldeventuallyinterferewithmachineoperation.
Allplates,saucers,trays, etc.should beloadedontheconveyorin an inclined
position. Bowls should beloaded upside down. Silverware must be washedin
rackstopreventlossofitems;failingtodosocouldcausetheconveyortojamand
damage ware or machine components.
DONOTattempttowashlargeitems(pots,pans,trays,etc.)withoutrstchecking
tomakesuretheytthroughthemachineopening.Suchitemsmustnotbewashed
inthedishwasherunlesstheywilleasilypassthrough.
Donotallowforeignobjectstoentertheunit,especiallymetalliccontaminants.

– 8 –
Unloading
Removewarefromtheconveyor.Ifadishpushesagainstthedishlimit,theconveyor
stops and the pumps run for one minute before shutting off.
Unloadtheconveyorstartingwiththewarefurthestfromthedishlimit.Removethe
warethatisstrikingthedishlimitlast.Themachineautomaticallyrestarts.
RECOMMENDED MINIMUM TEMPERATURES
Thewatertemperaturesinthetanksandrinsearmsaremonitoredelectronically
andaredisplayedonthecontrolboxkeypaddisplay.Thedisplayshouldbechecked
periodicallytoassurethatpropertemperaturesarebeingmaintained.
NOTE: RefertotheHOTWATERSANITIZINGlabelonthesideofthecontrolbox
for minimum temperature ratings.
CONVEYOR SPEED ADJUSTMENT
Depending on the type of ware being washed, the conveyor speed can be adjusted
bypressingtheSPEEDSELECTIONkeylocatedonthekeypadonthefrontofthe
controlbox(Fig.16).Whenrstpressingthekey,thecurrentspeedselectionwill
beshownonthebottomlineofthedisplay.Bypressingthebuttonasecondorthird
time,thespeedwilltoggletothenextavailableselections;Speed:Low,Speed:
Medium, Speed: High.
CLEANING
ThedishwasherMUSTbethoroughlycleanedattheendofeachworkingshiftor
aftereachmeal.PushthePOWERbuttononthekeypadtoturnthemachineOFF.
Followtheinstructionsbelowforthemanualcleaningprocess.
Formachines equippedwithAuto Clean,seeinstructions on page9.TheAuto
Cleanprocesscanbecompletedattheendofeachworkingshiftoraftereachmeal;
however,itisrecommendedthatamanualcleaningbecompletedonceperday.
Disconnect the electrical power to the machine and follow
lockout/tagout procedures. There may be multiple circuits. Be sure all circuits
are disconnected.
Openallfrontaccessdoors.Drainthemachinebyswingingthetankdrainhandles
totheleftasshownonthelabelslocatedaboveeachtankdrain.Drainhandlesare
locatedneartheooratthefrontofeachtank.
Removeandcleanthecurtains.Beforeremovingthestrainerbasketsandpans,
cleantheinteriorandalltankshelvesusingahoseandspraynozzle.Flushall
debris toward the strainers.

– 9 –
Removethewasharmsbyliftinguponthearmclearingthetabfromthenotchin
thewasharmsupport.Slideupperarmsforward,swingingfrontofarmdown.Slide
lowerarmsforward,tiltfrontofarmsupwardtoallowwatertodrain.Removearms.
Cleanwasharmsinasink,openingwasharmsliderstoushfoodsoilfromarms.
Removethestrainerbasketsandstrainerpans.Alsoremovethedualrinsestrainer.
Empty strainers in trash receptacle or food waste disposer. DO NOT STRIKE
STRAINERPANSORSTRAINERBASKETSONSOLIDOBJECTTODISLODGE
DEBRIS. Scrub strainer pans and strainer baskets in a sink.
Removedualrinseandnalrinsearmsandcleandebrisfromnozzlesandarms.
Neverusesteelwooltocleanwarewashersurfaces.Useonlyproductsformulated
tobesafeonstainlesssteel.
Flushtankswithawaterhose,removinganyaccumulationoffoodsoil.
Reinstallallarmsintheirproperlocationandorientation.Ensurethatupperarm
nozzlespointdownward,andlowerarmnozzlespointupward.
Toinstallwasharms,slidemanifoldsonthesupportstowardtherearofthemachine
and ensure the tabs on the sides of the arms drop into the notches in the supports.
Replacethestrainerpansandstrainerbaskets.Reinstallthecurtainsaccordingto
thecurtainchartshownonpages14-15ofthismanual.Leavethemachinedoors
opentoallowtheinteriortoairoutanddry.
Cleanmachineexteriorlikeanyotherstainlesssteelappliance.Usedampcloth
andmildsoapywater.
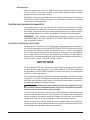
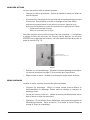
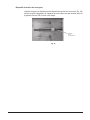
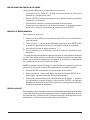
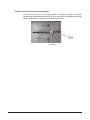
Spraythechannelswherethesensorsarelocatedattheloadendofthemachine
(Fig.12).Donotattempttocleanthesewithmetallicobjectsasdamagetosensors
can occur.
Fig. 12

– 10 –
Deliming (Manual process for machines not equipped with Auto Delime)
For machines not equipped with Auto Delime, follow these steps for manually
delimingthemachine.
1. PowermachineOFF.
2. Drainalltanksandremoveallfoodsoilsbycleaningthescrapbasketsandstrainer
pans.Flushinteriorofmachinewithahose.
3. Disable the detergent feeder chemical system according to the chemical
manufacturer’srecommendation.Thiswillpreventtheadditionofdetergentduring
thedelimingoperation.
4. Closealltankdrainsandre-installthestrainerpansandscrapbaskets.
5. PowerthemachineONallowingittollwithfreshwater.
6. RefertothePROGRAMMINGsectionofthismanualandadjusttheAUTOTIMEOUT
timeto30minutesbyenteringtheMANAGERPROGRAMMING.Thiswillallowthe
unittorunfor30minutesforthedelimecyclewithoutshuttingoff.NotetheAUTO
TIMEOUT setting before adjusting to 30 minutes.
7. Oncethellcyclehascompleted,openthedoorsandpourtherequiredamountof
delimerineachtankaccordingtothechemicalmanufacturer’sinstructionsfollowing
theirrecommendationsforpersonalprotectiveequipment(PPE).
8. Closethedoorsandstartthemachineallowingthepumpstorunfor30minutesat
normaloperatingtemperatures.
9. Afterthe30minuteshaselapsedandthemachinehastimedout,openthedoors
andinspecttheinteriorforanyremaininglimescaleresidue.Iflimescaleremains,
closethedoorsandrunthemachineforalongerperiodoftime.Dependingonthe
timebetweendelimingcyclesandthewaterhardness,themachinemayneedto
runlongerand/oradjusttheamountofdelimerbeingused.
10. PowermachineOFFanddrainalltanks.
11. Thoroughlyspraytheinsideoftheunitushingtheremainingdelimersolutiondown
the drain.
12. ClosealltankdrainsandpowerthemachineONallowingittollwithfreshwater.
13. RefertothePROGRAMMINGsectionofthismanualandadjusttheAUTOTIMEOUT
timebacktotheoriginalsetting asnotedinStep6byenteringtheMANAGER
PROGRAMMING.
14. Oncethellcyclehascompleted,startthemachineandrunthepumpsforafew
minutestoushanyremainingdelimerfromthesystem.
15. PowermachineOFFanddrainalltanks.
16. Following the chemical manufacturer’s recommendation, enable the detergent
feederchemicalsystem.
17. Theunitisnowreadyfornormaloperation.
Certain areas of the machine,suchastheloading,nalrinse,andunloadingsections,
maystillshowsignsofscaleresidueastheseareasarenotsubjectedtotherecirculated
washcontainingthedelimingsolution.Theseareaswillneedtobecleaned/delimed
manually as instructed below. DO NOT spray or wipe the deliming solution on
exterior surfaces of the dish machine as this could cause corrosion. If delimer
solution is accidentally contacted with the exterior of the machine, ush with
water and wipe. Always wear proper personal protective equipment (PPE) when
using delimer following chemical manufacturer’s recommendations.

– 11 –
1. Followingthechemicalmanufacturer’sinstructions,prepareamixtureofdelimer
andwater,andpourorbrushthesolutionontothesurfacetobecleaned.
2. Allowtosoakfor10minutes.Ifrequired,scrubtoremoveheavydeposits.
3. Rinsethoroughlywithfreshwater.
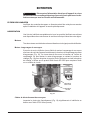
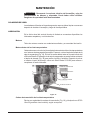
Automatic Soil Removal Section (When Equipped)
MachinesequippedwithAutomaticSoilRemoval(ASR)featureanadditionalsection
locatedimmediatelyaftertheloadendofthemachine.Duringmachineoperation,
theASRsectioncapturesfoodsoilandpumpsittotheexternalscrapbasket,located
beneaththeloadofthemachine.
Toemptytheexternalscrapbasketduringmachineoperation,removethebasket,
emptyandreplace.ThemachinewillcontinuetooperateunlesstheSTOPbuttonis
pressedattheload,unloadoronthekeypadlocatedonthefrontofthecontrolbox.
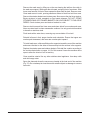
TocleantheASRsystem,removetheexternalscrapbasketlocatedbeneaththe
loadsection,emptyfoodsoil,rinsebasketinsinkandreplace.Removetheupper
andlowerASRwasharms.Toremovetheupperarm,pullbackonthetab,allow
thearmtodropandpullout.Toremovethelowerarm,pullupslightlyandpullthe
armout.Rinsebotharmsinthesinkandensureallnozzlesareclearofdebris.
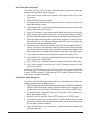
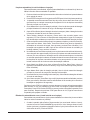
RemovetheASRstrainerpan,andthenremovethetwopiecesoilcollectorstand
pipe(Fig.13).Cleanthesecomponentsusingasprayerhoseinasink.Useahose
tospraydowntheinsideoftheASRsectionaswell.
Fig. 13
Replaceallcomponentswhencomplete.Toreplacethesoilcollectorstandpipe,drop
thebottomofthetubewiththestrainerintothedrainbodylocatedatthebottomof
theASRtankandtheninstallthesoilcollectortubeontopofthepreviouslyinstalled
tube.Placethestrainerpanontop,notingthatitsitsslightlyhigherthanthetank.
Replacethelowerwasharmbyfollowingtheguiderailandpushingthetubeinto
placeinthemanifold.Replacetheupperwasharmbypushingthetubeintothe
uppermanifold,pushingupandsnappingintoplace.

– 12 –
Auto Clean (When Equipped)
ToperformtheAuto Clean procedure,followthesteps listedbelow(italicstext
indicatesactualmachinedisplayprompts):
1. PresstheblueAutoCleanbuttonlocatedonthekeypadonthefrontofthe
controlbox.
2. Press ENTER to begin Auto Clean.
3. ThedisplaybrieyshowsPress Stop key at any time to abort Auto Clean cycle
before proceeding to step 4.
4. Close Master Drain–closethemanualMasterDrainvalvelocatedateitherthe
loadorunloadendofthemachine.
5. Open All Tank Drains–openalltankdrainslocatedatthebottomofeachtank.
6. Tanks draining. Please wait a few seconds – at this time, the machine is draining
thewaterinthetanksbelowthestrainerpansthrutheMasterDrainautomaticvalve.
7. Clean and replace strainer baskets. Open wash arm sliders, Close Doors, Press
Enter When Done –FormachinesequippedwithASR,cleanandreplacethe
soilcollectorstandpipeandstrainerpan.
8. No additional user intervention required. Auto clean will take approximately 30
minutes–atthistime,themachineisintheself-cleaningmode.Washpumpswill
runtoushfoodsoilfromwasharms,andthenAutoCleannozzleslocatedatthe
rearofeachchamberwillwasheachchambersectionabovethestrainerpans.
9. Close Wash Arm Sliders; then close all doors-Press Enter When Done
10. Open Master Drain–openthemanualMasterDrainvalvelocatedateitherthe
loadorunloadendofthemachine.
11. Close Tank Drains–closealltankdrainslocatedatthebottomofeachtank.
12. Auto Clean complete, Press Enter key to rell. Otherwise machine will shut
down in 60 seconds.
PressingtheSTOPbuttonatanytimeduringtheAutoCleanprocesscancelsthe
AutoCleancycle.ThedisplayreadsAuto Clean cycle not complete. Press STOP
to abort, ENTER to resume –AfterpressingSTOPtoabort,followtheonscreen
instructions to prepare for washing.
Auto Delime (When Equipped)
ToperformtheAutoDelimeprocedure,followthestepslistedbelow(italicstext
indicatesactualmachinedisplayprompts):
1. WhenthedisplaypromptsDelime Recommended,refertothe‘PROGRAMMING’
sectionofthismanualwhenreadytoinitiatethedelimecycle.Navigatetothe
‘Actions’menuandscrolldownto‘RunDelimeCycle’.PresstheENTERkey.
2. Thedisplaybrieyreads Press Stop key at any time to abort Delime cycle
before proceeding to step 3.
3. Remove ware from machine. Press ENTER when done or STOP to abort.
4. Place Delime Pump hose in delime solution. Press Enter when done.Placethe
hosefromthedelimechemicalpumplocatedattheunloadendofthemachine
intothedelimesolutioncontainer.
5. Open All Tank Drains-Leave drains open.–openalltankdrainslocatedatthe
bottom of each tank.

– 13 –
6. Clean Strainer Baskets, then replace. Press enter when done.
7. Tanks Draining Please Wait–afteralltankshavedrainedthedisplaytoggles
to step 8.
8. Close Master Drain–closetheMasterDrainmanualvalvelocatedateitherthe
loadorunloadendofthemachine.
9. Tanks Filling Please Wait–afterthemachinehaslledwithapproximately1-2
inchesofwaterinthetanks,thedisplaytogglestostep10.
10. Pour xx gallons delime into Tank 1. Press Enter when done–thedisplayprompts
youtopourtherequiredamountofdelimerintoTank1,locatednexttothedual
rinsetanktowardstheloadendofthemachineandlabeledDelime Tank.
11. Press ENTER to start conveyor.
12. Delime Cycle Running. Approximate Time Left: XX:XX – at this time, the machine
isrunningtheautodelimecycle.
13. Auto Delime Complete. Press Enter key to rell. Otherwise, machine will power
down in 5 minutes
14. Open Master Drain – after pressing Enter in the previous step or powering the
machinebackupfromapowerdown,opentheMasterDrainmanualvalve
locatedateithertheloadorunloadendofthemachine.
15. Close all Tank Drains–closealltankdrainslocatedatthebottomofeachtank.
PressingtheSTOPbuttonatanytimeduringtheAutoDelimeprocesswillcancel
thecycle.Ifthedelimesolutionhasnotyetbeenintroducedintothesystem,the
displaywillreadTanks rinsed and ready for wash. Press Enter to rell. Or machine
will power down in 5 minutes.Ifthedelimesolutionhasbeenintroducedintothe
system,thedisplaywillreadDelime solution in Tanks. Press Enter key to drain and
rinse tanks. Press Stop key to skip rinse cycle.
DO'S AND DON'TS FOR YOUR NEW HOBART DISHWASHER
DO assure proper water hardness of 3 grains or less per gallon.
DO pre-scrap dishes thoroughly.
DO use only detergents recommended by your chemical professional.
DO, at the end of the day, complete a manual cleaning cycle as needed; thoroughly cleanse
the machine, rinse, and dry (leave doors open).
DO, at the end of each meal period, complete an Auto Clean cycle (when equipped), following
instructions on the display.
DO use only products formulated to be safe on stainless steel.
DO NOT use detergents formulated for residential dishwashers.
DO NOT allow food soil to accumulate on the tank bottom.
DO NOT use steel wool to clean ware or dishwasher surface.
DO NOT allow foreign objects to enter the unit, especially metallic contaminants.
NOTE: Failuretofollowuse,care,andmaintenanceinstructionsmayvoidyourHobartdishwasher
warranty.

– 14 –
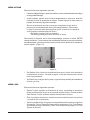
CURTAINS: MODELS FT1000, FT1000-ER, FT1000-ER-BD, & FT1000-ADV
Fig. 14

– 15 –
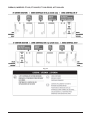
CURTAINS: MODELS FT1000S, FT1000S-ER, & FT1000S-ER-BD
Fig. 15

– 16 –
PROGRAMMING
MACHINE OPERATION AND PROGRAMMING SECURITY LEVELS
The advanced digital controls on your dishwasher allow several setup and
customizationoptions.Becausetheseoptionscanaffecttheoperationofthemachine,
theyarealllocked-outbydefaultfromthefactory.Tounlockthemforediting,the
securitylevelmustbeelevatedtoanappropriatelevel.
Itisrecommendedtokeepthedishwasherinthelowestsecuritylevelpossibleat
alltimes.Thiswillpreventoptionsfrombeinginadvertentlyorintentionallymodied
fromwhatisexpectedoracceptable.Thesecuritylevelwillautomaticallyrevert
backtothelowestallowablelevel(eitherOperatororSuperOperator,asdescribed
below)whenanyofthefollowingoccur:
1. No keys on the keypad are pressed for 10 minutes or more.
2. ThemachineisplacedinStandbybypressingthePOWERkey.
3. AninvalidSecurityCodeisenteredontheENTERSECURITYCODE?Screen.
Thefollowingnamesanddescriptionsofthevarioussecuritylevelsarelistedfrom
thelowestleveltothehighestlevel.Ahighersecuritylevelincludesalloftheabilities
ofthelowerlevelsplussomeextraabilities,asdescribedbelow.
NOTE: Thesecurityleveldoesnot,byitself,affecttheoperationofthemachineor
inhibittheuseofanyoftheStart,Stop,orPowerkeysorbuttons.Allofthesebasic
functionsarealwaysavailableinanysecuritylevel.
Operator – O
Thisisthemostbasicsecuritylevelandisenabledbydefaultwhentheunitis
poweredupasinitiallysetbythefactory.Nosecuritycodeisrequiredtoenterthis
securitylevel.ThislevelonlyallowsenteringtheSecurityCodetoelevatethecurrent
securityleveltosomethinghigher.
SuperOperator – SO
ThissecuritylevelcanbeenabledviatheManagerMenu(Manager→Operation
Parameters→SuperOperatorAccess).Onceenabled,"SuperOperator"willbe
addedasanoptionwhentheMenubuttonispressed(inthe"MainMenu").Asecurity
codeisNOTrequiredtoentertheSuperOperatormenuonceithasbeenenabled.
TheSuperOperatormenuallowssomeadvancedfeaturestobeaccessed;suchas
initiatingAutoDelime,reviewingerrorlogs,andchangingthedisplayedlanguage.
AdetailedlistofSuperOperatorfunctionsisshownintheParametersMenu.

– 17 –
Manager – M
Thissecuritylevelisthehighestlevelattainablebytheuser.ItrequirestheManager
CodetobeenteredbeforethesecuritylevelwillbeelevatedtoManager.
ThissecurityleveloffersunrestrictedaccesstoalloftheoptionslistedintheParameters
Menu.Becauseofthis,itisrecommendedthatpowertothemachinebecycledoff
andonwhenaccesstotheManagerleveloptionsarenolongerexplicitlyneeded.
TheSecurityCodefortheManagerlevelcanbechangedbyakitchenmanager
oranyonewiththeManagerCode.Thedefaultcodeislistedinthesectiontitled
Entering the Operation Parameters Menu. As such, it is recommended that this code
bechangedfromthedefaultandstoredinasafeplacewhereallkitchenmanagers,
butnooneelse,canaccessit.Ifthecodeiseverlostorforgotten,itcanbereset
by Hobart Service.
NOTE: Having Hobart Service reset the Manager Code is not covered under either
the basic or the extended warranty.
USER PROGRAMMING INSTRUCTIONS
Thedishwasherisequippedwithelectronicdigitalcontrolstoallowgreaterprecision
forcleaningyourware,maintainingrequiredtanktemperaturesandotheradvanced
functions.Someofthesefunctionsarecustomizedtosuittheneedsofyourkitchen
operation.
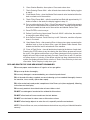
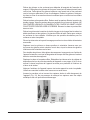
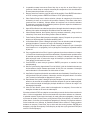
Allcustomizationisperformedthroughtheon-screenmenuusingtheUP,DOWN/
MENU,ENTER,andSTOP/BACKkeyslocatedonthekeypadonthecontrolbox
door(Fig.16).
START
STOP or BACK
POWER
AUTO CLEANSPEED
SELECTION
DOWN or
MENU
UPENTER DISPLAY
Fig. 16

– 18 –
MENU DISPLAY PROMPTS
Thefollowingpromptsareusedinsidethemenus.
• TheUPandDOWNarrowkeysareusedtochangeparametervaluesandto
navigate the menu.
• TheENTERkeyisusedtoacceptavalue,performaspeciedactionorenter
a submenu.
• TheBACKkeywillalwaysrevertbacktothepreviousmenuscreen.
• Thetextjusttotherightofthe‘>’symbolonthedisplayscreenshowswhat
actionorcommandwilloccurbypressingtheENTERkey.
ENTERING THE MANAGER MENU
To enter the Manager menu:
1. PresstheMENUkeyfromthemainscreen.ThiswilltakeyoutotheMain Menu.
2. Withthe‘>’symboltotheleftofManager,presstheENTERkey.Thiswilltake
you to the Enter Security Code screen.
3. You are prompted with four asterisks [****].
4. UsetheUPandDOWNkeystochangethedigitoftheSecurityCodetothe
appropriatevalue*.
*ThedefaultSecurityCodetoenterManagerprogrammingis1001.Thiscodecan
bechangedbyanyonewiththisknowledgeanditisrecommendedtochangeitfrom
thedefault.Ifthecodeiseverlostforsomereason,itcanberesetbyHobartService.
NOTE: Resetting the code is not covered under your warranty, whether you are in
theinitialwarrantyperiodorintheextendedwarrantyperiod.
5. Press the ENTER key to move to the next digit to the right.
6. Repeat steps 4 and 5 for each digit.
AfterpressingENTERonthefourthdigit,youwillbeintheManager Menu.
7. PresstheUPorDOWNkeysrepeatedlyuntilthe‘>’symbolistotheleftofthe
desired option and then press the ENTER key. The Manager options are: About,
Actions, Logs, and Operation Parameters.
ABOUT SCREEN
TheAboutscreendisplaysthefollowinginformation;Machine Model, Control Board
Revision, Relay Board Revision, Software Version, Sanitizing Mode, and Service
Number.

– 19 –
ACTIONS MENU
TheActionsMenuprovidesthefollowingoptions:
• ChangeManagerCode:Allowsthemanagersecuritycodetobechangedfrom
thedefaultvalue.
• ReverseJog:Allowstheconveyortobejoggedinthereversedirectionincase
thereisaconveyorjam.Whenenteringthismode,thefollowingmessageis
displayed:
Be sure all personnel clear of conveyor. Press button in upper Control Box
while pressing Enter.
> Exit without jogging
Reverse jog conveyor
Toreversejogtheconveyor,presstheENTERbuttonwiththe‘>’symbollocated
totheleftofReversejogconveyorwhilealsopressingthegreenbuttonlocated
behindtheuppercontrolboxdoor(Fig.17).
REVERSE JOG BUTTON
Fig. 17
• Run Delime Cycle:InitiatestheAutoDelimecycle;seepage10ofthismanual
forthecompleteprocedure.
• Set Date/Time: Enter this screen to set the date and time
LOGS MENU
TheLogsmenuprovidesthefollowingoptions:
• Delime Counter:Displaysthetimeremainingbeforedelimerecommendation
isdisplayed.AlsoallowstheabilitytoClear Delime Counter.
• Error Log: Displaystheprevious errorsalongwith thedate/timethe errors
occurred.
• Statistics:EnteringtheStatisticsscreenwilldisplaythefollowinginformation;
Time of Operation, Run Time Percent, Rinse Time, and Fill Time.

– 20 –
OPERATION PARAMETERS MENU
NOTE: Theparameterscanbechangedanytimethedisplayisactive,whichis
whenthemachineisoperatingorinidlemode.
Hobartbelievesthatthedefaultsettingsthatleavethefactoryaresuitableforthe
majority of kitchen operations. However, there are cases where kitchen managers
mayndtheneedtochangeoneormoreoptions;theParametersMenuallows
these changes.
WithintheParametersMenu,themanager(oroperator,insomecases)maymodify
factorydefault settings.The menustructureand descriptionofeach optionare
detailedbelow.PleasecontactHobartServiceifyouareuncomfortablechanging
anysettingorareunsureofwhichone(s)tochange.
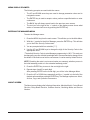
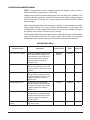
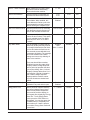
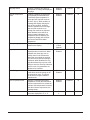
TheParametersMenuliststheparametername,ashortdescription,alistofpossible
valuestheparametercanhave,thefactorydefaultvalue based onthe specic
dishwashermodel,andthesecuritylevelrequiredtoaccessthatparameter
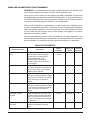
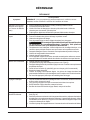
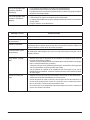
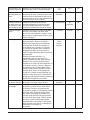
PARAMETERS MENU
Parameter Name Description Possible Values
Default
Value
Security
Required
AutoCleanDemoMode EnablesordisablestheAutoClean
DemoMode.Whenenabled,this
modeallowstheAutoCleancycle
to be demonstrated for training
purposes without running the
completecycle.
Disabled
Enabled
Disabled M
Auto Timeout Adjustabletimerfordetermining
when to shut down the pumps and
conveyor when no dishes are in the
machine.
1 – 30 mins 6 mins SO
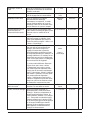
Conveyor Speed High Sets the High conveyor speed
setting when the operator presses
theSpeedSelectionbuttononthe
keypad changing the setting to
Speed: High.
4.0-8.5 8.5ft/min M
Conveyor Speed Low Sets the Low conveyor speed
setting when the operator presses
theSpeedSelectionbuttononthe
keypad changing the setting to
Speed: Low.
4.0-8.5 4.0ft/min M
Conveyor Speed Medium Sets the Medium conveyor speed
setting when the operator presses
theSpeedSelectionbuttononthe
keypad changing the setting to
Speed: Medium.
4.0-8.5 6.3ft/min M
Delime–MainTanks
Quantity
Setsthenumberofdelimergallons
requiredpertank.
0.0 – 2.0 0.50 M
La page est en cours de chargement...
La page est en cours de chargement...
La page est en cours de chargement...
La page est en cours de chargement...
La page est en cours de chargement...
La page est en cours de chargement...
La page est en cours de chargement...
La page est en cours de chargement...
La page est en cours de chargement...
La page est en cours de chargement...
La page est en cours de chargement...
La page est en cours de chargement...
La page est en cours de chargement...
La page est en cours de chargement...
La page est en cours de chargement...
La page est en cours de chargement...
La page est en cours de chargement...
La page est en cours de chargement...
La page est en cours de chargement...
La page est en cours de chargement...
La page est en cours de chargement...
La page est en cours de chargement...
La page est en cours de chargement...
La page est en cours de chargement...
La page est en cours de chargement...
La page est en cours de chargement...
La page est en cours de chargement...
La page est en cours de chargement...
La page est en cours de chargement...
La page est en cours de chargement...
La page est en cours de chargement...
La page est en cours de chargement...
La page est en cours de chargement...
La page est en cours de chargement...
La page est en cours de chargement...
La page est en cours de chargement...
La page est en cours de chargement...
La page est en cours de chargement...
La page est en cours de chargement...
La page est en cours de chargement...
La page est en cours de chargement...
La page est en cours de chargement...
La page est en cours de chargement...
La page est en cours de chargement...
La page est en cours de chargement...
La page est en cours de chargement...
La page est en cours de chargement...
La page est en cours de chargement...
La page est en cours de chargement...
La page est en cours de chargement...
La page est en cours de chargement...
La page est en cours de chargement...
La page est en cours de chargement...
La page est en cours de chargement...
La page est en cours de chargement...
La page est en cours de chargement...
La page est en cours de chargement...
La page est en cours de chargement...
La page est en cours de chargement...
La page est en cours de chargement...
La page est en cours de chargement...
La page est en cours de chargement...
La page est en cours de chargement...
La page est en cours de chargement...
-
 1
1
-
 2
2
-
 3
3
-
 4
4
-
 5
5
-
 6
6
-
 7
7
-
 8
8
-
 9
9
-
 10
10
-
 11
11
-
 12
12
-
 13
13
-
 14
14
-
 15
15
-
 16
16
-
 17
17
-
 18
18
-
 19
19
-
 20
20
-
 21
21
-
 22
22
-
 23
23
-
 24
24
-
 25
25
-
 26
26
-
 27
27
-
 28
28
-
 29
29
-
 30
30
-
 31
31
-
 32
32
-
 33
33
-
 34
34
-
 35
35
-
 36
36
-
 37
37
-
 38
38
-
 39
39
-
 40
40
-
 41
41
-
 42
42
-
 43
43
-
 44
44
-
 45
45
-
 46
46
-
 47
47
-
 48
48
-
 49
49
-
 50
50
-
 51
51
-
 52
52
-
 53
53
-
 54
54
-
 55
55
-
 56
56
-
 57
57
-
 58
58
-
 59
59
-
 60
60
-
 61
61
-
 62
62
-
 63
63
-
 64
64
-
 65
65
-
 66
66
-
 67
67
-
 68
68
-
 69
69
-
 70
70
-
 71
71
-
 72
72
-
 73
73
-
 74
74
-
 75
75
-
 76
76
-
 77
77
-
 78
78
-
 79
79
-
 80
80
-
 81
81
-
 82
82
-
 83
83
-
 84
84


Hobart FT1000S-ER-BD Mode d'emploi
- Taper
- Mode d'emploi
- Ce manuel convient également à
dans d''autres langues
Documents connexes
-
Hobart FT1000e Dishwasher Le manuel du propriétaire
-
-
Hobart CL44eNER Instructions Manual
-
Hobart LXeH ML-130192 Manuel utilisateur
-
-
-
-
-
-