
www.blackanddecker.ae
FSMH13E5
FSMH13E10
AR FR EN

2
ENGLISH
(Original instructions)
1
3
4
5
6
7
8
9
12
13
10
11
2

3
ENGLISH
(Original instructions)
7 17 18 19 22
20
21 16
B
FSMHI3E10
8
9
C
5
5a
5b
6
D
7 14 15 16
A
FSMHI3E5

4
ENGLISH
(Original instructions)
10
11
3
4
6
7
E
G H
1319
13a
F

Safety instructions
Warning! Read all Safety, Maintenance, Service' manual
carefully before operating this appliance. Read all of this
manual carefully before operating this appliance.
Intended use
Your BLACK+DECKER
TM
FSMH13E5, FSMH13E10 steam
mop has been designed for sanitising and cleaning sealed
hardwood, sealed laminate, linoleum, vinyl, ceramic tile,
stone and marble floors. This appliance is intended for
indoor household use only.
Safety of others
• This appliance can be used by children aged from 8
years and above and persons with reduced physical,
sensory or mental capabilities or lack of experience and
knowledge if they have been given supervision or
instruction concerning use of the appliance in a safe way
and understand the hazards involved.
• Children shall not play with the appliance. Cleaning and
user maintenance shall not be made by children without
supervision.
• If the supply cord is damaged, it must be replaced by the
manufacturer, its service agent or similarly qualified
persons in order to avoid a hazard.
• The plug must be removed from the socket-outlet before
cleaning or maintaining the appliance.
• The liquid or steam must not be directed towards
equipment containing electrical components, such as
the interior of ovens.
• The appliance shall not be left unattended while it is
connected to the supply mains;
• The appliance is not to be used if it has been dropped, if
there are visible signs of damage or if it is leaking;
• Keep the appliance out of reach of children when it is
energized or cooling down.
After use (Fig. H)
• Turn the steam mop 'OFF'. turn the steam operation
button (2) to off and then press the ON/OFF button (1).
• Wait until the steam mop cools down.
• Unplug the steam mop from the electrical wall outlet.
• Empty the water tank.
• remove the cleaning pad (7) and wash it ready for next
use.
• Wrap the power supply cable around the tidy hook (10).
Labels on appliance
The following pictograms along with the date code are
shown on the appliance.
5
ENGLISH
(Original instructions)
CAUTION Hot Steam
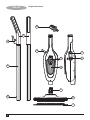
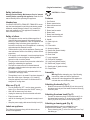
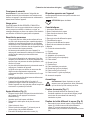
Features
1. On/off switch
2. Steam operate button
3. Water tank access tab
4. Water tank
5. Steam head connector
6. Steam head
7. Steam head cleaning pad
8. Handle connector button
9. Handle
10. Cable tidy hook
11. Grip
12. Power cable
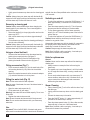
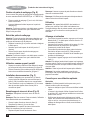
13. Accessory adaptor
14. Small brush (plastic bristles)
15. Small squeegee
16. Grout brush
17. Large squeegee
18. Sock pad for squeegee
19. Large brush (plastic bristles)
20. Small brush (copper bristles)
21. Small brush x2 (plastic bristles)
22. Carpet Glider
Assembly
Warning! Before attempting any of the following
instructions, make sure that the appliance is
switched off and unplugged and the appliance is
cold and does not contain any water.
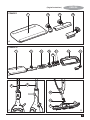
Attaching the handle (Fig. C)
• Slide the bottom end of the handle (9) into the top end of
the steam mop body until the handle connector button (8)
clicks into place.
Attaching the steam head (Fig. D)
• Connect the steam mop body to the steam head (6) via
the steam head connector (5), ensuring the connection
button (5a) clicks into place in the the opening (5b).
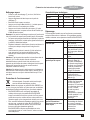
Attaching a cleaning pad (Fig. E)
Replacement cleaning pads are available from your
BLACK+DECKER dealer :- (cat no. FSMP20-XJ).
• Place a cleaning pad (7) on the floor with the velcro 'loop'
side facing up.

6
ENGLISH
(Original instructions)
• Lightly press the steam mop down onto the cleaning pad
(7).
Caution: Always place your steam mop with the handle (9)
supported in the upright position when stationary and make
sure the steam mop is turned off when not in use.
Removing a cleaning pad
Caution! Always wear suitable shoes when changing the
cleaning pad on your steam mop. Do not wear slippers or
open toed footwear.
• Return the handle (9) to the upright position and turn the
steam mop 'OFF'.
• Wait until the steam mop cools down (approximately 5
minutes).
• Lift the steam mop away from the cleaning pad freeing it
from the velcro fastening.
Caution! Always place your steam mop with the handle (9)
supported in the upright position when stationary and make
sure the steam mop is turned off when not in use.
Using as a hand held unit
• Disonnect the hand held unit from the steam head by
pushing the connection button (5a) figure D.
• Remove the handle (9) from the hand held unit by
pushing the handle connector button (8) figure C.
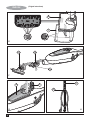
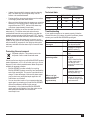
Fitting accessories (Fig. F)
• Fit the accessorie adaptor (13) into the main body of the
unit ensuring the button (13a) clicks into the relevant
opening.
• Attach the required accessorie to the accessorie adaptor
(13) and twist clockwise to lock into place.
Filling the water tank (Fig. G)
Note! Fill the water tank with clean tap water.
Note! In areas of hard water, the use of de-ionised water is
recommended.
• Open the water tank access tab (3).
• Fill the water tank (4) with water.
Warning! Your water tank has a 380ml capacity. Do not over
fill the tank.
• Replace the water tank access tab.
Note! Ensure the water tank access tab is firmly secured.
Note! Do not use chemical cleaners with your steam mop
water tank.
Use
Important! This unit will kill 99.9% of bacteria and germs
when used in accordance with the instructions in this manual
and with the micro fibre pad fitted and a continuous run time
of 90 seconds.
Switching on and off
• To switch the appliance on, press the ON/Off button (1). It
takes approximately 15 seconds for the steam mop to
heat up.
• Press the steam operation button (2). This will operate
the pump and the unit will begin to produce steam.
• To stop steam generation, turn the steam operation
button (2) to off. This will maintain power to the boiler for
quicker start up.
• To switch the appliance off, press the ON/Off button (1).
Caution! Never leave the steam mop in one spot on any
surface for any period of time.
Always place the steam mop with the handle (9) supported in
the upright position when stationary and make sure the
steam mop is turned off when not in use.
Caution! Always empty the steam mop after use.
Note! When first filled or after running dry, it can take up to
45 seconds for steam to be produced.
Hints for optimum use
General
Caution: Never use the steam mop without first attaching a
cleaning pad.
• Always vacuum or sweep the floor before using the
steam mop.
• The easiest way to use the appliance is to tilt the handle
to a 45º angle and clean slowly, covering a small area at
a time.
• Do not use chemical cleaners with your steam mop. To
remove stubborn stains from vinyl or linoleum floors, you
can pre-treat with a mild detergent and some water
before using the steam mop.
Steam Cleaning
• Place a cleaning pad (7) on the floor with the velcro 'loop'
side facing up.
• Lightly press the steam mop down onto the cleaning pad
(7).
• Connect the steam mop to the mains.
• Press the ON/OFF button (1). It takes approximately 15
seconds for the steam mop to heat up.
• Press the steam operate button (2). After a few seconds,
steam will start to come out of the steam head.
Note! When first filled or after running dry, it can take up to
45 seconds for steam to be produced.

7
ENGLISH
(Original instructions)
• It takes a few seconds for steam to enter the cleaning
pad. The steam mop will now glide easily over the
surface to be sanitized/cleaned.
• Push and pull the steam mop slowly across the surface
to thoroughly steam clean each section.
• When you have finished using the steam mop, return the
handle (9) to the upright position, making sure that it is
supported and turn it 'OFF'. Wait until the steam mop
cools down (approximately five minutes).
Caution! It is important to monitor the water level in the
water tank (4). To refill the water tank and continue to
sanitize/clean stand the mop upright making sure that the
handle is supported and turn the steam mop 'OFF'. Unplug
the unit from the electrical wall outlet, refill the water tank (4).
Caution! Never leave the steam mop in one spot on any
surface for any period of time. Always place the steam mop
with the handle (9) supported in the upright position when
stationary and make sure the steam mop is turned off when
not in use.
Protecting the environment
Separate collection. This product must not be
disposed of with normal household waste.
Should you find one day that your BLACK+DECKER product
needs replacement, or if it is of no further use to you, do not
dispose of it with other household waste. Make this product
available for separate collection.
• BLACK+DECKER provides a facility for recycling
BLACK+DECKER products once they have reached the
end of their working life. This service is provided free of
charge. To take advantage of this service please return
your product to any authorised repair agent who will
collect them on our behalf.
• You can check the location of your nearest authorised
repair agent by contacting your local BLACK+DECKER
office at the address indicated in this manual.
Alternatively, a list of authorized BLACK+DECKER
repair agents and full details of our after-sales service
and contact are available on the Internet at:
www.2helpU.com.
Technical data
Troubleshooting
If your appliance seems not to operate properly, follow the
instructions below. If this does not solve the problem, please
contact your local BLACK+DECKER repair agent.
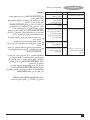
FSMH13E5-B5 FSMH13E10-B5
Voltage V
AC
220-240 220-240
Power W 1300 1300
Tank Capacity ml 380 380
Weight kg 1.8 1.8
Problem Step Possible solution
The steam mop is not 1. Check the unit is plugged
turning on in at the wall socket.
2. Check the unit is
switched on using the
ON/OFF switch (1)
3. Check the fuse in the
plug.
The steam mop is not 4. Check the water tank
producing steam (4) is full .
NOTE: When first filled
or after running dry it
can take up to 45
seconds for steam to be
produced.
5. Check the steam
generation button is in
the ON position (2).
Where can I get 6. Refer to the assembly
further information/ chapter of the manual
accessories for for correct fitting of parts
my steam mop and accessories.

8
ENGLISH
(Original instructions)
Warranty
BLACK+DECKER is confident of the quality of its products
and offers an outstanding warranty.
This warranty statement is in addition to and in no way
prejudices your statutory rights.
If a BLACK+DECKER product becomes defective due to
faulty materials, workmanship or lack of conformity, within 24
months from the date of purchase, BLACK+DECKER
warranty to replace defective parts, repair products
subjected to fair wear and tear or replace such products to
ensure minimum inconvenience to the customer unless:
The product has been used for trade, professional or
hire purposes;
The product has been subjected to misuse or neglect;
The product has sustained damage through foreign
objects, substances or accidents;
Repairs have been attempted by persons other than
authorised repair agents or BLACK+DECKER service
staff.
To claim on the warranty, you will need to submit proof of
purchase to the seller or an authorised repair agent. You can
check the location of your nearest authorised repair agent by
contacting your local BLACK+DECKER office at the
address indicated in this manual.
Alternatively, a list of authorised BLACK+DECKER repair
agents and full details of our after-sales service and contacts
are available on the Internet at: www.2helpU.com.
Black and Decker (Overseas) GmbH
PO Box 17164, Dubai, United Arab Emirates

9
FRANÇAIS
(Traduction des instructions d'origine)
Consignes de sécurité
Avertissement ! Lisez attentivement l’intégralité des
manuels de sécurité, de maintenance et d’entretien avant
d’utiliser cet appareil. Lisez attentivement et entièrement le
manuel avant d’utiliser l’appareil.
Usage prévu
Votre balai vapeur BLACK+DECKER
TM
FSMH13E5 et
FSMH13E10 a été conçu pour désinfecter et nettoyer les
sols en parquet, en stratifié, en linoléum, en vinyle, en
carrelage céramique, en pierre et en marbre. Il est destiné à
une utilisation à l’intérieur et grand public uniquement.
Sécurité des personnes
• Cet appareil peut être utilisé par des enfants de 8 ans
ou plus et par des personnes aux capacités physiques,
mentales ou sensorielles déficientes ou qui manquent
d’expérience ou de connaissances s’ils sont supervisés
ou ont été formés à l’utilisation sûre de l’appareil et qu’ils
sont conscients des risques potentiels.
• Ne laissez pas les enfants jouer avec l’appareil. Le
nettoyage et la maintenance à réaliser par l’utilisateur ne
doivent pas être entrepris par des enfants sans
surveillance.
• Si le cordon d’alimentation est endommagé, il doit être
remplacé par le fabricant ou l’un de ses prestataires de
service ou par une personne de même qualification, afin
d’éviter tout risque.
• La prise doit être débranchée de la prise murale avant le
nettoyage ou l’entretien de l’appareil.
• Le liquide ou la vapeur ne doivent en aucun cas être
dirigés vers des équipements contenant des
composants électriques, comme l’intérieur d’un four par
exemple.
• L’appareil ne doit pas être laissé sans surveillance tant
qu’il est branché au secteur ;
• L’appareil ne doit pas être utilisé s’il a chuté, s’il
présente des signes visibles de dommages ou s’il fuit ;
• Gardez l’appareil hors de portée des enfants lorsqu’il est
sous tension ou pendant qu’il refroidit.
Après utilisation (Fig. H)
• Éteignez le balai vapeur. Éteignez le bouton d’activation
de la vapeur (2) puis appuyez sur le bouton
Marche/Arrêt (1).
• Attendez que le balai vapeur refroidisse.
• Débranchez le balai vapeur de la prise de courant
murale.
• Videz le réservoir d’eau.
• Retirez le patin de nettoyage (7) et lavez-le pour le
trouver propre à la prochaine utilisation.
• Entourez le fil électrique autour du crochet (10).
Étiquettes apposées sur l’appareil
Les pictogrammes suivants ainsi que le code date sont
apposés sur l’outil.
ATTENTION Vapeur bouillante
Caractéristiques
1. Interrupteur Marche/Arrêt
2. Bouton d‘activation de la vapeur
3. Patte d‘accès au réservoir d‘eau
4. Réservoir d’eau
5. Raccord pour la tête diffusant la vapeur
6. Tête diffusant la vapeur
7. Patin pour la tête diffusant la vapeur
8. Bouton de raccordement du manche
9. Manche
10. Crochet de retenue de câble
11. Poignée
12. Câble électrique
13. Adaptateur pour accessoire
14. Petite brosse (poils en plastique)
15. Petite raclette
16. Brosse à joints
17. Raclette large
18. Patin-chaussette pour raclette
19. Brosse large (poils en plastique)
20. Petite brosse (poils en cuivre)
21. Petite brosse x 2 (poils en plastique)
22. Accessoire moquette
Assemblage
Avertissement ! Avant d’exécuter ce qui suit,
assurez-vous que l’appareil est éteint, débranché,
qu’il est froid et qu’il ne contient pas d’eau.
Fixation du manche (Fig. C)
• Glissez l’extrémité inférieure du manche (9) dans
l’extrémité supérieure du corps du balai vapeur jusqu’à
ce le bouton de raccordement du manche (8)
s’enclenche en place.
Fixation de la tête diffusant la vapeur (Fig. D)
• Raccordez le corps du balai vapeur à la tête diffusant la
vapeur (6) à l’aide du raccord de la tête diffusant la
vapeur (5), en vous assurant que le bouton de
raccordement (5a) s’enclenche correctement dans le trou
(5b).

10
FRANÇAIS
(Traduction des instructions d'origine)
Fixation du patin de nettoyage (Fig. E)
Vous trouverez des patins de nettoyage de rechange auprès
de votre revendeur BLACK+DECKER (cat. n° FSMP20-XJ).
• Placez un patin de nettoyage (7) sur le sol, côté Velcro
bouclé vers le haut.
• Appuyez légèrement le balai vapeur sur le patin de
nettoyage (7).
Attention : Positionnez toujours votre balai vapeur, manche
(9) à la verticale et assurez-vous que le balai est éteint
lorsqu’il n’est pas utilisé.
Retrait du patin de nettoyage
Attention ! Portez toujours des chaussures adaptées pour
remplacer le patin de nettoyage de votre balai vapeur. Ne
portez pas de chaussons ni de pieds-nus.
• Replacez le manche (9) en position verticale et éteignez
le balai vapeur.
• Attendez que le balai vapeur ait refroidi (environ 5
minutes).
• Retirez le balai vapeur du patin de nettoyage en
enlevant la fixation Velcro.
Attention ! Positionnez toujours votre balai vapeur, manche
(9) à la verticale et assurez-vous que le balai est éteint
lorsqu’il n’est pas utilisé.
Utilisation comme appareil portatif
• Séparez le module portatif de la tête diffusant la vapeur
en enfonçant le bouton de raccordement (5a) figure D.
• Retirez le manche (9) du module portatif en enfonçant le
bouton de raccordement de manche (8) figure C.
Installation des accessoires (Fig. F)
• Installez l’adaptateur pour accessoires (13) dans le
corps principal de l’appareil en vous assurant que le
bouton (13a) s’enclenche dans le trou correspondant.
• Fixez l’accessoire voulu sur l’adaptateur (13) et tournez
dans le sens des aiguilles d’une montre pour le
verrouiller en place.
Remplissage du réservoir d’eau (Fig. G)
Remarque ! Remplissez le réservoir avec de l’eau du
robinet.
Remarque ! Dans les zones où l’eau est calcaire, l’utilisation
d’eau déminéralisée est recommandée.
• Ouvrez la patte d’accès au réservoir d’eau (3).
• Remplissez le réservoir (4) avec de l’eau.
Avertissement ! La capacité du réservoir d’eau est de
380ml. Ne remplissez pas trop le réservoir.
• Replacez la patte d’accès au réservoir d’eau.
Remarque ! Assurez-vous que la patte d’accès au réservoir
d’eau est correctement fixée.
Remarque ! N’utilisez pas de nettoyants chimiques dans le
réservoir d’eau de votre balai vapeur.
Utilisation
Important ! Cet appareil détruit 99,9% des bactéries et
germes pour autant qu’il soit utilisé conformément aux
consignes décrites dans le présent manuel, avec un patin en
microfibre et qu’il fonctionne en continu pendant 90
secondes.
Allumage et extinction
• Pour mettre l’appareil en marche, appuyez sur le bouton
Marche/Arrêt (1). Le balai vapeur a besoin d’environ 15
secondes pour chauffer.
• Appuyez sur le bouton d’activation de la vapeur (2). Cela
permet d’actionner la pompe pour que l’appareil
commence à produire de la vapeur.
• Pour arrêter la production de vapeur, placez le bouton
d’activation de vapeur sur Arrêt (2). Cela permet de
conserver la puissance à l’intérieur de la chaudière pour
accélérer le redémarrage.
• Pour éteindre l’appareil, appuyez sur le bouton Marche/
Arrêt (1).
Attention ! Ne laissez jamais le balai vapeur trop longtemps
au même endroit. Placez toujours le balai vapeur, manche (9)
à la verticale et assurez-vous que le balai est éteint lorsqu’il
n’est pas utilisé.
Attention ! Videz toujours le balai vapeur après utilisation.
Remarque ! Au premier remplissage ou après avoir
fonctionné à vide, la production de vapeur peut prendre
jusqu’à 45 secondes.
Conseils pour une utilisation optimale
Généralités
Attention : N’utilisez jamais le balai vapeur sans y avoir
d’abord installé un patin de nettoyage.
• Aspirez ou balayez toujours le sol avant d’utiliser le balai
vapeur.
• Le moyen le plus simple d’utiliser l’appareil est d’incliner
le manche à 45° et de nettoyer lentement en couvrant de
petites zones à la fois.
• N’utilisez pas de nettoyants chimiques avec le balai
vapeur. Afin d’éliminer les taches tenaces sur les sols en
vinyle ou en lino, vous pouvez les prétraiter avec un
mélange de détergent doux et d’eau, avant d’utiliser le
balai vapeur.

Nettoyage vapeur
• Placez un patin de nettoyage (7) sur le sol, côté Velcro
bouclé vers le haut.
• Appuyez légèrement le balai vapeur sur le patin de
nettoyage (7).
• Branchez le balai vapeur au secteur.
• Appuyez sur le bouton Marche/Arrêt (1). Le balai vapeur a
besoin d’environ 15 secondes pour chauffer.
• Appuyez sur le bouton d’activation de vapeur (2). Après
quelques secondes, la vapeur se forme et est évacuée par
la tête diffusant la vapeur.
Remarque ! Au premier remplissage ou après avoir fonctionné à
vide, la production de vapeur peut prendre jusqu’à 45 secondes.
• La vapeur met quelques secondes pour atteindre le patin de
nettoyage. Une fois fait, le balai vapeur glisse facilement sur
la surface à désinfecter/nettoyer.
• Déplacez lentement le balai vapeur d’avant en arrière sur la
surface pour nettoyer chaque zone à fond grâce à la
vapeur.
• Une fois terminé, relevez le manche (9) à la verticale en
vous assurant qu’il est soutenu et éteignez le balai.
Attendez que le balai vapeur ait refroidi (environ cinq
minutes).
Attention ! Il est important de surveiller le niveau d’eau dans le
réservoir (4). Pour faire le plein d’eau et continuer à
désinfecter/nettoyer, placez le balai à la verticale en vous
assurant que le manche est soutenu et éteignez le balai vapeur.
Débranchez l’appareil de la prise de courant murale et
remplissez le réservoir d’eau (4).
Attention ! Ne laissez jamais le balai vapeur trop longtemps au
même endroit. Placez toujours le balai vapeur, manche (9) à la
verticale et assurez-vous que le balai est éteint lorsqu’il n’est
pas utilisé.
Protection de l'environnement
Collecte séparée. Ce produit ne doit pas être jeté
avec les déchets domestiques normaux.
Si vous décidez de remplacer ce produit BLACK+DECKER, ou
si vous n'en avez plus l'utilité, ne le jetez pas avec vos déchets
domestiques Rendez-le disponible pour une collecte séparée.
• BLACK+DECKER fournit un dispositif permettant de
collecter et de recycler les produits BLACK+DECKER
lorsqu'ils ont atteint la fin de leur cycle de vie. Pour pouvoir
profiter de ce service, veuillez retourner votre produit à un
réparateur agréé qui se chargera de le collecter pour nous.
• Pour connaître l'adresse du réparateur agréé le plus proche
de chez vous, contactez le bureau BLACK+DECKER à
l'adresse indiquée dans ce manuel. Vous pourrez aussi
trouvez un liste des réparateurs agréés de
BLACK+DECKER et de plus amples détails sur notre
service après-vente sur le site Internet à l'adresse suivante :
www.2helpU.com
Caractéristiques techniques
Dépannage
Si votre appareil semble ne pas fonctionner correctement,
suivez les instructions ci-dessous. Si le problème persiste,
veuillez contacter votre réparateur local BLACK+DECKER.
11
FRANÇAIS
(Traduction des instructions d'origine)
Problème Étape Solution possible
Le balai vapeur ne 1. Vérifiez que l’appareil est
s’allume pas bien branché
dans une prise murale.
2. Vérifiez que l’appareil a
bien été allumé à l’aide
de l’interrupteur Marche/
Arrêt (1)
3. Vérifiez le fusible de la
prise.
Le balai vapeur ne 4. Contrôlez que le
produit pas de vapeur réservoir d’eau (4)
est plein .REMARQUE :
Au premier remplissage
ou après avoir fonctionné
à vide, la production de
vapeur peut prendre
jusqu’à 45 secondes.
5. Vérifiez que le bouton
d’activation de la
vapeur est en position
Marche (2).
6. L’appareil vapeur est
équipé d’un thermostat
et d’un interrupteur
thermique. S’il surchauffe
pour quelque raison que
ce soit, il s’éteint.
Si cela se produit,
éteignez et
débranchez le, laissez-le
refroidir pendant 2 à 4
heures avant de
réessayer.
Où puis-je obtenir 7. Consultez le chapitre
plus d’informations/ Assemblage du manuel
d’accessoires pour mon pour savoir comment
balai vapeur correctement installerles
pièces et les
accessoires.
FSMH13E5-B5 FSMH13E10-B5
Tension V
AC
220-240 220-240
Puissance W 1300 1300
Capacité du réservoir ml 380 380
Poids kg 1.8 1.8

12
FRANÇAIS
(Traduction des instructions d'origine)
Garantie
L’entreprise BLACK+DECKER est certaine de la qualité de
ses produits et propose une garantie exceptionnelle.
Cette déclaration de garantie vient s’ajouter à vos droits
légaux et n’y porte en aucun cas préjudice.
Si un produit BLACK+DECKER s’avère défectueux en raison
de défauts de matériaux ou de fabrication, ou d’un manque
de conformité, dans les 24 mois à compter de la date
d’achat, la garantie de BLACK+DECKER permet le
remplacement de pièces défectueuses, la réparation ou
l’échange de produits soumis à une usure normale afin de
garantir un minimum d’inconvénients pour le client, sauf si :
le produit a été utilisé à des fins commerciales,
professionnelles ou de location ;
le produit a été utilisé de manière inadéquate ou avec
négligence ;
le produit a subi des dommages provoqués par des
objets, substances ou accidents étrangers ;
des tentatives de réparation ont été effectuées par des
personnes autres que les agents de réparation agréés ou
le personnel d’entretien de BLACK+DECKER.
Pour soumettre une réclamation au titre de la garantie, vous
devrez apporter une preuve d’achat au vendeur ou à un
agent de réparation agréé. Vous pouvez trouver l’agent de
service agréé le plus proche en contactant votre agence
BLACK+DECKER locale à l’adresse indiquée dans ce
manuel.
Autrement, une liste d’agents de réparation agréés
BLACK+DECKER et des informations complètes concernant
notre service après-vente, y compris les coordonnées, sont
disponibles en ligne à l’adresse suivante : www.2helpU.com.
Black and Decker (Overseas) GmbH
PO Box 17164, Dubai, United Arab Emirates

13
ﺔـﻴـﺑﺮـﻌـﻟﺍ
(ﺔﻴﺴﻴﺋﺮﻟﺍ ﺕﺎﻤﻴﻠﻌﺘﻟﺍ)
ﻥﺎﻤﻀﻟﺍ
ﻡﺪﻘﺗﻭ ﺎﻬﺗﺎﺠﺘﻨﻣ ﺓﺩﻮﺟ ﻲﻓ BLACK+DECKER ﻖﺜﺗ
.ﻞﺟﻷﺍ ﻞﻳﻮﻃ ﺎ
ﹰ
ﻧﺎﻤﺿ
ﻻﻭ ﺔﻴﻧﻮﻧﺎﻘﻟﺍ ﻚﻗﻮﻘﺣ ﻰﻟﺇ ﺔﻓﺎﺿﺇ ﺍﺬﻫ ﻥﺎﻤﻀﻟﺍ ﻥﺎﻴﺑ ﺪﻌ
ﹸ
ﻳ
.ﻝﺍﻮﺣﻷﺍ ﻦﻣ ﻝﺎﺣ ﻱﺄﺑ ﺎﻬﺑ ﻞﺨﻳ
BLACK+DECKER ﺞﺘﻨﻣ ﻲﻓ ﻞﻠﺧ ﺩﻮﺟﻭ ﺔﻟﺎﺣ ﻲﻓ
ﻊﻣ ﻖﻓﺍﻮﺘﻟﺍ ﻡﺪﻋ ﻭﺃ ﺔﻋﺎﻨﺼﻟﺍ ﻭﺃ ﺩﺍﻮﳌﺍ ﻲﻓ ﺐﻴﻋ ﺐﺒﺴﺑ
ﻦﻤﻀﺗ ،ﺀﺍﺮﺸﻟﺍ ﺦﻳﺭﺎﺗ ﻦﻣ
ﹰ
ﺍﺮﻬﺷ 24 ﻝﻼﺧ ،ﺮﻴﻳﺎﻌﳌﺍ
ﺡﻼﺻﺇﻭ ﺔﺒﻴﻌﳌﺍ ﺀﺍﺰﺟﻷﺍ ﻝﺍﺪﺒﺘﺳﺍ BLACK+DECKER
ﻝﺍﺪﺒﺘﺳﺍ ﻭﺃ ﻲﻌﻴﺒﻄﻟﺍ ﻰﻠﺒﻟﺍﻭ ﻞﻛﺂﺘﻟﺍ ﺓﺎﻋﺍﺮﻣ ﻊﻣ ﺕﺎﺠﺘﻨﳌﺍ
:ﻢﻟ ﺎﻣ ﻞﻴﻤﻌﻠﻟ ﺝﺎﻋﺯﺇ ﻞﻗﺃ ﻥﺎﻤﻀﻟ ﺕﺎﺠﺘﻨﳌﺍ ﻩﺬﻫ
ﻭﺃ ﺔﻴﻨﻬﻣ ﻭﺃ ﺔﻳﺭﺎﲡ ﺽﺍﺮﻏﺃ ﻲﻓ ﺞﺘﻨﳌﺍ ﻡﺍﺪﺨﺘﺳﺍ ﻢﺘﻳ
؛ﺮﻴﺟﺄﺗ ﺽﺍﺮﻏﺃ
؛ﻝﺎﻤﻫﻹﺍ ﻭﺃ ﻡﺍﺪﺨﺘﺳﻻﺍ ﺀﻮﺴﻟ ﺞﺘﻨﳌﺍ ﺽﺮﻌﺗ
ﻭﺃ ﺔﺒﻳﺮﻏ ﺩﺍﻮﻣ ﻭﺃ ﺀﺎﻴﺷﺃ ﺔﻄﺳﺍﻮﺑ ﻒﻠﺘﻠﻟ ﺞﺘﻨﳌﺍ ﺽﺮﻌﺗ
؛ﺙﺩﺍﻮﺣ
ﺀﻼﻛﻭ ﺮﻴﻏ ﺹﺎﺨﺷﺃ ﺔﻄﺳﺍﻮﺑ ﺞﺘﻨﳌﺍ ﺡﻼﺻﺇ ﺔﻟﻭﺎﺤﻣ
ﺔﻛﺮﺸﻟ ﻊﺑﺎﺘﻟﺍ ﺔﻧﺎﻴﺼﻟﺍ ﻖﻳﺮﻓ ﻭﺃ ﻦﻳﺪﻤﺘﻌﳌﺍ ﺔﻧﺎﻴﺼﻟﺍ
.BLACK+DECKER
ﺀﺍﺮﺸﻟﺍ ﻞﻴﻟﺩ ﱘﺪﻘﺗ ﻰﻟﺇ ﺝﺎﺘﲢ ﻑﻮﺳ ،ﻥﺎﻤﻀﻟﺎﺑ ﺔﺒﻟﺎﻄﻤﻠﻟ
ﻰﻠﻋ ﻑﺮﻌﺘﻟﺍ ﻚﻨﻜﳝ .ﺪﻤﺘﻌﳌﺍ ﺔﻧﺎﻴﺼﻟﺍ ﻞﻴﻛﻭ ﻭﺃ ﻊﺋﺎﺒﻠﻟ
ﻰﻠﻋ ﻝﺎﺼﺗﻻﺍ ﻝﻼﺧ ﻦﻣ ﺪﻤﺘﻌﻣ ﺔﻧﺎﻴﺻ ﻞﻴﻛﻭ ﺏﺮﻗﺃ ﻊﻗﻮﻣ
ﻥﺍﻮﻨﻌﻟﺍ ﻲﻓ ﻚﻳﺪﻟ ﻲﻠﶈﺍ BLACK+DECKER ﺐﺘﻜﻣ
.ﻞﻴﻟﺪﻟﺍ ﺍﺬﻫ ﻲﻓ ﺢﺿﻮﳌﺍ
ﻦﻳﺪﻤﺘﻌﳌﺍ ﺔﻧﺎﻴﺼﻟﺍ ﺀﻼﻛﻮﺑ ﺔﻤﺋﺎﻗ ﺪﺟﻮﺗ ،ﺮﺧﺁ ﻞﻳﺪﺒﻛﻭ
ﻞﻴﺻﺎﻔﺘﻟﺍﻭ BLACK+DECKER ﺔﻛﺮﺸﻟ ﲔﻌﺑﺎﺘﻟﺍ
ﺎﻨﺑ ﺔﺻﺎﳋﺍ ﻝﺎﺼﺗﻻﺍ ﻞﺋﺎﺳﻭﻭ ﻊﻴﺒﻟﺍ ﺪﻌﺑ ﺎﻣ ﺕﺎﻣﺪﳋ ﺔﻠﻣﺎﻜﻟﺍ
.www.2helpU.com :ﻰﻠﻋ ﺖﻧﺮﺘﻧﻹﺍ ﻰﻠﻋ
GmbH (ﺔﻴﳌﺎﻌﻟﺍ) Black and Decker ﺔﻛﺮﺷ
ﺓﺪﺤﺘﳌﺍ ﺔﻴﺑﺮﻌﻟﺍ ﺕﺍﺭﺎﻣﻹﺍ ،ﻲﺑﺩ ،17164 ﺪﻳﺮﺑ ﻕﻭﺪﻨﺻ
ﻞﻤﺘﶈﺍ ﻞﳊﺍ
ﻞﺻﻮﻣ ﺯﺎﻬﳉﺍ ﻥﺃ ﻦﻣ ﻖﻘﲢ
.ﻂﺋﺎﳊﺍ ﻲﻓ ﺲﺒﻘﳌﺎﺑ
ﺓﺪﺣﻮﻟﺍ ﻞﻴﻐﺸﺗ ﻦﻣ ﻖﻘﲢ
ﻝﻮﺤﻣ ﻡﺍﺪﺨﺘﺳﺎﺑ
(1) ﻑﺎﻘﻳﻹﺍ/ﻞﻴﻐﺸﺘﻟﺍ
ﻲﻓ ﺩﻮﺟﻮﳌﺍ ﺮﻬﺼﻨﳌﺍ ﻦﻣ ﻖﻘﲢ
.ﺲﺑﺎﻘﻟﺍ
.(4) ﺀﺎﳌﺍ ﻥﺍﺰﺧ ﺀﻼﺘﻣﺍ ﻦﻣ ﻖﻘﲢ
ﻭﺃ ﺓﺮﻣ ﻝﻭﻷ ﺀﻞﳌﺍ ﺪﻨﻋ :ﺔﻈﺣﻼﻣ
ﻥﺃ ﻦﻜﳝ ،ﻑﺎﳉﺍ ﻞﻴﻐﺸﺘﻟﺍ
ﻰﻟﺇ ﻞﺼﺗ ﺓﺪﻣ ﺭﺎﺨﺒﻟﺍ ﻕﺮﻐﺘﺴﻳ
.ﺞﺘﻨ
ﹸ
ﻳ ﻲﻜﻟ ﺔﻴﻧﺎﺛ 45
ﻲﻓ ﺭﺎﺨﺒﻟﺍ ﺝﺎﺘﻧﺇ ﺭﺯ ﻥﺃ ﻦﻣ ﻖﻘﲢ
.(2) ﻞﻴﻐﺸﺘﻟﺍ ﻊﺿﻭ
ﻞﻴﻟﺪﻟﺍ ﻲﻓ ﻊﻴﻤﺠﺘﻟﺍ ﻞﺼﻓ ﻊﺟﺍﺭ
ﺕﺎﻘﺤﻠﳌﺍﻭ ﺀﺍﺰﺟﻷﺍ ﺐﻴﻛﺮﺘﻟ
.ﻢﻴﻠﺳ ﻞﻜﺸﺑ
.ﺓﻮﻄﳋﺍ
.1
.2
.3
.4
5
.7
ﺔﻠﻜﺸﳌﺍ
ﺔﻳﺭﺎﺨﺒﻟﺍ ﺔﺤﺳﺎﳌﺍ ﻞﻴﻐﺸﺗ ﺃﺪﺒﻳ ﻻ
ﺍ
ﹰ
ﺭﺎﺨﺑ ﺞﺘﻨﺗ ﻻ ﺔﻳﺭﺎﺨﺒﻟﺍ ﺔﺤﺳﺎﳌﺍ
ﻦﻣ ﺪﻳﺰﳌﺍ ﻰﻠﻋ ﻝﻮﺼﳊﺍ ﻲﻨﻨﻜﳝ ﻦﻳﺃ
ﻲﺘﺤﺳﺎﳌ ﺕﺎﻘﺤﻠﳌﺍ/ﺕﺎﻣﻮﻠﻌﳌﺍ
ﺔﻳﺭﺎﺨﺒﻟﺍ

14
ﺔـﻴـﺑﺮـﻌـﻟﺍ
(ﺔﻴﺴﻴﺋﺮﻟﺍ ﺕﺎﻤﻴﻠﻌﺘﻟﺍ)
ﺾﺒﻘﳌﺍ ﺔﻟﺎﻣﺇ ﻲﻫ ﺯﺎﻬﳉﺍ ﻡﺍﺪﺨﺘﺳﻻ ﺔﻘﻳﺮﻃ ﻞﻬﺳﺃﻭ •
ﺔﻘﻄﻨﻣ ﺔﻴﻄﻐﺗ ﻊﻣ ،ﺀﻂﺒﺑ ﻒﻴﻈﻨﺘﻟﺍﻭ ﺔﺟﺭﺩ 45 ﺔﻳﻭﺍﺰﺑ
.ﺓﺮﻣ ﻞﻛ ﻲﻓ ﺓﺮﻴﻐﺻ
ﻚﺘﺤﺳﺎﻣ ﻊﻣ ﺔﻴﺋﺎﻴﻤﻴﻜﻟﺍ ﺕﺎﻔﻈﻨﳌﺍ ﻡﺪﺨﺘﺴﺗ ﻻ •
ﻭﺃ ﻞﻴﻨﻴﻔﻟﺍ ﺕﺎﻴﺿﺭﺃ ﻦﻣ ﺓﺪﻴﻨﻌﻟﺍ ﻊﻘﺒﻟﺍ ﺔﻟﺍﺯﻹ .ﺔﻳﺭﺎﺨﺒﻟﺍ
ﻒﻴﻔﺧ ﻒﻈﻨﲟ ﺎ
ﹰ
ﻘﺒﺴﻣ ﺎﻬﺘﳉﺎﻌﻣ ﻚﻨﻜﳝ ،ﻊﻤﺸﳌﺍ
.ﺔﻳﺭﺎﺨﺒﻟﺍ ﺔﺤﺳﺎﳌﺍ ﻡﺍﺪﺨﺘﺳﺍ ﻞﺒﻗ ﺀﺎﳌﺍ ﺾﻌﺑﻭ
ﺭﺎﺨﺒﻟﺎﺑ ﻒﻴﻈﻨﺘﻟﺍ
ﻪﺠﺘﻳ ﺚﻴﺤﺑ ﺽﺭﻷﺍ ﻰﻠﻋ (7) ﻒﻴﻈﻨﺘﻟﺍ ﺔﻴﺸﺣ ﻊﺿ •
.ﻰﻠﻋﻷ "ﺕﺎﻧﻭﺰﻠﳊﺍ" ﻭﺮﻜﻠﻴﻔﻟﺍ ﻂﻳﺮﺷ ﺐﻧﺎﺟ
ﺔﻴﺸﺣ ﻰﻠﻋ ﻖﻓﺮﺑ ﺔﻳﺭﺎﺨﺒﻟﺍ ﺔﺤﺳﺎﳌﺎﺑ ﻂﻐﺿﺍ •
.(7) ﻒﻴﻈﻨﺘﻟﺍ
.ﺭﺎﻴﺘﻟﺍ ﺬﺧﺄﲟ ﺔﻳﺭﺎﺨﺒﻟﺍ ﺔﺤﺳﺎﳌﺍ ﻞﻴﺻﻮﺘﺑ ﻢﻗ •
ﺮﻣﻷﺍ ﻕﺮﻐﺘﺴﻳ .(1) ﻑﺎﻘﻳﻹﺍ/ﻞﻴﻐﺸﺘﻟﺍ ﺭﺯ ﻰﻠﻋ ﻂﻐﺿﺍ •
.ﺔﻳﺭﺎﺨﺒﻟﺍ ﺔﺤﺳﺎﳌﺍ ﻦﺨﺴﺗ ﻲﻜﻟ ﺔﻴﻧﺎﺛ 15 ﻲﻟﺍﻮﺣ
،ﺔﻠﻴﻠﻗ
ﹴ
ﻥﺍﻮﺛ ﺪﻌﺑ .(2) ﺭﺎﺨﺒﻟﺍ ﻞﻴﻐﺸﺗ ﺭﺯ ﻰﻠﻋ ﻂﻐﺿﺍ •
.ﺭﺎﺨﺒﻟﺍ ﺱﺃﺭ ﻦﻣ ﺝﻭﺮﳋﺍ ﻲﻓ ﺭﺎﺨﺒﻟﺍ ﺃﺪﺒﻴﺳ
،ﻑﺎﳉﺍ ﻞﻴﻐﺸﺘﻟﺍ ﺪﻌﺑ ﻭﺃ ﺓﺮﻣ ﻝﻭﻷ ﺀﻞﳌﺍ ﺪﻨﻋ !ﺔﻈﺣﻼﻣ
ﻲﻜﻟ ﺔﻴﻧﺎﺛ 45 ﻰﻟﺇ ﻞﺼﺗ ﺓﺪﻣ ﺭﺎﺨﺒﻟﺍ ﻕﺮﻐﺘﺴﻳ ﻥﺃ ﻦﻜﳝ
.ﺞﺘﻨ
ﹸ
ﻳ
ﺔﻴﻨﻔﻟﺍ ﺕﺎﻧﺎﻴﺒﻟﺍ
ﺎﻬﺣﻼﺻﺇﻭ ﻝﺎﻄﻋﻷﺍ ﻑﺎﺸﻜﺘﺳﺍ
ﻊﺒﺗﺎﻓ ،ﻢﺋﻼﳌﺍ ﻞﻜﺸﻟﺎﺑ ﻞﻤﻌﻳ ﻻ ﻙﺯﺎﻬﺟ ﻥﺃ ﻭﺪﺒﻳ ﻥﺎﻛ ﺍﺫﺇ
ﻞﺣ ﻰﻟﺇ ﺍﺬﻫ ﺩﺆﻳ ﻢﻟ ﺍﺫﺇ .ﻰﻧﺩﻷﺎﺑ ﺓﺩﺭﺍﻮﻟﺍ ﺕﺎﻤﻴﻠﻌﺘﻟﺍ
ﺢﻴﻠﺼﺗ ﻞﻴﻛﻮﺑ ﻝﺎﺼﺗﻻﺍ ﻰﺟﺮﻳ ،ﺔﻠﻜﺸﳌﺍ
.ﻲﻠﶈﺍ BLACK+DECKER
ﻰﻟﺇ ﺭﺎﺨﺒﻟﺍ ﻞﺧﺪﻳ ﻲﻜﻟ ﺔﻠﻴﻠﻗ
ﹴ
ﻥﺍﻮﺛ ﺮﻣﻷﺍ ﻕﺮﻐﺘﺴﻳ •
ﻥﻵﺍ ﺔﻳﺭﺎﺨﺒﻟﺍ ﺔﺤﺳﺎﳌﺍ ﻖﻟﺰﻨﺘﺳ .ﻒﻴﻈﻨﺘﻟﺍ ﺔﻴﺸﺣ
ﻢﺘﻴﺳ ﻱﺬﻟﺍ ﺢﻄﺴﻟﺍ ﻰﻠﻋ ﺔﻟﻮﻬﺴﺑ
.ﻪﻔﻴﻈﻨﺗ/ﻪﻤﻴﻘﻌﺗ
ﻰﻠﻋ ﺀﻂﺒﺑ ﺎﻬﺒﺤﺳﺍﻭ ﺔﻳﺭﺎﺨﺒﻟﺍ ﺔﺤﺳﺎﳌﺍ ﻊﻓﺩﺍ •
.ﺍ
ﹰ
ﺪﻴﺟ ﺭﺎﺨﺒﻟﺎﺑ ﻢﺴﻗ ﻞﻛ ﻒﻴﻈﻨﺘﻟ ﺢﻄﺴﻟﺍ
ﺪﻋﺃ ،ﺔﻳﺭﺎﺨﺒﻟﺍ ﺔﺤﺳﺎﳌﺍ ﻡﺍﺪﺨﺘﺳﺍ ﻦﻣ ﻲﻬﺘﻨﺗ ﺎﻣﺪﻨﻋ •
ﻪﻧﺃ ﻦﻣ ﺪﻛﺄﺘﻟﺍ ﻊﻣ ،ﻲﺳﺃﺮﻟﺍ ﻊﺿﻮﻟﺍ ﻰﻟﺇ (9) ﺾﺒﻘﳌﺍ
ﻥﺃ ﻰﻟﺇ ﺮﻈﺘﻧﺍ ."ﻞﻴﻐﺸﺘﻟﺍ ﻑﺎﻘﻳﺇ" ﻊﺿﻭ ﻰﻠﻋ ﺮﻘﺘﺴﻣ
.(ﻖﺋﺎﻗﺩ ﺲﻤﺧ ﻲﻟﺍﻮﺣ) ﺔﻳﺭﺎﺨﺒﻟﺍ ﺔﺤﺳﺎﳌﺍ ﺩﺮﺒﺗ
.(4) ﺀﺎﳌﺍ ﻥﺍﺰﺧ ﻲﻓ ﺀﺎﳌﺍ ﻯﻮﺘﺴﻣ ﺔﺒﻗﺍﺮﻣ ﻢﻬﳌﺍ ﻦﻣ !ﻪﻴﺒﻨﺗ
ﻊﺿ ،ﻒﻴﻈﻨﺘﻟﺍ / ﻢﻴﻘﻌﺘﻟﺍ ﺔﻠﺻﺍﻮﻣﻭ ﺀﺎﳌﺍ ﻥﺍﺰﺧ ﺀﻞﻣ ﺓﺩﺎﻋﻹ
ﺾﺒﻘﳌﺍ ﻥﺃ ﻦﻣ ﺪﻛﺄﺘﻟﺍ ﻊﻣ ﻲﺳﺃﺮﻟﺍ ﻊﺿﻮﻟﺍ ﻲﻓ ﺔﺤﺳﺎﳌﺍ
ﻑﺎﻘﻳﺇ" ﻊﺿﻭ ﻰﻟﺇ ﺔﻳﺭﺎﺨﺒﻟﺍ ﺔﺤﺳﺎﳌﺍ ﺭﺯ ﺭﺩﺃﻭ ﺩﻮﻨﺴﻣ
،ﻂﺋﺎﳊﺍ ﻲﻓ ﺭﺎﻴﺘﻟﺍ ﺬﺧﺄﻣ ﻦﻋ ﺯﺎﻬﳉﺍ ﻞﺼﻓﺍ ."ﻞﻴﻐﺸﺘﻟﺍ
.(4) ﺀﺎﳌﺍ ﻥﺍﺰﺧ ﺀﻞﻣ ﺪﻋﺃﻭ
ﺪﺣﺍﻭ ﻥﺎﻜﻣ ﻲﻓ ﺍ
ﹰ
ﺪﺑﺃ ﺔﻳﺭﺎﺨﺒﻟﺍ ﺔﺤﺳﺎﳌﺍ ﻙﺮﺘﺗ ﻻ !ﻪﻴﺒﻨﺗ
ﺔﺤﺳﺎﳌﺍ ﺎ
ﹰ
ﻤﺋﺍﺩ ﻊﺿ .ﻦﻣﺰﻟﺍ ﻦﻣ ﺓﺮﺘﻔﻟ ﺢﻄﺳ ﻱﺃ ﻰﻠﻋ
ﺪﻨﻋ ﻲﺳﺃﺮﻟﺍ ﻊﺿﻮﻟﺍ ﻲﻓ (9) ﺾﺒﻘﳌﺍ ﻥﻮﻜﻳ ﺚﻴﺤﺑ ﺔﻳﺭﺎﺨﺒﻟﺍ
ﻝﺎﺣ ﻲﻓ ﺔﻳﺭﺎﺨﺒﻟﺍ ﺔﺤﺳﺎﳌﺍ ﻞﻴﻐﺸﺗ ﻑﺎﻘﻳﺇ ﻦﻣ ﺪﻛﺄﺗﻭ ﺕﺎﺒﺜﻟﺍ
.ﻡﺍﺪﺨﺘﺳﻻﺍ ﻡﺪﻋ
ﺔﺌﻴﺒﻟﺍ ﺔﻳﺎﻤﺣ
ﻦﻣ ﺺﻠﺨﺘﻟﺍ ﻡﺪﻋ ﻡﺰﻠﻳ .ﻞﺼﻔﻨﳌﺍ ﺯﺮﻔﻟﺍﻭ ﻊﻤﳉﺍ
.ﺔﻳﺩﺎﻌﻟﺍ ﺔﻴﻟﺰﻨﳌﺍ ﺔﻣﺎﻤﻘﻟﺍ ﻊﻣ ﺞﺘﻨﳌﺍ ﺍﺬﻫ
BLACK+DECKER ﺞﺘﻨﻣ ﻝﺍﺪﺒﺘﺳﺍ ﺎﻣ
ﹴ
ﻡﻮﻳ ﻲﻓ ﺕﺩﺭﺃ ﺍﺫﺇ
ﻊﻣ ﻪﻨﻣ ﺺﻠﺨﺘﺗ ﻼﻓ ،ﻪﻣﺪﺨﺘﺴﺗ ﺪﻌﺗ ﻢﻟ ﻭﺃ ،ﻚﺑ ﺹﺎﳋﺍ
ﺔﻴﻠﻤﻌﻟ ﺍ
ﹰ
ﺰﻫﺎﺟ ﺞﺘﻨﳌﺍ ﺍﺬﻫ ﻞﻌﺟﺍ .ﻯﺮﺧﻷﺍ ﺔﻴﻟﺰﻨﳌﺍ ﺕﺎﻔﻠﺍ
.ﺎﻫﺯﺮﻓﻭ ﺕﺎﻔﻟﺎﺍ ﻊﻤﺟ
ﺮﻳﻭﺪﺗ ﺓﺩﺎﻋﻹ ﺍ
ﹰ
ﺰﻛﺮﻣ BLACK+DECKER ﺔﻛﺮﺷ ﺮﻓﻮﺗ •
ﻰﻟﺇ ﺎﻬﻟﻮﺻﻭ ﺩﺮﺠﲟ BLACK+DECKER ﺕﺎﺠﺘﻨﻣ
.ﻞﻤﻌﻠﻟ ﺎﻬﺘﻴﺣﻼﺻ ﻡﺪﻋﻭ ﻲﺿﺍﺮﺘﻓﻻﺍ ﺎﻫﺮﻤﻋ ﺔﻳﺎﻬﻧ
،ﺔﻣﺪﳋﺍ ﻩﺬﻫ ﻦﻣ ﺓﺩﺎﻔﺘﺳﻼﻟ .ﺎ
ﹰ
ﻧﺎﺠﻣ ﺔﻣﺪﳋﺍ ﻩﺬﻫ ﻡﺪﻘ
ﹸ
ﺗﻭ
ﻑﻮﺳﻭ ﺪﻤﺘﻌﳌﺍ ﺔﻧﺎﻴﺼﻟﺍ ﻞﻴﻛﻮﻟ ﻚﺠﺘﻨﻣ ﺓﺩﺎﻋﺇ ﻰﺟﺮ
ﹸ
ﻳ
.ﻚﻨﻋ ﺔﺑﺎﻴﻨﻟﺎﺑ ﺎﻬﻤﻠﺘﺴﻳ
ﺪﻤﺘﻌﻣ ﺔﻧﺎﻴﺻ ﻞﻴﻛﻭ ﺏﺮﻗﺃ ﻊﻗﻮﻣ ﻰﻠﻋ ﻑﺮﻌﺘﻟﺍ ﻚﻨﻜﳝ •
BLACK+DECKER ﺐﺘﻜﻣ ﻰﻠﻋ ﻝﺎﺼﺗﻻﺍ ﻝﻼﺧ ﻦﻣ
ﹰ
ﻻﺪﺑﻭ .ﻞﻴﻟﺪﻟﺍ ﺍﺬﻫ ﻲﻓ ﺢﺿﻮﳌﺍ ﻥﺍﻮﻨﻌﻟﺍ ﻲﻓ ﻚﻳﺪﻟ ﻲﻠﶈﺍ
ﻦﻳﺪﻤﺘﻌﳌﺍ ﺔﻧﺎﻴﺼﻟﺍ ﺀﻼﻛﻮﺑ ﺔﻤﺋﺎﻗ ﺪﺟﻮﺗ ،ﻚﻟﺫ ﻦﻣ
ﻞﻴﺻﺎﻔﺘﻟﺍﻭ BLACK+DECKER ﺔﻛﺮﺸﻟ ﲔﻌﺑﺎﺘﻟﺍ
ﺔﺻﺎﳋﺍ ﻝﺎﺼﺗﻻﺍ ﻞﺋﺎﺳﻭﻭ ﻊﻴﺒﻟﺍ ﺪﻌﺑ ﺎﻣ ﺕﺎﻣﺪﳋ ﺔﻠﻣﺎﻜﻟﺍ
.www.2helpU.com :ﻰﻠﻋ ﺖﻧﺮﺘﻧﻹﺍ ﻰﻠﻋ ﺎﻨﺑ
ﺔﻴﻨﻔﻟﺍ ﺕﺎﻧﺎﻴﺒﻟﺍ
ﺎﻬﺣﻼﺻﺇﻭ ﻝﺎﻄﻋﻷﺍ ﻑﺎﺸﻜﺘﺳﺍ
ﻊﺒﺗﺎﻓ ،ﻢﺋﻼﳌﺍ ﻞﻜﺸﻟﺎﺑ ﻞﻤﻌﻳ ﻻ ﻙﺯﺎﻬﺟ ﻥﺃ ﻭﺪﺒﻳ ﻥﺎﻛ ﺍﺫﺇ
،ﺔﻠﻜﺸﳌﺍ ﻞﺣ ﻰﻟﺇ ﺍﺬﻫ ﺩﺆﻳ ﻢﻟ ﺍﺫﺇ .ﻰﻧﺩﻷﺎﺑ ﺓﺩﺭﺍﻮﻟﺍ ﺕﺎﻤﻴﻠﻌﺘﻟﺍ
.ﻲﻠﶈﺍ BLACK+DECKER ﺢﻴﻠﺼﺗ ﻞﻴﻛﻮﺑ ﻝﺎﺼﺗﻻﺍ ﻰﺟﺮﻳ
FSMH13E10-B5 FSMH13E5-B5
220-240 220-240 ﺩﺩﺮﺘﻣ ﺭﺎﻴﺗ ﺖﻟﻮﻓ ﻲﺋﺎﺑﺮﻬﻜﻟﺍ ﺪﻬﳉﺍ
1300 1300 ﻁﺍﻭ ﺔﻗﺎﻄﻟﺍ
380 380 ﻞﻣ ﻥﺍﺰﳋﺍ ﺔﻌﺳ
1.8 1.8 ﻢﺠﻛ ﻥﺯﻮﻟﺍ

15
ﺔـﻴـﺑﺮـﻌـﻟﺍ
(ﺔﻴﺴﻴﺋﺮﻟﺍ ﺕﺎﻤﻴﻠﻌﺘﻟﺍ)
(D ﻞﻜﺸﻟﺍ) ﺭﺎﺨﺒﻟﺍ ﺱﺃﺭ ﻞﻴﺻﻮﺗ
ﻝﻼﺧ ﻦﻣ (6) ﺭﺎﺨﺒﻟﺍ ﺱﺃﺮﺑ ﺔﻳﺭﺎﺨﺒﻟﺍ ﺔﺤﺳﺎﳌﺍ ﻞ
ﹼ
ﺻﻭ •
ﺭﺯ ﺖﻴﺒﺜﺗ ﻡﺎﻜﺣﺇ ﻦﻣ ﺪﻛﺄﺗﻭ (5) ﺭﺎﺨﺒﻟﺍ ﺱﺃﺭ ﻞﺻﻮﻣ
.(5b) ﺔﺤﺘﻔﻟﺍ ﻲﻓ ﻪﻧﺎﻜﻣ ﻲﻓ (5a) ﻞﻴﺻﻮﺘﻟﺍ
(E ﻞﻜﺸﻟﺍ) ﻒﻴﻈﻨﺘﻟﺍ ﺔﻴﺸﺣ ﺖﻴﺒﺜﺗ
ﻉﺯﻮﻣ ﻦﻣ ﻞﻳﺪﺑ ﻒﻴﻈﻨﺗ ﺕﺎﻴﺸﺣ ﺮﻓﻮﺘﺗ
ﺔﺌﻔﻟﺍ ﻢﻗﺭ) -:ﻚﻳﺪﻟ BLACK+DECKER
.(FSMP20-XJ
ﻪﺠﺘﻳ ﺚﻴﺤﺑ ﺽﺭﻷﺍ ﻰﻠﻋ (7) ﻒﻴﻈﻨﺘﻟﺍ ﺔﻴﺸﺣ ﻊﺿ •
.ﻰﻠﻋﻷ "ﺕﺎﻧﻭﺰﻠﳊﺍ" ﻭﺮﻜﻠﻴﻔﻟﺍ ﻂﻳﺮﺷ ﺐﻧﺎﺟ
ﺔﻴﺸﺣ ﻰﻠﻋ ﻖﻓﺮﺑ ﺔﻳﺭﺎﺨﺒﻟﺍ ﺔﺤﺳﺎﳌﺎﺑ ﻂﻐﺿﺍ •
.(7) ﻒﻴﻈﻨﺘﻟﺍ
ﻥﻮﻜﻳ ﺚﻴﺤﺑ ﺔﻳﺭﺎﺨﺒﻟﺍ ﻚﺘﺤﺳﺎﻣ ﺎ
ﹰ
ﻤﺋﺍﺩ ﻊﺿ :ﻪﻴﺒﻨﺗ
ﻦﻣ ﺪﻛﺄﺗﻭ ﺕﺎﺒﺜﻟﺍ ﺀﺎﻨﺛﺃ ﻢﺋﺎﻘﻟﺍ ﻊﺿﻮﻟﺍ ﻲﻓ (9) ﺾﺒﻘﳌﺍ
ﺪﻴﻗ ﻥﻮﻜﺗ ﻻ ﺎﻣﺪﻨﻋ ﺔﻳﺭﺎﺨﺒﻟﺍ ﺔﺤﺳﺎﳌﺍ ﻞﻴﻐﺸﺗ ﻑﺎﻘﻳﺇ
.ﻡﺍﺪﺨﺘﺳﻻﺍ
ﻒﻴﻈﻨﺗ ﺔﻴﺸﺣ ﺔﻟﺍﺯﺇ
ﺔﻴﺸﺣ ﺮﻴﻴﻐﺗ ﺪﻨﻋ ﺔﻤﺋﻼﻣ ﺔﻳﺬﺣﺃ ﺎ
ﹰ
ﻤﺋﺍﺩ
ﹺ
ﺪﺗﺭﺍ !ﻪﻴﺒﻨﺗ
ﻭﺃ ﺎ
ﹰ
ﺒﺸﺒﺷ
ﹺ
ﺪﺗﺮﺗ ﻻ .ﺔﻳﺭﺎﺨﺒﻟﺍ ﻚﺘﺤﺳﺎﻣ ﻲﻓ ﻒﻴﻈﻨﺘﻟﺍ
.ﻊﺑﺎﺻﻷﺍ ﺪﻨﻋ ﺎ
ﹰ
ﺣﻮﺘﻔﻣ
ﹰ
ﺀﺍﺬﺣ
ﺔﺤﺳﺎﳌﺍ ﺭﺯ ﺭﺩﺃﻭ ﻲﺳﺃﺮﻟﺍ ﻊﺿﻮﻟﺍ ﻰﻟﺇ (9) ﺾﺒﻘﳌﺍ ﺪﻋﺃ •
."ﻞﻴﻐﺸﺘﻟﺍ ﻑﺎﻘﻳﺇ" ﻊﺿﻭ ﻰﻟﺇ ﺔﻳﺭﺎﺨﺒﻟﺍ
5 ﻲﻟﺍﻮﺣ) ﺔﻳﺭﺎﺨﺒﻟﺍ ﺔﺤﺳﺎﳌﺍ ﺩﺮﺒﺗ ﻥﺃ ﻰﻟﺇ ﺮﻈﺘﻧﺍ •
.(ﻖﺋﺎﻗﺩ
ﻒﻴﻈﻨﺘﻟﺍ ﺔﻴﺸﺣ ﻦﻋ ﺍ
ﹰ
ﺪﻴﻌﺑ ﺔﻳﺭﺎﺨﺒﻟﺍ ﺔﺤﺳﺎﳌﺍ ﻊﻓﺭﺍ •
.ﻭﺮﻜﻠﻴﻔﻟﺍ ﺖﺒﺜﻣ ﻦﻣ ﺎﻫﺮﻳﺮﲢ ﻊﻣ
ﻥﻮﻜﻳ ﺚﻴﺤﺑ ﺔﻳﺭﺎﺨﺒﻟﺍ ﻚﺘﺤﺳﺎﻣ ﺎ
ﹰ
ﻤﺋﺍﺩ ﻊﺿ !ﻪﻴﺒﻨﺗ
ﻦﻣ ﺪﻛﺄﺗﻭ ﺕﺎﺒﺜﻟﺍ ﺀﺎﻨﺛﺃ ﻢﺋﺎﻘﻟﺍ ﻊﺿﻮﻟﺍ ﻲﻓ (9) ﺾﺒﻘﳌﺍ
ﺪﻴﻗ ﻥﻮﻜﺗ ﻻ ﺎﻣﺪﻨﻋ ﺔﻳﺭﺎﺨﺒﻟﺍ ﺔﺤﺳﺎﳌﺍ ﻞﻴﻐﺸﺗ ﻑﺎﻘﻳﺇ
.ﻡﺍﺪﺨﺘﺳﻻﺍ
ﺪﻴﻟﺎﺑ ﺔﻟﻮﻤﶈﺍ ﺓﺪﺣﻮﻟﺍ ﻡﺍﺪﺨﺘﺳﺍ
ﻦﻋ ﺭﺎﺨﺒﻟﺍ ﺱﺃﺭ ﻦﻣ ﺪﻴﻟﺎﺑ ﺔﻟﻮﻤﶈﺍ ﺓﺪﺣﻮﻟﺍ ﻞﺼﻓﺍ •
ﺢﺿﻮﻣ ﻮﻫ ﺎﻤﻛ (5a) ﻞﻴﺻﻮﺘﻟﺍ ﺭﺯ ﻰﻠﻋ ﻂﻐﻀﻟﺍ ﻖﻳﺮﻃ
.D ﻞﻜﺸﻟﺍ ﻲﻓ
ﻖﻳﺮﻃ ﻦﻋ ﺪﻴﻟﺎﺑ ﺔﻟﻮﻤﶈﺍ ﺓﺪﺣﻮﻟﺍ ﻦﻣ (9) ﺾﺒﻘﳌﺍ ﻝﺯﺃ •
ﺎﻤﻛ (8) ﺾﺒﻘﳌﺎﺑ ﺩﻮﺟﻮﳌﺍ ﻞﻴﺻﻮﺘﻟﺍ ﺭﺯ ﻰﻠﻋ ﻂﻐﻀﻟﺍ
.C ﻞﻜﺸﻟﺎﺑ ﺢﺿﻮﻣ ﻮﻫ
(F ﻞﻜﺸﻟﺍ) ﺕﺎﻘﺤﻠﳌﺍ ﺐﻴﻛﺮﺗ
ﻲﺴﻴﺋﺮﻟﺍ ﻢﺴﳉﺍ ﻲﻓ (13) ﺕﺎﻘﺤﻠﳌﺍ ﺊﻳﺎﻬﻣ ﺐﻛﺭ •
ﻲﻓ (13a) ﺭﺰﻟﺍ ﺖﻴﺒﺜﺗ ﻡﺎﻜﺣﺇ ﻦﻣ ﺪﻛﺄﺘﻟﺍ ﻊﻣ ﺓﺪﺣﻮﻠﻟ
.ﺔﺒﺳﺎﻨﳌﺍ ﻪﺘﺤﺘﻓ
ﻲﻓ ﻩﺭﺩﺃﻭ (13) ﻖﺤﻠﳌﺍ ﺊﻳﺎﻬﲟ ﺏﻮﻠﻄﳌﺍ ﻖﺤﻠﳌﺍ ﺐﻛﺭ •
.ﻡﺎﻜﺣﺈﺑ ﻪﻧﺎﻜﻣ ﻲﻓ ﺮﻘﺘﺴﻳ ﻰﺘﺣ ﺔﻋﺎﺴﻟﺍ ﺏﺭﺎﻘﻋ ﻩﺎﲡﺍ
(G ﻞﻜﺸﻟﺍ) ﺀﺎﳌﺍ ﻥﺍﺰﺧ ﺀﻞﻣ
.ﻒﻴﻈﻧ ﺭﻮﺒﻨﺻ ﺀﺎﲟ ﺀﺎﳌﺍ ﻥﺍﺰﺧ ﻸﻣﺍ !ﺔﻈﺣﻼﻣ
ﺀﺎﳌﺍ ﻡﺍﺪﺨﺘﺳﺎﺑ ﻰﺻﻮﻳ ،ﺮﺴﻌﻟﺍ ﺀﺎﳌﺍ ﻖﻃﺎﻨﻣ ﻲﻓ !ﺔﻈﺣﻼﻣ
.ﻪﻨﻳﺄﺗ ﺔﻟﺍﺯﺇ ﺪﻌﺑ
.(3) ﻩﺎﻴﳌﺍ ﻥﺍﺰﺧ ﻰﻟﺇ ﻝﻮﺻﻮﻟﺍ ﻥﺎﺴﻟ ﺢﺘﻓﺍ •
.ﺀﺎﳌﺎﺑ (4) ﺀﺎﳌﺍ ﻥﺍﺰﺧ ﻸﻣﺍ •
ﺎﲟ ﻥﺍﺰﳋﺍ ﻸﲤ ﻻ .ﻞﻣ 380 ﺀﺎﳌﺍ ﻥﺍﺰﺧ ﺔﻌﺳ ﻎﻠﺒﺗ !ﺮﻳﺬﲢ
.ﺪﳊﺍ ﺯﻭﺎﺠﺘﻳ
.ﻪﻧﺎﻜﻣ ﻰﻟﺇ ﻩﺎﻴﳌﺍ ﻥﺍﺰﺧ ﻰﻟﺇ ﻝﻮﺻﻮﻟﺍ ﻥﺎﺴﻟ ﺪﻋﺃ •
ﺖﺒﺜﻣ ﻩﺎﻴﳌﺍ ﻥﺍﺰﺧ ﻰﻟﺇ ﻝﻮﺻﻮﻟﺍ ﻥﺎﺴﻟ ﻥﺃ ﻦﻣ ﺪﻛﺄﺗ !ﺔﻈﺣﻼﻣ
.ﻪﻧﺎﻜﻣ ﻲﻓ ﻡﺎﻜﺣﺈﺑ
ﻩﺎﻴﳌﺍ ﻥﺍﺰﺧ ﻊﻣ ﺔﻴﺋﺎﻴﻤﻴﻜﻟﺍ ﺕﺎﻔﻈﻨﳌﺍ ﻡﺪﺨﺘﺴﺗ ﻻ !ﺔﻈﺣﻼﻣ
.ﺔﻳﺭﺎﺨﺒﻟﺍ ﻚﺘﺤﺳﺎﻣ ﻲﻓ
ﻡﺍﺪﺨﺘﺳﻻﺍ
ﻢﻴﺛﺍﺮﳉﺍﻭ ﺎﻳﺮﻴﺘﻜﺒﻟﺍ ﻦﻣ 99.9% ﻰﻠﻋ ﺯﺎﻬﳉﺍ ﻲﻀﻘﻳ !ﻡﺎﻫ
ﻡﺍﺪﺨﺘﺳﺎﺑﻭ ﻞﻴﻟﺪﻟﺍ ﺍﺬﻫ ﺕﺎﻤﻴﻠﻌﺘﻟ ﺎ
ﹰ
ﻘﻓﻭ ﻪﻣﺍﺪﺨﺘﺳﺍ ﺪﻨﻋ
.ﺔﻴﻧﺎﺛ 90 ﻞﻴﻐﺸﺗ ﺖﻗﻭ ﻊﻣﻭ ﺔﻘﻴﻗﺪﻟﺍ ﻑﺎﻴﻟﻷﺍ ﺕﺍﺫ ﺕﺎﻴﺸﳊﺍ
ﻞﻴﻐﺸﺘﻟﺍ ﻑﺎﻘﻳﺇﻭ ﻞﻴﻐﺸﺘﻟﺍ
ﻑﺎﻘﻳﻹﺍ /ﻞﻴﻐﺸﺘﻟﺍ ﺭﺯ ﻰﻠﻋ ﻂﻐﺿﺍ ,ﺯﺎﻬﳉﺍ ﻞﻴﻐﺸﺘﻟ •
ﻦﺨﺴﺗ ﻲﻜﻟ ﺔﻴﻧﺎﺛ 15 ﻲﻟﺍﻮﺣ ﺮﻣﻷﺍ ﻕﺮﻐﺘﺴﻳ .(1)
.ﺔﻳﺭﺎﺨﺒﻟﺍ ﺔﺤﺳﺎﳌﺍ
ﻰﻟﺇ ﻚﻟﺫ ﻱﺩﺆﻴﺳ .(2) ﺭﺎﺨﺒﻟﺍ ﻞﻴﻐﺸﺗ ﺭﺯ ﻰﻠﻋ ﻂﻐﺿﺍ •
.ﺭﺎﺨﺒﻟﺍ ﺝﺎﺘﻧﺇ ﻲﻓ ﺓﺪﺣﻮﻟﺍ ﺃﺪﺒﺘﺳﻭ ﺔﺨﻀﳌﺍ ﻞﻴﻐﺸﺗ
(2) ﺭﺎﺨﺒﻟﺍ ﻞﻴﻐﺸﺗ ﺭﺯ ﻰﻠﻋ ﻂﻐﺿﺍ ،ﺭﺎﺨﺒﻟﺍ ﺝﺎﺘﻧﺇ ﻑﺎﻘﻳﻹ •
ﻰﻠﻋ ﺔﻈﻓﺎﶈﺍ ﻰﻟﺇ ﻚﻟﺫ ﻱﺩﺆﻴﺳ .ﺔﻴﺻﺎﳋﺍ ﻩﺬﻫ ﻑﺎﻘﻳﻹ
.ﻞﻴﻐﺸﺘﻟﺍ ﺔﻴﻠﻤﻋ ﺀﺪﺑ ﻊﻳﺮﺴﺘﻟ ﺔﻳﻼﻐﻟﺍ ﺔﻗﺎﻃ
/ ﻞﻴﻐﺸﺘﻟﺍ ﺭﺯ ﻰﻠﻋ ﻂﻐﺿﺍ ،ﺯﺎﻬﳉﺍ ﻞﻴﻐﺸﺗ ﻑﺎﻘﻳﻹ •
.(1) ﻑﺎﻘﻳﻹﺍ
ﻰﻠﻋ ﺪﺣﺍﻭ ﻥﺎﻜﻣ ﻲﻓ ﺍ
ﹰ
ﺪﺑﺃ ﺔﻳﺭﺎﺨﺒﻟﺍ ﺔﺤﺳﺎﳌﺍ ﻙﺮﺘﺗ ﻻ !ﻪﻴﺒﻨﺗ
.ﻦﻣﺰﻟﺍ ﻦﻣ ﺓﺮﺘﻔﻟ ﺢﻄﺳ ﻱﺃ
ﻲﻓ (9) ﺾﺒﻘﳌﺍ ﻥﻮﻜﻳ ﺚﻴﺤﺑ ﺔﻳﺭﺎﺨﺒﻟﺍ ﺔﺤﺳﺎﳌﺍ ﺎ
ﹰ
ﻤﺋﺍﺩ ﻊﺿ
ﻞﻴﻐﺸﺗ ﻑﺎﻘﻳﺇ ﻦﻣ ﺪﻛﺄﺗﻭ ﺕﺎﺒﺜﻟﺍ ﺪﻨﻋ ﻲﺳﺃﺮﻟﺍ ﻊﺿﻮﻟﺍ
.ﻡﺍﺪﺨﺘﺳﻻﺍ ﻡﺪﻋ ﻝﺎﺣ ﻲﻓ ﺔﻳﺭﺎﺨﺒﻟﺍ ﺔﺤﺳﺎﳌﺍ
.ﻡﺍﺪﺨﺘﺳﻻﺍ ﺪﻌﺑ ﺔﻳﺭﺎﺨﺒﻟﺍ ﺔﺤﺳﺎﳌﺍ ﺎ
ﹰ
ﻤﺋﺍﺩ ﻍﺮﻓﺃ !ﻪﻴﺒﻨﺗ
ﻦﻜﳝ ،ﻑﺎﳉﺍ ﻞﻴﻐﺸﺘﻟﺍ ﺪﻌﺑ ﻭﺃ ﺓﺮﻣ ﻝﻭﻷ ﺀﻞﳌﺍ ﺪﻨﻋ !ﺔﻈﺣﻼﻣ
.ﺞﺘﻨ
ﹸ
ﻳ ﻲﻜﻟ ﺔﻴﻧﺎﺛ 45 ﻰﻟﺇ ﻞﺼﺗ ﺓﺪﻣ ﺭﺎﺨﺒﻟﺍ ﻕﺮﻐﺘﺴﻳ ﻥﺃ
ﻞﺜﻣﻷﺍ ﻡﺍﺪﺨﺘﺳﻻﺍ ﺕﺎﺤﻴﻤﻠﺗ
ﻡﺎﻋ
ﺖﻴﺒﺜﺗ ﻥﻭﺪﺑ ﺍ
ﹰ
ﺪﺑﺃ ﺔﻳﺭﺎﺨﺒﻟﺍ ﺔﺤﺳﺎﳌﺍ ﻡﺪﺨﺘﺴﺗ ﻻ :ﻪﻴﺒﻨﺗ
.
ﹰ
ﻻﻭﺃ ﻒﻴﻈﻨﺘﻟﺍ ﺔﻴﺸﺣ
ﻞﺒﻗ ﺎ
ﹰ
ﻳﻭﺪﻳ ﻭﺃ ﺔﻴﺋﺎﺑﺮﻬﻜﻟﺍ ﺔﺴﻨﻜﳌﺎﺑ ﺽﺭﻷﺍ ﺎ
ﹰ
ﻤﺋﺍﺩ ﺲﻨﻛﺍ •
.ﺔﻳﺭﺎﺨﺒﻟﺍ ﺔﺤﺳﺎﳌﺍ ﻡﺍﺪﺨﺘﺳﺍ

16
ﺔـﻴـﺑﺮـﻌـﻟﺍ
(ﺔﻴﺴﻴﺋﺮﻟﺍ ﺕﺎﻤﻴﻠﻌﺘﻟﺍ)
ﺔﻣﻼﺴﻟﺍ ﺕﺎﻤﻴﻠﻌﺗ
ﻲﻓ ﺓﺭﻮﻛﺬﳌﺍ ﺕﺎﻤﻴﻠﻌﺘﻟﺍﻭ ﺕﺍﺩﺎﺷﺭﻹﺍ ﻊﻴﻤﺟ ﺃﺮﻗﺍ !ﺮﻳﺬﲢ
ﻞﺒﻗ ﺓﺪﻳﺪﺷ ﺔﻳﺎﻨﻌﺑ ﺔﻣﺪﳋﺍﻭ ﺔﻧﺎﻴﺼﻟﺍﻭ ﺔﻣﻼﺴﻟﺍ ﻞﻴﻟﺩ
ﺕﺎﻤﻴﻠﻌﺘﻟﺍﻭ ﺕﺍﺩﺎﺷﺭﻹﺍ ﻊﻴﻤﺟ ﺃﺮﻗﺍ .ﺯﺎﻬﳉﺍ ﺍﺬﻫ ﻞﻴﻐﺸﺗ
ﺍﺬﻫ ﻞﻴﻐﺸﺗ ﻞﺒﻗ ﺓﺪﻳﺪﺷ ﺔﻳﺎﻨﻌﺑ ﻞﻴﻟﺪﻟﺍ ﺍﺬﻫ ﻲﻓ ﺓﺭﻮﻛﺬﳌﺍ
.ﺯﺎﻬﳉﺍ
ﻡﺍﺪﺨﺘﺳﻻﺍ ﻦﻣ ﺽﺮﻐﻟﺍ
ﻉﻮﻧ ﻦﻣ ﺔﻳﺭﺎﺨﺒﻟﺍ ﻚﺘﺤﺳﺎﻣ ﻢﻴﻤﺼﺗ ﰎ
FSMH13E10ﻭ BLACK+DECKER
TM
FSMH13E5
ﻒﻠﻐﳌﺍ ﺪﻠﺼﻟﺍ ﺐﺸﳋﺍ ﺕﺎﻴﺿﺭﺃ ﻒﻴﻈﻨﺗﻭ ﻢﻴﻘﻌﺘﻟ
ﻚﻴﻣﺍﺮﻴﺴﻟﺍﻭ ﻞﻴﻨﻴﻔﻟﺍﻭ ﻊﻤﺸﳌﺍﻭ ﺔﻔﻠﻐﳌﺍ ﺔﻴﻧﺪﻌﳌﺍ ﻖﺋﺎﻗﺮﻟﺍﻭ
ﻲﻟﺰﻨﳌﺍ ﻡﺍﺪﺨﺘﺳﻼﻟ ﺺﺼﺨﻣ ﺯﺎﻬﳉﺍ ﺍﺬﻫ .ﻡﺎﺧﺮﻟﺍﻭ ﺮﺠﳊﺍﻭ
.ﻂﻘﻓ ﻲﻠﺧﺍﺪﻟﺍ
ﻦﻳﺮﺧﻵﺍ ﺔﻣﻼﺳ
ﻦﻣ ﺍ
ﹰ
ﺀﺪﺑ ﻝﺎﻔﻃﻷﺍ ﺔﻄﺳﺍﻮﺑ ﺯﺎﻬﳉﺍ ﺍﺬﻫ ﻡﺍﺪﺨﺘﺳﺍ ﻦﻜﳝ •
ﻭﺃ ﺔﻳﺪﺴﳉﺍ ﺕﺍﺭﺪﻘﻟﺍ ﻱﻭﺫ ﺹﺎﺨﺷﻷﺍﻭ ﺮﺜﻛﺄﻓ ﺕﺍﻮﻨﺳ 8
ﺺﻘﻧ ﻢﻬﻳﺪﻟ ﻦﻣ ﻭﺃ ﺔﻀﻔﺨﻨﳌﺍ ﺔﻴﻠﻘﻌﻟﺍ ﻭﺃ ﺔﻴﺴﳊﺍ
ﻭﺃ ﻢﻬﻴﻠﻋ ﻑﺍﺮﺷﻹﺍ ﺮﺒﻋ ﻚﻟﺫﻭ ،ﺔﻓﺮﻌﳌﺍﻭ ﺓﺮﺒﳋﺍ ﻲﻓ
ﺯﺎﻬﳉﺍ ﻡﺍﺪﺨﺘﺳﺎﺑ ﺔﻘﻠﻌﺘﳌﺍ ﺕﺎﻤﻴﻠﻌﺘﻟﺎﺑ ﻢﻫﺪﻳﻭﺰﺗ
.ﻚﻟﺫ ﻰﻠﻋ ﺔﺒﺗﺮﺘﳌﺍ ﺮﻃﺎﺎﺑ ﻲﻋﻮﻟﺍﻭ ﺔﻨﻣﺁ ﺔﻘﻳﺮﻄﺑ
ﻝﺎﻔﻃﻸﻟ ﺢﻤﺴﺗ ﻻ .ﺯﺎﻬﳉﺎﺑ ﻝﺎﻔﻃﻷﺍ ﺚﺒﻋ ﺮﻈﺤﻳ •
.ﺔﺑﺎﻗﺭ ﻥﻭﺪﺑ ﺔﻧﺎﻴﺼﻟﺍ ﻭﺃ ﻒﻴﻈﻨﺘﻟﺍ ﺀﺍﺮﺟﺈﺑ
ﻰﺟﺮ
ﹸ
ﻳ ،ﻲﺋﺎﺑﺮﻬﻜﻟﺍ ﺭﺎﻴﺘﻟﺍ ﻚﻠﺳ ﻒﻠﺗ ﺔﻟﺎﺣ ﻲﻓ •
ﻭﺃ ﺪﻤﺘﻌﳌﺍ ﺔﻣﺪﳋﺍ ﻞﻴﻛﻭ ﻭﺃ ﺯﺎﻬﳉﺍ ﻊ
ﱢ
ﻨﺼﲟ ﺔﻧﺎﻌﺘﺳﻻﺍ
ﻚﻠﺴﻟﺍ ﻝﺍﺪﺒﺘﺳﻻ ﻞﻴﻫﺄﺘﻟﺍ ﺔﺟﺭﺩ ﺲﻔﻧ ﻰﻠﻋ ﻲﻨﻓ ﻱﺃ
.ﺔﻠﻤﺘﺤﻣ ﺮﻃﺎﺨﻣ ﻱﺃ ﺐﻨﺠﺘﻟ ﻚﻟﺫﻭ ﻒﻟﺎﺘﻟﺍ
ﺯﺎﻬﳉﺍ ﻒﻴﻈﻨﺗ ﻞﺒﻗ ﺭﺎﻴﺘﻟﺍ ﺬﺧﺄﻣ ﻦﻣ ﺲﺑﺎﻘﻟﺍ ﺔﻟﺍﺯﺇ ﺐﲡ •
.ﻪﺘﻧﺎﻴﺻ ﻭﺃ
ﺕﺍﺪﻌﳌﺍ ﻰﻟﺇ ﺭﺎﺨﺒﻟﺍ ﻭﺃ ﻞﺋﺎﺴﻟﺍ ﻪﻴﺟﻮﺗ ﻡﺪﻋ ﺐﺠﻳ •
ﻦﻣ ﻥﺍﺮﻓﻷﺍ ﻞﺜﻣ ﺔﻴﺋﺎﺑﺮﻬﻛ ﺕﺎﻧﻮﻜﻣ ﻰﻠﻋ ﺔﻳﻮﺘﶈﺍ
.ﻞﺧﺍﺪﻟﺍ
ﺬﺧﺄﲟ ﻪﻠﻴﺻﻮﺗ ﺀﺎﻨﺛﺃ ﺔﺑﺎﻗﺭ ﻥﻭﺪﺑ ﺯﺎﻬﳉﺍ ﻙﺮﺘ
ﹸ
ﻳ ﻻﺃ ﺐﺠﻳ •
؛ﺭﺎﻴﺘﻟﺍ
ﻪﺑ ﻥﺎﻛ ﻭﺃ ،ﻪﻃﻮﻘﺳ ﻝﺎﺣ ﻲﻓ ﺯﺎﻬﳉﺍ ﻡﺍﺪﺨﺘﺳﺍ ﲔﻌﺘﻳ ﻻ •
؛ﺐﻳﺮﺴﺗ ﺩﻮﺟﻭ ﻭﺃ ﻒﻠﺘﻠﻟ ﺓﺮﻫﺎﻇ ﺭﺎﺛﺁ ﻱﺃ
ﺎﻣﺪﻨﻋ ﻝﺎﻔﻃﻷﺍ ﻝﻭﺎﻨﺘﻣ ﻦﻋ ﺍ
ﹰ
ﺪﻴﻌﺑ ﺯﺎﻬﳉﺍ ﻰﻠﻋ ﻆﻓﺎﺣ •
.ﻩﺪﻳﺮﺒﺗ ﺪﻨﻋ ﻭﺃ ﺀﺎﺑﺮﻬﻜﻟﺎﺑ
ﹰ
ﻼﺼﺘﻣ ﻥﻮﻜﻳ
(H ﻞﻜﺸﻟﺍ) ﻡﺍﺪﺨﺘﺳﻻﺍ ﺪﻌﺑ
ﻑﺎﻘﻳﺇ) ’OFF‘ ﻊﺿﻮﻟﺍ ﻰﻟﺇ ﺔﻳﺭﺎﺨﺒﻟﺍ ﺔﺤﺳﺎﳌﺍ ﺭﺯ ﺭﺩﺃ •
ﻑﺎﻘﻳﺇ ﻊﺿﻭ ﻰﻟﺇ (2) ﺭﺎﺨﺒﻟﺍ ﻞﻴﻐﺸﺗ ﺭﺯ ﺭﺩﺃ .(ﻞﻴﻐﺸﺘﻟﺍ
.(1) ﻑﺎﻘﻳﻹﺍ/ﻞﻴﻐﺸﺘﻟﺍ ﺭﺯ ﻰﻠﻋ ﻂﻐﺿﺍ ﻢﺛ ﻞﻴﻐﺸﺘﻟﺍ
.ﺔﻳﺭﺎﺨﺒﻟﺍ ﺔﺤﺳﺎﳌﺍ ﺩﺮﺒﺗ ﻥﺃ ﻰﻟﺇ ﺮﻈﺘﻧﺍ •
ﻲﻓ ﺀﺎﺑﺮﻬﻜﻟﺍ ﺬﻔﻨﻣ ﻦﻋ ﺔﻳﺭﺎﺨﺒﻟﺍ ﺔﺤﺳﺎﳌﺍ ﻞﺼﻓﺍ •
.ﻂﺋﺎﳊﺍ
.ﻩﺎﻴﳌﺍ ﻥﺍﺰﺧ ﻎﻳﺮﻔﺘﺑ ﻢﻗ •
ﺓﺰﻫﺎﺟ ﻥﻮﻜﺘﻟ ﺎﻬﻠﺴﻏﺍﻭ (7) ﻒﻴﻈﻨﺘﻟﺍ ﺔﻴﺸﺣ ﻝﺯﺃ •
.ﻲﻟﺎﺘﻟﺍ ﻡﺍﺪﺨﺘﺳﻼﻟ
.(10) ﻖﻴﻠﻌﺘﻟﺍ ﻑﺎﻄﺧ ﻝﻮﺣ ﺔﻗﺎﻄﻟﺍ ﻞﺑﺎﻛ ﺖ
ﱢ
ﺒﺛ •
ﺯﺎﻬﳉﺍ ﻰﻠﻋ ﺓﺩﻮﺟﻮﳌﺍ ﺕﺎﻘﺼﻠﳌﺍ
ﻰﻠﻋ ﺦﻳﺭﺎﺘﻟﺍ ﺩﻮﻛ ﻊﻣ ﺔﻴﻟﺎﺘﻟﺍ ﺔﻴﺤﻴﺿﻮﺘﻟﺍ ﺭﻮﺼﻟﺍ ﺮﻬﻈﺗ
.ﺯﺎﻬﳉﺍ
ﻦﺧﺎﺳ ﺭﺎﺨﺑ ﻪﻴﺒﻨﺗ
ﺺﺋﺎﺼﳋﺍ
ﻑﺎﻘﻳﻹﺍ/ﻞﻴﻐﺸﺘﻟﺍ ﺡﺎﺘﻔﻣ .1
ﺭﺎﺨﺒﻟﺍ ﻞﻴﻐﺸﺗ ﺭﺯ .2
ﻩﺎﻴﳌﺍ ﻥﺍﺰﺧ ﻰﻟﺇ ﻝﻮﺻﻮﻟﺍ ﻥﺎﺴﻟ .3
ﻩﺎﻴﳌﺍ ﻥﺍﺰﺧ .4
ﺭﺎﺨﺒﻟﺍ ﺱﺃﺭ ﻞﺻﻮﻣ .5
ﺭﺎﺨﺒﻟﺍ ﺱﺃﺭ .6
ﺭﺎﺨﺒﻟﺍ ﺱﺃﺭ ﻒﻴﻈﻨﺗ ﺔﻴﺸﺣ .7
ﺾﺒﻘﳌﺍ ﻞﺻﻮﻣ ﺭﺯ .8
ﺾﺒﻘﻣ .9
ﻞﺑﺎﻜﻟﺍ ﻖﻴﻠﻌﺘﻟ ﻑﺎﻄﺧ .10
ﺔﻀﺒﻗ .11
ﺔﻗﺎﻄﻟﺍ ﻞﺑﺎﻛ .12
ﻖﺤﻠﳌﺍ ﺊﻳﺎﻬﳌﺍ .13
(ﻲﻜﻴﺘﺳﻼﺑ ﺮﻌﺷ) ﺓﺮﻴﻐﺻ ﺓﺎﺷﺮﻓ .14
ﺓﺮﻴﻐﺻ ﺔﺤﺴﳑ .15
ﺖﻨﻤﺳﻹﺍ ﺓﺎﺷﺮﻓ .16
ﺓﺮﻴﺒﻛ ﺔﺤﺴﳑ .17
ﺔﺤﺴﻤﻤﻠﻟ ﺔﻴﺸﺣ .18
(ﻲﻜﻴﺘﺳﻼﺑ ﺮﻌﺷ) ﺓﺮﻴﺒﻛ ﺓﺎﺷﺮﻓ .19
(ﻲﺳﺎﺤﻧ ﺮﻌﺷ) ﺓﺮﻴﻐﺻ ﺓﺎﺷﺮﻓ .20
(ﻲﻜﻴﺘﺳﻼﺑ ﺮﻌﺷ) ﺓﺮﻴﻐﺻ ﺓﺎﺷﺮﻓ 2 .21
ﺩﺎﺠﺴﻟﺍ ﺔﺟﻻﺯ .22
ﺀﺍﺰﺟﻷﺍ ﻊﻴﻤﲡ
،ﺔﻴﺗﻵﺍ ﺕﺎﻤﻴﻠﻌﺘﻟﺍ ﻦﻣ
ﹴ
ﻱﺃ ﻲﻓ ﺔﻟﻭﺎﶈﺍ ﻞﺒﻗ !ﺮﻳﺬﲢ
ﻥﺃﻭ ﺭﺎﻴﺘﻟﺍ ﻦﻋ ﻝﻮﺼﻔﻣﻭ ﺄﻔﻄ
ﹸ
ﻣ ﺯﺎﻬﳉﺍ ﻥﺃ ﻦﻣ ﺪﻛﺄﺗ
.ﻩﺎﻴﻣ ﻰﻠﻋ ﻯﻮﺘﺤﻳ ﻻﻭ ﺩﺭﺎﺑ ﺯﺎﻬﳉﺍ
(C ﻞﻜﺸﻟﺍ) ﺾﺒﻘﳌﺍ ﺖﻴﺒﺜﺗ
ﻑﺮﻄﻟﺍ ﻞﺧﺍﺩ ﻰﻟﺇ (9) ﺾﺒﻘﻤﻠﻟ ﻲﻠﻔﺴﻟﺍ ﻑﺮﻄﻟﺍ ﺭﺮﻣ •
ﻪﻧﺎﻜﻣ ﻲﻓ ﺖ
ﹼ
ﺒﺜ
ﹸ
ﻳ ﻰﺘﺣ (8) ﺔﻳﺭﺎﺨﺒﻟﺍ ﺔﺤﺳﺎﻤﻠﻟ ﻱﻮﻠﻌﻟﺍ
.ﺎ
ﹰ
ﺗﻮﺻ ﺎ
ﹰ
ﺛﺪﺤﻣ

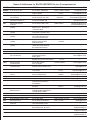
COUNTRY NAME ADDRESS TELEPHONE NO. EMAIL
Names & Addresses for BLACK+DECKER Service Concessionaries
BAHRAIN Alfouz Services Co. WLL P.O. Box 26562, Tubli, Manama (00973) 17783562 / 17879987 [email protected]
BAHRAIN Kewalram & Sons Co. WLL P.O. Box 84, Manama, (00973) 17213110 [email protected]
EGYPT Anasia Egypt for Trading P.O. Box 2443, 9, Mostafa Refaat Street, (00202) 22684159 [email protected]
JORDAN Mega Hardware - 93 King Abdullah II St., (009626) 5349098 [email protected]
(Sami Bashiti & Partners Co.) P.O.BOX 3005 AMMAN 11953 www.mega-hardware.com
KSA Fawaz Ebrahim Al Zayani P.O. Box 76026, Al Raka : 31952 (009663) 8140914 [email protected]
Trading Est. www.fawazalzayanigroup.com
KSA United Trading & Marketing Co; #15, Khamis Mushait 62411, Abha, (00966) 172500378 [email protected]
(U-MARK) Military city road – Near City max
and Ghunaim Market
KSA United Trading & Marketing Co; #116, Prince Fahad Ibn Ibrahim (00966) 11473-3258 [email protected]
(U-MARK) Al Saud Street - Near Nawan Hotel
KSA United Trading & Marketing Co; Ash Shiqah, Al Hamr, Buraydah (00966) 16-3694969 [email protected]
(U-MARK) 52371 Al Hamr Road near Jaryat
Al Umran & Khub Ath Thinayan
KSA United Trading & Marketing Co; King Abdulaziz St, Al Aziziyah (00966) 138179319 [email protected]
(U-MARK) Dammam 32424 near Dat AS 138172654
Sihha Medical Center
KSA United Trading & Marketing Co; Jabal Ar-Rubabah, Misrifah, (00966) 126612552 [email protected]
(U-MARK) Jeddah 23331 Falastin Road Near
New Jeddah National Hospital
KSA United Trading & Marketing Co; (U-MARK) #356, Al Talah Medina 42322 (00966) 148423339 [email protected]
KUWAIT Al Omar Technical Co. P.O. Box 4062, Safat 13041, Kuwait (00965) 24848595 / 24840039 [email protected]
LEBANON Aces Service Centre P.O. Box 90-102, Nahr El Mot, (009611) 898989 / 262626 [email protected]
Building, Beirut
LIBYA Homeworld Co. Senidal St. Amr Ibn Elaas Road, (0021861) 9094183 [email protected]
Benghazi, Libya (P.O. Box 18182 Salmany) ext. 103
LIBYA North Africa Trading P.O. Box 348, 7 October (00218061) 3383994 [email protected]
( El Ghoul Brothers) Street 11, Benghazi
LIBYA North Africa Trading AlBarniq Dewalt Center, (00218021) 3606430 [email protected]
MAURITIUS The Brandhouse Ltd. Rogers Industrial Park 1, Riche (00230) 2069450 claims([email protected]
OMAN Oman Marketing & Service Co. P.O. Box 2734,Behind Honda (00968) 24560232 [email protected]
OMAN Oman Marketing & Service Co. (Omasco) Al Ohi, Sohar,Oman (00968) 26846379 [email protected]
OMAN Oman Marketing & Service Co. (Omasco) Sanaya, Salalah,Oman (00968) 23212290 [email protected]
PAKISTAN Ammar Service & Spares Office No 6068 6th Floor Central (009221) 32775252 [email protected]
Plaza Behind Gul Plaza Marston
Road.KARACHI
QATAR Al Muftah Service Centre Al Wakrah Road, P.O. Box 875, (00974) 44650880 [email protected]
TUNISIA Societe Tunisienne De RUE DE LA PHYSIQUE. NOUVELLE (0021679) 389687 [email protected]
Maintenance(STM) ZONE INDUSTRIELLE BEN AROUS.
2013 BEN AROUS, TUNISIA.
UAE Light House Electrical P.O. Box 120, Abu Dhabi (009712) 6726131 [email protected]
UAE Light House Electrical P.O. Box 120, Abu Dhabi (009712) 5548315 [email protected]
UAE BLACK+DECKER (Overseas) GmbH P.O. Box 5420, Dubai (009714) 8127400 / 8127406 [email protected]
UAE Zillion Equipment and P.O. Box 10584, Ras Al Khaimah (009717) 2277095 [email protected]
UAE Zillion Equipment and Spare Parts P.O. Box 19740, Opp. Bin Sadal / (009713) 7216690 [email protected]
Trading LLC Trimix Redymix Sanaiya, Al Ain
YEMEN Middle East Trading Co. (METCO) 5th Flr.Hayel Saeed Anam (009674) 213455 [email protected]
YEMEN Middle East Trading Co. (METCO) Mualla Dakka, Aden (009672) 222670 [email protected]
YEMEN Middle East Trading Co. (METCO) Hayel st.,Sana'a,Yemen (009671) 204201 [email protected]


PRODUCT MODEL NO.
FSMH13E5 - FSMH13E10 N761183
WARRANTY REGISTRATION CARD
YOUR NAME/ VOTRE NOM/
YOUR ADDRESS/ VOTRE ADRESSE/
POSTCODE/ CODE POSTAL/
DATE OF PURCHASE/ JOUR D’ACHAT/
DEALER'S NAME & ADDRESS/ NOM ET ADRESSE DU VENDEUR/
«ùßr
«∞FMu«Ê
«∞d±e «∞∂d¥bÍ
¢U¸¥a «∞Ad«¡
≈ßr Ë ´Mu«Ê «∞∂Uzl
-
 1
1
-
 2
2
-
 3
3
-
 4
4
-
 5
5
-
 6
6
-
 7
7
-
 8
8
-
 9
9
-
 10
10
-
 11
11
-
 12
12
-
 13
13
-
 14
14
-
 15
15
-
 16
16
-
 17
17
-
 18
18
-
 19
19
-
 20
20


Black & Decker FSM13E1 Manuel utilisateur
- Catégorie
- Nettoyeurs à vapeur
- Taper
- Manuel utilisateur
dans d''autres langues
- English: Black & Decker FSM13E1 User manual
Documents connexes
-
Black & Decker FSM13E1 Manuel utilisateur
-
Black & Decker FSMH13101SM Manuel utilisateur
-
-
-
-
Black & Decker FSMH1621 Manuel utilisateur
-
-
-
Black & Decker DVA315J Manuel utilisateur
-
Black & Decker SteaMitt FSH10SMP Manuel utilisateur
