
English
1 Your multicooker
Congratulations on your purchase, and welcome to Philips!
To fully benet from the support that Philips oers,
register your product at www.philips.com/welcome.
2 What’s in the box
a
Multicooker main
unit
f Measuring cup
b Power cord g User manual
c Steam basket h Recipe booklet
d Rice spatula i Warranty card
e Soup ladle j Safety leaet
3 Overview
Product overview
a
Top lid
g
Main unit
b
Detachable inner
lid
h
Cooker handle
c
Inner pot
i
Water level indications
d
Control panel
j
Sealing ring
e
Heating element
k
Detachable steam vent
cap
f
Power socket
l
Lid release button
Controls overview
m
Keep-warm
button
s
Cooking time button
n
MyRecipe button
t
Menu/Child lock button
o
Stage cooking
button
u
Temperature button
p
Preset time button
v
Start/Cancel button
q
Decrease button
w
Display screen
r
Increase button
Menus overview
Menus
Default
cooking
time
Cooking time
regulating
range
Reheat (Réchauer) 25 min 5-60 min
Rice (Riz) 30-40 min /
Grain (Grains/
légumineuses) 30-40 min /
Risotto (Risotto) 30-40 min /
Jam (Céréales) 10 min 5 min - 2 hr
Steam (Vapeur) 45 min 5 min - 2 hr
Boil (Bouillir) 4 min 1 - 15 min
Soup (Soupe Sauce) 1 hr 20 min-4 hr
Fry (Frire) 15 min 5-60 min
Slow cooking (Slow
cooking) 5 hr 1-15 hr
Stew (Mijoter) 1 hr 20 min - 10 hr
Compote (Compote) 10 min 5-40 min
Menus
Default
cooking
time
Cooking time
regulating
range
Pasta (Pâtes) 45 min 5 min - 2 hr
Egg (Oeufs) 4 min 1-15 min
Jelly meat (Conture) 6 hr 4-10 hr
Ragout (Ragout) 2 hr 20 min - 10 hr
Pizza (Pizza) 35 min 10-60 min
Roast (Rissoler) 1 hr /
Bake (Four) 45 min 20 min - 2 hr
Yogurt (Yaourt) 8 hr 6-12 hr
Ker (Etuve) 8 hr 6-12 hr
Manual (Manuel) 2 hr 5 min - 10 hr
Stage cooking (Stage
Cooking) 5 min 5 min - 15 hr
Menus
Preset
time
Default
cooking
temperature
Temperature
regulating
range
Reheat
(Réchauer) / 85°C /
Rice (Riz) 1-24 hr 130-140°C /
Grain (Grains/
légumineuses) 1-24 hr 130-140°C /
Risotto (Risotto) 1-24 hr 130-140°C /
Jam (Céréales) 1-24 hr 90-100°C /
Steam (Vapeur) 1-24 hr 100°C /
Boil (Bouillir) / 100°C /
Soup (Soupe
Sauce) 1-24 hr 90-100°C /
Fry (Frire) / 145-160°C /
Slow cooking
(Slow cooking) 1-24 hr 80°C /
Stew (Mijoter) 1-24 hr 95°C /
Compote
(Compote) 1-24 hr 100°C /
Pasta (Pâtes) 1-24 hr 100°C /
Egg (Oeufs) / 100°C /
Jelly meat
(Conture) 1-24 hr 90-100°C /
Ragout (Ragout) 1-24 hr 90°C /
Pizza (Pizza) 1-24 hr 130°C /
Roast (Rissoler) 1-24 hr 120-130°C /
Bake (Four) / 130°C 40-160°C
Yogurt (Yaourt) 1-24 hr 40±3°C /
Ker (Etuve) 1-24 hr 40±3°C /
Manual (Manuel) 1-24 hr 100°C 30-160°C
Stage cooking
(Stage Cooking) 1-24 hr 100°C 30-160°C
Note
• The cooking time for rice (Riz), grain (Grains/
légumineuses), and risotto (Risotto) is determined
by the multicooker in accordance to the quantity of
ingredients put in the inner pot.
• You can adjust the cooking temperature for bake
(Four), manual (Manuel) and stage cooking (Cuisson
par étapes). For bake, the temperature is available
from 40°C to 160°C; for manual and stage cooking, the
temperature is available from 30°C to 160°C.
• After the cooking process has started, you can touch
"On/o" to deactivate the current cooking process, and
the multicooker will switch to the standby mode.
Cooking rice (Riz) and grain
(Grains/légumineuses)
Note
• If the voltage is unstable at the area you live, it is
possible that food in the multicooker overows.
• After the cooking is nished, stir the rice/grain and
loosen it immediately to release excessive moisture for
uy rice/grain.
• Depending on the cooking conditions, the bottom
portion of the rice/grain may become slightly browned.
1 Measure the rice/grain using the measuring cup
provided (g. a).
2 Rinse rice, put the washed rice in the inner pot, and
ll in water (g. b).
Note
• For details about the ratio of rice/grain and water, refer
to the recipe booklet.
3 Press the lid release button to open the lid (g. c).
4 Wipe the outside of the inner pot dry (g. d), and
then put it in the multicooker (g. e).
Note
• Make sure that the inner pot is in proper contact with
the heating element.
• Make sure that the outside of the inner pot is clean and
dry, and that there is no foreign residue on the heating
element.
5 Close the lid of the multicooker (g. f), and put the
plug in the power socket (g. g).
6 Touch "Menu" to select “Riz” (g. j) or “Grains/
légumineuses” (g. k).
7 Touch and hold "On/o" for 3 seconds to conrm
and start cooking (g. i).
8 When the cooking is nished, the appliance beeps
and turns into warm keeping automatically.
Making risotto (Risotto)
1 Put the ingredients for the risotto into the inner pot.
2 Wipe the outside of the inner pot dry (g. d), and
then put it in the multicooker (g. e).
3 Close the lid of the multicooker (g. f), and put the
plug in the power socket (g. g).
4 Touch "Menu" to select “Risotto” (g. l).
5 Touch and hold "On/o" for 3 seconds to conrm
and start cooking (g. i).
6 When the cooking is nished, the appliance beeps
and turns into warm keeping automatically.
Cooking jam (Céréales)
1 Put ingredients for the jam into the inner pot and stir
a little bit.
2 Wipe the outside of the inner pot dry (g. d), and
then put it in the multicooker (g. e).
3 Close the lid of the multicooker (g. f), and put the
plug in the power socket (g. g).
4 Touch "Menu" to select “Céréales” (g. m).
» To choose a dierent cooking time, refer to
chapter “Setting up the cooking time”.
5 Touch and hold "On/o" for 3 seconds to conrm
and start cooking (g. i).
6 When the cooking is nished, the appliance beeps
and turns into warm keeping automatically.
Note
• displays on the screen before the water/liquid is
brought to boil. When the water/liquid starts boiling, the
set cooking time displays on the screen.
• For details about the ratio of ingredients and liquid, refer
to the recipe booklet.
Steaming (Vapeur)
1 Pour some water into the inner pot.
Note
• To steam vegetable, use 0.2L to 1L water depending on
the types and amount of vegetable; to steam meat, use
0.5L to 2L water depending on the size and amount of
meat.
• Make sure that not all the steaming holes on the steam
basket are covered by the ingredients, so that hot steam
could ow up from under the steam basket.
2 Put the steam basket in the inner pot, put the food in
a bowl, and then put the bowl on the steam basket.
3 Wipe the outside of the inner pot dry (g. d), and
then put it in the multicooker (g. e).
4 Close the lid of the multicooker (g. f), and put the
plug in the power socket (g. g).
5 Touch "Menu" to select “Vapeur” (g. n).
» To choose a dierent cooking time, refer to
chapter “Setting up the cooking time”.
6 Touch and hold "On/o" for 3 seconds to conrm
and start cooking (g. i).
7 When the cooking is nished, the appliance beeps
and turns into warm keeping automatically.
Note
• When steaming food, do not immerse the steam basket
in water.
• displays on the screen before the water/liquid is
brought to boil. When the water/liquid starts boiling, the
set cooking time displays on the screen.
• After the steaming is nished, use a kitchen glove or
a cloth to remove the bowl and steam basket, as they
could be very hot.
Boiling (Bouillir)
1 Fill the inner pot with some water.
2 Wipe the outside of the inner pot dry (g. d), and
then put it in the multicooker (g. e).
3 Close the lid of the multicooker (g. f), and put the
plug in the power socket (g. g).
4 Using the multicooker
Note
• For all menus, do not exceed the MAX indication on
the inside of the inner pot when putting food, liquid or
ingredients in it, otherwise the food may overow during
cooking.
• The cooking time does not display straight from the
beginning for rice (Riz), grain (Grains/légumineuses)
and risotto (Risotto). displays on the screen
during most of the cooking time as the multicooker
needs to detect the water/liquid and ingredient volume
in the initial preparation stage. When the multicooker
detects the actual cooking time needed, the remaining
cooking time displays on the screen. For jam (Céréales),
steam (Vapeur), boil (Bouillir), jelly meat (Conture)
and compote (Compote), displays on the screen
before the water/liquid is brought to boil. When the
water/liquid starts boiling, the set cooking time displays
on the screen.
• Refer to the recipe booklet for more details on cooking
with each menu.
Tip
• To select a certain menu, touch "Menu" repeatedly. You
can also touch "Menu" once, and then touch increase "+"
or decrease "-" to do so.
Before rst use
1 Take out all the accessories from the inner pot, and
remove the packaging material of the inner pot.
2 Clean all parts of the multicooker thoroughly before
using it for the rst time (see chapter ‘Cleaning and
Maintenance’).
Note
• Make sure all parts are completely dry before you start
using the multicooker.
Reheating (Réchauer)
1 Loosen the food and evenly distribute it in the inner
pot.
2 Pour some water onto the food to prevent it from
becoming too dry. The quantity of the water
depends on the amount of food.
3 Wipe the outside of the inner pot dry (g. d), and
then put it in the multicooker (g. e).
4 Close the lid of thepre multicooker (g. f), and put
the plug in the power socket (g. g).
5 Touch "Menu" to select “Réchauer” (g. h).
» To choose a dierent cooking time, refer to
chapter “Setting up the cooking time”.
6 Touch and hold "On/o" for 3 seconds to conrm
and start cooking (g. i).
7 When the cooking is nished, the appliance beeps
and turns into warm keeping automatically.
5 Touch and hold "On/o" for 3 seconds to conrm
and start cooking (g. i).
6 When the cooking is nished, the appliance beeps
and turns into warm keeping automatically.
Frying (Frire)
1 Wipe the outside of the inner pot dry (g. d), and
then put it in the multicooker (g. e).
2 Put the plug in the power socket (g. g).
3 Pour some cooking oil into the inner pot.
4 Touch "Menu" to select “Frire” (g. q).
5 Touch and hold "On/o" for 3 seconds to conrm
and start cooking (g. i).
6 Let the cooking oil heat up for 5 minutes, and then
put the ingredients and seasonings into the inner pot.
7 Keep the lid open and stir the ingredients constantly
with a spatula.
8 When the cooking is nished, the appliance beeps
and turns into standby automatically.
Slow cooking (Slow Cooking)
1 Clean the inner pot thoroughly and wipe the inside of
the pot dry with a soft cloth.
2 Wipe the outside of the inner pot dry (g. d), and
then put it in the multicooker (g. e).
3 Put the plug in the power socket (g. g).
4 Touch "Menu" to select “Slow Cooking” (g. r).
» To choose a dierent cooking time, refer to
chapter “Setting up the cooking time”.
5 Touch and hold "On/o" for 3 seconds to conrm
and start cooking (g. i).
6 When the cooking is nished, the appliance beeps
and turns into warm keeping automatically.
Making stew (Mijoter) or ragout
(Ragout)
1 Put the ingredients for the stew or ragout in the inner
pot.
2 Wipe the outside of the inner pot dry (g. d), and
then put it in the multicooker (g. e).
3 Close the lid of the multicooker (g. f), and put the
plug in the power socket (g. g).
4 Touch "Menu" to select “Mijoter” (g. s) or
“Ragout” (g. t).
» To choose a dierent cooking time, refer to
chapter “Setting up the cooking time”.
5 Touch and hold "On/o" for 3 seconds to conrm
and start cooking (g. i).
6 When the cooking is nished, the appliance beeps
and turns into warm keeping automatically.
Making compote (Compote)
1 Put the ingredients for the compote in the inner pot.
2 Wipe the outside of the inner pot dry (g. d), and
then put it in the multicooker (g. e).
3 Close the lid of the multicooker (g. f), and put the
plug in the power socket (g. g).w
4 Touch "Menu" to select “Compote” (g. u).
» To choose a dierent cooking time, refer to
chapter “Setting up the cooking time”.
5 Touch and hold "On/o" for 3 seconds to conrm
and start cooking (g. i).
6 When the cooking is nished, the appliance beeps
and turns into warm keeping automatically.
Note
• displays on the screen before the water/liquid is
brought to boil. When the water/liquid starts boiling, the
set cooking time displays on the screen.
Boiling pasta (Pâtes)
1 Fill the inner pot with some water.
Note
• Do not exceed the MAX indication on the inside of the
inner pot.
2 Wipe the outside of the inner pot dry (g. d), and
then put it in the multicooker (g. e).
3 Close the lid of the multicooker (g. f), and put the
plug in the power socket (g. g).
4 Touch "Menu" to select “Pâtes” (g. v).
» To choose a dierent cooking time, refer to
chapter “Setting up the cooking time”.
5 Touch and hold "On/o" for 3 seconds to conrm
and start cooking (g. i).
6 When the water is brought to boil, the multicooker
beeps 5 times as a reminder for you to open the lid
and put the pasta in the inner pot.
Note
• displays on the screen before the water is brought
to boil. When the water starts boiling, the set cooking
time displays on the screen.
• If the multicooker is left idle for 1 minute after the
multicooker beeps, the multicooker turns into standby
mode.
7 After the pasta is put in the inner pot, touch "Menu"
to resume the cooking process.
8 Keep the lid open and constantly stir the pasta with
a spatula.
Tip
• You can also close the lid after the pasta is put in the inner
pot for a soft and tender taste of the pasta.
9 When the cooking is nished, the appliance beeps
and turns into standby automatically.
Boiling egg (Oeufs)
1 Fill the inner pot with some water.
Note
• Do not exceed the MAX indication on the inside of the
inner pot.
2 Wipe the outside of the inner pot dry (g. d), and
then put it in the multicooker (g. e).
3 Close the lid of the multicooker (g. f), and put the
plug in the power socket (g. g).
4 Touch "Menu" to select “Oeufs" (g. w).
» To choose a dierent cooking time, refer to
chapter “Setting up the cooking time”.
5 Touch and hold "On/o" for 3 seconds to conrm
and start cooking (g. i).
6 When the water is brought to boil, the multicooker
beeps 5 times as a reminder for you to open the lid
and put the eggs in the inner pot.
4 Touch "Menu" to select “Bouillir” (g. o).
» To choose a dierent cooking time, refer to
chapter “Setting up the cooking time”.
5 Touch and hold "On/o" for 3 seconds to conrm
and start cooking (g. i).
6 When the water is brought to boil, the multicooker
beeps 5 times as a reminder for you to open the lid
and put the food in the inner pot.
Note
• displays on the screen before the water/liquid is
brought to boil. When the water/liquid starts boiling, the
set cooking time displays on the screen.
7 When the cooking is nished, the appliance beeps
and turns into standby automatically.
Making soup (Soupe Sauce)
1 Put ingredients and water/liquid for the soup into the
inner pot.
2 Wipe the outside of the inner pot dry (g. d), and
then put it in the multicooker (g. e).
3 Close the lid of the multicooker (g. f), and put the
plug in the power socket (g. g).
4 Touch "Menu" to select “Soupe Sauce” (g. p).
» To choose a dierent cooking time, refer to
chapter “Setting up the cooking time”.
Specifications are subject to change without notice
© 2015 Koninklijke Philips N.V.
All rights reserved.
HD4734_HD4749_UM_FR_V1.0_151113
HD4734
HD4749
3
m
o
q
n
p
v
w
u
t
r
s
8 10 11 12
14
9
3S
49 50 51
3S
52
3S
31 32
3S
33 35
3S
3634
38 42
46
48
44
40
4
15
28 29 30
24
25 26 27
16
2119 20 22
23
37 39 41
43 45
47
2
4
13
17 18
www.philips.com/welcome
User manual
www.philips.com/welcome
Warranty
1
http://www.philips.com/welcome
Recipe
a
b
c
d
e
f
g h i
www.philips.com/welcome
Safety Leaflet
j
2
k
j
g
f
l
h
c
a
b
d
e
i
7
5 63
Question?
Contact
Philips
Register your product and get support at
www.philips.com/welcome
Always there to help you
EN User manual FR Mode d’emploi
Note
• displays on the screen before the water is brought
to boil. When the water starts boiling, the set cooking
time displays on the screen.
• The default cooking time for boiling egg is 4 minutes,
and “04:00” displays on the screen.
• If the multicooker is left idle for 5 minute after the
multicooker beeps, the multicooker turns into standby
mode.
7 After the eggs are put in the inner pot, close the lid
and touch "Menu" to resume the cooking process.
8 When the cooking is nished, the appliance beeps
and turns into standby automatically.
Making jelly meat (Conture)
1 Put the ingredients for the jelly meat in the inner pot.
2 Wipe the outside of the inner pot dry (g. d), and
then put it in the multicooker (g. e).
3 Close the lid of the multicooker (g. f), and put the
plug in the power socket (g. g).
4 Touch "Menu" to select “Conture" (g. x).
» To choose a dierent cooking time, refer to
chapter “Setting up the cooking time”.
5 Touch and hold "On/o" for 3 seconds to conrm
and start cooking (g. i).
6 When the cooking is nished, the appliance beeps
and turns into warm keeping automatically.
Note
• displays on the screen before the water/liquid is
brought to boil. When the water/liquid starts boiling, the
set cooking time displays on the screen.
Making pizza (Pizza)
1 Put the ingredients for the pizza in the inner pot.
2 Wipe the outside of the inner pot dry (g. d), and
then put it in the multicooker (g. e).
3 Close the lid of the multicooker (g. f), and put the
plug in the power socket (g. g).
4 Touch "Menu" to select “Pizza" (g. y).
» To choose a dierent cooking time, refer to
chapter “Setting up the cooking time”.
5 Touch and hold "On/o" for 3 seconds to conrm
and start cooking (g. i).
6 When the cooking is nished, the appliance beeps
and turns into warm keeping automatically.
Note
• If you cook with frozen pizza, you can adjust the cooking
time according to your own preference. The pizza gets
browner as the cooking time increases.
Roasting (Rissoler)
1 Put ingredients into the inner pot.
2 Wipe the outside of the inner pot dry (g. d), and
then put it in the multicooker (g. e).
3 Close the lid of the multicooker (g. f), and put the
plug in the power socket (g. g).
4 Touch "Menu" to select “Rissoler" (g. z).
5 Touch and hold "On/o" for 3 seconds to conrm
and start cooking (g. i).
6 There are 2 stages of roasting. When the rst stage
(about 35 minutes) is over, the multicooker beeps
5 times every 30 seconds as a reminder for you to
open the lid, and turn the food over in the inner pot.
» ashes on the screen.
7 Touch "Menu" to start the second stage.
» If "Menu" is not touched within 5 minutes after
the rst stage is over, the multicooker will turn
into warm keeping.
8 When the cooking is nished, the appliance beeps
and turns into standby automatically.
Baking (Four)
1 Put the ingredients to bake in the inner pot.
2 Wipe the outside of the inner pot dry (g. d), and
then put it in the multicooker (g. e).
3 Close the lid of the multicooker (g. f), and put the
plug in the power socket (g. g).
Note
• When baking cake or bread, keep the lid closed during
cooking. Baking cake at 130°C and by 45 minutes usually
delivers best cooking result.
• If you bake other food with a temperature above 140°C,
keep the lid open.
4 Touch "Menu" to select “Four" (g. {).
» To choose a dierent baking temperature, refer
to chapter “Setting up the cooking temperature”.
» To choose a dierent cooking time, refer to
chapter “Setting up the cooking time”.
5 Touch and hold "On/o" for 3 seconds to conrm
and start cooking (g. i).
6 When the cooking is nished, the appliance beeps
and turns into warm keeping automatically.
Note
• If the baking temperature is set below 80°C, when the
cooking is nished, the appliance turns into standby
automatically.
• When removing the inner pot from the multicooker after
cooking, use a kitchen glove or a cloth, as the inner pot
could be very hot.
Making yogurt (Yaourt) or ker
(Etuve)
1 Mix the ingredients for the yogurt or ker well and
put them in the inner pot.
2 Wipe the outside of the inner pot dry (g. d), and
then put it in the multicooker (g. e).
3 Close the lid of the multicooker (g. f), and put the
plug in the power socket (g. g).
4 Touch "Menu" to select "Yaourt" (g. |) or "Etuve"
(g. }).
» To choose a dierent cooking time, refer to
chapter “Setting up the cooking time”.
5 Touch and hold "On/o" for 3 seconds to conrm
and start cooking (g. i).
6 When the cooking is nished, the appliance beeps
and turns into standby automatically.
Manual (Manuel)
You may use the manual mode to cook food with more
control over the cooking time and temperature.
1 Put ingredients into the inner pot.
2 Wipe the outside of the inner pot dry (g. d), and
then put it in the multicooker (g. e).
3 Close the lid of the multicooker (g. f), and put the
plug in the power socket (g. g).
4 Touch "Menu" to select "Manuel" (g. ~).
» To choose a dierent baking temperature, refer
to chapter “Setting up the cooking temperature”.
» To choose a dierent cooking time, refer to
chapter “Setting up the cooking time”.
5 Touch and hold "On/o" for 3 seconds to conrm
and start cooking (g. i).
6 When the cooking is nished, the appliance beeps
and turns into warm keeping automatically.
Note
• If you select a temperature below 80°C, the multicooker
automatically turns into standby after the cooking
process is nished.
• If you select a temperature above 140°C, the top lid must
be open during cooking.
Stage cooking (Cuisson par
étapes)
With the stage cooking function, you can set up to 9
stages of cooking with dierent time and temperature.
For example, you can set the rst stage for 5 minutes at
160°C, the second stage for 10 minutes at 100°C and the
last stage for 20 minutes at 80°C.
1 When the multicooker is at standby mode, touch
"Cuisson par étapes". (g. )
» “1” lights up on the screen.
2 Refer to chapter “Setting up the cooking time” and
select the cooking time for stage 1.
3 Refer to chapter “Setting up the cooking
temperature” and select the cooking temperature for
stage 1.
4 Touch "Cuisson par étapes" again and move to stage
2. (g. €)
» “2” lights up on the screen.
5 Set the cooking time and temperature for stage 2.
6 Repeat the above steps until you have set all the
stages you need, and then touch and hold "On/o"
for 3 seconds to conrm and start cooking (g. i).
MyRecipe (MaRecette)
Saving stage cooking to MyRecipe
(MaRecette)
Within 10 minutes after the stage cooking is nished, you
can save the cooking stages in "MyRecipe (MaRecette)".
1 Touch and hold "Cuisson par étapes" for 3 seconds.
(g. )
» “F1” displays on the screen.
2 Touch increase "+" or decrease "-" to select one of
the slots: F1, F2, F3, F4 or F5 (g. ‚).
3 Touch "MaRecette" to conrm and save the cooking
stages to the designated slot (g. ƒ).
Selecting already saved MyRecipe
(MaRecette) settings
1 At standby mode, touch and hold "MaRecette" for
3 seconds. (g. „)
» “F1” displays on the screen.
2 Touch increase "+" or decrease "-" to select one of
previously saved MyRecipe settings: F1, F2, F3, F4 or
F5 (g. ‚).
3 Touch and hold "On/o" for 3 seconds to conrm
and start cooking (g. i).
Note
• If you would like to replace one of the current MyRecipe
(MaRecette) settings with a new setting, select the
setting you no longer need, and save the new setting
to it.
• The total cooking time for all the cooking stages has a
maximum limitation of 24 hours.
Warm keeping
The multicooker provides you with easy control over the
keep-warm mode.
• After you have touched "Menu" to select the cooking
function, if you touch and hold "On/o" for 3 seconds
directly, the keep-warm indicator will light up. After the
cooking is nished, the multicooker will switch to keep-
warm mode directly.
• After you have touched "Menu" to select the cooking
function, if you touch "Chaud" rst, and then touch and
hold "On/o" for 3 seconds , the keep-warm indicator
will be o. After the cooking is nished, the multicooker
will be in standby mode.
Note
• After the appliance turns into warm keeping, it remains
at warm keeping for 12 hours, after that it beeps and
cease the warm keeping process.
• At standby mode, you can touch "Chaud" to switch to
warm keeping. The accumulated warm keeping time
displays on the screen. The appliance remains at warm
keeping for 24 hours, after that it beeps and cease the
warm keeping process.
• In keep-warm mode, you can touch "Chaud" to switch
to standby.
Setting up the cooking time
You can adjust the cooking time for some menus. Refer to
chapter “Menus overview” and see which menus have the
time regulation as well as the regulating range.
1 Select the cooking menu you need.
2 Touch "Temps de cuisson" (g. …).
» The hour unit starts ashing on the display.
3 Touch increase "+" or decrease "-" to set the hour
unit (g. †).
4 After the hour unit is set, touch "Temps de cuisson"
again (g. ‡).
» The minute unit starts ashing on the display.
5 Touch increase "+" or decrease "-" to set the minute
unit (g. ˆ).
6 Touch and hold "On/o" for 3 seconds to conrm
and start cooking (g. i).
Note
• If the multicooker is left idle for 15 seconds after "Temps
de cuisson" is touched, it will turn to standby mode.
• For menus with a maximum cooking time of no more
than 1 hour, the rst time you touch "Temps de cuisson",
the minute unit starts ashing on the display.

Setting up the cooking time for “boiling
egg” (Egg)
You can set up the cooking time for “boiling egg” to an
accuracy of 30 seconds.
1 Select the “boling egg” (Egg) function.
2 Touch "Temps de cuisson" (g. ‰).
» The minute unit starts ashing on the display.
Note
• The default cooking time for boiling egg is 4 minutes,
and “04:00” displays on the screen.
3 Touch increase "+" or decrease "-" to set the minute
unit (g. Š).
4 Touch "Temps de cuisson" again (g. ‹).
» The second unit starts ashing on the display.
5 Touch increase "+" or decrease "-" to set the second
unit (g. Œ).
» The second unit changes by 30 seconds each
time increase "+" or decrease "-" is touched.
6 Touch and hold "On/o" for 3 seconds to conrm
and start cooking (g. i).
Preset time for delayed cooking
You can preset the delayed cooking time for some
cooking menus. Refer to chapter “Menus overview” and
see which menus can be preset.
1 Select the cooking menu you need.
2 Touch "Départ diéré" (g. ).
» The hour unit starts ashing on the display.
3 Touch increase "+" or decrease "-" to set the hour
unit (g. ).
4 After the hour unit is set, touch "Départ diéré" again
(g. ).
» The minute unit starts ashing on the display.
5 Touch increase "+" or decrease "-" to set the minute
unit (g. ).
6 Touch and hold "On/o" for 3 seconds to conrm
and start cooking (g. i).
Note
• If the multicooker is left idle for 15 seconds after "Départ
diéré" is touched, it will turn to standby mode.
• The cooking process will be nished when the preset
time has elapsed. For example, if you set a preset time
of 8 hours at 10:00 in the morning, the cooking process
will be nished 8 hours later at 18:00 in the evening.
Setting up the cooking
temperature
You can adjust the cooking temperature for some menus.
Refer to chapter “Menus overview” and see which menus
have the temperature regulation as well as the regulating
range.
1 Select the cooking menu you need.
2 Touch "Temp" (g. ‘).
» The default cooking temperature displays on the
screen.
3 Touch increase "+" or decrease "-" to set the cooking
temperature (g. ’).
4 Touch and hold "On/o" for 3 seconds to conrm
and start cooking (g. i).
Note
• Instead of touching increase "+" or decrease "-" to set
the cooking temperature, you can also touch "Temp"
repeatedly to adjust the cooking temperature.
Setting up the child lock
To protect children from using the multicooker or to avoid
any misoperation, you can activate the child lock during a
cooking process.
• Touch and hold "Menu" for 3 seconds to activate the
child lock (g. “).
» “Verrouillage enfant” lights up on the display.
• To unlock, touch and hold “menu” (Menu) for 3 seconds
again (g. ”).
» “Verrouillage enfant” goes o.
5 Cleaning and
Maintenance
Note
• Unplug the multicooker and wait until it has cooled
down suciently before cleaning.
Interior
Inside of the top lid and the main body; the heating
element:
• Wipe with a wrung out cloth.
• Make sure to remove all the food residues stuck to the
multicooker.
Exterior
Surface of the top lid and outside of the main body:
• Wipe with a cloth damped with soap water.
• Only use soft and dry cloth to wipe the control panel.
• Make sure to remove all the food residues around
the control panel.
Accessories
Rice spatula, soup ladle, measuring cup, inner pot, steam
basket, and detachable steam vent cap:
• Soak in hot water and clean with sponge.
6 Recycling
This symbol means that this product shall not
be disposed of with normal household waste
(2012/19/EU).
Follow your country’s rules for the separate
collection of electrical and electronic products.
Correct disposal helps prevent negative
consequences for the environment and human
health.
7 Guarantee and service
If you need service or information, or if you have a
problem, visit the Philips website at www.philips.com
or contact the Philips Customer Care Center in your
country. You can nd its phone number in the worldwide
guarantee leaet. If there is no Customer Care Center in
your country, go to your local Philips dealer.
8 Specifications
Model Number HD4749
Rated voltage 220V-240V
~
Rated power output 890W-1070W
Rated capacity 5.0L
9 Troubleshooting
If you encounter problems when using this multicooker,
check the following points before requesting service.
If you cannot solve the problem, contact the Philips
Consumer Care Center in your country.
Problem Solution
The light on
the button
does not go
on.
There is a connection problem. Check
if the power cord is connected to
the multicooker properly and if the
plug is inserted rmly into the power
outlet.
The light is defective. Take the
appliance to your Philips dealer or a
service center authorized by Philips.
The display
does not
function.
The multicooker is not connected
to the power supply. If there is no
power supply, the power failure
backup function does not work and
the display does not function.
The ingredients
are not
cooked.
You did not touch and hold "On/o"
for 3 seconds to start the cooking
process.
Make sure that there is no foreign
residue on the heating element and
the outside of the inner pot before
switching the multicooker on.
The heating element is damaged, or
the inner pot is deformed. Take the
multicooker to your Philips dealer or
a service center authorized by Philips.
The rice is too
dry and not
well cooked.
Add more water to the rice, and cook
for a bit longer.
The rice is
scorched.
You have not rinsed the rice properly.
Rinse the rice until the water runs
clear.
The
multicooker
does not turn
into warm
keeping
automatically.
You might have touched “Chaud”
before starting the cooking process.
In this case the multicooker will be
in standby mode after the cooking is
nished.
The temperature control is defective.
Take the appliance to your Philips
dealer or a service center authorized
by Philips.
Water spills
out of the
multicooker
during cooking.
Make sure that the ingredients you
put in the inner pot do not exceed
the MAX indication.
I cannot get
to the desired
cooking
function.
Touch "Menu" repeatedly to select
the desired function.
Dishes smell
bad after
cooking
Clean the inner pot with some
washing detergent and warm water.
After cooking, make sure the steam
vent cap, inner lid and inner pot is
cleaned thoroughly.
Error message
(E1, E2, E3, or
E4) appears on
the display.
There has been a power failure
during cooking. Take the appliance to
your Philips dealer or a service center
authorized by Philips.
Français
1 Votre cuiseur
multifonction
Félicitations pour votre achat et bienvenue dans le monde
de Philips !
Pour proter pleinement de l'assistance oerte par Philips,
enregistrez votre appareil à l'adresse suivante : www.
philips.com/welcome.
2 Contenu de l'emballage
a Unité principale
du cuiseur
multifonction
f Mesure graduée
b Cordon
d'alimentation
g Mode d'emploi
c Panier vapeur h Livret de recettes
d
Spatule à riz
i Carte de garantie
e
Louche
j Livret de sécurité
3 Présentation
Présentation du produit
a
Couvercle
supérieur
g
Unité principale
b
Couvercle intérieur
amovible
h
Poignée du cuiseur
c
Cuve
i
Indications du niveau
d'eau
d
Panneau de
commande
j
Anneau d'étanchéité
e
Résistance
chauante
k
Capuchon amovible
des évents à vapeur
f
Prise secteur
l
Bouton de
déverrouillage du
couvercle
Aperçu des commandes
m
Bouton de
maintien au chaud
s
Bouton de temps de
cuisson
n
Bouton MaRecette
t
Bouton Menu/de
verrouillage enfant
o
Bouton de cuisson
par étapes
u
Thermostat
p
Bouton de départ
diéré
v
Bouton marche/
annulation
q
Bouton de
diminution
w
Écran
r
Bouton
d'augmentation
Présentation des menus
Menus
Temps de
cuisson par
défaut
Plage de
réglage du
temps de
cuisson
Réchauer 25 min 5-60 min
Riz 30-40 min /
Grains/légumineuses 30-40 min /
Risotto 30-40 min /
Céréales 10 min 5 min - 2 h
Vapeur 45 min 5 min - 2 h
Bouillir 4 min 1 - 15 min
Soupe Sauce 1 h 20 min-4 h
Frire 15 min 5-60 min
Slow cooking (Cuisson
lente) 5 heures 1-15 h
Mijoter 1 h 20 min - 10 h
Compote 10 min 5-40 min
Pâtes 45 min 5 min - 2 h
Oeufs 4 min 1-15 min
Conture 6 h 4-10 h
Menus
Temps de
cuisson par
défaut
Plage de
réglage du
temps de
cuisson
Ragout 2 h 20 min - 10 h
Pizza 35 min 10-60 min
Rissoler 1 h /
Four 45 min 20 min - 2 h
Yaourt 8 h 6-12 h
Etuve 8 h 6-12 h
Manuel 2 h 5 min - 10 h
Cuisson par étapes 5 min 5 min -15 h
Menus
Durée
pré-
dénie
Température
de cuisson
par défaut
Plage de
réglage du
thermostat
Réchauer / 85 °C /
Riz 1-24 h 130-140 °C /
Grains/
légumineuses 1-24 h 130-140 °C /
Risotto 1-24 h 130-140 °C /
Céréales 1-24 h 90-100 °C /
Vapeur 1-24 h 100 °C /
Bouillir / 100 °C /
Soupe Sauce 1-24 h 90-100 °C /
Frire / 145-160°C /
Slow cooking
(Cuisson lente) 1-24 h 80 °C /
Mijoter 1-24 h 95°C /
Compote 1-24 h 100 °C /
Pâtes 1-24 h 100 °C /
Oeufs / 100 °C /
Conture 1-24 h 90-100 °C /
Ragout 1-24 h 90 °C /
Pizza 1-24 h 130 °C /
Rissoler 1-24 h 120-130°C /
Four / 130 °C 40-160°C
Yaourt 1-24 h 40 ±3 °C /
Etuve 1-24 h 40 ±3 °C /
Manuel 1-24 h 100 °C 30-160°C
Cuisson par
étapes 1-24 h 100 °C 30-160°C
Note
• Le temps de cuisson du riz, des grains/légumineuses
et du (risotto est déni par le cuiseur multifonction en
fonction de la quantité d'ingrédients placés dans la
cuve.
• Vous pouvez adapter la température de cuisson pour
les modes Four, Manuel et Cuisson par étapes. La
température peut être réglée de 40 °C à 160 °C en mode
Four et de 30 °C à 160 °C en modes Manuel et Cuisson
par étapes.
• Après que la cuisson a démarré, vous pouvez toucher
le bouton « On/o » (marche/arrêt) pour désactiver le
processus de cuisson en cours. Le cuiseur multifonction
passe alors en mode veille.
4 Utilisation du cuiseur
multifonction
Note
• Pour l'ensemble des menus, ne dépassez pas
l'indication MAX à l'intérieur de la cuve lorsque vous
la remplissez d'aliments, de liquides ou d'ingrédients,
car ceci pourrait provoquer un débordement lors de la
cuisson.
• Le temps de cuisson ne s'ache pas directement depuis
le début pour les modes Riz, Grains/légumineuses
et Risotto. s'ache sur l'écran pendant
pratiquement toute la durée de la cuisson, car le cuiseur
multifonction doit détecter la quantité de liquide ou
le volume des ingrédients utilisés lors de la phase de
préparation initiale. Lorsque le cuiseur multifonction
détecte le temps précis nécessaire à la cuisson, le temps
de cuisson restant s'ache sur l'écran. Pour les modes
Céréales, Vapeur, Bouillir, Conture et Compote,
apparaît sur l'acheur avant que l'eau/le liquide
soit porté(e) à ébullition. Lorsque l'eau/le liquide
commence à bouillir, le temps de cuisson déni apparaît
sur l'acheur.
• Veuillez vous reporter au livret de recettes pour obtenir
plus de précisions sur la cuisson de chaque menu.
Conseil
• Pour sélectionner un menu, touchez « Menu » à plusieurs
reprises. Vous pouvez aussi toucher le bouton « Menu »,
puis le bouton d'augmentation « + » ou de diminution
« - ».
Avant la première utilisation
1 Retirez tous les accessoires de la cuve et ôtez
l'emballage de cette dernière.
2 Nettoyez soigneusement tous les éléments du
cuiseur multifonction avant la première utilisation
(voir le chapitre « Nettoyage et entretien »).
Note
• Séchez bien tous les éléments avant d'utiliser le cuiseur
multifonction.
Faire réchauer
1 Décollez les aliments et répartissez-les
uniformément dans la cuve.
2 Versez de l'eau sur les aliments pour éviter qu'ils ne
deviennent trop secs. La quantité d'eau dépend de la
quantité d'aliments.
3 Essuyez la partie externe de la cuve (g. d), et
placez-la dans le cuiseur multifonction (g. e).
4 Fermez le couvercle du cuiseur multifonction (g. f),
et branchez le cordon d'alimentation sur la prise
secteur (g. g).
5 Touchez « Menu » pour sélectionner « Réchauer »
(g. h).
» Pour sélectionner un temps de cuisson diérent,
reportez-vous au chapitre « Réglage du temps
de cuisson ».
6 Maintenez le bouton « On/o » (marche/arrêt)
enfoncé pendant 3 secondes pour conrmer et
démarrer la cuisson (g. i).
7 Lorsque la cuisson est terminée, l'appareil
émet un signal sonore et maintient au chaud
automatiquement.
Riz et Grains/légumineuses
Note
• Si la tension de la zone dans laquelle vous vivez est
instable, il est possible que les aliments débordent du
cuiseur multifonction.
• Une fois que la cuisson est terminée, mélangez le riz/les
grains et décollez-le(s) immédiatement an d'enlever
toute humidité excessive pour un riz/des grains
moelleux.
• En fonction des conditions de cuisson, la portion
inférieure du riz/des grains peut brunir légèrement.
1 Mesurez le riz/les grains à l'aide de la mesure
graduée fournie (g. a).
2 Rincez le riz, mettez-le dans la cuve et remplissez
cette dernière avec de l'eau (g. b).
Note
• Pour obtenir plus de précisions sur la quantité de riz/
grains et d'eau nécessaire, reportez-vous au livret de
recettes.
3 Appuyez sur le bouton de déverrouillage pour ouvrir
le couvercle (g. c).
4 Essuyez la partie externe de la cuve (g. d), et
placez-la dans le cuiseur multifonction (g. e).
Note
• Assurez-vous que la cuve soit directement en contact
avec la résistance chauante.
• Assurez-vous que l'extérieur de la cuve soit bien
propre et sec, et qu'il n'y ait aucun corps étranger sur la
résistance chauante.
5 Fermez le couvercle du cuiseur multifonction (g. f),
et branchez le cordon d'alimentation sur la prise
secteur (g. g).
6 Touchez « Menu » pour sélectionner « Riz » (g. j)
ou « Grains/légumineuses » (g. k).
7 Maintenez le bouton « On/o » (marche/arrêt)
enfoncé pendant 3 secondes pour conrmer et
démarrer la cuisson (g. i).
8 Lorsque la cuisson est terminée, l'appareil
émet un signal sonore et maintient au chaud
automatiquement.
Faire cuire du risotto
1 Dans la cuve, mettez les ingrédients nécessaires à la
préparation du risotto.
2 Essuyez la partie externe de la cuve (g. d), et
placez-la dans le cuiseur multifonction (g. e).
3 Fermez le couvercle du cuiseur multifonction (g. f),
et branchez le cordon d'alimentation sur la prise
secteur (g. g).
4 Touchez « Menu » pour sélectionner « Risotto »
(g. l).
5 Maintenez le bouton « On/o » (marche/arrêt)
enfoncé pendant 3 secondes pour conrmer et
démarrer la cuisson (g. i).
6 Lorsque la cuisson est terminée, l'appareil
émet un signal sonore et maintient au chaud
automatiquement.
Céréales
1 Mettez les ingrédients nécessaires à la préparation
des céréales dans la cuve et mélangez un peu.
2 Essuyez la partie externe de la cuve (g. d), et
placez-la dans le cuiseur multifonction (g. e).
3 Fermez le couvercle du cuiseur multifonction (g. f),
et branchez le cordon d'alimentation sur la prise
secteur (g. g).
4 Touchez « Menu » pour sélectionner « Céréales »
(g. m).
» Pour sélectionner un temps de cuisson diérent,
reportez-vous au chapitre « Réglage du temps
de cuisson ».
5 Maintenez le bouton « On/o » (marche/arrêt)
enfoncé pendant 3 secondes pour conrmer et
démarrer la cuisson (g. i).
6 Lorsque la cuisson est terminée, l'appareil
émet un signal sonore et maintient au chaud
automatiquement.
Note
• apparaît sur l'acheur avant que l'eau/le liquide
soit porté(e) à ébullition. Lorsque l'eau/le liquide
commence à bouillir, le temps de cuisson déni apparaît
sur l'acheur.
• Pour obtenir plus de précisions sur la quantité
d'ingrédients et de liquide nécessaire, reportez-vous au
livret de recettes.
Vapeur
1 Versez un peu d'eau dans la cuve.
Note
• Pour cuire des légumes à la vapeur, utilisez de 0,2 l à
1 l d'eau selon le type et la quantité de légumes. Pour
cuire de la viande à la vapeur, utilisez de 0,5 l à 2 l d'eau
selon la taille et la quantité de viande.
• Veillez à ce que tous les orices d'évacuation de la
vapeur ne soient pas obstrués par les ingrédients, et ce
an que la vapeur chaude puisse s'échapper du dessous
du panier vapeur.
2 Placez le panier vapeur dans la cuve, mettez les
aliments dans un bol et placez le bol dans le panier
vapeur.
3 Essuyez la partie externe de la cuve (g. d), et
placez-la dans le cuiseur multifonction (g. e).
4 Fermez le couvercle du cuiseur multifonction (g. f),
et branchez le cordon d'alimentation sur la prise
secteur (g. g).
5 Touchez « Menu » pour sélectionner « Vapeur »
(g. n).
» Pour sélectionner un temps de cuisson diérent,
reportez-vous au chapitre « Réglage du temps
de cuisson ».
6 Maintenez le bouton « On/o » (marche/arrêt)
enfoncé pendant 3 secondes pour conrmer et
démarrer la cuisson (g. i).
7 Lorsque la cuisson est terminée, l'appareil
émet un signal sonore et maintient au chaud
automatiquement.
Note
• Lorsque vous cuisez à la vapeur, ne plongez pas le
panier vapeur dans l'eau.
• apparaît sur l'acheur avant que l'eau/le liquide
soit porté(e) à ébullition. Lorsque l'eau/le liquide
commence à bouillir, le temps de cuisson déni apparaît
sur l'acheur.
• Lorsque la cuisson à la vapeur est terminée, utilisez un
gant de cuisine ou un torchon pour retirer le bol et le
panier vapeur car ces derniers peuvent être brûlants.
Faire cuire à l'eau bouillante
1 Remplissez la cuve avec de l'eau.
2 Essuyez la partie externe de la cuve (g. d), et
placez-la dans le cuiseur multifonction (g. e).
3 Fermez le couvercle du cuiseur multifonction (g. f),
et branchez le cordon d'alimentation sur la prise
secteur (g. g).
4 Touchez « Menu » pour sélectionner « Bouillir »
(g. o).
» Pour sélectionner un temps de cuisson diérent,
reportez-vous au chapitre « Réglage du temps
de cuisson ».
5 Maintenez le bouton « On/o » (marche/arrêt)
enfoncé pendant 3 secondes pour conrmer et
démarrer la cuisson (g. i).
6 Lorsque l'eau est portée à ébullition, le cuiseur
multifonction émet 5 signaux sonores pour vous
rappeler que vous devez ouvrir le couvercle et verser
les aliments dans la cuve.
Note
• apparaît sur l'acheur avant que l'eau/le liquide
soit porté(e) à ébullition. Lorsque l'eau/le liquide
commence à bouillir, le temps de cuisson déni apparaît
sur l'acheur.
7 Lorsque la cuisson est terminée, l'appareil émet un
signal sonore et se met automatiquement en veille.
Soupe / Sauce
1 Dans la cuve, mettez les ingrédients et l'eau/le
liquide nécessaires à la préparation de la soupe ou
de la sauce.
2 Essuyez la partie externe de la cuve (g. d), et
placez-la dans le cuiseur multifonction (g. e).
3 Fermez le couvercle du cuiseur multifonction (g. f),
et branchez le cordon d'alimentation sur la prise
secteur (g. g).
4 Touchez « Menu » pour sélectionner « Soupe
Sauce » (g. p).
» Pour sélectionner un temps de cuisson diérent,
reportez-vous au chapitre « Réglage du temps
de cuisson ».
5 Maintenez le bouton « On/o » (marche/arrêt)
enfoncé pendant 3 secondes pour conrmer et
démarrer la cuisson (g. i).
6 Lorsque la cuisson est terminée, l'appareil
émet un signal sonore et maintient au chaud
automatiquement.
Faire frire
1 Essuyez la partie externe de la cuve (g. d), et
placez-la dans le cuiseur multifonction (g. e).
2 Branchez le cordon d'alimentation sur la prise
secteur (g. g).
3 Versez un peu d'huile de friture dans la cuve.
4 Touchez « Menu » pour sélectionner « Frire »
(g. q).
5 Maintenez le bouton « On/o » (marche/arrêt)
enfoncé pendant 3 secondes pour conrmer et
démarrer la cuisson (g. i).
6 Laissez chauer l'huile de friture pendant 5 minutes,
puis placez les ingrédients et l'assaisonnement dans
la cuve.
7 Laissez le couvercle ouvert et mélangez les
ingrédients sans arrêt avec une spatule.
8 Lorsque la cuisson est terminée, l'appareil émet un
signal sonore et se met automatiquement en veille.
Slow cooking (Cuisson lente)
1 Lavez soigneusement la cuve et essuyez la partie
interne avec un torchon n.
2 Essuyez la partie externe de la cuve (g. d), et
placez-la dans le cuiseur multifonction (g. e).
3 Branchez le cordon d'alimentation sur la prise
secteur (g. g).
4 Touchez « Menu » pour sélectionner « Slow
cooking » (Cuisson lente) (g. r).
» Pour sélectionner un temps de cuisson diérent,
reportez-vous au chapitre « Réglage du temps
de cuisson ».
5 Maintenez le bouton « On/o » (marche/arrêt)
enfoncé pendant 3 secondes pour conrmer et
démarrer la cuisson (g. i).
6 Lorsque la cuisson est terminée, l'appareil
émet un signal sonore et maintient au chaud
automatiquement.
Mijoter ou Ragout
1 Dans la cuve, mettez les ingrédients nécessaires à la
préparation de ce type de plats.
2 Essuyez la partie externe de la cuve (g. d), et
placez-la dans le cuiseur multifonction (g. e).
3 Fermez le couvercle du cuiseur multifonction (g. f),
et branchez le cordon d'alimentation sur la prise
secteur (g. g).
4 Touchez « Menu » pour sélectionner « Mijoter »
(g. s) ou « Ragout » (g. t).
» Pour sélectionner un temps de cuisson diérent,
reportez-vous au chapitre « Réglage du temps
de cuisson ».
5 Maintenez le bouton « On/o » (marche/arrêt)
enfoncé pendant 3 secondes pour conrmer et
démarrer la cuisson (g. i).
6 Lorsque la cuisson est terminée, l'appareil
émet un signal sonore et maintient au chaud
automatiquement.
Compote
1 Dans la cuve, mettez les ingrédients nécessaires à la
préparation de la compote.
2 Essuyez la partie externe de la cuve (g. d), et
placez-la dans le cuiseur multifonction (g. e).
3 Fermez le couvercle du cuiseur multifonction (g. f),
et branchez le cordon d'alimentation sur la prise
secteur (g. g).w
4 Touchez « Menu » pour sélectionner « Compote »
(g. u).
» Pour sélectionner un temps de cuisson diérent,
reportez-vous au chapitre « Réglage du temps
de cuisson ».
5 Maintenez le bouton « On/o » (marche/arrêt)
enfoncé pendant 3 secondes pour conrmer et
démarrer la cuisson (g. i).
6 Lorsque la cuisson est terminée, l'appareil
émet un signal sonore et maintient au chaud
automatiquement.
Note
• apparaît sur l'acheur avant que l'eau/le liquide
soit porté(e) à ébullition. Lorsque l'eau/le liquide
commence à bouillir, le temps de cuisson déni apparaît
sur l'acheur.
Faire cuire des pâtes
1 Remplissez la cuve avec de l'eau.
Note
• Ne dépassez pas l'indication MAX à l'intérieur de la
cuve.
2 Essuyez la partie externe de la cuve (g. d), et
placez-la dans le cuiseur multifonction (g. e).
3 Fermez le couvercle du cuiseur multifonction (g. f),
et branchez le cordon d'alimentation sur la prise
secteur (g. g).
4 Touchez « Menu » pour sélectionner « Pâtes »
(g. v).
» Pour sélectionner un temps de cuisson diérent,
reportez-vous au chapitre « Réglage du temps
de cuisson ».
5 Maintenez le bouton « On/o » (marche/arrêt)
enfoncé pendant 3 secondes pour conrmer et
démarrer la cuisson (g. i).
6 Lorsque l'eau est portée à ébullition, le cuiseur
multifonction émet 5 signaux sonores pour vous
rappeler que vous devez ouvrir le couvercle et verser
les pâtes dans la cuve.
Note
• apparaît sur l'acheur avant que l'eau soit portée
à ébullition. Lorsque l'eau commence à bouillir, le temps
de cuisson déni apparaît sur l'acheur.
• Si le cuiseur multifonction n'est pas utilisé dans un délai
d'1 minute après qu'il a émis un signal sonore, il passe en
mode veille.
7 Une fois les pâtes versées dans la cuve, touchez
« Menu » pour remettre en route le processus de
cuisson.
8 Laissez le couvercle ouvert et remuez en
permanence les pâtes avec une spatule.
Conseil
• Vous pouvez également refermer le couvercle une fois
les pâtes versées dans la cuve pour les rendre fondantes
et moelleuses.
9 Lorsque la cuisson est terminée, l'appareil émet un
signal sonore et se met automatiquement en veille.
Oeufs
1 Remplissez la cuve avec de l'eau.
Note
• Ne dépassez pas l'indication MAX à l'intérieur de la cuve.
2 Essuyez la partie externe de la cuve (g. d), et
placez-la dans le cuiseur multifonction (g. e).
3 Fermez le couvercle du cuiseur multifonction (g. f),
et branchez le cordon d'alimentation sur la prise
secteur (g. g).
4 Touchez « Menu » pour sélectionner « Oeufs »
(g. w).
» Pour sélectionner un temps de cuisson diérent,
reportez-vous au chapitre « Réglage du temps
de cuisson ».
5 Maintenez le bouton « On/o » (marche/arrêt)
enfoncé pendant 3 secondes pour conrmer et
démarrer la cuisson (g. i).
6 Lorsque l'eau est portée à ébullition, le cuiseur
multifonction émet 5 signaux sonores pour vous
rappeler que vous devez ouvrir le couvercle et verser
les œufs dans la cuve.
Note
• apparaît sur l'acheur avant que l'eau soit portée
à ébullition. Lorsque l'eau commence à bouillir, le temps
de cuisson déni apparaît sur l'acheur.
• Le temps de cuisson par défaut pour préparer un œuf
est de 4 minutes. « 04:00 » apparaît sur l'acheur.
• Si le cuiseur multifonction n'est pas utilisé dans un délai
de 5 minutes après qu'il a émis un signal sonore, il passe
en mode veille.
7 Une fois les œufs placés dans la cuve, fermez le
couvercle et touchez « Menu » pour remettre en
route le processus de cuisson.
8 Lorsque la cuisson est terminée, l'appareil émet un
signal sonore et se met automatiquement en veille.
Conture
1 Dans la cuve, mettez les ingrédients nécessaires à la
confection de la conture.
2 Essuyez la partie externe de la cuve (g. d), et
placez-la dans le cuiseur multifonction (g. e).
3 Fermez le couvercle du cuiseur multifonction (g. f),
et branchez le cordon d'alimentation sur la prise
secteur (g. g).
4 Touchez « Menu » pour sélectionner « Conture »
(g. x).
» Pour sélectionner un temps de cuisson diérent,
reportez-vous au chapitre « Réglage du temps
de cuisson ».
5 Maintenez le bouton « On/o » (marche/arrêt)
enfoncé pendant 3 secondes pour conrmer et
démarrer la cuisson (g. i).
6 Lorsque la cuisson est terminée, l'appareil
émet un signal sonore et maintient au chaud
automatiquement.
Note
• apparaît sur l'acheur avant que l'eau/le liquide
soit porté(e) à ébullition. Lorsque l'eau/le liquide
commence à bouillir, le temps de cuisson déni apparaît
sur l'acheur.
Faire des pizzas
1 Dans la cuve, mettez les ingrédients nécessaires à la
préparation de la pizza.
2 Essuyez la partie externe de la cuve (g. d), et
placez-la dans le cuiseur multifonction (g. e).
3 Fermez le couvercle du cuiseur multifonction (g. f),
et branchez le cordon d'alimentation sur la prise
secteur (g. g).
4 Touchez « Menu » pour sélectionner « Pizza »
(g. y).
» Pour sélectionner un temps de cuisson diérent,
reportez-vous au chapitre « Réglage du temps
de cuisson ».
5 Maintenez le bouton « On/o » (marche/arrêt)
enfoncé pendant 3 secondes pour conrmer et
démarrer la cuisson (g. i).
6 Lorsque la cuisson est terminée, l'appareil
émet un signal sonore et maintient au chaud
automatiquement.
Note
• Si vous faites cuire des pizzas surgelées, vous pouvez
adapter le temps cuisson en fonction de vos goûts. Plus
le temps de cuisson augmente, plus la pizza devient
dorée.
Faire rissoler
1 Mettez les ingrédients dans la cuve.
2 Essuyez la partie externe de la cuve (g. d), et
placez-la dans le cuiseur multifonction (g. e).
3 Fermez le couvercle du cuiseur multifonction (g. f),
et branchez le cordon d'alimentation sur la prise
secteur (g. g).
4 Touchez « Menu » pour sélectionner « Rissoler »
(g. z).
5 Maintenez le bouton « On/o » (marche/arrêt)
enfoncé pendant 3 secondes pour conrmer et
démarrer la cuisson (g. i).
6 Rissoler comporte 2 étapes. Lorsque la première
étape (environ 35 minutes) est terminée, le cuiseur
multifonction émet 5 signaux sonores toutes les
30 secondes pour vous rappeler que vous devez
ouvrir le couvercle et mélanger les aliments qui se
trouvent dans la cuve.
»
clignote sur l'acheur.
7 Touchez « Menu » pour lancer la deuxième étape.
» Si vous ne touchez pas « Menu » dans un délai
de 5 minutes après la n de la première étape,
le cuiseur multifonction passe en mode de
maintien au chaud.
8 Lorsque la cuisson est terminée, l'appareil émet un
signal sonore et se met automatiquement en veille.
Faire cuire au four
1 Dans la cuve, mettez les ingrédients destinés à être
cuits au four.
2 Essuyez la partie externe de la cuve (g. d), et
placez-la dans le cuiseur multifonction (g. e).
3 Fermez le couvercle du cuiseur multifonction (g. f),
et branchez le cordon d'alimentation sur la prise
secteur (g. g).
Note
• Pour faire cuire du pain ou un gâteau, gardez le
couvercle fermé lors de la cuisson. Si vous cuisez le
gâteau à 130 °C et pendant 45 minutes, vous obtiendrez
généralement les meilleurs résultats.
• Si vous cuisez d'autres aliments à une température
supérieure à 140 °C, laissez le couvercle ouvert.
4 Touchez « Menu » pour sélectionner « Four »
(g. {).
» Pour sélectionner une température de cuisson
au four diérente, reportez-vous au chapitre
« Réglage de la température de cuisson ».
» Pour sélectionner un temps de cuisson diérent,
reportez-vous au chapitre « Réglage du temps
de cuisson ».
5 Maintenez le bouton « On/o » (marche/arrêt)
enfoncé pendant 3 secondes pour conrmer et
démarrer la cuisson (g. i).
6 Lorsque la cuisson est terminée, l'appareil
émet un signal sonore et maintient au chaud
automatiquement.
Note
• Si la température de cuisson est inférieure à 80 °C,
lorsque la cuisson est terminée, l'appareil se met
automatiquement en veille.
• Après la cuisson, lorsque vous sortez la cuve du cuiseur
multifonction, utilisez un gant de cuisine ou un torchon
car la cuve risque d'être brûlante.
Yaourt ou Etuve
1 Mélangez bien les ingrédients nécessaires à la
confection des yaourts ou de l'étuve et versez cette
préparation dans la cuve.
2 Essuyez la partie externe de la cuve (g. d), et
placez-la dans le cuiseur multifonction (g. e).
3 Fermez le couvercle du cuiseur multifonction (g. f),
et branchez le cordon d'alimentation sur la prise
secteur (g. g).
4 Touchez « Menu » pour sélectionner « Yaourt »
(g. |) ou « Etuve » (g. }).
» Pour sélectionner un temps de cuisson diérent,
reportez-vous au chapitre « Réglage du temps
de cuisson ».
5 Maintenez le bouton « On/o » (marche/arrêt)
enfoncé pendant 3 secondes pour conrmer et
démarrer la cuisson (g. i).
6 Lorsque la cuisson est terminée, l'appareil émet un
signal sonore et se met automatiquement en veille.
Manuel
Vous pouvez utiliser le mode manuel pour cuire des
aliments avec un plus grand contrôle du temps de cuisson
et de la température.
1 Mettez les ingrédients dans la cuve.
2 Essuyez la partie externe de la cuve (g. d), et
placez-la dans le cuiseur multifonction (g. e).
3 Fermez le couvercle du cuiseur multifonction (g. f),
et branchez le cordon d'alimentation sur la prise
secteur (g. g).
4 Touchez « Menu » pour sélectionner « Manuel »
(g. ~).
» Pour sélectionner une température de cuisson
au four diérente, reportez-vous au chapitre
« Réglage de la température de cuisson ».
» Pour sélectionner un temps de cuisson diérent,
reportez-vous au chapitre « Réglage du temps
de cuisson ».
5 Maintenez le bouton « On/o » (marche/arrêt)
enfoncé pendant 3 secondes pour conrmer et
démarrer la cuisson (g. i).
6 Lorsque la cuisson est terminée, l'appareil
émet un signal sonore et maintient au chaud
automatiquement.
Note
• Si vous sélectionnez une température inférieure à 80 °C,
le cuiseur multifonction se met automatiquement en
veille une fois la cuisson terminée.
• Si vous sélectionnez une température supérieure
à140 °C, le couvercle supérieur doit rester ouvert
pendant la cuisson.
Cuisson par étapes
Grâce à la fonction de cuisson par étapes, vous pouvez
régler jusqu'à 9 étapes de cuisson avec des températures
et des temps de cuisson variés.
Par exemple, vous pouvez régler une première étape de
5 minutes à 160 °C, une deuxième étape de 10 minutes à
100 °C et une dernière étape de 20 minutes à 80 °C.
1 Lorsque le cuiseur multifonction est en mode veille,
touchez « Cuisson par étapes ». (g. )
» « 1 » s'allume sur l'acheur.
2 Reportez-vous au chapitre « Réglage du temps de
cuisson » et sélectionnez le temps de cuisson pour
l'étape 1.
3 Reportez-vous au chapitre « Réglage de la
température de cuisson » et sélectionnez la
température de cuisson pour l'étape 1.
4 Touchez à nouveau « Cuisson par étapes » et passez
à l'étape 2. (g. €)
» « 2 » s'allume sur l'acheur.
5 Réglez le temps de cuisson et le thermostat pour
l'étape 2.
6 Recommencez les étapes indiquées ci-dessus
jusqu'à ce que vous ayez réglé toutes les phases
nécessaires, puis maintenez le bouton « On/O »
(marche/arrêt) enfoncé pendant 3 secondes pour
conrmer et démarrer la cuisson (g. i).
MaRecette
Enregistrer les étapes de cuisson
comme MaRecette
Dans un délai de 10 minutes après la n de la cuisson par
étapes, vous pouvez enregistrer les étapes de cuisson
dans « MaRecette ».
1 Maintenez « Cuisson par étapes » enfoncé pendant
3 secondes. (g. )
» « F1 » apparaît sur l'acheur.
2 Touchez le bouton d'augmentation « + » ou de
diminution « - » pour sélectionner : F1, F2, F3, F4 ou
F5 (g. ‚).
3 Touchez « MaRecette » pour conrmer et enregistrer
les étapes de cuisson à l'emplacement souhaité
(g. ƒ).
Sélectionner des réglages MaRecette
déjà enregistrés
1 En mode veille, maintenez le bouton « MaRecette »
enfoncé pendant 3 secondes. (g. „)
» « F1 » apparaît sur l'acheur.
2 Touchez le bouton d'augmentation « + » ou de
diminution « - » pour sélectionner l'un des réglages
MaRecette précédemment enregistrés : F1, F2, F3, F4
ou F5 (g. ‚).
3 Maintenez le bouton « On/o » (marche/arrêt)
enfoncé pendant 3 secondes pour conrmer et
démarrer la cuisson (g. i).
Note
• Si vous souhaitez remplacer l'un des réglages MaRecette
déjà enregistrés par un nouveau réglage, sélectionnez le
réglage que vous souhaitez supprimer et enregistrez le
nouveau à sa place.
• Le temps total de cuisson pour toutes les étapes de
cuisson a une limite maximale de 24 heures.
Mode de maintien au chaud
Le cuiseur multifonction vous permet un contrôle aisé du
maintien au chaud.
• Après que vous avez touché « Menu » pour
sélectionner la fonction de cuisson, si vous maintenez
« On/o » (marche/arrêt) enfoncé pendant 3 secondes
directement, le voyant de maintien au chaud s'allume.
Une fois que la cuisson est terminée, le cuiseur
multifonction bascule directement en mode de
maintien au chaud.
• Après que vous avez touché « Menu » pour
sélectionner la fonction de cuisson, si vous touchez
« Chaud », puis maintenez « On/o » (marche/arrêt)
enfoncé pendant 3 secondes, le voyant de maintien au
chaud est éteint. Une fois que la cuisson est terminée,
le cuiseur multifonction passe en mode veille.
Note
• Après que l'appareil est passé en mode de maintien au
chaud, il reste dans ce mode pendant 12 heures. Ensuite,
il émet un signal sonore et entame un processus de
refroidissement.
• Lorsque l'appareil est en mode veille, vous pouvez
toucher
« Chaud » pour passer au maintien au chaud.
La durée accumulée de maintien au chaud apparaît
sur l'acheur. L'appareil maintient au chaud pendant
24 heures. puis il émet un signal sonore et entame un
processus de refroidissement.
• En mode de maintien au chaud, vous pouvez toucher
« Chaud » pour passer en veille.
Le réglage du temps de cuisson
Vous pouvez régler le temps de cuisson pour certains
menus. Reportez-vous au chapitre « Présentation des
menus » pour savoir quels menus peuvent faire l'objet
d'un réglage de temps et d'une plage de réglage.
1 Sélectionnez le menu que vous voulez préparer.
2 Touchez « Temps de cuisson » (g. …).
» L'unité de l'heure commence à clignoter sur
l'acheur.
3 Touchez le bouton d'augmentation « + » ou de
diminution « - » pour régler l'unité de l'heure (g. †).
4 Une fois que l'unité de l'heure est dénie, touchez à
nouveau « Temps de cuisson » (g. ‡).
» L'unité des minutes commence à clignoter sur
l'acheur.
5 Touchez le bouton d'augmentation « + » ou de
diminution « - » pour régler l'unité des minutes
(g. ˆ).
6 Maintenez le bouton « On/o » (marche/arrêt)
enfoncé pendant 3 secondes pour conrmer et
démarrer la cuisson (g. i).
Note
• Si le cuiseur multifonction n'est pas utilisé dans un délai
de 15 secondes après que « Temps de cuisson » a été
touché, il passe en mode veille.
• Pour les menus avec un temps de cuisson maximum de
moins d'une heure, la première fois que vous touchez
« Temps de cuisson », l'unité des minutes commence à
clignoter sur l'acheur.
Régler le temps de cuisson pour la
préparation d'un œuf
Vous pouvez régler le temps de cuisson pour la
préparation d'un œuf avec une précision de 30 secondes.
1 Sélectionnez la fonctionOeufs).
2 Touchez « Temps de cuisson » (g. ‰).
» L'unité des minutes commence à clignoter sur
l'acheur.
Note
• Le temps de cuisson par défaut pour préparer un œuf
est de 4 minutes. « 04:00 » apparaît sur l'acheur.
3 Touchez le bouton d'augmentation « + » ou de
diminution « - » pour régler l'unité des minutes
(g. Š).
4 Touchez à nouveau « Temps de cuisson » (g. ‹).
» La seconde unité commence à clignoter sur
l'acheur.
5 Touchez le bouton d'augmentation « + » ou de
diminution « - » pour régler la seconde unité (g. Œ).
» La seconde unité augmente/diminue de
30 secondes chaque fois que vous touchez le
bouton d'augmentation « + » ou de diminution
« - ».
6 Maintenez le bouton « On/o » (marche/arrêt)
enfoncé pendant 3 secondes pour conrmer et
démarrer la cuisson (g. i).
Programmation pour une cuisson
ultérieure
Vous pouvez programmer un temps de cuisson ultérieur
pour certains modes de cuisson. Reportez-vous au
chapitre « Présentation des menus » pour connaître les
menus qui peuvent être prédénis.
1 Sélectionnez le menu que vous voulez préparer.
2 Touchez « Départ diéré » (g. ).
» L'unité de l'heure commence à clignoter sur
l'acheur.
3 Touchez le bouton d'augmentation « + » ou de
diminution « - » pour régler l'unité de l'heure (g. ).
4 Une fois que l'unité de l'heure est dénie, touchez à
nouveau « Départ diéré » (g. ).
» L'unité des minutes commence à clignoter sur
l'acheur.
5 Touchez le bouton d'augmentation « + » ou de
diminution « - » pour régler l'unité des minutes
(g. ).
6 Maintenez le bouton « On/o » (marche/arrêt)
enfoncé pendant 3 secondes pour conrmer et
démarrer la cuisson (g. i).
Note
• Si le cuiseur multifonction n'est pas utilisé dans un
délai de 15 secondes après que « Départ diéré » a été
touché, il passe en mode veille.
• Le processus de cuisson est terminé lorsque le temps
de programmation est écoulé. Par exemple, si vous
programmez une cuisson diérée de 8 heures pour 10 h
du matin, le processus de cuisson s'achèvera 8 heures
plus tard, à 18 h.
Réglage de la température de
cuisson
Vous pouvez régler la température de cuisson pour
certains menus. Reportez-vous au chapitre « Présentation
des menus » pour savoir quels menus peuvent faire l'objet
d'un réglage de température et d'une plage de réglage.
1 Sélectionnez le menu que vous voulez préparer.
2 Touchez « Temp » (g. ‘).
» La température de cuisson par défaut apparaît
sur l'acheur.
3 Touchez le bouton d'augmentation « + » ou de
diminution « - » pour régler la température de
cuisson (g. ’).
4 Maintenez le bouton « On/o » (marche/arrêt)
enfoncé pendant 3 secondes pour conrmer et
démarrer la cuisson (g. i).
Note
• Au lieu de toucher le bouton d'augmentation « + » ou de
diminution « - » pour régler la température de cuisson,
vous pouvez également toucher « Temp » à plusieurs
reprises pour faire de même.
Conguration de la fonction
verrouillage enfant
Pour empêcher les enfants d'utiliser le cuiseur
multifonction ou pour éviter tout dysfonctionnement, vous
pouvez activer la fonction verrouillage enfant pendant le
processus de cuisson.
• Maintenez le bouton « Menu » enfoncé pendant
3 secondes pour activer la fonction verrouillage enfant
(g. “).
» « Verrouillage enfant » s'allume sur l'acheur.
• Pour déverrouiller, maintenez à nouveau le bouton
« Menu » enfoncé pendant 3 secondes (g. ”).
» « Verrouillage enfant » s'éteint.
5 Nettoyage et entretien
Note
• Avant de nettoyer le cuiseur multifonction, débranchez-
le et attendez qu'il se soit refroidi susamment.
Intérieur
Intérieur du couvercle supérieur et du corps de l'appareil :
la résistance chauante :
• Essuyez à l'aide d'un chion essoré.
• Veillez à enlever tous les résidus d'aliments collés au
cuiseur multifonction.
Extérieur
Surface du couvercle supérieur et extérieur du corps de
l'appareil :
• Essuyez à l'aide d'un chion humidié avec de l'eau
savonneuse.
• Utilisez uniquement un chion doux et sec pour
essuyer le panneau de commande.
• Veillez à enlever tous les résidus d'aliments autour
du panneau de commande.
Accessoires
Spatule à riz, louche, mesure graduée, cuve, panier vapeur
et capuchon des évents à vapeur :
• Trempez dans de l'eau chaude et nettoyez à l'aide
d'une éponge.
6 Recyclage
Ce symbole signie que ce produit ne doit pas
être mis au rebut avec les ordures ménagères
(2012/19/UE).
Respectez les règles en vigueur dans votre pays
pour la mise au rebut des produits électriques
et électroniques. Une mise au rebut correcte
contribue à préserver l'environnement et la santé.
7 Garantie et service
Si vous rencontrez un problème ou si vous souhaitez
obtenir des informations ou faire réparer votre
appareil, rendez-vous sur le site Web de Philips
à l'adresse www.philips.com ou contactez le
Service Consommateurs Philips de votre pays.
Vous trouverez son numéro de téléphone dans le
dépliant de garantie internationale. S'il n'existe pas
de Service Consommateurs Philips dans votre pays,
renseignez-vous auprès de votre revendeur Philips.
8 Caractéristiques
Référence du modèle HD4749
Tension nominale 220 V-240 V
~
Puissance de sortie nomi-
nale
890 W-1 070 W
Capacité nominale 5,0 l
9 Dépannage
En cas de problème lors de l'utilisation de ce cuiseur
multifonction, vériez les points suivants avant de faire
appel au service d'assistance. Si vous ne parvenez
pas à résoudre le problème, contactez le Service
Consommateurs Philips de votre pays.
Problème Solution
Le voyant sur
le bouton ne
s'allume pas.
Il s'agit d'un problème de
branchement. Vériez si le cordon
d'alimentation est correctement
raccordé au cuiseur multifonction et
si la che est fermement insérée dans
la prise secteur.
Le voyant est défectueux. Conez
l'appareil à votre revendeur Philips
ou à un Centre Service Agréé Philips.
L'écran ne
fonctionne pas.
Le cuiseur multifonction n'est pas
branché. S'il n'y a pas de courant, la
fonction de sauvegarde en cas de
coupure de courant et l'acheur ne
fonctionnent pas.
Les ingrédients
ne sont pas
cuits.
Vous n'avez pas maintenu le bouton
« On/o » (marche/arrêt) enfoncé
pendant 3 secondes pour démarrer
la cuisson.
Assurez-vous qu'aucun résidu ne
se trouve sur l'élément chauant et
l'extérieur de la cuve avant d'allumer
le cuiseur multifonction.
L'élément chauant est endommagé
ou la cuve est déformée. Conez
le cuiseur multifonction à votre
revendeur Philips ou à un
Centre Service Agréé Philips.
Le riz est trop
sec et pas bien
cuit.
Ajoutez plus d'eau au riz et
poursuivez un peu la cuisson.
Le riz est sec. Vous n'avez pas rincé le riz
correctement. Rincez le riz jusqu'à ce
que l'eau devienne claire.
Le cuiseur
multifonction
ne passe pas
automatique-
ment en mode
de maintien au
chaud.
Vous avez peut-être touché
« Chaud » avant de démarrer la
cuisson. Dans ce cas, le cuiseur
multifonction passe en mode veille
lorsque la cuisson est terminée.
Le thermostat est défectueux. Conez
l'appareil à votre revendeur Philips
ou à un Centre Service Agréé Philips.
De l'eau
déborde
du cuiseur
multifonction
pendant la
cuisson.
Veillez à ne pas remplir la cuve
d'ingrédients au-delà de l'indication
MAX.
Je ne
parviens pas
à sélectionner
la fonction
de cuisson
souhaitée.
Touchez « Menu » à plusieurs
reprises pour sélectionner la fonction
souhaitée.
Les plats ne
sentent pas
bon après la
cuisson
Nettoyez la cuve à l'eau chaude
savonneuse.
Après la cuisson, veillez à nettoyer
soigneusement le capuchon des
évents à vapeur, le couvercle
intérieur et la cuve.
Un message
d'erreur (E1,
E2, E3 ou E4)
apparaît sur
l'acheur.
Une panne de courant s'est peut-être
produite durant la cuisson. Conez
l'appareil à votre revendeur Philips
ou à un Centre Service Agréé Philips.
-
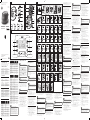 1
1
-
 2
2


Philips HD4734 Manuel utilisateur
- Taper
- Manuel utilisateur
dans d''autres langues
- English: Philips HD4734 User manual
Documents connexes
-
Philips CONNECTE HD3198/77 Le manuel du propriétaire
-
-
-
-
Philips HD3037 Manuel utilisateur
-
-
-