Proline PCI300G-E-2 Mode d'emploi
- Catégorie
- Congélateurs
- Taper
- Mode d'emploi

BUILT-IN
FRIDGE FREEZER
Instruction booklet
COMBINÉ ENCASTRÉ
Guide d’utilisation
INBOUW COMBI
KOELKAST-VRIESKAST
Handleiding
RÉFRIGÉRATEUR
PCI300G-E-2

EN - 1 -
Contents
SAFETY .................................................................................................... 2
WARNINGS .................................................................................................2
IMPORTANT SAFETY INSTRUCTIONS .....................................................3
Before installing and operating your appliance ............................................4
PARTS OF THE APPLIANCE AND THE COMPARTMENTS ................... 5
HOW TO OPERATE THE APPLIANCE ..................................................... 6
Thermostat Setting ......................................................................................6
Warnings about Temperature Adjustments ..................................................6
Accessories .................................................................................................7
Ice tray .......................................................................................................................7
Plastic scraper ............................................................................................................7
Temperature indicator ..................................................................................8
STORING FOOD IN THE APPLIANCE ..................................................... 9
Refrigerator Compartment ...........................................................................9
Freezer Compartment .................................................................................9
CLEANING AND MAINTENANCE .......................................................... 10
Defrosting operation .................................................................................. 11
Defrosting the Refrigerator Compartment ................................................. 11
Defrosting the Freezer Compartment ........................................................11
Replacing the Refrigerator Light Bulb ........................................................12
SHIPMENT AND REPOSITIONING ......................................................... 12
BEFORE CALLING YOUR AFTER SALES SERVICE ............................ 13
Tips for saving energy ...............................................................................14
INSTALLATION MANUAL ....................................................................... 15
Installation instructions and door reversibility ............................................15
TECHNICAL DATA .....................................................................................19

EN - 2 -
SAFETY PART - 1.
Notes:
Please read this instruction manual carefully before installing and using your appliance, and
keep it in a safe place for future reference. We are not responsible for any damage caused
by misuse or non-compliance with the instructions.
WARNINGS
• This appliance can be used by children aged from 8 years and above and persons with
reduced physical, sensory or mental capabilities or lack of experience and knowledge if
they have been given supervision or instruction concerning use of the appliance in a safe
way and understand the hazards involved. Children shall not play with the appliance.
Cleaning and user maintenance shall not be made by children without supervision.
• This appliance is intended to be used in household and similar applications such as
- staff kitchen areas in shops, offi ces and other working environments;
- farm houses and by clients in hotels, motels and other residential type environments;
- bed and breakfast type environments;
- catering and similar non-retail applications.
• If the supply cord is damaged, it must be replaced by the manufacturer, its service agent
or similarly qualifi ed persons in order to avoid a hazard.
• WARNING To avoid a hazard due to instability of the appliance, it must be fi xed in
accordance with the instructions.
• WARNING: Keep ventilation openings, in the appliance enclosure or in the built-in
structure, clear of obstruction.
• WARNING: Do not use mechanical devices or other means to accelerate the defrosting
process, other than those recommended by the manufacturer.
• WARNING: Do not damage the refrigerant circuit.
• WARNING: Do not use electrical appliances inside the food storage compartments of
the appliance, unless they are of the type recommended by the manufacturer.
• Do not store explosive substances such as aerosol cans with a fl ammable propellant in
this appliance.
• WARNING: For making ice (ice cubes), use potable water only.
• INSTALLATION: DO NOT INSTALL THIS APPLIANCE IN AREAS THAT ARE TOO
HUMID OR TOO COLDS, SUCH AS THE CONSTRUCTION APPENDICES, GARAGES
OR WINE CELLARS.
• Never freeze defrosted food except if they have been cooked before, in order to eliminate
harmful bacteria. Never refreeze seafood that has been defrosted.
• The appliance should be placed on a horizontal fl oor and keep the ventilation freely.
Don't try to replace or repair any components by yourself, ask the service agency for
help if necessary.
• Always handle the appliance to avoid any damage.

EN - 3 -
IMPORTANT SAFETY INSTRUCTIONS
• If you are discarding an old freezer or refrigerator with a lock / catch fi tted to the door,
ensure that it is left in a disabled condition to prevent the entrapment of young children
when playing.
• As old refrigeration equipment may contain CFC’s which will damage the ozone layer,
when disposing of any refrigeration equipment please contact your local waste disposal
department for advice on the correct method of disposal.
• Unplug the appliance from the mains socket when not in operation and before cleaning.
• Remove food before cleaning the appliance.
• Do not insert oversized food as this could cause incorrect operation.
• Extreme caution must be used when moving the appliance.
• To turn the appliance off, turn the thermostat knob fully counter-clockwise to Off position,
then remove the plug from the mains socket.
• Do not give children ice-cream and water ices coming directly from the freezer as the
low temperature may cause ‘freezer burns’ on the lips.
• Do not use multiple sockets or extension cords.
• Do not plug in damaged, torn or old plugs.
• Do not pull, bend or damage the cord.
• Do not twist and bend the cables, and keep them away from hot surfaces.
• After installation make sure that the power cable is not trapped
underneath the appliance.
• Do not plug-in or out the plug from the socket with wet hands to
prevent electrocution!
• Do not place glass bottles or beverage cans in the freezer
department. Bottles or cans may explode.
• Do not place explosive or fl ammable material in your fridge for
your safety. Place drinks with higher alcohol amount vertically in
the refrigerator compartment and keep the bottles tightly closed.
• When taking ice directly from the freezer, do not touch it, ice may
cause ice burns and/or cuts.
• Do not touch frozen food with wet hands! Do not eat ice-cream
and ice cubes immediately after you take them out of the freezer
compartment.
• Do not re-freeze the frozen goods after being melted. This may
cause health issues like food poisoning.
• Do not cover the body or top of fridge with lace. This affects the performance of your fridge.
• Do not operate any electrical appliances inside the refrigerator or freezer.
• Fix the accessories in the fridge during transportation to prevent damage to accessories.

EN - 4 -
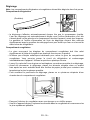
Before installing and operating your appliance
Before starting to use your fridge, you should pay attention to the following points:
• Operating voltage for your fridge is 220-240 V at 50Hz.
• The plug must be accessible after installation.
• Your appliance may have a smell when it is operated for the fi rst time; the smell will fade
away when your appliance starts to cool.
• Before making the connection to the power supply, ensure that the voltage on the rating
label corresponds to the voltage of electrical system in your home.
• Insert the plug into a socket with an effi cient ground connection. If the socket has no
ground contact or the plug does not match, please call an authorised electrician for
assistance.
• The appliance must be connected with a properly installed fused socket. Power supply
(AC) and voltage at the operating point must correspond to the details stated on the
rating label of the appliance (located on the inside left of the appliance).
• We do not take responsibility for damages that may occur as a result of usage without
grounding.
• Place your fridge in a place where it is not exposed to direct sunlight.
• Your fridge should never be used outdoors or left under the rain.
• Your appliance should be at least 50 cm away from stoves, gas ovens and heater cores,
and should be at least 5 cm away from electrical ovens.
• Do not place heavy items on the appliance.
• Clean the appliance thoroughly, especially in the interior, before use (See Cleaning and
Maintenance).
• The installation procedure into the kitchen unit is given in the Installation Manual. This
product is intended to be used in proper kitchen units only.
• The adjustable front legs should be adjusted to an appropriate height to allow your
appliance to operate in a stable and proper way. You can adjust the legs by turning
them clockwise (or counter-clockwise). This should be done before placing food in the
appliance.
• Before using your fridge, wipe all parts with warm water and one
teaspoon of sodium bicarbonate, and then rinse with clean water
and dry. Place all parts after cleaning.
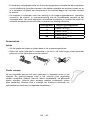
• Install the distance adjustment spacer (the part with white vanes
at the rear) by turning it 90° as shown in the fi gure to prevent the
condenser from touching the wall.
Note:
• When it is operated for the fi rst time or after transportation, keep your fridge in the upright
position for 3 hours before you plug it in. Otherwise, you may damage the compressor.

EN - 5 -
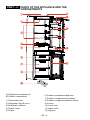
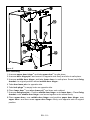
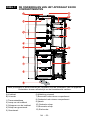
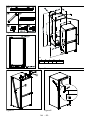
PARTS OF THE APPLIANCE AND THE
COMPARTMENTS
PART - 2.
A) Refrigerator compartment
B) Freezer compartment
1) Thermostat knob
2) Refrigerator light & cover
3) Refrigerator shelves
4) Crisper cover
5) Crisper
6) Freezer compartment fl ap door
7) Freezer compartment top drawer
8) Freezer compartment bottom drawer
9) Ice tray
10) Lower rack
11) Upper racks
12) Egg tray

EN - 6 -
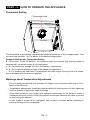
Thermostat Setting
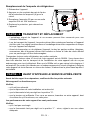
HOW TO OPERATE THE APPLIANCE PART - 3.
The thermostat automatically regulates the inside temperature of the compartments. Turn
the knob from position 1 to 5 to adjust to the desired temperature.
Freezer & Refrigerator Thermostat Setting
0 : Off position. In the Off position, the appliance does not operate (the cooling system is
switched off), but power supply is not interrupted.
1 – 2 : For short-term storage of food in the freezer compartment.
3 – 4 : For long-term storage of food in the freezer compartment.
5 : For freezing the fresh food. The appliance will work longer. Once your food is frozen,
you must readjust to the previous position.
Warnings about Temperature Adjustments
• It is not recommended that you operate your fridge in environments colder than 10°C in
terms of its effi ciency.
• Temperature adjustments should be made according to the frequency of door openings
and the quantity of food kept inside the fridge.
• When fi rst turned on, your fridge must operate continuously for 24 hours to reach a
satisfactory level of cooling. During this period, do not open the door too often or put too
much food on the shelves.
• If your fridge is turned off or unplugged, wait at least 5 minutes before restarting to
prevent damage to the compressor.
Thermostat knob

EN - 7 -
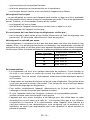
Accessories
Ice tray
• Fill the ice tray with ¾ full of potable water and place in freezer compartment.
• After the water completely turned into ice, you can slightly twist the tray as shown below
to loosen the ice cubes.
Notes for use:
- Clean and defrost your appliance regularly (See "Defrosting" section).
- Check the contents of the compartments every now and then.
- Store commercially prepared food in accordance with the instructions given on the package.
- Choose high-quality fresh food and make sure it is thoroughly clean before freezing it.
- Do not store poisonous or any dangerous substances in your freezer. It has been designed
for the freezing of edible food only.
- Do not consume food which has been frozen for an excessive length of time.
- Do not leave the door open for long periods, as this will make the appliance more costly to
run and cause excessive ice formation.
- Do not use sharp objects such as knives to remove the ice from the appliance. Only use a
plastic scraper.
- Do not put liquid-fi lled bottles or sealed cans containing carbonated liquids into the freezer
as they may burst.
Plastic scraper
After a certain time, frost will appear in some parts of the freezer. You
should periodically remove the frost using the plastic scraper provided
with the product. Do not use sharp metal objects for this operation, they
could puncture the refrigerator circuit and cause irreparable damage to the
appliance.

EN - 8 -
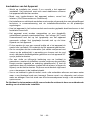
Temperature indicator
In order to help you make the right settings, your
appliance has been fi tted with a temperature indicator,
located in the coldest area of your refrigerator (that is,
just above the crisper).
To enjoy good food preservation in your refrigerator,
especially in the coldest area, make sure the logo “OK”
appears on the temperature indicator. If it does not, it
means the temperature setting is wrong.
Area Products
Upper shelves Cooked food, meals and any food to be consumed within a few days
Coldest area Meat, poultry, wild game and fi sh.
Maximum preservation time: 1 to 2 days.
Fresh fruit, cooked meats.
Crisper Fresh vegetables and fruits
Inner door
The bottles will be kept in the lower racks, and the upper racks will be
for small volume daily products (yogurts, light cream…)
Butter, cheese and eggs will be put in the appropriate cabinets.
As the logo “OK” is represented on a black background, it is barely visible if the temperature
indicator is poorly lit. Correctly lighting the temperature indicator makes the logo easier to
see.
Every time you want to change the temperature setting, wait at least 12 hours until the
temperature is stable, and adjust it if necessary. Please note that you should turn the
thermostat knob by one level at a time.
After fi lling the appliance with fresh foods or after opening the door frequently or during a
long period, the logo “OK” might not appear on the temperature indicator. This is normal.
If the evaporator of the refrigerator compartment (back side of the appliance) abnormally
gets covered with frost (appliance overloaded, high ambient temperature, frequent door
openings), you should set the thermostat knob to a lower position until the compressor
regularly stops again.
The ideal preservation temperature is different depending on the food type. As a consequence,
they should not be placed in the same area of the refrigerator:

EN - 9 -
Refrigerator Compartment
The refrigerator compartment is used for storing fresh food for a few days.
• Do not place food in direct contact with the rear wall of the refrigerator compartment.
Leave some space around food to allow circulation of air.
• Do not place hot food or evaporating liquid in the refrigerator.
• Wrap all food in food quality polythene bags or containers and make sure any air is
excluded.
• To reduce humidity and avoid formation of frost, never place liquids in unsealed
containers in the refrigerator.
• Meat of all types, wrapped in packages, is recommended to be placed on the glass shelf
just above the crisper, where the air is colder.
• You can put the fruits and vegetables into crisper without packing.
• To avoid the cold air escaping, try not to open the door too often, and not to leave it open
for a long time.
Freezer Compartment
The freezer compartment is used for freezing fresh foods and for storing frozen foods for the
period of time indicated on packaging, and for making ice cubes.
• For freezing fresh food; wrap and seal fresh food properly, that is the packaging
should be air tight and shouldn’t leak. Special freezer bags, aluminum foil (heavy grade,
in doubt double wrap), polythene bags and plastic containers are ideal.
• Do not allow the fresh food to be frozen to come into contact with the already frozen
food.
• Always mark the date and the content on the pack and do not exceed the stated storage
time.
• In case of a power failure or malfunction, the freezer compartment will maintain a
suffi ciently low temperature for food storage for a few hours. However, avoid opening
the freezer door to slow down the temperature rise within the freezer compartment.
• The maximum amount of fresh foods that can be loaded in the freezer within 24 hours is
indicated on the rating label (see Freezing Capacity).
• Never place warm food in the freezer compartment.
• When purchasing and storing frozen food products; ensure that the packaging is
not damaged.
• The storage time and the recommended temperature for storing frozen foods are
indicated on the packaging. For storing and using, follow the manufacturer’s instructions.
If no information is provided, food should not be stored for more than 3 months.
• Place frozen food in the freezer compartment as soon as possible after buying it.
• Once the food is thawed, it must not be refrozen; you must cook it as quickly as possible
in order to consume or to freeze once again.
• Storage: If you want to use the maximum net capacity of the freezer compartment, you
can remove the drawers and store the items directly on the cooling tubes.
STORING FOOD IN THE APPLIANCE PART - 4.

EN - 10 -
CLEANING AND MAINTENANCE PART - 5.
• Unplug your appliance.
• Remove all substances.
• Clean the inside and outside walls with a clean sponge or soft cloth using warm and
soapy water. Do not try to wash your appliance by pouring water.
• Remove the parts individually and clean with soapy water. Do not put them in the
washing machine.
• Rinse well and wipe dry with a clean soft cloth.
• Make sure that no water is coming into contact with the electrical system of the thermostat
setting or of the lamp.
• Regularly check the door gasket.
You should clean the condenser with broom at least once a year
in order to save energy and increase the productivity of your
appliance.
Never use fl ammable, explosive or corrosive material like thinner, gas, acid for
cleaning.
Note: If the appliance is not to be used for a long period of time, it is recommended to
remove all food, defrost the appliance, clean the inside of the appliance and leave the doors
open to allow the air to circulate, thus avoiding unpleasant smells.

EN - 11 -
Defrosting the Refrigerator Compartment
• The fridge defrosting process is carried out automatically every time the compressor
stops. The defrost water is automatically routed to the drain port and into a tray placed
on the top of the compressor to the rear of the appliance from which it evaporates.
• The evaporating tray and the defrost water drain hole should be cleaned periodically with
defrost drain plug to prevent the water from collecting at the bottom of the refrigerator
instead of fl owing out.
Defrosting the Freezer Compartment
• The frost covering the shelves of the freezer compartment should be removed
periodically.
• Do not use sharp metal objects for this operation. They could puncture the refrigerator
circuit and cause irreparable damage to the unit. Use the plastic scraper provided.
• When there is more than 5 mm of frost on the shelves, defrosting must be done.
• Before defrosting operation, place the frozen food in a cool place after wrapping it in
sheets of newspaper in order to obtain its temperature steady for long time.
• To accelerate the defrosting process place one or more basins of warm water in the
freezer compartment.
• Dry the inside of the compartment with a sponge or a clean cloth.
• Once the unit has been defrosted, place the food into freezer and remember to consume
them in a short period of time.
Defrosting operation
Note: The refrigerator and freezer compartments of your appliance should be defrosted
twice a year.
(Evaporating tray)

EN - 12 -
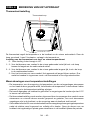
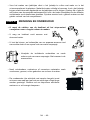
Replacing the Refrigerator Light Bulb
1. Unplug the unit from the power supply,
2. Remove the refrigerator light cover (A) by
pressing the hooks placed on both sides of the
cover.
3. Change the light bulb (B) with a new one (E14,
no more than 15 W).
4. Replace the light cover and plug the unit.
• Original package and foam may be kept for re-transportation.
• During transportation, the appliance should be empty and its doors should be closed.
• You should fasten your fridge with thick package, bands or strong cords and follow the
instructions for transportation on the package.
• Remove movable parts (shelves, accessories, crisp, etc.) or fi x them into the fridge
against shocks using bands during re-positioning and transportation.
• Carry your fridge in the upright position.
SHIPMENT AND REPOSITIONING PART - 6.
Your appliance uses R600a as a refrigerant. Therefore you should be careful during
shipment and installation to prevent your appliance’s cooler elements from being damaged.
Although R600a is an environmentally friendly and natural gas, it is explosive. In the event of
a leak caused by damage to the cooler elements, move your fridge from open fl ame or heat
sources and ventilate the room where the appliance is located for a few minutes.

EN - 13 -
BEFORE CALLING YOUR AFTER SALES SERVICE PART - 7.
If your refrigerator is not working properly, please check the following before calling for help.
Your appliance is not working.
Check that;
• The appliance is plugged in.
• The general switch in your home is not disconnected.
• The voltage is suffi cient. To check this, plug in another appliance that you know which is
working into the same socket.
Your appliance performs poorly.
Check that;
• You have not overloaded the appliance ,
• The thermostat is not set to position "1" (if it is, you will have to set the thermostat to a
suitable value)
• The doors are closed perfectly ,
• There is no dust on the condenser ,
• There is enough place at the rear and side walls.
Your appliance is noisy when operating.
The cooling gas which circulates in the refrigerator circuit may make a slight noise (bubbling
sound) even when the compressor is not running. Do not worry this is quite normal. If these
sounds are different check that;
• The appliance is correctly levelled.
• Nothing is coming in contact with the rear of the appliance.
• The stuffs on the appliance are not vibrating.
There is water in the lower part of the refrigerator.
Check that;
The drain hole for defrost water is not clogged(Use defrost drain plug to clean the drain hole)
Your appliance is not cooling suffi ciently.
Your fridge is designed to operate in the ambient temperature intervals stated in the
standards, according to the climate class stated on the rating label. Operating your appliance
outside the stated temperatures is not recommended.
Climate class
Ambient Temperature (
o
C)
T Between 16 and 43
o
C
ST Between 16 and 38
o
C
N Between 16 and 32
o
C
SN Between 10 and 32
o
C

EN - 14 -
Tips for saving energy
1– Install the appliance in a cool, well-ventilated room , but not in direct sunlight or near
any heat source (radiator, cooker.. etc). Otherwise use an insulating plate.
2– Allow warm food and drinks to cool down outside the appliance.
3– When thawing frozen food, place it in the refrigerator compartment. The low
temperature of the frozen food will help to cool the refrigerator compartment when it is
thawing, thus saving energy.
4– When placing drinks and soups, make sure they are covered. Otherwise humidity
increases in the appliance, extending the time needed to reach optimum performance.
Also covering drinks and soups helps to save smell and taste.
5– When placing food and drinks, open the appliance door as briefl y as possible.
6– Do not move the shelves within the appliance so as to keep the appropriate cooling
zones.
7– Door gasket must be clean and pliable. Replace gaskets if worn.
Conformity Information
• Normal class is defi ned for the environment temperatures between 16°C and 32°C in
accordance with the TS EN ISO 15502 Standards.
• The appliance is designed in compliance with the EN15502, IEC60335-1 / IEC60335-2-
24, 2004/108/EC standards.
Recommendations
• The compressor protection thermal fuse will cutout after sudden power breakdowns or
after unplugging the appliance, because the gas in the cooling system is not stabilised.
This is quite normal, and the fridge will restart after 4 or 5 minutes.
• The cooling unit of your refrigerator is hidden in the rear wall. Therefore, water droplets or
icing may occur on the rear surface of your fridge due to the operation of the compressor
in specifi ed intervals. This is normal. There is no need to perform a defrosting operation
unless the icing is excessive.
• If the problem persists after you have followed all the instructions above, please consult
the nearest authorised service.
• The appliance you have purchased is designed for domestic use and can be used only
at home and for the stated purposes. It is not suitable for commercial or common use. If
the consumer uses the appliance in a way that does not comply with these features, we
emphasise that the producer and the dealer shall not be responsible for any repair and
failure within the guarantee period.

EN - 15 -
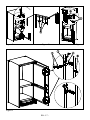
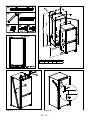
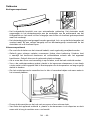
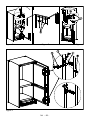
Installation instructions and door reversibility
Installation
! Before installation, read the instructions carefully.
! Fit the refrigerator/freezer in stable kitchen units only.
! If necessary, reverse the door according to instructions.
! Check the installation dimensions according to fi g.C. The position of the joint between
the unit doors must be level with the position of the joint between the appliance doors.
1. See fi g.A for the necessary attachment components.
2. Insert trim fl ap
1
into slot and screw by screws
6
. (fi g.D)
3. Pass the power cord through ventilation shaft and position it so that the appliance could
be easily plugged in once it has been installed. (fi g.B - fi g.C)
4. Take out the trim gasket
2
located on the side panel of the appliance and stick it on
reverse side of the door hinges of the appliance. (fi g.D - fi g.E)
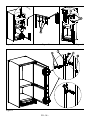
5. Raise appliance and slide into kitchen unit. Push appliance to the reverse side of door
hinges providing that trim gasket
2
covers space between appliance and the kitchen unit.
6. Align front feet with front surface of kitchen unit. (fi g.F)
7. Screw the front feet by using screws
5
. (fi g.F)
8. Screw trim fl ap
1
to kitchen unit using screws
5
. (fi g.G)
9. Screw fi xing bracket
11
, as leaned to kitchen unit by using screws
5
. Repeat this for the
opposite side. (fi g.H)
10. Screw guides
3
to appliance doors with screws
6
. Lean appliance doors to unit door as it
is opened at right angle. Slide rails
4
into guides
3
aligning the groove. Screw the rails
4
to
the unit doors with screws
5
. (fi g.J)
11. Set 1~2 mm gap on handle side between unit itself and unit doors by adjusting guides
3
.
That is vital for appliance performance. (fi g.J)
INSTALLATION MANUAL

EN - 16 -
Figure A
Figure B Figure C
Figure D Figure E
A B C D E
1770 722 684 934 1770-1790
mm

EN - 17 -
Figure F Figure G Figure H
Figure J

EN - 18 -
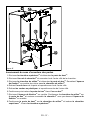
Door reversing
1. Unscrew upper door hinge
15
and take upper door
14
to safe place.
2. Unscrew door hinge pin
16
and screw it to opposite side fi rmly and take to safe place.
3. Unscrew middle door hinge
12
and take lower door
10
to safe place. Screw back fi xing
bracket
11
to original position without middle door hinge
12
.
4. Take door lower pin
18
to opposite side.
5. Take hole plugs
17
to empty holes on opposite side.
6. Place lower door
10
over door lower pin
18
and close onto cabinet.
7. Unscrew fi xing bracket
13
. Position middle door hinge
12
onto lower door
10
. Place fi xing
bracket
11
onto middle door hinge
12
and screw together onto cabinet fi rmly.
8. Place upper door
14
over middle door hinge
12
and position upper door hinge
15
over
upper door
14
and then screw upper door hinge
15
fi rmly onto opposite side of original
position.
Figure K

EN - 19 -
TECHNICAL DATA
Brand
Appliance type Fridge-Freezer
Star rating
Net Freezer volume (l.)
68L
Net Fridge volume (l.)
158L
Freezing capacity (kg/24h)
3kg
Climate Class +Ambient Range
N (+16
o
C to +32
o
C)
Energy class
(1)
A+
Gross weight (kg) 51,25
Power consumption (kWh/year)
(2)
257
Supply voltage (V/Hz)
220-240V / 50Hz
Light Power (Watts)
15W
Noise [dB(A)re 1 pW]
42 dB
Refrigerating agent
R600a / 55g
Outside dimensions (W x D x H)
540 X 545 X 1770
Insulation Blowing Gas
Cyclo pentane
(1) Energy class: A.....G (A= economical G=less economical)
(2) The real power consumption depends on using conditions and appliance location.
12/06/2013Kesa Electricals© UK: EC1N 6TE.
La page est en cours de chargement...
La page est en cours de chargement...
La page est en cours de chargement...
La page est en cours de chargement...
La page est en cours de chargement...
La page est en cours de chargement...
La page est en cours de chargement...
La page est en cours de chargement...
La page est en cours de chargement...
La page est en cours de chargement...
La page est en cours de chargement...
La page est en cours de chargement...
La page est en cours de chargement...
La page est en cours de chargement...
La page est en cours de chargement...
La page est en cours de chargement...
La page est en cours de chargement...
La page est en cours de chargement...
La page est en cours de chargement...
La page est en cours de chargement...
La page est en cours de chargement...
La page est en cours de chargement...
La page est en cours de chargement...
La page est en cours de chargement...
La page est en cours de chargement...
La page est en cours de chargement...
La page est en cours de chargement...
La page est en cours de chargement...
La page est en cours de chargement...
La page est en cours de chargement...
La page est en cours de chargement...
La page est en cours de chargement...
La page est en cours de chargement...
La page est en cours de chargement...
La page est en cours de chargement...
La page est en cours de chargement...
La page est en cours de chargement...
La page est en cours de chargement...
La page est en cours de chargement...
La page est en cours de chargement...
-
 1
1
-
 2
2
-
 3
3
-
 4
4
-
 5
5
-
 6
6
-
 7
7
-
 8
8
-
 9
9
-
 10
10
-
 11
11
-
 12
12
-
 13
13
-
 14
14
-
 15
15
-
 16
16
-
 17
17
-
 18
18
-
 19
19
-
 20
20
-
 21
21
-
 22
22
-
 23
23
-
 24
24
-
 25
25
-
 26
26
-
 27
27
-
 28
28
-
 29
29
-
 30
30
-
 31
31
-
 32
32
-
 33
33
-
 34
34
-
 35
35
-
 36
36
-
 37
37
-
 38
38
-
 39
39
-
 40
40
-
 41
41
-
 42
42
-
 43
43
-
 44
44
-
 45
45
-
 46
46
-
 47
47
-
 48
48
-
 49
49
-
 50
50
-
 51
51
-
 52
52
-
 53
53
-
 54
54
-
 55
55
-
 56
56
-
 57
57
-
 58
58
-
 59
59
-
 60
60


Proline PCI300G-E-2 Mode d'emploi
- Catégorie
- Congélateurs
- Taper
- Mode d'emploi
dans d''autres langues
- English: Proline PCI300G-E-2 Operating instructions
- Nederlands: Proline PCI300G-E-2 Handleiding
Documents connexes
Autres documents
-
 De Dietrich DRP772MJ Le manuel du propriétaire
-
Telefunken TFEKGK178X10A++ Manuel utilisateur
-
-
-
VESTEL VEKD5015 Manuel utilisateur
-
ETNA EEK 151 A Le manuel du propriétaire
-
WALTHAM WTFI123TT Le manuel du propriétaire
-
-
-
