Insignia NS-DPF0712G Guide d'installation rapide
- Taper
- Guide d'installation rapide

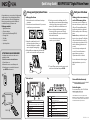
Sides and back
Quick Setup Guide | NS-DPF0712G 7" Digital Picture Frame
ENGLISH 12-0793
# DESCRIPTION
1 Memory card slot (SD/SDHC/MMC/Memory Stick/xD)
(Memory Stick Pro Duo/microSD require an adapter - not included)
2 Adjustable stand
3 Power On/O switch
4 USB (type A) port
5 Remote control slot
6 USB (type Mini B) port
7 DC 5 V power connector
To p
Setting up the frame
1 Pull out the stand to set the frame in landscape
orientation.
2 Turn the stand counterclockwise 90° if you want to
set the frame in portrait orientation.
3 Extend the stand from the back of
the frame, then place the frame on a
at surface. Gently push or pull the
stand to adjust the viewing angle.
4 Plug the AC power adapter into the frame’s DC
power connector and into an AC power outlet.
Congratulations on your purchase of a high-quality
Insignia product. Your new digital picture frame
represents the state of the art in digital picture
frame design and is designed for reliable and
trouble-free sharing of your memories.
Package contents
• Digital picture frame
• AC power adapter
• Remote control with battery (CR2025)
• Cleaning cloth
• USB cable
• User Guide
• Quick Setup Guide
ATTENTION: DISABLE DEMO MODE!
Your frame comes with a store demo mode
enabled by default.
To disable store mode and enable buttons:
1 Turn the frame on.
2 Remove the remote control battery tab.
3 Point the remote control at the frame and
press ENTER on the remote.
ON
OFF
Viewing pictures on a memory
card or USB memory device
Insert a memory card or USB memory
device into the memory card slot or the
USB port. The frame will immediately
begin loading a slide show of pictures
from the memory card or USB memory
device.
Caution: Memory cards t into the card
slots in only one direction. The label side
of the card should face the screen. Do
not force a memory card into a slot. The
card should t snugly when inserted
correctly.
Some cards require an adapter to t
correctly. For more information on
supported memory cards, see
“Specications” in the User Guide.
For more information about using your
digital picture frame, see your User
Guide.
Six-month limited warranty
Visit www.insigniaproducts.com for details.
Contact Insignia:
For customer service, call 1-877-467-4289
www.insigniaproducts.com
© 2012 BBY Solutions, Inc., Inc. All rights reserved.
INSIGNIA is a trademark of BBY Solutions, Inc. Registered
in some countries. All other products and brand names
are trademarks of their respective owners.
5 Slide the power switch to the On position. The
frame will turn on and automatically start playing
a slide show of the pictures stored in internal
memory. This slide show is called Demo mode.
6 Remove the plastic tab that extends past the
bottom edge of the remote control. This tab
protects the battery. The remote control will not
work until it is removed.
For more information on using the remote
control, see your User Guide.
7 To turn o Demo mode, point the remote control
at the front of the frame and press ENTER.
Set up your digital picture frame
Start your slide show
Made in China
THIS CLASS (B) DIGITAL APPARATUS COMPLIES
WITH CANADIAN ICES-003.
CET APPAREIL NUMÉRIQUE DE LA CLASSE (B) EST
CONFORME À LA NORME NMB-003 DU CANADA.
Model: NS-DPF0712G
Power: 5VDC, 1.0A (5W)
Tested to Comply with FCC Standards
FOR HOME OR OFFICE USE
Manufactured for Insignia Products
7601 Penn Avenue South
Richfield MN USA 55423
Portrait
Landspace
REMOTE
D
C
5V
I
N
/
DESCRIPTION
Menu / Standby—Press to open the menu. To enter Standby mode,
press and hold for two seconds.
Left arrow—Press to move the menu selection left or to display the
previous picture.
Right arrow—Press to move the menu selection right or to display
the next picture.
Enter/Play/Pause—Press to select menu items. During a slideshow,
press to pause or resume.
Up arrow—Press to navigate up.
Down arrow—Press to navigate down.
Back button—Go back to the previous selection or screen.
# BUTTON
1 MENU/
2
3
4 ENTER/
5
6
7
PRESS
-
 1
1
