Haier HW150-BP14986E Manuel utilisateur

Catégorie
Machines à laver
Taper
Manuel utilisateur
EN
HW150-BP14986E
User manual
Washing machine
EN
Thank you
2
Legend
Warning – Important Safety information
General information and tips
Environmental information
Disposal
Help protect the environment and human health. Put
the packaging in applicable containers to recycle it.
Help to recycle waste of electrical and electronic ap-
pliances. Do not dispose appliances marked with this
symbol with the household waste. Return the product
to your local recycling facility or contact your municipal
offi ce.
Thank you for purchasing a Haier Product.
Please read these instructions carefully before using this appliance. The instructions con-
tain important information which will help you get the best out of the appliance and ensure
safe and proper installation, use and maintenance.
Keep this manual in a convenient place so you can always refer to it for the safe and proper
use of the appliance.
If you sell the appliance, give it away, or leave it behind when you move house, make sure
you also pass this manual so that the new owner can become familiar with the appliance
and safety warnings.
WARNING!
Risk of injury or suff ocation!
Disconnect the appliance from the mains supply. Cut off the mains cable and dispose
of it. Remove the door catch to prevent children and pets to get closed in the appliance.
EN
Content
3
1-Safety information ......................................................................................................................... 4
2-Product description ...................................................................................................................... 7
3-Control panel .................................................................................................................................. 8
4-Programmes .................................................................................................................................12
5-Consumption ................................................................................................................................15
6-Daily use .........................................................................................................................................16
7-Eco-friendly washing ..................................................................................................................21
8-Care and cleaning ........................................................................................................................22
9-Troubleshooting ...........................................................................................................................25
10-Installation ...................................................................................................................................28
11-Technical data .............................................................................................................................32
12-Customer service ......................................................................................................................34
1-Safety information
EN
4
Read the following safety instructions before using the appliance
WARNING!
Before fi rst use
Make sure there is no transport damage.
Make sure all transport bolts are removed.
Remove all packaging and keep out of children´s reach.
Handle the appliance always with at least two persons because it
is heavy.
Daily use
This appliance can be used by children aged from 8 years and
above and persons with reduced physical, sensory or mental ca-
pabilities or lack of experience and knowledge if they have been
given supervision or instruction concerning use of the appliance
in a safe way and understand the hazards involved.
Keep away children under 3 years of age from the appliance un-
less they are constantly supervised.
Children shall not play with the appliance.
Do not let children or pets come close to the appliance when the
door is open.
Store washing agents out of reach of children.
Pull up zips, fi x loose threads and take care for small items to
prevent laundry from being entangled. If necessary, use an ap-
propriate bag or net.
Do not touch or use the appliance when barefoot or with wet or
damp hands or feet.
Do not cover or encase the appliance during operation or after-
wards to allow any moisture or dampness to evaporate.
Do not place heavy objects or sources of heat or damp on top of
the appliance.
Do not use or store flammable detergent or dry cleaning agent
in close vicinity to the appliance.
Do not use any flammable sprays in close vicinity to the appli-
ance.
Do not wash any garments treated with solvents in the appli-
ance without having dried them previously in the air.
EN
1-Safety information
5
WARNING!
Daily use
Do not remove or insert the plug in the presence of flammable gas.
Do not hot wash foam rubber or sponge-like materials.
Do not wash any laundry which is polluted with fl our.
Do not open detergent drawer during any wash cycle.
Do not touch the door during the washing process, it gets hot.
Do not open the door if the water level is visibly over the port-
hole.
Do not force the door to open. The door is fitted with a self-
lock device and will open shortly after the washing procedure is
ended.
Switch off the appliance after each wash programme and before
undertaking any routine maintenance and disconnect the appli-
ance from the electrical supply to save electricity and for safety.
Hold the plug, not the cable, when unplugging the appliance.
Maintenance / cleaning
Make sure children are supervised if they carry out cleaning and
maintenance.
Disconnect the appliance from the electrical supply before un-
dertaking any routine maintenance.
Keep the lower part of the porthole clean and open door and
detergent drawer if appliance is not in use to prevent odours.
Do not use water spray or steam to clean the appliance.
Replace a damaged supply cord only by the manufacturer, its
service agent or similarly qualifi ed persons in order to avoid a
hazard.
Do not try to repair the appliance by yourself. In case of repair
please contact our customer service.
Installation
The appliance should be placed in a well-ventilated place. Ensure
a location which allows opening the door fully.
Never install the appliance outdoors in a damp place, or in an
area which may be prone to water leaks such as under or near a
sink unit. In the event of a water leak cut power supply and allow
the machine to dry naturally.
1-Safety information
EN
6
Intended use
This appliance is intended for washing machine-washable laundry
only. Anytime follow the instructions given on the label of each gar-
ment label. It is designed exclusively for domestic use inside the
house. It is not intended for commercial or industrial use.
Changes or modifi cations to the device are not allowed. Unintended
use may cause hazards and loss of of all warranty and liability claims.
WARNING!
Installation
Install or use the appliance only where the temperature is above
5 °C.
Do not place the appliance directly on a carpet, or close to a wall
or furniture.
Do not install the appliance in direct sunlight or in the near of
heat sources(e.g. stoves, heaters).
Make sure that the electrical information on the rating plate
agrees with the power supply. If it does not, contact an
electrician.
Do not use multi-plug adapters and extension cables.
Make sure only the delivered electric cable and hose set are
used.
Make sure not to damage the electric cable and the plug. If dam-
aged have it replaced by an electrician.
Use a separate earthed socket for the power supply which
is easy accessible after installation. The appliance must be
earthed.
Make sure the hose joints and connections are fi rm and there is
no leakage.
EN
2-Product description
7
2.1 Picture of appliance
Front (Fig. 2-1): Rear side (Fig. 2-2):
2.2 Accessories
Check the accessories and literature in accordance with this list (Fig.:2-3):
Inlet hose-
assembly
6 Blanking
plugs
Drain hose
bracket
Sponge
User manual
Warranty-
card
Note:
Due to technical changes and di erent models, the illustrations in the following chap-
ters may di er from your model.
2-3
2-1
2-2
2-2
1 2 5
6
4
3
T1
T2
T3
T4
S1
S2
S3
S4
S5
S6
S7
S8
1
2
3
5
6
7
4
1 Dispenser drawer
2 Worktop
3 Programme
selector
4 Control Panel
5 Washer door
6 Filter/
Service ap
7 Adjustable feet
1 Shipping bolts (T1-T4)
2 Back cover
3 Back cover screws (S1-S8)
4 Power cord
5 Water inlet valve
6 Drain hose
2x
1x
1x
3-Control panel
EN
Baby Care
Eco
Cotton Wool Delicate Cotton 20
Delay
Night Wash
Steam
Function
Temp.
Speed
Extra Rinse
Synthetic Duvet Refresh
Mix
Express 15 min
Super Fast
Outdoor
Spin
5
4 3 2 1
6 7
8
1 “Power“ button
2 Programme selector
3 Display
4 Dispenser drawer
3.1 “Power“ button
Touch this button (Fig. 3-2) to switch on,the display lights
up.Touch it again for about 3 seconds to switch o.
5 Function buttons
6 Setting buttons
Note : Acoustic signal
In following cases an acoustic signal sounds:
when pressing a button
when turning the programme selector
at the end of programme
in case of failures
The acoustic signal can be deselected if necessary ; see DAILY USE (see P20 6.13).
3-2
3-1
Note: Variety
Apperance and features will vary.
Note: Mode
Display will turn into standby “OFF” mode if standby mode lasts too long
Note: Power supply.
Unplug power cord to disconnect the appliance from power supply.
7 “Start/Pause“
button
EN
3-Control panel
9
3.2 Programme selector
By turning the knob (Fig. 3-3) one of 14 programmes
can be selected, related LED will light up, its default
settings will be displayed.
3.3 Display
The display (Fig. 3-4) shows following information:
Wash time
End time delay
Error codes and service information
Function buttons and “Start/Pause“ button
3-3
3.5 Function buttons
The function buttons (buttons 3.5.1-3.5.5, Fig. 3-6)
enable additional functions to programmes before
starting the programme. The related indicators are
displayed.
By switching o the appliance or setting a new pro-
gramme, all options are disabled.
If a button has multiple options, the desired option can
be selected by pressing the button in sequence.
To delete the setting or to cancel the setting process,
press the function button until the desired LED lights
or-in case of only one option-the LED switches o
3.4 Detergent drawer
Open dispenser drawer, the following components can
be seen (Fig. 3-5):
1: Compartment for powder or Liquid detergent
2: Detergent flap slector, lift it up for powder detergent,
keep it down for liquid detergent.
3: Compartment for sanitizer.
4: Compartment for softener.
5: Lock tab, press it down to pull out dispenser drawer.
The recommendation on the type of detergents is
suitable for the various washing temperatures, please
refer to the manual of detergent
3-6
3.5.1 3.5.5 3.5.6 3.5.7 3.5.83.5.33.5.2 3.5.4
5
3-6
3-4
3-4
3-5
1
2
5
3
4
3-5
3-Control panel
EN
10
3.5.3 “Steam“ button
This function (Fig. 3-9) is available on cycles of Cot-
ton, synthetic, Babycare, Mix. When it is selected,
temperature function turns to be unselectable. Icon
will be lighted when above cycles are selected.
3-12
Steam
3-9
3-10
Note: Factory settings
To get best results in each programme Haier has well de ned speci c default settings.
If there is no special requirement default settings are recommended.
Note: Nightwash
Max. speed can be setted is 800 rpm as you add Nightwash to a programme. Easy Iron
is the default setting of Nightwash. Nightwash will be cancelled if Easy Iron is cancelled.
3.5.5-Function button “ “
This function (Fig. 3-11) intensi es di erent washing
time. The “i-time”can’t operate in single washing
function, washing spin function and easy self-cleaning.
3.5.1-Function button “Delay“
Press this button (Fig. 3-7) to start the programme
with a delay. End time delay could be increased in steps
of 30 minutes from 0,5-24h (add time to the original
programme time). For example display o
6:30 means end of programme cycle will be in 6 hours
and 30 minutes. Touch “Start/Pause” button to activate
the time delay. It is not applicable to programme Spin.
3.5.4-“Function“ button
Press this button (Fig.3-10) to choose special features.
The symbols are explained below.
3.5.2-“Nightwash“ button
Press this button (Fig. 3-8) to select Nightwash
function to achieve better performance at night. All
the acoustic signal will be turned o , except for failure
signal. A 12 hour dispersing of laundry load is added to
the programme as 1 minute left..
3-7
3-8
Delay
Delay
8
3-11
I-time
Easy Iron
Allergen
Intense
EN
3-Control panel
11
3.6.2-Setting button“Speed“
Touch this button (Fig. 3-13) to change or deselect the
spin of the programme. If no value is illuminated the
laundry will not spun
3.6.3-Setting button “Extra Rinse“
Touch this button (Fig. 3-14) to rinse the laundry more
intense with fresh water. This is recommended for peo-
ple with sensitive skin. By touching the button several
times one to three extra cycles can be selected. Extra
rinse times will be lighting when it is selected.
3.7 “Start/Pause“ button
Press this button (Fig. 3-15) to start a selected pro-
gramme. Press it again will pause the appliance and
unlock the door when appliance is running. A few sec-
onds may be taken to unlock the doorExtra rinse times
will be lighting when it is selected
3.8 Child lock
Press button “Delay” and “Nightwash” (Fig. 3-16) for
3 seconnds simultaneously to all panel elements
against activation. For unlocking please touch the two
buttons again.The child lock indicator lighets up when
the child lock works. This feature is optional when the
machine is running.
3-18
Note: Settings
Settings are not aviliable on some programmes.
3.6.1-Setting button “Temp.“
Touch this button (Fig. 3-12) to change the washing
temperature of the programme. If no value is illumina-
ted the water will not heated.
3-12
3-13
3-10
Speed
3-14
Extra Rinse
3.6 Setting buttons
Individual settings for water temperature (Temp.), spin speed (Speed) extra rinse times
(Extra Rinse) can be set to programmes. Each setting has several options to be set from
minimum to maximum.
3-15
3-16
Temp.
4-Programmes
EN
12
Max.
load
Temperature
Spin speed
in rpm
Extra
Rinse
in kg
in °C
2)
Programme 1 2 3 Fabrics type
Cotton
15
90
60
40
30
-
º
º
/
Cotton
1400
1000
800
400
-
3
2
1
-
Synthetic
7.5
60
40
30
-
º º
/
Synthetic or mixed
fabrics
1000
800
400
-
3
2
1
-
Duvet
3
40
30
-
º º
/
Duvet
800
400
-
2
1
-
Wool 3
40
30
-
º º
/
Machine-washable
fabric made of wool or
with wool content
800
400
-
2
1
-
Delicate 3
30
-
º º
/
Delicate laundry
and Silk
400
-
1
-
Cotton 20 °C
15
/
º º
/
Cotton
1000
800
400
-
3
2
1
-
Refresh 1
/
/
/
/ Cotton/Synthetic
/ /
Babycare
7.5
90
60
40
30
-
º º
/
Cotton/Synthetic
1000
800
400
-
2
1
-
º
Optional, / Not available
3
2
1
2
3
Detergent compartment for:
1
Liquid or powder Detergent
2
Softener or care product
Sanitizer
3
Wash Programmes
The wash programmes are optimized for speci c types of laundrys. Select the programme
that most closely matches the items being washed. Settings shown in bold are the sug-
gested settings for the programme
EN
4-Programmes
13
Max.
load
Temperature
Spin speed
in rpm
Extra
Rinse
in kg
in °C
2)
Programme 1 2 3 Fabrics type
Mix
15
60
40
30
-
º
º
/
Lightly soiled mixed
laundry of cotton
and synthetic
1000
800
400
-
3
2
1
-
Express 15min
2
40
30
-
º º
/
Cotton/Synthetic
1400
1000
800
400
-
2
1
-
Super Fast
7.5
40
30
-
º º
/
Cotton/Synthetic
1000
800
400
-
1
-
Outdoor
7.5
40
30
-
º
/
Cotton, linen and
synthetic
1000
800
400
-
1
-
Spin 15
/
/ / /
All fabrics
1400
1000
800
400
-
/
Eco 40 -60
15
/
º º
/
Cotton/linen
/
/
º
Optional, / Not available
3
2
1
2
3
Detergent compartment for:
1
Liquid or powder Detergent
2
Softener or care product
Sanitizer
3
Note: Index
1. Max. load refers to weight of dry laundry;
2. “-” refers to display light o for corresponding setting. For temperature setting , it
refers to inlet water will not being heated; for speed setting, it refers to no spinning for
selected programme; for extra rinse setting, it refers to no extra rinse.
3. Choose 90°C wash temperature only for special hygienic requirements.
4. Reduce detergent amount for Express 15 and Super Fast because programme dura-
tion is short.
5.The recommendation on laundry load of "Refresh" is a single piece for adult clothing,
no more than 5 pieces for baby clothing.
6.The design and specifications are subject to change without notice for quality im-
provement purposes.
/
4-Programmes
EN
14
Note: Sub-function
Sub-function of Intense can not be selected to programmes of Duvet, Delicate, Express
15, Super Fast.
Programme
Options
Delay Nightwash Steam
Function
i-time
Cotton
o o o o o
Synthetic o o o o
Duvet
o o - o o
Wool o o - o
Delicate o o - o
Cotton 20
o - - - -
Refresh
- -
Babycare
o o o o o
Mix
o o o o o
Espress 15 min o o - o o
Super Fast o - o
Outdoor
o o - o o
Spin
o - -
Eco 40-60 o - - - -
Functions below are available on speci c programmes to provide enhanced performance.
O” indicates that function can be selected to the programme. “-” indicates that function
cannot be selected to the programme.
- - -
o
o
o
o
o
o
o
o
-
o
o
o
o
o
o
-
-
o
o
-
o
o
o
-
-
-
-
-
- -
- -
-
-
o
-
o
EN
5-Consumption
15
Programme
Temper-
ature
in °C
Max. load
in kg
Energy
consumption
in kWh
Water
consumption
in L
Washing time
in h:min
Spin
drying
perfor-
mance
in %
Eco 40-60 *
40 7.5
60 7.5
60
15
The indicated consumption values may accordingly di er to local conditions.
* Standard programme for the Energy Labelling according to 2010/30 EU:
“Eco 40-60” “60°C/40°C” with “max. spin” speed setting.
(Select Eco 40-60, often touch
speed for 5 seconds. After the temperature function is displayed, select the temperature
and the maximum speed.)
The standard Eco 40-60 programmes are suitable to clean normally soiled cotton laundry
at 40 °C or 60°C. They are the most e cient programmes in terms of combined energy
and water consumption for cotton laundry. Used water temperature may di er from de-
clared cycle temperature.
Note: Auto Weight
The appliance is equipped with a loading recognition. At low loading, energy, water and
washing time will be reduced automatically in some programmes.The dispiay shows
4 53
4:50 53
4:45
53
0.8
52
0.84
52
0.84
70
6-Daily use
EN
16
6.3 Preparing laundry
Sort out clothes according to fabric (cotton, syn-
thetics, wool or silk) and to how dirty they are (Fig.
6-3). Pay attention to the care labelling of wash-
ing labels.
Separate white clothes from coloured ones.
Wash coloured textiles rst by hand to check if
they fade or run.
Empty pockets (keys, coins, etc.) and remove
harder decorative objects (e.g. brooches).
Garments without hems, delicates and nely wo-
ven textile such as fi ne curtains are to be put into
a wash bag to care for this delicate laundry (hand
or dry cleaning would be better).
Close zippers, velco fastener and hooks, make
sure the buttons are sewn on tightly.
Place sensitive items like laundry without rm
hem, delicate underwear (Dessous) and small
items such as socks, belts, bras, etc. in a wash
bag.
Unfold large pieces of fabric such as bed sheets,
bedspreads etc.
Turn jeans and printed, decorated or color-inten-
sive textiles inside out; possibly wash separately.
6.1 Power supply
Connect the washing machine to a power supply
(220V to 240V~/50Hz; Fig. 6-1). Please refer also to
section INSTALLATION.
6.2 Water connection
Before connecting check the cleanliness and clar-
ity of the water inlet.
Turn on the tap (Fig.6-2).
Note: Tightness
Before use check for leakage in the joints between the tap and the inlet hose by turning
on the tap.
CAUTION!
Non-textile, as well as small, loose or sharp-edged items may cause malfunctions and
damage of clothes and appliance.
6-1 6-2
6-3
EN
6-Daily use
17
Care chart
Washing
Washable up to 95°C
normal process
Washable up to 60°C
normal process
Washable up to 60°C
mild process
Washable up to 40°C
normal process
Washable up to 40°C
mild process
Washable up to 40°C
very mild process
Washable up to 30°C
normal process
Washable up to 30°C
mild process
Washable up to 30°C
very mild process
Wash by hand
max. 40°C
Do not wash
Bleaching
Any bleaching allowed Only oxygen/
non -chlorine
Do not bleach
Drying
Tumble drying possible
normal temperature
Tumble drying possible
lower temperature
Do not tumble dryr
Line drying Flat drying
Ironing
Iron at a maximum
temperature
up to 200 °C
Iron at a medial tem-
perature
up to 150°C
Iron at a low temper-
ature up to 110 °C;
without steam (steam
ironing may cause irre-
versible damage)
Do not iron
Professional Textile Care
Dry cleaning in tetra-
chloroethene
Dry cleaning in hy-
drocarbons
Do not dry clean
Professional wet clean Do not professional
wet clean
6.4 Loading the appliance
Put in the laundry piece by piece
Don‘t overload. Note the diff erent maximum load according to programmes! Rule of
thumb for maximum load: Keep six inches between load and drum top.
Close the door carefully. Make sure that no pieces of laundry are pinched.
6-Daily use
EN
18
6.5 Selecting detergent
Washing e ciency and performance is determined by used detergent quality.
Use only machine wash approved detergent.
If needed use speci c detergents, e.g. for synthetic and woolen fabric.
Mind always detergent manufacturer recommendations.
Do not use dry cleaning agents such as trichloroethylene and similar products.
Choose the best detergent
Programme
Kind of detergent
Universal Colour Delicate Special Softener
Cotton
L/P L/P - - o
Synthetic - o
Duvet
L
Wool o
Delicate
Cotton 20
Refresh
- - -
Babycare
o
Mix
L/P L/P - - o
Espress 15 min L L - - o
Super Fast - - o
Outdoor
Spin
- - -
Eco 40-60 - - o
L = gel-/liquid detergent P = powder detergent O = optional
_
= no
If using liquid detergent, it is not recommended to activate the time delay.
We recomment by using:
Laundry powder: 20°C to 90°C* (best use: 40-60°C)
Color detergent: 20°C to 60°C (best use: 30-60°C)
Wool/delicate detergent: 20°C to 30°C (best use:20-30°C)
* Choose 90 °C wash temperature only for special hygienic requirements.
* If you choose the water temperature 60°C or above,we would like to advise
you to use less detergent.Please kindly use the special disinfectant, which is
suitable for cotton or synthetic cloth.
* It is better to use less or free suds detergent powder.
-
-
-
-
-
-
-
-
o
-
L/P L/P
L/P L/P
L/P L/P
- -
L/P
-
-
-
-
L/P
L/P
L/P
-
L/P L/P
L/P L/P
- -
L/P
- -
-
-
EN
6-Daily use
19
6.7 Switch on the appliance
Touch the “Power“- button to switch on the appli-
ance (Fig. 6-5). The LED of the “Start/Pause“ button
is fl ashing.
6.6 Adding detergent
1. Slide out the detergent drawer.
2. Put the required chemicals into corresponding
compartments (Fig. 6-4)
3. Push back the drawer gently.
Note:
Remove detergent residues before next wash cycle from the detergent drawer.
Do not overuse detergent or softener.
Please follow the instruction on the detergent package.
Always fi ll the detergent just before the beginning of the wash cycle.
Concentrated liquid detergent should be diluted before adding.
The best use of liquid detergent is by using a dosing ball, which is given with the laundry
into the washing machine.
Do not use liquid detergent if “end time delay“ is selected.
Carefully choose the programme settings according to the care symbols on all laun-
dry labels and according to the programme table.
6.8 Select a programme
To get the best washing results, select a programme
which fi ts the degree of soiling and sort of laundry
type.
Turn the programme knob (Fig. 6-6) to select the
right programme. Related programme LED lights up
and the default settings are displayed.
6.9 Add individual selections
Select required options and settings (Fig. 6-7); refer to
CONTROL PANEL.
,
Refreshtics rgic ol Spin
6-4
6-4
6-5
6-6
6-7
6-7
6-Daily use
EN
20
6.13 Activate or deactivate the buzzer
The acoustic signal can be deselected if necessary:
1. Switch on the appliance.
2. Select the Spin programme.
3. Touch the “Extra Rinse“ and “+ ” button at the same time for about 3 seconds.
“bEEP OFF” will be displayed and the buzzer will be deactivated.
For activating the buzzer press these two buttons at the same time again. “ ” will
be displayed.
Note: Door lock
For safety reasons the door is locked partially during the washing cycle. It is only pos-
sible to open the door at the end of the programme or after the programme was can-
celled correctly (see description above).
In case of high water level, high water temperature and during spinning it is not pos-
sible to open the door;  is displayed
Note: Standby mode / energy-saving mode
The switched on appliance will go into standby-mode if it will not be activated within 2
minutes before starting the program or at the end of program. The display switsches
off . This saves energy. To interrupt the standby mode touch “ Start/Pause“ button.
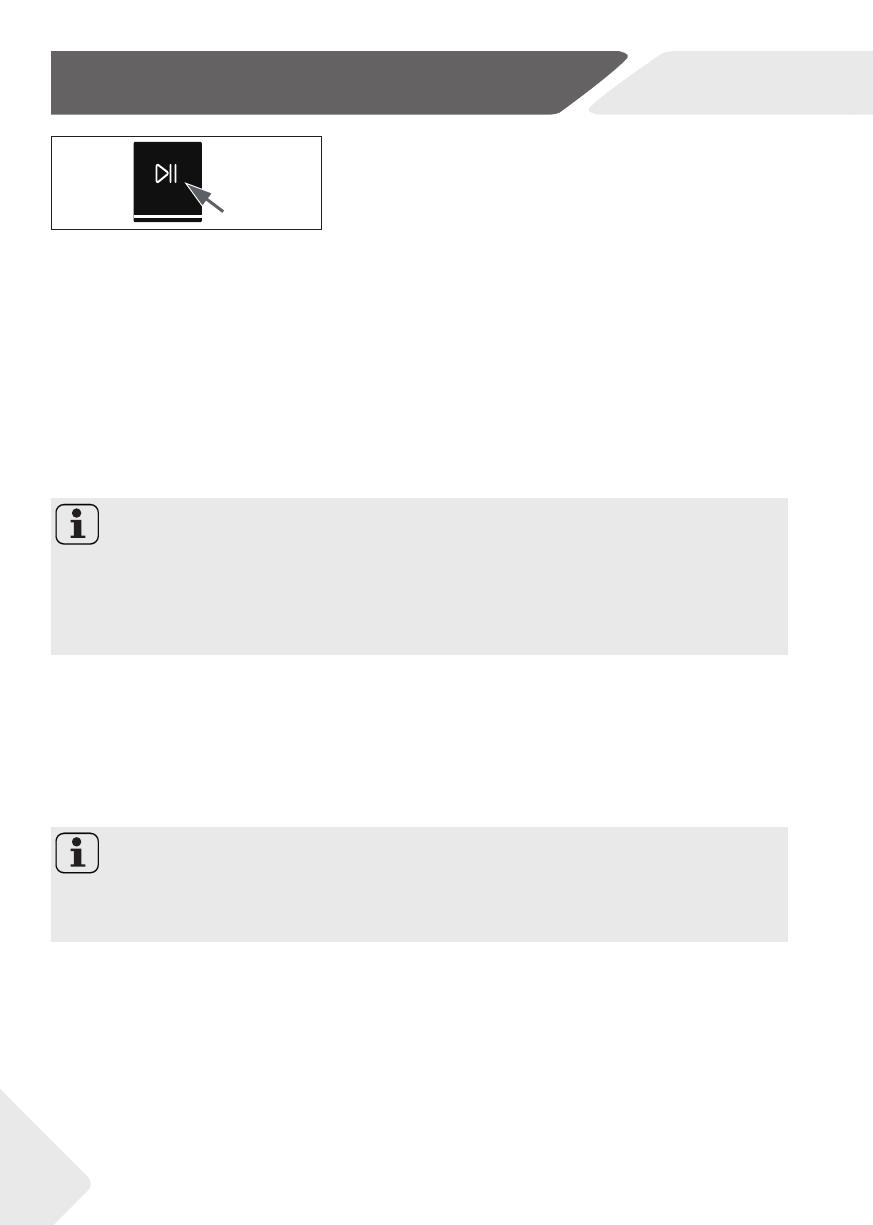
6.10 Start wash programme
Touch “Start/Pause“ button (Fig. 6-8) to start. The
LED of the “Start/Pause“ button stops fl ashing and
lights up continuously
Appliance operates according to present settings.
Changes are only possible by cancelling the programme.
3-14
6-8
6.12 After washing
6.11 Pause/ cancel wash programme
To pause a running programme press gently “Start/Pause“. The LED above the button is
ashing. Press it again to resume operation.
To cancel a running programme and all its individual settings
1. Touch “Start/Pause” button to interrupt the running programme.
2. Touch “Power“ button for about 2 seconds to switch the appliance off .
3. Select “Spin” and “no speed’, then run the programme to drain the water.
4. Select a new programme and start it..
1. At programme cycle end  is displayed.
2. The appliance switches off automatically.
3. Remove laundry as soon as possible to go easy on it and to prevent more wrinkling.
4. Turn off the water supply.
5. Unplug the power cord.
6. Open the door to prevent formation of moisture and odours. Let it open while not used.
1 / 1

Haier HW150-BP14986E Manuel utilisateur

Catégorie
Machines à laver
Taper
Manuel utilisateur

dans d''autres langues