
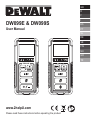
Please read these instructions before operating the product.
www.2helpU.com
DW099E & DW099S
User Manual
DW099E
GB
NL
GR
I
FIN
D
DK
ES
NO
F
SE
PT
TR

C
1
2
E
DW099E
2
Figures
A
4
DW099E
6.21ft
6.17ft
1
2
6.17ft
4
3
6.21ft
B
1
2
5
2
D
AAA
6
1
3
7
5
6

2
1
3
F G
H

4
GB
Contents
• User Safety
• Battery Safety
• Setup (Load Batteries)
• Operation
• Warranty
• Error Codes
• Specications
Retain all sections of this manual for future
reference.
User Safety
WARNING:
Carefully read the Safety Instructions and
Product Manual before using this product.
The person responsible for the product must
ensure that all users understand and adhere to
these instructions.
WARNING:
The following label information is placed on
your laser tool to inform you of the laser class
for your convenience and safety.
DW099S
FCC ID: 2ADA6DW099S
IC: 12409A-DW099S
DW099E
The DW099E and DW099S tools emit a visible laser
beam, as shown in Figure
A
#1. The laser beam
emitted is Laser Class 2 per IEC 60825-1 and complies
with 21 CFR 1040.10 and 1040.11 except for deviations
pursuant to Laser Notice No. 50, dated June 24, 2007.
WARNING:
While the laser tool is in operation, be careful
not to expose your eyes to the emitting laser
beam (red light source). Exposure to a laser
beam for an extended time period may be
hazardous to your eyes. Do not look into the
beam with optical aids.
WARNING: To reduce the risk of injury, user
must read the Product User manual, Laser
Safety manual, and Battery Safety information.
DeWalt, Slough, Bershire SL1 3YD, UK herewith
declares that the product DW099E/DW099S is in
compliance with the essential requirements and all
other provisions of Directive 1999/5/EC. Please contact
DeWalt for Declaration of Conformity.
Battery Safety
WARNING: Batteries can explode or leak and
cause serious injury or re. To reduce the risk:
ALWAYS follow all instructions and warnings
on the battery label and package.
DO NOT short any battery terminals.
DO NOT charge alkaline batteries.
DO NOT mix old and new batteries. Replace
all of them at the same time with new batteries
of the same brand and type.
DO NOT mix battery chemistries.
DO NOT dispose of batteries in re.
ALWAYS keep batteries out of reach of
children.
ALWAYS remove batteries if the device will not
be used for several months.
NOTE: Ensure that the recommended
batteries are used.
NOTE: Ensure the batteries are inserted in the
correct manner, with the correct polarity.
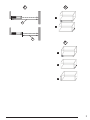
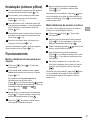
Setup (Load Batteries)
1.
Locate the battery compartment latch on the back
of the tool (Figure
C
#2).
2.
Using your finger, pull the latch up to unlock and
remove the battery door (Figure
D
#1 and #2).
3.
Insert two AAA batteries, making sure to position
the - and + ends of each battery as noted inside the
battery compartment (Figure
D
#3).
4.
Slide the pins at the bottom of the battery door into
the notches in the battery compartment
(Figure
D
#4).
5.
Push the battery door down until it snaps in place
(Figure
D
#5).
When the tool is ON, the battery level appears in the
display window (Figure
E
#1).

5
GB
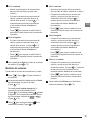
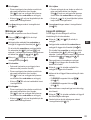
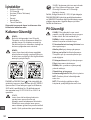
Operation
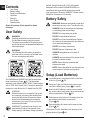
Measuring Distance to a Wall or Object
1.
Click (Figure
A
#5) to turn on the tool.
2.
The tool will measure the distance from the bottom
of the tool to the wall or object (Figure
F
#1).
To measure from the top of the tool instead of the
bottom (Figure
F
#2), hold for 2 seconds.
On the display window, the tool icon will change
from to (Figure
E
#5).
3.
Point the laser at the top of the tool (Figure
A
#1)
toward the wall or object whose distance you need
to measure (Figure
F
).
4.
Click to measure the distance from the tool
to the wall or object.
5.
At the bottom of the display window (Figure
A
#2),
view the current measurement (Figure
E
#3).
To take a new measurement, click to move the
current measurement up to the previous line on the
display window (Figure
E
#2). Then repeat steps 2-5.
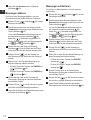
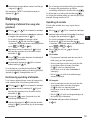
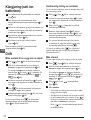
Measuring Distances Continuously
To take a series of measurements as you move
around, change to Continuous Measure mode.
1.
Click (Figure
A
#5) to turn on the tool.
2.
Point the laser at the top of the tool (Figure
A
#1)
toward the wall or object whose distance you need
to measure (Figure
F
).
3.
Click and hold for 2 seconds to turn on the
Continuous Measure mode.
4.
At the bottom of the display window
(Figure
A
#2), view the current measurement
(Figure
E
#3), which will keep changing as you
move the tool.
5.
To take the current measurement (from the tool to
the wall or object) and exit Continuous Measure
mode, click .
To take a new measurement, click to move the
current measurement up to the previous line on the
display window. Then repeat steps 2-5.
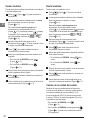
Measuring Area
You can measure the area of a wall, floor, or object.
1.
Click (Figure
A
#5) to turn on the tool.
2.
The tool will measure the distance from the bottom
of the tool to the wall or object (Figure
F
#1).
To measure from the top of the tool instead of the
bottom (Figure
F
#2), hold for 2 seconds.
On the display window, the tool icon will change
from to (Figure
E
#5).
3.
Click to show on the display window
(Figure
E
#4).
4.
Measure the width.
• Point the top of the tool at one side of the target
(wall, floor, or object).
• Position the tool at one end of the target and
point the laser dot across the width. (Figure
G
#1 shows where to position the tool if you are
measuring from the bottom of the tool.)
• Click to display the width measurement at
the top of the display window.
5.
Measure the length.
• Position the tool at one end of the target and
point the laser dot across the length. (Figure
G
#2 shows where to position the tool if you are
measuring from the bottom of the tool.)
• Click to display the length measurement
on the second line of the display window.
6.
View the Area measurement at the bottom of the
display window (Figure
E
#3).

6
GB
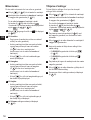
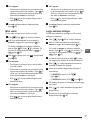
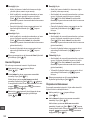
Measuring Volume
You can measure the volume of a room or object.
1.
Click (Figure
A
#5) to turn on the tool.
2.
The tool will measure the distance from the bottom
of the tool to the wall or object (Figure
F
#1).
To measure from the top of the tool instead of the
bottom (Figure
F
#2), hold for 2 seconds.
On the display window, the tool icon will change
from to (Figure
E
#5).
3.
Click twice to show on the display
window (Figure
E
#4).
4.
Measure the width.
• Point the top of the tool at one side of the target
(room or object).
• Position the tool at one end of the target and
point the laser dot across the width. (Figure
H
#1 shows where to position the tool if you are
measuring from the bottom of the tool.)
• Click to display the width measurement at
the top of the display window.
5.
Measure the length.
• Position the tool at one end of the target and
point the laser dot across the length. (Figure
H
#2 shows where to position the tool if you are
measuring from the bottom of the tool.)
• Click to display the length measurement
on the second line of the display window.
6.
Measure the height.
• Positon the tool at one end of the target and
point the laser dot across the height. (Figure
H
#3 shows where to position the tool if you are
measuring from the bottom of the tool).
• Click to display the height measurement
on the third line of the display window.
7.
View the Volume measurement at the bottom of the
display window (Figure
E
#3).
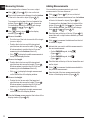
Adding Measurements
You can add two measurements to get a total
measurement of the two distances.
1.
Click (Figure
A
#5) to turn on the tool.
2.
The tool will measure the distance from the bottom
of the tool to the wall or object (Figure
F
#1).
To measure from the top of the tool instead of the
bottom (Figure
F
#2), hold for 2 seconds.
On the display window, the tool icon will change
from to (Figure
E
#5).
3.
Point the laser at the top of the tool (Figure
A
#1)
toward the wall or object whose distance you need
to measure.
4.
Click to measure the distance from the tool
to the wall or object.
5.
Indicate that you want to add this measurement to
the next measurement.
• On the DW099E keypad, click
(Figure
A
#7).
• On the DW099S keypad, click
(Figure
B
#1).
6.
Point the laser at the top of the tool toward the next
wall or object.
7.
Click to measure the distance and add it to
the previous measurement.
8.
View the total of the two measurements at the
bottom of the display window (Figure
E
#3).

7
GB
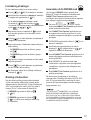
Subtracting Measurements
You can subtract one measurement from another.
1.
Click (Figure
A
#5) to turn on the tool.
2.
The tool will measure the distance from the bottom
of the tool to the wall or object (Figure
F
#1).
To measure from the top of the tool instead of the
bottom (Figure
F
#2), hold for 2 seconds.
On the display window, the tool icon will change
from to (Figure
E
#5).
3.
Point the laser at the top of the tool (Figure
A
#1)
toward the wall or object whose distance you need
to measure.
4.
Click to measure the distance from the tool
to the wall or object.
5.
Indicate that you want to subtract the next
measurement from this measurement.
• On the DW099E keypad, click twice.
• On the DW099S keypad, click twice.
6.
Point the laser at the top of the tool toward the next
wall or object.
7.
Click to measure the distance and subtract it
from the previous measurement.
8.
View the difference between the two measurements
at the bottom of the display window (Figure
E
#3).
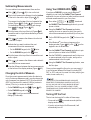
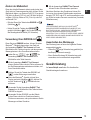
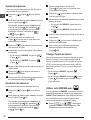
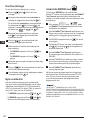
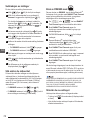
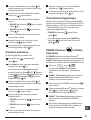
Changing the Unit of Measure
Once the current measurement is taken (the device is
not in Continuous Measure mode), you can change the
unit of measure from decimal ft (6.21 ft) to fractional ft
(6'02"9/16), fractional ft to meters (1.894 m), meters to
inches (74 9/16 in), or inches to decimal ft.
• On the DW099E keypad, click (Figure
A
#3).
• On the DW099S keypad, hold
(Figure
B
#1) until you see the measurement
change (2-3 seconds).
Using Your DW099S With
If you have a DW099S, you can use its Bluetooth
®
capability to pair it with the DeWALT Tool Connect
application on your cell phone or tablet, and then record
accurate measurements in your floor plans.
1.
From either or , download
the DeWALT Tool Connect application to your cell
phone or tablet.
2.
Using the DeWALT Tool Connect application,
capture the room or space for which you want to
record the measurements, and build your floor plan.
3.
On the DW099S keypad, click to turn on the
tool.
4.
If the Bluetooth
®
icon does not appear on the
display window (Figure
E
#6), click on the
keypad to turn on Bluetooth
®
.
5.
Use the DeWALT Tool Connect application to pair
your cell phone or tablet to the DW099S.
6.
Use the DW099S to measure each wall in the room
or space captured in the floor plan, and sync the
measurements to the floor plan.
7.
Using the DeWALT Tool Connect application, save
the floor plan.
Once you have saved the floor plan, you can export it
to one of several different file formats, including PDF,
DXF, or JPG, and print it or email it to other people (your
realtor, home center, etc.).
“THE BLUETOOTH
®
WORD MARK AND LOGOS ARE
REGISTERED TRADEMARKS OWNED BY BLUETOOTH
SIG, INC. AND ANY USE OF SUCH MARKS BY DEWALT
INDUSTRIAL TOOL CO. IS UNDER LICENSE. OTHER
TRADEMARKS AND TRADE NAMES ARE THOSE OF THEIR
RESPECTIVE OWNERS.”
Turning Off the Tool
The tool can be turned off in either of these ways:
• Press and hold for several seconds (until the
display window clears).
• If you do not use the tool for 90 seconds, it will
automatically turn off.

8
GB
Warranty
Go to www.2helpU.com for the latest warranty
information.
Protecting the Environment
Separate collection. This product must not
be disposed of with normal household
waste.
Should you nd one day that your DeWALT product
needs replacement, or if it is of no further use to you,
do not dispose of it with household waste. Make this
product available for separate collection.
Separate collection of used products and
packaging allows materials to be recycled
and used again. Re-use of recycled
materials helps prevent environmental pollution and
reduces the demand for raw materials.
Local regulations may provide for separate
collection of electrical products from the household,
at municipal waste sites or by the retailer when you
purchase a new product.
DeWALT provides a facility for the collection and
recycling of DeWALT products once they have
reached the end of their working life. To take
advantage of this service please return your product
to any authorised repair agent who will collect them
on our behalf.
You can check the location of your nearest
authorised repair agent by contacting your local
DeWALT ofce at the address indicated in this
manual. Alternatively, a list of authorised DeWALT
repair agents and full details of our after-sales
service and contacts are available on the Internet at:
www.2helpU.com.
Batteries
• When disposing batteries, think of the protection
of the environment.
• Check with your local authorities for an
environmentally safe way of battery disposal.

9
GB
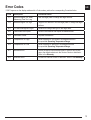
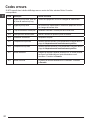
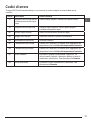
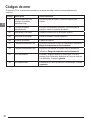
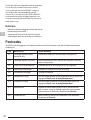
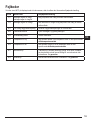
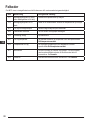
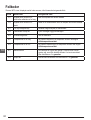
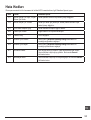
Error Codes
If INFO appears on the display window with a Code number, perform the corresponding Corrective Action.
Code Description Corrective Action
101 Received Signal Too Weak,
Measuring Time Too Long
Use the target plate or change the target surface.
102 Received Signal Too High Target is too reective. Use the target plate or change the target
surface.
201 Too Much Background Light Reduce the background light on the target area.
202 Laser Beam Interrupted Remove the obstacle and repeat the measurement.
203 Insufcient Power Replace the batteries.
301 Temperature Too High Allow the device to cool down to a temperature within
the specied Operating Temperature Range.
302 Temperature Too Low Allow the device to warm up to a temperature within
the specied Operating Temperature Range.
401 Hardware Error Switch the device on/off several times. If the error still occurs,
return the defective device to the Service Center or distributor.
Refer to the Warranty.
402 Unknown Error Contact the Service Center or distributor. Refer to the Warranty.

10
GB
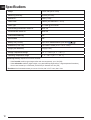
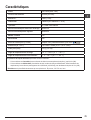
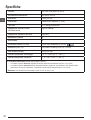
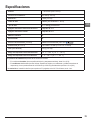
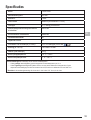
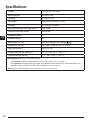
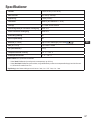
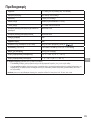
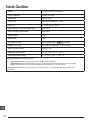
Specications
Range .1m to 30m (4in to 100ft)
Measuring Accuracy* ± 2mm (± 3/32in)*
Resolution** 1mm (1/16in)**
Laser Class Class 2 (IEC/EN60825-1: 2014)
Laser Type ≤ 1.0mW @ 620-690nm
Laser/Backlight Automatic Switch-off After 30s
Unit Automatic Switch-off After 90s
Continuous Measuring Yes
Area/Volume Yes
Battery Life (2 x AAA) Up to 3000 Measurements (2500 with )
Dimension (H x D x W) 120 x 48.5 x 26mm (4.72 x 1.91 x 1.02in)
Weight (with Batteries) 100g (3.21oz)
Storage Temperature Range -10° C ~ +60 C (14° F ~ 140° F)
Operating Temperature Range 0° C ~ +40° C (32° F ~ 104° F)
*Measuring Accuracy depends on the current conditions:
• Under favorable conditions (good target surface and room temperature), up to 10m (33ft).
• Under unfavorable conditions (bright sunlight, a very weak reecting target surface, or large temperature uctuations),
the error can increase by to ± 0.25mm/m (± 0.003 in/ft) for distances over 10m (33ft).
**Resolution is the nest measurement you can see. In inches, that is 1/16". In mm, that is 1mm.

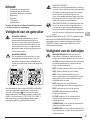
Inhalt
• Benutzersicherheit
• Sicherer Umgang mit Batterien
• Vorbereitung (Batterien einlegen)
• BETRIEB
• Gewährleistung
• Fehlercodes
• Technische Daten
Bewahren Sie alle Teile dieses Handbuchs zum
späteren Nachschlagen auf.
Benutzersicherheit
WARNUNG:
Lesen Sie alle Sicherheits- und
Bedienungsanweisungen, bevor Sie dieses
Produkt verwenden. Die Person, die für
das Produkt verantwortlich ist, muss
dafür sorgen, dass alle Benutzer diese
Anweisungen verstehen und sich an sie
halten.
WARNUNG:
Das folgende Informationsetikett auf dem
Laserwerkzeug informiert Sie zu Ihrer
Sicherheit über die Laser-Klasse.
DW099S
FCC ID: 2ADA6DW099S
IC: 12409A-DW099S
DW099E
Die Werkzeuge DW099E und DW099S geben einen
sichtbaren Laserstrahl aus, siehe Abbildung
A
#1.
Der ausgegebene Laserstrahl entspricht Laserklasse
2 gemäß IEC 60825-1 und erfüllt 21 CFR 1040.10 und
1040.11, außer bezüglich Abweichungen gemäß Laser
Notice No. 50 vom 24. Juni 2007.
WARNUNG:
Während das Laserwerkzeug in Betrieb
ist, darauf achten, nicht in den Laserstrahl
(rote Lichtquelle) zu blicken. Eine längere
Belastung durch Laserstrahlen kann
den Augen schaden. Nicht mit Hilfe von
optischen Hilfsmitteln in den Strahl blicken.
WARNUNG: Um das Risiko von
Verletzungen zu verringern, muss der
Benutzer das Produkthandbuch sowie
das Handbuch zum sicheren Umgang mit
Lasern und die Hinweise zu Batterien lesen.
DeWalt, Slough, Berkshire SL1 3YD, UK, erklärt
hiermit, dass das Produkt DW099E/DW099S
in Übereinstimmung mit den grundlegenden
Anforderungen und allen anderen Bestimmungen
der Richtlinie 1999/5/EC steht. Bezüglich der
Konformitätserklärung wenden Sie sich bitte an DeWalt.
Sicherer Umgang mit
Batterien
WARNUNG: Batterien können explodieren
oder auslaufen und dadurch Verletzungen
oder Feuer verursachen. Zum Reduzieren
von Risiken:
Befolgen Sie IMMER die Anleitungen und
Warnhinweise auf dem Etikett des Batterien
und der Verpackung.
Schließen Sie Batterieklemmen NICHT
kurz.
NICHT versuchen, Alkali-Batterien
aufzuladen.
Verwenden Sie NICHT gleichzeitig alte und
neue Batterien. Ersetzen Sie alle Batterien
gleichzeitig durch neue Batterien der
gleichen Marke und des gleichen Typs.
Verwenden Sie NICHT gleichzeitig
Batterien mit unterschiedlicher chemischer
Zusammensetzung.
Entsorgen Sie Batterien NICHT im Feuer.
Halten Sie Kinder IMMER von Batterien
fern.
Entfernen Sie IMMER die Batterien, wenn
ein Gerät mehrere Monate nicht gebraucht
wird.
HINWEIS: Stellen Sie sicher, dass die
empfohlenen Batterien verwendet werden.
HINWEIS: Stellen Sie sicher, dass die
Batterien richtig herum, d.h. mit der
richtigen Polarität eingesetzt sind.
11
D

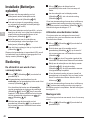
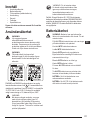
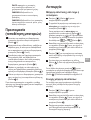
Vorbereitung (Batterien
einlegen)
1.
Die Batteriefachsicherung befindet sich an der
Rückseite des Werkzeugs (Abbildung
C
#2).
2.
Ziehen Sie die Sicherung mit dem Finger nach
oben, um das Batteriefach zu öffnen, und entfernen
Sie die Abdeckung (Abbildung
D
#1 und #2).
3.
Legen Sie zwei AAA-Batterien ein und stellen Sie
dabei sicher, dass die mit - und +gekennzeichneten
Enden jeder Batterie richtig herum im Batteriefach
liegen (Abbildung
D
#3).
4.
Schieben Sie die Stifte unten an der
Batterieabdeckung in die Kerben im Batteriefach
(Abbildung
D
#4).
5.
Drücken Sie die Abdeckung nach unten, bis sie
einrastet (Abbildung
D
#5).
Wenn das Werkzeug eingeschaltet ist, wird auf dem
Display der Batteriestand angezeigt (Abbildung
E
#1).
BETRIEB
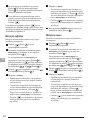
Messung der Entfernung zu einer
Wand oder einem Objekt
1.
Drücken Sie auf (Abbildung
A
#5), um das
Werkzeug einzuschalten.
2.
Das Werkzeug misst dann den Abstand von der
Unterseite des Werkzeugs zu der Wand oder dem
Objekt (Abbildung
F
#1).
Um von der Oberseite des Werkzeugs statt von
der Unterseite zu messen (Abbildung
F
#2),
halten Sie 2 Sekunden lang gedrückt. Im
Display-Fenster ändert sich das Werkzeugsymbol
von zu (Abbildung
E
#5).
3.
Richten Sie den Laser oben am Werkzeug
(Abbildung
A
#1) auf die Wand oder das Objekt,
zu der bzw. dem Sie den Abstand messen wollen
(Abbildung
F
).
4.
Drücken Sie auf , um den Abstand von
dem Werkzeug zu der Wand oder dem Objekt zu
messen.
5.
Lesen Sie unten am Display (Abbildung
A
#2) das
aktuelle Messergebnis ab (Abbildung
E
#3).
Für eine weitere Messung drücken Sie auf ,
um das aktuelle Messergebnis in die vorherige Zeile
des Displays zu verschieben (Abbildung
E
#2).
Wiederholen Sie dann die Schritte 2-5.
Dauermessung von Abständen
Wenn Sie eine Reihe von Messungen durchführen
möchten, während Sie sich bewegen, wechseln Sie
zum Dauermessmodus.
1.
Drücken Sie auf (Abbildung
A
#5), um das
Werkzeug einzuschalten.
2.
Richten Sie den Laser oben am Werkzeug
(Abbildung
A
#1) auf die Wand oder das Objekt,
zu der bzw. dem Sie den Abstand messen wollen
(Abbildung
F
).
3.
Halten Sie 2 Sekunden lang gedrückt, um
den Dauermessmodus zu aktivieren.
4.
Am unteren Display-Rand (Abbildung
A
#2) sehen
Sie den aktuellen Messwert (Abbildung
E
#3), der
sich ständig verändert, wenn Sie das Werkzeug
bewegen.
5.
Um eine aktuelle Messung (vom Werkzeug zu der
Wand oder dem Objekt) durchzuführen und den
Dauermessmodus zu verlassen, drücken Sie auf
.
Für eine weitere Messung drücken Sie auf , um
das aktuelle Messergebnis in die vorherige Zeile des
Displays zu verschieben. Wiederholen Sie dann die
Schritte 2-5.
D
12

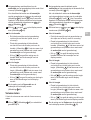
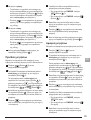
Messung von Flächen
Sie können die Fläche einer Wand, eines Bodens
oder eines Objekts ausmessen.
1.
Drücken Sie auf (Abbildung
A
#5), um das
Werkzeug einzuschalten.
2.
Das Werkzeug misst dann den Abstand von der
Unterseite des Werkzeugs zu der Wand oder dem
Objekt (Abbildung
F
#1).
Um von der Oberseite des Werkzeugs statt von
der Unterseite zu messen (Abbildung
F
#2),
halten Sie 2 Sekunden lang gedrückt. Im
Display-Fenster ändert sich das Werkzeugsymbol
von zu (Abbildung
E
#5).
3.
Drücken Sie auf , so dass im Display
angezeigt wird (Abbildung
E
#4).
4.
Messen der Breite.
• Richten Sie die Oberseite des Werkzeugs
auf eine Seite des Ziels (Wand, Boden oder
Objekt).
• Platzieren Sie das Werkzeug an einem Ende
des Ziels und richten Sie den Laserpunkt über
die Breite. (Abbildung
G
#1 zeigt die richtige
Position des Werkzeugs, wenn Sie von der
Unterseite des Werkzeugs aus messen.)
• Drücken Sie auf , um den
Breitenmesswert oben im Display anzuzeigen.
5.
Messen der Länge.
• Platzieren Sie das Werkzeug an einem Ende
des Ziels und richten Sie den Laserpunkt über
die Länge. (Abbildung
G
#2 zeigt die richtige
Position des Werkzeugs, wenn Sie von der
Unterseite des Werkzeugs aus messen.)
• Drücken Sie auf , um den
Längenmesswert in der zweiten Zeile des
Displays anzuzeigen.
6.
Lesen Sie die Fläche unten im Display ab
(Abbildung
E
#3).
Messen des Volumens
Sie können das Volumen eines Raumes oder Objekts
ermitteln.
1.
Drücken Sie auf (Abbildung
A
#5), um das
Werkzeug einzuschalten.
2.
Das Werkzeug misst dann den Abstand von der
Unterseite des Werkzeugs zu der Wand oder dem
Objekt (Abbildung
F
#1).
Um von der Oberseite des Werkzeugs statt von
der Unterseite zu messen (Abbildung
F
#2),
halten Sie 2 Sekunden lang gedrückt. Im
Display-Fenster ändert sich das Werkzeugsymbol
von zu (Abbildung
E
#5).
3.
Drücken Sie zweimal auf , so dass im Display
angezeigt wird (Abbildung
E
#4).
4.
Messen der Breite.
• Richten Sie die Oberseite des Werkzeugs auf
eine Seite des Ziels (Raum oder Objekt).
• Platzieren Sie das Werkzeug an einem Ende
des Ziels und richten Sie den Laserpunkt über
die Breite. (Abbildung
H
#1 zeigt die richtige
Position des Werkzeugs, wenn Sie von der
Unterseite des Werkzeugs aus messen.)
• Drücken Sie auf , um den
Breitenmesswert oben im Display anzuzeigen.
5.
Messen der Länge.
• Platzieren Sie das Werkzeug an einem Ende
des Ziels und richten Sie den Laserpunkt über
die Länge. (Abbildung
H
#2 zeigt die richtige
Position des Werkzeugs, wenn Sie von der
Unterseite des Werkzeugs aus messen.)
• Drücken Sie auf , um den
Längenmesswert in der zweiten Zeile des
Displays anzuzeigen.
6.
Messen der Höhe.
• Platzieren Sie das Werkzeug an einem Ende
des Ziels und richten Sie den Laserpunkt über
die Höhe. (Abbildung
H
#3 zeigt die richtige
Position des Werkzeugs, wenn Sie von der
Unterseite des Werkzeugs aus messen.)
• Drücken Sie auf , um den
Höhenmesswert in der dritten Zeile des
Displays anzuzeigen.
13
D

7.
Lesen Sie das Volumen unten im Display ab
(Abbildung
E
#3).
Messungen addieren
Sie können zwei Messungen addieren, um eine
Gesamtmessung der beiden Strecken zu erhalten.
1.
Drücken Sie auf (Abbildung
A
#5), um das
Werkzeug einzuschalten.
2.
Das Werkzeug misst dann den Abstand von der
Unterseite des Werkzeugs zu der Wand oder dem
Objekt (Abbildung
F
#1).
Um von der Oberseite des Werkzeugs statt von
der Unterseite zu messen (Abbildung
F
#2),
halten Sie 2 Sekunden lang gedrückt. Im
Display-Fenster ändert sich das Werkzeugsymbol
von zu (Abbildung
E
#5).
3.
Richten Sie den Laser oben am Werkzeug
(Abbildung
A
#1) auf die Wand oder das Objekt,
zu der bzw. dem Sie den Abstand messen wollen.
4.
Drücken Sie auf , um den Abstand von
dem Werkzeug zu der Wand oder dem Objekt zu
messen.
5.
Geben Sie an, dass Sie diese Messung zu der
nächsten Messung addieren möchten.
• Drücken Sie auf der Tastatur des DW099E auf
(Abbildung
A
#7).
• Drücken Sie auf der Tastatur des DW099S auf
(Abbildung
B
#1).
6.
Richten Sie den Laser an der Oberseite des
Werkzeugs in Richtung der nächsten Wand oder
des nächsten Objekts.
7.
Drücken Sie auf , um die Strecke zu messen
und zu der vorherigen Messung zu addieren.
8.
Lesen Sie die Summe der beiden Messungen unten
im Display ab (Abbildung
E
#3).
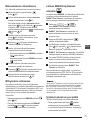
Messungen subtrahieren
Sie können ein Messergebnis von einem anderen
subtrahieren.
1.
Drücken Sie auf (Abbildung
A
#5), um das
Werkzeug einzuschalten.
2.
Das Werkzeug misst dann den Abstand von der
Unterseite des Werkzeugs zu der Wand oder dem
Objekt (Abbildung
F
#1).
Um von der Oberseite des Werkzeugs statt von
der Unterseite zu messen (Abbildung
F
#2),
halten Sie 2 Sekunden lang gedrückt. Im
Display-Fenster ändert sich das Werkzeugsymbol
von zu (Abbildung
E
#5).
3.
Richten Sie den Laser oben am Werkzeug
(Abbildung
A
#1) auf die Wand oder das Objekt,
zu der bzw. dem Sie den Abstand messen wollen.
4.
Drücken Sie auf , um den Abstand von
dem Werkzeug zu der Wand oder dem Objekt zu
messen.
5.
Geben Sie an, dass Sie die nächste Messung von
dieser Messung subtrahieren möchten.
• Drücken Sie auf der Tastatur des DW099E
zweimal auf .
• Drücken Sie auf der Tastatur des DW099S
zweimal auf .
6.
Richten Sie den Laser an der Oberseite des
Werkzeugs in Richtung der nächsten Wand oder
des nächsten Objekts.
7.
Drücken Sie auf , um die Strecke zu messen
und von der vorherigen Messung zu subtrahieren.
8.
Lesen Sie die Differenz zwischen den beiden
Messungen unten im Display ab (Abbildung
E
#3).
D
14

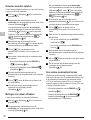
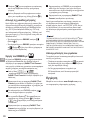
Ändern der Maßeinheit
Wenn der aktuelle Messwert erfasst wurde (wobei das
Gerät nicht im Dauermessmodus steht), können Sie die
Maßeinheit ändern: von Dezimal-Fuß (6,21 ft) zu einem
Fuß-Wert als Bruch (6'02"9/16), ein Fuß-Wert als Bruch
zu Meter (1,894 m), Meter zu Zoll (74 9/16 in) oder Zoll
zu Dezimal-Fuß.
• Drücken Sie auf der Tastatur des DW099E auf
(Abbildung
A
#3).
• Halten Sie auf der Tastatur des DW099S
gedrückt (Abbildung
B
#1), bis Sie die Änderung
des Messergebnisses sehen (2-3 Sekunden).
Verwendung Ihres DW099S mit
Wenn Sie einen DW099S besitzen, können Sie seine
Bluetooth
®
-Fähigkeit dazu nutzen, das Gerät mit
der Anwendung DeWALT Tool Connect auf Ihrem
Mobiltelefon oder Tablet zu koppeln, und dann genaue
Messergebnisse in Ihre Grundrisse aufzunehmen.
1.
Laden Sie von oder die
Anwendung DeWALT Tool Connect auf Ihr
Mobiltelefon oder Tablet herunter.
2.
Mit der Anwendung DeWALT Tool Connect
können Sie den Raum oder die Fläche erfassen, für
die Sie Messergebnisse aufnehmen möchten, und
Ihren Grundriss erstellen.
3.
Drücken Sie auf der Tastatur des DW099S auf
, um das Werkzeug einzuschalten.
4.
Wenn das Bluetooth
®
-Symbol nicht auf dem
Display erscheint (Abbildung
E
#6), drücken Sie
auf der Tastatur auf , um Bluetooth
®
zu
aktivieren.
5.
Verwenden Sie die Anwendung DeWALT Tool
Connect, um Ihr Mobiltelefon oder Tablet mit dem
DW099S zu koppeln.
6.
Verwenden Sie den DW099S, um alle Wände
in dem Raum oder die im Grundriss erfassten
Flächen zu vermessen, und synchronisieren Sie die
Messungen mit dem Grundriss.
7.
Mit der Anwendung DeWALT Tool Connect
können Sie den Grundriss dann speichern.
Nach dem Speichern des Grundrisses können Sie
ihn in eins von mehreren Dateiformaten exportieren,
darunter PDF, DXF oder JPG, und ihn ausdrucken oder
per E-Mail an andere Personen verschicken (Vermieter,
Möbelhaus usw.).
“DIE WORTMARKE UND DAS LOGO BLUETOOTH
®
SIND REGISTRIERTE WARENZEICHEN IM BESITZ VON
BLUETOOTH SIG, INC., UND JEGLICHE VERWENDUNG
SOLCHER KENNZEICHNUNGEN DURCH DEWALT
INDUSTRIAL TOOL CO. ERFOLGT UNTER LIZENZ. ANDERE
WARENZEICHEN UND HANDELSNAMEN SIND EIGENTUM
IHRER JEWEILIGEN BESITZER.”
Ausschalten des Werkzeugs
Das Werkzeug kann auf einer der folgenden Weisen
ausgeschaltet werden:
• Halten Sie einige Sekunden lang gedrückt (bis
das Display nichts mehr anzeigt).
• Wenn Sie das Werkzeug 90 Sekunden lang nicht
verwenden, wird es automatisch ausgeschaltet.
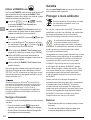
Gewährleistung
Auf www.2helpU.com nden Sie die aktuellen
Gewährleistungsinformationen.
15
D

Umweltschutz
Abfalltrennung. Dieses Produkt darf nicht
mit normalem Haushaltsabfall entsorgt
werden.
Wenn Sie eines Tages feststellen, dass Ihr DeWALT-
Produkt ersetzt werden muss oder Sie es nicht mehr
benötigen, entsorgen Sie es nicht mit dem normalen
Haushaltsabfall. Führen Sie dieses Produkt der
Abfalltrennung zu.
Die separate Entsorgung von
Gebrauchtprodukten und Verpackungen
ermöglicht das Recycling und die
Wiederverwendung der Stoffe. Die
Wiederverwendung von Recyclingstoffen hilft,
Umweltverschmutzung zu vermeiden und mindert
die Nachfrage nach Rohstoffen.
Lokale Vorschriften regeln möglicherweise die
getrennte Entsorgung von Elektroprodukten und
Haushaltsabfall an kommunalen Entsorgungsstellen
oder beim Einzelhändler, wenn Sie ein neues
Produkt kaufen.
DeWALT stellt Möglichkeiten für die Sammlung
und das Recycling von DeWALT-Produkten nach
Ablauf des Nutzungszeitraums zur Verfügung.
Um diesen Service zu nutzen, bringen Sie bitte
Ihr Produkt zu einer beliebigen autorisierten
Kundendienstwerkstatt, die es in unserem Auftrag
sammeln.
Die nächstgelegene autorisierte Kundendienststelle
erfahren Sie bei Ihrem örtlichen DeWALT-
Geschäftsstelle unter der in dieser Betriebsanleitung
angegebenen Adresse. Alternativ erhalten
Sie eine Liste der autorisierten DeWALT-
Kundendienstwerkstätten und vollständige
Informationen über unseren Kundendienst im
Internet unter: www.2helpU.com.
Batterien
• Wenn Sie Akkus entsorgen, denken Sie bitte an den
Schutz der Umwelt.
• Informieren Sie sich bei den zuständigen Stellen
vor Ort, wie Batterien und Akkus sicher und
umweltschonend entsorgt werden können.
D
16

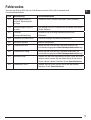
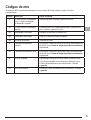
Fehlercodes
Wenn auf dem Display INFO und eine Code-Nummer erscheint, führen Sie die entsprechende
Korrekturmaßnahme durch.
Code Beschreibung Korrekturmaßnahme
101 Empfangenes Signal zu
schwach, Messung dauert
zu lange
Verwenden Sie die Zieltafel oder ändern Sie die Zieläche.
102 Das empfangene Signal ist
zu stark
Ziel reektiert zu stark. Verwenden Sie die Zieltafel oder ändern
Sie die Zieläche.
201 Zu starke
Hintergrundbeleuchtung
Reduzieren Sie die Hintergrundbeleuchtung auf den
Zielbereich.
202 Laserstrahl ist unterbrochen Hindernis beseitigen und Messung wiederholen.
203 Schwache Batterien Batterien austauschen.
301 Temperatur zu hoch Lassen Sie das Gerät auf eine Temperatur abkühlen, die
innerhalb des angegebenen Betriebstemperaturbereichs liegt.
302 Temperatur zu niedrig Lassen Sie das Gerät auf eine Temperatur aufwärmen, die
innerhalb des angegebenen Betriebstemperaturbereichs liegt.
401 Hardware-Fehler Schalten Sie das Gerät mehrmals ein und aus. Wenn der Fehler
weiterhin auftritt, senden Sie das defekte Gerät an das Service
Center oder den Händler. Beachten Sie die Garantiehinweise.
402 Unbekannter Fehler Wenden Sie sich an das Service Center oder den Händler.
Beachten Sie die Garantiehinweise.
17
D

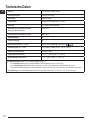
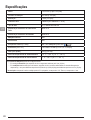
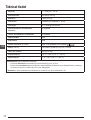
Technische Daten
Bereich 1m bis 30m (4in bis 100ft)
Messgenauigkeit* ± 2mm (± 3/32in)*
Auösung** 1mm (1/16in)**
Laserklasse Klasse 2 (IEC/EN60825-1: 2014)
Lasertyp ≤ 1,0mW bei 620-690nm
Automatische Abschaltung Laser/
Hintergrundbeleuchtung
Nach 30s
Automatische Abschaltung Gerät Nach 90s
Dauermessung Ja
Fläche/Volumen Ja
Batteriebetriebszeit (2 x AAA) Bis zu 3000 Messungen (2500 mit )
Abmessungen (H x T x B) 120 x 48,5 x 26mm (4,72 x 1,91 x 1,02in)
Gewicht (mit Batterien) 100g (3,21oz)
Lagertemperaturbereich -10° C ~ +60° C (14° F ~ 140° F)
Betriebstemperaturbereich 0° C ~ +40° C (32° F ~ 104° F)
Die *Messgenauigkeit hängt von den aktuellen Bedingungen ab:
• Unter günstigen Bedingungen (gute Zieloberäche und Raumtemperatur) bis zu 10m (33ft).
• Unter ungünstigen Bedingungen (helles Sonnenlicht, eine sehr wenig reektierende Zieloberäche oder große
Temperaturschwankungen) kann der Fehler bei Entfernungen über 10m (33ft) um ± 0,25mm/m (± 0,003 in/ft) höher liegen.
**Die Auösung ist das feinste Messergebnis, dass Ihnen angezeigt werden kann. In Zoll, also 1/16". In mm, also 1mm.
D
18

Table des matières
• Sécurité de l'utilisateur
• Sécurité concernant les piles
• Installation (mise en place des piles)
• Fonctionnement
• Garantie
• Codes erreurs
• Caractéristiques
Conservez toutes les sections de ce manuel
pour pouvoir vous y référer dans le futur.
Sécurité de l'utilisateur
AVERTISSEMENT :
Lisez attentivement les consignes
de sécurité et le manuel du produit
avant d'utiliser l'appareil. La personne
responsable du produit doit s'assurer
que tous les utilisateurs ont compris et
respectent ces instructions.
AVERTISSEMENT :
Les étiquettes d'informations suivantes sont
apposées sur votre outil laser an de vous
informer de la classication du laser pour
votre confort et votre sécurité.
DW099S
FCC ID: 2ADA6DW099S
IC: 12409A-DW099S
DW099E
Les outils DW099E et DW099S émettent un faisceau
laser visible, comme illustré par la figure
A
#1. Le
faisceau laser émis est de classe 2 selon la norme IEC
60825-1 et il est conforme à la norme 21 CFR 1040.10
et 1040.11, excepté concernant les écarts au titre de la
notice laser n°50 du 24 juin 2007.
AVERTISSEMENT :
Lorsque l'outil laser est en marche,
n'exposez pas vos yeux au faisceau laser
émis (source lumineuse rouge). L'exposition
à un faisceau laser pendant une période
prolongée peut être dangereuse pour vos
yeux. Ne regardez pas directement vers le
faisceau avec des accessoires optiques.
AVERTISSEMENT : An de réduire le
risque de blessure, l'utilisateur doit lire
le manuel d'utilisation du produit, ainsi
que le manuel de sécurité laser et les
informations sur la sécurité relatives aux
piles et batteries.
DeWalt, Slough, Bershire SL1 3YD, UK déclare par
la présente que le produit DW099E/DW099S est
conforme aux exigences essentielles et à toutes les
autres dispositions de la Directive 1999/5/CE. Veuillez
contacter DeWalt pour obtenir la déclaration de
conformité.
Sécurité concernant les
piles
AVERTISSEMENT : Les piles peuvent
exploser ou fuir et provoquer de graves
blessures ou un incendie. An d'en réduire
le risque :
Respectez TOUJOURS toutes les
consignes et tous les avertissements des
étiquettes apposées sur les piles et leur
emballage.
NE COURT-CIRCUITEZ aucune des
bornes des piles.
NE RECHARGEZ PAS les piles alcalines.
NE MÉLANGEZ PAS des piles neuves
avec des piles usagées. Remplacez toutes
les piles par des piles neuves de même
marque et de même type, en même temps.
NE MÉLANGEZ PAS des piles dont la
composition chimique est différente.
NE JETEZ PAS les piles au feu.
GARDEZ TOUJOURS les piles hors de
portée des enfants.
RETIREZ TOUJOURS les piles si l'appareil
n'est pas utilisé pendant plusieurs mois.
REMARQUE : Assurez-vous d'utiliser les
piles recommandées.
REMARQUE : Assurez-vous que les piles
sont insérées correctement, en respectant
la polarité.
19
F

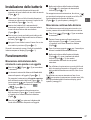
Installation (mise en place
des piles)
1.
Trouvez le loquet du compartiment à piles à l'arrière
de l'outil (Figure
C
#2).
2.
Relevez le loquet avec votre doigt pour le
déverrouiller et retirez le cache du compartiment
à piles (Figure
D
#1 et #2).
3.
Insérez deux piles AAA, en vous assurant de
positionner les extrémités - et + de chaque pile
comme indiqué à l'intérieur du compartiment à piles
(Figure
D
#3).
4.
Glissez les pointes au bas du cache dans les
encoches du compartiment à piles (Figure
D
#4).
5.
Poussez le cache jusqu'à ce qu'il s'enclenche en
place (Figure
D
#5).
Lorsque l'outil est allumé, le niveau de puissance des
piles apparaît dans la fenêtre d'affichage
(Figure
E
#1).
Fonctionnement
Mesurer la distance d'un mur ou d'un
objet
1.
Cliquez sur (Figure
A
#5) pour allumer
l'outil.
2.
L'outil mesure la distance entre le bas de l'outil et le
mur ou l'objet (Figure
F
#1).
Pour prendre la mesure depuis le haut de l'outil
et non du bas (Figure
F
#2), maintenez
enfoncé pendant 2 secondes. Dans la fenêtre
d'affichage, l'icône de l'outil passe de
à (Figure
E
#5).
3.
Pointez le laser situé en haut de l'outil
(Figure
A
#1) vers le mur ou l'objet dont vous
voulez mesurer la distance (Figure
F
).
4.
Cliquez sur pour mesurer la distance entre
l'outil et le mur ou l'objet.
5.
Au bas de la fenêtre d'affichage (Figure
A
#2),
vous pouvez voir la distance mesurée
(Figure
E
#3).
Pour prendre une nouvelle mesure, cliquez sur
pour déplacer la mesure actuelle jusqu'à la ligne
précédente dans la fenêtre d'affichage (Figure
E
#2).
Puis répétez les étapes 2 à 5.
Mesure de distances en continu
Pour prendre une série de mesures tout en vous
déplaçant, passez en mode Mesure Continue.
1.
Cliquez sur (Figure
A
#5) pour allumer
l'outil.
2.
Pointez le laser situé en haut de l'outil
(Figure
A
#1) vers le mur ou l'objet dont vous
voulez mesurer la distance (Figure
F
).
3.
Maintenez enfoncé pendant 2 secondes
pour passer en mode Mesure Continue.
4.
Au bas de la fenêtre d'affichage (Figure
A
#2),
vous pouvez voir la distance mesurée
(Figure
E
#3) qui ne cesse de changer à mesure
que vous déplacez l'outil.
5.
Pour prendre la mesure (entre le bas de l'outil
et le mur ou l'objet) et quitter le mode Mesure
Continue, cliquez sur .
Pour prendre une nouvelle mesure, cliquez sur
pour déplacer la mesure actuelle sur la ligne
précédente dans la fenêtre d'affichage. Puis répétez
les étapes 2 à 5.
F
20
La page est en cours de chargement...
La page est en cours de chargement...
La page est en cours de chargement...
La page est en cours de chargement...
La page est en cours de chargement...
La page est en cours de chargement...
La page est en cours de chargement...
La page est en cours de chargement...
La page est en cours de chargement...
La page est en cours de chargement...
La page est en cours de chargement...
La page est en cours de chargement...
La page est en cours de chargement...
La page est en cours de chargement...
La page est en cours de chargement...
La page est en cours de chargement...
La page est en cours de chargement...
La page est en cours de chargement...
La page est en cours de chargement...
La page est en cours de chargement...
La page est en cours de chargement...
La page est en cours de chargement...
La page est en cours de chargement...
La page est en cours de chargement...
La page est en cours de chargement...
La page est en cours de chargement...
La page est en cours de chargement...
La page est en cours de chargement...
La page est en cours de chargement...
La page est en cours de chargement...
La page est en cours de chargement...
La page est en cours de chargement...
La page est en cours de chargement...
La page est en cours de chargement...
La page est en cours de chargement...
La page est en cours de chargement...
La page est en cours de chargement...
La page est en cours de chargement...
La page est en cours de chargement...
La page est en cours de chargement...
La page est en cours de chargement...
La page est en cours de chargement...
La page est en cours de chargement...
La page est en cours de chargement...
La page est en cours de chargement...
La page est en cours de chargement...
La page est en cours de chargement...
La page est en cours de chargement...
La page est en cours de chargement...
La page est en cours de chargement...
La page est en cours de chargement...
La page est en cours de chargement...
La page est en cours de chargement...
La page est en cours de chargement...
La page est en cours de chargement...
La page est en cours de chargement...
La page est en cours de chargement...
La page est en cours de chargement...
La page est en cours de chargement...
La page est en cours de chargement...
La page est en cours de chargement...
La page est en cours de chargement...
La page est en cours de chargement...
La page est en cours de chargement...
La page est en cours de chargement...
La page est en cours de chargement...
La page est en cours de chargement...
La page est en cours de chargement...
La page est en cours de chargement...
La page est en cours de chargement...
La page est en cours de chargement...
La page est en cours de chargement...
La page est en cours de chargement...
La page est en cours de chargement...
La page est en cours de chargement...
La page est en cours de chargement...
La page est en cours de chargement...
La page est en cours de chargement...
-
 1
1
-
 2
2
-
 3
3
-
 4
4
-
 5
5
-
 6
6
-
 7
7
-
 8
8
-
 9
9
-
 10
10
-
 11
11
-
 12
12
-
 13
13
-
 14
14
-
 15
15
-
 16
16
-
 17
17
-
 18
18
-
 19
19
-
 20
20
-
 21
21
-
 22
22
-
 23
23
-
 24
24
-
 25
25
-
 26
26
-
 27
27
-
 28
28
-
 29
29
-
 30
30
-
 31
31
-
 32
32
-
 33
33
-
 34
34
-
 35
35
-
 36
36
-
 37
37
-
 38
38
-
 39
39
-
 40
40
-
 41
41
-
 42
42
-
 43
43
-
 44
44
-
 45
45
-
 46
46
-
 47
47
-
 48
48
-
 49
49
-
 50
50
-
 51
51
-
 52
52
-
 53
53
-
 54
54
-
 55
55
-
 56
56
-
 57
57
-
 58
58
-
 59
59
-
 60
60
-
 61
61
-
 62
62
-
 63
63
-
 64
64
-
 65
65
-
 66
66
-
 67
67
-
 68
68
-
 69
69
-
 70
70
-
 71
71
-
 72
72
-
 73
73
-
 74
74
-
 75
75
-
 76
76
-
 77
77
-
 78
78
-
 79
79
-
 80
80
-
 81
81
-
 82
82
-
 83
83
-
 84
84
-
 85
85
-
 86
86
-
 87
87
-
 88
88
-
 89
89
-
 90
90
-
 91
91
-
 92
92
-
 93
93
-
 94
94
-
 95
95
-
 96
96
-
 97
97
-
 98
98


DeWalt DW099 Manuel utilisateur
- Taper
- Manuel utilisateur
dans d''autres langues
- italiano: DeWalt DW099 Manuale utente
- English: DeWalt DW099 User manual
- español: DeWalt DW099 Manual de usuario
- Deutsch: DeWalt DW099 Benutzerhandbuch
- Nederlands: DeWalt DW099 Handleiding
- português: DeWalt DW099 Manual do usuário
- dansk: DeWalt DW099 Brugermanual
- svenska: DeWalt DW099 Användarmanual
- Türkçe: DeWalt DW099 Kullanım kılavuzu
- suomi: DeWalt DW099 Ohjekirja