KINGSLIM D5 Manuel utilisateur
- Catégorie
- Enregistreurs de disque
- Taper
- Manuel utilisateur

V1.0
USER MANUAL
KingSlim D5 Dash Cam


1
EnglishEnglish
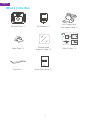
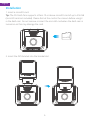
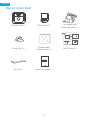
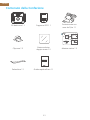
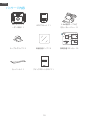
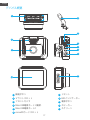
D5 Dash Cam * 1 Car Charger with
3.5m Power Cable * 1
GPS Bracket * 1
Quick Start Guide * 1
Cable Clips * 5 Static Sticker * 2
Double-sided
Adhesive Tape * 2
Pry Tool * 1
Quick Start Guide
KingSlim D5 Dash Cam
V1.0
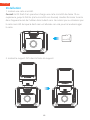
What's in the Box

2
EnglishEnglish
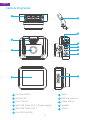
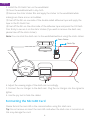
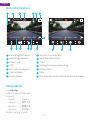
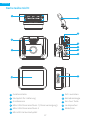
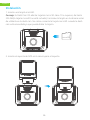
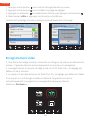
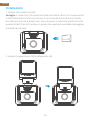
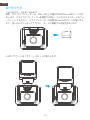
Camera Overview
1
2
3
4
511
10
7
6
8
9
Function Button
Bracket Slot
Front Camera
Mini USB Power Port 1 (Power supply)
Mini USB Power Port 2
microSD Card Slot
Reset
Working Indicator
Power Button
Speaker
Screen
3
11
2
1
6
8
7
9
10
5
4

3
EnglishEnglish
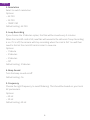
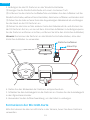
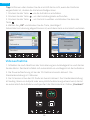
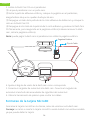
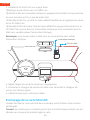
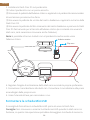
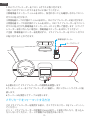
Installation
1. Insert a microSD card.
Tip: The D5 Dash Cam supports a Class 10 or above microSD card of up to 256 GB
(microSD card not included). Please format the card in the camera before using it
in the dash cam. Do not remove or insert the microSD card when the dash cam is
turned on as this may damage the card.
2. Insert the GPS bracket into the bracket slot.
microSD

EnglishEnglish
4
3. Install the D5 Dash Cam on the windshield.
Clean the windshield with a dry cloth.
Remove the static sticker film and apply the sticker to the windshield while
making sure there are no air bubbles.
Peel off the film on one side of the double-sided adhesive tape and apply the
tape to the D5 Dash Cam.
Peel off the film on the other side of the adhesive tape and press the D5 Dash
Cam firmly to secure it on the static sticker (if you wish to remove the dash cam,
please take off the static sticker).
Note: You can stick the dash cam to the windshield without using the static sticker.
Formatting the MicroSD Card
Please format the microSD in the camera before using this dash cam.
Tip: Do not remove or insert the microSD card when the dash cam is turned on as
this may damage the card.
4. Adjust the viewing angle of the dash cam accordingly.
5. Connect the car charger to the dash cam. Plug the car charger into the cigarette
lighter.
6. Use the pry tool to hide the cables.
Static Sticker
Cable Clip

EnglishEnglish
5
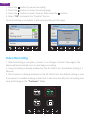
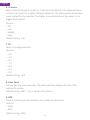
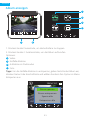
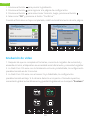
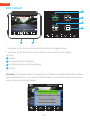
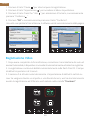
Setup
Date Stamp
HDR
Parking mode
Format
Default
Setup
Date Stamp
HDR
Parking mode
Format
Default
All data will be
formated
Cancel
OK
1. Press the button to pause recording.
2. Press the button to enter the setting page.
3. Press the button to select Format, then press the button.
4. Select "OK" and press the "Confirm" button.
Once formatting is complete, it will automatically exit this page.
Video Recording
1. After formatting is complete, connect a car charger and start the engine; the
device will automatically turn on and begin recording.
2. Loop recording is already enabled on the D5 Dash Cam; the default setting is 3
Minutes.
3. The G-sensor is already enabled on the D5 Dash Cam; the default setting is Low.
If an impact or sudden braking is detected, it will automatically start recording and
save the footage in the "frontemr" folder.

EnglishEnglish
6
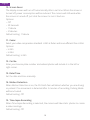
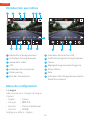
21/04/15
17:55
3840x2160
2021
Lock Current
Unlock Current
Lock All
Unlock All
1
2
3
4
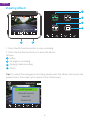
Viewing Album
1. Press the 4th function button to stop recording.
2. Press the 2nd function button to enter the album.
Options:
Video
Emergency recording
Parking mode recording
Photo
Tips: To unlock the emergency recording, please enter the album, short press the
power button, then select your option in the Unlock menu.
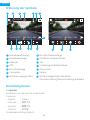
1
2
3
4
4K
00:00:24
04/16/2021 07:15:25 AM
2 4

EnglishEnglish
7
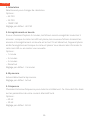
1
2
3
4
5
6
7
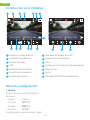
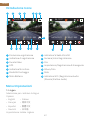
Recording Resolution
Recording Indicator
Video Time
GPS
Microphone Indicator
Parking Mode
Power Status
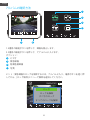
Icon Introduction
Setup Menu
12
4K
00:00:24
04/16/2021 07:15:25 AM 8
3 4 5 6 7
9
1013 11
1214
10
8
9
MicroSD Card Indicator
Stop/Start Recording
Time
Setting/Emergency Recording
Album/Photo
Date
WiFi Indicator/Audio Recording (Mute/Unmute)
11
12
13
14
1. Language
Select to switch language.
Options:
• English
• Français
• Español
• Deutsch
Default setting: English
• Italiano
• 简体中文
• 繁體中文
• 日本語
4K
04:12:57
04/18/2021 07:05:41 AM
111214

EnglishEnglish
8
2. Resolution
Select to switch resolution.
Options:
• 4K P30
• 2K P30
• 1080P P60
Default setting: 4K P30
3. Loop Recording
If you choose the 3 Minutes option, the files will be saved every 3 minutes.
When the microSD card is full, new files will overwrite the old ones if Loop Recording
is on. If it is off, the camera will stop recording when the card is full. You will then
need to format the microSD card or insert a new one.
Options:
• 1 Minute
• 3 Minutes
• 5 Minutes
• Off
Default setting: 3 Minutes
4. Beep Sound
Turn the beep sound on/off.
Default setting: On
5. Frequency
Choose the right frequency to avoid flickering. This should be based on your local
AC parameters.
Options:
• 60 Hz
• 50 Hz
Default setting: 60 Hz

EnglishEnglish
9
6. G-Sensor
When G-Sensor Mode is turned on, it will automatically start recording and save
content if an impact or sudden braking is detected. The videos will be locked and
never overwritten by new files. The higher the sensitivity level, the easier it is to
trigger the G-Sensor.
Options:
• Off
• Low
• Middle
• High
Default Setting: Low
7. EV
Select to change exposure.
Options:
• +0.0
• -1/3
• -2/3
• -1.0
• -4/3
• -5/3
• -2.0
Default setting: +0.0
8. Time Zone
Choose the time zone manually. The device will then display the time of the
selected time zone.
Default setting: GMT – 5 (U.S. Eastern Time Zone)
9. GPS
Track your driving speed and show your preferred speed unit.
Options:
• KM/H
• MPH
Default setting: KM/H

EnglishEnglish
10
10. Screen Saver
The display screen will turn off automatically after a set time. When the screen is
turned off, power consumption will be reduced. The camera will still work while
the screen is turned off. Just click the screen to turn it back on.
Options:
• Off
• 30 Seconds
• 1 Minute
• 2 Minutes
Default setting: 1 Minute
11. Codec
Select your video compression standard. H.265 is faster and more efficient than H.264.
Options:
• H.265
• H.264
Default setting: H.265
12. Car No.
Enter your license plate number and videos/photos will include it in the left or
right corner.
13. Date/Time
Set the date and time manually.
14. Motion Detection
When Motion Detection is on, the D5 Dash Cam will detect whether you are driving
or parked. If no movement is detected after 5 minutes of recording, Parking Mode
will be activated.
Default setting: Off
15. Time-lapse Recording
When Time-lapse Recording is selected, the camera will take static photos to create
a video montage.
Default setting: Off

EnglishEnglish
11
16. Date Stamp
Select to add a date stamp to photos/videos.
Default setting: On
17. HDR
Select to turn HDR mode on/off.
Default setting: Off
18. Parking Mode
If there is an impact on the car during parking, the camera will turn on automatically
and create a locked 20-second recording. The higher the selected level, the easier
it is to trigger the recording.
Default setting: Off
19. Format
Format your memory card.
20. Default
Restore the default settings.
21. Version
Check the software version of the camera. This information may be required when
technical support is needed.
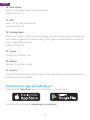
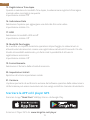
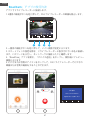
Download the App and GPS Player
Download the "RoadCam" app on the App Store or Google Play.
Download the GPS player: www.kingslim.net/player

WiFi Connected
MAC: f2a5c5df892b
Press Select to Disconnect
Video Photo
Photo
Exit
2021 03 17 13:47
NVT_CARDV688fc9c17556
Stop
Recording instrument
NVT_CARDV688fc9c17556
EnglishEnglish
12
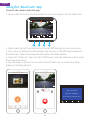
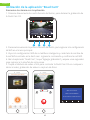
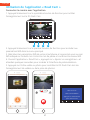
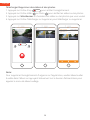
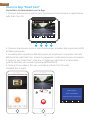
Connect the camera with the app.
1. Short press the fourth function button to stop recording on the D5 Dash Cam.
2. Short press the first function button to enter Wifi settings on the main menu.
3. Go to your smartphone's Wifi settings and connect to the Wifi name shown on
the dash cam. Enter the password and confirm the Wifi network.
4. Open the "Road Cam" app, tap "NVT_CARDVxxxx" and wait a few seconds to enter
the preview interface.
5. Tap the video or photo icon to control the D5 Dash Cam in either recording
videos or shooting photos.
Using the "Road Cam" App
4K
00:00:24
04/16/2021 07:15:25 AM
1 2 3 4

Note:
To exit Wifi settings, please press the first button on the dash cam.
To delete the emergency recording on the app, please unlock the video in the
album by short pressing the power button to call out the Unlock menu.
EnglishEnglish
13
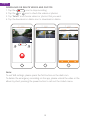
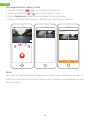
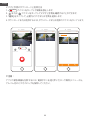
DOWNLOAD OR DELETE VIDEOS AND PHOTOS
1. Tap the icon to stop recording.
2. Tap the or icon to check the videos or photos.
3. Tap "Select" and choose videos or photos that you want.
4. Tap the download or delete icon to download or delete.
Photo Select
2021/04/21
2021/04/21 13:00
13:32:26 13:35:47
9.32MB 108.52MB
Movie Select
Loop video Emergency video
NVT_CARDV688fc9c17556
04/21/2021 07:51:29 AM
00:00:52
Video Photo
Photo
Exit
Stop
Stop

EnglishEnglish
14
Video: 4K at 30 fps/2K at 30 fps/1080P at 60 fps
Video Coding: H.264/H.265
Working temperature: 20–60°C (-4–140°F)
Input: 5V DC
If your D5 Dash Cam is not working properly, please follow these
troubleshooting steps:
1. The dash cam cannot record.
• Check whether the microSD card has enough space. Please back up any important
data to other devices first, then format the microSD card.
• Check if Loop Recording in the Settings menu is set to Off.
Set "Loop Recording" to 3 minutes.
2. Recording stops automatically.
During recording, a large amount of high-definition video data is processed.
Please use a high-speed microSD card of Class 10 or higher.
3. A "File Error" prompt appears when playing back pictures and videos.
Please use a genuine microSD card. Please format the microSD card.
4. The image is misty.
Ensure that there are no fingerprints or other marks on the camera lens. Use a soft
dry cloth to clean the lens. Clean the front windshield.
5. The device crashes.
If your device crashes, use a sharp object to press the reset button and restart the
device.
Specifications

EnglishEnglish
15
6. There is no sound on the video.
Ensure that Audio Recording Mode is on.
7. The camera keeps turning on and off automatically.
Please charge the camera with the included car charger. Do not charge the battery
via the USB data cable with other adapters.
1. Please mount your device in a secure place and protect the lens from scratches
and dirt.
2. Do not expose the device to rain, moisture or water under any circumstances.
3. Avoid leaving the device in direct sunlight for extended periods of time.
4. Do not dismantle or expose the internal battery.
Caution
For any inquiries about KingSlim products, please feel free to contact us.
We will respond within 24 hours.
Email: [email protected]
Tel: 888-811-1140 (US) Mon-Fri (except holiday) 9am-5pm (EST)
Official website: www.kingslim.net
Contact Us
The microSD, microSDHC, microSDXC and SD marks and logos are trademarks
of SD-3C, LLC.

16
Was ist in der Box?
D5 Dash Cam * 1 Car Charger with
3.5m Power Cable * 1
GPS Bracket * 1
Quick Start Guide * 1
Cable Clips * 5 Static Sticker * 2
Double-sided
Adhesive Tape * 2
Pry Tool * 1
Quick Start Guide
KingSlim D5 Dash Cam
V1.0
EnglishDeutsch

17
English
Kameraübersicht
1
2
3
4
511
10
7
6
8
9
Funktionstaste
Steckplatz für Halterung
Frontkamera
Mini-USB-Stromanschluss 1 (Stromversorgung)
Mini-USB-Stromanschluss 2
MicroSD-Kartensteckplatz
Sich ausruhen
Betriebsanzeige
Ein-/Aus-Taste
Lautsprecher
Bildschirm
3
11
2
1
6
8
7
9
10
5
4
EnglishDeutsch

18
English
Installation
1. Setzen Sie eine microSD-Karte ein.
Tipp: Die D5 Dashcam unterstützt eine microSD-Karte der Klasse 10 oder höher
mit bis zu 256 GB (microSD-Karte nicht im Lieferumfang enthalten). Bitte formatieren
Sie die Karte in der Kamera, bevor Sie sie in der Dashcam verwenden. Entfernen
oder stecken Sie die microSD-Karte nicht, wenn die Dashcam eingeschaltet ist, da
dies die Karte beschädigen kann.
2. Setzen Sie die GPS-Halterung in den Halterungsschacht ein.
microSD
EnglishDeutsch
La page est en cours de chargement...
La page est en cours de chargement...
La page est en cours de chargement...
La page est en cours de chargement...
La page est en cours de chargement...
La page est en cours de chargement...
La page est en cours de chargement...
La page est en cours de chargement...
La page est en cours de chargement...
La page est en cours de chargement...
La page est en cours de chargement...
La page est en cours de chargement...
La page est en cours de chargement...
La page est en cours de chargement...
La page est en cours de chargement...
La page est en cours de chargement...
La page est en cours de chargement...
La page est en cours de chargement...
La page est en cours de chargement...
La page est en cours de chargement...
La page est en cours de chargement...
La page est en cours de chargement...
La page est en cours de chargement...
La page est en cours de chargement...
La page est en cours de chargement...
La page est en cours de chargement...
La page est en cours de chargement...
La page est en cours de chargement...
La page est en cours de chargement...
La page est en cours de chargement...
La page est en cours de chargement...
La page est en cours de chargement...
La page est en cours de chargement...
La page est en cours de chargement...
La page est en cours de chargement...
La page est en cours de chargement...
La page est en cours de chargement...
La page est en cours de chargement...
La page est en cours de chargement...
La page est en cours de chargement...
La page est en cours de chargement...
La page est en cours de chargement...
La page est en cours de chargement...
La page est en cours de chargement...
La page est en cours de chargement...
La page est en cours de chargement...
La page est en cours de chargement...
La page est en cours de chargement...
La page est en cours de chargement...
La page est en cours de chargement...
La page est en cours de chargement...
La page est en cours de chargement...
La page est en cours de chargement...
La page est en cours de chargement...
La page est en cours de chargement...
La page est en cours de chargement...
La page est en cours de chargement...
La page est en cours de chargement...
La page est en cours de chargement...
La page est en cours de chargement...
La page est en cours de chargement...
La page est en cours de chargement...
La page est en cours de chargement...
La page est en cours de chargement...
La page est en cours de chargement...
La page est en cours de chargement...
La page est en cours de chargement...
La page est en cours de chargement...
La page est en cours de chargement...
La page est en cours de chargement...
La page est en cours de chargement...
La page est en cours de chargement...
-
 1
1
-
 2
2
-
 3
3
-
 4
4
-
 5
5
-
 6
6
-
 7
7
-
 8
8
-
 9
9
-
 10
10
-
 11
11
-
 12
12
-
 13
13
-
 14
14
-
 15
15
-
 16
16
-
 17
17
-
 18
18
-
 19
19
-
 20
20
-
 21
21
-
 22
22
-
 23
23
-
 24
24
-
 25
25
-
 26
26
-
 27
27
-
 28
28
-
 29
29
-
 30
30
-
 31
31
-
 32
32
-
 33
33
-
 34
34
-
 35
35
-
 36
36
-
 37
37
-
 38
38
-
 39
39
-
 40
40
-
 41
41
-
 42
42
-
 43
43
-
 44
44
-
 45
45
-
 46
46
-
 47
47
-
 48
48
-
 49
49
-
 50
50
-
 51
51
-
 52
52
-
 53
53
-
 54
54
-
 55
55
-
 56
56
-
 57
57
-
 58
58
-
 59
59
-
 60
60
-
 61
61
-
 62
62
-
 63
63
-
 64
64
-
 65
65
-
 66
66
-
 67
67
-
 68
68
-
 69
69
-
 70
70
-
 71
71
-
 72
72
-
 73
73
-
 74
74
-
 75
75
-
 76
76
-
 77
77
-
 78
78
-
 79
79
-
 80
80
-
 81
81
-
 82
82
-
 83
83
-
 84
84
-
 85
85
-
 86
86
-
 87
87
-
 88
88
-
 89
89
-
 90
90
-
 91
91
-
 92
92


KINGSLIM D5 Manuel utilisateur
- Catégorie
- Enregistreurs de disque
- Taper
- Manuel utilisateur
dans d''autres langues
- italiano: KINGSLIM D5 Manuale utente
- español: KINGSLIM D5 Manual de usuario
- Deutsch: KINGSLIM D5 Benutzerhandbuch
- 日本語: KINGSLIM D5 ユーザーマニュアル
Documents connexes
Autres documents
-
70mai Lite 2-Inch LCD Screen 1080P Resolution 24H Parking Monitor Manuel utilisateur
-
 BlueHive BH100 Le manuel du propriétaire
-
Ring RDC1000 Mode d'emploi
-
Ring RSDC4000 Mode d'emploi
-
Hikvision C6 Manuel utilisateur
-
iON DashCam Manuel utilisateur
-
VAVA VA-VD002 Manuel utilisateur
-
iON DashCam Wi-Fi Manuel utilisateur
-
Kenwood DRV-A301W Guide de démarrage rapide
-
Kenwood DRV-A501W Manuel utilisateur
