Schilling SP100+ Mode d'emploi
- Catégorie
- Imprimer
- Taper
- Mode d'emploi

Bedienungsanleitung SIGNOMAT S200
Operating Instructions SIGNOMAT S200
Mode d´opération SIGNOMAT S200

Bedienungsanleitung SIGNOMAT S200
Updated: 11-09
Operating instructions SIGNOMAT S200
Mode d´opération SIGNOMAT S200
2
VORWORT
Sehr geehrter Kunde,
Sie haben mit der Anschaffung der SCHILLING Beschriftungsanlage Signomat S200 eine gute Wahl getroffen, und
wir danken Ihnen für das Vertrauen, das Sie unserem Produkt entgegenbringen. Ihre Anlage würdigt dieses
Vertrauen, doch stellt sie von Anfang an eine Bedingung: Sie wünscht immer, auch unter den rauesten Bedingungen,
anständig behandelt zu werden. Deshalb gehört diese Bedienungsanleitung in die Hände des Bedienungspersonals.
Es wäre verfehlt, diese im Betriebsarchiv ein verstaubtes Dasein fristen zu lassen. Wir haben deshalb versucht Ihnen
alle Hinweise und Informationen zu geben, die für die Bedienung, Wartung und Überwachung der Anlage notwendig
sind.
Bitte lesen Sie diese Anleitung VOR DER INBETRIEBNAHME der Anlage aufmerksam durch und machen Sie sich
mit ihr vertraut.
Wenn Sie genau allen Anweisungen folgen, werden Sie Zeit sparen und Verlusten vorbeugen, und Sie werden mit
der Leistung der Anlage nach Jahren noch voll zufrieden sein.
Wir wünschen Ihnen erfolgreiche Arbeit und beste Ergebnisse mit Ihrer SCHILLING-Anlage.
Vielen Dank für Ihre Aufmerksamkeit und einen guten Start!
INTRODUCTION
Dear Customer,
You have made a good choice by purchasing a Signomat S200 Marking System. Thank you for your trust in our
product. Your system will honour this trust, but there will be one condition to satisfy right from the onset: The system
should always be treated with respect, even under the most ardent of conditions. Therefore, these Operating
Instructions should be kept with operators.
It would be a mistake to have these Operating Instructions rot away under heaps of dust. We have therefore
endeavoured to give you all the recommendations and information necessary for operating, servicing and monitoring
your system.
Please read these Instructions carefully PRIOR TO COMMISSIONING the system in order to become familiar with
them.
Following these Instructions precisely will save you time and prevent losses, and you will still be fully satisfied with the
system’s performance in years to come.
We wish you success in your work and optimal results by employing your SCHILLING System.
Thank you for your attention and have a good start!
INTRODUCTION
Cher client,
Vous avez fait un bon choix avec l’achat d’un système de marquage SIGNOMAT S200 de SCHILLING. Nous vous
remercions pour votre confiance en nos produits. Votre machine honore votre confiance, mais demande une
condition pour toujours fonctionner parfaitement. Elle souhaite, d’être manipulée avec précaution, même dans des
conditions difficiles.
Par conséquent, ce mode d’opération appartient aux mains de l’employeur. Ce serait une erreur, de laisser ce mode
d’opération atterrir aux archives!
C’est pourquoi, nous avons essayé de vous donner toutes les recommandations et informations qui sont nécessaires
à l’emploi, au service, et contrôle de votre machine.
Lisez, s’il vous plaît, attentivement ces instructions AVANT LA MISE EN MARCHE de la machine, et mettez vous en
confiance.
Si vous suivez exactement ces instructions, vous économiserez du temps et éviterez des faires des erreurs. Vous
serez satisfait de la performance de votre machine pendant des années.
Nous vous souhaitons du succès et de bons résultats avec votre machine SCHIILLING.
Nous vous remercions pour votre attention et bon départ!

Bedienungsanleitung SIGNOMAT S200
Updated: 11-09
Operating instructions SIGNOMAT S200
Mode d´opération SIGNOMAT S200
3
Inhalt:
1. Sicherheitshinweise 3
2. Bestimmungsgemäßer Gebrauch 3
3. Technische Daten 4
4. Herstellerinformation 4
-Hersteller 4
-Änderungen 4
-Vertraulichkeit 4
5. Maschine, Bedienelemente
Signomat S200 5/6
6. Transport, Montage und
Inbetriebnahme 6
7. Arbeiten mit dem Signomat S200 7
8. Arbeiten mit dem Zubehör 7
9. Verbesserung der Signierung 8
10.Kurzschluss und Überlast 8
11.Wartung und Pflege 8
Bestellwesen 9
-Stempel + Schablonen 9
-Elektrolytverwendungsliste/
Chemikalien 10/11
Diese Bedienungsanleitung ist eine wichtige
Grundlage für fachgerechte Bedienung und
Wartung der Geräte. Sorgen Sie deshalb dafür,
dass die Bedienungsanleitung für den Bediener
jederzeit verfügbar ist.
1) Sicherheitshinweise
Berühren Sie bei eingeschaltetem Gerät nie
direkt mit dem Handstempel die
Kontaktplatte des Signomat S200, sonst gibt
es einen Kurzschluss. Sollte dies doch
einmal geschehen sein, sehen Sie im
Abschnitt „Kurzschluss“ nach, was zu tun
ist.
Der SIGNOMAT S200 ist bei
bestimmungsgemäßem Gebrauch ungefährlich.
Trotzdem sollten Sie im Gebrauch der
Chemikalien einige Dinge beachten:
Benutzen Sie Gummihandschuhe.
Die Augen mit Schutzbrille vor Elektrolyt,
Neutralyt und Konservat schützen. Sollten die
Augen trotzdem einmal Kontakt mit den
Chemikalien haben, spülen Sie die Augen sofort
gründlich mit viel klarem Wasser, suchen Sie
einen Arzt auf.
Bei Haut- und Kleiderkontakt mit den
Chemikalien sind diese sofort mit Wasser zu
reinigen.
Essen und Trinken am Signierarbeitsplatz ist
verboten. Vor der Nahrungsaufnahme sind die
Hände zu waschen.
Halten Sie Kinder vom Gerät fern.
SIGNOMAT S200 nur in trockenen Räumen
betreiben.
Das Gerät kann mit einer Netzspannung von
230 Volt oder 115 Volt betrieben werden. Die
Umschaltung erfolgt automatisch beim
Einschalten.
Halten Sie explosive Gase vom Gerät fern.
Vor dem Öffnen des Gerätes Netzstecker
ziehen.
Quetsch- und Scherstellen sind weitestgehend
beseitigt.
2) Bestimmungsgemäßer Gebrauch
Die Geräte dienen ausschließlich der Signierung
metallischer Gegenstände. Die Funktion und ein
reproduzierbares Ergebnis ist nur mit Schilling
Zubehör gewährleistet.
Contents:
1. Safety instructions 3
2. Scope of application 3
3. Technical data 4
4. Manufacturer information 4
-Manufacturer 4
-Alterations 4
-Confidentiality 4
5. Machine, control elements
Signomat S200 5/6
6. Transport, installation and start-up 6
7. Working with the Signomat S200 7
8. Working with the accessories 7
9. Improving the marking results 8
10.Short circuit and overcharge 8
11.Servicing and maintenance 8
Ordering 9
-Stamps + stencils 9
-Use of Electrolytes/Chemicals 12/13
These operating instructions form is an
important prerequisite for the proper operation
and maintenance of the equipment. Therefore,
please ensure that the operating instructions are
kept available for the operating personnel at all
times.
1) Safety instructions
Never allow the manual stamp to touch the
contact plate of the Signomat S200 directly
when the machine is switched on, as this
results in a short circuit. Should this happen,
please refer to the section „Short circuit“ for
instructions.
When used properly, the SIGNOMAT S200 is
operationally safe. Still, a few points should be
noted for the handling of chemicals:
Use rubber gloves.
Eyes must be protected against electrolyte,
neutralyte and preserving agent. Should eyes
come into contact with the chemicals,
immediately rinse eyes thoroughly with clear
water and contact a physician.
Do not swallow electrolyte, neutralyte and
preserving agent. Should electrolyte be
swallowed, immediately drink a large glass of
clear water and contact a physician.
Should skin or clothing come into contact with
the chemicals, rinse immediately with water.
Eating or drinking at the workplace is prohibited.
Hands must be washed before eating.
Keep children clear of the machine.
Use the Signomat S200 in dry locations only.
This machine can be operated with 230 Volt or
115 Volt. The adaptation is carried out
automatically when switching on the device.
Keep explosive gases clear of the machine.
Disconnect the mains plug before opening the
machine.
Most points at which danger of injury exist have
been eliminated.
2) Scope of applications
The equipment is designed exclusively for
marking metallic objects. Proper function and a
reproducible result are guaranteed only when
Schilling accessories are used.
Sommaire:
1. Consignes de sécurité 3
2. Utilisation réglementaire 3
3. Caractéristique techniques 4
4. Informations concernant le fabricant 4
-Fabricant 4
-Modifications 4
-Confidentiel 4
5. Machine, éléments de commande
Signomat S200 5/6
6. Transport, montage et mise en service 6
7. Opération avec le Signomat S200 7
8. Opération avec les accessoires 7
9. Amélioration du marquage 8
10. Court-circuit et surcharge 8
11. Entretien et maintenance 8
Commandes 9
-Tampon + pochoir 9
-Utilisation des Électrolytes/
Produits électrochimiques 14/15
Ce mode d´utilisation contient les informations
essentielles pour assurer l´utilisation et
l´entretien des appareils, conformément aux
exigences techniques. Veillez à ce que ce mode
d´opération soit toujours à disposition de
l´utilisateur.
1) Consignes de sécurité
Lorsque l´appareil est en marche, ne jamais
mettre en contact le tampon manuel avec la
plaque porte-contact du Signomat S200,
sinon il y a un court-circuit. En cas de court-
circuit, consultez le paragraphe „court-
circuit“ afin de savoir procéder.
Le SIGNOMAT S200 est sans dangers dans la
mesure où il est utilisé correctement.
Cependant, vous devez prendre certaines
remarques en considération lors de l´utilisation
des produits électrochimiques:
Utilisez des gants en caoutchouc. Portez des
lunettes protectrices afin de protéger vos yeux
contre les effets de l´électrolyte, du neutralyte et
du produit de conservation. Dans le cas où des
produits électrochimiques vous pénètrent dans
les yeux, rincez les grandes eaux claires et
consultez un médecin. Ne pas avaler de
l`électrolyte, du neutralyte ou du produit de
conservation. Si vous avez avalé de
l´électrolyte, buvez un grand verre d´eau claire
et consultez un médecin. Si les produits
électrochimiques entrent en contact avec la
peau ou les vêtements, nettoyez aussitôt avec
de l´eau. Il est interdit de manger et de boire au
poste de travail de marquage. Se laver les
mains avant de consommer de la nourriture.
L´électrolyte peut être éliminée dans les eaux
d´évacuation. Tenir les enfants à distance de
l´appareil.
Mettre l´appareil Signomat S200 en exploitation
uniquement dans les locaux secs. La machine
fonctionne avec 230 Volt ou 115 Volt. Le
basculement s’effectue automatiquement
pendant la mise en marche de la machine.
Tenez les gaz explosifs à distance de l´appareil.
Avant d´ouvrir l´appareil, retirer la prise secteur.
Dans une large mesure, les risques de coupure
et d´écrasement ont été éliminés..
2) Utilisation réglementaire
Les appareils servent exclusivement à marquer
les objets métalliques. L´appareil fonctionne et
garantit un bon résultat de reproduction
uniquement lorsqu´on utilise les accessoires de
la société Schilling.

Bedienungsanleitung SIGNOMAT S200
Updated: 11-09
Operating instructions SIGNOMAT S200
Mode d´opération SIGNOMAT S200
4
3) Technische Daten
Typ: SIGNOMAT S200
Fabrikations Nummer: siehe Typenschild
Baujahr: siehe Typenschild
Abmessungen:
B x H x T 260 x 95 x 250 mm
Betriebsspannung: 230 V/115 V 50/60 Hz
Signierspannung: 12 V
Signierart: hell/dunkel
Nennleistung: 40 VA
Gewicht: 3,9 kg
Sicherung: 5 A autom. Stromüberwachung
1,00 A Schmelzsicherung 5x20mm
Geräuschpegel: 20 dB
4) Herstellerinformation
Schilling Marking Systems GmbH
In Grubenäcker 1
DE-78532 Tuttlingen Deutschland
Telefon: +49 (0)7461 9472-0
Fax: +49 (0)7461 9472-20
eMail: [email protected]
Homepage: www.schilling-marking.de
Änderungen:
Technische Änderungen vorbehalten. Ihre
Maschine kann sich deshalb in einigen Details
von den Abbildungen in diesem Handbuch
unterscheiden. Dies nimmt jedoch keinen
Einfluss auf die Bedienung der Maschine.
Die mit “ * “ gekennzeichneten Positionen sind
optional und nur bei entsprechender Bestellung
im Lieferumfang enthalten.
Vertraulichkeit:
Diese Bedienungsanleitung ist vertraulich zu
behandeln. Sie ist ausschließlich zur
Verwendung in Ihrem Betrieb durch befugte
Personen bestimmt. Die Überlassung an Dritte
ist verboten und verpflichtet zum
Schadenersatz. Alle Rechte, auch die der
Übersetzung, sind vorbehalten. Kein Teil dieser
Bedienungsanleitung darf in irgendeiner Form
ohne schriftliche Genehmigung des Hauses
Schilling reproduziert oder
unter Verwendung
elektronischer Systeme verarbeitet werden.
3) Technical data
Type: SIGNOMAT S200
Factory number: see nameplate
Year of construction: see nameplate
Dimensions:
W x H x L 260 x 95 x 250 mm
Operating voltage: 230 V/115 V 50/60 Hz
Marking voltage: 12 V
Type of mark: light/dark
Rate power: 40 VA
Weight: 3.9 kg
Fusing: 5 A autom. power control
1.00 A fuse 5x20 mm
Noise level: 20 dB
4) Manufacturer information
Schilling Marking Systems GmbH
In Grubenaecker 1
DE-78532 Tuttlingen Germany
Telephone: +49 (0)7461 9472-0
Facsimile: +49 (0)7461 9472-20
Facsimile: [email protected]
Web: www.schilling-marking.com
Alterations:
Technical alterations reserved. Your machine
may therefore deviate in details from the
illustrations in the manual. This does not affect
the operation of the machine.
The “ * ” marked positions are optional and have
to be ordered separately.
Confidentiality:
These operating instructions are to be treated
confidentially. They have been provided only for
use in your operation by authorized persons.
The transfer of this document to third parties is
prohibited and may result in damages claims. All
rights, including the right to translation, are
reserved. No portion of these operating
instructions may be reproduced in any form or
processed by means of electronic systems
without written permission by Schilling.
3) Caractéristiques techniques
Type: SIGNOMAT S200
Numéro de fabrication: voir plaquette
Année de fabrication: voir plaquette
Dimensions:
L x H x L 260 x 95 x 250 mm
Tens. d´exploitation: 230 V/115 V 50/60 Hz
Tension de marquage: 12 V
Type de marquage: foncé/clair
Puissance nominale: 40 VA
Poids: 3,9 kg
Fusible: 5 A contrôle autom. du courant
fusible 1,00 A 5x20 mm
Niveau de bruit: 20 dB
4) Informations concernant le fabricant
Schilling Marking Systems GmbH
In Grubenaecker 1
DE-78532 Tuttlingen Allemagne
Téléphone: +49 (0)7461 9472-0
Télécopie: +49 (0)7461 9472-20
eMail: [email protected]
Page d’accueil: www.schilling-marking.com
Modifications:
Sous réserve de modifications techniques. Il se
peut que, pour quelques détails, votre machine
soit différente du modèle représenté dans les
illustrations de ce manuel. Cela n´a cependant
aucun effet sur l´utilisation de la machine.
Les positions marquées avec “ * “ ne sont que
des options et ne sont comprises dans la
livraison uniquement si spécifier dans la
commande.
Confidentiel:
Ce mode d´opération doit être traité
confidentiellement. Il est exclusivement destiné
à une utilisation interne, dans votre entreprise,
par du personnel en ayant l´autorisation. Il est
interdit de le remettre à un tiers sous peine de
dommages intérêts. Tous droits réservés, y
compris ceux de traduction. Il est interdit de
traiter par systèmes électroniques ou de
reproduire une partie de ce mode d´opération,
sous quelque forme que se soit, sans
l´autorisation écrite de la société Schilling.
La page est en cours de chargement...

Bedienungsanleitung SIGNOMAT S200
Updated: 11-09
Operating instructions SIGNOMAT S200
Mode d´opération SIGNOMAT S200
6
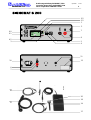
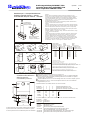
5) Maschine, Bedienelemente SIGNOMAT
S200
Die Hauptteile und Bedienungselemente finden
Sie auf Seite 5 abgebildet.
1 Gelbe Leuchte „Betriebsbereitschaft“
2 Grüne Leuchte „Signierstrom an“
3 Rote Leuchte „Überstromanzeige“
4 Umschalter für den Betriebsmodus
4.2 Anzeige des Betriebsmodus
5 Auswahl hell / dunkel (Tabelle beachten)
5.2 Anzeige der Stromart
7 Rote Anschlussbuchse für das Werkstück
8 Schwarze Anschlussbuchse für den
Signierstempel
9.0 Signierzeit vergrößern
9.1 Signierzeit verkleinern
9.2 Anzeige der Signierzeit (0,1 bis 9,9
Sekunden und unendlich)
10 Ein/Aus - Schalter
11 Anschlussbuchse für den Fußschalter
13 Typenschild
14 Handstempel
15 Kontaktklemme
16 Rotes Kabel
17 Schwarzes Kabel
18 Fußschalter mit Kabel und Stecker*
19 Netzkabel
20 Filz und O-Ring
6) Transport, Montage und Inbetriebnahme
Bewahren Sie die Verpackung auf und
verwenden Sie diese zum Transport wieder.
Achten Sie darauf, dass alles Zubehör
mitverpackt wird und die Flüssigkeitsflaschen
sorgfältig verschlossen sind. Ausgelaufene
Flüssigkeiten sollten unter Verwendung von
Gummihandschuhen, Putztuch und Wasser
aufgewischt werden. Beachten Sie dabei die
Sicherheitshinweise unter Kapitel 1.
Schließen Sie den Signomat mit dem Netzkabel
19 an die Netzspannung an. Schalten Sie das
Gerät auf der Rückseite mit dem Schalter 10 ein.
Das Gerät stellt sich automatisch auf die
anliegende Netzspannung um, erkennt alle
angeschlossene Komponenten und stellt den
entsprechenden Betriebsmodus ein. Die Lampe
1 muss leuchten. Stecken Sie das schwarze
Kabel 17 in den Stempel 14 und in die schwarze
Buchse 8 des Gerätes. Wählen Sie mit dem
Taster 5, ob Sie hell oder dunkel signieren
möchten. Jedes Drücken der Taste schaltet die
Stromart um. Sie wird im Display 5.2 angezeigt.
Wählen Sie mit dem Taster 4 den Signiermodus
aus. Jedes Drücken der Taste schaltet in einen
anderen Modus um. Er wird im Display 4.2,
grafisch (Handstempel oder Handstempel mit
Fußschalter), angezeigt. Prüfen Sie, ob der
Stempel 14 mit Filz und O-Ring 20 ausgestattet
ist. Wählen Sie in Anlehnung an die beiliegende
Tabelle „Elektrolytverwendungsliste“ den für Ihr
Werkstück-Metall richtigen Elektrolyten. Die
Signierdauer wird mit der Taste 9.0 vergrößert
und mit der Taste 9.1 verkleinert. Die eingestellte
Signierzeit kann auf dem Display 9.2 abgelesen
werden. Der Bereich liegt zwischen 0,1 – 9,9 s
(empfohlene Signierzeit 1x4s,
oberflächenbehandelte z.B. brünierte Teile 2x4s).
Befeuchten Sie den Filz mit etwas Elektrolyt.
5) Machine, control elements Signomat S200
The main parts and control elements are
illustrated on page 5.
1 Yellow lamp „ready for operating“
2 Green lamp „marking current on“
3 Red lamp „marking current too high“
4 Working mode selection
4.2 Display of working mode
5 Current selection light / dark (see table)
5.2 Display of current selection
7 Red connector socket for workpiece
8 Black connector socket for stamp
9.0 Increment marking time
9.1 Decrement marking time
9.2 Display of marking time (0.1 to 9.9 seconds
and unlimited)
10 On/off switch
11 Connection socket for foot switch
13 Nameplate
14 Manual stamp
15 Contact clamp
16 Red cable
17 Black cable
18 Foot switch with cable and plug*
19 Mains cable
20 Felt piece and O-ring
6) Transportation, installation and start up
Save packaging and use for later transportation.
Ensure that all accessories are packed with the
machine, and that bottles containing fluids are
sealed carefully. Rubber gloves, a cloth and
water should be used to clean up spilled fluids.
Please refer to the safety instructions given in
Section 1.
Connect the Signomat to mains voltage by
means of the mains cable 19. Switch the
machine on at the rear by means of switch 10.
The machine switches automatically to the local
mains voltage, recognizes the connected
components and adjusts to the corresponding
operating mode. Lamp 1 should light up. Plug the
black cable 17 into the stamp 14 and into black
socket 8 of the machine. Use switch 5 to choose
either light or dark marking. Each push of the key
changes the type of current. It is shown on the
display 5.2
. Use switch 4 to select the marking
modus. Each push of the key changes over to a
different modus. It is shown as a graphic on the
display 4.2: (Hand stamp or hand stamp with foot
switch). Check whether stamp 14 is equipped
with felt piece and O-ring 20. Select the correct
electrolyte for the metal of the workpiece
according to the attached table “Use of
Electrolytes”. Use switch 9.0 to extend the
marking time and switch 9.1 to reduce it. The
selected marking time is shown on the display
9.2. It may range from 0.1 to 9.9 s
(recommended marking time is 1x4s, or 2x4s for
surface treated parts e.g. black oxide). Moisten
the felt piece with electrolyte.
5) Machine, éléments de commande
Signomat S200
Les composants principaux et les éléments de
commande sont représentés à la page 5.
1 Voyant jaune, état de marche
2 Voyant vert, courant pour le marquage
enclenché
3 Voyant rouge «surintensité de courant»
4 Sélection du mode d’opération
4.2 Indication du mode d’opération
5 Commutateur clair/foncé (consulter le
tableau)
5.2 Indication du mode courant
7 Douille de raccordement rouge pour la pièce
à marquer
8 Douille de raccordement noire pour le
tampon
9.0 Augmenter le temps de marquage
9.1 Diminuer le temps de marquage
9.2 Indication pour la durée de marquage (0,1 à
9,9 secondes et illimité)
10 Interrupteur marche/arrêt
11 Douille de raccordement pour l´interrupteur
à pédale.
13 Plaque signalétique
14 Tampon manuel
15 Pince de contact
16 Câble rouge
17 Câble noir
18 Interrupteur à pédale avec câble et prise*
19 Cordon électrique
20 Feutre et anneau torique d´étanchéité
6) Transport, montage et mise en service:
Conservez l´emballage et réutilisez le pour le transport.
Prenez garde à ce que tous les accessoires soient
emballés avec l´appareil et que la bouteille de produits
fluides soit fermée avec précaution. Essuyer les produits
fluides qui se sont échappés en utilisant des gants en
plastique, un chiffon et de l´eau. Respectez les consignes
de sécurité présentées au chapitre 1.
Raccordez le Signomat à la tension secteur en utilisant le
câble secteur 19. Enclenchez l´appareil au moyen de
l´interrupteur 10 se trouvant au dos de l´appareil. La
machine s’adapte automatiquement à la tension de
réseau locale, reconnaît tous les composants connectés
et ajuste le mode d’opération correspondant. La lampe 1
doit s´allumer. Branchez le câble noir 17 au tampon 14
dans la douille noire 8 de l´appareil. Sélectionnez au
moyen de l´interrupteur 5 le type de marquage que vous
voulez effectuer, clair ou foncé. Chaque pression sur la
touche change le type de marquage qui est indiqué sur
l’écran 5.2. Sélectionnez au moyen de l’interrupteur 4 le
mode de marquage. Chaque pression sur la touche
change le mode de marquage qui est indiqué sur l’écran
4.2 comme un symbole (tampon manuel ou tampon
manuel avec interrupteur à pédale). Contrôlez si le
tampon 14 est équipé de feutre et de l´anneau torique
d´étanchéité 20. A l´aide du tableau „utilisation des
électrolytes“ ci-joint, sélectionnez l´électrolyte adaptée au
métal de votre pièce à marquer. Augmentez la durée de
marquage avec la touche 9.0 et diminuez la durée de
marquage avec la touche 9.1. La durée sélectionnée est
indiquée sur l’écran 9.2. Le gamme est entre 0,1 et 9,9 s
(durée de marquage recommandée 1x4s, surface traitée
p. ex. pièce brunir noire 2x4s). Humidifiez le feutre avec
un peu d´électrolyte.

Bedienungsanleitung SIGNOMAT S200
Updated: 11-09
Operating instructions SIGNOMAT S200
Mode d´opération SIGNOMAT S200
7
7) Arbeiten mit dem Signomat S200
Wählen Sie in Anlehnung an die beiliegende
Tabelle „Elektrolytverwendungsliste“ den für
Ihr Metallwerkstück richtigen Elektrolyt
(empfohlene Signierzeit 1x4s,
oberflächenbehandelte z.B. brünierte Teile
2x4s). Benetzen Sie den Filz am Stempel und
die Schablone vorsichtig und gleichmäßig mit
dem richtigen Elektrolyt. Der Filz muss
gleichmäßig befeuchtet sein, darf aber nicht
tropfen. Drücken Sie den Handstempel
senkrecht von oben mit der ganzen Fläche
gleichmäßig auf die Schablone. Wenn Sie
ohne Fußschalter arbeiten, schaltet sich der
Signierstrom jetzt von selbst ein. Wenn Sie
den Fußschalter verwenden und ihn an die
Buchse 11 angeschlossen haben, fließt erst
dann der Signierstrom, wenn der Stempel mit
dem Werkstück Kontakt hat und Sie den
Fußschalter 18 betätigt haben.
Wischen Sie Elektrolytreste mit dem
neutralytfeuchten Tuch ab. Korrosionsanfällige
Metalle werden mit Neutralyt N2 neutralisiert
und mit Konservat K1 geschützt. Welcher
Elektrolyt für Ihren Werkstoff geeignet ist,
entnehmen Sie bitte der beiliegenden Tabelle.
Um Oxidationsprobleme (Rost) zu
vermeiden, empfehlen wir dringend, dass Sie
mit den Chemikalien sehr sauber arbeiten.
Vor allem dürfen Sie nicht das Werkstück mit
den Händen berühren, wenn Elektrolytreste
an Ihren Händen sind
(Elektrolytverschleppung). Bei Stählen mit
hohem Kohlenstoffgehalt ist ein sauberes
Neutralisieren, Ultraschall-reinigen und/oder
Überziehen mit einem Ölfilm oder
unserem
Konservat dringend angeraten.
Bei Schablonen, die größer als der
Handstempel sind, wenden Sie das
Streichverfahren an: Stellen Sie eine Signierzeit
größer 9.9s oder kleiner 0,1s ein, arbeitet das
Gerät mit Dauerstrom und dieses Symbol
erscheint im Display „OO“. Statt mit dem
Handstempel unbeweglich auf die Schablone
und das Werkstück zu drücken, streichen Sie
gleichmäßig mit dem Handstempel in eine
Richtung über die Schablone von einem Ende
zum anderen. Erarbeiten Sie so die
Geschwindigkeit, die für eine gute Signierung
bei einmaligem Streichen benötigt wird. Wenn
Sie die Signierung dunkler wünschen, können
Sie mehrmals über die Schablone und das
Werkstück streichen.
8) Arbeiten mit dem Zubehör
Die Kontaktklemme 15 hilft Ihnen, wenn Sie
sperrige Werkstücke signieren wollen. Klemmen
Sie die Kontaktklemme am Werkstück an,
stecken Sie das rote Kabel 16 auf die
Kontaktklemme und die rote Buchse 7 und
signieren Sie das Werkstück wie gewohnt mit
Schablone und Handstempel.
Kundenspezifische Aufbaueinheiten sind als
Zubehör extra erhältlich und erleichtern Ihnen
das passgenaue Signieren, weil die Schablone
und das Werkstück vom Aufbau exakt gehalten
werden. Legen Sie das Werkstück in die
Werkstückaufnahme (auswechselbar und
gegebenenfalls kundenspezifisch) der
Aufbaueinheit und justieren Sie mit den
Einstellschrauben die Schablone. Schließen Sie
die Werkstückaufnahme des Aufbaues mit dem
roten Kabel 16 an die rote Buchse 7 an und
signieren Sie wie gewohnt mit dem
Handstempel das Werkstück.
7) Working with the Signomat S200
Select the correct electrolyte for the metal of the
workpiece according to the provided table “Use
of Electrolytes” (recommended marking time
1x4s, surface treated parts e.g. black oxide
2x4s). Carefully and evenly moisten the felt
piece on the stamp and the stencil with the
selected electrolyte. The felt must be evenly
moistened with the electrolyte and should not
drip. Position the moistened marking stencil with
the desired text on the workpiece. Press the
manual stamp downward vertically, ensuring
that the entire surface contacts the stencil
evenly. If foot switch is not used, the marking
current is now automatically switched on. If foot
switch
is used and connected to socket 11,
marking current is switched on only after the
stamp has made contact with the workpiece and
foot switch 18 has been activated.
Wipe away remaining electrolyte using a cloth
moistened with neutralyte. Metals which corrode
are neutralised by neutralyte N2 and protected
by preserving agent K1. The electrolyte suitable
for the workpiece material used is listed in the
provided table.
In order to avoid oxidation (rust), we urgently
recommend that chemicals are handled with
extreme care. Above all, never touch the
workpiece with your hands when traces of
electrolyte are on your hands (electrolyte
may be carried over). For steel with high
carbon content, thorough neutralization,
cleaning by ultrasound and/or coating with a
film of oil or a preserving agent is highly
recommended.
Apply the stroking method for stencils which are
larger than the manual stamp. Set the marking
time either on more than 9.9s or less than 0.1s
to operate the machine with continuous current.
This is shown with the symbol „OO“ on the
display. Instead of pressing the manual stamp
on the stencil and workpiece without movement,
press the manual stamp on the stencil while
moving in one direction from one end to the
other. Determine the speed required to obtain
satisfactory marking results with one stroke in
this manner. If the marking should be darker,
the stamp may be stroked over the stencil and
workpiece several times.
8) Working with accessories
Contact clamp 15 is provided for marking bulky
objects. Clamp the contact clamp onto the
workpiece, connect the red cable 16 to the
contact clamp and red socket 7, and mark the
workpiece using stencil and manual stamp as
described above.
Add-on assemblies constructed according to
customer specification are additionally available
as accessory equipment, and facilitate exact
marking by holding the stencil and workpiece in
a precisely defined position. Place the
workpiece in the workpiece receiver
(exchangeable and constructed according to
customer specification on request) of the add-on
assembly and adjust the stencil using the
adjusting screw. Connect the workpiece receiver
on the add-on assembly to the red socket 7
using the red cable 16, and mark the workpiece
using the manual stamp as described above.
7) Opération avec le Signomat S200
A l´aide du tableau „utilisation des électrolytes“
ci-joint, sélectionnez l´électrolyte adaptée au
métal de votre pièce à marquer (durée de
marquage recommandée 1x4s, surface traitée
p. ex. pièce brunir noire 2x4s). Humidifiez avec
précaution et régulièrement le feutre du tampon
et le pochoir avec l´électrolyte correcte. Le
feutre doit être humidifié régulièrement avec
l´électrolyte mais il ne doit pas goutter. Ensuite,
placez le pochoir de marquage humide dans la
position souhaitée, votre texte étant placé sur la
pièce. Appliquez le tampon manuel
verticalement, à partir du haut, sur toute la
surface, en l´appuyant régulièrement sur le
pochoir. Si vous travailler sans l´interrupteur à
pédale le courant pour le marquage maintenant
s’enclenche automatique. Si vous avez utilisé
l´interrupteur à pédale 18 et que vous l´avez
raccordé à la douille 11, le courant pour le
marquage s´enclenche lorsque le tampon est en
contact avec la pièce à marquer et que vous
avez actionné l´interrupteur à pédale 18.
Essuyez les restes d´électrolyte avec un chiffon
humidifié de neutralyte. Les métaux sensibles à
la corrosion sont neutralisés avec neutralyte N2
et protégés en appliquant du produit de
conservation K1. Le tableau ci-contre, vous
indique quelle sorte d´électrolyte est adaptée à
la matière Première que vous utilisez.
Afin d´éviter des problèmes d´oxydation
(rouille), nous vous recommandons de
travailler très proprement avec les produits
électrochimiques. Surtout, vous ne devez
pas toucher la pièce à marquer avec les
mains lorsque celle-ci présente encore des
restes d´électrolyte (entraînement de
l´électrolyte). Pour les aciers à haute teneur
en carbone, il est fortement recommandé
d´effectuer une neutralisation propre,
d´effectuer un nettoyage par ultrasons et/ou
d´appliquer une pellicule d´huile ou de
produit de conservation.
Concernant les pochoirs de dimensions
supérieures à celles du tampon, utilisez le
procédé d´application: Ajustez le temps de
marquage >9.9s ou <0.1s pour travailler avec
courant permanent («infini»). Il est indiqué sur
l’écran avec le symbole „OO“. Au lieu d´appuyer
le pochoir de manière fixe sur le pochoir et sur
la pièce à marquer, appliquez le tampon manuel
régulièrement dans une direction sur le pochoir
d´une extrémité à l´autre. Réglez donc de cette
manière la vitesse qui est nécessaire pour
garantir un marquage correct en effectuant une
seule application. Si vous désirez obtenir un
marquage plus foncé, vous pouvez effectuer
plusieurs fois une application sur le pochoir et la
pièce à marquer.
8) Opérations avec les accessoires
La pince de contact 15 vous permet de marquer
des pièces de grandes dimensions. Serrez la
pince de contact sur la pièce à marquer,
branchez le câble rouge 16 à la pince de
contact et dans la douille rouge 7 et marquez
comme d´habitude la pièce avec le pochoir et
avec le tampon manuel.
Les unités d´extension spécifiques à vos
besoins sont disponibles en tant qu´accessoires
spéciaux et vous facilitent la précision de
marquage, étant donné que le pochoir et la
pièce à marquer sont maintenus de manière
exacte par l´unité. Placez la pièce à marquer sur
le support de pièces (remplaçable et le cas
échéant spécifique à vos besoins) de l´unité
d´extension et ajustez le pochoir au moyen des
vis de réglage. Raccordez le support de pièces
à l´unité au moyen au câble rouge 16 à la
douille rouge 7 et marquez la pièce comme
d´habitude avec le tampon manuel.

Bedienungsanleitung SIGNOMAT S200
Updated: 11-09
Operating instructions SIGNOMAT S200
Mode d´opération SIGNOMAT S200
8
9) Verbesserung der Signierung
Vor dem ersten Signieren ist die Schablone
ohne Strom mit Elektrolyt benetzen. Ein
trockener Filz verhindert den Stromfluss, die
Signierung wird sehr schlecht. Eingetrocknetes
Elektrolyt und Neutralyt versalzen die
Maschine, dadurch ist der Stromfluss
behindert. Die Signierung wird schlecht.
Deshalb ist reinigen mit klarem Wasser täglich
Pflicht. Die Schablonen müssen regelmäßig
und behutsam zwischen zwei Fingern unter
Wasser gesäubert werden, da sie durch
Metallrückstände verschmutzt werden. Auch
den Stempel und die Werkstückaufnahme
regelmäßig mit Wasser reinigen. Bei starker
Verschmutzung ist sie mit Schilling
Schleifreiniger (Art.Nr: 22.165) zu behandeln.
Sorgen Sie dafür, dass Ihnen für Ihr Metall der
richtige Elektrolyt zur Verfügung steht (siehe
beiliegende Elektrolytverwendungsliste auf
Seiten 10/11). Bestimmte Materialien, z.B.
Hartmetall, müssen mit Konservat K1 (Art.Nr:
22.111) geschützt werden. Kleine Flächen
durch einfache Andrucktechnik signieren.
Große Flächen von Hand mit Abstreichtechnik
signieren.
Die Schablone darf sich nicht zu stark
erwärmen, da sie sonst vorzeitig verschleißt
oder der Elektrolyt verdampft. Bei Signierzeiten
ab 5s treten Temperaturen von 120°C und
mehr in der Schablone auf. Das Signierbild wird
schlecht und die Schablone „wellt“ sich. Die
Schablone muss ausgetauscht werden. Im
Normalbetrieb haben die Langzeitschablonen
eine Standzeit von 2000-3000 Signierungen.
Gedunkelte Filze regelmäßig ersetzen. Der
Filz dunkelt umso mehr, je größer das
Signierbild ist.
10) Kurzschluss und Überlast
Der Signomat besitzt eine elektronische
Signierstromüberwachung. Sie schaltet, bei
Kurzschluss oder Überlast, den Signierstrom
innerhalb von Sekundenbruchteilen ab und löst
ein akustisches und optisches Warnsignal aus.
Nach fünf Sekunden ist das Gerät für die
nächste Signierung wieder einsatzbereit.
Eine Netzsicherung befindet sich auf der
Platine. Sollte diese durchgebrannt sein muss
das Gerät im Werk überprüft werden. Prüfen
Sie grundsätzlich die Netzverbindung. Sollte
kein Signierstrom fließen, ist zu prüfen, ob die
Kabel durch Abknicken unterbrochen sind;
dann sind die Kabel sofort durch original
Schilling Ersatzkabel auszutauschen.
11) Wartung und Pflege
Signomat:
Der Signomat ist wartungsfrei. Den Stempel,
den Filz und die Kontaktplatte oder die
Werkstückaufnahme nach jedem Arbeitstag mit
Wasser gründlich reinigen. Schablonen haben
eine Standzeit von bis zu 3000 Signierungen.
Den Stempel bei starker Abnutzung ersetzen.
Filze täglich gegen neue austauschen.
9) Improving marking results
Before the first marking procedure, moisten the
stencil with electrolyte when current is switched
off. Dry felt impedes current conduction, and the
resulting mark is extremely poor. Dried
electrolyte and Neutralyt result in salt deposits in
the machine; this also impedes current
conduction, causing poor marking results. For
this reason, daily rinsing with clear water is
necessary. Stencils soiled by metallic residue
must be cleaned carefully and at regular
intervals. To do this, hold the stencil carefully
between two fingers under water and clean. The
stamp and work piece receiver must also be
cleaned with water at regular intervals. In case
of extreme soiling, clean with Schilling abrasive
cleaner (Art. No: 22.165).
Ensure that the electrolyte suitable for the metal
to be marked is on hand (see attached list Use
of Electrolytes pages 12/13). Certain materials,
e.g. hard metal, must be protected by preserving
agent K1 (Art. No: 22.111). Mark small surfaces
using the simple pressing method. Mark larger
surfaces manually using the stroking method.
To avoid premature wear and to prevent the
electrolyte from evaporating, the stencil should
not be heated excessively. Using marking times
over 5s causes the material of the stencil to gum
up to temperatures of over 120°C. This causes
poor marking results and stencil turns “wavy”.
The stencil must than be replaced. In normal
operation, the stencils with long service life are
good for 2000-3000 marking procedures. Felt
which has darkened must be replaced at
regular intervals. Darkening of the felt
increases with the size of the marking image.
10) Short circuits and overcharge
The Signomat is equipped with an electronic
controller of the marking current. In case of a
short circuit or overcharge, it switches off the
marking current within fractions of a second and
triggers an acoustic an optical warning signal.
After five seconds, the machine is ready to be
used for the next marking.
The board is equipped with a mains fuse. Have
the machine checked by Schilling in case that
this fuse is burnt. Generally check the mains
connection. Should no marking power be
available, check whether the cables are kinked
and therefore interrupted. If so, immediately
replace cables with original Schilling
replacement cables.
11) Servicing and maintenance
Signomat:
The Signomat is maintenance-free. The stamp,
the felt piece and contact plate or workpiece
receiver must be cleaned thoroughly with water
after each working day. Stencils have a service
life of 2000-3000 marking procedures. Replace
the stamp when it shows signs of excessive
wear. Replace the marking felts daily.
9) Amélioration du marquage
Avant le premier marquage, humidifier le
pochoir avec l´électrolyte, sans courant. Un
feutre sec empêche le flux du courant, le
marquage est très mauvaise qualité. De
l´électrolyte et du neutralyte séchés sur la
machine, empêche le courant de s´écouler. Le
marquage est alors de mauvaise qualité. Pour
cette raison, il faut effectuer un nettoyage
quotidien avec de l´eau claire. Il faut nettoyer
régulièrement et avec précaution les pochoirs
en les maintenant sous l´eau avec deux doigts,
étant donné qu´ils peuvent être salis par des
restes de métal. Nettoyer également sous l´eau
le tampon et le support de pièces. Dans le cas
où ils sont très sales, les traiter avec le gomme
nettoyante Schilling (Art.No.: 22.165).
Veillez à disposer de l´électrolyte appropriée
pour votre métal (voir tableau sur pages 14/15).
Certains matériaux, comme par ex. le métal dur,
doivent être protégés avec un produit de
conservation K1 (Art.No.: 22.111). Marquer les
petites surfaces en utilisant une technique
d´application simple. Marquer les surfaces de
grandes dimensions, à la main, en utilisant la
technique d´application.
Le pochoir ne doit pas se réchauffer trop
fortement sinon il s´use prématurément ou
l´électrolyte s´évapore. Des temps de marquage
dépassant 5s comportent un échauffement
dépassant 120°C sur le pochoir et le tissu du
pochoir colle. Le marquage est alors de
mauvaise qualité. Il faut remplacer le pochoir.
Dans des conditions d´exploitation normales, les
pochoirs de longue durée ont un temps
d´utilisation permettant d´effectuer 2000-3000
marquages. Remplacer régulièrement les
feutres encrassés. Plus le marquage est
grand, plus le feutre s´encrasse.
10) Court-circuit et surcharge
Le Signomat a un contrôle électronique du
courant de marquage. Il coupe le courant de
marquage depuis une fraction d’une seconde en
cas d’un court-circuit ou d’un surcharge. Un
signal acoustique et optique est déclenché.
Après 5 seconds, la machine est prête pour le
prochain marquage. Sur la platine se trouve un
fusible de secteur. En cas d’une combustion de
ce fusible, le Signomat doit être contrôlé par
Schilling. En générale, il doit contrôler le
raccordement de réseau. S´il n´y a pas de
courant pour le marquage, contrôlez si les
câbles ne sont pas pliés ou rompus; il faut alors
aussitôt remplacer les câbles par des câbles de
remplacement d´origine, de la société Schilling.
11) Entretien et maintenance
Signomat:
Le Signomat n´a pas besoin d´entretien. A la fin
de chaque journée de travail, nettoyer à fond
avec de l´eau le tampon, le feutre et la plaque
porte-contact ou le support de pièces. Les
pochoirs ont un temps d´utilisation permettant
d´effecteur jusqu´à 3000 marquages. En cas de
forte usure, remplacer le tampon. Remplacez
les feutres quotidiennement.

Bedienungsanleitung SIGNOMAT S200
Updated: 11-09
Operating instructions SIGNOMAT S200
Mode d´opération SIGNOMAT S200
9
29.
34.
Deutsch:
Wählen Sie den Handstempel oder den Maschinenstempel aus und
notieren Sie sich die ersten beiden Zahlen als Bestellnummer-Anfang. Aus
unterstehender Tabelle bestimmen Sie die Maße des Stempels, wählen
eine der Stempelformen A bis I aus und ergänzen die Bestellnummer. Bei
Stempel B, C, E, F, G und H und geben Sie zusätzlich noch den
gewünschten Durchmesser an.
Bestell-Beispiel: 34.806 C 8 = Maschinenstempel / Maße 50x15x25mm /
Form C / konkav für Durchmesser 8 mm.
English:
Select the manual stamp or machine stamp and note the first two numbers;
these are the first two digits of the ordering number. Use the table provided
below the determine the dimensions of the stamp; select a stamp shape
from A to I and complete the ordering number. Please specify the desired
diameter for stamp shapes B, C, E, F, G and H.
Example: 34.806 C 8 = machine stamp / dimensions 50x15x25mm / shape
C / concave for 8 mm diameter
Francais:
Choisissez le tampon ou le tampon mécanique et notez les deux premiers
chiffres au début du numéro de commande. Le tableau ci-dessous vous
permet de déterminer les dimensions du tampon, choisissez une des
formes de tampons de A à I et complétez le numéro de commande. Pour
les tampons B, C, E, F, G et H et indiquez également le diamètre souhaité.
Example de commande: 34.806 C 8 = timbre mécanique / dimensions
50x15x25mm / forme C / concave pour un diamètre de 8 mm.
In Grubenäcker 1
D-78532 Tuttlingen
Tel.: +49 (0)7461 9472-0
b
a
15 mm
65 mm
39,5 +/- 1 mm
123456
4
2
1
3
1 Repro Preis X € / Price for repros X € / Prix repro X €
2 Fotosatz einzeilig Y € / Price for phototypesetting, one line Y €/ Photocomposition,
prix Y € pour une ligne (mehrzeilig auf Anfrage/several lines available on request/
plusieurs lignes, sur demande)
3 Signierschablone Preis Z € / Price for marking stencil Z € / Pochoir à marquer, prix Z €
4 Nachbestell-Nr. Preis Z € / Price for subsequent orders Z € / No. de commande
supplémentaire, prix Z €
Normalschablonen / Standards stencils / Pochoirs normaux
FO 40 40 30 < 30
FO 50 50 40 < 40
FO 60 60 50 < 50
FO 80 80 70 < 70
FO 100 100 90 < 90
Sonderschablonen mit speziellen Rahmungen auf Anfrage
Special stencils with special frames available on request
Pochoirs spéciaux avec encadrement spécial sur demande
Standardmaße
Standard dimensions
Dimensions standard
Höhe
Height
Hauteur 25 mm
Breite
Width
Largeur 15 mm
.800 15 .805 45
.801 20 .806 50
.811 25 .807 55
.802 30 .808 60
.803 35 .809 80
.804 40 .810 100
Sondermaße auf Anfrage.
Other dimensions available on request.
Dimensions spéciales sur demande.
Handstempel mit integrierter Elektrolytversorgung, o. Abb. Bestell-Nr. 29.001
Manual stamp with integrated electrolyte supply, not pictured. Ordering no. 29.001.
Tampon manuel avec alimentation en électrolyte intégrée, pas d´image. No. de cde. 29.001.
Automatische Filzverstellung ohne Stempel o. Abb. Bestell-Nr. 11.130.
Automatic felt piece adjustment without stamp, not pictured. Ordering no. 11.130.
Réglage automatique du feutre sans tampon, pas d´image. No. de cde. 11.130.
Manuelle Filzverstellung ohne Stempel, o. Abb. Bestell-Nr. 11.120.
Manual felt piece adjustment without stamp, not pictured. Ordering no. 11.120.
Réglage manuel du feutre sans tampon, pas d ´image. No. de cde. 11.120.
H
H
H
H
B
L
L
B
D
DH
H
7.5
1
5
1
5
L
B
H
H
L
H
H
B
L
B
B
flach/flat/à plat konkav/concave/concave
flach/flat/à plat
konvex/convex/convexe
bikonkav/biconcave/biconcave
abgesetzt/offset
décalé < 15 x 15
A
D
G
B
E
H
C
F
I
Handstempel + Stempel Bestellwesen
Ordering manual stamps + stamps
Commandes tampon manuel + tampon
Schablonen Bestellwesen
Ordering stencils
Commandes pochoirs
Handstempel
Manual stamp
Tampon manuel
Maschinenstempel
Machine stamp
Tampon mécanique
Bestell-Nr.
Ordering no.
No de cde.
Bestell-Nr.
Ordering no.
No de cde.
Länge in mm
Length in mm
Longeur en mm
Länge in mm
Length in mm
Longeur en mm
Bestell-Nr.
Ordering no.
No de cde.
Bestell-Nr.
Ordering no.
No de cde.
Maße
Dimensions
Dimensions
Stempelgröße (Maße in mm)
Stamp size (dimensions in mm)
Dimensions du tampon (dimensions en mm)
a
a
a
b
b
b
Kurzzeitschablonen / stencil with short service life / Pochoir de courte durée
22.160.5
22.160.6
22.161.BE
22.162.1
22.5118.13
22.5124.13
22.4100.13
BS 60x180mm
BL 180mm x 270mm
BS 60mm x 10m
78mm x 30m perforiert/perforated/perforé
Klischeeband für Drucker/printer SP100+ 95mm x 20m
Klischeeband/stamp tape/cassette de ruban stencil
18 mm breit/wide/large, 3,0 m lang/long/longue
Klischeeband 24 mm breit/wide/large, 3,5 m lang/long/longue
La page est en cours de chargement...
La page est en cours de chargement...
La page est en cours de chargement...
La page est en cours de chargement...

Bedienungsanleitung SIGNOMAT S200
Updated: 11-09
Operating instructions SIGNOMAT S200
Mode d´opération SIGNOMAT S200
14
Utilisation des Électrolytes
Toutes les données ont été relevées au cours d´essais et n´ont pas valeur de références universelle. La
Hotline est à la disposition de nos clients.
Matériau, alliages, branche N° art.
Electrolyte
Ajustage
l’appareil/
voltage
Remarques
Aciers, inoxydable 22.001 AE1 foncé/12V Production en série, autonettoyant électrolyte
22.035 AE35 foncé/12V pH-neutre, corrosion basse
22.036 AE36 foncé/12V pH-neutre, corrosion très basse
Aciers, carbone bas 22.036 AE36 foncé/12V pH-neutre, corrosion très basse
22.010 AE10 foncé/12V Production en série, autonettoyant électrolyte
22.038 AE38 foncé/12V
Aciers, aciers de construction, corrosif 22.036 AE36 foncé/12V pH-neutre, corrosion très basse
22.035 AE35 foncé/12V pH-neutre, corrosion basse
Aciers, CrCo, aciers à partir de 1.4310 22.035 AE35 foncé/12V pH-neutre, corrosion basse
Aciers, décoratif (article de publicité) 22.035 AE35 foncé/12V pH-neutre, corrosion basse
22.036 AE36 foncé/12V pH-neutre, corrosion très basse
Aciers, durcir & ne durcir pas 22.020 AE20 foncé/12V
Aciers, instruments chirurgicaux 22.033 AE33 foncé/12V pH-neutre, corrosion basse
22.001 AE1 foncé/12V Production en série, autonettoyant électrolyte
22.034 AE34 foncé/12V
22.035 AE35 foncé/12V pH-neutre, corrosion basse
Aciers, jusque 1.4021 / 1.4310 22.001 AE1 foncé/12V Production en série, autonettoyant électrolyte
22.033 AE33 foncé/12V pH-neutre, corrosion basse
Aciers, manger & l'industrie alimentaire,
flexible cathéter chirurgical (bougies)
22.007 AE7 foncé/12V pH-neutre, corrosion basse
Acier outil 22.033 AE33 foncé/12V pH-neutre, corrosion basse
22.010 AE10 foncé/12V Production en série, autonettoyant électrolyte
Aciers, outil & allier hautement 22.033 AE33 foncé/12V pH-neutre, corrosion basse
22.035 AE35 foncé/12V pH-neutre, corrosion basse
Acier outil, allier hautement & durcir 22.033 AE33 foncé/12V pH-neutre, corrosion basse
22.035 AE35 foncé/12V pH-neutre, corrosion basse
Aluminium 22.038 AE38 clair/24V
Aluminium (le plus alliages) 22.038 AE38 clair/24V
Accorder quelques secondes développer à colorer
avant nettoyage
Aluminium à grande teneur magnésium
ou silicium
22.025 AE25 clair/24V Noir n’est possible pas sauf farci vernis
22.038 AE38 clair/24V
Marquage en profondeur avant anodise (minimum
0.05mm)
Argentan 22.037 AE37 foncé/12V
22.025 AE25 foncé/12V
Béryllium 22.001 AE1 foncé/12V Production en série, autonettoyant électrolyte
Brunir noir 22.026 AE26 foncé/12V Ajustage: clair & foncé
22.030 AE30 foncé/12V Ajustage: clair & foncé
Brunir noirs aciers 22.026 AE26 foncé/12V Ajustage: clair & foncé
Bronze 22.037 AE37 foncé/12V
22.025 AE25 foncé/12V
Carbures 22.035 AE35 foncé/12V pH-neutre, corrosion basse
Chromer 22.005 AE5 foncé/12V
Chromer (décoratif) 22.005 AE5 foncé/12V
22.035 AE35 foncé/12V pH-neutre, corrosion basse
Chromer pièces 22.005 AE5 foncé/12V
22.001 AE1 foncé/12V Production en série, autonettoyant électrolyte
Cobalt alliages 22.037 AE37 foncé/12V
Cuivre 22.037 AE37 foncé/12V
22.025 AE25 foncé/12V
Cuivre alliages 22.037 AE37 foncé/12V
22.025 AE25 foncé/12V
Cuivre nickel 22.030 AE30 foncé/12V

Bedienungsanleitung SIGNOMAT S200
Updated: 11-09
Operating instructions SIGNOMAT S200
Mode d´opération SIGNOMAT S200
15
Matériau, alliages, branche N° art.
Electrolyte
Ajustage
l’appareil/
voltage
Remarques
CuZn alliages 22.037 AE37 foncé/12V
22.025 AE25 foncé/12V
Discaloy 22.030 AE30 foncé/12V
Étain 22.010 AE10 foncé/12V Production en série, autonettoyant électrolyte
Fer 22.035 AE35 foncé/12V pH-neutre, corrosion basse
22.010 AE10 foncé/12V Production en série, autonettoyant électrolyte
22.036 AE36 foncé/12V pH-neutre, corrosion très basse
Hastelloy 22.037 AE37 foncé/12V
Haynes 25 22.001 AE1 foncé/12V Production en série, autonettoyant électrolyte
Inconel 22.037 AE37 foncé/12V
Inconel 718 & 750 22.030 AE30 foncé/12V
Laiton 22.037 AE37 foncé/12V
22.025 AE25 foncé/12V
Métal dur 22.026 AE26 foncé/12V Pas de neutralisation/nettoyage
Monel 22.038 AE38 foncé/12V
22.035 AE35 foncé/12V pH-neutre, corrosion basse
Nickel & alliages 22.001 AE1 foncé/12V Production en série, autonettoyant électrolyte
22.035 AE35 foncé/12V pH-neutre, corrosion basse
22.030 AE30 foncé/12V
Nickel, chimique 22.003 AE3 foncé/12V
22.035 AE35 foncé/12V pH-neutre, corrosion basse
Nickel, nickelé (laiton & cuivre) 22.035 AE35 foncé/12V pH-neutre, corrosion basse
22.001 AE1 foncé/12V Production en série, autonettoyant électrolyte
Nickel, nickelé (acier & aluminium) 22.001 AE1 foncé/12V Production en série, autonettoyant électrolyte
22.030 AE30 foncé/12V
Nitraloy 22.035 AE35 foncé/12V pH-neutre, corrosion basse
Or & dorer 22.010 AE10 foncé/12V Production en série, autonettoyant électrolyte
22.035 AE35 foncé/12V pH-neutre, corrosion basse
Plomb & alliages 22.030 AE30 foncé/12V
Titane 22.037 AE37 foncé/12V
Utiliser uniquement électrolyte minimal et des
durées de marquage brèves (1-1,5s)
22.004 AE4 foncé/12V
Utiliser uniquement électrolyte minimal et des
durées de marquage brèves (1-1,5s)
Wolfram (pur) 22.028 AE28 foncé/12V Pas de neutralisation/nettoyage
Zinc & zingué 22.010 AE10 foncé/12V Production en série, autonettoyant électrolyte
22.037 AE37 foncé/12V
Zirconium 22.035 AE35 foncé/12V pH-neutre, corrosion basse
22.028 AE28 foncé/12V
-
 1
1
-
 2
2
-
 3
3
-
 4
4
-
 5
5
-
 6
6
-
 7
7
-
 8
8
-
 9
9
-
 10
10
-
 11
11
-
 12
12
-
 13
13
-
 14
14
-
 15
15


Schilling SP100+ Mode d'emploi
- Catégorie
- Imprimer
- Taper
- Mode d'emploi
dans d''autres langues
- English: Schilling SP100+ Operating instructions
- Deutsch: Schilling SP100+ Bedienungsanleitung
Autres documents
-
 DecoArt ADS501-B Manuel utilisateur
-
Walter SURFOX Standard Kit Le manuel du propriétaire
-
Hasbro Colorblaster T-Master Mode d'emploi
-
Sony MDS-LSA1 Manuel utilisateur
-
 ADEUNIS ARFx3 PRO Mode d'emploi
-
-
 Rex-royal S200 MCT Manuel utilisateur
-
-
SICK S300/S200 Mounting instructions
-
Yamaha DVX-S200 Le manuel du propriétaire


