EarthWise TC70040EW Le manuel du propriétaire
- Catégorie
- Mini motoculteurs
- Taper
- Le manuel du propriétaire

SAVE THIS MANUAL FOR FUTURE REFERENCE
Thank you for your purchase.
DO NOT RETURN THIS PRODUCT TO THE STORE. OPERATING, ASSEMBLY, PARTS, SERVICE QUESTIONS?
CALL 1-800-313-5111 BETWEEN 7:30AM-4:30PM EST FOR ASSISTANCE.
This product has been engineered and manufactured to our high standard for dependability, ease of operation, and
operator safety. Properly cared for, it will give you years of rugged, trouble-free performance.
WARNING: To reduce the risk of injury, the user must read and understand the operator’s manual
before using this product.
BATTERY MUST BE CHARGED BEFORE FIRST USE.
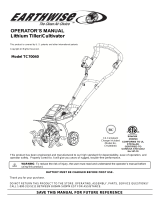
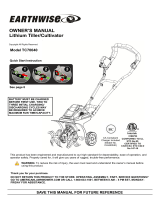
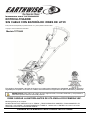
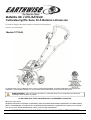
OPERATOR’S MANUAL
Lithium Tiller/Cultivator
Model TC70040
This product is covered by U. S. patents and other international patents
Copyright All Rights Reserved.

PRODUCT SPECIFICATIONS
Model: TC70040
Input: 40V, DC only Working width: 7-IN or 11-IN
Battery: 40V, 4.0Ah Lithium Ion Working depth max: 8-IN
Tine Speed: 130 RPM Working time: 45 Minutes
Weight: 28 Pounds Charging time: 2 1/2 Hours
Product Specifications . . . . . . . .. . . . . . . . . . . . . . . . . . .2
Symbols . . . . . . . . . . . . . . . . . . . . . . . . . . . . . . . . . . . . . 3
Safety Warnings . . . . . . . . . . . . . . . . . . . . . . . . . . . . 4 - 5
Assembly . . . . . . . . . . . . . . . . . . . . . . . . . . . . . . . . . .6 - 7
Operating . . . . . . . . . . . . . . . . . . . . . . . . . . . . . . . . . 8 - 9
2
Maintenance. . . . . . . . . . . . . . . . . . . . . . . . . . . . . . . . . .10
Charging the Battery . . . . . . . . . . . . . . . . . . . . . . . . .. . . 11
Storage . . . . . . . . . . . . . . . . . . . . . . . . . . . . . . . . . . . . . 12
Troubleshooting . . . . . . . . . . . . . . . . . . . . . . . . . . . . . . 13
Warranty . . . . . . . . . . . . . . . . . . . . . . . . . . . . . . . . . . . .14
TABLE OF CONTENTS
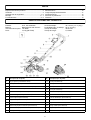
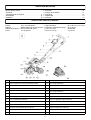
No. Description (P/N)
13 Tine D (RTC70040-29)
14 Tine C (RTC70040-30)
15 Tine B (RTC70040-33)
16 Tine A (RTC70040-34)
17 Lock pin (RTC70040-36)
18 Wheel frame (RTC70040-41)
19 Release button (RTC70040-47)
20 Wheel (RTC70040-40)
21 Wheel hub cap (RTC70040-39)
22 Auxiliary handle (RTC70040-52)
23 Battery charger (RTC70040-51)
24 Li-Ion Battery, 40V/4Ah (RTC70040-04)
No. Description (P/N)
1 Upper handle section (RTC70040-01 & 05)
2 Bail wire (RTC70040-10)
3 Switch box & power cable assy (RTC70040-02)
4 Key (RTC70040-11 & 12)
5 Cable clip (RTC70040-07)
6 Handle bolt M6x45 (RTC70040-08)
7 Wing nut (RTC70040-09)
8 Center handle (RTC70040-03)
9 Lower handle (RTC70040-13)
10 Battery pack cover (RTC70040-19)
11 Battery pack housing (RTC70040-20)
12 Protective shield (RTC70040-24)

Precautions that involve your safety.
Read the instruction manual and follow the warning and safety instructions!
SWITCH OFF! Remove plug from outlet immediately if the cable is
damaged or cut.
SWITCH OFF! Remove key and battery pack from unit before cleaning
or maintenance.
Do not use in wet weather conditions.
Wear eye and ear protection.
Keep bystanders at a safe distance.
DANGER! Rotating blades. Keep hands and feet at a safe distance.
DANGER! Of being hit by thrown objects.
Waste electrical products should not be disposed of with household waste. Please recycle
where facilities exist. Check with your Local Authority or retailer for recycling advice.
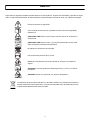
SYMBOLS
Some of the following symbols may be used on this product. Please study them and learn their meaning. Proper
interpretation of these symbols will allow you to operate the product better and safer.
3

TO REDUCE RISK OF INJURY: Before any use be
sure everyone using this product reads and understands
all safety instructions and other information contained in
this manual.
CAUTION: Wear appropriate personal hearing
protection during use. Under some conditions and
duration of use, noise from this product may contribute
to hearing loss.
Save these instructions and review frequently prior to
use and in instructing others.
WARNING: When using electric appliances, basic
safety precautions should always be followed to reduce
risk of fire, electric shock, and personal injury, including
the following:
READ ALL INSTRUCTIONS
IMPORTANT SAFETY WARNINGS
GENERAL SAFETY
4
AVOID ACCIDENTAL STARTING—Don’t carry tiller
when key is inserted or the battery is installed. Be sure
key is removed when installing battery.
DO NOT FORCE TILLER - It will perform better and
safer at the rate for which it was designed.
DON’T OVERREACH - Guide the tiller at a walking
pace only. Keep proper footing and balance at all
times.
LIGHTING - Only operate your tiller in daylight or good
artificial light.
STORE IDLE UNIT INDOORS-When not in use, the
tiller should be stored indoors in a dry area out of
children’s reach.
MAINTAIN UNIT WITH CARE-Keep clean for best
performance and to reduce the risk of injury. Keep
handles dry, clean and free from oil.
Do not operate the tiller on a slope that is too steep for
safe operation. When on slopes, slow down and make
sure you have good footing.
Before starting the tiller make sure the tines are not
touching any object and are free to move.
DANGER: RISK OF CUT- Wear gloves and use
caution when cleaning or performing maintenance on
the tiller/cultivator.
Always remove the switch key and the battery pack and
wait until the tines come to a complete stop before
carrying out any maintenance or repairs.
WARNING: Do not operate the tiller/cultivator near
underground electrical cables, telephone lines, pipes or
hoses.
If the tiller strikes a foreign body, turn it off immediately,
wait for the tines to stop and check for damage. If
necessary, repair before restarting.
If the tiller starts to vibrate abnormally, turn it off
immediately and check for the cause. Vibration is
generally a warning of trouble.
CHECK FOR DAMAGED PARTS - Before further use of
the product, any part that is damaged should be
carefully checked to determine that it will operate
properly and perform its intended function. Check for
alignment of moving parts, binding of moving parts,
breakage of parts, mounting and any other condition that
may affect its operation. Any part that is damaged
should be properly repaired or replaced. For assistance
call our customer service help line at 1-800-313-5111.
AVOID DANGEROUS ENVIRONMENTS - Don’t use
this product in rainy or stormy conditions. Do not operate
in gaseous or explosive atmospheres. Motors in these
products normally spark, and the sparks might ignite
fumes.
KEEP CHILDREN AWAY - All visitors, children and pets
should stay at a safe distance from the work area.
DRESS PROPERLY- Don’t wear loose clothing or
jewelry and wear protective hair covering to contain long
hair. They can be caught in moving parts. Use of rubber
gloves and substantial footwear is recommended when
working outdoors.
USE SAFETY GLASSES - Wear safety glasses with
side shields or goggles that are marked to comply with
ANSI Z87.1 standard when operating this product.
Grip the bail wire firmly with both hands. Never operate
the tiller/cultivator with one hand.
WARNING: Keep hands away from moving parts.
Tines do not stop immediately after the tiller/cultivator is
turned off. Do not put hands, feet or any body part or
clothing near the rotating tines.
REMOVE THE BATTERY from the tiller when not in
use or when servicing or cleaning. Do not leave
unattended.
CAUTION: The tiller/cultivator may bounce upward
and/or jump forward if the tines strike extremely hard
packed soil, frozen ground, or buried obstacles such as
large stones, roots or stumps.
USE RIGHT APPLIANCE - Do not use this product for
any job except that for which it is intended.
STAY ALERT - Watch what you are doing. Use common
sense. Do not operate the tiller when you are tired or
under the influence of drugs, alcohol or medications.

Make sure cord is located so that it will not be stepped
on, tripped over, come in contact with sharp edges or
moving parts or otherwise be subjected to damage or
stress. This will reduce the risk of accidental falls, which
could cause injury and damage to the cord, which could
result in electric shock.
Keep cord and charger away from heat to prevent
damage to housing or internal parts.
Do not let gasoline, oils, petroleum-based products, etc.
come in contact with plastic parts. They contain
chemicals that can damage, weaken or destroy plastic.
An extension cord should not be used unless absolutely
necessary. Use of improper extension cord could result
in a risk of fire and electric shock. If extension cord
must be used, make sure:
a. That pins on plug of extension cord are the same
number, size and shape as those of the plug on
charger
b. That extension cord is properly wired and in good
condition; and
c. That wire size is large enough for AC ampere rating
of charger as specified below:
Cord length (Feet) - 25’ 50’ 100’
Cord Size (AWG) - 16 16 16
NOTE: AWG= American Wire Gauge
Save these instructions. Refer to them frequently and
use them to instruct others who may use this product. If
you loan someone this tiller, loan them these
instructions also.
WARNING: Keep all connections dry and off the
ground. Do not touch plug with wet hands.
Do not abuse the cord. Never use the cord for
carrying, pulling or unplugging the charger. Keep
cord away from heat, oil, sharp edges or moving
parts. Damaged or entangled cords increase the
risk of electric shock.
Use of an attachment not recommended or sold by
the battery charger manufacturer may result in a
risk of fire, electric shock, or injury to persons.
Following this rule will reduce the risk of electric
shock, fire, or serious personal injury.
Do not service tiller with battery or switch key
installed.
Do not use the charger when the ambient
temperature is above 113°F (45°C) or below
0°F (-18°C).
Do not operate charger with a damaged cord or
plug which could cause shorting and electric
shock. If damaged, replace the charger with an
identical charger from an authorized service
provider.
Do not operate charger if it has received a sharp
blow, been dropped or otherwise damaged in any
way. Take it to a qualified individual for electrical
check to determine if the charger is in good
working order.
Unplug charger from outlet before attempting any
maintenance or cleaning to reduce the risk of
electric shock.
Disconnect charger from the power supply when
not in use to prevent damage to the charger during
a power surge.
Risk of electric shock, Do not touch uninsulated
portion of output connector or uninsulated battery
terminal.
Do not expose charger to wet or damp conditions,
Water entering charger will increase the risk of
electric shock.
GENERAL SAFETY
5
SAFETY RULES FOR CHARGER
WARNING: California Proposition 65:
This product contains chemicals known to the
State of California to cause cancer, birth defects or
other reproductive harm.
WARNING: Some dust and debris created by
this tool could contain chemicals known to the
State of California to cause cancer, birth defects or
other reproductive harm. Some examples of these
chemicals are:
-chemicals in fertilizer
-compounds in insecticides, herbicides and pesticides
-arsenic and chromium from chemically treated lumber
Your risk of exposure to these chemicals varies
depending on how often you do this type of work. To
reduce your exposure, work in a well ventilated area
and with approved safety equipment such as dust
masks that are specially designed to filter out
microscopic particles.

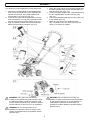
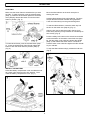
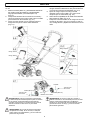
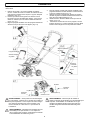
4. Attach the center handle to the auxiliary handle and
the lower handles using the two supplied M6 X 45
bolts and wing nuts. (Fig. 2-3)
5. Fasten the upper handle to the center handle using
the two supplied M6 X 45 bolts and wing nuts.
(Fig. 2-4)
6. Use the two supplied cable clips to secure the cord
to the handle. (Fig. 2-5)
7. Attach the key strap to the handle as shown.
(Fig. 2-6) When not in use, remove the key and
place it out of reach of children.
ASSEMBLY
6
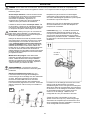
This product must be assembled correctly before use.
1. Remove the screws (M5 X 12) and washers from
each end of the wheel frame axle. Assemble the
wheels onto the axle, then install washers and
screws (M5 X 12) to secure. (Fig. 2-1)
2. Press the hub caps into the wheels and cover the
ends of the axles. You may use a hammer to seat
the hub caps securely into the wheels. (Fig. 2-1)
3. Align the auxiliary handle with the lower handles.
Make sure the holes are aligned. (Fig. 2-2)
WARNING: If any parts are damaged or
missing do not operate this product until the parts
are replaced. Failure to heed this warning could
result in serious personal injury. Call our customer
service help line at -800-313-5111 for assistance.
WARNING: Do not install battery until
assembly is complete. Failure to comply could
result in accidental starting and possible serious
personal injury.
WARNING: Do not attempt to modify this
product or create accessories not recommended
for use with this product. Any such alteration or
modification is misuse and could result in a
hazardous condition leading to possible serious
personal injury.

7
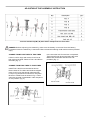
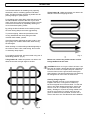
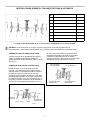
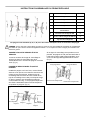
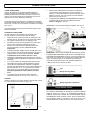
ADJUSTABLE TINE ASSEMBLY INSTRUCTION
Tines are identified (A,B,C,D) with letters stamped into the Tine Hubs.
CHANGE FROM FOUR TINES TO TWO TINES
Lift the Lock Pin rings and remove Lock Pins at
both ends of the shaft. Remove Tine A and D from
the shaft. (Fig. 3)
CHANGE FROM TWO TINES TO FOUR TINES
Install Tine A and D onto the shaft as shown.
Ensure holes in Tine Hubs and shaft are aligned.
Insert Lock Pin into the through holes and pull
Lock pin ring downward to lock the Pin into place.
Be sure to install Tines as shown in Fig 3. Tines
cannot be secured if assembled in other sequence
of Tine position. (Fig. 3)
In the event the lock Pins are lost or misplaced,
Tines A and D may be secured using the extra
M8X40 Hex head bolts and M8 Lock nuts
provided. (Fig. 4)
DANGER: Before adjusting tine assembly, make sure the battery is removed from the battery
compartment and the switch key is removed. Failure to heed this warning could result in serious personal
injury.

8
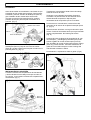
OPERATING
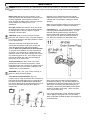
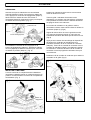
STARTING:
Make sure the wheel frame is raised before you start
the tiller. To raise the frame, push the release button
(Step A); rotate the wheel frame upward to horizontal
level (Step B); release the button to lock the wheel
frame in position. (Fig. 5)
To lower wheel frame, push the release button (Step
A). Lower the wheel frame (Step B) and release the
button to lock the wheel frame in position (Step C).
(Fig. 6)
INSTALL THE BATTERY
Raise the battery compartment cover and slide the bat-
tery down until it clicks to lock it into position. Then
close the battery compartment cover. (Fig. 7)
Move the tiller/cultivator to the work area prior to
starting the motor.
Hold the tiller/cultivator firmly while starting. The tines
will pull the tiller/cultivator forward during operation.
Lower the tines slowly into the ground being tilled.
To start the tiller/cultivator, insert the switch key into
the slot on the switch box (Step A). (Fig. 8)
Align the key groove with the guide in the key hole.
Press firmly until key is fully inserted. Do not attempt to
turn the key. (Fig. 8)
Push the safety lock button on the switch box and hold
to allow activation of the switch control bail wire (Step
B). Pull the switch control bail wire toward the handle
(Step C) and release the switch button. Continue to
hold the switch control bail wire against the tiller handle
as you cultivate.
To stop the tiller/cultivator simply release the bail wire.
(Fig.8)

9
OPERATING
Use the tiller/cultivator for breaking sod, preparing
seed beds, and for cultivating gardens and flower
beds. The tiller/cultivator can also dig small holes for
planting saplings or potted plants.
For breaking sod or deep tilling, allow the tines to pull
the tiller/cultivator forward to the end of your arm’s
reach, then firmly pull it back toward yourself. You will
achieve the best results by repeatedly allowing it to
move forward and pulling it back.
By pulling the tiller/cultivator back towards yourself,
the tines will dig deeper and more aggressively.
To prevent tripping, take extra precautions when
moving backwards and when pulling the tiller/
cultivator back toward yourself.
If the tiller/cultivator digs deep enough to stay in one
spot, gently rock it side to side until it starts moving
forward again.
When working on inclines always stand diagonally to
the incline to retain a firm, safe footing. Do not work
on extremely steep slopes.
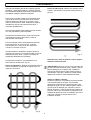
For preparing seed beds, we recommend using one of
these tilling patterns: (Fig. 9)
Tilling Pattern A– Make two passes over area to be
tilled, the second at a right angle to the first.
Tilling Pattern B - Make two passes over area to be
tilled, the second overlapping the first.
Before use, remove any visible stones or other
foreign bodies from the area.
CAUTION: Before moving the tiller/cultivator from
one area to another, release the bail wire and wait for
the tines to come to a complete stop. Be careful not
to let the tines touch the ground while moving the
tiller/cultivator. The tines as well as the unit itself may
be damaged even if the motor is switched off.
Clearing foreign objects:
During operation a stone or root could become
lodged in the tines, or tall grass or weeds may
become wrapped around the tine shaft. To clear the
tines or tine shaft release the bail wire, wait for the
tines to come to a complete stop and remove the
battery. Dislodge or remove the foreign matter from
the tines or tine shaft. To simplify removal of tall
grass or weeds from the tine shaft, remove one or
more of the tines. See Tine Removal and Installation.
Fig. 9
Fig. 9

MAINTENANCE
Before each use check the condition of the
tines and ensure that all threaded connections are
securely tightened. If the tines become dull or
blunt, sharpen or replace them. Call our customer
service help line at 1-800-313-5111 for
assistance.
Once per season lubricate the tines and shaft.
At the end of the season, check the tiller/cultivator
for damage prior to storing. Repair or replace
damaged or broken parts.
CAUTION: Always clean the tiller/cultivator
after each use. Failure to carry out proper cleaning
can result in damage to the tiller/cultivator or result
in poor performance.
Clean the underside of the protective shield
around the tines with a scrub brush, and a soft
cloth dampened with a mild soap and water
mixture. Never use a water hose to clean the tiller!
To remove soil and debris from the transmission
and tines, use a stiff brush or a dampened cloth.
Clean the vents on the motor housing and remove
any remaining grass or dirt. Once cleaned, wipe
the tines and shaft with a dry cloth and apply a
light coat of oil to prevent rust.
Tines maintenance: Worn tines invite poor
performance and overload of the motor. Check
tines before each use. Sharpen or replace the tine
assemblies with new ones when necessary. Call
1-800-313-5111 for assistance.
WARNING: Injury can occur while working on
the tines. Wear protective gloves.
Tine Removal and Installation (Fig. 10)
Lift the Lock Pin rings and remove the Lock Pins at
both ends of the shaft. Remove Tine A and D from
the shaft. Remove the M8x40 bolts and M8 Hex
lock nuts at both ends of the shaft. Remove Tine B
and C from the shaft. Reverse above steps to
install Tines.
Replace worn or damaged parts with original
replacement parts only. Parts from another tiller/
cultivator will not fit properly causing an unsafe
situation.
Make sure all protective devices are secure and in
good condition. Repair or replace if necessary.
Lubrication (Fig. 11): The tines drive transmission
case has grease installed at the factory. It is not
required that the grease level be checked nor
recommended that grease be added during the
first 2 years of use. After the second season of
use, follow the directions as described below:
Drain screw plug is located on the right side of
transmission housing. Lay the tiller/cultivator on
its left side and clean the transmission of dirt and
debris prior to removing the drain screw plug. If
necessary, remove tine assemblies to have better
access to the drain screw plug. Use a 5mm hex
key to unscrew the plug.
Using a squeeze bottle or tube, add approximately
2.0 oz. (60ml) of auto gear lube. Do not overfill.
When completed, reinstall the drain screw plug into
the transmission.
10
DANGER: Before performing any maintenance, make sure the battery is removed from the battery
compartment and the switch key is removed. Failure to heed this warning could result in serious personal
injury.
10
Tine D Tine C
Tine B Tine A

BATTERY METER
Since the tiller battery is shipped in a low charge
condition, the battery must be charged before use. The
battery has 3 LED lights to indicate battery capacity.
These lights will only illuminate when the light indicator
button is pushed.
If three GREEN lights illuminate, the battery is charged
and ready for use. Two green lights are equal to 25%-
80% charge, while one green light is equal to 5%-25%
charge.
It is recommended to charge battery pack when one light
is illuminated.
CHARGING THE BATTERY PACK
The tiller comes with maintenance free, sealed 40 volt
storage batteries.
Remove the switch key from the tiller and store in a
safe location out of the reach of children.
Charge the battery pack only with the charger
provided.
Allow at least two hours of charge time before initial
use of the tiller.
Make sure the power supply is normal household
voltage, 120 volts, 60Hz, AC only.
The battery should be charged in a cool, dry place.
To improve battery life, store battery indoors in a
controlled climate. Fully charge battery pack every 3
months.
Since the battery will not develop a memory, it does
not have to be fully discharged before recharging.
2 to 3 initial charging/discharging cycles may be
required to achieve maximum run time/capacity.
When fully charged, the battery can be safely stored
in temperatures down to -4˚F(-20˚C) for a period of
up to one month before requiring charging. Fully
charge battery pack every 3 months.
The battery charger should be operated in
temperatures between 0˚F and 113˚F(-18˚C and
45˚C).
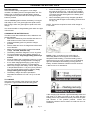
TO CHARGE
Insert the 120 volt plug of the charger into the wall
receptacle. Light A will illuminate and stay green.
(Fig. 12)
Place the battery pack into the charger by sliding
the pack as shown in Fig. 13 to lock it into position.
Light B will illuminate red to indicate that the battery
is charging and the three lights on the battery pack
will cycle in green.
When the battery pack is fully charged, light B will
turn green and the lights on the battery pack will shut
off. (Fig 13)
NOTE: Typical time required to reach a full charge is
2 1/2 hours.
NOTE: If light A remains green while light B
alternately flashes red and green, this indicates a
temperature abnormality (i.e. that the battery pack is
either too hot or too cold). If there is only a red blinking
light, this indicates that something is wrong with the
battery. Contact Earthwise customer service center at
1-800-313-5111 for assistance.
If the charging light indicator Light B alternately blinks red
and green or it does not come on at all, check that the
battery pack is fully seated into the bay. Remove the pack
and reinsert. If the problem persists, contact the
Earthwise customer service center at 1-800-313-5111 for
assistance.
Fig. 12
11
CHARGING THE BATTERY PACK
Fig. 13

Store the Tiller/Cultivator in a dry, clean area out of
reach of children.
During extended periods of storage, ensure that
the tiller/cultivator is protected against corrosion
and rust.
Winter storage - Fully recharge before storage
and then again every 90 days.
STORAGE
At the end of the season, or if the tiller/cultivator is
not being used for longer than a month, wipe over
all metal surfaces with an oil impregnated cloth to
protect them from corrosion or spray with a fine
coat of oil. Fold the handle down, and store the
tiller/cultivator in a suitable place.
12
BATTERY DISPOSAL
Remove the battery pack from the tiller/cultivator. Cover the terminals with heavy duty adhesive tape. Do
not attempt to destroy or disassemble battery pack or remove any components. This product contains
lithium-ion batteries which must be recycled or disposed of properly. Local, state or federal laws may
prohibit disposal of these batteries in the municipal solid waste or rural trash pick up systems.
The RBRC seal on the li-ion battery pack indicates that the costs to recycle the battery
pack at the end of its useful life has already been paid by The Great States Corporation /
American Lawn Mower Company. It is illegal to place spent li-ion batteries in the local
municipal solid waste or in the trash. RBRC in cooperation with The Great States
Corporation / American Lawn Mower Company has provided an environmentally friendly
and easy way to recycle spent li-ion batteries. Just contact your local recycling center or
call 1-800-8BATTERY for information on where to drop off the spent battery.

TROUBLESHOOTING
Problem Possible causes Remedy
Motor does not start Safety lock button not fully depressed
Battery not installed properly
Battery is low in charge
Battery is either defective or will not
take a charge.
Overheat protection activated
Check that safety lock button on switch box is fully
depressed before pulling the switch control bail wire.
Check battery installation.
Charge the battery.
Replace the battery.
1. Working depth too large, set to a shorter depth.
2. Tines blocked, remove the blockage.
3. Soil too hard, select correct work depth and
move forward and backward several times while
slowing down the operation speed.
4. Wait until the motor cools down for about 15
minutes before further use.
Abnormal noises Tines are jammed
Lubrication running out
Bolts, nuts or other components are
loose.
Switch off. Wait till tines come to a complete stop
and remove battery. Remove jammed material.
Tiller/cultivator must be repaired. Call our customer
service help line at 1-800-313-5111 for assistance.
Tighten all components. Arrange for repair if noises
continue.
Abnormal vibrations Tines damaged or worn
Working depth too large
Replace damaged or worn tines.
Adjust working depth.
Poor results Working depth too small
Worn tines
Read instructions on page 9 and 10 on how to ma-
neuver cultivator/tiller to get the desired results.
Replace damaged or worn tines.
CALL US FIRST !!
Call us first with questions about operating or maintaining this product at 1.800.313.5111
between 7:30 a.m. – 4:30 p.m. Eastern Standard Time, or send emails to ea[email protected].
13
SERVICE
Now that you have purchased your Tiller/Cultivator, should a need ever exist for repair parts or
service, simply contact us at 1-800-313-5111. Be sure to provide all pertinent facts when you call
or visit.
REPAIR PARTS
Please record your serial number in the space provided below.
• NAME OF ITEM Tiller/Cultivator
• MODEL NUMBER TC70040
• SERIAL NUMBER

WARRANTY
This product is manufactured for The Great States Corporation/American Lawn Mower Company. The Great
States Corporation/American Lawn Mower Company, Shelbyville, Indiana, has been making lawn mowers for
over 100 years and it warrants to the original owner that each new product and service part is free from defects in
material and workmanship and agrees to repair or replace under this warranty any defective product or part from
the original date of purchase for two (2) years except for the conditions and circumstances listed below. Proof of
purchase (original dated sales receipt) must accompany all warranty claims.
THIS WARRANTY IS NOT TRANSFERABLE AND DOES NOT COVER:
Products sold damaged or incomplete, sold “as is”,
sold reconditioned, or used as rental equipment.
Delivery, installation, or normal adjustments
explained in the operator’s manual.
Damage or liability caused by shipping, improper
handling, improper installation, incorrect voltage or
improper wiring, improper maintenance, improper
modification, or the use of accessories and/or
attachments not specifically recommended.
Repairs necessary because of operator abuse or
negligence, or the failure to install, operate, maintain,
or store the product according to the instructions in
the operator’s manual.
Damage caused by cold, heat, rain, excessive
humidity, corrosive environments and materials, or
other contaminants.
Expendable items that become worn during normal
use, including but not limited to tines.
Cosmetic defects that do not interfere with product
functionality.
Freight costs from customer to vendor. Repair and
transportation costs of products or parts determined not
to be defective.
ANY INCIDENTAL, INDIRECT, OR CONSEQUENTIAL
LOSS, DAMAGE, OR EXPENSE THAT MAY RESULT
FROM ANY DEFECT, FAILURE, OR MALFUNCTION
OF THE PRODUCT. Some states do not allow the
exclusion or limitation on how long an implied warranty
lasts, so the above limitations may not apply to you.
ANY NON-RESIDENTIAL USE OR COMMERCIAL
USE VOIDS ALL WARRANTIES.
The Great States Corporation
American Lawn Mower Company
830 Webster Street
Shelbyville, IN 46176
Phone 1-800-313-5111
www.earthwisetools.com
In a continued commitment to improve quality, the Manufacturer reserves the right to
make component changes or design changes when necessary.
Rev. 07/18/16
OPERATOR’S MANUAL
Lithium Tiller/Cultivator
This product is covered by U. S. patents and other international patents
Copyright All Rights Reserved.

GUARDE ESTE MANUAL PARA CONSULTAS FUTURAS
Muchas gracias por su compra.
NO DEVUELVA ESTE PRODUCTO A LA TIENDA. ¿TIENE PREGUNTAS SOBRE EL FUNCIONAMIENTO, EL
MONTAJE, LAS PIEZAS Y EL MANTENIMIENTO? LLAME AL 1-800-313-5111 ENTRE LAS 7:30 Y LAS 16:30
HORA DEL ESTE DE LOS ESTADOS UNIDOS.
Este producto fue diseñado y fabricado de acuerdo con nuestros altos estándares de confiabilidad, facilidad de operación y
seguridad para el operario. Si se trata con cuidado, esta herramienta le otorgará años de óptimo rendimiento y resistencia.
ADVERTENCIA: Para reducir el riesgo de sufrir alguna lesión, el usuario debe leer y comprender el
manual del operario antes de usar este producto.
DEBE CARGAR LA BATERÍA ANTES DE UTILIZARLA POR PRIMERA VEZ.
MANUAL DEL OPERARIO
ROTOCULTIVADOR
SIN CABLE CON BATERÍA DE IONES DE LITIO
Modelo TC70040
Este producto está amparado por patentes de EE. UU. y otras patentes internacionales.
Copyright. Todos los derechos reservados.

ESPECIFICACIONES DEL PRODUCTO
Modelo: TC70040
Entrada: 40 V, CC solamente Ancho de trabajo: 18 u 28 cm (7 u 11 pulg.)
Batería: Batería de litio 4Ah de 40 V Profundidad máx. de trabajo: 20 cm (8 pulg.)
Velocidad de las púas 130 RPM Tiempo de trabajo: 45 Minutos
Peso: 12,7kg (28 Libras) Tiempo de carga: 2,5 horas
2
ÍNDICE
N.° Descripción (N.º de pieza)
13 Púa D (RTC70040-29)
14 Púa C (RTC70040-30)
15 Púa B (RTC70040-33)
16 Púa A (RTC70040-34)
17 Pasador de bloqueo (RTC70040-36)
18 Bastidor de las ruedas (RTC70040-41)
19 Botón de desbloqueo (RTC70040-47)
20 Rueda (RTC70040-40)
21 Tapa del cubo de la rueda (RTC70040-39)
22 Mango auxiliar (RTC70040-52)
23 Cargador (RTC70040-51)
24 Batería de iones de litio de 40 V / 4 Ah (RTC70040-04)
N.° Descripción (N.º de pieza)
1 Mango superior (RTC70040-01 & 05)
2 Gatillo (RTC70040-10)
3 Conjunto de cable de alimentación e interruptor (RTC70040-02)
4 Llave (RTC70040-11 & 12)
5 Sujetador de cable (RTC70040-07)
6 Perno del mango M6x45 (RTC70040-08)
7 Tuerca mariposa (RTC70040-09)
8 Mango central (RTC70040-03)
9 Mango inferior (RTC70040-13)
10 Cubierta del paquete de baterías (RTC70040-19)
11 Alojamiento del paquete de baterías (RTC70040-20)
12 Escudo protector (RTC70040-24)
Especificaciones del producto ....................................... 2
Símbolos ....................................................................... 3
Advertencias de seguridad ....................................... 4 - 5
Montaje ………………………………………………….6 - 7
Funcionamiento ....................................................... 8 - 9
Mantenimiento …………………………………………….10
Carga del paquete de baterías ………………………….11
Almacenamiento ......................................................... 12
Solución de problemas ................................................ 13
Garantía ...................................................................... 14

Precauciones para su seguridad.
Lea el manual de instrucciones y atienda las instrucciones de seguridad y
advertencia.
¡DESCONECTAR! Retire el enchufe del tomacorriente de inmediato si
el cable está
¡DESCONECTAR! Retire la llave y el paquete de baterías de la unidad
antes de limpiarla o de darle mantenimiento.
No trabaje en condiciones de humedad.
Use protecciones para sus ojos y oídos.
Mantenga a las personas que se encuentran en el lugar a una distancia
segura.
¡PELIGRO! Cuchillas giratorias. Mantenga manos y pies a una distan-
cia segura.
¡PELIGRO! Puede ser golpeado por objetos despedidos.
Los desechos de los productos eléctricos no se deben eliminar con los desechos domésticos.
Recicle donde haya centros para tal fin. Consulte a la autoridad local o al distribuidor minoris-
ta para obtener asesoramiento sobre reciclado.
SÍMBOLOS
Algunos de los siguientes símbolos pueden aparecer en este producto. Tenga a bien estudiarlos y aprender su signifi-
cado. La adecuada interpretación de estos símbolos le permitirá operar el producto mejor y de manera más segura.
3

PARA REDUCIR EL RIESGO DE LESIONES: Antes de
utilizar este producto, cerciórese de que todos los usuarios
lean y comprendan las instrucciones de seguridad y la de-
más información incluida en este manual.
PRECAUCIÓN: Use protección auditiva apropiada
mientras trabaja. En ciertas condiciones y con cierta
duración de uso, el ruido generado por este producto pue-
de contribuir a la pérdida de la audición.
Guarde estas instrucciones y revíselas con frecuencia
antes de usar la herramienta y para impartirlas a otros.
ADVERTENCIA: Al utilizar aparatos eléctricos para
el jardín, se recomienda respetar las precauciones de
seguridad básicas que se detallan a continuación, a fin
de reducir riesgos de incendios, descargas eléctricas y
lesiones personales.
LEA TODAS LAS INSTRUCCIONES
ADVERTENCIAS DE SEGURIDAD IMPORTANTES
NORMAS GENERALES DE SEGURIDAD
4
EVITE EL ARRANQUE ACCIDENTAL - No traslade el
cultivador cuando se haya insertado la llave o si la batería
está instalada. Asegúrese de retirar la llave al instalar la
batería.
NO FUERCE LA ROTOCULTIVADOR- Realizará mejor el
trabajo con menor probabilidad de lesiones si maneja la
cortasetos a la velocidad para la que fue diseñada.
NO ADOPTE UNA POSTURA INCÓMODA. Guíe el
rotocultivador sólo a paso de hombre. Mantenga una
base de apoyo firme y buen equilibrio en todo momento.
ILUMINACIÓN. Trabaje con el rotocultivador sólo con luz
natural o buena luz artificial.
GUARDE LA UNIDAD BAJO TECHO. Cuando no esté en
uso, el rotocultivador se deberá guardar en un lugar cerrado y
seco, fuera del alcance de los niños.
PRESTE ATENCIÓN AL MANTENIMIENTO DE LA
UNIDAD. Consérvela limpia para lograr un óptimo
funcionamiento y reducir el riesgo de lesiones.
Inspeccione el cable de extensión periódicamente y
reemplácelo si está dañado. Mantenga los mangos secos,
limpios y libres de aceite.
Para un funcionamiento seguro, no utilice el rotocultivador en
pendientes demasiado pronunciadas. Cuando trabaje en
pendientes, disminuya la velocidad y asegúrese de tener una
buena base de apoyo.
Antes de encender el rotocultivador, cerciórese de que las
púas no estén en contacto con ningún objeto y de que
tengan libre movimiento.
PELIGRO: RIESGO DE CORTES. Use guantes y sea
prudente cuando limpie o realice el mantenimiento al
rotocultivador.
Siempre retire la llave del interruptor y el paquete de
baterías y espere hasta que las púas se hayan detenido
por completo antes de realizar cualquier trabajo de
mantenimiento o reparación.
ADVERTENCIA: No trabaje con el rotocultivador cerca
de cables eléctricos, líneas telefónicas, tuberías o
mangueras subterráneas.
Si el rotocultivador golpea un cuerpo extraño,
apáguelo de inmediato, espere a que las púas se
detengan y verifique si hay daños. Si fuera necesario,
repare las piezas dañadas antes de volver a poner en
marcha la herramienta.
Si el rotocultivador comienza a vibrar de manera
inusual, apáguelo de inmediato y revíselo para
detectar la causa. Generalmente, la vibración
advierte la existencia de un problema.
VERIFIQUE LAS PIEZAS DAÑADAS. Antes de seguir
usando el producto, se deberán revisar las piezas
dañadas en forma exhaustiva para determinar si la
herramienta funcionará correctamente y realizará el
trabajo previsto. Compruebe la alineación y las uniones
de las piezas móviles, el montaje, averías de
componentes y otros factores que puedan afectar el
funcionamiento. Se debe reparar o reemplazar cualquier
pieza dañada en forma adecuada. Para recibir asistencia,
comuníquese con nuestra línea de ayuda de atención al
cliente al 1-800-313-5111.
EVITE AMBIENTES PELIGROSOS. No utilice
este producto en condiciones de lluvia o tormenta
ni en lugares húmedos o mojados. Tampoco trabaje en
entornos donde existan gases o sustancias explosivas.
Por lo general, los motores de estos productos producen
chispas que podrían inflamar los gases.
MANTENGA ALEJADOS A LOS NIÑOS. Todos los
visitantes, niños y mascotas deben mantenerse a una
distancia segura de la zona de trabajo.
USE ROPA ADECUADA. No use prendas sueltas ni
artículos de joyería. Use protección para cubrir y
contener el cabello largo ya que puede quedar atrapado
en las piezas móviles. Se recomienda usar guantes de
goma y calzado resistente cuando se trabaja al aire
libre.
USE GAFAS DE SEGURIDAD. Al trabajar con este
producto, use gafas de seguridad con protectores
laterales que cumplan con la norma ANSI Z87.1.
Sujete la barra guía con ambas manos y con firmeza. No
debe sujetarla nunca con una sola mano.
ADVERTENCIA: Mantenga las manos lejos de las
piezas en movimiento. Las púas no se detienen de
inmediato cuando se apaga el rotocultivador. No
acerque ninguna parte de su cuerpo, ni prendas de
vestir a las púas giratorias.
EXTRAIGA LA BATERÍA DE LA ROTOCULTIVADOR
cuando no esté en uso o durante el servicio de
mantenimiento o la limpieza. Manténgala bajo vigilancia
constante.
PRECAUCIÓN: El rotocultivador puede rebotar hacia
arriba o saltar hacia delante si las púas golpean suelo muy
compactado o congelado, u obstáculos enterrados,
como piedras grandes, raíces o tocones.
USE LA HERRAMIENTA EN FORMA CORRECTA. No
utilice esta herramienta en trabajos para los que no esté
indicada.
PONGA ATENCIÓN. Observe lo que está haciendo. Use
el sentido común. No opere el rotocultivador si está
cansado o bajo la influencia de drogas o medicamentos.

Asegúrese de colocar el cable donde no pueda ser
pisado, ni sea motivo de tropezones. Tampoco en sitios
donde pueda entrar en contacto con bordes filosos o
piezas móviles, o estar expuesto a daños o tensiones.
Esto reducirá el riesgo de caídas accidentales (que
podrían provocar lesiones) y daños al cable (que podrían
causar descargas eléctricas).
Aleje el cable y el cargador de lugares calurosos para
evitar daños a la caja o las piezas internas.
Evite en todo momento que gasolina, aceites, productos a
base de petróleo, etc. entren en contacto con las piezas
plásticas. Contienen químicos que pueden dañar, debilitar
o destruir el plástico.
No utilice un cable de extensión a menos que sea
extremadamente necesario. El uso de un cable de
extensión incorrecto podría ocasionar riesgos de
incendios y descarga eléctrica. Si debe utilizar un cable
de extensión, tenga en cuenta:
a. Que las clavijas del enchufe del cable de extensión
sean del mismo número, tamaño y forma que las
del enchufe del cargador.
b. Que el cable de extensión esté conectado
correctamente y en buenas condiciones.
c. Que el tamaño del cable sea adecuado para el
amperaje de CA del cargador, según lo
especificado a continuación:
NOTA: AWG = sistema norteamericano de calibre de
cables
Guarde estas instrucciones. Consúltelas con frecuencia y
utilícelas para instruir a otros operarios. Si presta la
rotocultivador a alguien, proporciónele también estas
instrucciones.
ADVERTENCIA: Mantenga todas las conexiones
secas y alejadas del suelo. No toque el enchufe con las
manos mojadas.
No haga un mal uso del cable. Nunca tire del cable
para trasladar, empujar o desenchufar la
herramienta. Aleje el cable del calor, el aceite, los
bordes filosos o las piezas móviles. Los cables
dañados o enredados aumentan el riesgo de
descarga eléctrica.
El uso de un dispositivo no recomendado ni vendido
por el fabricante del cargador de batería podría
provocar riesgos de incendios, descargas eléctricas o
lesiones a personas. Si respeta esta regla, reducirá
riesgos de incendios, descargas eléctricas y lesiones
corporales serias.
No realice el mantenimiento de la rotocultivador con
la batería, la llave de seguridad instalados.
No utilice el cargador cuando la temperatura
ambiente es superior a 45 °C (113 °F) o inferior a
-18°C (0 °F).
No opere el cargador con un cable o enchufe
dañados porque se podrían producir cortocircuitos y
descargas eléctricas. Si el cargador está dañado,
reemplácelo con un cargador idéntico de un
proveedor de servicio técnico autorizado.
No utilice el cargador si ha sufrido un golpe fuerte, si
lo ha dejado caer al piso o si ha sufrido algún otro
daño. Llévelo a un centro de servicio técnico
autorizado para que reciba una inspección eléctrica y
se determine si está en buenas condiciones.
Para reducir el riesgo de descarga eléctrica,
desenchufe el cargador del tomacorriente antes de
realizar el mantenimiento o la limpieza.
Desconecte el cargador del suministro eléctrico
cuando no esté en uso para evitar daños en caso de
que se produzca un pico de tensión.
Riesgo de descarga eléctrica: No toque el conector
de salida ni el terminal de la batería en las áreas que
no tienen aislamiento.
No exponga el cargador a zonas húmedas o
mojadas. El ingreso de agua en el cargador aumenta
el riesgo de descarga eléctrica.
NORMAS GENERALES DE SEGURIDAD
5
NORMAS DE SEGURIDAD PARA EL CARGADOR
ADVERTENCIA: Proposición 65 de California:
Este producto contiene sustancias químicas al
estado de California como causantes de cáncer,
defectos de nacimiento u otros problemas
reproductivos.
ADVERTENCIA: Parte del polvo y los desechos
generados por el uso de esta herramienta
contienen químicos reconocidos por el Estado de
California como causantes de cáncer, defectos de
nacimiento u otros efectos nocivos para el aparato
reproductor. Algunos ejemplos de estos productos
químicos son:
- químicos presentes en fertilizantes
- compuestos presentes en insecticidas, herbicidas y
pesticidas
- arsénico y cromo de maderas tratadas químicamente
El riesgo que usted corre al exponerse a estos
químicos varía según la frecuencia con la que
realiza este tipo de trabajo. Para reducir la exposición,
trabaje en una zona bien ventilada y utilice equipo de
protección aprobado, como mascarillas antipolvo
especialmente diseñadas para filtrar partículas
microscópicas.
Largo del cable
(metros) 7,6 m
(25 pies) 15,2 m
(50 pies) 30,4 m
(100
pies)
Tamaño del
cable (AWG) 16 16 16

4. Conecte el mango central con el mango auxiliar y los
mangos inferiores utilizando los dos pernos M6 X 45
y las tuercas mariposa suministradas. (Fig. 2-3)
5. Ajuste el mango superior al mango central
utilizando los dos pernos M6 X 45 y las tuercas
mariposa que se suministran (Fig. 2-4).
6. Utilice los dos sujetadores de cable suministrados
para sujetar el cable. (Fig. 2-5)
7. Coloque la correa de la llave en el mango tal como se
muestra en la imagen. (Fig. 2-6) Cuando no esté en
uso, extraiga la llave y déjela fuera del alcance de los
niños.
MONTAJE
6
Este producto debe ser montado correctamente antes de
su uso.
1. Retire los tornillos (M5 X 12) y arandelas del bastidor de
las ruedas. Inserte las ruedas en el eje del bastidor,
luego fije las arandelas y los tornillos (M5 X 12).
(Fig. 2-1)
2. Coloque las cubiertas de las ruedas en las ruedas y
cubra los extremos de los ejes. Puede usar un martillo
para asentar bien las cubiertas. (Fig. 2-1)
3. Alinee el mango auxiliar con los mangos inferiores.
Asegúrese de que los orificios estén alineados.
(Fig. 2-2)
ADVERTENCIA: Si alguna pieza falta o está dañada,
no utilice este producto hasta reponer la pieza en cuestión.
De lo contrario, podría sufrir lesiones personales de
gravedad. Comuníquese con nuestra línea de ayuda de
atención al cliente al 1-800-313-5111 para recibir
asistencia.
ADVERTENCIA: No instale la batería hasta haber
completado el montaje. De lo contrario, la máquina
podría arrancar accidentalmente y provocar lesiones
personales de gravedad.
ADVERTENCIA: No intente modificar la unidad ni
elaborar accesorios no recomendados para usar con este
producto. Dicha clase de alteración o modificación
constituye un uso inadecuado de la herramienta y podría
generar situaciones de riesgo y provocar lesiones
personales de gravedad.
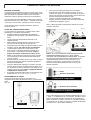
Mango auxiliar
Mango inferior
Tornillos (M5 X 12)
Arandela
Tapa del cubo
de la rueda
Arandela
Tapa del cubo
de la rueda
Tornillos (M5 X 12)
Bastidor de las ruedas
M6x45
M6x45
Mango central
Mango central
Mango superior
La page charge ...
La page charge ...
La page charge ...
La page charge ...
La page charge ...
La page charge ...
La page charge ...
La page charge ...
La page charge ...
La page charge ...
La page charge ...
La page charge ...
La page charge ...
La page charge ...
La page charge ...
La page charge ...
La page charge ...
La page charge ...
La page charge ...
La page charge ...
La page charge ...
La page charge ...
-
 1
1
-
 2
2
-
 3
3
-
 4
4
-
 5
5
-
 6
6
-
 7
7
-
 8
8
-
 9
9
-
 10
10
-
 11
11
-
 12
12
-
 13
13
-
 14
14
-
 15
15
-
 16
16
-
 17
17
-
 18
18
-
 19
19
-
 20
20
-
 21
21
-
 22
22
-
 23
23
-
 24
24
-
 25
25
-
 26
26
-
 27
27
-
 28
28
-
 29
29
-
 30
30
-
 31
31
-
 32
32
-
 33
33
-
 34
34
-
 35
35
-
 36
36
-
 37
37
-
 38
38
-
 39
39
-
 40
40
-
 41
41
-
 42
42


EarthWise TC70040EW Le manuel du propriétaire
- Catégorie
- Mini motoculteurs
- Taper
- Le manuel du propriétaire