Posiflex CD-3301UB Guide d'installation rapide
- Taper
- Guide d'installation rapide

1
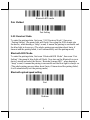
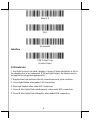
Product Overview
Front View
Rear View
Default Settings
Scanning the following barcode can restore the engine to the factory defaults.
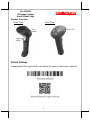
CD-3301UB
2D Image Scanner
Quick Setup Guide
Trigger
Button
Scan
window
Status LED

2
FCC NOTES
This equipment has been tested and found to comply with the limits for a Class A digital device,
pursuant to part 15 of the FCC Rules. These limits are designed to provide reasonable protection
against harmful interference when the equipment is operated in a commercial environment. This
equipment generates, uses, and can radiate radio frequency energy and, if not installed and used in
accordance with the instruction manual, may cause harmful interference to radio communications.
Operation of this equipment in a residential area is likely to cause harmful interference in which
case the user will be required to correct the interference at his own expense.
This device complies with part 15 of the FCC Rules. Operation is subject to the following two
conditions: (1) This device may not cause harmful interference, and (2) this device must accept
any interference received, including interference that may cause undesired operation.
CE CLASS A WARNING
This equipment is compliant with Class A of CISPR 32. In a residential environment this
equipment may cause radio interference.
AVERTISSEMENT CE CLASSE A
Cet équipement est conforme à la classe A de CISPR 32. Dans un environnement résidentiel, cet
équipement peut provoquer des interférences radio.
WARRANTY LIMITS
Warranty will terminate automatically when the machine is opened by any person other than the
authorized technicians. The user should consult his/her dealer for the problem happening.
Warranty voids if the user does not follow the instructions in application of this merchandise. The
manufacturer is by no means responsible for any damage or hazard caused by improper application.
LIMITES DE GARANTIE
La garantie prend fin automatiquement lorsque la machine est ouverte par une personne autre que
les techniciens autorisés. L'utilisateur doit consulter son revendeur pour le problème qui se produit.
La garantie s'annule si l'utilisateur ne suit pas les instructions d'application de cette marchandise.
Le fabricant n'est en aucun cas responsable de tout dommage ou danger causé par une mauvaise
application.
警告
為避免電磁干擾,本產品不應安裝或使用於住宅環境。
SAFETY INSTRUCTIONS
This equipment is not suitable for use in locations where children are likely to be present.
CONSIGNES DE SÉ CURITÉ
Cet équipement ne convient pas à une utilisation dans des endroits où des enfants sont susceptibles
d'être presents.
WARNING
Power cord shall be connected to a socket-outlet with earthing connection.

3
ATTENTION
Le cordon d'alimentation doit être connecté à une prise de courant avec mise à la terre.
Scanner Maintenance
The scanner is designed for long-term trouble-free operation and rarely requires
any maintenance. Only an occasional cleaning of the scanner window is necessary
in order to remove dirt and fingerprints.
Wipe the scan window with a soft lint-free cloth and a non-abrasive cleaner to
avoid the scan window from being scratched and damaged. The scan window can
be cleaned while the scanner is running.
The standard interface cable is attached to the scanner with a 10-pin modular
connector. When the connector is properly seated, it is secured in the scanner by a
flexible retention tab. The cable is designed to be field replaceable. Replacement
cables can be obtained from your authorized distributor. To replace the cable, take
the following steps.
1. Make sure the power of both the host terminal and the scanner is powered off.
2. Disconnect the old scanner cable from the host terminal.
3. Press down the retention tab, and gently pull out the cable.
4. Insert the new interface cable into the bottom of the scanner until it clicks.
Then, plug the new cable into the host.
Troubleshooting
This section contains information about how to solve problems that you may
encounter when operating the scanner. If a trouble occurs, please refer to the
following diagnostic tips as a mean to solve the trouble. However, before referring
to the tips, make sure that the scanner is installed well. If the problem remains,
contact your dealer.
Problem
Diagnostic Tips
The scanner is on but cannot read
any barcode.
The scanner window is dirty. Clean the scanner
window as described in the Scanner
Maintenance section.
The presented barcode type is not enabled. Use
this guide to tell the scanner to accept that type
of barcode.
The host terminal has disabled the scanner.
Check the setup of host terminal.
The barcode type presented is not supported by
the scanner.
The scanner does not accept more
than two or three barcode labels.
Determine whether the required barcode types
are enabled or not.
A stray barcode is sitting somewhere in the
scanner field of view. Remove all barcode labels
from the scanner’s scan volume and try again.

4
Problem
Diagnostic Tips
The scanner cannot send the data to the POS
system. Make sure that the scanner is installed
well and your host POS system is ready to
receive data.
A barcode is read by the scanner
but not accepted by the POS
system.
The communication settings of the system port
and the scanner do not match. Adjust the settings
to make them match to each other.
The scanner is not installed well. Contact your
dealer for the proper installation. The software
running on the POS system does not support the
data format of the barcode label.
When a barcode stays close to the
scanner, the barcode cannot be read
automatically by the scanner.
Check whether or not you have enabled the
Manual Trigger mode. If you have enabled this
mode accidentally, please disable the Manual
Trigger mode by scanning the “Disable trigger”
barcode in the advanced user manual.
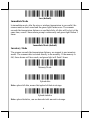
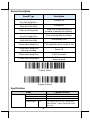
Programming Codes
Below are some suggestion you need to bear in mind while scanning labels:
1. The barcode labels shown in bold and black are default factory settings.
2. Please cover the unwanted codes for scanning the specific barcode required
for the programming to prevent confusion in code scanning.
3. Use the user manual downloaded from our global website for advanced
programming.
4. While scanning the setup barcode labels provided in the quick guide, you need
to pull the trigger to initiate the decoding process.
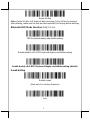
Firmware Version
Scan the below barcode to retrieve the current firmware version.
Communication Mode
2.4G Receiver mode (default)

5
Bluetooth HID mode
Pair Method
Pair Setting
2.4G Receiver Mode:
To enter the pairing status, first scan “2.4G Receiver Mode”, then scan
“Pairing Setting” (the green light will flash). Now plug the USB dongle into
the device, when hearing a “beep” sound, it means the pairing is successful and
the blue light is always on. (The whole pairing process takes about 1min, if
timeout and the pairing failed, it will automatically exit the pairing mode)
Bluetooth HID Mode:
To enter the pairing status, first scan “Bluetooth HID Mode”, then scan “Pair
Setting” (the green & blue light will flash). Now turn on the Bluetooth in your
device, search and select the device “Barcode Scanner HID”, when hearing a
“beep” sound, it means the pairing is successful and the blue light is always on.
(The whole pairing process takes about 1min, if timeout and the pairing failed,
it will automatically exit the pairing mode)
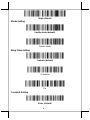
Bluetooth upload speed setting
Fast
Medium

6
Low (default)
Immediate Mode
ln immediate mode, after the wire or wireless transmission is successful, the
scanner emits a short sound and the green light flashes once. The scanner
exceeds the transmission distance or send data fails, all data will be lost, at the
same time, sound 3 times alarm prompt continuously and green light flashes 3
times.
Immediate Mode (default)
Inventory Mode
The scanner exceeds the transmission distance, we suggest to use inventory
model. The scanner data is storied directly in the memory. If the memory is
full, three alarms will be sounds, and green light will flash 3 times.
Memory Mode
Upload data
Note: upload all data, means that upload all data in storage.
Upload statistics
Note: upload statistics, can see barcode total amount in storage.

7
Delete all data
Note: Delete all data, will delete all data in storage, Data will not be restored
after deleting, make sure the data has been uploaded for backup before deleting.
Bluetooth HID Mode Function (Only for los)
HID Keyboard display and hidden setting
Disable double-click HID Keyboard display and hidden setting
Enable double-click HID Keyboard display and hidden setting (default)
Sound Setting
Disable sound
(Mute only for wireless firmware)
Low

8
High (default)
Shake Setting
Enable shake (default)
Disable shake
Sleep Time Setting
5 minute (default)
30 minutes
On
Terminal Setting
Enter (default)

9
Enter+LF
TAB
No terminal
Interface
USB Virtual Com
(Vendor Class)
LED Indicator
1. Red light is always on when charging, it turns off when the battery is full or
the charging line is not connected. If the red light flashes, the battery may be
not applied or not applied appropriately;
2. Regular blue light indicates that all connections are in good condition;
3. Green light flashes when under 2.4G connection;
4. Blue light flashes when under SPP connection;
5. Green & blue lights flash synchronously when under HID connection;
6. Green & blue lights flash alternately when under BLE connection;

10
Buzzer Description
Sound Type
Description
1 time long beep
(low first high after )
Scanner on
1 time long beep
(high first low after)
Scanner off
1 time short beep(low)
Scan code or pair receiver or
wireless connected successfully.
1 time short beep
(low first high after)
Save scanning data in storage.
1 time short beep
(high first low after)
Scan setting code
3 times short beep(low)
2.4G send data fail or cache is full
5 times short beep(low)
and stop scanning
Power off
2 times short beep(low)
2.4G Disconnect
2 times short beep(high)
Scan the Setting code which
does not work
Display Power
Display Version
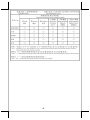
Specifications
Item
Characteristics
Performance
Image Sensor
1280*800 CMOS
Illumination
White LED
Aiming
Red LED
Symbologies
2D
QR, Micro QR, PD417, Micro PDF,
Data Matrix, Aztex, Maxicode, Han
Xin, etc.

11
1D
Code 128, EAN-13, EAN-8, Code 39,
UPC-A, UPC-E, Codabar, Interleaved
2 of 5, ITF-6, ITF-14, ISBN, Code
93, UCC/EAN-128, GS1 Databar,
Matrix 2 of 5, Standard 2 of 5,
Plessey, MSI-Plessey, etc.
Resolution*
≧4mil
Typical Depth of Field*
EAN-13 (13mil): 40mm-360mm
PDF417 (6.67mil): 30mm-200mm
Data Matrix (10mil): 30mm-220mm
Code 39 (5mil): 40mm-180mm
QR Code (20mil): 40mm-330mm
Min. Symbol Contrast
≧25%
Scan Angle**
Roll: 360°, Pitch: ±50°, skew: ±50°
Field of View
Horizontal 49.6°, Vertical 37.2°
Electrical
Interface
USB
*Test conditions: T=25°C Illumination=200lux using incandescent lamp.
**Test conditions: Scan Distance=(min. DOF + max. DOF)/2; T=25°C;
Illumination=200lux using incandescent lamp.
Notification:
1. Please read this manual carefully before using the barcode scanner;
2. The charging voltage of the scanner is 5V, please use a 5V/1A power
adaptor for charging to ensure that there is sufficient power for the normal
operation of scanner;
3. Our company reserves all rights, and reserves the right to make changes to
the product to improve its reliability, functionality or design;
4. Please be advised that any revision of this manual will not be informed.
※
The product information and specifications are subject to change without
prior notice. To get the detailed information of the CD-3301UB, please
check this model from Posiflex Global Website.
(http://www.posiflex.com/en-global/Download/download). Or download
the advanced manual for more detailed settings.

12
-
 1
1
-
 2
2
-
 3
3
-
 4
4
-
 5
5
-
 6
6
-
 7
7
-
 8
8
-
 9
9
-
 10
10
-
 11
11
-
 12
12


Posiflex CD-3301UB Guide d'installation rapide
- Taper
- Guide d'installation rapide
dans d''autres langues
- English: Posiflex CD-3301UB Quick setup guide
Autres documents
-
 Inateck BCST-70 Mode d'emploi
-
 Winmate M101PR Manuel utilisateur
-
Renkforce RF-IDC9277L Le manuel du propriétaire
-
 Winmate M900P Manuel utilisateur
-
 Winmate M116PT Manuel utilisateur
-
 Winmate M101P-ME Manuel utilisateur
-
 Winmate M900P Manuel utilisateur
-
Winmate M101BK Manuel utilisateur
-
 Winmate M101S Manuel utilisateur
-
 Winmate M101B Series Manuel utilisateur


