
Quick Guide
EN | FR
Discover the new experience of connected
pipetting on www.gilson.com
Découvrez la nouvelle expérience de pipetage
connecté sur www.gilson.com

GET STARTED
PARTS CHECKLIST
3
2PIPETMAN® M CONNECTED | QUICK GUIDEPARTS CHECKLIST | PIPETMAN® M CONNECTED
Parts Checklist
●PIPETMAN® M Connected pipette
●Power Supply, 5V with AC adapter and cable
●Battery tags (qty 4)
●Ejector tags (qty 4)
●Tip ejector extension (P10M model only)
●PIPETMAN® M Connected Quick Guide
●Safety bag
●Certificate of Conformity with barcode sticker
●Lubricant (except for the P10M and
multichannel models)
Installation
NOTICE
Fully charge the pipette (for
approximately three hours)
before use.
For daily use, please wait the
pipette battery reach at least
50%.
PIPETMAN M Connected uses a
Lithium-Ion battery. Operation on
the battery is done at user’s risk
only.
Use only one of the approved charging devices:
●Power supply, included in box
●Stand adapter, for use with Gilson
CARROUSEL™ Stands, sold separately
(part number F807023)
●POWER CARROUSEL™ charging pipette
stand, sold separately (partnumberFB1001)
NOTE
The battery can take a few minutes
to wake up.
Other References
This Quick Guide provides you with basic
information to get started with PIPETMAN M
Connected.
Make sure you have read PIPETMANM Connected
User’s Guide, available on www.gilson.com for
additional information.
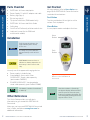
Get Started
All menu options (refer to Menu Options on
page 10) for PIPETMAN M Connected can be
reached with two buttons.
Push Button
Turn the push button left or right to set the
volume. Push to pipette.
Menu Button
Access pipette modes and adjust functions.
NOTE
After three minutes of inactivity,
the pipette display will turn o and
enter sleep mode. Press the push
button to reactivate the pipette. The
last setting and pipetting mode will
appear on the screen.
Menu
Button
Push
Button
Figure 1
Buttons on the PIPETMAN® M
Connected

USE THE MENU BUTTON
USE THE PUSH BUTTON
5
4PIPETMAN® M CONNECTED | QUICK GUIDEUSE THE PUSH BUTTON | PIPETMAN® M CONNECTED
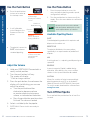
Use the Push Button
●Press the push button
to turn on or wake up
the startup screen
●A self-calibration
test will begin as the
firmware resets the
piston
●The pipette is preset to
PIPET, also known as
standard pipetting
Adjust the Volume
1. Hold your PIPETMAN M Connected in a
nearly vertical position.
2. Turn the push button half way.
The screen will display:
“
Click to change volume.
”
3. Press the push button; the volume on the
display will start blinking, you can now
adjust the volume:
●Turn the push button either
clockwise to decrease volume
or counter clockwise to increase
volume, as indicated on the button.
●Press the push button one time when
finished. The volume is locked.
4. Select a suitable tip for the pipette.
5. PIPETMAN M Connected is now ready to
pipette.
Figure 2
Volume range
displayed on startup
screen
Figure 3
Screen displayed
during calibration
Firmware
Version
Number of
Readjustments
Use the Menu Button
1. Press the menu button to access the
menu and adjust pipetting modes, speed,
configuration, and quit.
2. Turn the push button to choose one of the
modes. Press the menu button to confirm the
selection.
NOTE
Pipette speed is set to six by default;
both the aspirate and dispense speeds
can be adjusted in the speed menu.
Available Pipetting Modes
PIPET
Standard pipetting mode which aspirates and
dispenses the volume set.
REPETITIVE
The pipette distributes the same volume
repeatedly in an equal number of predefined
aliquots.
MIX
A mixing phase, i.e., aspirating and dispensing are
repeated.
REVERSE
A preset amount of liquid is added during
aspiration. After delivery, the excess volume
remains in the tip and should be discarded.
CUSTOM
Allows for creation of up to ten personalized
pipetting protocols on a PC or an Android™
tablet for transfer to PIPETMAN M Connected.
To use this mode, download the software from
www.gilson.com.
Turn O the Pipette
Press and hold the push button for at least five
seconds.
Figure 4
Volume screen with
pipetting mode
displayed

MISE EN ROUTE
CONTENU
7
6PIPETMAN® M CONNECTED | QUICK GUIDECONTENU | PIPETMAN® M CONNECTED
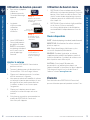
Contenu
●Pipette PIPETMAN® M Connected
●Alimentation 5V avec adaptateur secteur et
cordon USB
●4 étiquettes côté batterie
●4 étiquettes côté éjecteur
●Extension d’éjecteur (pour modèle P10M)
●Guide d’utilisation rapide
●Sachet de sécurité
●Certificat de conformité (incl. vignette
code-barres)
Installation
AVIS
Avant la première utilisation,
il est vivement recommandé de
charger complètement la batterie
de votre nouveau PIPETMAN M
Connected. Cette opération prend
environ 3 heures et s’eectue à l’aide
de l’un des accessoires suivants.
Ne pas utiliser la pipette tant que la
charge n’a pas atteint 50%.
ATTENTION
PIPETMAN M Connected utilise une
batterie Ion Lithium. Merci de ne pas
intervenir sur la batterie.
●Alimentation, incluse dans la boîte
●Adaptateur-chargeur pour portoir
CARROUSEL™, vendu séparément
●Portoir-chargeur POWER CARROUSEL,
vendu séparément
NOTE
L’initialisation peut prendre quelques
minutes.
Complément d’information
Ce guide vous donne les informations de base
pour la mise en route de votre
PIPETMANM Connected.
Assurez-vous de lire le guide d’utilisation,
téléchargeable sur www.gilson.com, pour obtenir
des instructions plus détaillées et pour toute
information complémentaire.
Mise en route
PIPETMAN M Connected est si facile à utiliser
que seuls 2 boutons vous permettent de pipeter et
d’atteindre toutes les commandes (Cf. page 10)
Le bouton-poussoir
Permet le réglage du volume par rotation vers la
gauche ou la droite, et le pipetage d’une simple
pression.
Le bouton menu
Permet d’accéder aux modes de pipetage et aux
fonctions de réajustement.
NOTE
PIPETMAN M Connected se met en
veille après 3 minutes d’inactivité.
L’écran s’éteint. Cliquez simplement
sur le bouton-poussoir pour réactiver
la pipette: vos derniers paramètres
(réglages, mode de pipetage)
s’achent sur l’écran.
Bouton
Menu
Bouton-
poussoir
Image 1
Boutons du PIPETMAN® M Connected

UTILISATION DU BOUTON MENU
UTILISATION DU BOUTON-POUSSOIR
9
8PIPETMAN® M CONNECTED | QUICK GUIDEUTILISATION DU BOUTON-POUSSOIR | PIPETMAN® M CONNECTED
Utilisation du bouton-poussoir
●Pour activer la pipette,
cliquez sur
le bouton-poussoir,
l’écran de démarrage
apparait.
●La pipette
réalise une auto
calibration,
le piston se
réinitialise.
●Votre PIPETMANM
Connected propose
par défaut le mode
PIPET, il correspond
au pipetage standard
aussi connu sous le
nom de pipetage
forward.
Ajuster le volume
1. Tenez votre PIPETMAN M Connected en
position verticale.
2. Tournez le bouton-poussoir d’un demi-tour,
l’écran affiche: ‘Click to Change Volume.’
3. Cliquez sur le bouton-poussoir ; le volume
affiché commence à clignoter.
4. Vous pouvez maintenant modifier le volume
en tournant le bouton-poussoir dans le sens
des aiguilles d’une montre pour diminuer
le volume, ou dans le sens inverse pour
l’augmenter.
5. Cliquez sur le bouton-poussoir pour
verrouiller le volume lorsque vous avez
terminé.
6. Sélectionnez une pointe correspondant au
modèle de PIPETMAN M Connected.
Vous êtes prêt à pipeter.
Image 2
Gamme de volumes
affichée sur l’écran de
démarrage
Image 3
Ecran affiché lors
de la phase d’auto
calibration
Version du
micro logiciel
Nombre de
réajustements
Image 4
L’écran affiche le
volume ainsi que le
mode de pipetage
choisi
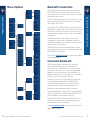
Utilisation du bouton menu
1. PIPETMAN M Connected permet de réaliser
différentes techniques de pipetage. Pressez le
bouton “Menu” pour accéder au menu. Pour
choisir l’un des modes de pipetage, tournez
le bouton-poussoir et validez votre sélection
d’un simple clic.
2. PIPETMAN M Connected est réglé par défaut
sur la vitesse 6 (vitesse maximale).
Les vitesses d’aspiration et de distribution
sont modifiables indépendamment l’une de
l’autre.
Modes disponibles
PIPET : Mode de pipetage standard (mode forward).
REPETITIVE : Distribution d’un même volume à
plusieurs reprises.
MIX : Phase de mélange, réalisée par cycles
successifs d’aspiration/distribution.
REVERSE : Pendant l’aspiration, un volume
supplémentaire prédéfini de liquide est prélevé.
Après la distribution, l’excédent de volume reste
dans la pointe avant d’être rejeté.
CUSTOM : Créez jusqu’à 10 protocoles
personnalisés sur ordinateur ou depuis une
tablette Android™ et transférez les dans la pipette.
Téléchargez le logiciel sur le site de Gilson à
l’adresse suivante www.gilson.com.
Éteindre
Pour éteindre votre PIPETMAN M Connected,
pressez le bouton-poussoir pendant environ 5 sec.

BLUETOOTH CONNECTION
MENU OPTIONS
11
10 PIPETMAN® M CONNECTED | QUICK GUIDEMENU OPTIONS | PIPETMAN® M CONNECTED
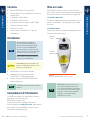
Menu Options
Click to
change volume
Mode
PIPET
Mode
REPETITIVE
Mode
MIX
Mode
REVERSE
Mode
CUSTOM
Speed
Configuration
Quit
Disassembly
Service info...
Service
settings...
Pipette info...
Firmware
VX.XX.XX
S/N
XXXXXXX
Total cycles
XXX
Readjustment
X
Meas. vol 10%
XX.XX µL
Meas. vol 50%
XX.XX µL
Meas. vol 100%
XX.XX µL
Quit
Quit
Click to
confirm
Quit
Quit
Quit
Standard
readjustment
Reset
settings
Volume limit
Beeper
ON
Contrast
Service
Adjustment…
Quit Quit
X
150.0 µL
Click to
start protocol
Aspiration
X
X
Dispense
Disassembly
Click to exit
Nb of cycles
X
Period
XXX days
Pipetting Cycles
XXX cycles
Date
XX/XX/XX
Service alert
ON
Days left
XX of XX
Quit
Service alert
ON
Bluetooth Connection
PIPETMAN M Connected can be connected to
the PIPETMAN® M Connected Software and the
Gilson apps either with the USB cable or using the
Bluetooth® connection.
To turn on Bluetooth, press the menu button, then
press and hold the push button for 2-3 seconds
until a blue light flashes.
Associated with TRACKMAN® Connected and its
PipettePilot® application, PIPETMAN M Connected
will reduce risks of human errors by transferring
verifiable pipetting parameters and commands in
the pipette.
With PipetteScope® app, know exactly when
your pipette needs to be calibrated, request a
calibration appointment, and view service history
reports all in one location.
With PIPETMAN M Connected Software create,
save, and transfer up to ten custom protocols into
PIPETMAN M Connected.
Please visit www.gilson.com to learn more about
Gilson applications.
Connexion Bluetooth
PIPETMAN M Connected peut être connecté
au logiciel PIPETMAN M et aux applications
Gilson soit via le câble USB, soit via la connexion
Bluetooth®. Pour activer la connexion Bluetooth,
appuyez sur le bouton menu, puis maintenez le
bouton poussoir enfoncé pendant 2 à 3 secondes
jusqu’à ce que le voyant bleu clignote.
Lorsqu’il est associé à TRACKMAN® Connected
et son application PipettePilot, PIPETMAN M
Connected pourra réduire les risques d’erreurs
humaines en transférant des paramètres de
pipetage et des commandes dans la pipette.
L’application PipetteScope® permet de demander et
suivre la calibration et l’utilisation du PIPETMAN M
Connected de manière fiable et précise.
Depuis PIPETMAN M Connected Software, créez,
enregistrez et transférez jusqu’à dix protocoles
personnalisés dans votre pipette.
Visitez www.gilson.com pour en savoir plus sur les
applications Gilson.

gilson.com/contactus
LT801595/D | ©2021 Gilson SAS. All rights reserved.
Regulatory Compliance
Gilson certifies on its sole responsibility that
PIPETMAN M Connected complies with the requirements
of the following standards:
Standards for EU
●2014/30/EU Electromagnetic compatibility, EMC
●2014/35/EU Low Voltage Directive, LVD
●2014/53/EU Radio Equipment Directive
Standards for UK
●Electromagnetic Compatibility, Regulation 2016,
BS EN Standard 61326-1
●Electrical Equipment (Safety), Regulation 2016,
BS EN Standard 61010-1
This Bluetooth-enabled device also complies with the
following requirements:
●USA, User information: Contains FCC ID: 2AAQS-ISP1507
●Canada, User information: Contains IC: 11306A-ISP1507
●Japan, TELEC certification n°207-16ISP5
The WEEE symbol (crossed-out wheeled bin), according
to the European Directive 2012/19/EU, indicates separate
collection for WEEE – Waste of Electrical and
Electronic Equipment. Do not dispose electronic
devices and their batteries in a household bin. Use
the recycling path in place in your country.
Warranty
Gilson warrants this pipette against defects in material under
normal use and service for a period of 24 months from the date
of purchase. This warranty shall not apply to pipettes that have
been subjected to abnormal use and/or improper or inadequate
maintenance (contrary to the recommendations given in the
user’s guide), including, but not limited to pipettes that have
been subjected to physical damage, improper handling, or
spillage or exposure to any corrosive environment. This warranty
shall also be void in the event pipettes are altered or modified
by any party other than Gilson or its designates. Gilson’s sole
liability under this warranty shall be limited to, at Gilson’s sole
option, repair or replacement of any defective components of
pipettes or refund of the purchase price paid for such pipettes.
THE FOREGOING WARRANTY IS EXCLUSIVE AND GILSON
HEREBY DISCLAIMS ALL OTHER WARRANTIES, WHETHER
EXPRESS OR IMPLIED, INCLUDING ANY WARRANTIES OF
MERCHANTABILITY AND ANY WARRANTIES OF FITNESS
FOR A PARTICULAR PURPOSE, UNDER NO CIRCUMSTANCES
SHALL GILSON BE LIABLE FOR ANY CONSEQUENTIAL,
PUNITIVE, INDIRECT OR INCIDENTAL DAMAGES ARISING
OUT OF ANY BREACH OF ANY EXPRESS OR IMPLIED
WARRANTY.
-
 1
1
-
 2
2
-
 3
3
-
 4
4
-
 5
5
-
 6
6
-
 7
7


