Sony HT-RT3 Mode d'emploi
- Catégorie
- Équipement musical supplémentaire
- Taper
- Mode d'emploi

HT-RT3
Home Theatre
System
Operating Instructions US
Mode d’emploi FR
Manual de Instrucciones ES

2
US
For the customers in the USA
Owner’s Record
The model and serial numbers are
located at the rear exterior of the
Subwoofer. Record these numbers in
the space provided below. Refer to
them whenever you call upon your Sony
dealer regarding this product.
Model No.
Serial No._____________________________
To reduce the risk of fire or electric
shock, do not expose this apparatus
to rain or moisture.
To reduce the risk of fire, do not cover
the ventilation opening of the appliance
with newspapers, tablecloths, curtains,
etc.
Do not expose the appliance to naked
flame sources (for example, lighted
candles).
To reduce the risk of fire or electric
shock, do not expose this appliance to
dripping or splashing, and do not place
objects filled with liquids, such as vases,
on the appliance.
Do not install the appliance in a
confined space, such as a bookcase or
built-in cabinet.
Do not expose batteries or appliances
with battery-installed to excessive heat,
such as sunshine and fire.
To prevent injury, this apparatus must
be securely placed on the cabinet or
attached to the floor/wall in accordance
with the installation instructions.
Indoor use only.
On power sources
The unit is not disconnected from the
mains as long as it is connected to the
AC outlet, even if the unit itself has
been turned off.
As the main plug is used to disconnect
the unit from the mains, connect the
unit to an easily accessible AC outlet.
Should you notice an abnormality in
the unit, disconnect the main plug
from the AC outlet immediately.
For the customers in the USA
This symbol is intended to alert
the user to the presence of
uninsulated “dangerous
voltage” within the product’s enclosure
that may be of sufficient magnitude to
constitute a risk of electric shock to
persons.
This symbol is intended to alert
the user to the presence of
important operating and
maintenance (servicing) instructions in
the literature accompanying the
appliance.
Properly shielded and grounded cables
and connectors must be used for
connection to host computers and/or
peripherals in order to meet FCC
emission limits.
NOTE:
This equipment has been tested and
found to comply with the limits for a
Class B digital device, pursuant to Part
15 of the FCC Rules. These limits are
designed to provide reasonable
protection against harmful interference
in a residential installation. This
equipment generates, uses and can
radiate radio frequency energy and, if
not installed and used in accordance
with the instructions, may cause
harmful interference to radio
communications.
WARNING

3
US
However, there is no guarantee that
interference will not occur in a particular
installation. If this equipment does
cause harmful interference to radio or
television reception, which can be
determined by turning the equipment
off and on, the user is encouraged to try
to correct the interference by one or
more of the following measures:
Reorient or relocate the receiving
antenna.
Increase the separation between the
equipment and receiver.
Connect the equipment into an outlet
on a circuit different from that to
which the receiver is connected.
Consult the dealer or an experienced
radio/TV technician for help.
CAUTION
You are cautioned that any changes or
modifications not expressly approved in
this manual could void your authority to
operate this equipment.
This equipment must not be co-located
or operated in conjunction with any
other antenna or transmitter.
This equipment complies with FCC
radiation exposure limits set forth for an
uncontrolled environment and meets
the FCC radio frequency (RF) Exposure
Guidelines. This equipment has very low
levels of RF energy that is deemed to
comply without maximum permissive
exposure evaluation (MPE).
Important Safety Instructions
1) Read these instructions.
2) Keep these instructions.
3) Heed all warnings.
4) Follow all instructions.
5) Do not use this apparatus near
water.
6) Clean only with dry cloth.
7) Do not block any ventilation
openings. Install in accordance with
the manufacturer’s instructions.
8) Do not install near any heat sources
such as radiators, heat registers,
stoves, or other apparatus (including
amplifiers) that produce heat.
9) Do not defeat the safety purpose of
the polarized or grounding-type
plug. A polarized plug has two
blades with one wider than the
other. A grounding type plug has
two blades and a third grounding
prong. The wide blade or the third
prong are provided for your safety. If
the provided plug does not fit into
your outlet, consult an electrician for
replacement of the obsolete outlet.
10) Protect the power cord from being
walked on or pinched particularly at
plugs, convenience receptacles, and
the point where they exit from the
apparatus.
11) Only use attachments/accessories
specified by the manufacturer.
12) Use only with the cart, stand, tripod,
bracket, or table specified by the
manufacturer, or sold with the
apparatus. When a cart is used, use
caution when moving the cart/
apparatus combination to avoid
injury from tip-over.
13) Unplug this apparatus during
lightning storms or when unused for
long periods of time.
14) Refer all servicing to qualified service
personnel. Servicing is required
when the apparatus has been
damaged in any way, such as power-
supply cord or plug is damaged,
liquid has been spilled or objects
have fallen into the apparatus, the
apparatus has been exposed to rain
or moisture, does not operate
normally, or has been dropped.

4
US
For the customers in Canada
Properly shielded and grounded cables
and connectors must be used for
connection to host computers and/or
peripherals.
This device complies with Industry
Canada’s licence-exempt RSSs.
Operation is subject to the following
two conditions:
(1) This device may not cause
interference; and
(2) This device must accept any
interference, including interference that
may cause undesired operation of the
device.
This equipment complies with IC
radiation exposure limits set forth for an
uncontrolled environment and meets
RSS-102 of the IC radio frequency (RF)
Exposure rules.
This equipment has very low levels of RF
energy that is deemed to comply
without maximum permissive exposure
evaluation (MPE). But it is desirable that
it should be installed and operated
keeping the radiator at least 20 cm or
more away from person’s body.
Copyrights and Trademarks
This system incorporates Dolby*
Digital.
* Manufactured under license from
Dolby Laboratories.
Dolby and the double-D symbol are
trademarks of Dolby Laboratories.
The BLUETOOTH® word mark and
logos are registered trademarks
owned by Bluetooth SIG, Inc. and any
use of such marks by Sony Corporation
is under license. Other trademarks and
trade names are those of their
respective owners.
The terms HDMI and HDMI High-
Definition Multimedia Interface, and
the HDMI Logo are trademarks or
registered trademarks of HDMI
Licensing Administrator, Inc. in the
United States and other countries.
The N-Mark is a trademark or
registered trademark of NFC Forum,
Inc. in the United States and in other
countries.
Android™ is a trademark of Google
LLC.
Google Play is a trademark of Google
LLC.
MPEG Layer-3 audio coding
technology and patents licensed from
Fraunhofer IIS and Thomson.
Windows Media is either a registered
trademark or trademark of Microsoft
Corporation in the United States and/
or other countries.
This product is protected by certain
intellectual property rights of Microsoft
Corporation. Use or distribution of
such technology outside of this
product is prohibited without a license
from Microsoft or an authorized
Microsoft subsidiary.
“BRAVIA” is a trademark of Sony
Corporation.
“ClearAudio+” is a trademark of Sony
Corporation.
“PlayStation” is a registered trademark
of Sony Computer Entertainment Inc.
Apple, iPhone, iPod, and iPod touch
are trademarks of Apple Inc.,
registered in the U.S. and other
countries.
Use of the Made for Apple badge means
that an accessory has been designed to
connect specifically to the Apple product(s)
identified in the badge, and has been
certified by the developer to meet Apple
performance standards. Apple is not
responsible for the operation of this device
or its compliance with safety and
regulatory standards.

5
US
Compatible iPhone/iPod models
The compatible iPhone/iPod models
are as follows. Update your iPhone/
iPod with the latest software before
using with the system.
Made for:
iPhone 6s/iPhone 6s Plus/iPhone 6/
iPhone 6 Plus/iPhone 5s/iPhone 5c/
iPhone 5
iPod touch (6th generation)/
iPod touch (5th generation)
Other system and product names are
generally trademarks or registered
trademarks of the manufacturers. ™
and marks are not indicated in this
document.
About these operating
instructions
The instructions in these Operating
Instructions describe the controls on
the remote control. You can also use
the controls on the Subwoofer if they
have the same or similar names as
those on the remote control.
Some illustrations are presented as
conceptual drawings, and may be
different from the actual products.
The default setting is underlined.
The text enclosed in double quotation
mark (“--”) appears in the front panel
display.

6
US
Table of Contents
About these operating
instructions ...........................5
Guide to parts and controls ....... 7
Listening
Listening to sound from the
connected devices ..............11
Listening to music from a USB
device ................................. 12
Sound Adjustment
Enjoying sound effects ............ 13
BLUETOOTH Functions
Listening to music from a
BLUETOOTH device ............ 14
Controlling the system using a
smartphone or tablet
(Sony | Music Center) ......... 16
Settings and Adjustments
Using the setup display ............17
Other Functions
Using the Control for HDMI
function ..............................20
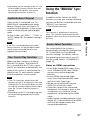
Using the “BRAVIA” Sync
function .............................. 21
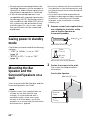
Saving power in standby
mode .................................. 22
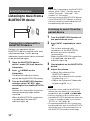
Mounting the Bar Speaker and
the Surround Speakers on
a wall .................................. 22
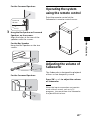
Operating the system using
the remote control ............. 23
Adjusting the volume of
Subwoofer ..........................23
Additional Information
Precautions ..............................24
Troubleshooting .......................25
Playable types of files ..............29
Supported audio formats ........29
Specifications ...........................30
On BLUETOOTH
communication .................. 31
Connecting
Startup Guide (separate document)

7
US
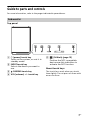
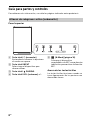
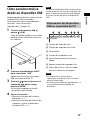
Guide to parts and controls
For more information, refer to the pages indicated in parentheses.
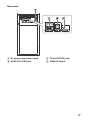
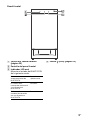
Top panel
(power) touch key
Turns on the system, or sets it to
standby mode.
INPUT touch key
Selects the device you want to
use.
PAIRING touch key
VOL (volume) +/– touch key
(N-Mark) (page 15)
Position the NFC-compatible
device near this indication to
activate the NFC function.
About touch keys
The touch keys work when you touch
them lightly. Do not press on them with
excessive force.
Subwoofer

8
US
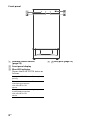
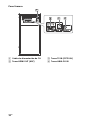
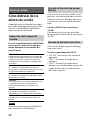
Front panel
Remote control sensor
(page 23)
Front panel display
Blue LED indicator
Shows the BLUETOOTH status as
follows.
(USB) port (page 12)
During BLUETOOTH
pairing
Flashes quickly
The system is
attempting to connect
with a BLUETOOTH
device
Flashes
The system has
established connection
with a BLUETOOTH
device
Lights up

9
US
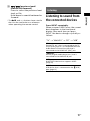
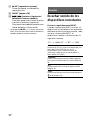
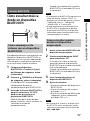
Rear panel
AC power cord (mains lead)
HDMI OUT (ARC) jack
TV IN (OPTICAL) jack
ANALOG IN jack

10
US
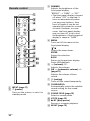
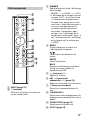
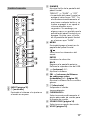
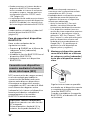
INPUT (page 11)
(power)
Turns on the system, or sets it to
standby mode.
DIMMER
Adjusts the brightness of the
front panel display.
“BRIGHT” “DARK” “OFF”
The front panel display is turned
off when “OFF” is selected. It
turns on automatically when
you press any buttons, then
turns off again if you do not
operate the system for several
seconds. However, in some
cases, the front panel display
may not turn off. In this case,
the brightness of the front panel
display is same as “DARK”.
MENU
Turns on/off the menu in the
front panel display.
/
Selects the menu items.
ENTER
Enters the selection.
BACK
Return to the previous display.
Stops USB playback.
(volume) +*/–
Adjusts the volume.
SW (subwoofer volume) +/–
(page 23)
Adjusts the volume of bass
sound.
(muting)
Turns off the sound temporarily.
CLEARAUDIO+
Automatically selects the suitable
sound setting for the sound
source.
SOUND FIELD (page 13)
Selects a sound mode.
VOICE (page 13)
* (play/pause)
Pauses or resumes playback.
NIGHT (page 13)
Remote control

11
US
Listening
/ (previous/next/
rewind/fast forward)
Press to select the previous/next
track or file.
Hold down to search backward or
forward.
*The and + buttons have a tactile
dot. Use the tactile dot as a reference
when operating the remote control.
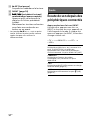
Listening to sound from
the connected devices
Press INPUT repeatedly.
When you press INPUT once, the current
device appears in the front panel
display, then each time you press
INPUT, the device changes cyclically as
follows.
“TV” “ANALOG” “BT” “USB”
Listening
“TV”
Device (TV, etc.) that is connected to the TV
IN (OPTICAL) jack, or a TV compatible with the
Audio Return Channel function that is
connected to the HDMI OUT (ARC) jack
“ANALOG”
Device (Digital media player, etc.) that is
connected to the ANALOG IN jack
“BT”
BLUETOOTH device that supports A2DP
(page 14)
“USB”
USB device that is connected to the (USB)
port (page 12)

12
US
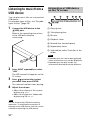
Listening to music from a
USB device
You can play music files on a connected
USB device.
For playable types of files, see “Playable
types of files” (page 29).
1 Connect the USB device to the
(USB) port.
Refer to the operating instructions
of the USB device before
connecting.
2 Press INPUT repeatedly to select
“USB”.
The USB content list appears on the
TV screen.
3 Press / to select the content
you want, then press ENTER.
The selected content starts playing.
4 Adjust the volume.
Adjust the volume of the system
by pressing +/–.
Adjust the volume of Subwoofer
by pressing SW +/–.
Do not remove the USB device during
operation. To avoid data corruption or
damage to the USB device, turn the system
off before removing the USB device.
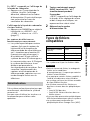
Playing time
Total playing time
Bit rate
Playback status
Rewind/fast forward speed
Repeat play status
Selected file index/Total files in the
folder
Depending on the source being played,
some information may not be displayed.
Depending on the play mode, the
information displayed may be different.
Note
Information of USB device
on the TV screen
Notes

13
US
Sound Adjustment
Enjoying sound effects
You can easily enjoy pre-programmed
sound fields that are tailored to different
kinds of sound sources.
Press SOUND FIELD repeatedly until
the sound field you want appears in
the front panel display.
You can also press CLEARAUDIO+ to select
“CLEARAUDIO+”.
This function is useful when watching
movies late at night. You will be able to
hear the dialog clearly even at a low
volume level.
Press NIGHT to select “N.ON”.
To inactivate the Night Mode function,
press NIGHT to select “N.OFF”.
This function helps make dialogs
clearer.
Press VOICE repeatedly.
“UP OFF”: The Clear Voice function is
turned off.
“UP 1”: Dialogue range is enhanced.
“UP 2”: Dialogue range is enhanced,
and the parts of range difficult to be
discerned by the elderly are boosted.
Sound Adjustment
Selecting the sound field
“CLEARAUDIO+”
You can enjoy the sound with Sony-
recommended sound field. Sound field is
automatically optimized according to
playback content and function.
“MOVIE”
Sounds are played back with surround
effects, and they are realistic and powerful,
making them suitable for movies.
“MUSIC”
Sound effects are optimized for listening to
music.
“SPORTS”
Commentary is clear, cheers are heard as
surround-sound, and sounds are realistic.
“GAME”
Sounds are powerful and realistic, suitable
for game play.
“STANDARD”
Sound that corresponds to every source.
Tip
Using the Night Mode
function
Using the Clear Voice
function

14
US
Listening to music from a
BLUETOOTH device
Pairing is an operation where
BLUETOOTH devices register with each
other beforehand. Once a pairing
operation is performed, it does not need
to be performed again.
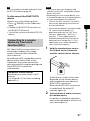
1 Place the BLUETOOTH device
within 1 meter (3.3 feet) from the
Subwoofer.
2 Press PAIRING on the
Subwoofer.
The blue LED indicator flashes
quickly during BLUETOOTH pairing.
3 Turn on the BLUETOOTH function,
and then select “HT-RT3” after
searching for it on the BLUETOOTH
device.
Perform this step within 5 minutes,
otherwise pairing mode will be
canceled.
When the BLUETOOTH connection
is established, the blue LED
indicator lights up.
If passkey is required on the BLUETOOTH
device, enter “0000”. Passkey may be
called “Passcode”, “PIN code”, “PIN
number” or “Password”.
You can pair up to 9 BLUETOOTH devices.
If the 10th BLUETOOTH device is paired,
the least recently connected device will
be replaced by the new one.
1 Turn the BLUETOOTH function of
the paired device to on.
2 Press INPUT repeatedly to select
“BT”.
The system automatically
reconnects to the BLUETOOTH
device it was most recently
connected to.
When the BLUETOOTH connection
is established, the blue LED
indicator lights up.
3 Start playback on the BLUETOOTH
device.
4 Adjust the volume.
Adjust the volume of the
BLUETOOTH device.
Adjust the volume of the system
by pressing +/–.
Adjust the volume of Subwoofer
by pressing SW +/–.
Once the system and the BLUETOOTH
device are connected, you can control
playback by pressing and /.
You can connect to the system from a
paired BLUETOOTH device even when the
system in standby mode, if you set the
“BTSTB” to “ON” (page 18).
The audio playback on this system may
be delayed from that on the BLUETOOTH
device because of the characteristics of
the BLUETOOTH wireless technology.
BLUETOOTH Functions
Pairing this system with a
BLUETOOTH device
Notes
Listening to music from the
paired device
Notes

15
US
BLUETOOTH Functions
You can enable or disable codec AAC from
BLUETOOTH device (page 18).
To disconnect the BLUETOOTH
device
Perform any of the following items.
Press PAIRING on the Subwoofer
again.
Disable the BLUETOOTH function on
the BLUETOOTH device.
Turn off the system or the BLUETOOTH
device.
NFC (Near Field Communication) is a
technology enabling short-range
wireless communication between
various devices.
By holding an NFC-compatible remote
device near to the N-Mark on the
Subwoofer, the system and remote
device proceed to complete pairing and
the BLUETOOTH connection
automatically.
The system only can recognize and
connect to one NFC-compatible remote
device at a time.
Depending on your remote device, you
may need to perform the following items
on your remote device in advance.
Turn on the NFC function. For details,
refer to the operating instructions of
the remote device.
If your remote device is having an older
OS version than Android 4.1.x,
download and start the “NFC Easy
Connect” application. “NFC Easy
Connect” is a free application for
Android remote devices that can be
obtained from Google Play™. (The
application may not be available in
some countries/regions.)
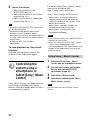
1 Hold the remote device near to
the N-Mark on the Subwoofer
until the remote device vibrates.
Follow the on-screen instructions
displayed on the remote device,
and complete the procedure for
BLUETOOTH connection.
When the BLUETOOTH connection
is established, the blue LED
indicator lights up.
2 Start playback of audio source on
the remote device.
For details on playback operations,
refer to the operating instructions of
your remote device.
Tip
Connecting to a remote
device by One-touch
function (NFC)
Compatible remote devices
Remote devices with a built-in NFC
function
(OS: Android 2.3.3 or later, excluding
Android 3.x)
Notes

16
US
3 Adjust the volume.
Adjust the volume of the
BLUETOOTH device.
Adjust the volume of the system
by pressing +/–.
Adjust the volume of Subwoofer
by pressing SW +/–.
If pairing and the BLUETOOTH connection
fail, do the following.
Hold the remote device near to the
N-Mark on the Subwoofer again.
Remove the case from the remote device
if using a commercially available remote
device case.
Relaunch “NFC Easy Connect”
application.
To stop playback by One-touch
function
Hold the remote device near to the
N-Mark on the Subwoofer again.
Controlling the
system using a
smartphone or
tablet (Sony | Music
Center)
Sony | Music Center is an application for
controlling compatible Sony audio
devices using the mobile device such as
a smartphone or tablet.
For details about Sony | Music Center,
refer to the following URL.
http://www.sony.net/smcqa/
Sony | Music Center allows you to:
enjoy music at home seamlessly.
change commonly used settings,
select the input of the system, and
adjust the volume.
enjoy music content stored on a
smartphone with the system.
enjoy music visually with your
smartphone display.
Sony | Music Center uses the BLUETOOTH
function of the system.
What you can control with Sony | Music
Center varies depending on the
connected device. The specification and
design of the application may change
without notice.
1 Download free Sony | Music
Center app on the mobile device.
2 Connect the system and mobile
device with the BLUETOOTH
connection (page 14).
3 Start Sony | Music Center.
4 Operate by following the Sony |
Music Center screen.
Use the latest version of Sony | Music
Center.
Tip
Notes
Using Sony | Music Center
Note

17
US
Settings and Adjustments
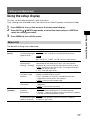
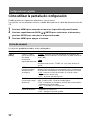
Using the setup display
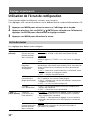
You can set the following items with the menu.
Your settings are retained even if you disconnect the AC power cord (mains lead).
1 Press MENU to turn on the menu in the front panel display.
2 Press BACK///ENTER repeatedly to select the item and press ENTER to
select the setting you want.
3 Press MENU to turn off the menu.
The default settings are underlined.
Settings and Adjustments
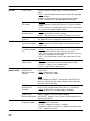
Menu list
Menu items Function
“LVL >”
(Level)
“SUR.L”/“SUR.R”
(Surround left/right
speaker level)
“0.0 dB”
: Adjusts the sound level of the Surround
Speakers from –6.0 dB to +6.0 dB (0.5 dB interval).
Be sure to set “TTONE” to “ON” for easy adjustment.
“ATT”
(Attenuation
settings – Analog)
Distortion may occur when you listen to a device
connected to the ANALOG IN jack. You can prevent
distortion by attenuating the input level on the system.
“ON”: Attenuates the input level. The output level will
decrease at this setting.
“OFF”: Normal input level.
“DRC”
(Dynamic range
control)
Useful for enjoying movies at low sound volume. DRC
applies to Dolby Digital sources.
“ON”: Compresses sound in accordance with the
information contained in the content.
“OFF”: Sound is not compressed.
“TTONE”
(Test tone)
“ON”: The test tone is output from each speaker in
sequence.
“OFF”: Turns off the test tone.
“SPK >”
(Speaker)
“PLACE”
(Speaker
placement)
“STDRD”: Select this setting if you install the Bar Speaker
and the Surround Speakers in standard position.
“FRONT”: Select this setting if you install the Bar Speaker
and the Surround Speakers in front.
“SUR.L”/“SUR.R”
(Surround left/right
speaker distance)
“3.0 M”
: Adjusts the distance from the seating position to
the Surround Speakers from 1.0 meter (3.3 feet) to
6.0 meters (19.7 feet).
Note

18
US
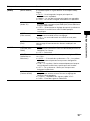
“AUD >”
(Audio)
“DUAL”
(Dual mono)
You can enjoy multiplex broadcast sound when the
system receives a Dolby Digital multiplex broadcast
signal.
“M/S”: Mixed sound of both the main and sub languages
will be output.
“MAIN”: Sound of the main language will be output.
“SUB”: Sound of the sub language will be output.
“TV AU”
(TV audio)
“AUTO”: Select this setting when the system is
connected to an HDMI (ARC) jack of a TV with an HDMI
cable.
“OPT”: Select this setting when the system is connected
to a TV with the optical digital cable.
“EFCT”
(Sound effect)
“ON”: The sound of the selected sound field is played. It
is recommended to use this setting.
“OFF”: The input source is down-mixed for 2 channels.
“STRM”
(Stream)
Shows the current audio stream information.
See page 29 on the supported audio formats.
“HDMI>” “CTRL”
(Control for HDMI)
“ON”: The Control for HDMI function is enabled. Devices
connected with an HDMI cable can control each other.
“OFF”: Off.
“TVSTB”
(Standby Linked to
TV)
This function is available when you set “CTRL” to “ON”.
“AUTO”: If the input of the system is “TV”, the system
turns off automatically when you turn off the TV.
“ON”: The system turns off automatically when you turn
off the TV regardless of the input.
“OFF”: The system does not turn off when you turn off
the TV.
“COLOR”
(HDMI color)
“AUTO”: Automatically detects the type of external
device, and switches to the matching color setting.
“YCBCR”: Outputs YCBCR video signals.
“RGB”: Outputs RGB video signals.
“BT >”
(BLUETOOTH)
“BTAAC”
(BLUETOOTH
Advanced audio
coding)
You can set whether or not the system uses AAC via
BLUETOOTH.
“ON”: Enable AAC codec.
“OFF”: Disable AAC codec.
If you change the “BTAAC” setting when a BLUETOOTH
device is connected, the codec setting is only reflected
after the next connection.
“BTSTB”
(BLUETOOTH
standby)
When the system has pairing information, the system is in
BLUETOOTH standby mode even when it is turned off.
“ON”: BLUETOOTH standby mode is enabled.
“OFF”: BLUETOOTH standby mode is disabled.
“INFO”
(BLUETOOTH
device information)
The detected BLUETOOTH device name and device
address appear in the front panel display.
“NO DEVICE” appears if the system is not connected to a
BLUETOOTH device.
“USB >” “REPT”
(Playback mode)
“NONE”: Plays back all tracks.
“ONE”: Repeats one track.
“FLDER”: Repeats all tracks in a folder.
“RANDM”: Repeats all tracks in a folder in random order.
“ALL”: Repeats all tracks.
Menu items Function
Note

19
US
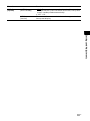
Settings and Adjustments
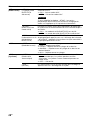
“SYS >”
(System)
“ASTBY”
(Auto standby)
“ON”: Turns on the auto standby function. When you do
not operate the system for about 20 minutes, the system
enters standby mode automatically.
“OFF”: Off.
“VER”
(Version)
The current firmware version information appears in the
front panel display.
Menu items Function

20
US
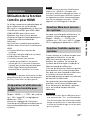
Using the Control for
HDMI function
Connecting a device such as a TV or
Blu-ray Disc player compatible with the
Control for HDMI function* by HDMI
cable (High Speed HDMI Cable with
Ethernet, not supplied) enables you to
easily operate the device by a TV remote
control.
The following functions can be used
with the Control for HDMI function.
System Power Off function
System Audio Control function
Audio Return Channel
One-Touch Play function
* Control for HDMI is a standard used by
CEC (Consumer Electronics Control) for
allowing HDMI (High-Definition
Multimedia Interface) devices to control
each other.
These functions may work with devices
other than those manufactured by Sony,
but operation is not guaranteed.
Set “HDMI>” – “CTRL” on the system to
“ON” (page 18). The default setting is
“ON”.
Enable the Control for HDMI function
settings for the TV and other device
connected to the system.
If you enable the Control for HDMI
(“BRAVIA” sync) function when using a TV
manufactured by Sony, the Control for
HDMI function of the system is also
enabled automatically. When settings are
completed, “DONE” appears in the front
panel display.
When you turn off the TV, the system
will turn off automatically.
Set “HDMI>” – “TVSTB” on the system to
“ON” or “AUTO” (page 18). The default
setting is “AUTO”.
If you turn on the system while you are
watching the TV, the TV sound will be
output from the speakers of the system.
The volume of the system can be
adjusted using the TV’s remote control.
If the TV sound was output from the
speakers of the system the previous
time you watched the TV, the system
will be turned on automatically when
you turn on the TV again.
Operations can also be made by the
TV’s menu. For details, refer to the
operating instructions of your TV.
Sound is only output from the TV if other
than “TV” input is selected when using
the Twin Picture function on the TV. When
you disable the Twin Picture function, the
sound is output from the system.
The number for the system’s volume level
is displayed on the TV screen depending
on the TV. The volume number displayed
on the TV may differ from the number on
the front panel display of the system.
Other Functions
Note
Preparing to use the Control
for HDMI function
Tip
System Power Off function
System Audio Control
function
Notes
La page charge ...
La page charge ...
La page charge ...
La page charge ...
La page charge ...
La page charge ...
La page charge ...
La page charge ...
La page charge ...
La page charge ...
La page charge ...
La page charge ...
La page charge ...
La page charge ...
La page charge ...
La page charge ...
La page charge ...
La page charge ...
La page charge ...
La page charge ...
La page charge ...
La page charge ...
La page charge ...
La page charge ...
La page charge ...
La page charge ...
La page charge ...
La page charge ...
La page charge ...
La page charge ...
La page charge ...
La page charge ...
La page charge ...
La page charge ...
La page charge ...
La page charge ...
La page charge ...
La page charge ...
La page charge ...
La page charge ...
La page charge ...
La page charge ...
La page charge ...
La page charge ...
La page charge ...
La page charge ...
La page charge ...
La page charge ...
La page charge ...
La page charge ...
La page charge ...
La page charge ...
La page charge ...
La page charge ...
La page charge ...
La page charge ...
La page charge ...
La page charge ...
La page charge ...
La page charge ...
La page charge ...
La page charge ...
La page charge ...
La page charge ...
La page charge ...
La page charge ...
La page charge ...
La page charge ...
La page charge ...
La page charge ...
La page charge ...
La page charge ...
La page charge ...
La page charge ...
La page charge ...
La page charge ...
La page charge ...
La page charge ...
La page charge ...
La page charge ...
La page charge ...
La page charge ...
La page charge ...
La page charge ...
-
 1
1
-
 2
2
-
 3
3
-
 4
4
-
 5
5
-
 6
6
-
 7
7
-
 8
8
-
 9
9
-
 10
10
-
 11
11
-
 12
12
-
 13
13
-
 14
14
-
 15
15
-
 16
16
-
 17
17
-
 18
18
-
 19
19
-
 20
20
-
 21
21
-
 22
22
-
 23
23
-
 24
24
-
 25
25
-
 26
26
-
 27
27
-
 28
28
-
 29
29
-
 30
30
-
 31
31
-
 32
32
-
 33
33
-
 34
34
-
 35
35
-
 36
36
-
 37
37
-
 38
38
-
 39
39
-
 40
40
-
 41
41
-
 42
42
-
 43
43
-
 44
44
-
 45
45
-
 46
46
-
 47
47
-
 48
48
-
 49
49
-
 50
50
-
 51
51
-
 52
52
-
 53
53
-
 54
54
-
 55
55
-
 56
56
-
 57
57
-
 58
58
-
 59
59
-
 60
60
-
 61
61
-
 62
62
-
 63
63
-
 64
64
-
 65
65
-
 66
66
-
 67
67
-
 68
68
-
 69
69
-
 70
70
-
 71
71
-
 72
72
-
 73
73
-
 74
74
-
 75
75
-
 76
76
-
 77
77
-
 78
78
-
 79
79
-
 80
80
-
 81
81
-
 82
82
-
 83
83
-
 84
84
-
 85
85
-
 86
86
-
 87
87
-
 88
88
-
 89
89
-
 90
90
-
 91
91
-
 92
92
-
 93
93
-
 94
94
-
 95
95
-
 96
96
-
 97
97
-
 98
98
-
 99
99
-
 100
100
-
 101
101
-
 102
102
-
 103
103
-
 104
104


Sony HT-RT3 Mode d'emploi
- Catégorie
- Équipement musical supplémentaire
- Taper
- Mode d'emploi
dans d''autres langues
- English: Sony HT-RT3 Operating instructions
- español: Sony HT-RT3 Instrucciones de operación
Documents connexes
-
Sony HT-CT390 Manuel utilisateur
-
Sony HTRT3 Manuel utilisateur
-
Sony HT-MT500 Mode d'emploi
-
Sony HT-CT800 Manuel utilisateur
-
Sony HT-XT2 Home Theatre System Manuel utilisateur
-
Sony HT-NT5 Mode d'emploi
-
-
-
-