GE Monogram ZIF360NHRH Manuel utilisateur
- Catégorie
- Fabricants de glaçons
- Taper
- Manuel utilisateur
Ce manuel convient également à

Owner’s
Manual
36” Built-In
All-Refrigerators and
All-Freezers
monogram.com
09-14 GE
224D2602P002
49-60722-2

Consumer Information
36” All-Refrigerator and All-Freezer Units
2
Contents
Consumer Services
Important Phone Numbers .................... 19
Model and Serial Numbers .......................3
Problem Solver .............................16-17
Product Registration .............................3
Safety Instructions ............................ 4–7
State of California
Warranty ..............................Back Cover
Care and Cleaning
Cleaning—Outside and Inside .................. 13
Light Bulb Replacement ....................... 14
Vacation ...................................... 14
Operating Instructions
Automatic Icemaker .............................9
Sabbath Mode Product ........................ 13
Shelves ........................................ 12
Storage Drawers .............................. 11
Temperature Controls ...........................8
Water Filter Accessory ......................... 10
Preparation
Location ....................................... 15
Before
using
your
refrigerator/
freezer
Read this manual carefully. It is intended
to help you operate and maintain your new
refrigerator/freezer properly.
Keep it handy for answers to your questions.
If you don’t understand something or
need more help, there is a list of toll-free
consumer service numbers included in
the back section of this manual.
OR
Visit our Website at: monogram.com

3
Write
down the
model
& serial
numbers
You’ll see them on a label inside the refrigerator/
freezer under the storage drawers.
Before sending in the Product Registration
card, please write these numbers here:
Model Number
Serial Number
Use these numbers in any correspondence or
service calls concerning your refrigerator/freezer.
If you
received a
damaged
refrigerator/
freezer
Immediately contact the dealer (or builder) that
sold you the refrigerator/freezer.
Save time
& money
Before you request service, check the Problem
Solver in the back of this manual.
It lists causes of minor operating problems that
you can correct yourself.
If you
need
service
To obtain service, see the Consumer Services
page in the back of this manual.
We’re proud of our service and want you to be
pleased. If for some reason you are not happy
with the service you receive, here are steps to
follow for further help.
For customers in the USA:
FIRST, contact the people who serviced your
appliance. Explain why you are not pleased.
In most cases, this will solve the problem.
NEXT, if you are still not pleased, write all the
details—including your phone number—to:
Manager, Customer Relations
GE Appliances
Appliance Park
Louisville, KY 40225
For customers in Canada:
FIRST, contact the people who serviced your
appliance. Explain why you are not pleased. In
most cases, this will solve the problem.
NEXT, if you are still not pleased, write all the
details—including your phone number to:
Manager, Consumer Relations
Mabe Canada Inc.
1 Factory Lane, Suite 310
Moncton, N.B. E1C 9M3
Consumer Information
36” All-Refrigerator and All-Freezer Units

4
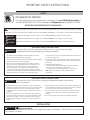
IMPORTANT SAFETY INSTRUCTIONS
GE Appliances Website
For more information on your refrigerator’s operation, visit www.GEAppliances.com or
call 800.GECARES (800.432.2737). In Canada visit GEAppliances.ca or call 800.561.3344.
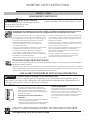
This is the safety alert symbol. This symbol alerts you to potential hazards that can kill or hurt you and others. All safety
messages will follow the safety alert symbol and the word “DANGER”, “WARNING”, or “CAUTION”. These words are defined as:
Indicates a hazardous situation which, if not avoided, will result in death or serious injury.
Indicates a hazardous situation which, if not avoided, could result in death or serious injury.
Indicates a hazardous situation which, if not avoided, could result in minor or moderate injury.
IMPORTANT SAFETY INSTRUCTIONS
To reduce the risk of fire, explosion, electric shock, or injury when using your
refrigerator/freezer follow these basic safety precautions:
REFRIGERATOR/FREEZER SAFETY INFORMATION
WARNING
WARNING
DANGER
CAUTION
In refrigerators/freezers with automatic ice makers, avoid contact
with the moving parts of the ejector mechanism, or with the heating
element that releases the cubes. Do not place fingers or hands
on the automatic ice making mechanism while the refrigerator is
plugged in.
Do not clean glass shelves or covers with warm water when they
are cold. Glass shelves and covers may break if exposed to sudden
temperature changes or impact, such as bumping or dropping.
Tempered glass is designed to shatter into many small pieces if it
breaks.
Keep fingers out of the “pinch point” areas; clearances between the
doors and between the doors and cabinet are necessarily small. Be
careful closing doors when children are in the area.
Do not touch the cold surfaces in the freezer compartment when
hands are damp or wet, skin may stick to these extremely cold
surfaces.
Do not refreeze frozen foods which have thawed completely.
IMPORTANT SAFETY INSTRUCTIONS
To reduce the risk of injury when using your refrigerator/freezer, follow these
basic precautions.
This refrigerator/freezer must be properly installed and located in
accordance with the Installation Instructions before it is used.
Replace all parts and panels before operating.
Do not store or use gasoline or other flammable vapors and liquids
in the vicinity of this or any other appliance.
Because of potential safety hazards under certain conditions,
we strongly recommend against the use of an extension cord.
However, if you must use an extension cord, it is absolutely
necessary that it be a UL-listed (in the United States) or a CSA
certified (in Canada), 3-wire grounding type appliance extension
cord having a grounding type plug and outlet and that the electrical
rating of the cord be 15 amperes (minimum) and 120 volts.
To prevent suffocation and entrapment hazards to children,
remove the doors from any refrigerator/freezer before disposing of
it or discontinuing its use.
Do not allow children to climb, stand or hang on the door handles
or the shelves in the refrigerator/freezer. They could seriously injure
themselves.
Unplug the refrigerator/freezer :
• To discontinue power to the refrigerator/freezer. It cannot be
turned off by any setting on the control panel.
• To clean, replace a burned out light bulb, or make repairs.
Note: Repairs must be performed by a qualified Service
Professional.
CAUTION
SAFETY
WARNING
Explosion Hazard.
Keep flammable materials and vapors, such as gasoline, away from freezer. Failure to do so can result in
fire, explosion, or death.
INSTALLATION

5
IMPORTANT SAFETY INSTRUCTIONS
Dans les éfrigérateurs / congélateurs qui ont des machines
à glaçons, évitez tout contact avec les éléments mobiles du
mécanisme d’éjection ou avec l’élément chauffant situé à la partie
inférieure de la machine à glaçons. Ne mettez jamais vos doigts
ou vos mains sur le mécanisme de fabrication automatique de
glaçons quand le réfrigérateur est branché.
Ne nettoyez pas les clayettes ou les couvercles en verre avec de l’eau
tiède quand ceux-ci sont froids. Les clayettes et couvercles en verre
peuvent se casser s’ils sont exposés à des changements soudains
de température ou si vous les cognez ou les faites tomber. Le verre
trempé est conçu pour se briser en petits morceaux en cas de casse.
Ne laissez jamais vos doigts dans des endroits où ils risquent
d’être pincés. L’écartement entre les portes et l’armoire est
nécessairement petit. Faites attention de fermer les portes quand
des enfants se trouvent à proximité.
Ne touchez jamais les surfaces froides dans le compartiment
congélation quand vos mains sont humides ou mouillées. Votre
peau peut coller à ces surfaces extrêmement froides.
Ne recongelez pas les aliments surgelés qui ont complètement
dégelé.
IMPORTANTES CONSIGNES DE SÉCURITÉ
Pour réduire le risque de blessures lorsque vous utilisez votre réfrigérateur,
veuillez suivre ces consignes de sécurité :
Vous devez bien installer et placer votre réfrigérateur /
congélateur, conformément aux Instructions d’installation
avant de l’utiliser.
Remettez toutes les pièces et panneaux en place avant
d’utiliser l’appareil.
Ne conservez jamais ou n’utilisez jamais d’essence ou d’autres
liquides ou gaz inflammables à proximité de votre réfrigérateur
ou de tout autre appareil électroménager.
Nous déconseillons fortement l’utilisation d’une rallonge à cause
des risques potentiels dans certaines conditions. Cependant, si
l’utilisation d’un cordon prolongateur est nécessaire, ce dernier doit
obligatoirement être homologué UL (aux USA) ou CSA (au Canada),
à trois brins avec mise à la terre pour appareil électroménager et
doit être équipé d’une fiche et d’une prise femelle avec terre. Les
caractéristiques électriques du cordon prolongateur doivent être
de 15 ampères (minimum) et de 120 volts.
Pour éviter les risques d’asphyxie et d’enfermement pour les
enfants. Démontez les portes de réfrigérateur / congélateur
avant de le mettre au rebut ou d’interrompre son utilisation.
Ne permettez jamais aux enfants de grimper, de monter, de
se tenir ou de se pendre aux étagères de votre réfrigérateur.
Ils peuvent endommager le réfrigérateur et se blesser
sérieusement.
Débranchez votre réfrigérateur / congélateur :
• L’alimentation électrique du réfrigérateur ne peut pas être
coupée par l’intermédiaire du panneau de commande.
• Débranchez votre réfrigérateur avant de le nettoyer, Avant
de remplacer une ampoule grillée, et de le réparer.
NOTE : Nous vous recommandons fortement de faire
accomplir tout service par un technicien qualifié.
Site Internet d’Électroménagers GE
Pour de plus amples informations sur le fonctionnement de votre réfrigérateur, consultez le
site www.electromenagersge.ca ou composez le 800.561.3344.
CONSIGNES DE SÉCURITÉ POUR LE RÉFRIGÉRATEUR / CONGÉLATEUR
SÉCURITÉ
IMPORTANTES CONSIGNES DE SÉCURITÉ
Pour réduire le risque d’incendie, d’explosion, de choc électrique ou de blessures lorsque
vous utilisez votre réfrigérateur / congélateur, veuillez suivre ces consignes de sécurité :
AVERTISSEMENT
Ce symbole représente une alerte de sécurité. Ce symbole vous avise de dangers possibles pouvant causer
la mort, des blessures ou autres. Tous les messages de sécurité seront précédés du symbole d’alerte de sécurité
ainsi que des mots « DANGER », « AVERTISSEMENT » ou « MISE EN GARDE ». Ces messages sont les suivants :
Signale une situation qui présente un danger imminent et qui, si elle n’est pas évitée, entraînera des blessures
graves, voire la mort.
Signale une situation qui présente un danger imminent et qui, si elle n’est pas évitée, peut entraîner des
blessures graves, voire la mort.
.
Signale une situation qui présente un danger imminent et qui, si elle n’est pas évitée, peut entraîner des
blessures mineures ou graves.
AVERTISSEMENT
DANGER
MISE EN GARDE
MISE EN GARDE
INSTALLATION
AVERTISSEMENT
Risque d’explosion.
Conservez les matériaux et vapeurs inflammables tels que l’essence à l’écart de votre congélateur. Une
explosion, un incendie voire la mort pourrait en résulter.

6
IMPORTANT SAFETY INSTRUCTIONS
USE OF EXTENSION CORDS
Because of potential safety hazards under certain conditions, we strongly recommend against the use of an
extension cord.
However, if you must use an extension cord, it is absolutely necessary that it be a UL-listed (in the United States) or a
CSA-listed (in Canada), 3-wire grounding type appliance extension cord having a grounding type plug and outlet and
that the electrical rating of the cord be 15 amperes (minimum) and 120 volts.
READ AND FOLLOW THIS SAFETY INFORMATION CAREFULLY.
SAVE THESE INSTRUCTIONS
Do not, under any circumstances, cut or remove the third (ground) prong from the power cord.
For personal safety, this appliance must be properly grounded.
The power cord of this appliance is equipped with a 3-prong
(grounding) plug which mates with a standard 3-prong
(grounding) wall outlet to minimize the possibility of electric
shock hazard from this appliance.
Have the wall outlet and circuit checked by a qualified
electrician to make sure the outlet is properly grounded.
Where a standard 2-prong wall outlet is encountered, it is
your personal responsibility and obligation to have it replaced
with a properly grounded 3-prong wall outlet. Do not use an
adapter.
The refrigerator/freezer should always be plugged into its
own individual electrical outlet which has a voltage rating that
matches the rating plate.
This provides the best performance
and also prevents overloading house wiring circuits which
could cause a fire hazard from overheated wires.
Never unplug your refrigerator/freezer by pulling on the power
cord. Always grip plug firmly and pull straight out from the
outlet.
Repair or replace immediately all power cords that have
become frayed or otherwise damaged. Do not use a cord that
shows cracks or abrasion damage along its length or at either
end.
When moving the refrigerator/freezer away from the wall, be
careful not to roll over or damage the power cord.
CONNECTING ELECTRICITY
WARNING
Suffocation and child entrapment hazard.
Remove fresh-food or freezer doors prior to disposal. Failure to do so can result in child entrapment
which can lead to death or brain damage.
Child entrapment and suffocation are not problems of the past.
Junked or abandoned refrigerators are still dangerous even if
they will sit for “just a few days.” If you are getting rid of your old
refrigerator, please follow the instructions below to help prevent
accidents.
Before You Throw Away Your Old Refrigerator or
Freezer:
Take off the fresh food and freezer doors.
Leave the shelves in place so that children may not easily
climb inside.
Refrigerants
All refrigeration products contain refrigerants, which under
federal law must be removed prior to product disposal. If you
are getting rid of an old refrigeration product, check with the
company handling the disposal about what to do.
PROPER DISPOSAL OF YOUR OLD REFRIGERATOR
IMPORTANT:
SAFETY (CONT.)
WARNING
Electrical Shock Hazard.
Plug into a grounded 3-prong outlet
Do not remove the ground prong
Do not use an adapter
Failure to follow these instructions can result in death, fire, or electrical shock.

7
IMPORTANT SAFETY INSTRUCTIONS
LISEZ ET SUIVEZ SOIGNEUSEMENT CES MESURES DE SÉCURITÉ.
CONSERVEZ CES INSTRUCTIONS
UTILISATION DE RALLONGES ÉLECTRIQUES
Nous vous recommandons fortement de ne pas utiliser de rallonge électrique, à cause d’un danger de risques possibles de
sécurité dans certaines conditions.
Cependant, si vous devez absolument utiliser un cordon rallonge électrique, il est absolument requis que vous utilisiez un
cordon rallonge trifilaire, avec mise à la terre, certifié UL (aux États-Unis) ou ACNOR (au Canada), avec prise et fiche à trois
conducteurs, et à notation électrique de 15 ampères (minimum) et 120 volts.
BRANCHEMENTS ÉLECTRIQUES
AVERTISSEMENT
Risque de choc électrique.
Branchez l’appareil dans une prise triple avec terre.
Ne retirez pas la broche de terre.
N’utilisez pas d’adaptateur.
Le non-respect de ces instructions peut entraîner des
risques d’incendies, des chocs électriques ou la mort.
Ne coupez pas ou n’enlevez pas, sous aucun prétexte, la troisième broche de mise à la terre du cordon
d’alimentation. Pour des raisons de sécurité, cet appareil doit être correctement mis à la terre.
Le cordon d’alimentation de cet appareil est équipé d’une fiche
à trois broches (pour une mise à la terre) qui s’adapte à la prise
de courant standard à 3 broches (pour une mise à la terre) pour
minimiser les risques de chocs électriques par cet appareil.
Faites vérifier la prise murale et le circuit électrique par
un électricien qualifié pour s’assurer que le système est
correctement mis à la terre.
Dans le cas d’une prise biphasée, l’installateur a la responsabilité
et l’obligation de la remplacer par une prise triphasée
correctement mise à la terre. N’utilisez pas d’adaptateur.
Le
réfrigérateur / congélateur
doit toujours être branché à sa
propre prise électrique d’une tension nominale correspondant à
celle indiquée sur sa plaque signalétique.
Une alimentation électrique à 115 volts CA, 60 Hz, avec un fusible
de 15 ou 20 ampères et une mise à la terre est nécessaire. Ceci
permet d’obtenir un meilleur rendement et évite de surcharger
les circuits électriques du domicile qui risque d’occasionner un
incendie en surchauffant.
Ne débranchez jamais le
réfrigérateur / congélateur
en tirant sur
le cordon d’alimentation. Prenez toujours fermement la fiche en
main et tirez pour la sortir de la prise.
Réparez ou remplacez immédiatement tout cordon électrique
usé ou endommagé. N’utilisez pas un cordon fissuré ou
présentant des dommages dus aux frottements soit sur sa
longueur ou aux extrémités.
Lorsque vous éloignez votre
réfrigérateur / congélateur
du
mur, faites attention à ne pas le faire rouler sur le cordon
d’alimentation afin de ne pas l’endommager.
MISE AU REBUT APPROPRIÉE DE VOTRE ANCIEN RÉFRIGÉRATEUR
AVERTISSEMENT
Un enfant risque de suffoquer ou d’y être emprisonné.
Démontez les portes du compartiment de réfrigération ou du compartiment de congélation, avant
mettre celui-ci au rebut. Le non-respect de cette recommandation peut entraîner l’enfermement d’un
enfant qui peut entraîner la mort ou des lésions cérébrales.
Les enfants pris au piège ou morts d’asphyxie sont toujours
d’actualité. Les réfrigérateurs jetés ou abandonnés
restent dangereux même si vous ne les laissez au rebut
que pour « quelques jours ». Si vous voulez jeter votre
ancien réfrigérateur, suivez les instructions suivantes pour
empêcher les accidents.
Avant de jeter votre ancien réfrigérateur ou
congélateur:
Démontez les portes du compartiment de réfrigération
ou du compartiment de congélation.
Laissez les clayettes en place, pour éviter que des enfants
puissent facilement grimper dans votre réfrigérateur.
Fluides frigorigènes
Les appareils réfrigérants contiennent des fluides
frigorigènes qui conformément à la législation fédérale
doivent être retirés avant la mise au rebut de l’appareil.
Si vous mettez au rebut un ancien réfrigérateur
contenant des fluides frigorigènes, vérifiez la procédure
à suivre auprès de la compagnie responsable de
l’élimination.
IMPORTANT:
SÉCURITÉ (CONT.)

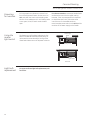
Door
alarm
To turn the Door Alarm feature on, press
DOOR ALARM once. The ACTIVE light will come
on. To turn it off, press it again.
When the DOOR ALARM is active,
the alarm will flash and beep if
you keep the door open for more
than 2 minutes.
8
Temperature Controls
Temperature
controls
Changing
display
temperatures
from °F to °C
To change the temperature display between
Fahrenheit and Celsius, press Temp Display
°C/°F.
The temperature display shows the actual
temperature of the freezer or fresh food unit.
The actual temperature will vary from the set
temperature based on factors such as door
opening, amount of food, defrost cycling and
room temperature.
NOTE: Frequent door openings or door left open
for periods of time may increase the internal
temperature of the freezer and fresh food
compartments temporarily.
To turn off the cooling system in either the
freezer or fresh food unit, press the plus (+) pad
until the display shows OFF.
To turn the cooling system on, press the minus
(–) pad. The preset temperature of 0°F for the
freezer or 37°F for the fresh food unit will appear
in the display.
To check the current temperature setting for
the fresh food or freezer unit, press the plus
(+) or minus (–) pad once. After 5 seconds, the
display will return to the actual temperature.
To change the temperature settings, press the
plus (+) or minus (–) pad for each increment to
the desired temperature set point. Allow 24 hours
for the unit to reach the temperature you have
set.
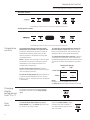
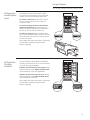
Temperature Ranges
Low High
Fresh Food
Freezer
NOTE:
Setting the controls to OFF stops cooling,
but does not shut off electrical power to the unit.
34°F
1°C
–6°F
–21°C
42°F
5°C
+4°F
–15°C
36” All-Refrigerator and All-Freezer Units
All-Freezer Controls
All-Refrigerator Controls
Preset Settings: Allow 24 hours to reach these preset temperatures.
Preset Settings: Allow 24 hours to reach these preset temperatures.

9
Automatic Icemaker (freezer models)
36” All-Refrigerator and All-Freezer Units
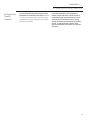
Automatic
icemaker
(freezer models)
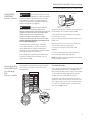
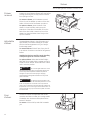
Accessing the
icemaker and
ice storage
bin
(freezer models)
The icemaker is located behind the first drawer
on the right of the freezer. The ice bin is the
second drawer.
To remove the ice bin:
Open the access door to reach the icemaker. Set
the icemaker power switch to the OFF position.
With the access door closed, support the storage
bin at the bottom while slightly lifting. Pull bin
straight out. See Drawer Removal section.
To replace the ice bin: Slide the bin back until
the tab on the bin locks into the slot on the shelf.
After replacing the ice bin, open the access door
to reach the icemaker. Set the icemaker power
switch to the ON position.
Icemaker
Ice bin
On/Off switch
CAUTION
Avoid contact with the moving
parts of the ejector mechanism, or with the heating
element (located on the bottom of the ice maker)
that releases the cubes. Do not place fingers or
hands on the automatic ice making mechanism
while the refrigerator is plugged in.
MISE EN GARDE
Évitez tout contact avec les
pièces mobiles du mécanisme d’éjection ou
l’élément chauffant (situé dans le bas de la machine
à glaçons) qui libère les cubes. Ne placez pas les
doigts ou les mains sur le mécanisme de
production de glace automatique lorsque le
réfrigérateur est branché dans la prise électrique.
A newly-installed refrigerator may take 12–24
hours to begin making ice.
The icemaker will produce seven cubes per
cycle—approximately 15 cycles in a 24-hour
period, depending on freezer compartment
temperature, room temperature, number of door
openings and other use conditions.
If the refrigerator is operated before the water
connection is made to the icemaker, set the
power switch to OFF.
When the refrigerator has been connected to the
water supply, set the power switch to
ON
.
Throw away the first full bucket of ice to allow
the water line to clear.
Be sure nothing interferes with the sweep of the
feeler arm.
When the bin fills to the level of the feeler arm,
the icemaker will stop producing ice.
It is normal for several cubes to be joined
together.
If ice is not used frequently, old ice cubes will
become cloudy, taste stale and shrink.
NOTE: Icemaker works best between 40 and 120
PSI home water pressure.
Feeler Arm
Icemaker
Power
Switch

10
Water Filter
36” All-Refrigerator and All-Freezer Units
Water filter
cartridge
(freezer
models)
Water filter cartridge
The water filter cartridge is located behind the top
access panel.
When to replace the filter on models with a
replacement indicator light
There is a replacement indicator light for the water
filter cartridge on the temperature control panel.
This light will turn orange to tell you that you need to
replace the filter soon.
The filter cartridge should be replaced when the
replacement indicator light turns red or if the flow of
water to the ice maker decreases.
Removing the filter cartridge
If you are replacing the cartridge, first remove the old
one by slowly turning it to the left. Do not pull down on
the cartridge. A small amount of water may drip down.
NOTE: To reduce the risk associated with property
damage due to water leakage, read and follow
instructions before installation and use of this
system. Installation and use MUST comply with all
state and local plumbing codes.
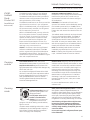
Installing the filter cartridge
1
Fill the replacement cartridge with water from
the tap to allow for better flow immediately after
installation.
2
Line up the arrow on
the cartridge and the
cartridge holder. Place
the top of the new
cartridge up inside the
holder. Do not push it up
into the holder.
3
Slowly turn it to the right until the filter cartridge
stops. DO NOT OVERTIGHTEN. As you turn the
cartridge, it will automatically raise itself into
position. The cartridge will move about 1/2 turn.
4
Press and hold the RESET WATER FILTER pad on
the temperature control panel for three seconds
to clear the red or amber lilght.
NOTE: A newly installed water filter cartridge may
cause water to spurt into the ice maker.
Filter bypass plug
You must use the filter bypass plug when a
replacement filter cartridge is not available. The ice
maker will not operate without the filter or filter bypass
plug.
For the maximum benefit of your filtration system, GE recommends the use of GE-branded filters only. Us-
ing GE-branded filters in GE, Hotpoint® and Monogram refrigerators provides optimal performance and
reliability. GE filters meet rigorous industry NSF standards for safety and quality that are important for
products that are filtering your water. GE has not qualified non-GE-branded filters for use in GE and Hot-
point refrigerators and there is no assurance that non-GE-branded filters meet GE’s standards for quality,
performance and reliability.
If you have questions, or to order additional filter cartridges, visit our website at www.gewaterfilters.
com or call GE Parts and Accessories, 800.626.2002.
Customers in Canada should consult the yellow pages for the nearest Camco Service Center.
Cartridge
Holder
Filter Bypass
Plug
SmartWater

11
Sorage Drawers
Refrigerator—
Sealed snack
pans
The sealed snack pans retain high humidity
for the convenient storage of lunch meats and
cheese, hors d’oeuvres, spreads and snacks.
To remove a snack pan, pull the pan out and
lift the front of the pan up until it snaps out
of the wire holder.
To remove the upper drawers when the door
cannot be opened fully, the shelf above the
drawers must be removed. Push the shelf back,
then lift up. Tilt the cover and take it out.
To replace a snack pan, place the back of the
pan in the wire holder. Lower the front of the pan,
then push down until the front of the pan snaps
into the wire holder.
Excess water that may accumulate in the bottom
of the drawers should be emptied and the
drawers wiped dry.
36” All-Refrigerator and All-Freezer Units
Refrigerator—
Storage
drawers
The upper drawers have individual, adjustable
humidity controls that let you control the amount
of cold air entering the drawers.
Slide the control all the way to the High setting
and the drawer provides higher humidity levels
recommended for most leafy vegetables.
Slide the control all the way to the Low setting
and the drawer provides lower humidity levels
recommended for most fruits.
Excess water that may accumulate in the bottom
of the drawers should be emptied and the
drawers wiped dry.

12
Shelves
Door
shelves
Some door shelves are adjustable and can be
moved up and down to meet your storage needs.
The deeper door shelves must be placed at the
bottom of the door.
To remove: Lift the shelf up and slide it towards
you.
36” All-Refrigerator and All-Freezer Units
Adjustable
shelves
Tempered glass shelves in the refrigerator and
wire shelves in the freezer enable you to make
efficient shelf arrangements to fit your family’s
food storage needs.
To remove shelves: Tilt shelf up at front, then lift
it up and out of tracks on rear wall of refrigerator/
freezer.
Handle glass shelves carefully. Rough handling
of tempered glass can cause it to shatter.
To replace shelves: Select desired shelf height.
With shelf front raised slightly, engage top lugs in
tracks at rear of cabinet. Then lower front of shelf
until it locks into position.
CAUTION
Do not clean glass shelves or covers
with warm water when they are cold. Glass shelves and
covers may break if exposed to sudden temperature
changes or impact, such as bumping or dropping.
Tempered glass is designed to shatter into many small
pieces if it breaks.
MISE EN GARDE
Ne nettoyez pas les clayettes ou les
couvercles en verre avec de l’eau tiède quand ceux-ci sont
froids. Les clayettes et couvercles en verre peuvent se
casser s’ils sont exposés à des changements soudains de
température ou si vous les cognez ou les faites tomber. Le
verre trempé est conçu pour se briser en petits morceaux
en cas de casse.
Drawer
removal
Drawers in the refrigerator/freezer will stop before
coming all the way out, to help prevent contents
from spilling onto floor.
To remove a drawer, pull the drawer out and
lift the front of the drawer up and out of the wire
holder. Lift the back of the drawer up and out.
To replace a drawer, place the back of the
drawer in the wire holder, making sure the
extensions of the side of the drawer fit into the
back of the wire holder. Lower the front of the
drawer into the wire holder. Press firmly on the
top of the drawer.

13
Sabbath Mode/Care and Cleaning
Cleaning
outside
Door handles and trim—Clean with a cloth
dampened with soapy water. Dry with a soft cloth.
Keep the outside clean. Wipe with a clean cloth
lightly dampened with mild liquid dish detergent. Dry
with a clean, soft cloth.
Do not wipe the refrigerator/freezer with a soiled
dish cloth or wet towel. These may leave a residue
that can damage the finish. Do not use scouring
pads, powdered cleaners, bleach or cleaners
containing bleach because these products can
scratch and damage the finish.
Stainless steel—Regularly clean and polish the
stainless steel door panels and handles (on some
models) with a commercially available stainless
steel cleaner such as Stainless Steel Magic™ to
preserve and protect the fine finish. Stainless
Steel Magic and the Monogram polishing cloth
are available through GE Parts and Accessories,
800.626.2002, or monogram.com. For Stainless
Steel Magic, order part number WX10X15. For
Monogram polishing cloth, order part number
WX72X10001.
Do not use appliance wax or polish on the
stainless steel.
Cleaning
inside
To help prevent odors, leave an
open box of baking soda in the
refrigerator/freezer.
Turn off power at the circuit
breaker or fuse box before
cleaning. If this is not practical,
wring excess moisture out of
sponge or cloth when cleaning around switches,
lights or controls.
Use warm water and baking soda solution— about
a tablespoon (15 ml) of baking soda to a quart (1
liter) of water. This both cleans and neutralizes
odors. Thoroughly rinse and wipe dry.
Other parts of the refrigerator/freezer— including
door gaskets, meat and vegetable drawers, ice
storage bin and all plastic parts—can be cleaned the
same way. After cleaning the door gaskets, apply
a thin layer of petroleum jelly to the door gaskets
sealing surface on the hinge side. This helps keep
the gaskets from sticking and bending out of shape.
Avoid cleaning cold glass shelves with hot water
because the extreme temperature difference
may cause them to break. Handle glass shelves
carefully. Rough handling of tempered glass can
cause it to shatter.
Do not wash any plastic refrigerator/freezer parts
in the dishwasher.
ZSAB1
Sabbath
Mode
Product Kit
(available at
extra cost)
The Sabbath Mode Product Kit was designed
for use on the Jewish Sabbath and Holidays.
The Sabbath Mode feature makes it possible for
observant Jews to refrigerate and freeze food
during the duration of the holiday.
The Sabbath Mode feature can be set to override
typical reactions to actions in your refrigerator.
While in the Sabbath Mode, your refrigerator will
still operate normally. However, the refrigerator
will not respond to your actions.
While in the Sabbath Mode, you may notice the
fan running when the door is opened; however,
this is not a result of your actions. The fan will
operate at random times. The defrost heater
will continue to defrost the refrigerator and
freezer and will be activated on a timer. The
defrost heater will not defrost as a result of door
openings or any consumer actions.
ON/OFF—To activate, raise the top grillepanel
and set the Sabbath Mode switch to the ON
position. A green LED light will be visible below
the Sabbath Mode Kit switch. The light will be
visible when the grille is closed between the grille
door and compartment doors.
DISPLAYS, ALARMS and LIGHTS—The main
temperature control displays will be deactivated;
therefore they will not be lit, sound a tone or
operate when touched. Door alarms and lights
will be disabled.
ICEMAKER—The icemaker will continue to
operate. The icemaker can be disabled by setting
the icemaker power switch to the OFF position
(see Automatic Icemaker). To obtain ice, open the
freezer door and remove the cubed ice from the
ice bin.
This Sabbath Mode Product Kit can be purchased
from your local appliance dealer. The ZSAB1 Kit
is designed for use with all Monogram Built-In
All-Refrigerators and All-Freezers manufactured
after 2008. To locate your nearest dealer, visit our
web site monogram.com or call 1.800.626.2000. In
Canada, call 1.800.561.3344. Order Kit # ZSAB1.
NOTE: The Sabbath Mode Product Kit must be
installed by a qualified service technician.
NOTE: If installing the refrigerator and freezer as
a pair, 2 Sabbath Mode Kits must be ordered.
36” All-Refrigerator and All-Freezer Units

Care and Cleaning
14
Preparing
for vacation
For long vacations or absences, remove food
from the refrigerator/freezer. Set the control to
OFF, and clean the interior with a baking soda
solution of one tablespoon (15 ml) of baking soda
to one quart (1 liter) of water. Leave the door
open.
For shorter vacations, remove perishable foods
and leave the control at the regular setting.
However, if the room temperature is expected
to drop below 60°F (16°C), follow the same
instructions as for extended vacations.
Move icemaker power switch to the OFF position
and shut off the water supply to the freezer.
Light bulb
replacement
For upper and lower light bulb replacement, call
for service.
Master
Light Switch
36” All-Refrigerator and All-Freezer Units
Using the
master
light switch
This feature turns off the lights inside the unit. The
switch is located behind the top access panel. Lift
up the panel to access the switch. Turning off the
master switch does not turn off all power to the unit.
Master Light
Switch
All-Refrigerator
All-Freezer

15
Preparation
Refrigerator/
freezer
location
Do not install the refrigerator/freezer where
temperatures will be below 60°F (16°C) because
it will not run often enough to maintain proper
temperatures, and the refrigerator will develop
high internal humidity.
For proper installation, the refrigerator/
freezer must be placed on a level surface of
hard material the same height as the rest of
the flooring. This surface should be strong
enough to support a fully loaded refrigerator/
freezer, or approximately 1,200 lbs. each.
See the Installation Instructions for complete
directions.
36” All-Refrigerator and All-Freezer Units

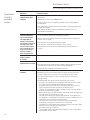
The Problem Solver
Questions?
Use this
problem
solver!
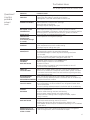
PROBLEM POSSIBLE CAUSE
REFRIGERATOR/ • May be in defrost cycle when motor does not operate for about
FREEZER DOES NOT 45 minutes.
OPERATE
• Temperature control in the OFF position.
• If interior light is not on, refrigerator/freezer may not be plugged in
at wall outlet.
• The house fuse is blown/house circuit breaker is tripped. Replace fuse
or reset the breaker.
• The Sabbath Mode Kit may be installed and operating. Turn off
the Sabbath Mode device.
MOTOR OPERATES • Normal when refrigerator/freezer is first plugged in. Wait 24 hours
FOR LONG PERIODS or the refrigerator/freezer to completely cool down.
OR CYCLES ON AND
• Often occurs when large amounts of food are placed in refrigerator/
OFF FREQUENTLY
freezer. This is normal.
• Door left open or package holding door open.
• Hot weather or frequent door openings. This is normal.
• Temperature control set at the coldest setting. See Temperature
Control.
VIBRATION OR RATTLING • Refrigerator may not be properly installed.
(Slight vibration
is normal.)
THUMPING SOUND • This is a normal operating sound.
WHEN DOOR IS CLOSED
• The mechanism that closes the door makes a slight thumping sound as
it passes over its lever point, at approximately 80 degrees.
• Closing the door slowly will minimize the sound.
OPERATING • The variable speed compressor changes speeds and sounds may vary.
SOUNDS
• Normal fan air flow—fans blow cold air through the fresh food and
freezer compartments—another fan cools the compressor motor.
• The fans change speeds in order to provide optimal cooling and
energy savings.
• These NORMAL sounds will also be heard from time to time:
– You may hear a whooshing or gurgling sound when the door closes.
This is due to pressure equalizing within the refrigerator.
– A water dripping sound may occur during the defrost cycle as ice
melts from the evaporator and flows into the drain pan.
– The flow of refrigerant through the freezer cooling coils may make a
gurgling sound like boiling water.
– Water dropping on the defrost heater can cause a sizzling, popping or
buzzing sound during the defrost cycle.
– You may hear cracking or popping sounds when the refrigerator is
first plugged in or during/after the defrost cycle. This happens as the
refrigerator cools to the correct temperature.
– The compressor may cause a clicking or chirping sound when
attempting to restart (this could take up to 5 minutes).
– The electronic control board may cause a clicking sound when relays
activate to control refrigerator components.
– Ice cubes dropping into the bin.
– The icemaker water valve will buzz and water will run in tubes when
the icemaker fills with water.
(Modern refrigerators
and freezers with more
storage space and a
larger freezer require
more operating time.
They start and stop
often to maintain
even temperatures.)
36” All-Refrigerator and All-Freezer Units
16

PROBLEM POSSIBLE CAUSE
DOOR NOT CLOSING • Package may be holding door open.
PROPERLY • Check the door gasket; it may be out of position
• Refrigerator is not level. See Installation Instructions.
REFRIGERATOR/ • Temperature control not set cold enough. See Temperature Control.
FREEZER TOO WARM • Warm weather or frequent door openings.
• Door left open for long time.
• Package may be holding door open.
ACTUAL TEMPERATURE • Refrigerator just plugged in. Allow 24 hours for system to stabilize.
NOT EQUAL TO SET • Door open for too long. Allow 24 hours for system to stabilize.
TEMPERATURE • Warm food added to refrigerator. Allow 24 hours for system to stabilize.
• Defrost cycle is in process. Allow 24 hours for system to stabilize.
FROST OR ICE • Door left open or package holding door open.
CRYSTALS ON • Too frequent or too long door openings.
FROZEN FOOD
(Frost within package
is normal.)
SLOW ICE CUBE • Door may have been left open.
FREEZING • Turn temperature control to a colder setting.
• Package may be holding door open.
ICE CUBES HAVE • Old cubes need to be discarded.
ODOR/TASTE • Ice storage bin needs to be emptied and washed.
• Unsealed packages in freezer may be transmitting odor/taste
to ice cubes.
• Interior of freezer needs cleaning. See Care and Cleaning.
• Poor-tasting incoming water. Change the water filter.
AUTOMATIC • Icemaker power switch is in the O (off) position.
ICEMAKER • Water supply turned off or not connected.
DOES NOT WORK • Freezer too warm.
• Piled up cubes in storage bin may cause icemaker to shut off
too soon. Level cubes by hand.
SMALL OR • Water filter clogged. Replace the filter or use the filter bypass plug.
HOLLOW CUBES • Check for a connection to a Reverse Osmosis water system. If an RO is
connected,
remove the water filter and install the orginal bypass plug
that came with the unit.
MOISTURE FORMS • Not unusual during periods of high humidity. Wipe surface dry.
ON OUTSIDE OF • Control humidity and temperature in the kitchen with air conditioning
REFRIGERATOR/FREEZER should eliminate this condition
MOISTURE • Too frequent or too long door openings.
COLLECTS INSIDE • In humid weather, air carries moisture into refrigerator/freezer when
doors are opened.
• Control humidity and temperature in the kitchen with air conditioning.
REFRIGERATOR/ • Foods with strong odors should be tightly covered.
FREEZER • Check for spoiled food.
HAS ODOR • Interior needs cleaning. See Care and Cleaning.
• Defrost water system beneath unit needs cleaning.
• Keep open box of baking soda in refrigerator/freezer; replace
every 3 months.
INTERIOR LIGHT • No power at outlet.
DOES NOT WORK • Light bulb needs replacing. See Call for service.
• Master light switch may be in the OFF position. Switch to ON.
• The Sabbath Mode Kit may be installed and operating. Turn off Sabbath
Mode device.
DOOR DIFFICULT TO • Tight door seal is due to pressure equalizing within the refrigerator.
REOPEN IMMEDIATELY After closing the door, wait 5–30 seconds to reopen.
AFTER CLOSING
Questions?
Use this
problem
solver!
(cont.)
The Problem Solver
36” All-Refrigerator and All-Freezer Units
17

18
Performance Data Sheet
SmartWater
™
Filtration System―GE MWF Cartridge
The concentration of the indicated substances in water entering the system was reduced to a concentration less than or equal to the permissible
limit for water leaving the system as specified in NSF/ANSI Standard 42 and Standard 53. System tested and certified by NSF International against
NSF/ANSI Standard 42 and Standard 53 for the reduction of substances listed below.
The following pharmaceutical reduction claims have not been certified by NSF International or the state of California.
Claims tested and verified by independent laboratory:
Contaminant
Reduction Average Influent
NSF specified
Challenge Concentration
Avg %
Reduction
Average Product
Water
Concentration
Max Permissible
Product Water
Concentration
NSF Reduction
Requirements
NSF
Test Report
Atenolol 978 ng/L N/A 99.5% 5.0 ng/L N/A N/A J-00121587
Fluoxetine 907 ng/l N/A 99.4% 5.4 ng/L N/A N/A J-00121587
Ibuprofen 885 ng/L N/A 94.1% 52.3 ng/L N/A N/A J-00121588
Progesterone 1097 ng/L N/A 99.5% 5.0 ng/L N/A N/A J-00121589
Trimethoprim 415 ng/L N/A 99.5% 2.0 ng/L N/A N/A J-00121587
It is essential that the manufacturer’s recommended installation, maintenance and filter replacement requirements be carried out for the product to perform as advertised.
See Installation Manual for Warranty information.
Application Guidelines/Water Supply Parameters
Service Flow 0.5 gpm (21.9 lpm)
Water Supply Potable Water
Water Pressure 40-120 psi (2.8-8.2 bar)
Water Temperature 33°F-100°F (0.6°C-38°C)
Note: While the testing was performed under standard laboratory conditions,
actual performance may vary.
Replacement Cartridge: MWF. For estimated costs of replacement elements
please call 1-800-626-2002 or visit our website at www.geapplianceparts.com.
WARNING
To reduce the risk associated with ingestion of contaminants:
• Do not use with water that is microbiologically unsafe or of unknown quality
without adequate disinfection befo
re and after the system. Systems certified
for cyst reduction may be used on disinfected water that may contain filterable
cysts. EPA Establishment Number 10350-MN-005.
NOTICE
To reduce the risk associated with property damage due to water leakage:
• Read and follow use instructions before installation and use of this system.
• Installation and use MUST comply with all state and local plumbing codes.
• Do not install if water pressure exceeds 120 psi (8.2 bar). If your water pressure
exceeds 80 psi, you must install a pressure-limiting valve. Contact a plumbing
professional if you are uncertain ho
w to check your water pressure.
• Do not install where water hammer conditions may occur. If water hammer
conditions exist you must install a water hammer arrester. Contact a plumbing
professional if you are uncertain how to check for this condition.
• Do not install on hot water supply lines. The maximum operating water
temperature of this filter system is 100º F (38º C).
• Protect filter from freezing. Drain filter when temperatures drop
below 33ºF (0.6ºC).
•
must be replaced every 6 months at the
rated capacity, or sooner if a noticeable reduction in flow rate occurs.
For conditions of use, health claims certified by the California Department of Public
Health, and replacements, see performance data sheet. California Department
of Public Health Certification #05-1698. The contaminants or other substances
removed or reduced by this water filter are not necessarily in all users’ water.
Capacity 300 Gallons (1,135 Liters). Contaminant Reduction Determined by NSF testing.
Substance Tested
for Reduction Average Influent
NSF specified
Challenge Concentration
Avg %
Reduction
Average Product
Water
Concentration
Max Permissible
Product Water
Concentration
NSF Reduction
Requirements
NSF
Test Report
Chlorine Taste and Odor 2.0 mg/L 2.0 mg/L ± 10% 97.5% 0.05 mg/L N/A ≥ 50% J-00077703
Nominal Particulate
Class I, , ≥0.5 to < 1.0 µm 7,833,333 pts/mL At least 10,000 particles/mL 99.7% 18,617 pts/mL N/A ≥85% J-00077704
Cyst* 101,000 cysts/L Minimum 50,000 cysts/L 99.99% 1 cyst/L N/A ≥99.95% J-00100036
Asbestos 47 MF/L
107 to 108 fibers/L; fibers
greater than 10 µm in length >99% <1 MF/L N/A ≥99% J-00077707
Atrazine 0.009 mg/L 0.009 mg/L ± 10% 94.5% 0.0005 mg/L 0.003 mg/L N/A J-00077708
Benzene 0.016 mg/L 0.015 mg/L ± 10%± 96.7% 0.0005 mg/L 0.005 mg/L N/A J-00077717
Carbofuran 0.08 mg/L 0.08 mg/L ± 10% 98.7% 0.001 mg/L 0.04 mg/L N/A J-00077718
Endrin 0.007 mg/L 0.006 mg/L ± 10% 97.1% 0.0002 mg/L 0.002 mg/L N/A J-00100039
Lead @ pH 6.5 0.152 mg/L 0.15 mg/L ± 10% 99.3% 0.001 mg/L 0.010 mg/L N/A J-00077722
Lead @ pH 8.5 0.148 mg/L 0.15 mg/L ± 10% 99.3% 0.001 mg/L 0.010 mg/L N/A J-00077723
Lindane 0.002 mg/L 0.002 mg/L ± 10% 99.0% 0.00002 mg/L 0.0002 mg/L N/A J-00077726
Mercury @ pH 6.5 0.0058 mg/L 0.006 mg/L ± 10% 93.2% 0.0004 mg/L 0.002 mg/L N/A J-00100037
Mercury @ pH 8.5 0.0061 mg/L 0.006 mg/L ± 10% 93.2% 0.0004 mg/L 0.002 mg/L N/A J-00092355
P-Dichlorobenzene 0.222 mg/L 0.225 mg/L ± 10% 99.8% 0.005 mg/L 0.075 mg/L N/A J-00077729
Tetrachloroethylene 0.015 mg/L 0.015 mg/L ± 10% 96.7% 0.0005 mg/L 0.005 mg/L N/A J-00082184
Toxaphene 0.015 mg/L 0.015 mg/L ± 10% 93.2% 0.001 mg/L 0.003 mg/L N/A J-00077730
2,4-D 0.218 mg/L 0.210 mg/L ± 10% 99.5% 0.0009 mg/L 0.07 mg/L N/A J-00085470
*Based on the use of Cryptosporidium parvum oocysts.
Tested and certified by NSF International
against NSF/ANSI Standard 42 and
Standard 53 in model GE MWF for the
reduction of the claims specified on the
performance data sheet.
REPLACEMENT
ELEMENT
National Sanitation
Foundation
Performance Data Sheet
SmartWater
™
Filtration System―GE MWF Cartridge
The concentration of the indicated substances in water entering the system was reduced to a concentration less than or equal to the permissible
limit for water leaving the system as specified in NSF/ANSI Standard 42 and Standard 53. System tested and certified by NSF International against
NSF/ANSI Standard 42 and Standard 53 for the reduction of substances listed below.
The following pharmaceutical reduction claims have not been certified by NSF Inter
national or the state of California.
Claims tested and verified by independent laboratory:
Contaminant
Reduction Average Influent
NSF specified
Challenge Concentration
Avg %
Reduction
Average Product
Water
Concentration
Max Permissible
Product Water
Concentration
NSF Reduction
Requirements
NSF
Test Report
Atenolol 978 ng/L N/A 99.5% 5.0 ng/L N/A N/A J-00121587
Fluoxetine 907 ng/l N/A 99.4% 5.4 ng/L N/A N/A J-00121587
Ibuprofen 885 ng/L N/A 94.1% 52.3 ng/L N/A N/A J-00121588
Progesterone 1097 ng/L N/A 99.5% 5.0 ng/L N/A N/A J-00121589
Trimethoprim 415 ng/L N/A 99.5% 2.0 ng/L N/A N/A J-00121587
It is essential that the manufacturer’s recommended installation, maintenance and filter replacement requirements be carried out for the product to perform as advertised.
See Installation Manual for Warranty information.
Application Guidelines/Water Supply Parameters
Service Flow 0.5 gpm (21.9 lpm)
Water Supply Potable Water
Water Pressure 40-120 psi (2.8-8.2 bar)
Water Temperature 33°F-100°F (0.6°C-38°C)
Note: While the testing was performed under standard laboratory conditions,
actual performance may vary.
Replacement Cartridge: MWF. For estimated costs of replacement elements
please call 1-800-626-2002 or visit our website at www.geapplianceparts.com.
WARNING
To reduce the risk associated with ingestion of contaminants:
• Do not use with water that is microbiologically unsafe or of unknown quality
without adequate disinfection before and after the system. Systems certified
for cyst reduction may be used on disinfected water that may contain filterable
cysts. EPA Establishment Number 10350-MN-005.
NOTICE
To reduce the risk associated with property damage due to water leakage:
• Read and follow use instructions before installation and use of this system.
• Installation and use MUST comply with all state and local plumbing codes.
• Do not install if water pressure exceeds 120 psi (8.2 bar). If your water pressure
exceeds 80 psi, you must install a pressure-limiting valve. Contact a plumbing
professional if you are uncertain ho
w to check your water pressure.
• Do not install where water hammer conditions may occur. If water hammer
conditions exist you must install a water hammer arrester. Contact a plumbing
professional if you are uncertain how to check for this condition.
• Do not install on hot water supply lines. The maximum operating water
temperature of this filter system is 100º F (38º C).
• Protect filter from freezing. Drain filter when temperatures drop
below 33ºF (0.6ºC).
•
must be replaced every 6 months at the
rated capacity, or sooner if a noticeable reduction in flow rate occurs.
For conditions of use, health claims certified by the California Department of Public
Health, and replacements, see performance data sheet. California Department
of Public Health Certification #05-1698. The contaminants or other substances
removed or reduced by this water filter are not necessarily in all users’ water.
Capacity 300 Gallons (1,135 Liters). Contaminant Reduction Determined by NSF testing.
Substance Tested
for Reduction Average Influent
NSF specified
Challenge Concentration
Avg %
Reduction
Average Product
Water
Concentration
Max Permissible
Product Water
Concentration
NSF Reduction
Requirements
NSF
Test Report
Chlorine Taste and Odor 2.0 mg/L 2.0 mg/L ± 10% 97.5% 0.05 mg/L N/A ≥ 50% J-00077703
Nominal Particulate
Class I, , ≥0.5 to < 1.0 µm 7,833,333 pts/mL At least 10,000 particles/mL 99.7% 18,617 pts/mL N/A ≥85% J-00077704
Cyst* 101,000 cysts/L Minimum 50,000 cysts/L 99.99% 1 cyst/L N/A ≥99.95% J-00100036
Asbestos 47 MF/L
107 to 108 fibers/L; fibers
greater than 10 µm in length >99% <1 MF/L N/A ≥99% J-00077707
Atrazine 0.009 mg/L 0.009 mg/L ± 10% 94.5% 0.0005 mg/L 0.003 mg/L N/A J-00077708
Benzene 0.016 mg/L 0.015 mg/L ± 10%± 96.7% 0.0005 mg/L 0.005 mg/L N/A J-00077717
Carbofuran 0.08 mg/L 0.08 mg/L ± 10% 98.7% 0.001 mg/L 0.04 mg/L N/A J-00077718
Endrin 0.007 mg/L 0.006 mg/L ± 10% 97.1% 0.0002 mg/L 0.002 mg/L N/A J-00100039
Lead @ pH 6.5 0.152 mg/L 0.15 mg/L ± 10% 99.3% 0.001 mg/L 0.010 mg/L N/A J-00077722
Lead @ pH 8.5 0.148 mg/L 0.15 mg/L ± 10% 99.3% 0.001 mg/L 0.010 mg/L N/A J-00077723
Lindane 0.002 mg/L 0.002 mg/L ± 10% 99.0% 0.00002 mg/L 0.0002 mg/L N/A J-00077726
Mercury @ pH 6.5 0.0058 mg/L 0.006 mg/L ± 10% 93.2% 0.0004 mg/L 0.002 mg/L N/A J-00100037
Mercury @ pH 8.5 0.0061 mg/L 0.006 mg/L ± 10% 93.2% 0.0004 mg/L 0.002 mg/L N/A J-00092355
P-Dichlorobenzene 0.222 mg/L 0.225 mg/L ± 10% 99.8% 0.005 mg/L 0.075 mg/L N/A J-00077729
Tetrachloroethylene 0.015 mg/L 0.015 mg/L ± 10% 96.7% 0.0005 mg/L 0.005 mg/L N/A J-00082184
Toxaphene 0.015 mg/L 0.015 mg/L ± 10% 93.2% 0.001 mg/L 0.003 mg/L N/A J-00077730
2,4-D 0.218 mg/L 0.210 mg/L ± 10% 99.5% 0.0009 mg/L 0.07 mg/L N/A J-00085470
*Based on the use of Cryptosporidium parvum oocysts.
Tested and certified by NSF International
against NSF/ANSI Standard 42
and
Standard 53 in model GE MWF for the
reduction of the claims specified on the
performance data sheet.
REPLACEMENT
ELEMENT
National Sanitation
Foundation
Performance Data Information
Capacity: 300 Gallons (1,135 Liters)
The concentration of the contaminants tested for this filter in water entering the system was reduced to
a concentration less than or equal to the permissible limit for water leaving the system as specified in
NSF/ANSI Standard 42 and Standard 53. System tested and certified by NSF International against NSF/
ANSI Standard 42 and Standard 53.
Please see geappliances.com for complete listing of the contaminants tested and the amounts reduced

19
With the purchase of your new Monogram appliance, receive
the assurance that if you ever need information or assistance
from GE, we’ll be there. All you have to do is call!
GE Answer
Center
®
In the USA:
800.626.2000
Whatever your question about any Monogram major appliance, GE Answer Center
®
information
service is available to help. Your call—and your question—will be answered promptly and
courteously. Call the GE Answer Center
®
Monday to Friday, 8 a.m. to 10 p.m. EST, and Saturday, 8
a.m. to 7 p.m.
OR
Visit our Website at: monogram.com
In Canada, call 1.800.561.3344.
In-Home Repair
Service
In the USA:
800.444.1845
In Canada:
1.800.561.3344
A GE consumer service professional will provide expert repair service, scheduled at a time that’s
convenient for you. To schedule service, call Monday to Friday, 7 a.m. to 10 p.m. EST, or Saturday
and Sunday, 8 a.m. to 6 p.m. Many GE Consumer Service company- operated locations offer you
service today or tomorrow, or at your con venience. Our factory-trained technicians know your
appliance inside and out—so most repairs can be handled in just one visit.
In Canada: Monday to Friday, 7 a.m. to 8 p.m. and Saturday, 8 a.m. to 5 p.m. EDST.
Service
Contracts
In the USA:
800.626.2224
In Canada:
1.800.561.3344
You can have the secure feeling that GE Consumer Service will still be there after your
warranty expires. Purchase a GE contract while your warranty is still in effect and you’ll
receive a substantial discount. With a multiple -year contract, you’re assured of future
service at today’s prices.
Parts and
Accessories
In the USA:
800.626.2002
In Canada:
1.800.561.3344
Individuals qualified to service their own appliances can have parts or accessories sent directly
to their home. The GE parts system provides access to over 47,000 parts…and all GE Genuine
Renewal Parts are fully warranted. VISA, MasterCard and Discover cards are accepted.
VIsit www.geappliances.com.
User maintenance instructions contained in this manual cover procedures intended to be
performed by any user. Other servicing generally should be referred to qualified service
personnel. Caution must be exercised, since improper servicing may cause unsafe operation.
For Customers
With Special
Needs…
In the USA:
800.626.2000
GE offers Braille controls for a variety of GE appliances, and a brochure to
assist in planning a barrier-free kitchen for persons with limited mobility.
Consumers with impaired hearing or speech who have access to a
TDD
or a conventional teletypewriter may call 800.TDD.GEAC (800.833.4322)
to request information or service.
Consumer Services
36” All-Refrigerator and All-Freezer Units

Printed in the United States
Warranty
36” All-Refrigerator and All-Freezer Units
YOUR MONOGRAM REFRIGERATOR AND FREEZER WARRANTY
Staple sales slip or cancelled check here. Proof of original
purchase date is needed to obtain service under warranty.
WHAT IS
COVERED
From the Date
of the Original
Purchase
LIMITED TWO-YEAR WARRANTY
For two years from date of original purchase, we will provide, free of charge, parts and service labor in
your home to repair or replace any part of the refrigerator or freezer that fails because of a manufacturing defect.
LIMITED FIVE-YEAR WARRANTY
For five years from date of original purchase, we will provide, free of charge, parts and service labor
in your home to repair or replace any part of the sealed refrigerating system (the compressor, condenser,
evaporator and all connecting tubing) that fails because of a manufacturing defect.
LIMITED ADDITIONAL SIXTH- THROUGH TWELFTH-YEAR WARRANTY ON THE SEALED SYSTEM
For the sixth through twelfth year from the date of the original purchase, we will provide, free of charge,
replacement parts for any part of the sealed refrigerating system (the compressor, condenser, evaporator and
all connecting tubing) that fails because of a manufacturing defect. You pay for the service trip to your home
and for service labor charges.
LIMITED THIRTY-DAY WARRANTY ON WATER FILTER CARTRIDGE (Water filter, if included)
From the date of the original purchase we will provide, free of charge, replacement parts for any part of
the water filter cartridge that fails because of a manufacturing defect. During this limited thirty-day warranty,
we will also provide, free of charge, a replacement water filter cartridge.
This warranty is extended to the original purchaser and any succeeding owner for products purchased for
ordinary home use in the 48 mainland states, Hawaii, Washington, D.C. or Canada. If the product is located
in an area where service by a GE Authorized Servicer is not available, you may be responsible for a trip
charge or you may be required to bring the product to an Authorized GE Service location for service.
In Alaska the warranty is the same except that it is LIMITED because you must pay to ship the product
to the service shop or for the service technician’s travel costs to your home.
All warranty service will be provided by our Factory Service Centers or by our authorized Customer Care
®
servicers during normal working hours.
Should your appliance need service, during warranty period or beyond, in the USA call 800.444.1845.
In Canada: 800.561.3344. Please have your serial number and model number available when calling for service.
Some states/provinces do not allow the exclusion or limitation of incidental or consequential damages,
so the above limitation or exclusion may not apply to you. This warranty gives you specific legal rights, and you
may also have other rights which vary from state to state/province to province. To know what your legal rights
are in your state/province, consult your local or state/provincial consumer affairs office or your state’s Attorney
General.
Warrantor in USA: General Electric Company,
Louisville, KY 40225
Warrantor in Canada: Mabe Canada Inc.
WHAT IS NOT
COVERED
• Service trips to your home to teach you how
to use the product.
• Replacement of house fuses or resetting of circuit
breakers.
• Damage to the product caused by accident, fire,
floods or acts of God.
• Failure of the product if it is used for other than
its intended purpose or used commercially.
• Damage caused after delivery.
• Improper installation, delivery or maintenance.
If you have an installation problem, contact
your dealer or installer. You are responsible
for providing adequate electrical, plumbing
and other connecting facilities.
• Replacement of the light bulbs, if included,
or water filter cartridge, if included, other
than as noted above.
• Replacement of the water filter cartridge,
if included, due to water pressure that is outside
the specified operating range or due to excessive
sediment in the water supply.
• Loss of food due to spoilage (in the USA only).
• Incidental or consequential damage caused
by possible defects with this appliance.
• Product not accessible to provide required
service.
• Damage caused by a non-GE brand water filter.
EXCLUSION OF IMPLIED WARRANTIES—Your sole and exclusive remedy is product repair as provided
in this Limited Warranty. Any implied warranties, including the implied warranties of merchantability
or fitness for a particular purpose, are limited to one year or the shortest period allowed by law.
09-14 GE
224D2602P002
49-60722-2
-
 1
1
-
 2
2
-
 3
3
-
 4
4
-
 5
5
-
 6
6
-
 7
7
-
 8
8
-
 9
9
-
 10
10
-
 11
11
-
 12
12
-
 13
13
-
 14
14
-
 15
15
-
 16
16
-
 17
17
-
 18
18
-
 19
19
-
 20
20


GE Monogram ZIF360NHRH Manuel utilisateur
- Catégorie
- Fabricants de glaçons
- Taper
- Manuel utilisateur
- Ce manuel convient également à
dans d''autres langues
- English: GE Monogram ZIF360NHRH User manual
Documents connexes
-
 GE Monogram Refrigerator All-Refrigerators and All-Freezers Manuel utilisateur
-
GE Monogram ZICP360NXRH Manuel utilisateur
-
GE Monogram Refrigerator Bottom-Freezer Built-In Refrigerators Manuel utilisateur
-
GE Monogram ZISB420DK Le manuel du propriétaire
-
 GE Monogram ZIPS360NHSS Le manuel du propriétaire
-
 GE Monogram ZIBS240 Le manuel du propriétaire
-
 GE Monogram ZIRS360NHRH Le manuel du propriétaire
-
 GE Monogram Built In 36 Single Door Refrigerators and 36 Single Door Freezers Manuel utilisateur
-
GE Monogram ZIFP360NXARH Manuel utilisateur


Autres documents
-
GE ZIFS360NHBRH Le manuel du propriétaire
-
Monogram ZISS420DKSS Guide d'installation
-
-
-
-
-
Dacor 863445 Mode d'emploi
-
AVG ARBM171DSE Manuel utilisateur