GE Monogram Refrigerator All-Refrigerators and All-Freezers Manuel utilisateur
- Catégorie
- Frigos
- Taper
- Manuel utilisateur
Ce manuel convient également à

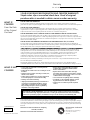
Owner’s
Manual
36" Built-In
All-Refrigerators and
All-Freezers
07-08 JR
monogram.com
49-60562
224D2602P001

Consumer Information
36” All-Refrigerator and All-Freezer Units
2
Contents
Consumer Services
Important Phone Numbers . . . . . . . . . . . . . . . . . . . . .27
Model and Serial Numbers . . . . . . . . . . . . . . . . . . . . . . .3
Problem Solver . . . . . . . . . . . . . . . . . . . . . . . . . . . . .21, 22
Product Registration . . . . . . . . . . . . . . . . . . . . . . . . . . . . .3
Safety Instructions . . . . . . . . . . . . . . . . . . . . . . . . . . . 4–7
State of California
Water Treatment Device Certificate . . . . . . . . . . . .26
Warranty . . . . . . . . . . . . . . . . . . . . . . . . . . . . . .Back Cover
Care and Cleaning
Cleaning—Outside and Inside . . . . . . . . . . . . . . . . . .13
Light Bulb Replacement . . . . . . . . . . . . . . . . . . . . . . . 14
Vacation . . . . . . . . . . . . . . . . . . . . . . . . . . . . . . . . . . . . . . .14
Operating Instructions
Anti-Tip Bracket Installation . . . . . . . . . . . . . . . .16–20
Automatic Icemaker . . . . . . . . . . . . . . . . . . . . . . . . . . . . .9
Sabbath Mode Product . . . . . . . . . . . . . . . . . . . . . . . . .12
Shelves . . . . . . . . . . . . . . . . . . . . . . . . . . . . . . . . . . . . .11, 12
Storage Drawers . . . . . . . . . . . . . . . . . . . . . . . . . . .10, 11
Temperature Controls . . . . . . . . . . . . . . . . . . . . . . . . . . .8
Water Filter Accessory . . . . . . . . . . . . . . . . . . . . . . . . .10
Wine Rack . . . . . . . . . . . . . . . . . . . . . . . . . . . . . . . . . . . . .12
Preparation
Anti-Tip Bracket . . . . . . . . . . . . . . . . . . . . . . . . . . . . . . . .15
Clearances . . . . . . . . . . . . . . . . . . . . . . . . . . . . . . . . . . . . .15
Location . . . . . . . . . . . . . . . . . . . . . . . . . . . . . . . . . . . . . . .15
Before
using
your
refrigerator/
freezer
Read this manual carefully. It is intended
to help you operate and maintain your new
refrigerator/freezer properly.
Keep it handy for answers to your questions.
If you don’t understand something or
need more help, there is a list of toll-free
consumer service numbers included in
the back section of this manual.
OR
Visit our Website at: monogram.com

3
Write
down the
model &
serial
numbers
You’ll see them on a label inside the
refrigerator/freezer under the storage drawers.
These numbers are also on the Consumer
Product Ownership Registration Card included
with this manual.
Before sending in this card, please write these
numbers here:
Model Number
Serial Number
Use these numbers in any correspondence or
service calls concerning your refrigerator/freezer.
If you
received a
damaged
refrigerator/
freezer
The warranty does not cover damage caused
after delivery.
Immediately contact the dealer (or builder) that
sold you the refrigerator/freezer.
Save time
& money
Before you request service, check the Problem
Solver in the back of this manual.
It lists causes of minor operating problems that
you can correct yourself.
If you
need
service
To obtain service, see the Consumer Services
page in the back of this manual.
We’re proud of our service and want you to be
pleased. If for some reason you are not happy
with the service you receive, here are steps to
follow for further help.
For customers in the USA:
FIRST, contact the people who serviced your
appliance. Explain why you are not pleased.
In most cases, this will solve the problem.
NEXT, if you are still not pleased, write all
the details—including your phone number—to:
Manager, Customer Relations
GE Appliances
Appliance Park
Louisville, KY 40225
For customers in Canada:
FIRST, contact the people who serviced your
appliance. Explain why you are not pleased.
In most cases, this will solve the problem.
NEXT, if you are still not pleased, write all
the details—including your phone number to:
Manager, Consumer Relations
Mabe Canada Inc.
1 Factory Lane, Suite 310
Moncton, N.B. E1C 9M3
Consumer Information
36” All-Refrigerator and All-Freezer Units

4
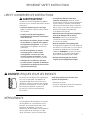
IMPORTANT SAFETY INSTRUCTIONS
READ AND SAVE THESE INSTRUCTIONS
w WARNING–When using this
appliance, always exercise basic safety
precautions, including the following:
• Use this appliance only for its intended
purpose as described in this Owner’s Manual.
• This refrigerator/freezer must be properly
installed in accordance with the Installation
Instructions before it is used.
• Do not allow children to climb, stand or hang
on the shelves in the refrigerator/freezer.
They could damage the refrigerator/freezer
and seriously injure themselves.
• Do not touch the cold surfaces in the freezer
compartment when hands are damp or wet.
Skin may adhere to these extremely cold
surfaces.
• Do not store or use gasoline or other
flammable vapors and liquids in the vicinity
of this or any other appliance.
• Your freezer has an automatic
icemaker—avoid contact with the moving
parts of the ejector mechanism, or with
the heating element located on the bottom
of the icemaker. Do not place fingers or hands
on the automatic icemaking mechanism while
the freezer is plugged in.
• Unplug your refrigerator/freezer
before cleaning and making repairs.
NOTE: We strongly recommend that
any servicing be performed by a qualified
individual.
• Before replacing a burned-out light bulb,
the refrigerator/freezer should be unplugged in
order to avoid contact with a live wire filament.
(A burned-out light bulb may break when being
replaced.) NOTE: Turning control to OFF does
not remove power to the light circuit.
• Do not refreeze frozen foods which have
thawed completely.
w DANGER: RISK OF CHILD ENTRAPMENT
Child entrapment and suffocation are not
problems of the past. Junked or abandoned
refrigerator/freezers are still dangerous…even
if they will sit for “just a few days.” If you are
getting rid of your old refrigerator/freezer,
please follow the instructions below to help
prevent accidents.
Before You Throw Away Your Old
Refrigerator/Freezer or Freezer:
• Take off the doors.
• Leave the shelves in place so that children may
not easily climb inside.
REFRIGERANTS
All refrigeration products contain refrigerants,
which under federal law must be removed prior
to product disposal. If you are getting rid of an old
refrigeration product, check with the company
handling the disposal about what to do.

5
LIRE ET CONSERVER CES INSTRUCTIONS
w AVERTISSEMENT :
Lorsque vous utilisez le réfrigérateur/congélateur,
observez toujours certaines précautions de base,
notamment :
• N’utilisez l’appareil que pour son usage
prévu, comme décrit dans le présent manuel
de l’utilisateur.
• Installez le réfrigérateur/congélateur
conformément aux directives d’installation
avant de l’utiliser.
• Ne laissez pas les enfants grimper, s’asseoir,
se tenir debout ni se pendre aux clayettes
du réfrigérateur/congélateur. Ils pourraient
endommager le réfrigérateur et se blesser
gravement.
• Une fois le congélateur en marche,
ne touchez pas les surfaces froides
du congélateur, surtout si vous avez
les mains humides ou mouillées : la peau
risque d’adhérer à ces surfaces très froides.
• N’entreposez et n’utilisez pas d’essence
ou autres vapeurs et liquides inflammables
à proximité de cet appareil ou de tout autre
appareil électroménager.
• Le congélateur doté d’une machine
à glaçons automatique—évitez le contact
avec les pièces mobiles du mécanisme éjecteur
ou avec l’élément chauffant situé à la partie
inférieure de la machine à glaçons. Ne posez
pas les doigts ou les mains sur le mécanisme
de la machine à glaçons pendant que
le congélateur est branché.
• Débranchez votre réfrigérateur/congélateur
avant de le nettoyer et de le réparer.
REMARQUE : Nous vous recommandons
vivement de confier toute réparation
à un technicien qualifié.
• Avant de remplacer une ampoule grillée,
le réfrigérateur/congélateur doit être débranché
afin d’éviter tout contact avec un fil sous tension.
(Une ampoule grillée peut se briser pendant
l’opération). REMARQUE : Lorsque vous placez
la commande sur «0» (éteint), l’alimentation
électrique de l’ampoule n’est pas coupée.
• Ne faites PAS recongeler des aliments
surgelés qui ont complètement dégelé.
w DANGER : RISQUES POUR LES ENFANTS
Les enfants pris au piège ou morts d’asphyxie
sont toujours d’actualité. Les appareils de
réfrigération abandonés sont toujours aussi
dangereux, même si on n’attend que “quelque
jours” pour s’en débarasser. Si vous ne gardez
pas votre ancien appareil, veuillez suivre
les directives ci-dessous afin de prévenir
les accidents.
Avant de vous débarasser de votre vieux
appareil de réfrigération :
• Démontez les portes.
• Laissez les clayettes en place afin d’empêcher
les enfants de grimper à l’intérieur.
RÉFRIGÉRANTS
Tous les appareils de réfrigération contiennent
des réfrigérants qui, conformément aux lois
fédérales, doivent être enlevés avant toute
élimination de l’appareil. Si vous vous
débarrassez de vieux appareils de réfrigération,
vérifiez, auprès de la société qui s’occupe
de leur élimination, ce que vous devez faire.
IMPORTANT SAFETY INSTRUCTIONS

6
HOW TO CONNECT ELECTRICITY
Do not, under any circumstances,
cut or remove the third (ground) prong
from the power cord. For personal safety,
this appliance must be properly grounded.
The power cord of this appliance is equipped
with a 3-prong (grounding) plug which mates
with a standard 3-prong (grounding) wall outlet
to minimize the possibility of electric shock
hazard from this appliance.
Have the wall outlet and circuit checked by
a qualified electrician to make sure the outlet
is properly grounded.
Where a standard 2-prong wall outlet is
encountered, it is your personal responsibility
and obligation to have it replaced with a properly
grounded 3-prong wall outlet.
The refrigerator/freezer should always
be plugged into its own individual electrical
outlet which has a voltage rating that matches
the rating plate.
DO NOT USE AN ADAPTER PLUG TO CONNECT
THE REFRIGERATOR/FREEZER TO A 2-PRONG
OUTLET.
DO NOT USE AN EXTENSION CORD WITH
THIS APPLIANCE.
This provides the best performance and also
prevents overloading house wiring circuits, which
could cause a fire hazard from overheated wires.
Never unplug your refrigerator/freezer by pulling
on the power cord. Always grip plug firmly and
pull straight out from the outlet.
Repair or replace immediately all power
cords that have become frayed or otherwise
damaged. Do not use a cord that shows cracks
or abrasion damage along its length or at
either end.
When moving the refrigerator/freezer away
from the wall, be careful not to roll over or
damage the power cord.
SAVE THESE
INSTRUCTIONS
IMPORTANT SAFETY INSTRUCTIONS

7
RACCORDEMENT ÉLECTRIQUE
Ne coupez ni retirez en aucun cas la troisième
broche (mise à la terre) de la fiche du cordon
d’alimentation. Pour votre sécurité, cet
appareil doit être correctement mis à la terre.
Le cordon d’alimentation de cet appareil
est muni d’une fiche à 3 broches (mise à la terre)
qui se branche dans une prise mural ordinaire
à 3 alvéoles (mise à la terre) pour réduire
au minimum les risques du chocs électriques.
Faites examiner la prise de courant et le circuit
par un électricien qualifié pour vous assurer
que la prise est correctement mise à la terre.
Si la prise murale est du type standard à
2 alvéoles, il vous incombe de la faire remplacer
par une prise à 3 alvéoles correctement mise
à la terre.
Le réfrigérateur/congélateur doit toujours être
branché dans sa propre prise de courant, dont
la tension nominale est identique à celle indiquée
sur la plaque signalétique.
N’UTILISEZ PAS UNE FICHE
D’ADAPTATION POUR RACCORDER
LE RÉFRIGÉRATEUR/CONGÉLATEUR
DANS UNE PRISE MURALE À 2 ALVÉOLES.
N’UTILISEZ PAS DE CORDONS PROLONGATEURS
AVEC CET APPAREIL.
Cette précaution est recommandée pour garantir
un rendement optimum et éviter une surcharge
des circuits électriques de la résidence,
ce qui pourrait créer un risque d’incendie
par surschauffe des fils.
Ne débranchez jamais l’appareil en tirant
le cordon d’alimentation. Saisissez fermement
la fiche du cordon et tirez droit pour la retirer
de la prise.
Réparez ou remplacez immédiatement tout
cordon effiloché ou endommagé. N’utilisez pas
un cordon fendillé ou présentant des signes
d’usure.
Lorsque vous déplacez l’appareil du mur, faites
attention de ne pas la faire rouler sur le cordon
d’alimentation afin de ne pas l’endommager.
CONSERVEZ
CES DIRECTIVES
IMPORTANT SAFETY INSTRUCTIONS

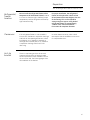
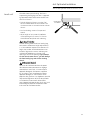
Door
alarm
To turn the Door Alarm feature on, press
DOOR ALARM once. The ACTIVE light will
come on. To turn it off, press it again.
When the DOOR ALARM
is active, the alarm will flash
and beep if you keep the door
open for more than 2 minutes.
8
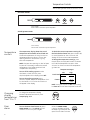
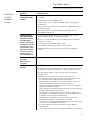
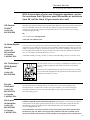
Temperature Controls
Temperature
controls
Changing
display
temperatures
from °F to °C
To change the temperature display
between Fahrenheit and Celsius, press
Temp Display °C/°F.
The temperature display shows the actual
temperature of the freezer or fresh food unit.
The actual temperature will vary from the set
temperature based on factors such as door
opening, amount of food, defrost cycling
and room temperature.
NOTE: Frequent door openings or door left open
for periods of time may increase the internal
temperature of the freezer and fresh food
compartments temporarily.
To turn off the cooling system in either
the freezer or fresh food unit, press
the plus (+) pad until the display shows OFF.
To turn the cooling system on, press
the minus (–) pad. The preset temperature of 0°F
for the freezer or 37°F for the fresh food unit
will appear in the display.
To check the current temperature setting for
the fresh food or freezer unit, press the plus (+)
or minus (–) pad once. After 5 seconds, the
display will return to the actual temperature.
To change the temperature settings, press
the plus (+) or minus (–) pad for each increment
to the desired temperature set point. Allow
24 hours for the unit to reach the temperature
you have set.
Temperature Ranges
Low High
Fresh Food
Freezer
NOTE: Setting the controls to OFF stops cooling,
but does not shut off electrical power to the unit.
34°F
1°C
–6°F
–21°C
45°F
7°C
+6°F
–14°C
36” All-Refrigerator and All-Freezer Units
All-Freezer Controls
All-Refrigerator Controls
Preset Settings:
Allow 24 hours to reach these preset temperatures.
Preset Settings:
Allow 24 hours to reach these preset temperatures.

9
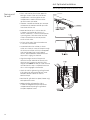
Automatic Icemaker (freezer models)
36” All-Refrigerator and All-Freezer Units
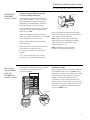
Automatic
icemaker
(freezer models)
Accessing
the icemaker
and ice
storage bin
(freezer models)
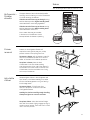
The icemaker is located behind the first drawer
on the right of the freezer. The ice bin
is the second drawer.
To remove the ice bin:
Open the access door to reach the icemaker. Set
the icemaker power switch to the OFF position.
With the access door closed, support the storage
bin at the bottom while slightly lifting. Pull bin
straight out. See Drawer Removal section.
To replace the ice bin: Slide the bin back until
the tab on the bin locks into the slot on the shelf.
After replacing the ice bin, open the access door
to reach the icemaker. Set the icemaker power
switch to the ON position.
Icemaker
Ice bin
On/Off switch
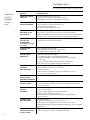
A newly-installed refrigerator may take
12–24 hours to begin making ice.
The icemaker will produce seven cubes per
cycle—approximately 15 cycles in a 24-hour
period, depending on freezer compartment
temperature, room temperature, number of
door openings and other use conditions.
If the refrigerator is operated before the water
connection is made to the icemaker, set the
power switch to OFF.
When the refrigerator has been connected
to the water supply, set the power switch to
ON
.
Throw away the first full bucket of ice.
Be sure nothing interferes with the sweep
of the feeler arm.
When the bin fills to the level of the feeler arm,
the icemaker will stop producing ice.
It is normal for several cubes to be joined
together.
If ice is not used frequently, old ice cubes
will become cloudy, taste stale and shrink.
After the icemaker has been turned on again,
there will be a delay of about 45 minutes before
the icemaker resumes operations.
NOTE: In homes with lower-than-average
water pressure, you may hear the icemaker
water valve cycle on several times when
making one batch of ice.
NOTE: Icemaker works best between
40 and 120 PSI home water pressure.
Icemaker
Feeler Arm
Power
Switch

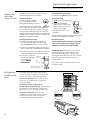
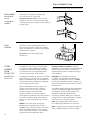
The water filter cartridge is located in the top
machine compartment of the freezer.
To Replace the Filter:
The filter cartridge is designed
to filter 300 gallons of water
(lasting approximately 12 months).
There is a replacement indicator light
for the water filter cartridge on the temperature
control panel. This light will turn yellow to tell you
that you need to replace the filter soon. The filter
cartridge should be replaced when the replacement
indicator light turns red or if the flow of water to the
dispenser or icemaker decreases.
Installing the Filter Cartridge:
1. Remove the old cartridge by slowly turning
it to the left. A small amount of water may
drip down. Do not pull down on the cartridge.
2. Fill the new cartridge with water from the tap to
allow for better flow immediately after installation.
3. Line up the arrow on the cartridge with the center
of the holder. Do not push it up into the holder.
4. Slowly turn it to the right
until the cartridge stops.
It will rotate about
1/4 turn. DO NOT
OVERTIGHTEN.
To Reset the Filter Status Light:
Press and hold the RESET pad for 3 seconds.
Filter Bypass Plug:
You must use the filter bypass plug:
a) if you have a household
reverse osmosis water system
and/or another form of home
water filtration system
b) if a replacement filter is not
available.
The icemaker and dispenser will not operate without
the filter or filter bypass plug installed.
Replacement filters:
To order additional filter cartridges in the United
States, visit our Website at monogram.com, or
call GE Parts and Accessories, 800.626.2002.
IMPORTANT NOTE: Remove the water filter to
immediately stop any water leak from the
Icemaker/Dispenser system. The water filter
cartridge holder (bracket) acts as a cut-off valve
when the filter is removed and will prevent
further leaking.
Call 1.800.844.1845 to schedule a service call
to repair the leak.
10
Water Filter/Storage Drawers
Refrigerator—
Sealed snack
pans
The sealed snack pans retain high humidity
for the convenient storage of lunch meats and
cheese, hors d’oeuvres, spreads and snacks.
To remove a snack pan, pull the pan out and
lift the front of the pan up until it snaps out
of the wire holder.
To remove the upper drawers when
the door cannot be opened fully, the shelf above
the drawers must be removed. Push the shelf
back, then lift up. Tilt the cover and take it out.
To replace a snack pan, place the back
of the pan in the wire holder. Lower the front
of the pan, then push down until the front
of the pan snaps into the wire holder.
36” All-Refrigerator and All-Freezer Units
Water filter
cartridge
(freezer models)
Cartridge
Holder
Slowly turn it to the right.
Do not overtighten.
Filter
Cartridge
Filter
Bypass
Plug

Adjustable
shelves
Tempered glass shelves in the refrigerator and
wire shelves in the freezer enable you to make
efficient shelf arrangements to fit your family’s
food storage needs.
To remove shelves: Tilt shelf up at front,
then lift it up and out of tracks on rear wall
of refrigerator/freezer.
Handle glass shelves carefully. Rough handling
of tempered glass can cause it to shatter.
To replace shelves: Select desired shelf height.
With shelf front raised slightly, engage top lugs in
tracks at rear of cabinet. Then lower front of shelf
until it locks into position.
11
Shelves
36” All-Refrigerator and All-Freezer Units
Refrigerator—
Storage
drawers
The upper drawers have individual, adjustable
humidity controls that let you control the amount
of cold air entering the drawers.
Slide the control all the way to the High setting
and the drawer provides higher humidity levels
recommended for most leafy vegetables.
Slide the control all the way to the Low setting
and the drawer provides lower humidity levels
recommended for most fruits.
Excess water that may accumulate
in the bottom of the drawers should
be emptied and the drawers wiped dry.
Drawer
removal
Drawers in the refrigerator/freezer will
stop before coming all the way out, to help
prevent contents from spilling onto floor.
To remove a drawer, pull the drawer out and lift
the front of the drawer up and out of the wire
holder. Lift the back of the drawer up and out.
To replace a drawer, place the back
of the drawer in the wire holder, making
sure the extensions of the side of the drawer fit
into the back of the wire holder. Lower the front
of the drawer into the wire holder. Press firmly
on the top of the drawer.

12
Shelves/Sabbath Mode
Door
shelves
Some door shelves are adjustable and can
be moved up and down to meet your storage
needs. The deeper door shelves must be placed
at the bottom of the door.
To remove: Lift the shelf up and slide it
towards you.
ZSAB1
Sabbath
Mode
Product Kit
(available at
extra cost)
The Sabbath Mode Product Kit was designed
for use on the Jewish Sabbath and Holidays.
The Sabbath Mode feature makes it possible
for observant Jews to refrigerate and freeze
food during the duration of the holiday.
The Sabbath Mode feature can be set to override
typical reactions to actions in your refrigerator.
While in the Sabbath Mode, your refrigerator will
still operate normally. However, the refrigerator
will not respond to your actions.
While in the Sabbath Mode, you may notice
the fan running when the door is opened;
however, this is not a result of your actions.
The fan will operate at random times.
The defrost heater will continue to defrost
the refrigerator and freezer and will be activated
on a timer. The defrost heater will not defrost
as a result of door openings or any consumer
actions.
ON/OFF—To activate, raise the top grille
panel and set the Sabbath Mode switch to
the ON position. A green LED light will be visible
below the Sabbath Mode Kit switch. The light
will be visible when the grille is closed between
the grille door and compartment doors.
DISPLAYS, ALARMS and LIGHTS—The main
temperature control displays will be deactivated;
therefore they will not be lit, sound a tone or
operate when touched. Door alarms and lights
will be disabled.
ICEMAKER—The icemaker will continue
to operate. The icemaker can be disabled by
setting the icemaker power switch to the OFF
position (see Automatic Icemaker). To obtain ice,
open the freezer door and remove the cubed ice
from the ice bin.
This Sabbath Mode Product Kit can be purchased
from your local appliance dealer. The ZSAB1 Kit
is designed for use with all Monogram Built-In
Refrigerators manufactured after 2008.
To locate your nearest dealer, visit our web site
monogram.com or call 1.800.626.2000. In Canada,
call 1.800.561.3344. Order Kit # ZSAB1.
NOTE: The Sabbath Mode Product Kit must
be installed by a qualified service technician.
NOTE: If installing the refrigerator and freezer as
a pair, 2 Sabbath Mode Kits must be ordered.
36” All-Refrigerator and All-Freezer Units
Removable
wine rack
(on all
refrigerator
models)
The wine rack is designed to hold a bottle
on its side and will fit on any shelf.
To relocate the wine rack: Pull the wine rack
straight out, position its lip over the right edge
of the shelf you want to suspend it from and push
it all the way in.

13
Care and Cleaning
Cleaning
outside
Door handles and trim—Clean with a cloth
dampened with soapy water. Dry with a soft cloth.
Keep the outside clean. Wipe with a clean
cloth lightly dampened with mild liquid dish
detergent. Dry with a clean, soft cloth.
Do not wipe the refrigerator/freezer with a soiled
dish cloth or wet towel. These may leave a residue
that can damage the finish. Do not use scouring
pads, powdered cleaners, bleach or cleaners
containing bleach because these products
can scratch and damage the finish.
Stainless steel—Regularly clean and polish
the Stainless Steel Door Panels and Handles
(on some models) with a commercially available
stainless steel cleaner such as Stainless Steel Magic
™
to preserve and protect the fine finish. Stainless Steel
Magic is available through GE Parts and Accessories,
800.626.2002, or ge.com. Order part number
WX10X15.
Do not use appliance wax or polish on the stainless
steel.
Cleaning
inside
To help prevent odors, leave
an open box of baking soda
in the refrigerator/freezer.
Turn off power at the circuit
breaker or fuse box before
cleaning. If this is not practical,
wring excess moisture out of
sponge or cloth when cleaning around switches,
lights or controls.
Use warm water and baking soda solution—
about a tablespoon (15 ml) of baking soda
to a quart (1 liter) of water. This both cleans
and neutralizes odors. Thoroughly rinse
and wipe dry.
Other parts of the refrigerator/freezer— including
door gaskets, meat and vegetable drawers, ice
storage bin and all plastic parts—can be cleaned
the same way. After cleaning the door gaskets,
apply a thin layer of petroleum jelly to the door
gaskets at the hinge side. This helps keep the
gaskets from sticking and bending out of shape.
Avoid cleaning cold glass shelves with hot water
because the extreme temperature difference
may cause them to break. Handle glass shelves
carefully. Rough handling of tempered glass can
cause it to shatter.
Do not wash any plastic refrigerator/freezer parts
in the dishwasher.
36” All-Refrigerator and All-Freezer Units

Care and Cleaning
14
Preparing
for vacation
For long vacations or absences, remove food
from the refrigerator/freezer. Set the control to
OFF, and clean the interior with a baking soda
solution of one tablespoon (15 ml) of baking
soda to one quart (1 liter) of water. Leave
the door open.
For shorter vacations, remove perishable foods
and leave the control at the regular setting.
However, if the room temperature is expected
to drop below 60°F (16°C), follow the same
instructions as for extended vacations.
Move icemaker power switch to the OFF position
and shut off the water supply to the freezer.
Light bulb
replacement
For upper and lower light bulb replacement,
call for service.
Master Light
Switch
36” All-Refrigerator and All-Freezer Units
Using the
master
light switch
This feature turns off the lights inside the unit. The
switch is located behind the top access panel. Lift up
the panel to access the switch. Turning off the
master switch does not turn off all power to the unit.
Master Light
Switch
All-Refrigerator
All-Freezer

15
Preparation
Refrigerator/
freezer
location
Do not install the refrigerator/freezer where
temperatures will be below 60°F (16°C) because
it will not run often enough to maintain proper
temperatures, and the refrigerator will develop
high internal humidity.
For proper installation, the refrigerator/
freezer must be placed on a level surface
of hard material the same height as the rest
of the flooring. This surface should be
strong enough to support a fully loaded
refrigerator/freezer, or approximately
1,200 lbs. each. See the Installation
Instructions for complete directions.
Clearances
If the refrigerator/freezer is to be installed in
a corner, a 4" clearance is required on the hinge
side for a 90° door opening and access to fresh
food drawers. A 15" clearance is required on
the hinge side to remove pans. A 25" clearance
is required on the hinge side for a full 130°
door swing.
No other clearances at top, sides or back
are required. See the Installation Instructions
for complete directions.
36” All-Refrigerator and All-Freezer Units
Anti-tip
bracket
The unit is top-heavy and must be secured
to prevent the possibility of tipping forward.
An anti-tip bracket must be installed to secure
this unit to the wall. The following pages show
the installation of this bracket.

16
Anti-Tip Bracket Installation
36” All-Refrigerator and All-Freezer Units
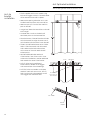
Anti-tip
bracket
installation
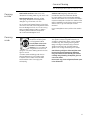
• The kit supplied with the unit contains 2 lag
bolts and 4 toggles with bolts. The wall bracket
will be attached to the wall in 4 places.
• Measure the opening where the unit is to be
installed. Mark the center with a vertical line.
• Measure up 81 1/2" from the floor. Mark this
point on the wall.
• Using a level, draw a horizontal line on the wall
at this height.
• Locate at least 2 studs on the back wall.
Mark these points on the horizontal line.
• Place the bottom of the wall bracket with tabs
on the horizontal line. Align the center notch
on the bracket with the center line on the wall.
• The anti-tip wall bracket has a series of holes.
Select 2 holes that match with the located
studs. Make sure the holes selected are
on the center of the studs. Mark the wall
at these points.
• Mark an additional hole at each end
of the bracket. If one of the studs is closer
to the end of the bracket, mark an additional
hole towards the center of the bracket.
• Drill 1/2" holes into the wall board
at the locations marked for the toggles
to be mounted (not the stud markings).
• Drill 3/16" holes into wooden studs where
marked. If steel stud construction, drill 1/2"
holes into the studs where marked. You will
use 2 toggles with the metal studs.
Two Additional
Hole Locations at
Ends of Brackets
Center
Wall Bracket
Line On Wall
Wall Studs
Line on Wall
Center

17
Anti-Tip Bracket Installation
36” All-Refrigerator and All-Freezer Units
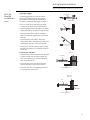
Anti-tip
bracket
installation
(cont.)
Install Wall Toggles:
The wall toggles and bolts can be ordered
as Service Kit #WR49X10193. Wall toggles
are installed in the drywall and metal studs
for stability. Install the wall toggles as follows:
• Drill 1/2" holes at the wall markings made
in the holes at the ends of the wall bracket.
• Hold the metal channel flat against the plastic
straps and slide the channel through the hole.
• Gently pull back at the ends of the plastic
straps to make the channel rest flush behind
the wall.
• Hold the ends of the straps in one hand
and slide the plastic cap along the straps until
the flange of the cap is flush with the wall.
• Place your thumb between the plastic straps
and bend up and down to snap the straps off
at the wall.
Install Screws and Bolts:
• Have someone hold the wall bracket centered
in place with each of the holes aligned with
the correct opening in the bracket and level
with the horizontal line.
• Insert the lag screws through the bracket
and into the stud. Tighten with a wrench.
• Insert the bolts into the toggle by hand until
snug. Tighten with a wrench.
Anti-Tip Wall Bracket
Bolt
Wall Toggle
Drywall or
Steel Stud
Plastic Straps
Metal Channel
Cap
Wood Stud
Lag Screw
Anti-Tip Wall Bracket

18
Anti-Tip Bracket Installation
36” All-Refrigerator and All-Freezer Units
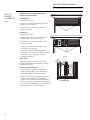
Anti-tip
bracket
installation
(cont.)
Remove Grilles for Access to Power Cord
and Anti-tip Locking Hooks
Fresh Food Unit
• Open the access door.
• Using a 1/4" hex driver, remove the 2 screws
at the bottom of the grille.
• Pull the bottom of the grille forward, down
and out to remove.
Freezer Unit
• Open the access door.
• Using a 1/4" hex driver, remove the 2 screws
at the bottom of the grille on the right.
• Pull the bottom of the grille forward, down
and out to remove.
• Using a 1/4" hex driver, remove the screw
on the left side of the grille.
• The grille is aluminum and will bend easily.
Gently pull forward on the left side of the grille
to open for access. This grille will not be
completely removed.
Power Cord
Locate the power cord inside the left cavity.
If it has not been adjusted so the plug is easily
accessible, do so now.
Move Unit into Final Position
• Move refrigerator toward its final installed
location. Align the tabs on the wall bracket
with the openings in the back of the unit.
• The unit has “L” bolts in the upper left and right
corners inside of the access compartment.
These bolts will interlock with the wall bracket
and secure the unit using the washers and hair
pin cotters in the hardware kit once the unit has
been leveled and is in the final position.
“L” Bolt
Left Grille Open
Power Cord Location
“L” Bolt
Left Grille Open
Power Cord Location
Screws
Screws

19
Anti-Tip Bracket Installation
36” All-Refrigerator and All-Freezer Units
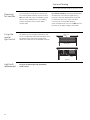
Level unit
All models have 4-point leveling. The front is
supported by leveling legs; the rear is supported
by adjustable wheels. Both are accessible from
the front of the unit.
• To level the back of the unit, turn the 7/16"
hex nut located above the front wheels. Turn
clockwise to raise or counterclockwise to lower
the unit.
• For front leveling, use a 1-1/4" open-end
wrench.
• Adjust height of unit to match installation
cutout opening 83-1/2 to 84-1/2". The unit
should be level and plumb with cabinetry.
CAUTION:
The rear leveling wheels and front leveling legs
are limited to a maximum height adjustment of
1". If the installation requires more than 84-1/2"
height, the installer should elevate the unit on
a sheet of plywood or runners. Cabinetry trim
could also be added across the top of the
opening to shorten the opening. If you attempt
to raise the unit more than 1", you will damage
the front leveling legs and the rear leveling
wheels.
PRUDENCE
Les roues de nivellement arrière et les pattes
de nivellement avant permettent un réglage
maximal de 25 mm (1 po). Si l’ouverture pour
l’appareil ménager a une hauteur supérieure
à 2,15 m (84-1/2 po), l’installateur doit élever
l’appareil ménager sur une feuille de contre-
plaqué ou des glissières. Il est également possible
d’ajouter des baguettes de finition des placards
sur le haut de l’ouverture afin de la réduire.
Lever l’appareil ménager de plus de 25 mm (1 po)
endommage les pattes de nivellement avant
et les roues de nivellement arrière.
Leveling Leg
Hex Nut Adjusts
Rear Wheels

20
Anti-Tip Bracket Installation
36” All-Refrigerator and All-Freezer Units
Secure unit
to wall
• The “L” rods can be found in the upper left
and right corners of the unit in the access
compartment. Look through the access
compartment to make sure the rods line
up with the anti-tip bracket.
• There are 2 washers and a hair pin cotter per
rod. Remove the washers and hair pin cotter
from the end of the rod.
• Rotate and move the “L” rod into the slot
in the anti-tip bracket tab. Once it is in
the slot, rotate the “L” rod so the hook portion
is pointing down. The holes at the front end
of the rod should be in a vertical position.
Do this to both sides.
• Pull out on the end of the rod to make sure
it is secure in the bracket.
• Locate the hole on the rod that is closest
to the unit. A hair pin cotter will be put through
this hole to secure the rod. If this hole appears
to be too far away for a snug fit against
the unit, add the washers one at a time until
the pin will fit tightly into the hole.
• Align the straight section of the pin with
the hole from the underside of the rod. Push
the pin up until it snaps into position. Pliers
may be used. NOTE: The hair pin cotter must be
vertical when this step is completed to ensure
the “L” rod is engaged in the bracket.
• Check the rod for tightness by pulling forward.
If the rod moves, remove the hair pin cotter
and place another washer on the rod.
Reinsert the pin.
• Bend the left grille back into place (freezer only)
and replace the screws.
• Replace the flat grille panel by sliding
it under the flange at the top of the access
compartment and pushing the grille back
into place. Replace screws.
La page est en cours de chargement...
La page est en cours de chargement...
La page est en cours de chargement...
La page est en cours de chargement...
La page est en cours de chargement...
La page est en cours de chargement...
La page est en cours de chargement...
La page est en cours de chargement...
-
 1
1
-
 2
2
-
 3
3
-
 4
4
-
 5
5
-
 6
6
-
 7
7
-
 8
8
-
 9
9
-
 10
10
-
 11
11
-
 12
12
-
 13
13
-
 14
14
-
 15
15
-
 16
16
-
 17
17
-
 18
18
-
 19
19
-
 20
20
-
 21
21
-
 22
22
-
 23
23
-
 24
24
-
 25
25
-
 26
26
-
 27
27
-
 28
28


GE Monogram Refrigerator All-Refrigerators and All-Freezers Manuel utilisateur
- Catégorie
- Frigos
- Taper
- Manuel utilisateur
- Ce manuel convient également à
dans d''autres langues
Documents connexes
-
 GE Monogram ZIRS360NHRH Le manuel du propriétaire
-
GE Monogram ZIF360NHRH Manuel utilisateur
-
GE Monogram ZICP360NXRH Manuel utilisateur
-
GE Monogram ZIFP360NXARH Manuel utilisateur
-
 GE Monogram Refrigerator Side-by-Side Built-In Refrigerators Manuel utilisateur
-
 GE Monogram Refrigerator Manuel utilisateur
-
GE Monogram ZISS420DMSS Manuel utilisateur
-
 GE Monogram Built In 36 Single Door Refrigerators and 36 Single Door Freezers Manuel utilisateur


Autres documents
-
GE 197D3354P013 Manuel utilisateur
-
-
-
-
Summit CL69ROSW Manuel utilisateur
-
-
-
Dacor 863445 Mode d'emploi
-
-
Monogram ZICP360SRBSS Le manuel du propriétaire