Monogram ZICP360SRBSS Le manuel du propriétaire
- Taper
- Le manuel du propriétaire

Owner's
Manual
Bottom-Freezer
Built-In Refrigerators
0
Monogram:

Consumer Information
Bottom Freezer Refrigerator
Introduction
Your new Monogram refrigerator makes an eloquent statement of style, convenience and kitchen
planning flexibility. Whether you chose it for its purity of design, practical storage arrangements
or assiduous attention to detail--or for all of these reasons--you'll find that your Monogram
refrigerator's superior blend of form and function will delight you for years to come.
The Monogram refrigerator was designed to provide the flexibility to blend in with your kitchen
cabinetry. Decorative door insert panels allow it to match your kitchen cabinets or blend with
your kitchen decor.
Since the Monogram refrigerator is a built-in product, custom panels are required on the
front of the Monogram refrigerator. Consult your kitchen designer or cabinetmaker for your
customized look.
The information on the following pages will help you operate and maintain your refrigerator
properly.
If you have any other questions, visit our Website at: ge.eom
Con_n_
Consumer Services
Important Phone Numbers ............... 19
Model and Serial Numbers ................ 3
Performance Data Sheet ................. 17
Problem Solver ...................... 15, 16
Product Registration ...................... 3
Safety Instructions ..................... 4-7
State of California
Water Treatment Device Certificate ........ 18
Warranty ....................... Back Cover
Care and Cleaning
Cleaning--Outside and Inside ............ 13
Condenser ............................. 13
Light Bulb Replacement ................. 14
Master Light Switch ...................... 14
Vacation ............................... 14
Operating Insu-uctions
Automatic Icemaker ..................... 10
Sabbath Mode Product Kit, ZSAB1 ......... 10
Shelves ................................ 12
Storage Pans ............................ 11
Temperature Controls .................... 8
Water Filter Cartridge ..................... 9
Before
using
your
refdg_ator
Read this manual carefully. It is intended to
help you operate and maintain your new
refrigerator properly.
Keep it handy for answers to your questions.
If you don't understand something or need
more help, there is a list of toll-free consumer
service numbers included in the back section
of this manual.
OR
Visit our Website at: ge.com
2

Consumer Information
Bottom Freezer Refrigerator
Write
clown the
model _._
serial
numbers
You'll see them on a label inside the fresh food
compartment under the storage drawers on
the right side.
These numbers are also on the Consumer
Product Ownership Registration Card included
with this manual.
Before sending in this card, please write these
numbers here:
Model Number
Serial Number
Use these numbers in any correspondence or
service calls concerning your refrigerator.
If you received
a damaged
refrigerator
Immediately contact the dealer (or builder)
that sold you the refrigerator.
Save time
& money
Before you request service, check the Problem It lists causes of minor operating problems that
Solver in the back of this manual, you can correct yourself.
If you need
service
To obtain service, see the Consumer Services
page in the back of this manual.
We're proud of our service and want you to be
pleased. If for some reason you are not happy
with the service you receive, here are steps to
follow for further help.
For customers in the USA:
FIRST, contact the people who serviced your
appliance. Explain why you are not pleased.
In most cases, this will solve the problem.
NEXT, if you are still not pleased, write all the
details_including your phone number--to:
Manager, Customer Relations
GE Appliances
Appliance Park
Louisville, KY 40225
For customers in Canada:
FIRST, contact the people who serviced your
appliance. Explain why you are not pleased.
In most cases, this will solve the problem.
NEXT, if you are still not pleased, write all the
details--including your phone number to:
Manager, Consumer Relations
Camco Inc.
1 Factory Lane, Suite 310
Moncton, N.B. E1C 9M3
3

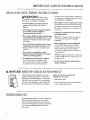
IMPORTANT SAFETY INSTRUCTIONS
READ AND SAVE THESE INSTRUCTIONS
AWARNING: When using
this appliance, always exercise basic safety
precautions, including the following:
• Use this appliance only for its intended
purpose as described in this Owner's
Manual.
• This refrigerator must be properly installed
in accordance with the Installation
Instructions before it is used.
• Do not allow children to dinth, stand or hang
on the shelves in the refrigerator. They could
damage the refrigerator and seriously injure
themselves.
• Do not touch the cold surfaces in the freezer
compartment when hands are damp or wet.
Skin may adhere to these extremely cold
surfaces.
• Do not store or use gasoline or other
flammable vapors and liquids in the vicinity
of this or any other appliance.
• In refrigerators with automatic icemakers,
avoid contact with moving parts of the
ejector mechanism, or with the heating
element located on the bottom of the
icemaker. Do not place f'mgers or hands on
the automatic icemaking mechanism while
the refrigerator is plugged in.
Keep f'mgers out of the "pinch point" areas:
clearances between the doors and between
the doors and cabinet are necessarily small.
Be careful closing doors when children are
in the area.
Unplug your refrigerator before cleaning
and making repairs.
NOTE: We strongly recommend that any
servicing be performed by a qualified
individual.
Before replacing a burned-out light bulb,
set the Master Light switch in the OFF
position to turn off the lights in order to
avoid contact with a live wire filament.
(A burned-out light bulb may break when
being replaced.)
NOTE: Setting the refrigerator temperature
controls to OFF does not remove power to
the light circuit.
• Do not refreeze frozen foods which have
thawed completely.
A DANGER: RISK OF CHILD ENTRAPMENT
Child entrapment and suffocation are not
problems of the past. Junked or abandoned
refrigerators are still dangerous...even if they
will sit for '_just a few days." If you are getting
rid of your old refrigerator, please fonow the
instructions below to help prevent accidents.
Before You Throw Away Your Old
Refrigerator or Freezer:
• Take offthe doors.
• Leave the shelves in place so that children
may not easily climb inside.
REFRIGERANTS
All refrigeration products contain refrigerants,
which under federal law must be removed
prior to product disposal. If you are getting
rid of an old refrigeration product, check with
the company handling the disposal about
what to do.
4

INSTRUCTIONS IMPORTANTES DE SI CURITI
LIRE ET CONSERVER INSTRUCTIONS
AAVERTISSEMENT :
Lorsque vous utilisez le rdfrigdrateur, observez
toujours certaines prdcautions de base,
notamment :
• N'utilisez le r6frig6rateur que pour son usage
pr6vu, comme d&rit dans le prdsent manuel.
• Installez le r_frig6rateur conform_ment aux
directives d'installation avant de rutiliser.
• Ne laissez pas les enfants grimper, s'asseoir,
se tenir debout nl se pendre aux clayettes du
r_frig_rateur. Ils pourraient endommager le
rdfxigdrateur et se blesser gravement.
• Une lois le r_frig_rateur en marche, ne
touchez pas les surfaces froides du
cong61ateur, surtout si vous avez les mains
humides ou mouill_es : la peau risque
d'adhdrer _ ces surfaces tr& froides.
• N'entreposez et n'utilisez pas d'essence ou
autres vapeurs et liquides inflammables
proximit_ de cet appareil ou de tout autre
appareil _lectrom_nager.
• Pour les r_frig_rateurs dot6s d'une machine
it gla_ons automatique, _vitez le contact avec
les pi&es mobiles du mdcanisme djecteur,
ou avec l'dMment chauffant situ_ _ la partie
infdrieure de la machine _ glagons. Ne posez
pas les doigts ou les mains sur le m&anisme
de la machine fi glagons pendant que le
r_frig_rateur est branchd.
•_loignez les doigts des parties du
r_frig_rateur oh l'on peut facilement se
pincer : les espaces entre les portes et en_e
les portes et les placm-ds sont toujours _trfflts.
Soyez prudent lorsque vous ferrnez les portes
de l'apparefl en pr&ence des enfants.
D_branchez votre r_frig_rateur avant
de le nettoyer et de le r_parer.
REMARQUE : Nous vous recommandons
vivement de confier toute rdparation _ un
technicien quaiifi&
Avant de remplacer une ampoule grill&,
mettez le commutateur de lumi_re
principale en position OFF (arr&) pour
&eindre la lumi_re afin d'dviter tout contact
avec un fil sous tension. (Une ampoule
grill& peut se briser pendant l'opfiradon).
REMARQUE : Lorsque vous placez les
commandes de temperature du rdfrigdrateur
sur OFF (arr&), l'alimentation dlectrique
de l'ampoule n'est pas couple.
Ne faites PAS recongeler des aliments
surgel_s qui ont compl_tement d_gel&
A DANGER : RISQUES POUR LES ENFANTS
Les enfants pris au pi_ge ou morts d'asphyxie
sont toujours d'actualit& Les appareils de
rdfrig&adon abandon_s sont toujours aussi
dangereux, m_me si on n'attend que "quelque
jours" pour s'en d_barasser. Si vous ne gardez
pas votre ancien appareil, veuillez suivre les
directives ci-dessous afin de pr&enir les
accidents.
Avant de vous d_barrasser de votre vieux
appareil de r6frlg_ration :
• D&nontez les portes.
• Laissez les clayettes en place afin d'emp&her
les enfants de grimper Al'int_rieur.
REFmGEP NTS
Tousles appareils de rdfrig_ration contiennent
des rdfrig_rants qui, conform_ment aux lois
f_d_rales, doivent &re enlev_s avant toute
dlimination de l'appareil. Si vous vous
ddbarrassez de vieux appareils de rdfrigfiration,
v_rifiez, aupr_s de la soci&_ qui s'occupe de
leur dlimination, ce que vous devez faire.
5

IMPORTANT SAFETY INSTRUCTIONS
HOW TO CONNECT ELECTRICITY
Do not, under any circumstances, cut or
remove the third (ground) prong from the
power cord. For personal safety, this appliance
must be properly grounded.
The power cord of this appliance is equipped
with a 3-prong (grounding) plug which mates
with a standard 3-prong (grounding) wall
outlet to minimize the possibility of electric
shock hazard from this appliance.
Have the wall outlet and circuit checked by
a qualified electrician to make sure the outlet
is properly grounded.
Where a standard 2-prong wall outlet is
encountered, it is your personal responsibility
and obligation to have it replaced with a
properly grounded 3-prong wail outlet.
Use ofa GFI (Ground Fault Interruptor) is not
recommended for the refrigerator outlet.
The refrigerator should always be plugged into
its own individual electrical outlet which has a
voltage rating that matches the rating plate.
This provides the best performance and also
prevents overloading house wiring circuits
which could cause a fire hazard from
overheated wires.
DO NOT USE AN ADAPTER PLUG TO
CONNECT THE REFRIGERATOR TO A
2-PRONG OUTLET.
DO NOT USE AN EXTENSION CORD
WITH THIS APPLIANCE.
Never unplug your refrigerator by pulling on
the power cord. Always grip plug firmly and
pull straight out from the outlet.
Repair or replace immediately all power cords
that have become frayed or otherwise
damaged. Do not use a cord that shows cracks
or abrasion damage along its length or at
either end.
When moving the refrigerator away from the
wall, be careful not to roll over or damage the
power cord.
Refer to the Installation Instructions for
particular electrical system specifications
for this refrigerator.
SAVE THESE
INSTRUCTIONS
6

INSTRUCTIONS IMPORTANTES DE SI CURITI
RA CCORDEMENT E,LECTRIQUE
Ne coupez ni retirez en aucun cas la a'oisi_me
broche (mise h la terre) de la fiche du cordon
d'alimentation. Pour votre s6curit6, cet
appareil dolt 6tre correctement ntis h la terre.
Le cordon d'alimentation de cet appareil est
muni d'une fiche 5.3 broches (mise 5.Ia terre)
qui se branche darts une prise mural ordinaire
5. 3 alv6oles (mise 5.la terre) pour r_duire au
minimum les risques du chocs 61ectriques.
Faites examiner la prise de courant et le circuit
par un dlectricien qualifid pour vous assurer
que la prise est correctement mise 5.la terre.
Si la prise murale est du type standard 5.
2 alvfoles, il vous incombe de la faire
remplacer par une prise _t 3 alv6oles
correctement mise 5.la terre.
L'utilisation d'un interrupteur de ddfaut 5.la
terre (GFI---Ground Fault Interruptor) n'est
pas recommandd pour la prise de courant
du rdfi-igdrateur.
Le rdfrigdrateur doit toujours _tre branchd
darts sa propre prise de courant, dont la tension
nominale est idenfique 5.celle indiqude sur ia
plaque signaldfique.
Cette prdcaufion est recommandde pour
garantir un rendement optimum et dviter
une surcharge des circuits dlectriques de la
rdsidence, ce qui pourrait crder un risque
d'incendie par surschauffe des ills.
N'UTILISEZ PAS UNE FICHE
D'ADAPTATION POUR RACCORDER
LER_RIG_qATEUR DANSUNE PRISE
MURALE_ 2 ALVEOLES.
N'UTILISEZ PAS DE CORDONS
PROLONGATEURS AVEC CET APPAREIL
Ne ddbranchezjamais l'appareil en tirant le
cordon d'alimentation. Saisissez fermement
la fiche du cordon et tirez droit pour la retirer
de la prise.
Rfparez ou remplacez immddiatement tout
cordon effflochd ou endommagd. N'utilisez
pas un cordon fendilld ou prdsentant des
signes d'usure.
Lorsque vous ddplacez l'appareil du mur, faites
attention de ne pas la fa'tre rouler sur le cordon
d'alimentation afin de ne pas l'endommager.
Voyez les Instructions d'InstaUation pour
les spdcificafions particuliers du syst6me
d'616ctrique de cet appareil.
CONSERVEZ CES
DIRECTIVES

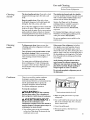
Operating Instructions
Bottom Freezer Refrigerator
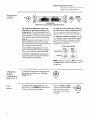
Temperature
controls
®\t°l Jj !tm,j
Preset Settings
Allow 24 h0urs to reach these preset temperatures.
The temperature display shows the actual
temperature of the freezer and fresh food
compartments. The actual temperature will
vary from the set temperature based on factors
such as frequency of door opening, amount of
food, defrost cycling and room temperature.
NOTE: Frequent door openings or door left
open for periods of time may increase the
internal temperature of the freezer and fresh
food compartments temporarily.
To turn off the cooling system in both the
freezer and fresh food compartments, press
either + pad until both displays show OFF.
To turn the cooling system on, press either
- pad. The preset temperatures of 0°F and
370F will appear in the display.
To check the current temperature setting for
the fresh food or freezer compartment, press
the + or - pad once. After 5 seconds, the
display will return to the actual temperature.
To change the temperature settings, press the
+ or - pads to desired temperature set point
for fresh food and freezer separately. Allow
24 hours for the refrigerator to reach the
temperature you have set.
Temperature Ranges
Low
Fresh Food 34°F
I°C
Freezer -6°F
-21°C
rligh
45°F
7°C
+6°F
-140C
NOTE:Setting the controls to OR:stops cooling,
but does not shut off electrical power to the
refrigerator.
Changing
isptay
temperatures
from °F to °C
To change the temperature display between
Fahrenheit and Celsius, press the Temp
Display *C/°F.
Door
alarm
To turn the Door Alarm feature on, press
the pad once. The ACTIVElight will come on.
To turn it off, press the pad again.
When the DOOR ALARM
is active, the alarm will flash
and beep if you keep the
door open for more than
2 minutes.
(01'

Automatic Icemaker (on some models)
Bottom Freezer Refrigerator
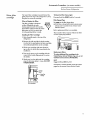
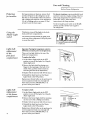
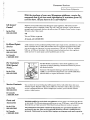
Water filter
cartridge
The water filter cartridge is located behind the
grille panel at the top of the refrigerator. Lift up
the panel to access the cartridge.
When to Replace the Filter:.
The filter cartridge is designed w_mm_
to filter 300 gallons of water _'_°_rau_"_'_
(lasting approximately 12 months).
k../
It should be replaced when the status
light turns red or ffyou notice the
ice cubes getting hollow or small.
Installing the Fdter Cartridge:
1 Raise the grille panel at the top of the
refiigerator.
2 Remove the old cartridge by slowly awning
it to the left. A small amount of water may drip
down. Do not pull down on the cartridge.
3 Fill the new cartridge with water from the
tap to allow for better flow immediately after
installation.
4 Line up the arrow on the cartridge with the
center of the holder. Do not push it up into
the holder.
5 Slowly tuna it to the right until the cartridge
stops. It will rotate about 1/4 turn. DO NOT
OVERTIGH'IEN.
Cartridge
Holder
_ WaterFilter
I Iutut Cartridge
Slowlyturnittotheright.
Donotovertighten.
To Reset the Fdl_r Status Light:
Press and hold the RESET pad for 3 seconds.
Fdter Bypass Plug:
You mm-t use the filter bypass plug:
a) if you have a household reverse osmosis water
system and/or another form of home water
filtration system
b) ira replacement filter is not available.
The icemaker will not operate without the filter
or filter bypass plug installed.
Replacement filters:
To order additional Filtercartridges inthe
United States, visit ourWebslte at ge.com, or call
GE Parts andAccessories, 800.626.2002.
MWF
Suggested Retail $38.95--47.95
Customers in Canada should consult the yellow
pages for the nearest Camco Service Center.

Automatic Icemaker (on some models) and Sabbath Mode Product Kit
Bottom Freezer Refrigerator
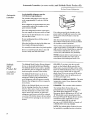
Automatic
icemaker
A new_'mstalled refrigerator may take
12-24 hours to begin making ice.
The icemaker will produce seven cubes per
cycle--approximately 15 cycles in a 24-hour
period.
If the refrigerator is operated before the water
connection is made to the icemaker, set the
power switch to O (off).
When the refrigerator has been connected to
the water supply, set the power switch to | (on).
Throw away the first full bucket of ice to allow
the water line to clear.
Be sure nothing interferes with the sweep of
the feeler arm.
When the bin fills to the level of the feeler arm,
the icemaker will stop producing ice.
It is normal for several cubes to be joined together.
ffice is not used frequendy, old ice cubes will
become cloudy, taste stale and shrink.
PowerSwitch
lcemaker
ffice cubes get stuck in the icemaker, set the
power switch to O (off) and remove the cubes.
Set the power switch to I (on) to restart the
icemaker.
After the icemaker has been turned on again,
there will be a delay of about 45 minutes before
the icemaker resumes operations.
The ice bucket is conveniently located in the
upper freezer basket. Occasionally ice cubes may
spill out of the bucket. Should the ice cubes fall
to the bottom of the freezer, they are of no
concern; they will sublimate away harmlessly.
NOTE: In homes with low water pressure, you
may hear the icemaker water valve cycle on
several times when making one batch of ice.
Sabbath
Mode
Product Kit
(available at
extra cost)
The Sabbath Mode Product Kit was designed
for use on the Jewish Sabbath and Holidays.
The Sabbath Mode feature makes it possible
for observant Jews to refrigerate and freezer
food during the duration of the holiday.
The Sabbath Mode feature can be set to
override typical reactions to actions in your
refrigerator. While in the Sabbath Mode
your refrigerator will still operate normally.
However the refrigerator will not respond to
your actions.
While in the Sabbath Mode you may notice
the fan running when the door is opened;
however, dais is not a result of your actions.
The fan will operate at random times. The
defrost heater will continue to defrost the
refrigerator and freezer and will be activated
on a timer. The defrost heater will not defrost
as a result of door openings or any consumer
actions.
ON/OFF--To activate, raise the top grill
panel, set the Sabbath Mode switch to the
ON position. A green LED light will be visible
below the Sabbath Mode Kit switch. The green
light may not be visible with the top grille
panel closed. If you are not sure if the unit is
in Sabbath Mode, raise the grille panel and
see ffthe green light is on.
DISPLAYS, ALARMS and LIGHT_-The main
temperature control, door alarms and lights
will be disabled.
ICEMAKER--The icemaker will be disabled.
This Sabbath Mode Product Kit can be
purchased from your local appliance dealer.
The ZSAB1 Kit is designed for use with
Monogram Built-In Refrigerators: 36", 42" and
48" Side-by-Side models manufactured after
February 2004 and 36" Bottom-Freezer models
manufactured after April 2004. To locate
your nearest dealer visit our web site
ge.com or call 1.800.626.2000. In Canada, call
1.888.880.3030. Order Kit # ZSAB1.
NOTE: The Sabbath Mode Product Kit must
be installed by a qualified service technician.
10

Storage Pans
Bottom Freezer Refrigerator
Sealed snack
pans
The sealed snack pans retain high humidity
for the convenient storage of lunch meats and
cheese, hors d'oeuvres, spreads and snacks.
Make sure the pans are closed completely to
maintain the correct humidity level.
I II ,I
/K lill ll
Thesepansmustbefullyclosedbefore
closingthefreshfoodcomportmentdoor.
Adjustable
humidity
pans
These drawers have individual, adjustable
humidity controls that let you control the
amount of cold air entering the drawers.
Make sure the drawers are closed completely
to maintain the correct humidity level.
Slide the control all the way to the High setting
and the drawer provides higher humidity levels
recommended for most leafy vegetables.
Slide the control all the way to the Low setting
and the drawer provides lower humidity levels
recommended for most fruits.
Excess water that may accumulate on the
bottom of the drawers should be emptied
and the drawers wiped dry.
These pansmust befully closed before
closingthe fresh food compartment door.
Pan
removal
To remove a pan, pull it out and lift the front
up and out of the wire holder. Lift the back
up and out.
To replace a pan, place the back of the pan in
the wire holder, making sure the indentations
at the back of the pan fit into the back of the
wire holder. Then lower the front of the pan
into the wire holder. Press firmly on the top of
the pan until it snaps into place.
High
humidity
storage
Storing unwrapped foods in a high humidity
environment keeps foods fresh by retaining
the natural moisture content of foods such as:
• Artichokes • Cherries • Parsley
• Asparagus *Com * Peas, green
• Beets, topped * Cucumbers * Radishes
• Blueberries * Currants * Rhubarb
• Carrots * Greens, leafy * Spinach
• Celery • Lettuce * Tomatoes, ripe
As in any refrigerated storage area, it is
recommended that foods with strong odors
be stored wrapped--foods such as:
• Broccoli *Cabbage *Parsnips
• Brussels sprouts *Cauliflower *Tumi_
• Green onions
Low
humidity
storage
Lower humidity storage should be used for
items such as:
• Apples • Papayas *Squash,
• Apricots • Peaches summer
• Gropes • Pears * StxawbenJes
• Mushrooms * Pomegranates *Tangeriaes
• Nectarines • Mangoes
• Oranges * Raspberries
11

Shelves and Bins
Bottom Freezer Refrigerator
Adjustable
shelves in the
fresh food
compartment
Tempered glass shelves in the fresh food
compartment enable you to make efficient
shelf arrangements to fit your family's food
storage needs.
To remove shelves: Tilt shelf up at front,
then lift it up and out of tracks on rear wall
of refrigerator.
To replace shelves: Select desired sheff height.
With shelf front raised slighdy, engage top lugs
in tracks at rear of cabinet. Then lower front
of sheff until it locks into position.
Removable
wine rack
The wine rack is designed to hold a bottle on
its side and will fit on any shelf.
To relocate the wine rack: Pull the wine rack
straight out, position its lip over the right edge
of the shelf you want to suspend it from and
push it all the way in.
Door
bins
Some door bins are adjustable and can be
moved up and down to meet your storage needs.
NOTE: The deeper door bins must be placed at
the bottom of the door only.
To remove: Lift the bin up and slide it
toward you.
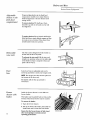
FreezdT
drawer with
basket
12
Inside the freezer drawer is a wire slide-out
freezer basket.
This basket can be pushed back so items on the
bottom of the freezer drawer can be reached.
To remove the basket:
1 Open the freezer drawer.
2 Lift up the back of the basket, then slide the
basket back until it clears the front hooks.
Ensure that the freezer drawer is fully closed
after each opening to maintain normal
operating performance.
Toremovebasket

Care and Cleaning
Bottom Freezer Refrigerator
Cleaning
outside
The door handles and trim. Clean with a cloth
dampened with soapy water. Dry with a soft
cloth.
Keep the outside dean. Wipe with a clean
cloth lighfly dampened with mild liquid dish
detergent. Dry with a clean, soft cloth.
Do not wipe the refrigerator with a soiled dish
cloth or wet towel. These may leave a residue
that can erode the paint. Do not use scouring
pads, powdered cleaners, bleach or cleaners
containing bleach because these products can
scratch and weaken the paint finish.
The stainless steel panels and door handles
(on some models) should be regularly cleaned
with a commercially available stainless steel
cleaner such as Stainless Steel Magic7 M
Stainless Steel Magic and the Monogram
polishing cloth are available to preserve
and protect the fine finish, through
GE Parts and Accessories, 800.626.2002,
or ge.com.
For Stainless SteelMagic, order part number
WX10X15. For Monogram polishing cloth,
order part number WX72X10001.
Do not use appliance wax or polish on the
stainless steel.
Cleaning
inside
To help prevent odors, leave an open box
ofbaldng soda in the refrigerator and freezer
compartments.
Turn off power at the circuit breaker or fuse
box before cleaning. If this is not practical,
wring excess moisture out of sponge or cloth
when cleaning around switches, lights or
controls.
Use warm water and baking soda solution--
about a tablespoon (15 ml) of baking soda
to a quart (1 liter) of water. This both cleans
and neutralizes odors. Thoroughly rinse
and wipe dry.
Other parts of the refrigerator-including
door gaskets, meat and vegetable drawers,
ice storage bin and all plastic parts-can be
cleaned the same way. After cleaning the door
gaskets, apply a thin layer of petroleum jelly to
the door gaskets at the hinge side. This helps
keep the gaskets from sticking and bending
out of shape.
Avoid cleaning cold glass shelves with hot
water because the extreme temperature
difference may cause them to break. Handle
glass shelves carefully. Rough handling of
tempered glass can cause it to shatter.
Do not wash any plastic refrigerator parts in
the dishwasher.
Condenser
There is no need for routine condenser
cleanings in normal home operadng
environments. However, in environments that
may be particularly dusty or greasy, the
condenser should be cleaned annually
for efficient refrigerator operation.
To clean the condenser:
AWARNING: Thecondenser
fins have sharp edges. Wear a long-sleeved
shirt and gloves to safely clean the condenser.
AAVERTISSEMENT :
Les ailerons du condensateur sont
extr6mement coupants. Portez une chemise/_
manches longues et des gants pour nettoyer le
condensateur en toute s6curit6.
1 Turn off the power at the circuit breaker
or fuse box. Wait about 30 minutes for the
condenser area to cool.
. CondenserCeils
Cleanthecondenserperiodicallywith a brush
2 Raise the grille panel at the top of the
refrigerator.
3 Use a soft bristle brush to loosen dust and
lint on the condenser fins. Use a vacuum
hose to remove soil.
4 Lower the grille panel.
5 Reconnect power at the fuse box or
circuit breaker.
13

Care and Cleaning
Bottom Freezer Refrigerator
Preparing
for vacation
For long vacations or absences, remove food
and shut off power to the refrigerator at the
fuse box or circuit breaker. Clean the interior
with a baking soda solution of one tablespoon
(15 ml) of baking soda to one quart (1 liter)
of water. Leave the doors open.
For shorter vacations, remove perishable foods
and leave controls at regular settings. However,
if the room temperature is expected to drop
below 60°F (16°C), follow the same
instructions as for long vacations.
Set the icemaker power switch to the O (off)
position and shut off the water supply to
the refrigerator.
Using the
Master Light
switch
This feature turns offthe lights in the fresh
food and freezer compartments.
The switch is located behind the grille panel
at the top of the refrigerator. Lift up the panel
to access the switch.
Light bulb
replacement
in the
fresh food
compartment
Important: Turning the temperature control to
OFF does not remove power to the light circuit.
There are four light bulbs in the top of the
fresh food compartment.
To replace the bulbs:
1 Set the Master Light switch in the OFF
position to turn off the lights. See Using the
Maater Light switch.
2 Remove the light shield by placing your
fingers in the openings at the back of the
shield. Then, pull the shield toward you
and swing the back of the shield down.
3 Replace with the same size bulb (40 watt max.).
4 Reinstall the shield and reset the Master
Light switch to the ON position.
Replacement 40-watt bulbs can be purchased at
your local general retail store, through GE
Parts and Accessories, 800.626.2002, or at
ge.com. Order part # 40A15.
Light bulb
replacement
in the freezer
compartment
_4
To replace a bulb:
1 Set the Master Light switch in the OFF
position to turn off the lights. See Using the
Master Light switch.
2 Remove the freezer light shield by removing
the two screws with a Phillips screwdriver.
3 Replace with the same size bulb (40 watt max.).
4 Reinstall the shield and reset the Master
Light switch to the ON position.
Replacement 40-watt bulbs can be purchased at
your local general retail store, through GE
Parts and Accessories, 800.626.2002, or at
ge.com. Order part # 40A15.

The Problem Solver
Bottom Freezer Refrigerator
Questions ?
Use this
problem
solver!
PROBLEM POSSIBLE CAUSE
REFRIGERATOR * May be in defrost cycle when compressor does not operate for about
DOES NOT OPERATE 30 minutes.
• Temperature control in the OFF position.
• If interior light is not on, refrigerator may not be plugged in at wall outlet.
• The fuse is blown/circuit breaker is tripped. Replace fuse or reset
the breaker.
MOTOR OPERATES
FOR LONG PERIODS
OR CYCLES ON AND
OFF FREQUENTLY
(Modern refrigerators
with more storage
space and a larger
freezer require
more operating time.
They start and stop
often to maintain
even temperatures.)
OPERATING
SOUNDS
• Normal when refrigerator is first plugged in. Wait 24 hours for the
refrigerator to completely cool down.
• The new variable speed compressor is designed to run for longer
periods of time to optimize efficiency and noise. You may notice the
compressor and/or fan speeds accelerate based upon door openings
and/or increased food loads.
• You may hear the fans spinning at high speeds. This happens when
the refrigerator is first plugged in, when the doors are opened
frequently or when a large amount of food is added to the
refrigerator or freezer compartments. The fans are helping to
maintain the correct temperatures.
• Door left open or package holding door open.
• If either door is open for over 3 minutes, you may hear the fans
come on in order to cool the light.
• Hot weather or frequent door openings. This is normal.
• Temperature controls set at the coldest setting. See Temperature Controls.
• Refrigerator is so quiet, that most of the time you will hear low or no
operating noise.
• Normal fan air flow---one fan blows cold air through the
fresh food and freezer compartments--another fan cools
the compressor motor.
• The fans change speeds in order to provide optimal cooling and
energy savings.
• These NORMAL sounds will also be heard from time to time:
- You may hear a whooshing or gurgling sound when the doors
close. This is due to pressure equalizing within the refrigerator.
- A water dripping noise may occur during the defrost cycle as ice
melts from the evaporator and flows into the drain pan.
- The flow of refrigerant through the freezer cooling coils may
make a gurgling noise like boiling water.
- Water dropping on the defrost heater can cause a sizzling,
popping or buzzing sound during the defrost cycle.
- You may hear cracking or popping sounds when the refrigerator is
first plugged in or during/after the defrost cycle. This happens as
the refrigerator cools to the correct temperature.
- Electronic dampers click open and closed to provide optimal
cooling and energy savings.
- The compressor may cause a clicking or chirping sound when
attempting to restart (this could take up to 5 minutes).
- The electronic control board may cause a clicking sound when
relays activate to control refrigerator components.
- Ice cubes dropping into the bin and water running in pipes
as icemaker refills.
- The icemaker water valve will buzz when the icemaker fills
with wate_
DOOR NOT CLOSING • Package holding door open.
PROPERLY * Check the door gasket; it may be out of position.
• Refrigerator not level. See Installation Instructions.
15

The Problem Solver
Bottom Freezer Refrigerator
Questions ?
Use this
problem
solver, t
16
PROBLEM POSSIBLE CAUSE
• Refrigerator may not be properly installed.
VIBRATION OR
RATTLING
(Slight vibration
is normal.)
FRESH FOOD
OR FREEZER
COMPARTMENT
TOO WARM
FROST OR ICE
CRYSTALS ON
FROZEN FOOD
(Frost within package
is normal.)
SLOW ICE CUBE
FREEZING
ICE CUBES HAVE
ODOR/TASTE
AUTOMATIC
ICEMAKER
DOES NOT WORK
• Temperature controls not set cold enough. See Temperature Controls.
• Warm weather or frequent door openings.
• Door left open for long time or freezer door left ajar.
• Package may be holding door open.
• Door left open or package holding door open,
• Frequent or long door openings.
• Freezer door left ajar.
• Door may have been left open or freezer door left ajar.
• Temperature of freezer compartment too warm.
• Old cubes need to be discarded.
• Ice storage bin needs to be emptied and washed.
• Unsealed packages in freezer compartment may be transmitting
odor/taste to ice cubes.
• Keep open box of baking soda in refrigerator; replace every 3 months.
• Interior of refrigerator needs cleaning. See Care and Cleaning.
• Poor-tasting incoming water. Replace water filter.
• Icemaker power switch is in the O (off) position.
• Water supply turned off, restricted or not connected. Call your
installer for proper water supply line connection.
• Water filter clogged. Replace the filter or use the filter bypass plug.
• Freezer compartment too WalTO.
• Piled up cubes in storage bin may cause icemaker to shut off too
soon. Level cubes in bin.
• Ice cubes stuck in icemaker. Turn off the icemaker, remove cubes
and tuna the icemaker back on.
MOISTURE FORMS • Not unusual during periods of high humidity. Wipe surface dry.
ON OUTSIDE OF • Door left open or package holding door open.
REFRIGERATOR
• Controlling humidity and temperature in the kitchen with air
conditioning will eliminate this condition.
MOISTURE • In humid weather, air carries moisture into refrigerator when doors
COLLECTS INSIDE are opened.
• Controlling humidity and temperature in the kitchen with air
conditioning will eliminate this condition.
REFRIGERATOR • Foods with strong odors should be tightly covered.
HAS ODOR • Check for spoiled food.
• Interior needs cleaning. See Care and Cleaning.
• Keep open box of baking soda in refrigerator; replace every 3 months.
INTERIOR LIGHT • No power at outlet.
DOES NOT WORK • Light bulb needs replacing. See Care and Cleaning.
• Master Light switch is in the OFF position.
SMALL OR • Water t'flter clogged. Replace the filter or use the filter bypass plug.
HOLLOW CUBES • Check for a connection to a Reverse Osmosis water system.
If an RO is connected, remove the water filter and install the
original bypass plug that came with the unit.

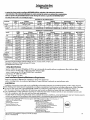
Performance Data Sheet
SmartWaterFiltrationSystem
MWF Cartridge
s systemhas been tested according toNSF/ANS142,/53for reduction of the substances listed below.
; concentration of the indicated substances in water entering the system was reduced toa concentration
. s than or equal to the permissible limit for water leaving the system, as specified in NSF/ANS142J53.*
0% safety factors built in for unmetered usage)
StandardNo. 42: Aesthetic Effects
rameter USEPA lnflu_tt Influent Efflue_at
MCL I_lle%,e Concentration Averab,e Averab,e Maximum
lofine -- 2.0mg/L + 10% 1.96mg/L 0.06mg/L 0.11mg/L
? _,cO .....
L "tictdate** -- _>10,000particles/mL 6,400,000#/mL 58,833#/mL 150,000#/mL
%Reduction
Average Minimum
96.77% 94.74%
99.14% 97.97%
Mi..a_q_t_a
Reduction
> 50%
_>83%
Standard No. 53: Health Effects
ameter
idity
++SLOS
aatpH65
.dat pH8.5
_uty atpH 6.5
rcuryatpH 8.5
chlor
dane
,D
' _aphene
; B_j3Z_2[Ie
r ?oofuran
1,4dichlorobenzene
azlne
USEPA
MCL
0.5 NTU
_>99,95% Reduction
_>99% Reducdon
0.015 mg/L
0.015 mg/L
0,002 mg/L
0.092 mg/L
0.002 mg/L
0.0002 mg/L
0.070 nag/L
0.003 nag/L
0.005 mg/L
0.040 mg/L
0.075 mg/L
0.003 mg/L
Intluent
I_aallen_ Concmatration
11 + 1NTU***
Minimum 50,000 L
107to 10sfibers/L; > 101an
0.15 rag/L+ 10%
0.15 nag/L+ 10%
0,006 mg/L + 10%
0.006 mg/L _+10%
0.04 mg/L +_10%
0.002 nag/L+_ 10%
0.210 mg/L +_10%
0.015 nag/L+_ 10%
0.015 rag/L_+ 10%
0.080 mg/L _+10%
0.225 mg/L _+10%
0.009 rag/L4.10%
Intlue_t
Average
10.5NTU
118,750#/L
57 MF/L
0.1567nag/L
0.1433nag/L
0.0059mg/L
0.0057mg/L
0.0367mg/L
0.0020mg/L
0.2033mg/L
0.0160mg/L
0.0145mg/L
0.0830mg/L
0.2283mg/L
0.0087nag/L
EP_uellt
Average Maximum
0.14NTU 0.28NTU
<I#/L 4#/L
0.996MF/L < 1MF/L
<0.0Olmg/L <0.001mg/L
<0.001mg/L <0.001rng/L
0.000350mg/L 0.0007mg/L
0.000325mg/L 0.0006nag/L
0.00023nag/L 0.0004nag/L
<0.00002rng/L ."0.00002mg/L
0.00337mg/L ).011000mg/L
0.00100nag/L 3.001000mg/L
0.000500mg/L 3.000500nag/L
0.001000mg/L 3.001000mg/L
0.000500mg/L 3.000500nag/L
<0.0005mg/L <0,0005mg/L
% Reduction
Avera_ Minimum
98,54% 97.20%
>99.99% > 99.99%
99.60% 99.39%
99.36% 99.29%
99.30% 99.29%
94.70% 87.50%
93.20% 89.29%
99.34% 98.67%
99.00% 98.95%
98.32% 94.50%
93.44% 91.67%
96,51% 95.83%
98.78% 98.65%
99.78% 99.77%
94.22% 93.33%
MAn.Required
Reduction
0.5 NTU
>99.95%
_>99%
0.010nag/L
0.010nag/L
0.002mg/L
0.002mg/L
0.002mg/L
0.0002nag/L
0.070mg/L
0.003mg/L
0.005mg/L
0.04nag/L
0.075nag/L
0.003nag/L
_' _tedusingaflow rateofO.50gpm;pressureofOOpsig;pHof7.5+_0.5;temp,of68°_+5°F120°_3°C)
. 4easurement inParticles/mLParticlesusedwere0.5-1microns
• '_rqTU=NephelometricTurbidityunts
:rating Specifications
....;_pacity: certified for up to 300 gallons (1135 1) up to six months for models without a replacement filter indicator light;
to one year for models wath a replacement filter mthcator hght
"essure requirement: 40-120 psi (2.8--8.2 bar), non-shock
: .zmperature: 33-100°F (0.6-38°C)
!ow rate: 0.5 gpm (1.9 lpm)
_eral Installation/Operation/Maintenance Requirements
: tush new cartridge at full flow for 3 minutes to purge out trapped air.
;_eplace cartridge when the indicator light flashes or water flow rate is reduced on non-indicator units.
_cial Notices
__i_stallation instructions, parts and service availability, and standard warranty are included with the product when shipped.
'.! This drinking water system must be maintained according to manufacturer's instructions, including replacement of filter cartridges.
i,Oo not use with water that is microbiologically unsafe or of unknown quality without adequate disinfection before or
: after the system. Systems certified for cyst reduction may be used on disinfected water that may contain filterable cysts.
,11.7he contaminants or other substances removed or reduced by this water treatment system are not necessarily in your water.
:l _heck for compliance with the state and local laws and regulations.
' tote that while the testing was performed under standard laboratory conditions, actual performance may vary. Systems must be
'1stalled and operated in accordance with manufacturer's recommended procedures and guidelines.
•tern Tested and Certified by NSF International against ANSI/NSF Standard 42 & 58 for the reduction of:
-,_,dard No. 42: Aesthetic Effects
-7?emical Unit
':_,hlorlne Taste andOdor
":: _%hanical FiltrationUnit
;2Particulate Reduction, ClassI
51
Standard No. 53: Health Effects
Chemical Reducdon Unit
Alachlor and Au-azine Reduction
Benzene and Carbofuran Reduction
1,4 dichlorobenzene and 2,4-D Reduction
Lead and Lindane Reduction
Mercury and Toxaphene Reduction
Mechanical Filtration Unit
Turbidity Reduction
Cyst and Asbestos Reduction
17
' [ufactured for: General Electric Company, Louisville, KY 40225
EST. No. 070595-MN-001
17.

!--=-
State of California
Department of Health Services
Water Treatment Device
Certificate Number
05-1698
Date Issued: February 2, 2005
Trademark/Model Designation
MWF
Replacement Elements
MWF
Manufacturer: General Electric Company
The water treatment device(s) !jsted on this certificate have met the testing requirements pursuant to Section
116830 of the Health and Safety Code:for the following healfh related contaminants:
Microbiological Contaminants and Turbidity
Cysts
Turbidity
'_ Organic Contaminants
:_ Alachlor
Atrazine
._;'" Benzene
_ Carbofuran
_v Lindane
, ,¢ Mercury
"_g" Toxaphene
1,4-dichlorobenzene
2,4-D
_t
Inorganie/Radiological Contaminants
Asbe_os
Mercury
:i!,
Rated Service Capacity: 300 gal Rated Service Flow: 0.5 gpm
Conditions of Certification:
Do not use where water is microbiologically unsafe or with water of unknown quality, except that systems certified for
cyst reduction may be used on disinfected waters that may contain filterable cysts.
Li
•, 18

Consumer Services
Bottom Freezer Refrigerator
With the purchase of your new Monogram appliance, receive the
assurance that if you ever need information or assistance from GE,
we'll be there. AU you have to do is call-toll-free!
GE Answer
Center ®
In the USA:
800. 626.2000
I/,L
In-Home Repair
Service
In the USA:
800. 444.1845
In Canada:
1.888.880.3030
Whatever your question about any Monogram major appliance, GE Answer Center _
information service is available to help. Your call--and your quesdon--will be answered
promptly and courteously. And you can call any time. GE Answer Center _ service is open
24 hours a day, 7 days a week.
OR
Visit our Website at: ge.com
In Canada, call 1.888.880.3030.
AGE consumer service professional will provide expert repair service, scheduled at a time
that's convenient for you. Many GE Consumer Service company-operated locations offer
you service today or tomorrow, or at your convenience (7:00 a.m. to 7:00 p.m. weekdays,
9:00 a.m. to 2:00 p.m. Saturdays). Our factory-trained technicians know your appliance
inside and out--so most repairs can be handled in just one visit.
!(
For Customers
With Special
Needs...
:: In the USA:
800.626.2000
!,j:
m
VG
!
GE offers Braille controls for a variety of GE appliances, mad
a brochure to assist in planning a barrier-free kitchen for persons
with limited mobility.
Consumers with impaired hearing or speech who have access to
a TDD or a conventional teletypewriter may call 800.TDD.GEAC
(800.833.4322) to request information or service.
Service Contracts
In the USA:
800.626.2224
In Canada:
1.888.880.3030
You can have the secure feeling that GE Consumer Service will still be there after your
warranty expires. Purchase a GE contract while your warranty is still in effect and you'll
receive a substantial discount. With a multiple-year contract, you're assured of future
service at today's prices.
Parts and
Accessories
In the USA:
800. 626. 2002
In Canada:
1.888.880.3030
Individuals qualified to service their own appliances can have parts or accessories sent directly
to their home. The GE parts system provides access to over 47,000 parts...and all GE Genuine
Renewal Parts are fully warranted. VISA, MasterCard and Discover cards are accepted.
User maintenance instructions contained in this manual cover procedures intended to be
performed by any user. Other servicing generally should be referred to qualified service
personnel. Caution must be exercised, since improper servicing may cause unsafe operation.
19

Warranty
Bottom Freezer Refrigerator
WHAT IS
COVERED
From the Date
of the Original
Purchase
WHAT IS NOT
COVERED
2P007
11-05 JR
Printed in the United States
YOUR MONOGRAM REFRIGERATOR WARRANTY
Staple sales slip or cancelled check here. Proof of original purchase
date is needed to obtain service under warranty.
LIMITED TWO.YEAR WARRANTY
For two years from date of original purchase, we will provide, free of charge, parts and service labor in your
home to repair or replace any part of the refr_erator that fails because of a manufacturing defect.
LIMITED FIVE-YEAR WARRANTY
For five years from date of original purchase, we will provide, free of charge, parts and service labor
in your home to repair or replace any part of the sealed refrigerating system (the compressor, condenser,
evaporator and all connecting tubing) that fails because of a manufacturing defect.
LIMITED ADDITIONAL SEVEN-YEAR WARRANTY ON THE SEALED SYSTEM
For the sixth through twelfth year from the date of the original purchase, we will provide, free of charge,
replacement parts for any part of the sealed refrigerating system (the compressor, condenser, evaporator and all
connecting tubing) that fails because of a manufacturing defect. You pay for the service trip to your home
and for service labor charges.
LIMITED THIRTY-DAY WARRANTY ON WATER FILTER CARTRIDGE (Water f'dter, if included)
From the date of the original purchase we will provide, free of charge, replacement parts for any part of the
water filter carbidge that fails because of a manufacturing defect. During this limited thirty<lay warranty, we
will also provide, free of charge, a replacement water filter cartlS.dge.
eeoee••t•• J e it•eeeeoeee e,oeoeee e e eoooooeeeeeoeeeeeeeeeeeeeeeooo oeeeo ooeo
This warranty is extended to the original purchaser and any succeeding owner for products purchased for
ordinary home use in the 48 mainland states, Hawaii, Washington, D.C. or Canada. If the product is located
in an area where service by a GE Authorized Servicer is not available, you may be responsible for a trip
charge or you may be required to bring the product to an Authorized GE Service location for service. In
Alaska the warranty is the same except that it is LIMITED because you must pay to ship the product to the
service shop or for the service technician's travel costs to your home.
All warranty service will be provided by our Factory Service Centers or by our authorized Customer Care ®
servicers during normal working hours.
Should your appliance need service, during warranty period or beyond, in the USA call 800.444.1845. In
Canada: 888.880.3030. Please have your serial number and model number available when calling for selwice.
• Service trips to your home to teach you how
to use the product.
• Replacement of house fuses or resetting of circuit
breakers.
• Damage to the product caused by accident, rtre,
floods or acts of God.
• Failure of the product if it is used for other than
its intended purpose or used commercially.
• Damage caused after delivery.
• Improper instaliafion, delivery or maintenance.
If you have an installation problem, contact your
dealer or installer. You are responsible for
providing adequate electrical, plumbing and
other connecting facilities.
• Replacement of the fight bulbs, if included, or
water f'dter cartridge, if included, other than as
nard above.
• Replacement of the water Fdter cartridge, if
induded, due to water pressure that is outside the
specified operating range or due to excessive
sediment in the water supply.
• Loss of food due to spoilage (in the USA only).
• Incidental or consequential damage caused by
possible defects with this appliance.
• Product not accessible to provide required service.
I[ EXCLUS_N_F_M_L_EDWARRANT_ES_Y_urs_leandexclusiveremedyispr_ductrepairaspr_videdin I
I this Limited Warranty. Any implied warranties, including the implied warranties of merchantability orfitnessfor
l a par_'cular purpose, are limited to one year or the shortest period allowed by law.
Some states/provinces do not allow the exclusion or limitation of incidental or consequential damages,
so the above limitation or exclusion may not apply to you. This warranty gives you specific legal rights, and
you may also have other rights which vary from state to state/province to province. To know what your legal
rights are in your state/province, consult your local or state/provincial consumer affairs office or your state's
Attorney General.
Warrantor in USA: General Electric Company, _ GEConsumer& Industrial
Louisville, KY 40225 _ Appliances
General Electric Company
Warrantor in Canada: Camco Inc. Louisville, KY 40225
ge.com
-
 1
1
-
 2
2
-
 3
3
-
 4
4
-
 5
5
-
 6
6
-
 7
7
-
 8
8
-
 9
9
-
 10
10
-
 11
11
-
 12
12
-
 13
13
-
 14
14
-
 15
15
-
 16
16
-
 17
17
-
 18
18
-
 19
19
-
 20
20


Monogram ZICP360SRBSS Le manuel du propriétaire
- Taper
- Le manuel du propriétaire
dans d''autres langues
- English: Monogram ZICP360SRBSS Owner's manual
Documents connexes
Autres documents
-
Smeg SRA416TP2 Manuel utilisateur
-
GE ZIBI240PCII Le manuel du propriétaire
-
 GE Monogram Refrigerator Built-In Refrigerators Manuel utilisateur
-
GE Monogram ZIFP360NXARH Manuel utilisateur
-
 GE Monogram Refrigerator Side-by-Side Built-In Refrigerators Manuel utilisateur
-
 GE Monogram Refrigerator All-Refrigerators and All-Freezers Manuel utilisateur
-
 GE Monogram Refrigerator Manuel utilisateur
-
 GE Monogram ZIRS360NHRH Le manuel du propriétaire
-
-


