ELICA ESNX43S2 Guide d'installation
- Catégorie
- Hottes
- Taper
- Guide d'installation
Ce manuel convient également à

Use, Care and Installation Guide
Guide d’utilisation, d’entretien et d’installation
Guía de instalación, uso y mantenimiento
Ceiling Hood
Models
ESNX43S1
IMPORTANT: READ AND SAVE THESE INSTRUCTIONS.
FOR RESIDENTIAL USE ONLY.
IMPORTANT : LIRE ET CONSERVER CES INSTRUCTIONS.
POUR UTILISATION RÉSIDENTIELLE UNIQUEMENT.
IMPORTANTE: LEER Y GUARDAR ESTE MANUAL DE INSTRUCCIONES.
SÓLO PARA USO DOMÉSTICO

2

3
IMPORTANT SAFETY INSTRUCTIONS
WARNING: TO REDUCE THE RISK OF FIRE,
ELECTRIC SHOCK, OR INJURY TO PERSONS,
OBSERVE THE FOLLOWING:
■ Use this unit only in the manner intended by the
manufacturer. If you have questions, contact the
manufacturer.
■ Before servicing or cleaning the unit, switch power
off at service panel and lock the service disconnecting
means to prevent power from being switched on
accidentally. When the service disconnecting means
cannot be locked, securely fasten a prominent warning
device, such as a tag, to the service panel.
■ Installation work and electrical wiring must be done
by qualified person(s) in accordance with all applicable
codes and standards, including fire-rated construction.
■ Do not operate any fan with a damaged cord or plug.
Discard fan or return to an authorized service facility for
examination and/or repair.
■ Sufficient air is needed for proper combustion and
exhausting of gases through the flue (chimney) of fuel
burning equipment to prevent backdrafting. Follow the
heating equipment manufacturer's guideline and safety
standards such as those published by the National Fire
Protection Association (NFPA), the American Society
for Heating, Refrigeration and Air Conditioning
Engineers (ASHRAE), and the local code authorities.
■ When cutting or drilling into wall or ceiling; do not
damage electrical wiring and other utilities.
■ Ducted fans must always be vented outdoors.
CAUTION: For general ventilating use only. Do not use
to exhaust hazardous or explosive materials and
vapors.
CAUTION: To reduce risk of fire and to properly
exhaust air, be sure to duct air outside - do not vent
exhaust air into spaces within walls or ceilings, attics or
into crawl spaces, or garages.
WARNING: TO REDUCE THE RISK OF FIRE, USE
ONLY METAL DUCTWORK.
WARNING: TO REDUCE THE RISK OF A RANGE TOP
GREASE FIRE:
■ Never leave surface units unattended at high settings.
Boilovers cause smoking and greasy spillovers that may
ignite. Heat oils slowly on low or medium settings.
■ Always turn hood ON when cooking at high heat or
when flambeing food (i.e. Crepes Suzette, Cherries
Jubilee, Peppercorn Beef Flambé).
■ Clean ventilating fans frequently. Grease should not be
allowed to accumulate on fan or filter.
■ Use proper pan size. Always use cookware appropriate
for the size of the surface element.
WARNING: TO REDUCE THE RISK OF INJURY TO
PERSONS IN THE EVENT OF A RANGE TOP GREASE
FIRE, OBSERVE THE FOLLOWING:
(a)
■ SMOTHER FLAMES with a close fitting lid, cookie
sheet, or metal tray, then turn off the burner. BE
CAREFUL TO PREVENT BURNS. If the flames do not go
out immediately, EVACUATE AND CALL THE FIRE
DEPARTMENT.
■ NEVER PICK UP A FLAMING PAN - you may be
burned.
■ DO NOT USE WATER, including wet dishcloths or
towels - a violent steam explosion will result.
■ Use an extinguisher ONLY if:
– You know you have a class ABC extinguisher, and you
already know how to operate it.
– The fire is small and contained in the area where it
started. – The fire department is being called.
– You can fight the fire with your back to an exit.
(a) Based on "Kitchen Fire Safety Tips" published by
NFPA.
■ WARNING: To reduce the risk of fire or electrical
shock, do not use this fan with any solid-state speed
control device.
READ AND SAVE THESE INSTRUCTIONS

4
WARNING
Thank you for purchasing a Elica Range Hood.
Please read all the instructions in this manual before installing
the appliance.
Save these instructions for future reference.
Only use this appliance as an exhaust ventilation system for the removal of
cooking vapors. DO NOT use to expel flammable substances or any other materials
or vapors.
The installation procedures in this manual are intended for qualified
installers, service technicians or persons with similar qualified background.
DO NOT attempt to install this appliance yourself.
Ensure that electrical power is turned off at source before commencing
installation. All electrical wiring must be properly installed, insulated and
grounded and conform to all applicable codes and standards.
Make sure all existing duct work is clean of grease build up, or duct work
should be replaced, if necessary, to avoid the possibility of a grease fire.
Check all joints on ductwork to ensure proper connection and all joints should
be properly taped. Be careful when cutting through ceilings or walls not to
damage any hidden pipes or electrical wiring. Ensure your kitchen has
sufficient air return vents to replace the exhausted air.
Fan ducts should always be vented to the outside of your home and never into
spaces within walls, ceilings, lofts or attics. Only use rigid, smooth steel
for ducting. The exhaust point of the blower requires a 6” round connection.

5
TABLE OF CONTENTS
BEFORE YOU BEGIN 6
DUCTING 6
ELELCTRICAL 7
Electrical supply 7
INSTALLATION 8
Before the installation 8
Panels opening 8
Installation 8
OPERATING PROCEDURE 10
General Advice 10
Techinical Data 11
Standard configuration 11
Generating a new transmission code 11
Learning the new transmission code 11
MAINTENANCE 12
Cleaning the Filter 12
Cleaning the Hood 12
WARRANTY 13

6
BEFORE YOU BEGIN
The manufacturer declines all responsibility in
the event of failure to observe the instructions
given here for installation, maintenance and
suitable operation of the product. The
manufacturer further declines all responsibility
for injury due to negligence and the warranty of
the unit automatically expires due to improper
maintenance and/or installation.
BEFORE YOU BEGIN: It is advisable to test run
the range hood before installation.
BEFORE STARTING – please read this entire
document and ensure you are fully conversant
with the require-ments and limitations. These
units weigh approximately 55lbs and therefore
require a minimum of two people to install.
CAUTION: FOR GAS RANGE & COOKTOP INSTALLATIONS:
MOUNT THIS HOOD SO THAT THE BOTTOM EDGE IS AT
LEAST 30” ABOVE THE COOKING SURFACE AND NO
GREATER THAN 10’.
FOR ELECTRIC RANGE & COOKTOP INSTALLATIONS:
MOUNT THIS HOOD SO THAT THE BOTTOM EDGE IS AT
LEAST 25” ABOVE THE COOKING SURFACE AND NO
GREATER THAN 10’.
FOR RESIDENTIAL USE ONLY. PLEASE, READ
INSTALLATION MANUAL FOR SPECIFIC APPLICATION.
DUCTING
6” round ducting must be available for the hood
through the ceiling, in line with the central
vertical axis of the range hood.
This unit must have it’s own ductwork. Do not
under any circumstances vent this unit into any
other ductwork or exhaust ducting in the
building.
Furthermore, please read carefully all of the
following installation instructions.
- Use an exhausting pipe whose maximum length
does not exceed 5 meters.
- Limit the no. of elbows in the piping, since
each elbow reduces the air capacity
of 1 linear meter. (Ex.: if you use no. 2 x 90 °
elbows, the length of piping must not exceed 3
meters).
- Avoid abrupt direction changes.
- Use a 6” constant diameter pipe for the whole
length.
- Use piping approved by standards in force.
Use the shortest most direct ductwork route
possible. Only use metal ducting - plastic
ducting is generally not permitted by code. Do
not use flexible metal ducting as the ridges of
the ducting cause severe air turbulence and will
significantly reduce the efficiency of any hood
-THIS TYPE OF DUCTING WILL REDUCE EFFICIENCY BY
50%.
Vent hoods may interrupt the proper flow of
exhaust gases from fire-places, gas furnaces and
gas water heaters. To minimize the risk of
drawing these lethal gases back into the home
please follow the heating equipment
manufacturers safety standards and guidelines.
Refer to NFPA and ASHRAE for additional
information.

7
ELECTRICAL CONNECTION
WARNING: All electrical work must be performed
by a qualified electrician.
Please ensure that the appropriate electrical
codes or prevailing local building codes and
ordinances are adhered to.
Ensure that the electricity supply is
disconnected at source. Do not use an extension
cord or adapter plug with this appliance.
This appliance must be grounded. Connect to a
properly grounded branch circuit, protected by a
15 amp circuit breaker.
Electrical Supply.
This appliance requires 120V/60Hz, 3amp
electrical supply – ensure an appropriately
qualified person completes the electrical hook-
up. The connection point for the electrical
supply is at the top of the unit, therefore the
electrical supply must be run down from the
ceiling alongside the ductwork.
All electrical and venting hook-ups must be in
place before commencing installation of the
hood-fan.

8
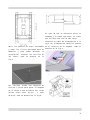
INSTALLATION
BEFORE THE INSTALLATION
PANELS OPENING
It is possible to open the steel panels, which
cover the grease filters, by slightly pulling on
a side of the panel itself, as shown in Fig. 1.
To achieve the complete opening of panels, you
need to release the safety chains, by using the
appropriate spring catches.
Before starting the appliance installation,
please check that all components are not
damaged, in such a case contact your retailer
and do not carry out installation.
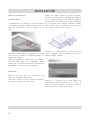
INSTALLATION
Fit a false ceiling with an opening that has the
following dimensions:
41”15/16 x 26”3/16 with a minimum distance of
13” between the ceiling and the false ceiling.
After having chosen the most suitable position,
prepare the ducting: an air outlet connection
piece, with a diameter of 6” to be installed in
the side selected, is provided with the
appliance.
Leave any unused exhaust outlets closed. As
shown in fig.2.
Draw the outline of the hole to house the
ceiling-mounted hood on the solid ceiling as
shown in Fig. 3 according to the model chosen.
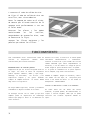
Make 4 holes in the ceiling according to the
dimensions as shown in Fig. 4, place the metric
plugs provided in the holes.

9
Open the stainless steel panels and
remove the
g
rease filters in order to
avoid dama
g
in
g
them in any way and too
allow installation; screw the threaded
bars provided into the plu
g
s as shown
in fig.5.
The threaded bars are 9”13/16 lon
g
and
serve to install the ceiling-mounted
hood at a distance from the solid
ceiling of between 10”5/8 mm and
14”9/16 as shown in fig. 6.
in case of a lar
g
er
g
ap between the
hood and the ceilin
g
, you need to use
longer threaded bars.
Connect the power supply into the
metal box placed inside the hood as
shown in fig. 7.

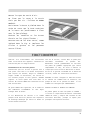
10
and connect the air outlet pipe.
Do not fix the ductin
g
to the outlet
with screws - use DUCT TAPE;
place the ceiling-mounted hood into
the niche, the outer edge of the hood
needs to be perfectly flush with the
false ceilin
g
. Insert the plates and
nuts provided on the threaded bars,
makin
g
sure to ti
g
hten them securely,
as shown in Fi
g
. 8; refit the
g
rease
filters and filter cover panels.
OPERATING PROCEDURES
Read all the instructions before operating the
appliance. Save these instructions for future
reference.
General Advice.
Ensure that the
g
rease filters are in place.
Without these components, operating blowers
could catch on to hair, fingers and loose
clothing. Keep fan, filters and surfaces clean
of grease and fat. Always turn hood fan ON when
cooking. NEVER leave cooking unattended.
NEVER dispose cigarette ashes, ignitable
substances or any foreign objects into blowers.
Cooking that generates flame is not recommended
as this hood is equipped with a thermal overload
that will shut down the motor if it senses
excessive heat.
When fryin
g
, oil in the pan can easily
overheat and ignite. Heat oil slowly in an
appropriately sized pot (covering the entire
burner) to reduce the risk of boiling over and
burning.
In the event of a range top grease fire, observe
the following:
Switch OFF the range hood. Turn off the cook
top then smother flames with a close fitting
lid, cookie sheet or other metal tray. If the
flames do not go out immediately.
EVACUATE AND CALL THE FIRE DEPARTMENT.
Never pick up a flaming pan – you may be burned.
DO NOT USE WATER including wet dishcloths or
towels, as a violent steam explosion may occur.

11
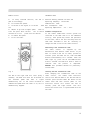
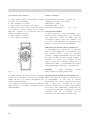
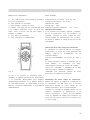
Remote control
A: At every selected function, the led li
ghts on accordingly.
B: To increase the speed.
C: To switch on the lights or to switch them
off.
D: ON/OFF To go from a higher speed back to
first one press twice the but ton: To switch
the hood on or off press once this button.
E: To reduce the speed.
F: To set the timer.
fig. 4
The led on the right side will start (every 5
seconds), the hood will work for 10 minutes at
the selected speed and then it lights
automatically off. If the client increases or
reduced the speed while the timer is on, this is
automatically stopped.
TECHNICAL DATA:
Alkaline battery powered: 12v mod. 23A
Operating frequency: 433.92 Mhz
Combinations: 4096
Max. consumption: 25Ma
Operating temperature: -20° : +55°C
Standard configuration.
If two cooker hoods-radio control system are
installed in the same room or in the immediate
vicinity, each system may affect the operation
of the other, due to the fact that they have the
same code. Therefore it will be necessary to
change the code of one of the radio controls.
Generating a new transmission code.
The radio control is supplied by the
manufacturer with default codes stored. If you
want to create a new set of codes, proceed as
follows: press and hold the UP, STOP and DOWN
buttons simultaneously for 2 seconds. After the
LEDS light up, press the UP and DOWN buttons
within 5 seconds. The LEDS will flash 3 times to
indicate that the process is completed.
WARNING: This procedure deletes all previously-
stored codes.
Learning the new transmission code.
After changing the transmission code on the
radio control, the cooker hood electronic
control unit must be made to set the new code as
follows: press the main Power Off button on the
cooker hood and then restore power to the
electronic control unit. Within the next 15
seconds, press the Light button. This will
ensure the control unit is synchronized with the
new code.

12
Warning The battery should be replaced every year
to guarantee the optimal range of the transmitter.
To replace the exhausted battery, take the plastic
lid off, remove the battery and replace it with a
new one, observing the correct battery polarities.
Used batteries should be discarded in special
collection bins.
Filter requires washing indicator: after 30 hours
of use, all the buttons will light up to remind
you that the
g
rease filter should be cleaned.
Follow the instructions for cleaning filters in
this booklet. Once the grease filters have been
cleaned and replaced, reset by pressing the timer
button (F). Do not rely solely on this indicator.
Generally, the grease filter should be washed on a
regular basis to avoid grease filter fires.
The blower should be turned on for approximately 5
minutes before cooking in order to establish air
currents upward through the hood. Use the low
speeds for normal use and the higher speeds for
strong odors and fumes.
MAINTENANCE
The hood-fan should provide many years of trouble
free service provided it is maintained properly.
The hood is equipped with a lighting system
based on LED technology.
The LEDs guarantee an optimum lighting, a
duration up to 10 times as long as the
traditional lamps and allow to save 90%
electrical energy.
For replacement, contact the technical service.
Cleaning the Filter.
Clean the grease filter either by carefully hand
washing, (so as not to damage the filter design)
or, preferably in a dishwasher. Depending on use,
the filters should be cleaned at least every two
weeks in a dishwasher.
Cleaning the Hood.
Cleaning of the internal parts should be done with
a clean damp (not excessively wet) cloth
together with regular household detergent. The
external stainless steel elements should be
cleaned with a good quality foaming stainless
steel cleaner. Read the manufacturers directions.
Generally they recommend that the foam be sprayed
onto a clean dry cloth and then applied to the
stainless steel. Allow the foam to react on the
surface for a few minutes and then wipe with a
clean dry cloth.
On the surfaces that are exposed directly to heat
from the cooktop, it is advisable to clean these
on a regular basis to avoid the marks from
becoming baked on.
Do not under any circumstances use an abrasive
type cleaner as this will scratch and damage the
stainless steel finish. Glass components should be
cleaned with a product such as Windex.

13
Warranty
ELICA North America
TWO-YEARS LIMITED WARRANTY
TO OBTAIN SERVICE UNDER WARRANTY
Owner must present proof of original purchase date. Please keep a copy of your dated proof of purchase (sales slip) in order to
obtain service under warranty.
PARTS AND SERVICE WARRANTY
For the period of two (2) years from the date of the original purchase, Elica will provide free of charge, non consumable parts or
components that failed due to manufacturing defects. During these two (2) years limited warranty, Elica will also provide free of
charge, all labor and in-home service to replace any defective parts.
WHAT IS NOT COVERED
• Damage or failure to the product caused by accident or act of God, such as, flood, fire or earthquake.
• Damage or failure caused by modification of the product or use of non-genuine parts.
• Damage or failure to the product caused during delivery, handling or installation.
• Damage or failure to the product caused by operator abuse.
• Damage or failure to the product caused by dwelling fuse replacement or resetting of circuit breakers.
• Damage or failure caused by use of product in a commercial application.
• Service trips to dwelling to provide use or installation guidance.
• Light bulbs, metal or carbon filters and any other consumable part.
• Normal wear of finish.
• Wear to finish due to operator abuse, improper maintenance, use of corrosive or abrasive cleaning products/pads and oven
cleaner products.
WHO IS COVERED
This warranty is extended to the original purchaser for products purchased for ordinary residential use in North America
(Including the United States, Guam, Puerto Rico, US Virgin Islands & Canada).
This warranty is non-transferable and applies only to the original purchaser and does not extend to subsequent owners of the
product. This warranty is made expressly in lieu of all other warranties, expressed or implied, including, but not limited to any
implied warranty of merchantability or fitness for a particular purpose and all other obligations on the part of Elica North
America, provided, however, that if the disclaimer of implied warranties is ineffective under applicable law, the duration of any
implied warranty arising by operation of law shall be limited to two (2) years from the date of original purchase at retail or such
longer period as may be required by applicable law.
This warranty does not cover any special, incidental and/or consequential damages, nor loss of profits, suffered by the original
purchaser, its customers and/or the users of the Products.
WHO TO CONTACT
To obtain Service under Warranty or for any Service Related Question Please Call:
• Elica North America Authorized Service at (888) 732-8018
Or by Writing To:
• Elica North America, Attention Customer Service
6658 156th Avenue SE,
Bellevue, WA 98006 USA
infoamericas@elica.com

14
IMPORTANTES INSTRUCTIONS DE SÉCURITÉ
AVERTISSEMENT :
POUR RÉDUIRE LE RISQUE
D'INCENDIE, CHOC ÉLECTRIQUE OU DOMMAGES
CORPORELS, RESPECTER LES INSTRUCTIONS
SUIVANTES :
■ Utiliser cet appareil uniquement dans les applications
envisagées par le fabricant. Pour toute question, contacter le
fabricant.
■ Avant d'entreprendre un travail d'entretien ou de nettoyage,
interrompre l'alimentation de la hotte au niveau du tableau de
disjoncteurs, et verrouiller le tableau de disjoncteurs pour
empêcher tout rétablissement accidentel de l'alimentation du
circuit. Lorsqu'il n'est pas possible de verrouiller le tableau de
disjoncteurs, placer sur le tableau de disjoncteurs une
étiquette d'avertissement proéminente interdisant le
rétablissement de l'alimentation.
■ Tout travail d'installation ou câblage électrique doit être
réalisé par une personne qualifiée, dans le respect des
prescriptions de tous les codes et normes applicables, y
compris les codes du bâtiment et de protection contre les
incendies.
■ Ne pas faire fonctionner un ventilateur dont le cordon ou la
fiche est endommagé(e). Jeter le ventilateur ou le retourner à
un centre de service agréé pour examen et/ou réparation.
■ Une source d'air de débit suffisant est nécessaire pour le
fonctionnement correct de tout appareil à gaz (combustion et
évacuation des gaz à combustion par la cheminée), pour qu'il
n'y ait pas de reflux des gaz de combustion. Respecter les
directives du fabricant de l'équipement de chauffage et les
prescriptions des normes de sécurité - comme celles publiées
par la National Fire Protection Association (NFPA) et
l'American Society for Heating, Refrigeration and Air
Conditioning Engineers (ASHRAE), et les prescriptions des
autorités réglementaires locales.
■ Lors d'opérations de découpage et de perçage dans un
mur ou un plafond, veiller à ne pas endommager les câblages
électriques ou canalisations qui peuvent s'y trouver.
■ Les ventilateurs d'évacuation doivent toujours décharger
l'air à l'extérieur.
MISE EN GARDE :
Cet appareil est conçu uniquement pour
la ventilation générale. Ne pas l'utiliser pour l'extraction de
matières ou vapeurs dangereuses ou explosives.
MISE EN GARDE :
Pour minimiser le risque d'incendie et
évacuer adéquatement les gaz, veiller à acheminer l'air aspiré
par un conduit jusqu'à l'extérieur - ne pas décharger l'air
aspiré dans un espace vide du bâtiment comme une cavité
murale, un plafond, un grenier, un vide sanitaire ou un
garage.
AVERTISSEMENT :
POUR RÉDUIRE LE RISQUE
D'INCENDIE, UTILISER UNIQUEMENT DES CONDUITS
MÉTALLIQUES.
AVERTISSEMENT :
POUR MINIMISER LE RISQUE D'UN FEU
DE GRAISSE SUR LA CUISINIÈRE :
■ Ne jamais laisser un élément de surface fonctionner à
puissance de chauffage maximale sans surveillance. Un
renversement/débordement de matière graisseuse pourrait
provoquer une inflammation et la génération de fumée. Utiliser
une puissance de chauffage moyenne ou basse pour le
chauffage d'huile.
■ Veiller à toujours faire fonctionner le ventilateur de la hotte lors
de la cuisson avec une puissance de chauffage élevée ou lors
de la cuisson d'un mets à flamber (à savoir crêpes Suzette,
cerise jubilée, steak au poivre flambé).
■ Nettoyer fréquemment les ventilateurs d'extraction. Veiller à
ne pas laisser la graisse s'accumuler sur les surfaces du
ventilateur ou des filtres.
■ Utiliser toujours un ustensile de taille appropriée. Utiliser
toujours un ustensile adapté à la taille de l'élément chauffant.
AVERTISSEMENT :
POUR RÉDUIRE LE RISQUE DE
DOMMAGES CORPORELS APRÈS LE DÉCLENCHEMENT
D'UN FEU DE GRAISSE SUR LA CUISINIÈRE, APPLIQUER
LES RECOMMANDATIONS SUIVANTES :
(a)
■ Placer sur le récipient un couvercle bien ajusté, une tôle à
biscuits ou un plateau métallique POUR ÉTOUFFER LES
FLAMMES, puis éteindre le brûleur. VEILLER À ÉVITER LES
BRÛLURES. Si les flammes ne s'éteignent pas immédiatement,
ÉVACUER LA PIÈCE ET APPELER LES POMPIERS.
■ NE JAMAIS PRENDRE EN MAIN UN RÉCIPIENT
ENFLAMMÉ - vous risquez de vous brûler.
■ NE PAS UTILISER D'EAU, ni un torchon humide - ceci
pourrait provoquer une explosion de vapeur brûlante.
■ Utiliser un extincteur SEULEMENT si :
– Il s'agit d'un extincteur de classe ABC, dont on connaît le
fonctionnement.
– Il s'agit d'un petit feu encore limité à l'endroit où il s'est déclaré.
– Les pompiers ont été contactés.
– Il est possible de garder le dos orienté vers une sortie pendant
l'opération de lutte contre le feu.
(a)
Recommandations tirées des conseils de sécurité en cas
d'incendie de cuisine publiés par la NFPA.
■ AVERTISSEMENT : Pour réduire le risque d'incendie ou de
choc électrique, ne pas utiliser ce ventilateur avec un
quelconque dispositif de réglage de la vitesse à semi-
conducteurs.
LIRE ET CONSERVER CES INSTRUCTIONS

15
AVERTISSEMENTS
Nous vous remercions d'avoir acheté une hotte Elica.
Veuillez respecter attentivement toutes les instructions indiquées
dans cette notice avant de procéder avec l’installation de la hotte.
Veuillez conserver ces instructions pour un usage ultérieur.
Utilisez cet appareil exclusivement comme un système d’aspiration pour l’élimination
de la vapeur se formant lors de la cuisson. N’utilisez pas l’appareil pour
l’évacuation de substances inflammables ou tout autre matériel ou toute autre
vapeur.
La procédure d’installation décrite dans cette notice est destinée à des
installateurs professionnels qualifiés, à un personnel technique ou à des personnes
ayant une formation similaire.
N’essayez pas à installer l’appareil par vous-mêmes.
Avant de commencer l’installation, assurez-vous que l’appareil est débranché du
réseau électrique. Tous les câblages doivent être reliés de façon appropriée, isolés
et mis à la terre conformément à toutes les lois et réglementations en vigueur.
Assurez-vous que toute la longueur du conduit est sans dépôts de graisse. Le cas
échéant, remplacez le conduit afin d’éviter tout risque d’incendie dû à la présence
de graisse. Vérifiez les joints du conduit afin d’assurer qu’il est bien monté et
que tous les joints sont scellés avec du ruban adhésif. Soyez particulièrement
prudent lorsque vous effectuez des trous dans les plafonds ou les parois pour ne pas
endommager des tuyaux ou des câbles électriques cachés. Assurez-vous que la cuisine
est pourvue d’un nombre de prises d’air suffisant pour le recyclage d’air.
L’air aspiré doit toujours être rejeté à l’extérieur de l’habitation, par conséquent
le conduit ne doit jamais rejeter l’air à l’intérieur de murs, plafonds, greniers ou
attiques. Utilisez seulement des conduits en acier rigide ou lisse. Le moteur est
pourvu d’une sortie d’évacuation qui nécessite d’un raccord rond de 6”.

16
INDEX
AVANT DE COMMENCER 17
CANALISATION 17
BRANCHEMENT ÉLECTRIQUE 18
Alimentation électrique 18
INSTALLATION 19
Avant de l’installation 19
Ouverture des panneaux 19
Installation 19
FONCTIONNEMENT 21
Recommandations de caractère général 21
Données Techniques 22
Configuration standard 22
Génération d’un nouveau code de transmission 22
Apprentissage du nouveau code de transmission 22
ENTRETIEN 23
Nettoyage du filtre 23
Nettoyage de la hotte 23
GARANTIE 24

17
AVANT DE COMMENCER
Le fabricant décline toute responsabilité en cas de
dommages causés par le non-respect des instructions
fournies ici lors de l’installation, l’entretien et
le fonctionnement normal de l’appareil. Le
fabricant décline en outre toute responsabilité en
cas de dommages dus à une négligence lors d’un
entretien et/ou installation inadéquate et dans ce
cas, la garantie de l’appareil expire
immédiatement.
AVANT DE COMMENCER : nous recommandons d’essayer le
fonctionnement de la hotte avant de son
installation.
AVANT DE COMMENCER – Veuillez lire attentivement ce
manuel d’utilisation et vous assurer d’être apte à
respecter les conditions et les restrictions.
Cet appareil pèse environ 55lb, donc l’installation
doit être effectuée par au moins deux personnes.
ATTENTION: POUR L INSTALLATION DES CUISINIERES A
GAZ: METTEZ LA HOTTE AFIN D'AVOIR ENTRE LE BORD
INFERIEUR DE LA HOTTE ET LE PLAN DE CUISSON UNE
DISTANCE DE 30”.
POUR DES CUISINIERES ELECTRIQUES: LA DISTANCE
ENTRE LE BORD INFERIEUR DE LA HOTTE ET LE PLAN
DE CUISSON NE DÔIT PAS ÊTRE INFERIEURE DE 25” ET
SUPERIEURE DE 10’ .
EMPLOI DOMESTIQUE. LIRE ATTENTIVEMENT LE LIVRET
INSTRUCTIONS POUR DES APPLICATIONS SPECIFIQUES.
CANALISATION
La hotte nécessite d’un raccord rond de 6” / 150mm
qui passe à travers le plafond, en ligne avec l’axe
vertical central de la hotte. Cet appareil doit
être équipe de son tuyau d’évacuation. En aucun cas
il est permis de faire évacuer l’air de cet
appareil à travers un autre tuyau ou autre
canalisation d’évacuation à l’intérieur de
l’immeuble. Lisez attentivement toutes les
instructions qui suivent :
- Utilisez un tuyau d’évacuation d’air dont
longueur maximale ne dépasse pas les 5 mètres.
- Limitez le nombre de coudes de la canalisation,
car chaque coude réduit le rendement d’aspiration
d’un mètre linéaire. (Par exemple : si vous
utilisez n. 2 coudes de 90°, la longueur de la
canalisation ne doit pas dépasser les 3 mètres de
longueur).
- Évitez tout changement drastique de direction.
- Utilisez un conduit ayant un diamètre constant de
6” sur toute la longueur.
- Utilisez un conduit conçu en matériel conforme
aux lois en vigueur.
Pour la canalisation, utilisez un parcours aussi
court et direct que possible. Utilisez seulement
des conduits en métal – en général, les conduits en
plastique ne sont pas permis par les
réglementations. N’utilisez pas des conduits
flexibles, car les plis peuvent causer des
turbulences et réduire considérablement
l’efficacité d’aspiration de la hotte.- CE TYPE DE
CANALISATION RÉDUIT L’EFFICACITÉ DE LA HOTTE DU
50%.
Les hottes d’aspiration peuvent interrompre le bon
flux des gaz d’échappement des cheminées,
chaudières à gaz et chauffe-bains à gaz. Afin de
réduire le risque de rejet de ces gaz létaux dans
l’habitation, veuillez lire et suivre les consignes
de sécurité et les lignes directrices fournies par
les fabricants des appareils de chauffage.
Pour toute information supplémentaire, veuillez
faire référence aux normes NFPA et ASHRAE.

18
BRANCHEMENT ÉLECTRIQUE
ATTENTION : Chaque entretien électrique doit
être effectué par un électricien qualifié.
Veuillez respecter les codes électriques
concernés ou les codes et les ordonnances
locales de construction en vigueur.
Assurez-vous que le courant électrique est
débranché du tableau électrique général.
N’utilisez pas une rallonge ou un adaptateur
avec cet appareil.
Cet appareil doit être mis à la terre. Effectuez
la connexion à un circuit mis à la terre,
protégé d’un interrupteur automatique de 15
ampères.
Alimentation électrique
Cet appareil nécessite une alimentation
électrique de 120V/60Hz, – assurez-vous que la
connexion électrique est effectuée par un
électricien qualifié et compétent. Le point de
connexion pour l’alimentation se trouve sur le
dessus de l’appareil, par conséquent
l’alimentation électrique doit descendre du
plafond le long de la canalisation.
Toutes les connexions électriques et les
évacuations d’air doivent être effectuées avant
de commencer l’installation de la hotte.

19
INSTALLATION
AVANT DE L’INSTALLATION
OUVERTURE DES PANNEAUX
Il est possible d’ouvrir les panneaux en acier
qui couvrent les filtres à graisse en tirant
légèrement le côté du panneau, comme indiqué
dans la Fig. 1.
Pour ouvrir complètement les panneaux, il faut
détacher les chaînes de sécurité par leurs
mousquetons.
Avant de commencer l’installation de l’appareil,
vérifiez que tous les composants ne sont pas
endommagés ; dans le cas contraire, contactez le
revendeur et interrompez l’installation.
INSTALLATION
Réalisez un faux plafond ayant des ouvertures
des dimensions suivantes :
41”15/16 x 26”3/16 ayant une distance minimale
de 13” entre le plafond et le faux plafond.
Après avoir choisi la position la plus
appropriée, réalisez la canalisation : un
conduit ayant un diamètre de 6” à installer sur
le côté de l’appareil choisi pour la sortie
d’air est fourni avec le produit. Laissez fermés
les trous pour la sortie d’air pas utilisés,
comme indiqué dans la Fig. 2.
Tracez sur le plafond solide les trous pour la
fixation de la hotte, comme indiqué dans la Fig.
3, selon le modèle choisi.
Effectuez 4 trous dans le plafond selon les
dimensions, comme indiqué dans la Fig. 4, et
insérez les tasseaux en plastique fournis dans
les trous.

20
Ouvrez les panneaux en acier et
enlevez les filtres à
g
raisse pour ne
pas les endomma
g
er et permettre ainsi
l’installation : insérez les ti
g
es
filetées dans les tasseaux, comme
indiqué dans la Fig. 5.
Les tiges filetées mesurent 9”13/16 et
servent au monta
g
e de la hotte à
plafond pour une distance du plafond
solide comprise entre 9”13/16 et
14”9/16, comme indiqué dans la Fig. 6.
En cas d’une plus
g
rande distance
entre la hotte et le plafond, utilisez
des tiges filetées plus longues.
Raccordez le câble d’alimentation à la
boîte d’alimentation en métal
positionnée à l’intérieur de la hotte,
comme indiqué dans la Fig. 7.
La page est en cours de chargement...
La page est en cours de chargement...
La page est en cours de chargement...
La page est en cours de chargement...
La page est en cours de chargement...
La page est en cours de chargement...
La page est en cours de chargement...
La page est en cours de chargement...
La page est en cours de chargement...
La page est en cours de chargement...
La page est en cours de chargement...
La page est en cours de chargement...
La page est en cours de chargement...
La page est en cours de chargement...
La page est en cours de chargement...
La page est en cours de chargement...
-
 1
1
-
 2
2
-
 3
3
-
 4
4
-
 5
5
-
 6
6
-
 7
7
-
 8
8
-
 9
9
-
 10
10
-
 11
11
-
 12
12
-
 13
13
-
 14
14
-
 15
15
-
 16
16
-
 17
17
-
 18
18
-
 19
19
-
 20
20
-
 21
21
-
 22
22
-
 23
23
-
 24
24
-
 25
25
-
 26
26
-
 27
27
-
 28
28
-
 29
29
-
 30
30
-
 31
31
-
 32
32
-
 33
33
-
 34
34
-
 35
35
-
 36
36


ELICA ESNX43S2 Guide d'installation
- Catégorie
- Hottes
- Taper
- Guide d'installation
- Ce manuel convient également à
dans d''autres langues
- English: ELICA ESNX43S2 Installation guide
- español: ELICA ESNX43S2 Guía de instalación
Documents connexes
-
ELICA EVR636SS Guide d'installation
-
-
ELICA EPL630S1 Guide d'installation
-
-
-
-
-
ELICA SUM1 Guide d'installation
-
-
