
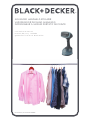
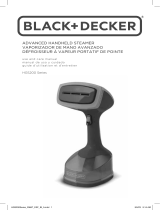
HGS200, HGS205 Series
TM
ADVANCED HANDHELD STEAMER
VAPORIZADOR DE MANO AVANZADO
DÉFROISSEUR À VAPEUR PORTATIF DE POINTE
use and care manual
manual de uso y cuidado
guide d’utilisation et d’entretien

Should you have any questions or concerns with your new product,
please call our Customer Service Line at 1-800-231-9786 (US and
Canada). Please do not return to the store.
Si usted tiene alguna inquietud o pregunta con su producto, por
favor llame a nuestra línea de servicio al cliente una atención
inmediata 1-800-231-9786 (EE.UU/Canadá) 01-800-714-2503
(México). No devuela a la tienda.
Si vous avez des questions ou des préoccupations à propos de
votre nouveau produit, veuillez communiquer avec notre Service à
la clientèle au 1 800 231-9786 (États-Unis et Canada). Veuillez ne
pas rapporter le produit au magasin.
Thank you for your purchase!
Gracias por su compra!
Merci de votre achat!

3
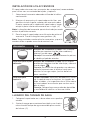
IMPORTANT SAFETY INSTRUCTIONS
When using your steamer, basic safety precautions should
always be followed, including the following:
SAVE THESE INSTRUCTIONS.
This product is for household use only.
POLARIZED PLUG (120V models only)
To reduce the risk of electric shock, this
appliance has a polarized plug (one blade
is wider than the other). This plug will fit in
a polarized outlet only one way. If the plug
does not fit fully into the outlet, reverse the
plug. If it still does not fit, contact a qualified
electrician to install the proper outlet. Do not
attempt to modify the plug in any way.
TAMPER-RESISTANT SCREW
Warning: This appliance is equipped with a
tamper-resistant screw to prevent removal
of the outer cover. To reduce the risk of fire
or electrical shock, do not attempt to remove
the outer cover. There are no user-serviceable
parts inside. Repair should be done only by
authorized service personnel.
Note: If the power supply cord is damaged, in
order to avoid a hazard, it should be replaced
by qualified personnel.
• READ ALL INSTRUCTIONS BEFORE USING.
• To reduce the risk of contact with hot water emitting from
steam vents, check appliance before each use by holding it
away from body and operating steam button.
• Only use steamer for intended use.
• To reduce the risk of electric shock, do not immerse the
steamer in water or other liquids.
• Always turn the steamer off by pressing and holding the
power button for 3 seconds, until the blue indicator light
turns off, before unplugging from the outlet. Never pull on
the cord to disconnect from the electrical outlet; instead
grasp plug and pull to disconnect. Always keep unplugged
when not in use or filling the tank.
• Do not allow cord to touch hot surfaces. Let steamer
cool completely before putting away. Loop cord loosely
together and secure with provided Velcro strap when
storing.
• Always turn off the steamer by pressing and holding
the power button for 3 seconds, and then unplug from
the electric outlet before filling with water, emptying, or
cleaning, and when not in use.
• Do not operate the steamer with a damaged cord, or if the
appliance has been dropped or damaged, or if it is leaking.
To reduce the risk of electric shock, do not disassemble or
attempt to repair the steamer; take it to a qualified service
person for examination and repair, or call the appropriate
toll-free number in this manual. Incorrect reassembly or
repair can cause a risk of fire, electric shock, or injury to
persons when the steamer is used.
• Close supervision is necessary for any appliance being
used by or near children. Do not leave the steamer
unattended while connected.
• Burns can occur from touching hot metal parts, hot water,
or steam. Use care when you turn a steam appliance upside
down – there may be hot water in the reservoir. Avoid rapid
movement of steamer to minimize hot water spillage.
• To reduce the likelihood of circuit overload, do not operate
another high wattage appliance on the same circuit.
• If an extension cord is absolutely necessary, a minimum
13-ampere cord should be used. Cords rated for less
amperage can result in a risk of fire or electrical shock due
to overheating. Care should be taken to arrange the cord
so that it cannot be pulled or tripped over.
• Do not use outdoors.
• Do not use anything other than water in the steamer while
in use or during cleaning.
• Never steam clothing while on a body.
• Never aim the steam directly towards people, animals
or plants. The steam is very hot and can results in burns.
Burns can occur from touching hot parts (including the
steamer head and frames), hot water, or steam.
• Never hold the steam head down while at rest or tilt it in a
backward position as this may result in hot water discharge
and possibly injury.
• This appliance is not intended for use by persons (including
children) with reduced physical, sensory, or mental
capabilities, or lack of experience and knowledge, unless they
have been given supervision or instruction concerning use of
the appliances by a person responsible for their safety.
• To avoid burns, when putting on or taking off attachments,
be sure the unit is off and no steam is being emitted.
• Children should be supervised to ensure that they do not
play with the appliance.
• The steamer must be used and rested on a stable surface.

4
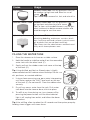
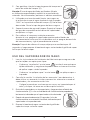
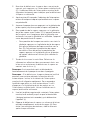
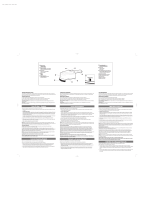
GETTING TO KNOW YOUR STEAMER
1. Steam trigger
2. Continuous steam switch
3. Comfort grip handle
4. Removable water tank
(Part # HGS200-01)
5. Power button (not shown)
6. Lint frame* (Part # HGS200-02)
7. Delicate fabric frame
(Part # HGS200-03)
8. Upholstery frame
(Part # HGS200-04)
Product may vary slightly from what is illustrated.
*Lint frame included in select models only.
2
3
1
4
6
7
8
5

5
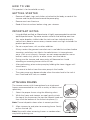
HOW TO USE
This product is for household use only.
GETTING STARTED
• Remove all labels, tags and stickers attached to the body, or cord of the
steamer and the plastic band around the power plug.
• Remove and save literature.
• Read all the instructions before using your steamer.
IMPORTANT NOTES
• Using distilled, purified, or filtered water is highly recommended to maintain
optimal performance. Tap water contains minerals that build up over time.
• Any water droplets visible inside the tank are from individual quality
control tests done to ensure every steamer meets our high standards for
product performance.
• Do not use perfumes, oils, or other additives.
• Always review the garment manufacturer’s care label instructions before
steaming, and always test fabrics for colorfastness in inconspicuous
areas (such as an inseam). Steamers are not recommended for use on
leather, suede, vinyl, plastic, or other steam sensitive fabrics.
• During use the steamer and accessories will become hot. Avoid
attaching or removing frames while still hot.
• After preheating, prime water pump by holding the steam trigger until
steam forms.
• It is normal to feel or hear the water pump in the handle.
• The water pump may become louder when the water level in the tank is
low. Check and refill tank, as needed.
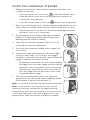
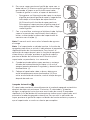
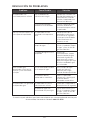
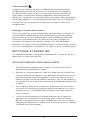
ATTACHING FRAMES
The steamer comes with three optional-use attachment
frames recommended for use with a variety of fabrics and
upholstery.
1. Select the proper frame using the following chart.
2. While the frame and steamer are cool, gently attach
the top of the frame over the top the steamer head and
then click the bottom of the frame into place. (A)
Note: Frame tab points down when in correct position.
3. Allow steamer to cool prior to removing frame. Gently
pull on the tab. (B)
Note: Be careful when removing frames as condensation
may build up during use.
A
B

6
Frame Usage
Lint Frame
Garment Care Label: For any garments that call
for medium to high heat and allow for use of
steam.
Tip: Frame helps remove lint, hair, and animal fur.
Delicate Fabric Frame
Garment Care Label: For any garments that call
for low heat and allow for use of steam.
Tip: For items with embellishment, turn the gar-
ment inside out to better remove wrinkles and
avoid damage to sensitive areas.
Upholstery Frame
Upholstered Fabrics: Great for deodorizing and
refreshing bedding, mattresses, curtains, plush
toys, furniture, and hard surfaces (such as count-
ers or desks that are not heat sensitive).
Tip: Always test for colorfastness and heat sensi-
tivity on an inconspicuous area.
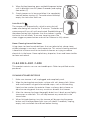
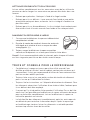
FILLING THE WATER TANK
1. Place the steamer on its base on a stable surface.
2. Hold the handle to stabilize and pull out the removable
water tank with the other hand. (C)
3. Gently pull out the rubber water tank cover at the top
of the tank. (D)
Tip: Using distilled, purified, or filtered water is highly
recommended and will reduce mineral buildup. Do not use
oils, perfumes, or scented additives.
4. Using a clean measuring cup, pour water into opening
until water reaches the “MAX” level mark on the top
of the tank. (E) Do not overfill. Close the rubber cover
securely.
5. Dry off any excess water from the tank. Push water
tank back into the steamer base; click into place.
6. To refill at any time during use, turn steamer off by
pressing the power button until the blue indicator
light is off, unplug from outlet, and follow the above
procedure.
Tip: After refilling, allow to reheat for 45 seconds and then prime pump by
holding steam trigger until steam forms.
C
D
E

7
USING THE HANDHELD STEAMER
1. Read the manufacturer's fabric label to make sure the fabrics are
suitable for steaming.
• If you see “do not iron” or this icon
, attach the delicate fabric
frame and make sure to test on an inconspicuous area prior to
steaming the entire garment.
• If you see “do not steam” or this icon
, do not steam the garment.
2. Refer to the “Attaching Frames” section for determining whether to use a
frame. Attach or remove frames while the steamer and frames are cool.
• Hang the garment in an area that will not be impacted by the heat
and steam, such as on a shower rod.
3. Plug the steamer into an outlet and then press the power
button. (F) The blue power button light will slowly blink,
indicating that the steamer is heating.
4. After about 45 seconds the power light will stay on,
indicating the steamer is preheated.
5. Prime the water pump by holding steam trigger until
steam forms.
6. To generate steam, press down on the steam trigger
with your index finger. (G) As long as the trigger is
held down, steam will emit from the steamer. When the
trigger is released, the steam will stop.
• To generate a constant flow of steam without holding
the trigger, press the steam trigger and then slide the
continuous steam switch down. (H) This will activate
the continuous steam feature. To turn the steam off,
press the trigger, push the continuous steam switch
up and then release trigger.
7. With your free hand keep the fabric taut. Steam the
garment with slow, downward strokes, keeping the head
of the steamer in contact with the fabric. (I)
Note: It is normal to feel or hear the water pump in the handle.
Note: If the steamer is left inactive, the auto shut-off
feature will activate, indicated by the rapidly blinking
Power Button. To resume steaming after the auto shut-off
is activated, either press the steam trigger or press the
power button. Allow the steamer to preheat if needed.
F
G
H
I

8
8. When finished steaming, press and hold the power button
until its blue light turns off (about 3 seconds) and unplug
from outlet. (J)
9. Stand steamer on its base and allow it to completely
cool off before storing. (K) To avoid mineral buildup,
empty the tank after each use.
Auto Shut-Off
The steamer will automatically switch to auto shut-off
mode after being left inactive for 15 minutes. The boiler and
water pump will turn off until reactivated. Rapid blinking of
the power button light indicates that the steamer is going
into auto shut-off mode. To resume steaming, press the
steam trigger or power button and wait for steamer to fully reheat.
Steam Cleaning Around the Home
Using steam to clean household items that can tolerate hot, damp steam
without damage is non-toxic, and inexpensive. This natural cleaning method
is beneficial to those sensitive to chemical cleaners or trying to reduce
chemicals in the home. Steam upholstery, draperies, linens and home textiles
to clean and refresh.
CLEANING AND CARE
This product contains no user serviceable parts. Refer to qualified service
personnel.
CLEANING STEAMER EXTERIOR
1. Make sure steamer is off, unplugged and completely cool.
2. Wipe the ironing plate and outer surface with soft, damp cloth. Water
and small amounts of gentle household soaps, such as dishwashing
liquid, can be used on the exterior. Never use heavy-duty cleaner, or
abrasive scouring pads that may scratch or discolor the steamer.
3. After the steamer has been thoroughly dried, turn it back on and lightly
steam over an old cloth. This will help remove any reside left in the
steam holes.
4. When finished cleaning, turn the steamer off by pressing the power
button until the blue power light turns off (about 3 seconds). Unplug,
empty tank, and allow time to cool before storing.
K
J

9
CLEANING FRAMES AND ACCESSORIES
For all accessories, allow to fully dry before using again or storing.
Accessories are not suitable for cleaning in a washing machine.
• Lint frame: Wipe with damp cloth to clean.
• Delicate frame: Wash with cold water and small amounts of gentle
cleanser if needed. The fabric in the frame cannot be removed.
• Upholstery frame: The fabric on this frame can be removed and hand
washed with cold water and gentle cleanser.
STORING THE STEAMER
1. Check that the steamer is unplugged and completely cool.
2. Gather the cord into even ovals and then gently cinch
with the strip of hook and loop. (L)
3. Always store steamer upright on its base to prevent
water leakage.
Tip: Emptying the tank after each use is recommended
because standing water can leave a residue over time.
STEAMING TIPS AND TRICKS
• This steamer is designed to use distilled, purified, or filtered water. Tap
water contains minerals that build up. Using water with perfumes or
scented additives is also not recommended.
• Always test garments by steaming a small hidden area to make sure the
garment takes well to steam.
• Always read garment care label instructions. Low heat settings require
the delicate fabric frame.
• Small amounts of dripping might occur during use. If excessive, the
steamer needs time to get back up to full temperature. Just allow the
steamer a minute to reheat.
• Wearing clothes immediately after ironing or steaming can actually
create wrinkles. Always allow clothing to cool for about 5 minutes after
ironing or steaming to set the press.
L

10
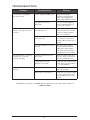
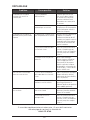
TROUBLESHOOTING
Problem Possible Cause Solution
The steamer is plugged in
but not heating.
There's a power supply issue. Check that the plug is
properly inserted into the
outlet or try plugging the
steamer into a different outlet.
The auto shut-off has
activated.
Press the steam trigger or
press the power button to
activate the steamer.
Not enough steam or no
steam is coming out of the
steamer.
The steamer is not heated to
full temperature.
Always allow steamer to
preheat at least 45 seconds,
or until the power button
light is a steady blue.
There is not enough water in
the water tank.
Follow the instructions under
the “filling the water tank”
section and fill to Max level
marker.
The water pump hasn’t been
primed.
After preheating, always
prime the water pump by
holding the steam trigger
until steam forms to ensure
enough water is in the boiler.
Discolored water is coming
through the holes and
staining the fabri
c.
Residue has built up in the
water tank.
Empty the water tank after
each use. Only use distilled,
filtered, or purified water.
Perfumed or scented
additives were used.
Regularly clean steamer and
refrain from using perfumed
or scented additives.
Steamer is leaking or
spitting.
Steamer is not hot enough. Allow the steamer to heat for
about 45 seconds.
Water tank is running low. Follow the instructions under
the “Filling the Water Tank”
section and fill to Max level
marker.
If additional assistance is needed, please contact our consumer service team at
1-800-231-9786.

11
NEED HELP?
For service, repair or any questions regarding your appliance, please call
our Customer Service Line at 1-800-231-9786. Please DO NOT return the
product to the place of purchase. Also, please DO NOT mail product back to
manufacturer, nor bring it to a service center. You may also want to consult
the website listed on the cover of this pamphlet.
Warranty Information
(Applies only in the United States and Canada)
What does it cover?
• Any defect in material or workmanship provided; however, Spectrum
Brands’ liability will not exceed the purchase price of product.
For how long?
• Two years from the date of original purchase with proof of such purchase.
What will we do to help you?
• Provide you with a reasonably similar replacement product that is either
new or factory refurbished.
How do you get service?
• Save your receipt as proof of date of sale.
• Visit the online service website at www.prodprotect.com/applica, or call
toll-free 1-800-231-9786, for general warranty service.
• If you need parts or accessories, please call 1-800-738-0245.
What does your warranty not cover?
• Damage from commercial use
• Damage from misuse, abuse or neglect
• Products that have been modified in any way
• Products used or serviced outside the country of purchase
• Glass parts and other accessory items that are packed with the unit
• Shipping and handling costs associated with the replacement of the unit
• Consequential or incidental damages (Please note, however, that some
states do not allow the exclusion or limitation of consequential or
incidental damages, so this limitation may not apply to you.)
How does state law relate to this warranty?
• This warranty gives you specific legal rights. You may also have other
rights that vary from state to state or province to province.

12
• LEA TODAS LAS INTRUCCIONES ANTES DE UTILIZAR EL
APARATO.
• A fin de reducir el riesgo de contacto con el agua caliente que
sale de los escapes de vapor, revise el aparato antes de cada uso
sosteniendolo lejos del cuerpo y operando el botón de vapor.
• Utilice el vaporizador solamente con el propósito para el que
ha sido diseñado.
• Para evitar el riesgo de descarga eléctrica, no sumerja el
vaporizador en agua ni en otros líquidos..
• Siempre apague el vaporizador presionando y sosteniendo
el botón de funcionamiento por 3 segundos hasta que la
luz indicadora azul se apague, antes de desenchufarlo del
tomacorriente. Nunca tire del cable para desenchufarlo del
tomacorriente; en vez de tirar, sujete el enchufe y hálelo para
desenchufarlo. Siempre mantenga desenchufado cuando no
esté en uso o cuando llene el tanque.
• No permita que el cable toque las superficies calientes.
Deje que el vaporizador se enfríe completamente antes de
guardarlo. Doble el cable holgadamente en forma de lazo y
asegúrelo con la tira de velcro para guardarlo.
• Siempre apague el vaporizador presionando y sosteniendo
el botón de funcionamiento por 3 segundos y luego
desenchufe del tomacorriente antes de llenar con agua,
vaciar o limpiarlo y cuando no esté en uso.
• No opere el vaporizador con un cable que esté dañado o si
el aparato se ha caido o dañado, o si está goteando. Para
reducir el riesgo de descarga eléctrica, no desensamble ni
intente reparar el vaporizador; acuda a un representante de
servicio calificado para su inspección y reparación o llame
el número gratis apropiado que aparece en este manual.
El reensamble o reparación incorrecta podría resultar en
un riesgo de incendio, descarga eléctrica o lesión personal
cuando el vaporizador sea utilizado.
• Se requiere supervisión de cerca para cualquier aparato en
manos de lo niños o cerca de ellos. No deje desatendido el
vaporizador mientras esté conectado.
• El contacto con las partes metálicas calientes, el agua caliente
o el vapor podrían ocasionar quemaduras. Proceda con
cuidado al voltear boca abajo un aparato de vapor – el tanque
puede contener agua caliente. Evite movimientos rápidos del
vaporizador para reducir los derrames de agua caliente.
• Para reducir la posibilidad de una sobrecarga del circuito, no
opere otro aparato de alta potencia en el mismo circuito.
• Si es absolutamente necesario utilizar un cable de extensión, se
debe utilizar un cable de un mínimo de 13 amperios. Los cables
con menor amperaje pueden resultar en un riesgo de incendio
o descarga eléctrica debido a sobrecalentamiento. Se debe
tener la precaución de colocar el cable de extensión de manera
que no se pueda halar o tropezarse con el sin darse cuenta.
• No utilice el aparato a la intemperie.
• No utilice ninguna otra sustancia que no sea agua en el
vaporizador mientras esté en uso o durante la limpieza.
• Nunca use vapor en las prendas mientras se llevan puestas
en el cuerpo.
• Nunca dirija el vapor directo hacia personas, animales
o plantas. El vapor está muy caliente y podría resultar en
quemaduras. Las quemaduras pueden occurrir al tocar las
piezas calientes (incluso la cabeza del vaporizador y los
accesorios), el agua caliente o el vapor.
• Nunca sostenga la cabeza de vapor hacia abajo mientras
esté descansando ni la incline hacia atrás ya que puede
causar que el agua caliente se derrame y ocasionar una
lesión personal.
• Este aparato no está diseñado para ser utilizado por
personas (incluyendo los niños) con su capacidad física,
psíquica o sensorial reducida, o con falta de experiencia
o sabiduria, a menos que sean supervisadas o instruidas
acerca del uso del aparato por una persona responsable de
su seguridad.
• Para evitar quemaduras al instalar o retirar los accesorios,
asegúrese de que la unidad esté apagada y que no esté
emitiendo vapor.
• Los niños deben ser supervisados para aseguar que no
juegen con el aparato.
• El vaporizador debe ser utilizado y colocado sobre una
superficie estable.
INSTRUCCIONES IMPORTANTES DE SEGURIDAD
Cuando vaya a utilizar su vaporizador, siempre se deben seguir precauciones
básicas de seguridad, incluyendo las siguientes:
CONSERVE ESTAS INSTRUCCIONES.
Este aparato eléctrico es para uso doméstico solamente.
ENCHUFE POLARIZADO (Solamente en los modelos de 120V)
Para reducir el riesgo de descarga eléctrica, este aparato está
equipado con un enchufe polarizado (un contacto es más
ancho que el otro). Este enchufe entrará en un tomacorriente
polarizado solamente de una manera. Si el enchufe no encaja
completamente en el tomacorriente, inviértalo. Si aún así
no entra, consulte a un electricista calificado para instalar el
tomacorriente apropiado. No intente modificar el enchufe de
manera alguna.
TORNILLO DE SEGURIDAD
Advertencia: Este aparato cuenta con un tornillo de seguridad
para evitar la remoción de la cubierta exterior del mismo. A fin de
reducir el riesgo de incendio o de choque eléctrico, por favor no
trate de remover la cubierta exterior. Este producto no contiene
piezas reparables por el consumidor. Toda reparación se debe
llevar a cabo únicamente por personal de servicio autorizado.
Nota: Si el cordón de alimentación está dañado, con el propósito
de evitar un daño, debe ser sustituido por personal calificado.

13
CONOZCA SU VAPORIZADOR
El producto puede variar ligeramente del que aparece ilustrado.
*Acessorio para pelusas incluido solo en modelos elegidos.
1. Gatillo de vapor
2. Interruptor de vapor continuo
3. Mango de agarre cómodo
Comfort Grip™
4. Tanque de agua removible
(pieza no. HGS200-01)
5. Botón de funcionamiento
(no mostrado)
6. Accesorio para pelusas
(pieza no. HGS200-02)
7. Accesorio para tejidos delicados
(pieza no. HGS200-03)
8. Accesorio para tapicería
(pieza no. HGS200-04)
2
3
1
4
6
7
8
5

14
CÓMO USAR
Este producto es solamente para uso doméstico.
PREPARACIÓN
• Retire toda etiqueta colgante y adherida al cuerpo o cable del
vaporizador y la tira plástica alrededor del enchufe.
• Retire y converve la literatura.
• Lea todas las instrucciones antes de utilizar su vaporizador.
NOTAS IMPORTANTES
• El uso de agua destilada, purificada o filtrada es altamente
recomendado para mantener desempeño óptimo. El agua de llave
contiene minerales que se acumulan con el transcurso del tiempo.
• Cualquier gota de agua visible dentro del tanque es debido a las
pruebas de control de calidad realizadas para asegurar que cada
vaparizador cumpla con nuestros altos estándares para el desempeño
del producto.
• El uso de agua destilada reducirá la acumulación de minerales. Agua
normal de la llave puede ser utilizada.
• No use perfumes, aceites ni otros aditivos.
• Siempre revise las instrucciones indicadas en la etiqueta del fabricante
para el cuidado de la prenda antes de aplicar vapor y siempre haga una
prueba de los tejidos para el nivel de desteñido en áreas no visibles
(como en un ruedo). No es recomendado utilizar los vaporizadores en
piel, gamuza, vinil, plástico ni ningún otro tejido que pueda ser sensible
al vapor.
• El vaporizador y sus accesorios se calentarán durante su uso. Evite
instalar o remover los accesorios mientras estén calientes.
• Después del precalentamiento, prepare la bomba de agua sosteniendo
el gatillo de vapor hasta que se forme el vapor.
• Es normal sentir o escuchar la bomba de agua en el mango.
• La bomba de agua podría tornarse más ruidosa cuando el nivel de agua
en el tanque está bajo. Revise el tanque y llénelo según sea necesario.

15
INSTALACIÓN DE LOS ACCESORIOS
El vaporizador viene con tres accesorios de uso opcional, recomendados
para utilizar con una variedad de tejidos y tapicería.
1. Seleccione el accesorio adecuado utilizando la tabla a
continuación.
2. Mientras el accesorio y el vaporizador están fríos, con
gentileza instale la parte superior del accesorio sobre
la parte superior de la cabeza del vaporizador y luego
encaje la parte inferior del accesorio en su lugar. (A)
Nota: La lengüeta del accesorio apunta hacia abajo cuando
está en la posición correcta.
3. Permita que el vaporizador se enfríe antes de retirar el
accesorio. Tire de la lengüeta con gentileza. (B)
Nota: Tenga cuidado cuando retire los accesorios ya que la
condensación se puede acumular durante el uso.
Accesorio Uso
Acesorio para pelusas
Etiqueta del cuidado de la ropal: Para cualquier
prenda que requiera nivel de calor mediano y
tolera el uso de vapor.
Consejo: Este accesorio ayuda a remover las pelusas,
el cabello y el pelo de animales.
Accesorio para tejidos
delicados
Etiqueta del cuidado de la ropa: Para cualquier
prenda que requiera nivel de calor bajo y tolera el
uso de vapor.
Consejo: Para artículos de prendas con adornos,
coloque la prenda con el tejido al revés para
eliminar las arrugas mejor y evitar daños en
áreas sensibles.
Accesorio para
tapicería
Tejidos tapizados: Ideal para desodorizar y refres-
car la ropa de cama, las cortinas, los jugetes de
felpa, muebles y las superficies duras (tales como
los mostradores o escritorios que no sean sensi-
bles al calor).
Consejo: Siempre haga una prueba de desteñido
y sensibilidad al calor en un área no visible.
LLENADO DEL TANQUE DE AGUA
1. Coloque el vaporizador en su base sobre una superficie
estable.
2. Sujete el mango para mantenerlo estable y con la otra
mano tire del tanque de agua removible para sacarlo
de la base. (C)
A
B
C

16
3. Con gentileza, tire de la tapa de goma del tanque en la
parte de arriba del tanque. (D)
Consejo: El uso de agua destilada, purificada o filtrada
es altamente recomendado y reducirá la acumulación de
minerales. No utilice aceites, perfumes ni aditivos aromáticos.
4. Utilizando una taza de medir limpia, vierta agua en
el orificio hasta que el agua alcance el nivel marcado
“MAX” en la parte de arriba del tanque. (E) No lo llene
demasiado. Cierre la tapa de goma de forma segura.
5. Seque el exceso de agua del tanque. Empuje el tanque
de agua de nuevo dentro de la base del vaporizador;
encájelo en su lugar.
6. Para rellenar el tanque en cualquier momento
durante el uso, apague el vaporizador presionando el botón de
funcionamiento hasta que la luz indicadora azul se apague, desenchufe
del tomacorriente y siga el procedimiento anterior.
Consejo: Después de rellenar el tanque, deje que se recaliente por 45
segundos y luego prepare la bomba de agua sosteniendo el gatillo de vapor
hasta que se forme vapor.
USO DEL VAPORIZADOR DE MANO
1. Leas las instrucciones de la etiqueta del fabricante para asegurarse de
que los tejidos son aptos para vapor.
• Si observa “no planche” o este icono
, instale el accesorio para
tejidos delicados y asegúrese de probar sobre un área oculta antes
de aplicar vapor a toda la prenda.
• Si observa “no aplique vapor” o este icono
, no aplique vapor a
la prenda.
2. Consulte la sección “Instalación de los accesorios” para determinar si
debe utilizar un accesorio. Instale o remueva los accesorios cuando el
vaporizador y los accesorios estén fríos.
• Cuelgue la prenda en una área que no vaya a ser impactada por el
calor y el vapor, tal como en una barra para la ducha.
3. Enchufe el vaporizador a un tomacorriente y luego presione el botón de
funcionamiento. (F) La luz azul del botón de funcionamiento parpadeará
lentamente, indicando que el vaporizador está calentando.
4. Depués de aproximadamente 45 segundos, la luz de
funcionamiento se mantendrá iluminada, indicando que el
vaporizador se ha precalentado.
5. Prepare la bomba de agua sosteniendo el gatillo de
vapor hasta que se forme vapor.
D
E
F

17
6. Para crear vapor, presione el gatillo de vapor con su
dedo índice. (G) Mientras que el gatillo se mantenga
presionado, el vapor se emitirá del vaporizador.
Cuando el gatillo se suelta, el vapor se dentendrá.
• Para generar un flujo continuo de vapor sin sostener
el gatillo, presione el gatillo de vapor y luego deslice
hacia abajo el intrerruptor de vapor continuo.
(H) Esto activará la función de vapor continuo.
Para apagar el vapor, presione el gatillo, empuje el
interruptor de vapor continuo hacia arriba y luego
suelte el gatillo.
7. Con su mano libre, mantenga el tejido estirado. Aplique
vapor a la prenda con movimientos hacia abajo y
lentos, manteniendo la cabeza del vaporizador en
contacto con el tejido. (I)
Nota: Es normal sentir o escuchar la bomba de agua en
el mango.
Nota: Si el vaporizador es dejado inactivo, la función de
apagado automático se activará, indicado por el parpadeo
rápido del botón de funcionamiento. Para resumir la
aplicación de vapor después que la función de apagado
automático es activada, presione el gatillo de vapor o
presione el botón de funcionamiento. Permita que el
vaporizador se precaliente, si es necesario.
8. Cuando termine de aplicar vapor, presione y sostenga
el botón de funcionamiento hasta que su luz azul se
apague (aproximadamente 3 segundos) y desenchufe del
tomacorriente. (J)
9. Coloque el vaporizador sobre su base y deje que se
enfríe completamente antes de almacenar. (K) Para
evitar acumulación de minerales, vacíe el tanque de agua
después de cada uso.
Apagado Automático
El vaporizador cambiará automáticamente al modo de apagado automático
después de dejarse inactivo por 15 minutos. El calentador y la bomba
de agua se apagarán hasta que sean reactivados de nuevo. El parpadeo
rápido de la luz del botón de funcionamiento indica que el vaporizador está
pasando al modo de apagado automático. Para resumir la aplicación de
vapor, presione el gatillo de vapor o el botón de funcionamiento y espere a
que el vaporizador se vuelva a calentar por completo.
K
G
H
I
J

18
Limpieza con Vapor Alrededor del Hogar
El uso de vapor para limpiar artículos del hogar que puedan tolerar vapor
húmedo, caliente sin ocasionar daños resulta económico y no es tóxico. Este
método natural de limpieza es beneficioso para aquellas personas alérgicas
a limpiadores químicos o que están tratando de reducir el contenido de
químicos en el hogar. Aplique vapor a tapicería, cortinas, linos y tejidos del
hogar para limpiar y refrescarlos.
LIMPIEZA Y CUIDADO
Este producto no contiene piezas que se deban ser reparadas por el usuario.
Consulte a personal de servicio calificado.
LIMPIEZA DEL EXTERIOR DEL VAPORIZADOR
1. Asegúrese de que el vaporizador esté apagado, desenchufado y
enfriado completamente.
2. Limpie la superficie exterior de la placa para planchar con un paño
suave, húmedo. Agua y pequeñas cantidades de jabones suaves para el
hogar, como el líquido de fregrar, pueden ser utilizados en la superficie
exterior. Nunca utilice un limpiador fuerte ni almohadillas abrasivas que
podrían rayar o decolorar el vaporizador.
3. Después de secar bien el vaporizador, enciéndalo de nuevo y aplique
vapor ligeramente sobre un paño viejo. Esto ayudará a remover
cualquier residuo en los orificios de vapor.
4. Cuando haya terminado de limpiar, apague el vaporizador presionando
el botón de funcionamiento hasta que la luz azul se apague
(aproximadamente 3 segundos). Desenchufe el aparato, vacíe el tanque
y déle tiempo para que se enfríe antes de almacenar.
LIMPIEZA DE LOS ACCESORIOS
Para todos los accesorios, permita que se sequen completamente antes de
utilizar de nuevo o almacenar. Los accesorios no son aptos para ser lavados
en máquina lavaplatos.
• Accesorio para pelusas: Limpie con un paño húmedo.
• Accesorio para tejidos delicados: Lave con agua fría y pequeñas
cantidades de detergente suave, si es necesario. La tela del accesorio no
puede ser removida.
• Accesorio para tapicería: La tela del accesorio puede ser removida y
lavada a mano con agua fría y un detergente suave.

19
ALMACENAMIENTO DEL VAPORIZADOR
1. Verifique que el vaporizador esté desenchufado y enfriado
por completo.
2. Recoja y doble el cable en forma ovalada y suavemente
sujételo con la tira de Velcro. (L)
3. Siempre almacene el vaporizador en posición vertical
sobre su base para evitar goteos de agua.
Consejo: Es recomendado vaciar el tanque después de cada uso ya que el
agua estacionada puede dejar residuos con el tiempo.
CONSEJOS Y TRUCOS PARA APLICAR VAPOR
• Este vaporizador está diseñado para ser utilizado con agua destilada,
purificada o filtrada. El agua de llave contiene minerales que se
acumulan. El uso de perfumes o aditivos aromáticos tampoco es
recomendado.
• Siempre haga una prueba de las prendas, aplicando vapor en un área
pequeña que no sea visible para asegurarse de que la pendra responda
bien al vapor.
• Siempre lea las instrucciones de la etiqueta sobre el cuidado de la ropa.
Los ajustes de calor bajos requieren el uso del accesorio para tejidos
delicados.
• Prodría ocurrir que pequeñas cantidades de agua goteen durante el
uso. Si el goteo es excesivo, esto significa que el vaporizador necesita
tiempo para alcanzar la temperatura total. Solo espere un minuto para
que el vaporizador se recaliente.
• El ponerse las prendas inmediatamente después de planchar o aplicar
vapor puede crear arrugas. Siempre permita que las prendas se enfríen
unos 5 minutos después de planchar o aplicar vapor para fijar el planchado.
L

20
RESOLUCIÓN DE PROBLEMAS
Problema Causa Posible Solución
El vaporizador está
enchufado pero no calienta.
Hay un problema de
suministro de energía.
Verifique que el enchufe esté
insertado adecuadamente en
el tomacorriente o trate de
enchufar el vaporizador a un
tomacorriente diferente.
La función de apagado
automático se ha activado.
Presione el gatillo de vapor
o presione el botón de
funcionamiento para activar
el vaporizador.
No hay suficiente vapor o no
sale vapor del vaporizador.
El vaporizador no está
calentado a la temperatura
total.
Siempre permita que el
vaporizador se precaliente
por lo menos 45 segundos
o hasta que la luz del botón
de funcionamiento esté
constante en azul.
No hay suficiente agua en el
tanque de agua.
Siga las instrucciones en la
sección “Llenado del Tanque
de Agua” y llene al nivel de
agua marcado Max.
La bomba de agua no se ha
preparado.
Después del
precalentamiento, siempre
prepare la bomba de agua,
sosteniendo el gatillo de
vapor hasta que se forme
vapor para asegurar que haya
suficiente cantidad de agua
en el calentador.
Está saliendo agua
descolorida a través de los
orificios y está manchando
el tejido.
Se han acumulados residuos
en el tanque de agua.
Vacíe el tanque de agua
después de cada uso.
Solamente utilice agua
destilada, filtrada o purificada.
Se utilizaron aditivos
perfumados o aromáticos.
Limpie el vaporizador
regularmente y abstengasel
de utilizar aditivos
perfumados o aromáticos.
El vaporizador está goteando
o disparando agua.
El vaporizador no está lo
suficentemente caliente.
Permita que el vaporizador se
caliente por unos 45 segundos.
El tanque de agua está
funcionando con poca agua.
Siga las instrucciones en la
sección “Llenado del Tanque
de Agua” y llene al nivel de
agua marcado Max.
Si necesita ayuda adicional, por favor comuníquese con nuestro equipo de servicio para
el consumidor, llamando al número 1-800-231-9786.
La page est en cours de chargement...
La page est en cours de chargement...
La page est en cours de chargement...
La page est en cours de chargement...
La page est en cours de chargement...
La page est en cours de chargement...
La page est en cours de chargement...
La page est en cours de chargement...
La page est en cours de chargement...
La page est en cours de chargement...
La page est en cours de chargement...
La page est en cours de chargement...
La page est en cours de chargement...
La page est en cours de chargement...
La page est en cours de chargement...
La page est en cours de chargement...
-
 1
1
-
 2
2
-
 3
3
-
 4
4
-
 5
5
-
 6
6
-
 7
7
-
 8
8
-
 9
9
-
 10
10
-
 11
11
-
 12
12
-
 13
13
-
 14
14
-
 15
15
-
 16
16
-
 17
17
-
 18
18
-
 19
19
-
 20
20
-
 21
21
-
 22
22
-
 23
23
-
 24
24
-
 25
25
-
 26
26
-
 27
27
-
 28
28
-
 29
29
-
 30
30
-
 31
31
-
 32
32
-
 33
33
-
 34
34
-
 35
35
-
 36
36


Black & Decker HGS205 Series Mode d'emploi
- Taper
- Mode d'emploi
- Ce manuel convient également à
dans d''autres langues
Documents connexes
Autres documents
-
 Black and Decker Appliances HGS200 Series Mode d'emploi
-
BLACK+DECKER HGS200 Mode d'emploi
-
Hamilton Beach 11555 Mode d'emploi
-
BLACK+DECKER HGS100G Mode d'emploi
-
Techwood TDV-1501 Manuel utilisateur
-
Shark S3973 Le manuel du propriétaire
-
 Black and Decker Appliances GS110-GS120 Series Mode d'emploi
-
Reliable Dash 100GH Manuel utilisateur
-
-

