Weston 83-0750-W Mode d'emploi
- Catégorie
- Trancheuses
- Taper
- Mode d'emploi
Ce manuel convient également à

MEAT SLICER
7½”
LE INVITAMOS A LEER CUIDADOSAMENTE ESTE INSTRUCTIVO ANTES DE USAR SU APARATO.
DUE TO CONSTANT FACTORY IMPROVEMENTS, THE PRODUCT PICTURED MIGHT DIFFER
SLIGHTLY FROM THE PRODUCT IN THIS BOX.

TABLE OF CONTENTS / ÍNDICE / TABLE DES MATIÈRES
2
IMPORTANT SAFEGUARDS
COMPONENT LIST
OTHER CONSUMER SAFETY INFORMATION
DIRECTIONS FOR USE
CLEANING INSTRUCTIONS
WARRANTY
SALVAGUARDIAS IMPORTANTES
LISTA DE COMPONENTES
OTRA INFORMACIÓN DE SEGURIDAD PARA EL CLIENTE
INSTRUCCIONES DE USO
INSTRUCCIONES DE LIMPIEZA
INFORMACIÓN DE GARANTÍA WESTON
PRÉCAUTIONS IMPORTANTES
DESCRIPTION DE LA PIÈCE
AUTRES CONSIGNES DE SÉCURITÉ POUR LE CONSOMMATEUR
NOTICES D’EMPLOI
INSTRUCTIONS DE NETTOYAGE
INFORMATION SUR LA GARANTIE
3
4-5
6
7-8
9
10
12
14-15
16
17-18
19
20
22
23-25
26
27-28
29
30

1. Read all instructions.
2. This appliance is not intended
for use by persons with
reduced physical, sensory, or
mental capabilities, or lack of
experience and knowledge,
unless they are closely
supervised and instructed
concerning use of the appliance
by a person responsible for their
safety.
3. This appliance shall not be used
by children. Keep the appliance
and its cord out of reach of
children.
4. Close supervision is necessary
when any appliance is used near
children. Children should be
supervised to ensure that they
do not play with the appliance.
5. To protect against risk of
electrical shock, do not put the
meat slicer assembly, cord or
plug in water or other liquid.
6. Turn the appliance OFF( ), then
unplug from outlet when not in
use, before putting on or taking
o parts, and before cleaning.
To unplug, grasp the plug and
pull from the outlet. Never pull
from the power cord.
7. Avoid contacting moving parts.
Personal injury may occur. The
blade continues to spin after the
meat slicer has been turned o.
Never try to stop the blade in
any way whatsoever.
8. Do not operate any appliance
with a damaged supply cord
or plug, or after the appliance
malfunctions or has been
dropped or damaged in
any manner. Supply cord
replacement and repairs
must be conducted by the
manufacturer, its service agent,
or similarly qualied persons
in order to avoid a hazard.
Call the provided customer
service number for information
on examination, repair, or
adjustment.
9. The use of attachments
not recommended by the
manufacturer may cause re,
electrical shock, or injury.
10. Blade is sharp. Handle carefully,
especially when assembling,
disassembling, or cleaning. It
is recommended that cut-proof
Kevlar gloves be worn when
handling the blade.
11. Never feed food by hand.
Always use completely
assembled slicer with the food
carriage and food pusher.
12. Do not use outdoors.
13. Do not let cord hang over edge
of table or counter, or touch hot
surfaces, including the stove.
14. Do not place on or near a hot
gas or electric burner or in a
heated oven.
15. Check that the control is OFF
( ) before plugging cord into
wall outlet. To disconnect cord,
turn the control to OFF( ); then
remove plug from wall outlet.
16. Do not use appliance for other
than intended purpose.
17. Do not leave meat slicer
unattended while it is operating.
18. Keep hands, hair, clothing, and
any loose items away from the
moving blade.
19. Operate the meat slicer only
when the blade-locking screw is
properly engaged and tightened.
IMPORTANT SAFEGUARDS
SAVE THESE INSTRUCTIONS
3
ENGLISH INSTRUCTIONS
WHEN USING ELECTRICAL APPLIANCES, BASIC SAFETY
PRECAUTIONS SHOULD ALWAYS BE FOLLOWED TO REDUCE THE
RISK OF FIRE, ELECTRIC SHOCK, AND/OR INJURY TO PERSONS,
INCLUDING THE FOLLOWING:

ENGLISH INSTRUCTIONS
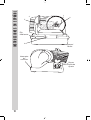
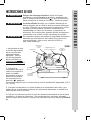
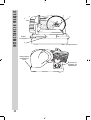
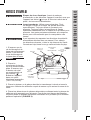
4
2
1
4
3
5
6
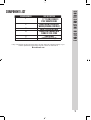
Power
Switch
Thickness
Adjustment
Knob
Sliding
Shaft
Body/Motor

ENGLISH INSTRUCTIONS
5
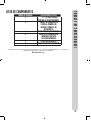
COMPONENT LIST
DIAGRAM NUMBER PART DESCRIPTION
1
7½” (19 CM) STAINLESS
STEEL SERRATED BLADE
2
BLADE LOCKING SCREW,LOCK
WASHER,RETAINING SCREWS(3)
3
GAUGE PLATE WITH SCREW
4
SLIDING FOOD CARRIAGE WITH
STAINLESS STEEL COVER
5
FOOD PUSHER
6
SUCTION CUP FOOT (4)
If any components of this unit are broken, the unit does not operate properly or you
need a replacement instruction manual, visit us on the web at
WestonBrands.com

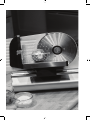
Before using your Meat Slicer for the
rst time, wash all parts thoroughly,
taking particular care to remove
all grease and oil from surfaces.
Dry all parts thoroughly before
reassembling. See “Cleaning
Instructions” section of this booklet.
PRIOR TO USE
FIGURE 1
CAUTION!
SHARP
BLADE!
ENGLISH INSTRUCTIONS
6
This appliance is intended for household use only.
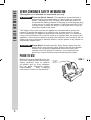
OTHER CONSUMER SAFETY INFORMATION
Electrical Shock Hazard.
This appliance is provided with a
polarized plug (one wide blade) to reduce the risk of electric
shock. The plug fits only one way into a polarized outlet. Do
not defeat the safety purpose of the plug by modifying the plug
in any way or by using an adapter. If the plug does not fit fully
into the outlet, reverse the plug. If it still does not fit, have an
electrician replace the outlet.
The length of the cord used on this appliance was selected to reduce the
hazards of becoming tangled in or tripping over a longer cord. If a longer
cord is necessary, an approved extension cord may be used. The electrical
rating of the extension cord must be equal to or greater than the rating of the
appliance. Care must be taken to arrange the extension cord so that it will not
drape over the countertop or tabletop where it can be pulled on by children or
accidentally tripped over.
Sharp Blade. Handle carefully. Keep fingers away from the
blade. Never feed food by hand. Always use the food pusher.
Always use completely assembled meat slicer with food
carriage and food pusher. Protective, cut-resistant Kevlar
gloves are recommended whenever handling the blade.
w WARNING
w CAUTION

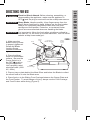
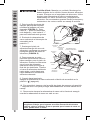
1. Make sure the
Blade Locking Screw
is properly tightened.
Rotate the Blade
Locking Screw
counter-clockwise to
tighten.
2. Place the Meat
Slicer on a at stable
surface. Be sure the
Power Switch is in
the OFF( ) position.
Plug the appliance
into a properly rated
electrical outlet (120V
AC, 60Hz).
3. Place a tray or plate behind the Meat Slicer and below the Blade to collect
the sliced food as it exits the Blade area.
4. Place food on to the Sliding Food Carriage between the Gauge Plate and
the Food Pusher. To avoid danger of injury, always use the Food Carriage
and Food Pusher while slicing (Figure 2).
DIRECTIONS FOR USE
FIGURE 2
Food
Pusher
Sliding
Food Carriage
CAUTION!
SHARP BLADE!
Food
Blade
Locking
Screw
Gauge
Plate
PRIOR TO USE
ENGLISH INSTRUCTIONS
7
Electrical Shock Hazard. Before cleaning, assembling, or
disassembling the appliance, make sure the appliance is
OFF( ) and the plug is removed from the outlet/power source.
Sharp Blade. Handle carefully. Keep fingers away from the
blade. Never feed food by hand. Always use the food pusher.
Always use completely assembled meat slicer with food
carriage and food pusher. Protective, cut-resistant Kevlar
gloves are recommended whenever handling the blade.
w WARNING
w CAUTION
It is important to follow the food safety guidelines outlined in
this manual. For the most up-to-date instruction, visit the USDA
website at http://www.usda.gov/.
w CAUTION

NOTE: Do not operate the appliance continuously for more than
10 minutes. Be sure to allow the appliance to cool down for 30-60
minutes before operating again. Failure to allow the slicer motor to
cool down may result in damage to the motor.
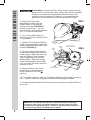
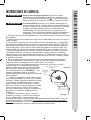
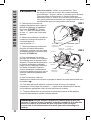
5. Rotate the Thickness
Adjustment Knob to set the
Gauge Plate to the desired
cutting thickness (FIGURE 3).
Rotate towards the “-” for the
thinnest slice, and rotate towards
the “+” for the thickest slice.
6. Turn on the Meat Slicer by
switching the Power Switch to the
“I” on position.
7. Hold the Food Pusher/Sliding
Food Carriage Handle; keep your
hands protected behind the Food
Pusher (FIGURE 4).
8. To begin slicing, push food in
toward the Gauge Plate with the
Food Pusher. Slide the food over
with the Sliding Food Carriage
until it reaches the end of the
Sliding Shaft. Slide the Sliding
Food Carriage back and repeat
until you have sliced the desired
amount of food.
9. When nished, turn o the
Meat Slicer by switching the
Power Switch to the OFF( )
position.
10. For safety, always rotate the Thickness Adjustment Knob all the way to
the “-” position after use to properly shield the sharp edge of Blade.
11. Always disconnect Meat Slicer from power source when the Meat Slicer is
not in use.
FIGURE 3
Thickness
Adjustment
Knob
FIGURE 4
Hold
Here
CAUTION!
SHARP BLADE!
Food
Pusher
Sliding
Food Carriage
Gauge
Plate
Sliding
Shaft
ENGLISH INSTRUCTIONS
8
Sharp Blade. Handle carefully. Keep fingers away from the
blade. Never feed food by hand. Always use the food pusher.
Always use completely assembled meat slicer with food
carriage and food pusher. Protective, cut-resistant Kevlar
gloves are recommended whenever handling the blade.
w CAUTION

CLEANING INSTRUCTIONS
1. Always disconnect the Meat Slicer from the power source before cleaning.
2. Never immerse the Motor Assembly of the Meat Slicer in water or other
liquid.
3. The Blade, Food Pusher, and Food Tray can all be hand washed in hot
soapy water. Because these parts come in contact with food, they should be
sanitized properly. Allow sanitized parts to air dry. Do not use harsh abrasives
to clean any part of the Meat Slicer. Use extreme caution when handling or
cleaning the Blade, as it is extremely sharp! Do not leave Blade underwater;
trying to handle sharp objects in water can be hazardous. It is highly
recommended to wear cut-resistant Kevlar Gloves when removing, cleaning
and re-installing the Blade.
4. Rotate the Thickness Adjustment Knob all the way to the “-” position.
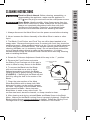
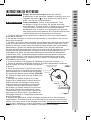
5. Remove the Food Pusher and rotate
the Sliding Food Carriage out of the way in
order to allow for easy access to the Blade.
6. To remove the Blade hold the Blade
with one hand and use a coin or small
athead screwdriver to unlock the Blade
Locking Screw by gently turning it clockwise
(FIGURE 5). Carefully pull the Blade o and
hold it by using the hole in the center of the
Blade.
7. Clean the outer surface of the Meat
Slicer Body/Motor with a damp cloth. Mild
detergent or water can be used to dampen
the cloth. Wipe away from the Blade, Never
wipe toward the Blade. Never immerse
Body/Motor in water or any other liquid. Do
not use steel wool, abrasive cleaners, or sharp utensils to clean.
9. After cleaning and drying, reinstall Blade and Blade Screw to the Body/
Motor. Make sure the Blade Locking Screw is properly tightened. Rotate the
Blade Locking Screw counter-clockwise to tighten. Rotate the Sliding Food
Carriage back to its proper position and re-install the Food Pusher.
CAUTION SHARP
Blade
Blade
Locking
Screw
FIGURE 5
ENGLISH INSTRUCTIONS
9
Electrical Shock Hazard. Before cleaning, assembling, or
disassembling the appliance, make sure the appliance is
OFF( ) and the plug is removed from the outlet/power source.
Sharp Blade. Handle carefully. Keep fingers away from the
blade. Never feed food by hand. Always use the food pusher.
Always use completely assembled meat slicer with food
carriage and food pusher. Protective, cut-resistant Kevlar
gloves are recommended whenever handling the blade.
w WARNING
w CAUTION

10
ONE-YEAR LIMITED WARRANTY
This warranty applies to products purchased and used in the U.S. and Canada. This is the only
express warranty for this product and is in lieu of any other warranty or condition.
This product is warranted to be free from defects in material and workmanship for a period of
one (1) year from the date of original purchase. During this period, your exclusive remedy is
repair or replacement of this product or any component found to be defective, at our option. If
the product or component is no longer available, we will replace with a similar one of equal or
greater value.
This warranty does not cover unauthorized repairs or service to products, products sold
“as-is” by retailers, glass, filters, wear from normal use, use not in conformity with the printed
directions, or damage to the product resulting from accident, alteration, abuse, or misuse.
This warranty extends only to the original consumer purchaser or gift recipient and is not
transferable. Keep the original sales receipt, as proof of purchase is required to make a
warranty claim. This warranty is void if the product is subjected to any voltage and waveform
other than as specified on the rating label (e.g., 120V ~ 60 Hz).
We exclude all claims for special, incidental and consequential damages caused by breach of
express or implied warranty. All liability is limited to the amount of the purchase price. Every
implied warranty, including any statutory warranty or condition of merchantability or
fitness for a particular purpose, is disclaimed except to the extent prohibited by law, in
which case such warranty or condition is limited to the duration of this written warranty.
This warranty gives you specific legal rights. You may have other legal rights that vary
depending on where you live. Some states or provinces do not allow limitations on implied
warranties or special, incidental, or consequential damages, so the foregoing limitations may
not apply to you.
To make a warranty claim, do not return this appliance to the store. Visit WestonBrands.com.
For faster service, locate the model, type, and series numbers on your appliance.

REBANADORA DE CARNE
DE 7½”
DEBIDO A CONSTANTES MEJORAS EN LA FÁBRICA, EL PRODUCTO QUE SE MUESTRA
PUEDE SER LIGERAMENTE DIFERENTE DEL PRODUCTO EN ESTA CAJA.

SALVAGUARDIAS IMPORTANTES
12
INSTRUCCIONES EN ESPAÑOL
GUARDE ESTAS INSTRUCCIONES
CUANDO UTILICE ARTEFACTOS ELÉCTRICOS, SIEMPRE DEBEN
SEGUIRSE PRECAUCIONES DE SEGURIDAD BÁSICAS A FIN DE REDUCIR
EL RIESGO DE INCENDIO, DESCARGA ELÉCTRICA, Y/O LESIONES A
PERSONAS, INCLUYENDO LAS SIGUIENTES:
1. Lea todas las instrucciones.
2. Este electrodoméstico no está
diseñado para ser utilizado por
personas con capacidades
físicas, sensoriales o mentales
reducidas, o por falta de experiencia
y conocimiento, a menos que
sean supervisadas e instruidas
estrechamente por una persona
responsable de su seguridad con
respecto al uso del artefacto.
3. Este electrodoméstico no debe ser
utilizado por niños. Mantenga el
electrodoméstico y su cable fuera del
alcance de los niños.
4. Se requiere de una estrecha
supervisión cuando el aparato se
use por o cerca de niños. Los niños
deben supervisarse para asegurar
que ellos no empleen los aparatos
como juguete.
5. Para protegerse contra el riesgo
de descarga eléctrica, no coloque
el ensamblaje de la cortadora de
carne, el cable o el enchufe en agua
u otro líquido.
6. APAGUE el electrodoméstico
( ) y, después, desenchúfelo del
tomacorriente cuando no esté en
uso, antes de armar o desarmar
piezas y antes de limpiarlo. Para
desenchufarlo, tome el enchufe y
retírelo del tomacorriente. Nunca tire
del cable eléctrico.
7. Evite contactar partes móviles.
Lesiones personales pueden
ocurrir La cuchilla continúa girando
después de que la cortadora de
carne ha sido apagada. Nunca
intente detener la cuchilla de
ninguna manera.
8. No opere ningún artefacto con
un cable o enchufe de suministro
dañado, ni después de que el
electrodoméstico funcione mal o
se haya caído o dañado de alguna
manera. El reemplazo del cable de
suministro y las reparaciones deben
ser realizadas por el fabricante,
su agente de servicio o personas
calicadas similarmente para evitar
un peligro. Llame al número de
servicio al cliente proporcionado
para obtener información sobre el
examen, la reparación o el ajuste.
9. El uso de accesorios no
recomendados por el fabricante
puede provocar incendios,
descargas eléctricas o lesiones.
10. La cuchilla es losa. Maneje
con cuidado, especialmente al
ensamblar, desmontar o limpiar. Se
recomienda usar guantes Kevlar
resistentes al corte cuando se
maneja la cuchilla.
11. Nunca alimente alimentos a mano.
Utilice siempre una máquina de
cortar completamente ensamblada
con el carro de alimentos y el
empujador de alimentos.
12. No lo use al aire libre.
13. No permita que el cable cuelgue del
borde de la mesa o mostrador, ni
toque supercies calientes, incluida
la estufa.
14. No lo coloque sobre o cerca de
un quemador de gas o eléctrico
caliente o en un horno caliente.
15. Verique que el control esté en
OFF( ) antes de enchufar el
cable a la toma de corriente. Para
desconectar el cable, gire el control
a OFF( ); luego retire el enchufe de
la toma de corriente.
16. No use el aparato para otro
propósito que no sea el previsto.
17. No deje desatendida la rebanadora
de carne mientras está en
funcionamiento.
18. Mantenga las manos, el cabello, la
ropa y cualquier objeto suelto lejos
de la cuchilla en movimiento.
19. Opere la rebanadora de carne
solo cuando el tornillo de bloqueo
de la cuchilla esté correctamente
enganchado y apretado.


2
1
4
3
5
6
Interruptor
de
corriente
Grosor
Perilla de
Ajuste
Eje
deslizante
Cuerpo/
Motor
14
INSTRUCCIONES EN ESPAÑOL

LISTA DE COMPONENTES
NÚMERO DE DIAGRAMA DESCRIPCIÓN DE LA PIEZA
1
7½” (19 CM) CUCHILLA
DENTADO DE ACERO INOXIDABLE
2
TORNILLO DE BLOQUEO DE LA
CUCHILLA, ARANDELA DE
BLOQUEO, TORNILLOS DE
RETENCIÓN (3)
3
PLACA MEDIDORA CON TORNILLO
4
CARRO DE DESLIZAMIENTO DE
ALIMENTOS CON TAPA
DE ACERO INOXIDABLE
5
PISÓN PARA ALIMENTOS
6
PATA CON COPA DE SUCCIÓN (4)
15
INSTRUCCIONES EN ESPAÑOL
Si cualquier componente de esta unidad está roto, si no funciona debidamente, o si necesita un
instructivo de repuesto, visítenos en la Web en
WestonBrands.com

16
INSTRUCCIONES EN ESPAÑOL
Antes de utilizar su rebanadora de
carne por primera vez, lave muy
bien todas las partes, teniendo
especial cuidado de quitar toda la
grasa y aceite de las supercies.
Seque muy bien todas las piezas
antes de volver a ensamblar. Ver
la sección de “Instrucciones de
Limpieza” de este cuadernillo.
ANTES DE USAR
FIGURA 1
ADVERTENCIA
¡NAVAJA
FILOSA!
La longitud del cable utilizado en este electrodoméstico se seleccionó para
reducir los riesgos de enredarse o tropezarse con un cable más largo. Si
es necesario un cable más largo, se puede usar un cable de extensión
aprobado. La clasicación eléctrica del cable de extensión debe ser igual o
mayor que la clasicación del dispositivo. Se debe tener cuidado para colocar
el cable de extensión de modo que no cuelgue sobre el mostrador o sobre la
mesa donde los niños puedan tirar de él o tropezarse accidentalmente.
OTRA INFORMACIÓN DE SEGURIDAD PARA EL CLIENTE
Peligro de descarga eléctrica. Este aparato está
provisto de un enchufe polarizado (una cuchilla ancha)
para reducir el riesgo de descarga eléctrica. El enchufe
se adapta solo de una manera a una toma polarizada.
No anule el propósito de seguridad del enchufe
modificando el enchufe de ninguna manera o usando un
adaptador. Si el enchufe no encaja completamente en la
toma de corriente, invierta el enchufe. Si todavía no se
ajusta, haga que un electricista reemplace la toma de
corriente.
Cuchilla afilada. Manejar con cuidado. Mantenga los
dedos alejados de la cuchilla. Nunca alimente alimentos
a mano. Siempre use el empujador de alimentos. Utilice
siempre una rebanadora de carne completamente
ensamblada con carro de alimentos y empujador de
alimentos. Se recomiendan guantes Kevlar protectores y
resistentes a los cortes cuando se maneja la cuchilla.
w ADVERTENCIA
w PRECAUCIÓN
Este electrodoméstico está diseñado solo para uso doméstico.

17
INSTRUCCIONES EN ESPAÑOL
1. Asegúrese de que
el tornillo de bloqueo
de la cuchilla esté
adecuadamente
apretado. Rote el
tornillo de bloqueo
de la cuchilla en la
dirección contraria a
las manecillas del reloj
para apretar.
2. Coloque la
rebanadora de carne
sobre una supercie
plana y estable.
Asegúrese de que el
botón de encendido
se encuentre en la
posición “ ”, apagado.
Conecte la máquina en un tomacorriente con la clasicación apropiada (120 V
AC, 60 Hz).
3. Coloque una bandeja o un plato detrás de la rebanadora de carne y por
debajo de la cuchilla para recolectar los alimentos rebanados a medida que
salen del área de la cuchilla.
4 Coloque los alimentos sobre el carro de alimentos deslizable entre la placa
medidora y el pisón de alimentos. Para evitar daños o lesiones, siempre
utilice el carro de alimentos y el pisón de alimentos mientras rebana (FIGURA
2).
INSTRUCCIONES DE USO
FIGURA 2
Pisón de
Alimentos
Carro de
alimentos
deslizable
¡ADVERTENCIA!
¡NAVAJA FILOSA!
Alimentos
Navaja
Tornillo de
bloqueo
Medidor de
presión
Placa
ANTES DE USAR
Peligro de descarga eléctrica. Antes de limpiar,
ensamblar o desensamblar el artefacto, asegúrese de
que el artefacto esté APAGADO( ) y que el enchufe se
haya retirado de la toma de corriente / fuente de poder.
Cuchilla afilada. Manejar con cuidado. Mantenga los
dedos alejados de la cuchilla. Nunca alimente alimentos
a mano. Siempre use el empujador de alimentos. Utilice
siempre una rebanadora de carne completamente
ensamblada con carro de alimentos y empujador de
alimentos. Se recomiendan guantes Kevlar protectores y
resistentes a los cortes cuando se maneja la cuchilla.
Es importante seguir las pautas de seguridad alimentaria
descritas en este manual. Para obtener la instrucción
más actualizada, visite el sitio web del USDA en
http://www.usda.gov/.
w ADVERTENCIA
w PRECAUCIÓN
w PRECAUCIÓN

18
INSTRUCCIONES EN ESPAÑOL
5. Rote la perilla de ajuste del
espesor para ajustar la placa
medidora al espesor de corte
deseado (FIGURA 3). Rote
hacia el “-” para una rebanada
más delgada, y rote hacia el “+”
para una rebanada más gruesa.
6. Encienda la rebanadora de
carne colocando el interruptor de
encendido en la
posición “I”.
7. Sostenga el pisón de
alimentos/mango del carro de
alimentos; mantenga sus manos
protegidas detrás del pisón de
alimentos (FIGURA 4).
8. Para comenzar a cortar,
presione los alimentos hacia la
placa medidora con el pisón de
alimentos. Deslice los alimentos
con el carro de alimentos
deslizante hasta que llegue al
nal del eje deslizante. Deslice
el carro de alimentos deslizante
hacia atrás y repita hasta que
haya rebanado la cantidad de
alimentos deseada.
9. Cuando haya terminado,
apague la rebanadora de carne colocando el botón de encendido en la
posición “ ” (apagado).
10. Por seguridad, siempre rote la perilla de ajuste de espesor a la posición
“-” después de su uso para proteger adecuadamente el borde alado de la
navaja.
11. Desconecte siempre la rebanadora de carne de la fuente de energía
cuando la rebanadora de carne no esté en uso.
FIGURA 3
Grosor
Perilla de
ajuste
FIGURA 4
Sostenga
Aquí
ADVERTENCIA
¡NAVAJA FILOSA!
Alimentos
Pisón
Carro de
alimentos
deslizable
Medidor de
presión
molido
Eje
deslizable
Cuchilla afilada. Manejar con cuidado. Mantenga los
dedos alejados de la cuchilla. Nunca alimente alimentos
a mano. Siempre use el empujador de alimentos. Utilice
siempre una rebanadora de carne completamente
ensamblada con carro de alimentos y empujador de
alimentos. Se recomiendan guantes Kevlar protectores y
resistentes a los cortes cuando se maneja la cuchilla.
w PRECAUCIÓN
NOTA: No opere el artefacto continuamente por más de 10 minutos.
Asegúrese de dejar que el aparato se enfríe durante 30-60 minutos
antes de volver a utilizarlo. Si no se permite que el motor de corte se
enfríe, puede dañar el motor.

19
INSTRUCCIONES EN ESPAÑOL
INSTRUCCIONES DE LIMPIEZA
Figure 5
CUIDADO, NAVAJA
FILOSA
Tornillo de
de bloqueo
de la
navaja
1. Siempre desconecte la rebanadora de carne de la fuente de corriente antes
de limpiarla.
2. Nunca sumerja el conjunto del motor de la rebanadora de carne en agua u
otros líquidos.
3. La cuchilla, el protector de la cuchilla, el pisón de alimentos, y la bandeja
de alimentos pueden lavarse a mano en agua caliente con jabón. Debido a
que estas partes entran en contacto con alimentos, deben desinfectarse de
forma adecuada. Deje que las partes desinfectadas se sequen al aire. No
utilice abrasivos fuertes para limpiar ninguna parte del rebanador de carne.
¡Tenga extrema precaución cuando manipule o limpie la cuchilla, ya que es
sumamente alada! No deje la cuchilla bajo el agua; tratar de manipular
objetos losos en el agua puede ser peligroso. Es altamente recomendable
utilizar guantes de Kevlar resistentes a los cortes al remover, limpiar y volver
a instalar la cuchilla.
4. Rote completamente la perilla de ajuste del espesor hasta la posición “-” .
5. Quite el prensador de alimentos y gire el carro de alimentos deslizable
fuera del camino para permitir un acceso fácil a la cuchilla.
6. Para remover la cuchilla sostenga la cuchilla con una mano y utilice
una moneda o un destornillador de pala
pequeño para soltar el tornillo de bloqueo
de la cuchilla, girándolo en el sentido de
las manecillas del reloj (FIGURA 5). De
manera cuidadosa, jale la cuchilla y
sosténgala utilizando el agujero en el centro
de la cuchilla.
7. Limpie la supercie exterior del cuerpo/
motor del rebanador de carne con un paño
húmedo. Puede utilizarse detergente suave
o agua para humedecer el paño. Limpie
hacia afuera de la cuchilla, Nunca limpie
hacia la cuchilla. Nunca sumerja el cuerpo/
motor en agua ni en ningún otro líquido.
No utilice esponjillas de acero, limpiadores
abrasivos, o utensilios alados para la
limpieza.
8. Después de limpiar y secar, vuelva a
instalar la navaja y el tornillo de la navaja
en el cuerpo/motor. Asegúrese de que
el tornillo de bloqueo de la cuchilla esté adecuadamente apretado. Gire el
tornillo de bloqueo de la cuchilla en la dirección contraria a las manecillas
del reloj para apretar. Gire el carro de alimentos deslizable de regreso a su
posición apropiada y vuelva a instalar el pisón de alimentos.
Peligro de descarga eléctrica. Antes de limpiar,
ensamblar o desensamblar el artefacto, asegúrese de
que el artefacto esté APAGADO( ) y que el enchufe se
haya retirado de la toma de corriente / fuente de poder.
Cuchilla afilada. Manejar con cuidado. Mantenga los
dedos alejados de la cuchilla. Nunca alimente alimentos
a mano. Siempre use el empujador de alimentos. Utilice
siempre una rebanadora de carne completamente
ensamblada con carro de alimentos y empujador de
alimentos. Se recomiendan guantes Kevlar protectores y
resistentes a los cortes cuando se maneja la cuchilla.
w ADVERTENCIA
w PRECAUCIÓN

20
Grupo HB PS, S.A. de C.V.
Monte Elbruz No. 124 – 401
Col. Polanco V Sección, Miguel Hidalgo
Ciudad de México, C.P. 11560
GARANTÍA PARA PRODUCTOS COMPRADOS EN MÉXICO
PRODUCTO: MARCA: MODELO:
Grupo HB PS, S.A. de C.V. cuenta con Centros de Servicio autorizados. Por favor consulte en la lista anexa el nombre y dirección
de los establecimientos en la República Mexicana en dónde usted podrá hacer efectiva la garantía, obtener partes, componen
consumibles y accesorios; así como también obtener servicio para productos fuera de garantía. Para mayor información llame al:
Centro de Atención al Consumidor: 800 95 30 121
Grupo HB PS, S.A. de C.V. le otorga a partir de la fecha de compra:
GARANTÍA DE 1 AÑO.
COBERTURA
• Esta garantía ampara, todas las piezas y componentes del producto que resulten con defecto de fabricación incluyendo la mano
de obra.
• Grupo HB PS, S.A. de C.V. se obliga a reemplazar, reparar o reponer, cualquier pieza o componente defectuoso; proporcionar la
mano de obra necesaria para su diagnóstico y reparación, todo lo anterior sin costo adicional para el consumidor.
• Esta garantía incluye los gastos de transportación del producto que deriven de su cumplimiento dentro de su red de servicio.
LIMITACIONES
• Esta garantía no ampara el reemplazo de piezas deterioradas por uso o por desgaste normal, como son: cuchillas, vasos, jarras,
filtros, etc.
• Grupo HB PS, S.A. de C.V. no se hace responsable por los accidentes producidos a consecuencia de una instalación eléctrica
defectuosa, ausencia de toma de tierra, clavija o enchufe en mal estado, etc.
EXCEPCIONES
Esta garantía no será efectiva en los siguientes casos:
a) Cuando el producto se hubiese utlizado en condiciones distintas a las normales. (Uso industrial, semi-industrial o comercial.)
b) Cuando el producto no hubiese sido operado de acuerdo con el instructivo de uso.
c) Cuando el producto hubiese sido alterado o reparado por personas no autorizadas por Grupo HB PS, S.A. de C.V. el
fabricante nacional, importador o comercializador responsable respectivo.
El consumidor puede solicitar que se haga efectiva la garantía ante la propia casa comercial donde adquirió su producto, siempre y
cuando Grupo HB PS, S.A. de C.V. no cuente con talleres de servicio.
PROCEDIMIENTO PARA HACER EFECTIVA LA GARANTÍA
• Para hacer efectiva la garantía, lleve su aparato al Centro de Servicio Autorizado más cercano a su domicilio (consulte la lista
anexa).
• Si no existe Centro de Servicio Autorizado en su localidad llame a nuestro Centro de Atención al Consumidor para recibir instruc-
ciones de cómo hacer efectiva su garantía.
FECHA DE
ENTREGA
SELLO DEL
VENDEDOR
QUEJAS Y SUGERENCIAS
DÍA___
MES___
AÑO___
• Si desea hacer comentarios o sugerencias con respecto a nuestro servicio o tiene alguna
queja derivada de la atención recibida en alguno de nuestros Centros de Servicio Autoriza-
dos, por favor dirigirse a:
GERENCIA INTERNACIONAL DE SERVICIO - 800 95 30 121
Email: [email protected]
CENTROS DE SERVICIO AUTORIZADOS
Ciudad de México
ELECTRODOMÉSTICOS
Av. Plutarco Elias Calles No. 1499
Zacahuitzco, Benito Juárez, Ciudad de México, C.P. 09490
Tel: 55 5235 2323
CASA GARCÍA
Av. Patriotismo No. 875-B
Mixcoac, Benito Juárez, Ciudad de México, C.P. 03910
Tel: 55 5563 8723
Nuevo León
FERNANDO SEPÚLVEDA REFACCIONES
Ruperto Martínez No. 238 Ote.
Col. Centro, Monterrey, N.L., C.P. 64000
Tel: 81 8343 6700
Jalisco
SERVICIOS DE MANTENIMIENTO CASTILLO
Garibaldi No. 1450
Ladrón de Guevara, Guadalajara, Jalisco, C.P. 44660
Tel: 33 3825 3480
Modelo(s): Tipos: Características Eléctricas:
83-0750-* MS01 120 V~ 60 Hz 200 W
83-0770-GK MS01 120 V~ 60 Hz 150 W
Los modelos incluidos en el instructivo de Uso y Cuidado pueden ir seguidos o no por un sujo cor-
respondiente a una o varias letras del alfabeto y sus combinaciones, separadas o no por un espacio,
coma, diagonal, o guión. *Como ejemplos los sujos pueden ser: “W”, “RT”, “RE” y/o “GK”.
La page est en cours de chargement...
La page est en cours de chargement...
La page est en cours de chargement...
La page est en cours de chargement...
La page est en cours de chargement...
La page est en cours de chargement...
La page est en cours de chargement...
La page est en cours de chargement...
La page est en cours de chargement...
La page est en cours de chargement...
La page est en cours de chargement...
La page est en cours de chargement...
-
 1
1
-
 2
2
-
 3
3
-
 4
4
-
 5
5
-
 6
6
-
 7
7
-
 8
8
-
 9
9
-
 10
10
-
 11
11
-
 12
12
-
 13
13
-
 14
14
-
 15
15
-
 16
16
-
 17
17
-
 18
18
-
 19
19
-
 20
20
-
 21
21
-
 22
22
-
 23
23
-
 24
24
-
 25
25
-
 26
26
-
 27
27
-
 28
28
-
 29
29
-
 30
30
-
 31
31
-
 32
32


Weston 83-0750-W Mode d'emploi
- Catégorie
- Trancheuses
- Taper
- Mode d'emploi
- Ce manuel convient également à
dans d''autres langues
- English: Weston 83-0750-W User guide
- español: Weston 83-0750-W Guía del usuario
Documents connexes
-
Weston 83-0750-W Mode d'emploi
-
-
-
-
-
-
Weston 01-0008-W Le manuel du propriétaire
-
-
-