Panasonic INVERTER NNQ553W Le manuel du propriétaire
- Catégorie
- Micro-ondes
- Taper
- Le manuel du propriétaire

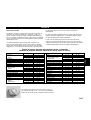
For models
Microwave Cookery Book
Mikrowellen Kochbuch
Magnetron Kookboek
Livre de recettes pour micro-ondes
Ricettario per forno a microonde
Recetario para Microondas
Livro de Cozedura de Microondas
Ksiqżka kucharska dla kuchni mikrofalowej
√‰ËÁfi˜ ª·ÁÂÈÚÈ΋˜ ªÈÎÚÔÎ˘Ì¿ÙˆÓ
NN
F623
NN
F663
NN
Q653
NN
Q623
NN
Q653
NN
F653

For further information, please also refer to the operating instructions.
Weitere Informationen entnehmen Sie bitte der beigelegten Bedienungsanleitung.
Voor meer informatie verwijzen wij U naar de gebruiksaanwijzing.
Pour plus d’informations veuillez vous référer à notre mode d’emploi.
Per ulteriori informazioni, si prega di consultare anche le istruzioni d’uso.
Para más información, consulte el manual de instrucciones.
Para mais informações, consulte o manual de instruções.
Bliższc szczegóły dotyczące danego
modelu podane są w fabrycznej instrukcji obsługi.
°È· Û˘ÌÏËڈ̷ÙÈΤ˜ ÏËÚÔÊÔڛ˜ Û˘Ì‚Ô˘Ï¢ı›ÙÂ Î·È ÙÔ ‚È‚ÏÈ¿ÚÈÔ Ì ÙȘ Ô‰ËÁ›Â˜ ¯Ú‹Ûˆ˜.
© Copyrighted by Matsushita Electric UK, Ltd 2003

En-1
English
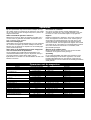
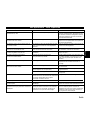
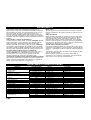
The items in this book are guidelines only. The total time will vary depending on the starting temperature of the food and the container used.
Always check if the food is piping hot before consumption.
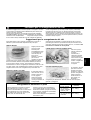
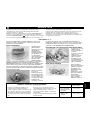
Inverter technology is the key
Inverter technology for microwave ovens has been developed by a Panasonic initiative over a period of more than 10 years. It is the key
technology for making a very different type of microwave oven which has a number of special qualities:
• It makes possible the first oven in the industry which controls the amount of microwave energy linearly. This new distribution system allows
cooking and defrosting food without losing its flavour.
• It provides efficient conversion of electrical energy to microwave energy, resulting in minimizing power requirements without sacrificing
microwave output.
• It allows a dramatic enlargement of oven cavity size even in a compact oven body, due to the small size of the inverter circuit, which
replaces the currently used bulky transformer.
• Finally, at the end of the product’s useful life, not using bulky transformers made of iron makes the process of recycling discarded ovens
environmentally friendly.
Cooking with Microwave Energy . . . . . . . . . . . . . . . . . . . . . . . . . . . .2
General Guidelines . . . . . . . . . . . . . . . . . . . . . . . . . . . . . . . . . . . . .2-3
Quick Check Guide to Cooking Utensils . . . . . . . . . . . . . . . . . . . . . .4
Microwave Power Levels . . . . . . . . . . . . . . . . . . . . . . . . . . . . . . . . . .5
Grilling . . . . . . . . . . . . . . . . . . . . . . . . . . . . . . . . . . . . . . . . . . . . . . . .5
Combination Cooking . . . . . . . . . . . . . . . . . . . . . . . . . . . . . . . . . . . . .5
Accessories to Use . . . . . . . . . . . . . . . . . . . . . . . . . . . . . . . . . . . . . .5
Reheating . . . . . . . . . . . . . . . . . . . . . . . . . . . . . . . . . . . . . . . . . . . . . .6
Reheating by Microwave . . . . . . . . . . . . . . . . . . . . . . . . . . . . . . . . .6-7
Microwaving Cooking Tips . . . . . . . . . . . . . . . . . . . . . . . . . . . . . . . . .8
Defrosting Guidelines . . . . . . . . . . . . . . . . . . . . . . . . . . . . . . . . . . . . .9
Defrosting Common Foods . . . . . . . . . . . . . . . . . . . . . . . . . . . . . . .10
Combination Cooking and Reheating Charts . . . . . . . . . . . . . . .11-13
Meat & Poultry . . . . . . . . . . . . . . . . . . . . . . . . . . . . . . . . . . . . . .14-15
Fish . . . . . . . . . . . . . . . . . . . . . . . . . . . . . . . . . . . . . . . . . . . . . . . . .16
Vegetables . . . . . . . . . . . . . . . . . . . . . . . . . . . . . . . . . . . . . . . . . . . .17
Eggs & Cheese . . . . . . . . . . . . . . . . . . . . . . . . . . . . . . . . . . . . . . . .18
Rice, Pasta, Dried Vegetables & Jacket Potatoes . . . . . . . . . . . . . .18
Common Queries Answered . . . . . . . . . . . . . . . . . . . . . . . . . . . . . .19
Contents

En-2
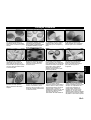
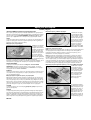
General Guidelines
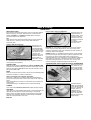
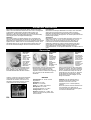
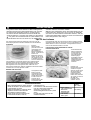
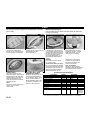
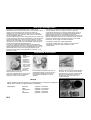
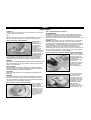
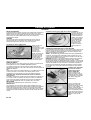
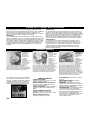
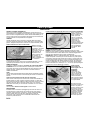
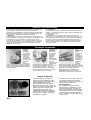
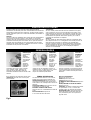
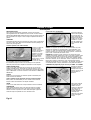
PIERCING
The skin or
membrane on
some foods
will cause
steam to build
up during
cooking.
These foods
must be
pierced or a
strip of skin
should be peeled off before cooking to allow
the steam to escape. Eggs, potatoes, apples,
sausages etc, will all need to be pierced
before cooking. DO NOT ATTEMPT TO BOIL
EGGS IN THEIR SHELLS.
MOISTURE
CONTENT
Many fresh
foods e.g.
vegetables
and fruit, vary
in moisture
content
throughout the
season.
Jacket
potatoes are a
particular example of this. For this reason
cooking times may have to be adjusted
throughout the year. Dry ingredients e.g. rice,
pasta, can dry out further during storage and
cooking times may differ from ingredients
freshly purchased.
CLING FILM
Cling film
helps keep the
food moist
and the
trapped steam
assists in
speeding up
cooking times.
However it
should be
pierced before
cooking, to allow excess steam to escape.
Always take care when removing cling film
from a dish as the build-up of steam will be
very hot. Always purchase cling film that
states on the packet “suitable for microwave
cooking” and use as a covering only. Do not
line dishes with cling film.
VEGETABLES - Boiled potatoes benefit
from standing for 1-2 mins., however most
other types of vegetables can be served
immediately.
DEFROSTING - It is essential to allow
standing time to complete the process. This
can vary from 5 mins. e.g. raspberries, to
up to 1 hour for a joint of meat.
If food is not cooked after
STANDING
TIME, return to oven and cook for
additional time.
Dense foods e.g. meat, jacket potatoes and
cakes, require a STANDING TIME (inside or
outside of the oven) after cooking, to allow
heat to finish conducting to cook the centre
completely.
STANDING TIME
MEAT JOINTS -
Stand 8 - 10 mins. wrapped in tin foil.
JACKET POTATOES -
Stand 5 mins. wrapped in tin foil.
LIGHT CAKES - Stand 5 mins. before
removing from dish.
RICH DENSE CAKES - Stand 15-20 mins.
FISH - Stand 2-5 mins.
EGG DISHES - Stand 2-3 mins.
PRECOOKED CONVENIENCE
FOODS - Stand for 5 mins.
PLATE MEALS - Stand for 2-5 mins.
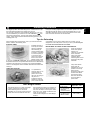
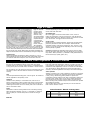
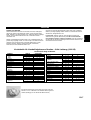
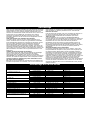
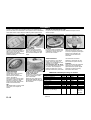
Microwaves are a form of high frequency electromagnetic waves
similar to those used in radios. Electricity is converted into microwave
energy by a magnetron tube. The microwaves travel from a
magnetron tube to the oven cavity where they are reflected,
transmitted or absorbed.
Reflection
Microwaves are reflected by metal similar to the way a ball would
bounce off a wall. Most metal cookware and utensils are not
recommended for microwave cooking, since they would produce
uneven cooking. Also, if a metal dish is placed close to the oven wall
(which is also metal), arcing (bluish sparks) could occur. Arcing can
damage an oven or cause a fire.
Transmission
Microwaves pass through some materials such as paper, glass and
plastic much like sunlight shining through a window. Because these
substances do not absorb or reflect the microwave energy, they are
ideal materials for microwave cooking containers. However, they will
get hot during cooking, because as food cooks, heat is conducted
from the food to the dish.
Absorption
Microwaves are absorbed by food. They penetrate to a depth of
about 2-4 cm. Microwave energy excites the molecules in the food
(especially water, fat and sugar molecules), and causes them to
vibrate very quickly. The vibration causes friction and heat is
produced. In large foods, the heat which is produced is conducted to
the centre to finish cooking the food.
Cooking with Microwave Energy

En-3
English
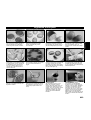
DISH SIZE
Follow the dish sizes given in the
recipes, as these affect the cooking
and reheating times. A quantity of
food spread in a bigger dish
cooks and reheats more quickly.
QUANTITY
Small quantities cook faster than
large quantities, also small meals
will reheat more quickly than
large portions.
DENSITY
Porous airy foods heat more
quickly than dense heavy foods.
SHAPE
Even shapes cook evenly. Food
cooks better by microwave when
in a round container rather than
square.
ARRANGING
Individual foods e.g. chicken
portions or chops, should be
placed on a dish so that the
thicker parts are to the outside.
SPACING
Foods cook more quickly and
evenly if spaced apart. NEVER
pile foods on top of each other.
INGREDIENTS
Foods containing fat, sugar or salt
heat up very quickly. The filling
may be much hotter than the
pastry. Take care when eating. Do
not overheat even if the pastry
does not appear to be very hot.
STARTING TEMPERATURE
The colder the food, the longer it
takes to heat up. Food from a
fridge takes longer to reheat than
food at room temperature.
General Guidelines
COVERING
Cover foods with microwave cling
film or a self-fitting lid. Cover fish,
vegetables, casseroles, soups.
Do not cover cakes, sauces,
jacket potatoes, pastry items.
TURNING AND STIRRING
Some foods require stirring
during cooking. Meat and poultry
should be turned after half the
cooking time.
LIQUIDS
All liquids must be stirred before
and during heating. Water
especially must be stirred before
and during heating, to avoid
eruption. Do not heat liquids that
have previously been boiled. DO
NOT OVERHEAT.
CLEANING
As microwaves work on food
particles, keep your oven clean at
all times. Stubborn spots of food
can be removed by using a
branded oven cleaner, sprayed
onto a soft cloth, always wipe the
oven dry after cleaning. Avoid any
plastic parts and door area.

En-4
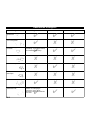
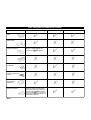
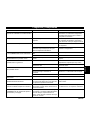
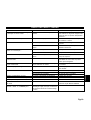
Quick Check Guide to Cooking Utensils
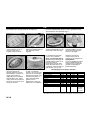
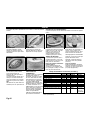
Heat resistant china and
ceramics
Pottery, Earthenware,
Stoneware
Aluminium foil
Cling film
Wicker, Wood, Straw
baskets
Foil/Metal containers
Heat resistant
glass
Microwave-safe plastic
cookware
Cookware For Microwave For Grill For Combination
✔
✔✔
✔
✔
✔
✔
✔
✘
✘
✘
✘
✘
✘
✘
✘
✘
✘
✘
✘
✔
✔
✔
✔
Do not use dishes with a metal
rim or pattern; or jugs or mugs
with glued handles.
Small amounts of aluminium foil can
be used to SHIELD and prevent food
from overheating when cooking or
defrosting. Take care that the foil
does not touch the sides or top of the
oven.

En-5
English
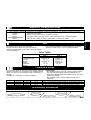
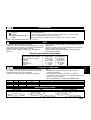
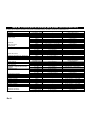
Grilling
Combination Cooking
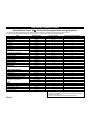
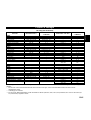
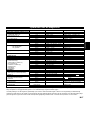
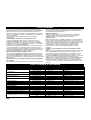
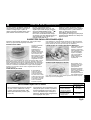
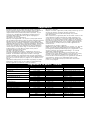
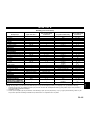
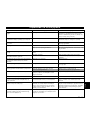
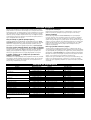
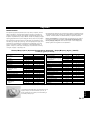
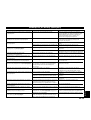
Power Level Use
Max. Power: 1000 W Reheating meals and sauces; Cooking fish, vegetables, sauces, and preserves
270 W (*) Defrosting frozen foods
600 W Roasting; Cooking egg sauces and sponge cakes; Heating milk
440 W
(NN-Q543/NN-Q523/NN-Q553) Cooking and reheating chicken casseroles and quiches
250 W Cooking stews, casseroles, rice puddings, rich fruit cakes, and egg custards
Note: (*) CYCLIC DEFROST with automatic standing time (see page 9).
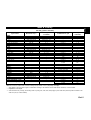
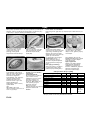
DO NOT ATTEMPT TO PREHEAT THE GRILL.
The quartz Grill on your oven gives fast, even cooking for a wide
variety of foods.
There is 1 Grill setting of 1300 W.
Place food to be grilled on the wire rack or in a shallow dish on wire
rack. Place this on the turntable. For large weight foods, place the
dish directly on the turntable.
The food being grilled should normally be turned over after half the
grilling time.
Never cover foods when grilling.
There is NO MICROWAVE POWER ON THE GRILL ONLY
PROGRAM.
First side Second side
Steak (4 pieces, well done) approx. 10 mins. approx. 10 mins.
Loin of pork (slices) approx. 12 mins. approx. 10 mins.
Porkchops 12-14 mins. approx. 12 mins.
Kebabs approx. 12 mins. approx. 12 mins.
Sausages 6-7 mins. approx. 6 mins.
Chicken legs 15-20 mins. 15-20 mins.
Toast 3-4 mins. 3 mins.
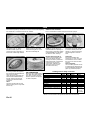
Combination cooking is ideal for many foods. The Microwave power
cooks them quickly, while the Grill provides traditional browning and
crisping; all of this happening simultaneously.
The following 3 combination modes are available:
NOTE:
• Never cover foods when cooking on a Combination program.
• For small quantities do not cook by Combination, cook by Grill or
Microwave only for best results.
• Do not preheat the oven on Combination.
Microwave Power Levels
Accessories to Use
Approximate Times for Grilling
Microwave Grill Combination
+
_
Combination mode Display Grill power Microwave power Uses
1 G1-600 W 1300 W 600 W White meat, lamb, whole poultry, gratin dishes. Preheating of pizza pan.
2 G1-440 W 1300 W 440 W Sausages, red meat, pieces of poultry, fish.
3 G1-250 W 1300 W 250 W 4/4 style cakes, quiches, pork chops, gratin dishes with eggs.

En-6
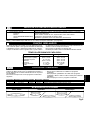
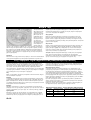
Many convenience foods are readily available in supermarkets. You
may also wish to reheat homecooked food or leftovers. This can all
be done safely in your oven, however you must check the food
carefully to see if it is piping hot before serving, just as you would in
a conventional oven.
Chilled foods to be reheated must also be stored correctly.
How do I choose which method to reheat by?
The heat method i.e. Microwave only or Combination, depends on
the type of food to be reheated. For foods that do not require
browning, reheat by microwave only. For foods that do require
browning, reheat by Combination.
How long do I reheat foods for?
There are reheating charts for Microwave and Combination: these
charts give timings that are a guideline ONLY, as the exact time will
depend on the weight of the food, size of the dish used and start
temperature.
What should I do if the food I am reheating does not
appear in the charts?
It is not possible to test every food available for the following charts,
however we have selected a great variety of foods, and suggest that
by following the guidelines given, you can reheat safely and
successfully.
Stirring and Turning
Whenever possible, foods should be stirred or turned over during
reheating. This helps ensure that the food reheats evenly on the
outside and in the centre.
Standing Time
Many foods require a STANDING TIME after reheating. Standing
time is a rest time which allows the heat in the food to continue to
transfer to the centre, thus eliminating cold spots. If the food has
been covered during the reheating time, then leave the covering on
during the standing time. Stand time is particularly important for
dense foods e.g. Lasagnes, Gratins, etc and those foods that cannot
be stirred during reheating.
When is food reheated?
Reheated food should be served “piping hot” i.e. steam should be
visibly emitted from all parts. As long as good hygiene practices have
been followed during the preparation and storage of the food, then
reheating by microwave or Combination present no added safety
risks.
Foods that cannot be stirred should be cut with a knife to test that
they are well heated through.
Even if manufacturer’s instructions or the times in the reheating
charts have been followed, it is still important to check that the food
is piping hot. If in doubt, always return the food to your oven for
further reheating.
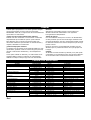
Reheating by Microwave
Reheating
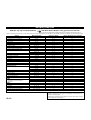
Food Weight/quantity Fresh Frozen
DELICATESSEN STARTERS
- croque monsieur 1 piece (170 g) MAX 1 min MAX 2 mins 30 secs to 3 mins
2 pieces (320 g) MAX 2 mins MAX 5 mins
- shellfish (4) 1 piece (170 g) MAX 2 mins MAX 3 mins
2 pieces (220 g) – MAX 6 to 7 mins
- unfilled pancake (2) 1 piece MAX 30 secs –
- stuffed pancake (2) (3) 1 piece (150 g) – MAX 3 to 4 mins
2 pieces (300 g) – MAX 5 mins
- soup (2) 400 g MAX 4 mins –
1 litre MAX 6 to 7 mins MAX 11 to 12 mins
- small pizza (1) 1 piece (160 g) MAX 1 min MAX 2 mins 30 secs to 3 mins
- American pizza 1 piece (400 g) MAX 4 to 5 mins MAX 7 to 8 mins
- small quiche (1) 1 piece (130 g) 600 W 1 min 10 secs MAX 3 mins
- large quiche 1 piece (400 g) 600 W 3 mins 600 W 7 to 8 mins
- Nem, Samosa (3) 2 pieces (100 g) MAX 15 to 20 secs –
READY-COOKED DISHES
- stuffed tomatoes 1 piece (170 g) MAX 2 mins MAX 6 to 7 mins
- Chilli con Carne (2) (3) 400 g MAX 3 mins 40 secs –
- Chicken Korma with rice (2) (3) 350 g – MAX 6 mins
- Quenelles (2) (3) 6 pieces (240 g) – 600 W 6 mins
- Snails (2) (3) 12 pieces (100 g) 440 W 2 mins 600 W 2 mins - 2 mins 30 secs
- Gratin dishes (starchy with meat) (4) 300 - 400 g MAX 3 mins MAX 8 to 10 mins
600 g MAX 6 to 8 mins MAX 13 to 14 mins
1 kg MAX 10 to 11 mins MAX 16 to 18 mins

English
Reheating by Microwave
BABY BOTTLES and FOOD JARS - CAUTION
Milk or formula MUST be stirred or shaken thoroughly before
heating and again at the end, and tested carefully before feeding
a baby.
For 210-240 ml of milk at fridge temperature, remove top and teat.
Heat on 1000 W for 25-30 secs.
CHECK CAREFULLY.
For 90 ml of milk at fridge temperature, remove top and teat. Heat on
1000 W for 10-15 secs. CHECK CAREFULLY.
N.B. Liquid at the top of the bottle will be much hotter than at the
bottom of the bottle and must be shaken thoroughly before checking
the temperature.
(1) Remove packaging and wrap in absorbent paper. (2) Cover. (3) Stir halfway through cooking time. (4) Remove the aluminium tray and put
the gratin in a heat-resistant microwaveable dish.
Food Weight/quantity Fresh Frozen
READY-COOKED DISHES (cont.)
- vegetable gratin (with/without meat) (4) 300 - 400 g MAX 6 mins MAX 11 to 13 mins
1 kg MAX 12 mins MAX 18 mins + 600 W 6 mins
- fish gratin (4) 450 g – 600 W 12 to 15 mins
1 kg – MAX 18 mins + 250 W 5 mins
- fish in sauce (2) (3) 225 g – MAX 6 to 7 mins
FILLINGS
- starchy (2) 300 g MAX 2 to 3 mins MAX 4 to 5 mins
- vegetables (2) 100 g MAX 1 min to 1 min 30 secs –
200 g MAX 1 min 30 secs to 2 mins –
- purée (2) (3)
of potato 200 g MAX 1 min 30 secs MAX 4 mins 30 secs
of vegetables 200 g MAX 1 to 2 mins MAX 5 mins
400 g MAX 3 mins 30 secs MAX 8 mins
- spaghetti in sauce (2) 210 g MAX 2 mins –
450 g MAX 4 mins –
- rice (2) 150 g MAX 1 min MAX 2 mins 30 secs
300 g MAX 2 mins 30 secs MAX 4 mins 30 secs
MEAT AND FISH
- hamburger (raw) (2) 1 piece (150 g) – MAX 1 min 30 secs
- cocktail sausages (2) (3) 120 g 250 W 2 to 3 mins –
- pieces of cooked meat
minced steak (2) 100 g 600 W 40 to 50 secs –
pork 2 pieces (2) 130 g 600 W 1 min 30 secs –
lamb 2 pieces (2) 160 g 600 W 1 min –
beef 2 pieces (2) 120 g 600 W 50 secs –
chicken leg (2) 205 g MAX 1 min 40 secs –
chicken nuggets 10 pieces (200 g) – MAX 2 mins 30 secs
cordon bleu 1 piece (100 g) – MAX 2 mins
MISCELLANEOUS
- baby food 30 g 600 W 15 secs Test –
(small pot at room temperature) 120 g 600 W 25 secs Test –
200 g 600 W 40 secs Test –
- breakfast pastries (1) 2 x 50 g – MAX 30 to 40 secs or 3 mins
- bread (1)
- sliced sandwich bread 800 g – 8 mins
- slice 60 g – MAX 40 secs
- baguette 150 g – MAX 30 to 40 secs
- 1 wholemeal loaf 500 g – MAX 2 mins 30 secs +
1
/2 hr stand
- rye bread roll 1 piece (85 g) – MAX 40 secs
3 x 85 g – MAX 1 min 10 secs
En-7

En-8
To soften butter for easy spreading on removal from the fridge
Soften for 35-40 seconds on (for 150g). Remove any foil
beforehand.
Swelling dried fruit
Add 4 tablespoons of water to 200 g of raisins or prunes, (they can
be swollen with rum for cakes). Stir and heat on 1000 W for 2 to 3
minutes. Allow to stand for 10 minutes.
Restoring cheese to room temperature
Cheese removed from the refrigerator must be placed in the oven
and "warmed" for 30 seconds -1 minute (depending on the size of the
cheese) at 250 W.
Blanching almonds or hazelnuts
Cover with hot water and cook for 3-6 minutes on 1000 W (return to
boil). Cool, drain and the skin is then easy to remove.
Drying herbs
Place absorbent paper on the turntable. Carefully spread out the
finely chopped, fresh herbs on the paper. Repeat several times if
necessary. Heat on 1000 W for a few minutes, checking them every
30 seconds until the herbs begin to dry. Extreme care must be taken
to ensure that the herbs do not remain in the oven too long;
otherwise, they will disintegrate, and possibly catch fire. Leave the
herbs on the absorbent paper for a further 2 hours at room
temperature, then store in air-tight containers.
Making caramel
Cook 100 g of sugar with 2 tablespoons of water in a bowl for 2-
3 minutes on 1000 W, checking halfway-through cooking time.
Remove caramel before it becomes darkened since it will continue to
cook outside. You can stop the cooking with 2 tablespoons of very
hot water (beware of sharp edges).
Liquifying hardened honey
Remove the lid to the pot, place in oven and heat on 250 W for 30-
50 seconds, depending on the quantity. Stir and repeat if necessary.
Croutons in minutes
Cut two slices of white bread into small cubes. Spread out these
cubes on a plate. Heat on 1000 W for 2 minutes then allow to stand
for 5 minutes. You can rub a clove of garlic on the slices of bread
before cutting them or drizzle with a few drops of olive oil.
How to obtain more juice from an orange or a lemon
Before squeezing, place orange or lemon in microwave for 30-40
seconds on 1000 W, then squeeze immediately; this will produce
more juice.
Melting butter
100g of butter in a ramekin dish covered with a saucer will melt in
around 1 minute at 600 W.
Melting chocolate
Break 100 g chocolate into little pieces into a bowl and heat at 600 W
for 2-2
1
/2 minutes (the time may vary depending on the cocoa and
sugar content). Stir at least once during cooking.
Leaving dough to prove
Place the covered dough in the oven and heat for around 5 minutes
on (for 500 g of dough). Leave the dough in the oven (away
from air currents) until it has doubled in volume.
Making mulled wine
In an ovenproof glass (or mug), mix together 20 CL of red wine, the
zest of a lemon, a pinch of cinnamon, one clove and 2-4 teaspoons
of sugar according to taste. Heat on 1000 W for 1-1
1
/
2 minutes.
"Deodorise" your oven
To rid your oven of that "fishy" smell, place a bowl of white wine
vinegar or water with the juice of a lemon inside the oven. Heat on
1000 W for 5 minutes. Wipe off the steam that collects on the oven
walls.
Preparing a hot compress
Heat a clean, damp, folded cloth on a plate for 1-2 minutes on
1000 W. Check temperature before applying the cloth.
Microwave Cooking Tips

En-9
English
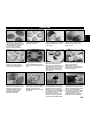
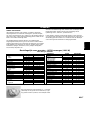
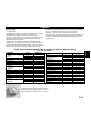
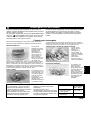
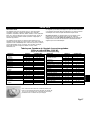
This feature allows you to enter the weight
in grams and the oven will select the
correct defrosting time for the foods
described. Do not use for porous foods e.g.
bread, cakes and convenience foods etc.
See Operating Instructions for selection of
the grams. During the defrosting process,
the oven will beep to remind you to check
the food i.e. turn, shield or break the food
apart, as shown above.
There are two categories for Auto Weight
Defrost:
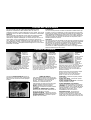
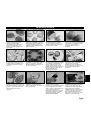
Defrosting Guidelines
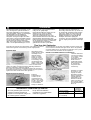
The biggest problem when defrosting food in a microwave is to get
the inside defrosted before the outside starts to cook.
For this reason Panasonic have made the defrosting on your oven
CYCLIC DEFROST, just select the 270 watts DEFROST pad
and set the required time. The oven then divides this time into 8
stages. These stages alternate between defrosting (total of 4) and
standing (total of 4).
During the standing stages there is no microwave power in the oven,
although the light will remain on and the turnatable will turn. The
automatic stand times ensure a more even defrost and for small
items the usual stand time can be eliminated.
Recommended
Weight (Min.- Max.)
1. Small pieces
e.g. Fish/Chops, 100 - 1200 g
Sausages,
Chicken Portions
2. Big pieces
e.g. Meat Joints, 400 - 2000 g
Whole Chicken
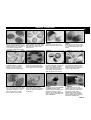
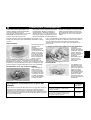
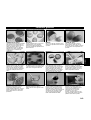
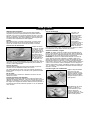
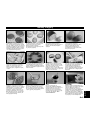
Tips for Defrosting
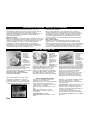
Auto Weight Defrost
Check the defrosting several times, even if you use the automatic
buttons. Observe the standing times.
STANDING TIMES
Individual portions of
food may be cooked
almost immediately
after defrosting (5
minutes standing time
for steaks, 15 minutes
for fruit and pastry). It
is normal for large
portions of food to be
frozen in the centre.
Before cooking, allow
to stand for a minimum of one hour. During this standing time, the
temperature becomes evenly distributed and the food is defrosted by
conduction. NB If the food is not going to be cooked immediately,
store it in the refrigerator. Never refreeze defrosted food without first
cooking it.
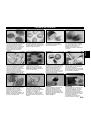
JOINTS AND POULTRY
It is preferable to
place the joints on an
upturned plate or
plastic rack so that
they are not resting in
the juices. It is
essential to protect
delicate or projecting
parts of this food with
small pieces of foil to prevent these parts from cooking. It is not
dangerous to use small pieces of foil in your oven, provided they do
not come into contact with the oven walls.
MINCED MEAT OR CUBES OF MEAT AND SEAFOOD
Since the outside of
these foods quickly
defrosts, it is
necessary to separate
them, break the
blocks into pieces
frequently while
defrosting and remove
them when they have
defrosted.
SMALL PORTIONS OF FOOD
Chops and chicken
pieces must be
separated as soon as
possible so that they
defrost evenly
throughout. Fatty parts
and the ends defrost
more quickly. Place
them near the centre
of the turntable or
protect them.

En-10
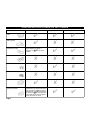
Defrosting Common Foods
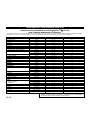
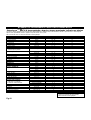
NOTES
# turn this food halfway through defrosting and protect ends and
projecting parts with foil.
* stir, turn or separate several times during defrosting.
Select Defrost Power 270 W then the approximate time given below.
The times given below are guidelines only. Always check the progress of the food by opening the oven door and then
re-starting. For larger quantities adjust times accordingly. It is not essential to cover food during defrosting.
Food Weight/quantity Time in minutes Standing times (minimum)
MEAT
- joints with bone# 500 g 18 - 20 60
- roast filleted# 500 g 20 - 22 70
- chops# 500 g 8 - 12 15
- cutlets# 250 g 6 - 7 10
- kidneys* 250 g 7 - 8 10
- lean beef* 430 g (2) 11 - 12 10
- entrecôte* 150 g 4 - 6 10
- minced beef, sausage meat, pork mince* 500 g 10 - 12 10
- hamburger* 200 g (2) 6 - 7 10
400 g (4) 10 - 12 10
- meat for stewing/braising* 500 g 12 - 14 15
- whole poultry# 500 g 12 - 13 60
- poultry pieces# 1 kg (4) 22 - 24 30
- poussin# 400 g 15 30
- rabbit# 500 g 14 - 15 30
- pork sausages* 300 g (2) 10 - 11 15
BUTTER 250 g 2 10
FRUIT COULIS 200 g 3 - 4 10
CHEESE* 450 g 3 10
RED FRUIT* 200 g 5 - 6 10
300 g 9 10
500 g 12 10
CAKES AND PUDDINGS
- Victoria Sandwich Cake 400 g (1) 7 10
- Black Forest 550 g (1) 4 - 5 15
- Bavarois 110 g (1 portion) 8 seconds 15
- raspberry tart 470 g (1) 10 15
CONCENTRATED FRUIT JUICE 200 ml 4 4
PASTRY
- sweet flan or shortcrust* 370 g (block) 4 - 5 5
- puff* 300 g (block) 3 - 4 5
FISH
- whole# 400 g (2) 10 - 12 15
- fillets# 500 g (4) 13 - 14 15
- fish steak with bone* 380 g (2) 10 15
- thick steaks without bone* 200 g (2) (4) 9 15
- shrimps/prawns* 200 g 7 10

En-11
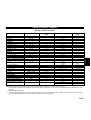
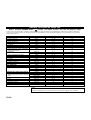
Combination Cooking and Reheating Charts (NN-F663/NN-F623/NN-F653)
(1) Put in a heat-resistant microwaveable dish (or a piece of greaseproof paper) on the wire rack. (2) Remove packaging and place directly on
the wire rack. (3) Turn or stir halfway through cooking time.
English
Food Weight/quantity Time required - fresh Time required - frozen
ENTREES
- croque monsieur (2) (3) 1 piece (100 g) 1 min 30 secs Combi 1 + 3 mins grill 3 mins Combi 1
2 pieces (300 g) 5 mins Combi 2 3 mins 30 Combi 1
1 piece (150 g) 3 to 4 mins Combi 1 + 1 min grill 3 to 4 mins Combi 2
- shellfish (1) 1 piece (100 g) – 5 mins Combi 2
(remove croissant halfway through) 1 piece (170 g) 2 mins 30 secs Combi 1 + 2 mins grill 5 to 7 mins Combi 2
2 pieces (2 x150 g) 4 to 5 mins Combi 1 7 mins 30 secs Combi 1
- cheese croissant, gnocchi (1) 1 piece (160 g) 3 to 4 mins Combi 1 3 mins 30 secs Combi 2
2 pieces (300 g) 4 to 5 mins Combi 1 –
- roulé au fromage (1) (3) 1 piece (130 g) 3 mins Combi 1 3 mins Combi 2
- large sausage roll (2) (3) 1 piece (130 g) 1 min 40 secs Combi 3 3 mins Combi 1
- stuffed pancakes (1) (3) 1 piece (150 g) – 4 mins 30 secs Combi 1
1 piece (190 g) 3 mins Combi 1 –
2 pieces (2 x 130 g) 3 mins 30 secs to 4 mins Combi 2 7 mins Combi 1
- mini-quiches (1) 12 pieces (180 g) MAX 50 secs + 2 mins grill MAX 2 mins + 3 mins grill
- American pizza (2)
small 1 piece (200 g) 2 mins Combi 3 + 2 mins grill MAX 3 mins + 3 mins grill
big 1 piece (450 g) – 5 to 6 mins Combi 1
1 piece (750 g) – 8 mins Combi 1 + 2 min grill
- pizza (2)
small 1 piece (200 g)
4 mins Combi 2
MAX 2 mins 10 secs + 3 to 4 mins grill
1 piece (300 g) 3 mins Combi 1 + 1 min 30 secs grill –
big 1 piece (400 g) 3 mins 30 secs Combi 1 + 1 min 30 secs grill Autopizza***
1 piece (600 g) 5 mins Combi 1 + 1 min 30 secs grill Autopizza***
thin crust 1 piece (500 g) 4 mins Combi 1 + 1 min 30 secs grill –
calzone (3) 1 piece (420 g) 3 mins Combi 1 + 2 mins grill –
- small quiche (2) 1 piece (130 g) 2 mins Combi 3 –
1 piece (200 g) 4 mins Combi 2 –
2 pieces (300 g) 4 mins Combi 3 Autoquiche***
- large quiche 1 piece (400 g) 3 mins 30 secs Combi 1 –
1 piece (500 g) 4 mins 30 secs Combi 1 + 1 min 30 secs grill Autoquiche***
1 piece (600 g) 5 mins Combi 1 Autoquiche***
- double crust pastry pie with cheese, 1 piece (300 g) 4 to 5 mins Combi 1 –
- ham or bacon filling (2) (3) 1 piece (500 g) 6 to 7 mins Combi 1 –
- double crust mushroom pie 1 piece (450 g) 8 mins Combi 1 –
COOKED DISHES
- Lasagne Bolognaise (1) 130 g 2 mins Combi 1 + 3 mins grill –
300 g 6 to 8 mins Combi 2 AutoGratin***
1 kg Combi 1 10 to 12 mins AutoGratin***
- fish gratin (1) 450 g – AutoGratin***
800 g – AutoGratin***
- vegetable gratin (1) 450 g 5 - 7 mins Combi 1 AutoGratin***
1 kg 12 - 14 mins Combi 1 AutoGratin***
SIDE DISHES
- Dauphine potato (1) (3) 200 g – 4 mins 30 secs Combi 1
- noisettes potato (1) (3) 350 g – 4 mins Combi 1 + 3 mins grill
- Duchesse potato (1) 500 g – 7 mins Combi 1 + 7 mins grill
- oven chips (1) (3) 400 g – 8 to 10 mins Combi 1
MEAT AND FISH
- Confit of duck (1) (3) 2 pieces (400 g)
4 mins Combi 1 + 3 mins grill
–
- Cordon bleu (1) (3) 1 piece (120 g) 4 mins Combi 1 3 mins 30 secs Combi 1
- Chicken nuggets (1) (3) 10 pieces (200 g) 3 mins Combi 1 + 2 mins
grill
6 mins Combi 2
MISCELLANEOUS
- ready-cooked double crust almond pie (2) (3)
1 piece (400 g) 3 mins to 3 min 30 secs Combi 3 4 to 5 mins Combi 2
- apricot crumble (1) 1 piece (300 g) – 5 to 6 mins Combi 1
- croissants & other types of sweet rolls (2) (3)
1 piece (60 g) Grill 2 mins MAX 12 secs + 2 mins grill (or Auto)

En-12
Cooking Chart For Your Pizza Pan (NN-F663/NN-F623)
Food Weight/quantity Fresh Frozen
- appetisers - tartlets 12 pieces (160 g) – 2 mins 30 secs Combi 1
- appetisers - vol-au-vents (for cooking) 15 pieces (210 g) – 7 mins 30 secs Combi 2**
- choux pastry 20 pieces (150 g) – 1 min 30 secs Combi 1**
- crique lardons-fromage 1 x 170 g 4 mins Combi 2 3 mins Combi 1 + 2 mins grill
- tarte alsacienne 1 x 120 g 4 mins Combi 3 3 mins 30 secs Combi 1
PIZZA
- standard crust 2 x 140 g 4 mins 30 secs Combi 2 –
200 g – 3 mins Combi 1
300 g 6 mins Combi 1 7 mins Combi 1
500 g 5 mins Combi 3 6 mins Combi 1
- thin crust 200 g 4 mins Combi 3 3 mins Combi 1
250 g 2 mins Combi 1 + 2 mins grill** 3 mins Combi 1
- American style 500 g – 6 mins Combi 1
- McCain rise and up 500 g – 10 mins 30 secs Combi 1
QUICHES & PIES
- quiche lorraine 1 x 100 g – 2 mins 30 secs to 3 mins Combi 1
2 x 150 g 3 mins Combi 2 –
150 g – 2 mins 30 secs to 3 mins Combi 1
400 g – 5 to 6 mins Combi 1
- leek quiche 2 x 120 g – 5 mins Combi 1
400 g – 6 mins 30 secs Combi 1**
- Savoie pie 450 g 4 mins 30 secs to 5 mins Combi 1** 10 min Combi 1* + **
- double crust mushroom pie 450 g 6 to 7 mins Combi 1** –
- seafood quiche 350 g 4 mins Combi 2** –
- quiche with onion and anchovy filling 1 x 150 g – 2 mins 40 secs Combi 1
- stuffed crepes 4 pieces (200 g) – 3 mins Combi 1
2 pieces (100 g) – 1 min 40 secs Combi 1*
- stuffed pancakes 2 pieces (140 g) 3 mins Combi 2 5 mins Combi 1
- roulé au fromage, large sausage roll 130 g 2 mins Combi 3 2 mins 20 secs to 3 mins (roulé) Combi 3
2 x 130 g 2 mins 30 secs Combi 1 3 mins Combi 1**
- chicken vol-au-vents 1 piece (150 g) 2 mins 20 secs Combi 1 4 mins Combi 1 (remove the lid)
2 x 150 g 3 mins Combi 1 6 mins 30 secs to 7 mins Combi 1
(remove the lid)
- gnocchis 2 x 130 g – 6 mins Combi 1
- croque-monsieur 1 x 100 g 3 mins Combi 3* –
2 x 100 g 4 mins Combi 3 + 1 min grill –
1 x 160 g 3 mins 30 secs to 4 mins Combi 3 3 mins Combi 1
2 x 160 g 5 to 6 mins Combi 3 5 mins Combi 1
- croque-bacon/tomato 1 x 140 g 2 mins 30 secs Combi 2 3 mins 30 secs Combi 1
POTATOES
- oven chips 200 g – 5 mins Combi 1 + 3 to 5 mins grill*
400 g – 6 mins Combi 1 + 5 to 7 mins grill*
- potato wedges 300 g – 4 mins Combi 1 + 5 mins grill*
- Duchesse potato 400 g – 9 mins Combi 1 + 4 mins grill
- Dauphine potato 200 g – 4 to 5 mins Combi 1*
- roast potatoes 9 pieces (600 g) – 10 mins Combi 1*
- noisettes potato 450 g – 8 mins Combi 1 + 3 mins grill*
- pieces/quarters (raw) 500 g to 1 kg 15 to 20 min Combi 1* –
SAUSAGES 2 pieces (120 g) 2 mins Combi 1* 3 mins 30 secs Combi 1*
3 pieces (180 g) 3 mins Combi 1* 4 mins Combi 1*
- Toulouse sausage 1 piece (150 g) 3 mins 30 secs to 4 mins Combi 2* 4 mins 30 secs Combi 1*
- pork sausages* 1 piece (150 g) 5 mins Combi 2* 7 mins Combi 1*
(*) Turn or stir halfway through cooking. (**) Allow to stand for 5 minutes after heating.
Unless otherwise indicated, the pizza pan is always preheated for 4 minutes on Combination N°1.

En-13
English
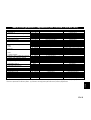
Cooking Chart For Your Pizza Pan (NN-F663/NN-F623)
Food Weight/quantity Fresh Frozen
- pork chop* 180 g 3 to 4 mins Combi 2* 6 mins Combi 1*
- duck fillet* 1 piece (350 g) 4 mins Combi 3 + 5 mins grill* –
- chicken legs 2 pieces (670 g) 10 mins Combi 1 + 4 mins grill* 18 mins Combi 1 + 4 mins grill*
- hamburgers*
standard 1 piece (100 g) 1 min 50 secs to 2 mins Combi 3* 3 mins 30 secs to 4 mins Combi 3*
1 piece (140 g) 2 mins 30 secs to 3 mins Combi 3* –
2 pieces (200 g) – 4 mins 20 secs Combi 3*
4 pieces (400 g) – 3 mins 30 secs to 4 mins Combi 3
- breaded fish* 2 pieces (200 g) 3 mins 40 secs Combi 2* 5 mins Combi 1*
- fish sticks 5 pieces (150 g) – 4 mins Combi 1*
10 pieces (300 g) – 5 mins Combi 1*
- cordon bleu 1 piece (100 g) 3 mins 30 secs Combi 3* 3 mins Combi 1*
2 pieces (200 g) 3 mins 30 secs Combi 2* 5 mins Combi 1*
- chicken nuggets 10 pieces (200 g) 4 mins Combi 2* 4 mins Combi 1*
5 pieces (100 g) 3 mins Combi 2* 3 mins Combi 1*
- omelette 4 beaten eggs 1 to 2 mins Combi 1* –
8 beaten eggs 2 mins to 2 mins 30 secs Combi 1* –
- apple strudel (pre-cooked)* 300 g – 4 mins 30 secs to 5 mins Combi 1* and **
- double crust almond pie (pre-cooked) 400 g – 2 mins 30 secs Combi 1**
- apple fritters (pre-cooked) 7 pieces (220 g) – 6 mins Combi 3*
- waffles (pre-cooked) 1 piece (70 g) – 2 mins 30 secs Combi 3*
- croustade aux pommes (pre-cooked) 400 g – 5 mins Combi 1**
- kouing aman aux pommes (pre-cooked) 550 g – 3 mins Combi 1**
- Tarte Tatin 1 piece (600 g) – 7 mins Combi 1** /stand apple side down
1 piece (150 g) – 2 mins Combi 2** /stand apple side down
- nut brownies (pre-cooked) 2 pieces (150 g) – 1 min 30 secs Combi 3 * and **
Unless otherwise indicated, the pizza pan is always preheated for 4 minutes on Combination N°1.
(*) Turn or stir halfway through cooking.
(**) Allow to stand for 5 minutes after heating.

En-14
DEFROSTED JOINTS
If the meat has previously been frozen, ensure it is properly thawed
before cooking by microwave. Defrosted joints of meat must be
allowed to STAND for a minimum of 1 hour before cooking to
ensure the centre is fully defrosted.
FAT
Large amounts of fat absorb microwave energy and can cause the
meat next to it to overcook. Always choose joints that aren’t
excessively fatty.
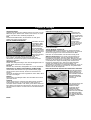
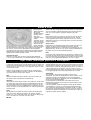
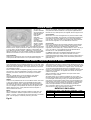
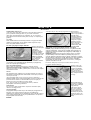
Cooking with microwave only
Place joints on an
upturned plate in a
microwaveable dish
and on the turntable.
It is important that the
joint should not soak
in its juice. The
upturned plate is not
needed for pieces of
meat or poultry if
fricasseed or cooked
with an accompaniment.
It is advisable to cover the meat with a lid or cling-film to speed up
cooking and prevent splashes.
STANDING TIME
Meat and poultry require a minimum of 15 mins. STANDING TIME
wrapped in tin foil after cooking by microwave. Roast meat is always
easier to carve after STANDING and the meat will continue to cook
during the STAND TIME.
BONE
Bone tips on legs of lamb and crown roasts may need shielding when
cooked by microwave, to prevent overcooking.
How to cook small cuts of meat by microwave
Some cuts of meat can be cooked by microwave although due to
their short cooking times and no heat source, they will not crisp and
brown.
They should always be cooked on a microwave rack to lift them out
of their juices.
Arrange drumsticks so the fleshiest part is towards the outside.
TURNING
Joints and poultry should be turned over halfway through cooking.
SHIELDING
Large joints may need shielding with pieces of smooth aluminium foil
after half the cooking time to avoid overcooking on the outside
edges. Turkeys and large chickens should have their breast meat,
legs and wings protected. Secure foil with toothpicks and do not
allow foil to touch the walls of the oven.
How to roast a joint by Combination
Place the joint on an
upturned saucer on
heatproof dish. Joints
are best cooked by
microwave only then
browned and crisped
by a final
Combination stage.
DO NOT cover.
Tips for stews and ragouts
BEFORE: the accompanying vegetables must be cut into regular
pieces and pre-cooked, otherwise they may stay crunchy when
cooking is completed. Lightly cover the pieces of meat with flour, to
ensure the sauce cooks properly.
DURING cooking, it is essential to keep the pieces of meat covered
by the liquid using an upturned saucer or plate (to prevent the meat
from drying out). Since cooking stews takes a long time and
sometimes there is a lot of evaporation, do not hesitate to add liquid
while cooking if necessary. Cover the vessel with a lid to restrict
evaporation. Bring to the boil on 1000 W for 10 to 12 mins. then
continue cooking for the desired length of time at 250 W.
Cooking small cuts of meat by Grill or Combination
Place food on the wire
rack. Place the wire
rack on the turntable.
Use a heatproof dish
to catch grease/drips.
For larger pieces or
pieces of meat that will
not fit without touching
the roof or catching on
the grill, place in a
heatproof dish on
turntable. The grilling
action will still brown
the food, but may take
slightly longer.
Meat & Poultry
Guidelines

En-15
English
Meat & Poultry
Type of meat Microwave only***
Cooking time
Combination or grill
Cooking time
in minutes in minutes
BEEF
- rib* Grill 25 -30**
- roast* 600 W 5 Combi 3 7 - 8
- stew MAX then 250 W 10 then 60 - 75** – –
LAMB
- roast on the bone* 600 W 6 - 7 Combi 1 7 - 8
- rolled shoulder* 600 W 8 Combi 1 8 - 9
- stew* MAX then 250 W 10 then 40 - 50** – –
VEAL
- roast shoulder* 600 W 14 - 15 Combi 1 10 - 11
- stew MAX then 250 W 10 then 50 - 60 ** – –
PORK
- roast fillet* 600 W 15 - 17*** Combi 1 11 - 12
- roast spare rib* 600 W 15 - 17*** Combi 1 12 - 13
- stew MAX then 250 W 10 then 50 - 60** – –
- ribs* – – Grill 20
CHICKEN - GUINEA FOWL - TURKEY
- roast whole – – Combi 1 8 - 9
- pieces* 600 W 7 - 8 Combi 2 12 - 14
or Grill 25**
- turkey drumstick* – – Combi 1 8 - 9
- turkey pieces 600 W 12 Combi 1 10 - 11
DUCK
- roast whole – – Combi 1 then grill 9 - 10 then 4**
- pieces* – – Combi 1 then grill 7 - 8 then 6**
- stew MAX then 250 W 10 then 70** – –
RABBIT MAX 7 - 8 – –
GAME
- roast* MAX 5 - 6*** Combi 3 9 - 11
- stew MAX then 250 W 10 then 70** – –
CHIPOLATAS, MERGUEZ* MAX 3 - 4 Grill 12 - 14**
PORK SAUSAGE (1 pce)* – – Combi 2 8**
Toulouse Sausage (2 pces)* – – Combi 2 10
or Grill 15**
Note: For boned or stuffed meat, increase cooking time by at least 5 mins. (depending on weight).
* dish placed on the wire rack for grill or combination cooking, if the thickness of the meat allows; otherwise, on the turntable.
** Regardless of the weight.
*** with microwave-only cooking, the cooking times of joints (pork, veal, lamb, beef) apply to joints that have previously been browned on all
sides in a pan (for a few minutes).
For 500 g (time in minutes)

En-16
Fish cooks very well by microwave as it stays moist and the lingering
fish smells left in conventional ovens are avoided.
WHEN IS FISH COOKED?
Fish is cooked when it flakes easily and becomes opaque.
Fish
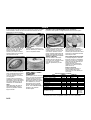
ARRANGING
Thin fillets of fish i.e. plaice,
should be rolled up prior to
cooking to avoid overcooking on
the thinner outside edge and tail.
COVERING
Always cover fish with either
microwave cling film or use a
dish with a self-fitting lid.
LIQUID
Fresh fish should always be
sprinkled with 30 ml (2 tbsp) of
lemon juice or white wine. When
cooking Frozen fish, add liquid
as above for even cooking.
FISH STEAKS
Fish steaks should be arranged
in a circle - thicker part to the
outside - to avoid overcooking
and disintegration of the tail
ends.
WHOLE FISH
If cooking 2 whole fish together,
they should be arranged head to
tail for even cooking.
Large whole fish must have the
tail and head shielded halfway
through cooking with smooth
pieces of tin foil secured with
toothpicks.
SALT
DO NOT sprinkle salt onto fish
before cooking as this may make
the fish dry.
COOKING FISH BY GRILL
OR COMBINATION
Brush fish with melted butter or
oil to keep fish moist. Place on
wire rack. DO NOT add salt,
however sprinkle with pepper
or herbs if required.
Big fish (more than 400 g)
You are recommended to turn
them over halfway through
cooking time and to protect the
head and tail with a small piece
of aluminium foil to avoid
overcooking. (Attention: the
aluminium must not touch
the walls of the oven).
Stand time
Fish should STAND after
cooking for 2-3 mins. This can
be outside the oven to enable
the oven to be used for futher
cooking.
Fish en papillote
You can make papillotes of fish
by replacing the aluminium foil
by microwaveable greaseproof
paper (or parchment paper).
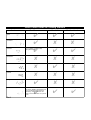
Food FRESH FROZEN
Power Time Power Time
Fish in thin fillets 600 W 4 - 5 MAX 10
Fish in thick fillets 600 W 5 - 6 MAX 11 - 12
Fish steaks 600 W 5 - 7 MAX 11 - 13
Whole fish 600 W 5 MAX 12
Shrimp* 600 W 4 - 5
Mussels* 600 W 5 - 6
Scallops* 600 W 6 - 7
Squid* 600 W 5 - 6 MAX 11
Crab* 600 W 5 - 6
Fish croquettes (1 piece=50 g)* MAX 3 min 30
(2 pieces)
or 5 min
(4 pieces)
*We do not recommend cooking with the Auto menu for these fish.
Cooking Time for 500g in minutes

En-17
English
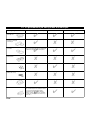
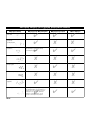
Vegetables
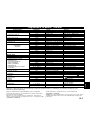
*We do not recommend cooking with the Auto menu for these vegetables.
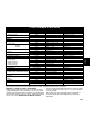
Fresh/Frozen Vegetables Manual Cooking Charts - Use Max Power (1000 W)
For 500g (time in minutes)
ADDED WATER
Very water-rich vegetables such as tomatoes, courgettes,
aubergines, frozen vegetables for ratatouille, mushrooms, spinach,
endives, lettuce, onions, most fruits, etc., to which little or no water
should be added, since microwave cooking uses the water contained
in the foods naturally.
Fairly water-rich vegetables, to which 4 to 5 tablespoons of water
should be added for 500g, to create the steam which cooks the
vegetables and prevents dehydration: cauliflower, leeks, broccoli,
Brussels sprouts, fennel, carrots, celeriac, asparagus, dwarf beans,
potatoes, cabbages, turnips, artichokes, etc.
Vegetables containing relatively little water, to which 8 to 10
tablespoons of water should be added per 500 g to encourage
hydration: peas, broad beans, runner beans, French beans.
In all cases: vegetables must be cooked on 1000 W power (except
for whole cauliflowers) and must not be salted before cooking, but
after. This is because the salt absorbs the natural moisture of the
vegetable and encourages dehydration.
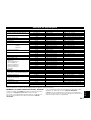
VEGETABLES FRESH FROZEN
Artichokes:
- whole 11 - 12 –
- hearts 10 - 12 13 - 16
Asparagus* 10 - 12 14 - 15
Aubergines 9 - 11 –
Beetroot* 18 - 20 –
Chinese Leaves 8 - 10 14 - 15
Broccoli 8 - 10 13 - 15
Mushrooms 9 - 10 13 - 15
Carrots:
- round slices 10 - 12 13 - 15
- strips 12 - 14 –
Cabbage* 12 - 14 –
Cauliflower 10 - 12 13 - 15
Brussels sprouts 10 - 12 13 - 15
Boule celery 9 - 11 –
Celery* 15 - 17 –
Courgettes 8 - 10 13 - 15
Endives 12 - 14 18 - 20
Spinach:
- chopped – 12
- leaves 9 - 10 13
VEGETABLES FRESH FROZEN
Broad beans* 16 - 19 18 - 20
Fennel:
- whole cut in half 12 - 14 –
- thin cut 17 - 20 –
Green beans* 12 - 13 12 - 13
Dwarf beans 10 - 13 –
Mixed spring vegetables* – 15 - 16
Corn on cob (2 cobs)* 12 - 14 14 - 17
Turnips 10 - 12 18 - 20
Onions 9 - 12 15 - 18
Peas* 20 16 - 18
Mange-tout peas 10 - 12 –
Thin sliced leeks 12 - 14 15 - 16
Leek stalks 12 - 14 15 - 16
Squash 10 - 12 –
Capsicums 12 - 14 14 - 16
Whole potatoes (<220 g) 9 - 12 –
Cut potatoes 10 - 12 –
Ratatouille 16 - 18 14 - 16
Salsify 12 - 14 14 - 16
Tomatoes* 4 - 5 –
A whole cauliflower must be cooked head down,
on 600 W power, for 12 to 15 mins. (according to
size of cauliflower) with 6 tablespoons of water.

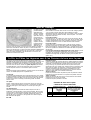
En-18
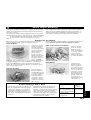
Eggs are delicate
products which
require special
attention. This is
because if they
are placed straight
into the oven, they
explode because
of the pressure
created inside the
shell. Being
broken, the yolk
also explodes if
the film covering it is not pierced. So push the tip of a toothpick into
the centre of the yolk; if the egg is fresh, it will not spill out. The yolk
and the white react differently to the microwaves and unfortunately
the yolk cooks more quickly. When eggs are beaten (omelette), the
edges should be taken into the centre halfway through cooking time.
Poached eggs
Heat 50 ml of water with salt and a dash of vinegar for 1 min on
1000 W. Break the egg into the boiling water and carefully pierce the
yolk and the white with a toothpick; cook on 600 W for 30 to 40
seconds (depending on the size of the egg). Leave to stand for 1
minute, then drain and serve.
Scrambled eggs
Mix 2 raw eggs in a bowl with a little cream or milk, a knob of
butter, salt and pepper. Cook for 40 seconds on 1000 W. Remove
and beat briskly with a fork. Resume cooking on 1000 W for a further
30 to 40 seconds. The eggs should remain creamy.
Oeufs cocotte
Break the egg into a buttered ramekin, season with salt and pepper,
pierce the yolk and the white with a toothpick. Add the desired
ingredients (cream, mushrooms, lumpfish roe, etc.). Cook for 1 min
30 sec to 2 min per egg at 250 W, depending on the size of the egg
and the quantity of garnish.
Cheeses react differently depending what type they are: the fattier
they are the quicker they melt. If they are cooked for too long a time,
they harden. When possible, it is preferable to add grated cheese at
the last moment (for pasta, gratins, etc.).
The cooking times for dried vegetables in the microwave are much
the same as with traditional cooking. On the other hand, these
foodstuffs heat up very quickly, without taking on a reheated flavour,
so long as they are in a closed vessel, with butter or sauce mixed in.
For the cooking, use a big vessel (to avoid any overspill). Fully cover
with water or stock. Leave to stand for at least 5 to 8 minutes after
cooking.
Rice
Once the liquid reaches boiling point, cook for approx. 20 minutes at
250 W, regardless of the quantity of rice.
Semolina
Semolina cooks perfectly in a microwave oven, with no risk of
burning. Simply add a volume of water equal to that of the semolina,
bring to the boil covered on 1000 W for 2 min 30 sec (for 200 g of
medium-grain semolina with 0.2 l of water), then cook on 250 W for
about 3 min while it swells.
Pasta
Remember to salt the cooking water and stir once during cooking.
When the liquid is bubbling, cook for 7 or 8 minutes on 1000 W for
250 g of pasta (for 1 litre of water) and 10 minutes for 250 g of
ravioli.
Dried vegetables
Fully cover with water and leave to soak for one night. The next day,
rinse and drain. Cover with water. Do not salt before cooking (this
hardens the dried vegetables). Cook for 10 minutes on 1000 W then
15 to 30 minutes on 250 W. Monitor the cooking and add water if
necessary: the dried vegetables must always be covered with liquid.
Jacket potatoes
Varieties of potatoes vary in their suitability for cooking by microwave.
The ideal size of potato to be cooked by microwave or Combination
is 200 g -250 g. Microwaving jacket potatoes is quicker than
Combination, but will produce a soft result. Combination cooking will
produce a drier, crisper texture. If you wish to further enhance the
browning at the end of cooking, use the GRILL (see chart below).
Before Cooking wash potatoes and prick skins several times. Spread
around edge of turntable.
After Cooking remove from oven and wrap in tin foil to retain the
heat. Leave to stand for 5 mins.
Eggs & Cheese
Rice, Pasta, Dried Vegetables & Jacket Potatoes
Jacket Potatoes - Manual Cooking Chart
Qty
1
2
4
Mins. on 1000 W
4-7
7-10
11-15
Mins. on Grill to crisp
8-10
10-12
11-13
La page charge ...
La page charge ...
La page charge ...
La page charge ...
La page charge ...
La page charge ...
La page charge ...
La page charge ...
La page charge ...
La page charge ...
La page charge ...
La page charge ...
La page charge ...
La page charge ...
La page charge ...
La page charge ...
La page charge ...
La page charge ...
La page charge ...
La page charge ...
La page charge ...
La page charge ...
La page charge ...
La page charge ...
La page charge ...
La page charge ...
La page charge ...
La page charge ...
La page charge ...
La page charge ...
La page charge ...
La page charge ...
La page charge ...
La page charge ...
La page charge ...
La page charge ...
La page charge ...
La page charge ...
La page charge ...
La page charge ...
La page charge ...
La page charge ...
La page charge ...
La page charge ...
La page charge ...
La page charge ...
La page charge ...
La page charge ...
La page charge ...
La page charge ...
La page charge ...
La page charge ...
La page charge ...
La page charge ...
La page charge ...
La page charge ...
La page charge ...
La page charge ...
La page charge ...
La page charge ...
La page charge ...
La page charge ...
La page charge ...
La page charge ...
La page charge ...
La page charge ...
La page charge ...
La page charge ...
La page charge ...
La page charge ...
La page charge ...
La page charge ...
La page charge ...
La page charge ...
La page charge ...
La page charge ...
La page charge ...
La page charge ...
La page charge ...
La page charge ...
La page charge ...
La page charge ...
La page charge ...
La page charge ...
La page charge ...
La page charge ...
La page charge ...
La page charge ...
La page charge ...
La page charge ...
La page charge ...
La page charge ...
La page charge ...
La page charge ...
La page charge ...
La page charge ...
La page charge ...
La page charge ...
La page charge ...
La page charge ...
La page charge ...
La page charge ...
La page charge ...
La page charge ...
La page charge ...
La page charge ...
La page charge ...
La page charge ...
La page charge ...
La page charge ...
La page charge ...
La page charge ...
La page charge ...
La page charge ...
La page charge ...
La page charge ...
La page charge ...
La page charge ...
La page charge ...
La page charge ...
La page charge ...
La page charge ...
La page charge ...
La page charge ...
La page charge ...
La page charge ...
La page charge ...
La page charge ...
La page charge ...
La page charge ...
La page charge ...
La page charge ...
La page charge ...
La page charge ...
La page charge ...
La page charge ...
La page charge ...
La page charge ...
La page charge ...
La page charge ...
La page charge ...
La page charge ...
La page charge ...
La page charge ...
La page charge ...
La page charge ...
La page charge ...
La page charge ...
La page charge ...
La page charge ...
La page charge ...
La page charge ...
La page charge ...
La page charge ...
-
 1
1
-
 2
2
-
 3
3
-
 4
4
-
 5
5
-
 6
6
-
 7
7
-
 8
8
-
 9
9
-
 10
10
-
 11
11
-
 12
12
-
 13
13
-
 14
14
-
 15
15
-
 16
16
-
 17
17
-
 18
18
-
 19
19
-
 20
20
-
 21
21
-
 22
22
-
 23
23
-
 24
24
-
 25
25
-
 26
26
-
 27
27
-
 28
28
-
 29
29
-
 30
30
-
 31
31
-
 32
32
-
 33
33
-
 34
34
-
 35
35
-
 36
36
-
 37
37
-
 38
38
-
 39
39
-
 40
40
-
 41
41
-
 42
42
-
 43
43
-
 44
44
-
 45
45
-
 46
46
-
 47
47
-
 48
48
-
 49
49
-
 50
50
-
 51
51
-
 52
52
-
 53
53
-
 54
54
-
 55
55
-
 56
56
-
 57
57
-
 58
58
-
 59
59
-
 60
60
-
 61
61
-
 62
62
-
 63
63
-
 64
64
-
 65
65
-
 66
66
-
 67
67
-
 68
68
-
 69
69
-
 70
70
-
 71
71
-
 72
72
-
 73
73
-
 74
74
-
 75
75
-
 76
76
-
 77
77
-
 78
78
-
 79
79
-
 80
80
-
 81
81
-
 82
82
-
 83
83
-
 84
84
-
 85
85
-
 86
86
-
 87
87
-
 88
88
-
 89
89
-
 90
90
-
 91
91
-
 92
92
-
 93
93
-
 94
94
-
 95
95
-
 96
96
-
 97
97
-
 98
98
-
 99
99
-
 100
100
-
 101
101
-
 102
102
-
 103
103
-
 104
104
-
 105
105
-
 106
106
-
 107
107
-
 108
108
-
 109
109
-
 110
110
-
 111
111
-
 112
112
-
 113
113
-
 114
114
-
 115
115
-
 116
116
-
 117
117
-
 118
118
-
 119
119
-
 120
120
-
 121
121
-
 122
122
-
 123
123
-
 124
124
-
 125
125
-
 126
126
-
 127
127
-
 128
128
-
 129
129
-
 130
130
-
 131
131
-
 132
132
-
 133
133
-
 134
134
-
 135
135
-
 136
136
-
 137
137
-
 138
138
-
 139
139
-
 140
140
-
 141
141
-
 142
142
-
 143
143
-
 144
144
-
 145
145
-
 146
146
-
 147
147
-
 148
148
-
 149
149
-
 150
150
-
 151
151
-
 152
152
-
 153
153
-
 154
154
-
 155
155
-
 156
156
-
 157
157
-
 158
158
-
 159
159
-
 160
160
-
 161
161
-
 162
162
-
 163
163
-
 164
164
-
 165
165
-
 166
166
-
 167
167
-
 168
168
-
 169
169
-
 170
170
-
 171
171
-
 172
172
-
 173
173
-
 174
174


Panasonic INVERTER NNQ553W Le manuel du propriétaire
- Catégorie
- Micro-ondes
- Taper
- Le manuel du propriétaire
dans d''autres langues
Documents connexes
-
Panasonic nn a 764w wbwpg Le manuel du propriétaire
-
Panasonic HLMX465B Le manuel du propriétaire
-
-
-
-
Panasonic nn q 543 Le manuel du propriétaire
-