Siemens Vacuum Cleaner Le manuel du propriétaire
- Catégorie
- Aspirateurs
- Taper
- Le manuel du propriétaire

VS06G....
Instructions for use
Notice d'utilisation
Gebruiksaanwijzing
Instrucciones de uso
Brugsanvisning
Bruksanvisning
Bruksanvisning
Käyttöohje
Instruções de utilização
en
fr
nl
es
da
no
sv
fi
pt
å

fr
nl
es
da
Intended use . . . . . . . . . . . . . . . . . . . . . . . . . . . . . . . . . . . . . . . . . . . . . . . . . . . . . . . . . .4
Safety information . . . . . . . . . . . . . . . . . . . . . . . . . . . . . . . . . . . . . . . . . . . . . . . . . . . . .4
Disposal information . . . . . . . . . . . . . . . . . . . . . . . . . . . . . . . . . . . . . . . . . . . . . . . . . . . .5
Your vacuum cleaner . . . . . . . . . . . . . . . . . . . . . . . . . . . . . . . . . . . . . . . . . . . . . . . . . . .6
Setting up . . . . . . . . . . . . . . . . . . . . . . . . . . . . . . . . . . . . . . . . . . . . . . . . . . . . . . . . . . . .7
Vacuuming . . . . . . . . . . . . . . . . . . . . . . . . . . . . . . . . . . . . . . . . . . . . . . . . . . . . . . . . . . .9
When the work is done . . . . . . . . . . . . . . . . . . . . . . . . . . . . . . . . . . . . . . . . . . . . . . . .12
Changing the dust bag . . . . . . . . . . . . . . . . . . . . . . . . . . . . . . . . . . . . . . . . . . . . . . . . .14
Care . . . . . . . . . . . . . . . . . . . . . . . . . . . . . . . . . . . . . . . . . . . . . . . . . . . . . . . . . . . . . . .17
Optional extra . . . . . . . . . . . . . . . . . . . . . . . . . . . . . . . . . . . . . . . . . . . . . . . . . . . . . . . .18
Utilisation conforme aux prescriptions et à l’emploi prévu . . . . . . . . . . . . . . . . . . . . .20
Consignes de sécurité . . . . . . . . . . . . . . . . . . . . . . . . . . . . . . . . . . . . . . . . . . . . . . . . .20
Indication pour la mise au rebut . . . . . . . . . . . . . . . . . . . . . . . . . . . . . . . . . . . . . . . . . .21
Description de l’appareil . . . . . . . . . . . . . . . . . . . . . . . . . . . . . . . . . . . . . . . . . . . . . . . .22
Mise en service . . . . . . . . . . . . . . . . . . . . . . . . . . . . . . . . . . . . . . . . . . . . . . . . . . . . . . .23
Aspiration . . . . . . . . . . . . . . . . . . . . . . . . . . . . . . . . . . . . . . . . . . . . . . . . . . . . . . . . . . .25
Après le trevail . . . . . . . . . . . . . . . . . . . . . . . . . . . . . . . . . . . . . . . . . . . . . . . . . . . . . . .28
Changement de filtre
. . . . . . . . . . . . . . . . . . . . . . . . . . . . . . . . . . . . . . . . . . . . . . . . . .30
Entretie
. . . . . . . . . . . . . . . . . . . . . . . . . . . . . . . . . . . . . . . . . . . . . . . . . . . . . . . . . . . . .33
Accessoires spéciaux . . . . . . . . . . . . . . . . . . . . . . . . . . . . . . . . . . . . . . . . . . . . . . . . . .34
Gebruik volgens de voorschriften . . . . . . . . . . . . . . . . . . . . . . . . . . . . . . . . . . . . . . . . .36
Veiligheidsvoorschriften . . . . . . . . . . . . . . . . . . . . . . . . . . . . . . . . . . . . . . . . . . . . . . . .36
Instructies voor recycling . . . . . . . . . . . . . . . . . . . . . . . . . . . . . . . . . . . . . . . . . . . . . . .37
Beschrijving van het apparaat . . . . . . . . . . . . . . . . . . . . . . . . . . . . . . . . . . . . . . . . . . .38
De stofzuiger in gebruik nemen . . . . . . . . . . . . . . . . . . . . . . . . . . . . . . . . . . . . . . . . . .39
Zuigen . . . . . . . . . . . . . . . . . . . . . . . . . . . . . . . . . . . . . . . . . . . . . . . . . . . . . . . . . . . . . .41
Na het werk . . . . . . . . . . . . . . . . . . . . . . . . . . . . . . . . . . . . . . . . . . . . . . . . . . . . . . . . . .44
Vervangen van de filter . . . . . . . . . . . . . . . . . . . . . . . . . . . . . . . . . . . . . . . . . . . . . . . . .46
Onderhoud . . . . . . . . . . . . . . . . . . . . . . . . . . . . . . . . . . . . . . . . . . . . . . . . . . . . . . . . . .49
Extra toebehoren . . . . . . . . . . . . . . . . . . . . . . . . . . . . . . . . . . . . . . . . . . . . . . . . . . . . . .50
Uso de acuerdo con las especificaciones . . . . . . . . . . . . . . . . . . . . . . . . . . . . . . . . . .52
Consejos y advertencias de seguridad . . . . . . . . . . . . . . . . . . . . . . . . . . . . . . . . . . . .52
Indicaciones para eliminar el material de embalaje . . . . . . . . . . . . . . . . . . . . . . . . . . .53
Descripción de los aparatos . . . . . . . . . . . . . . . . . . . . . . . . . . . . . . . . . . . . . . . . . . . .54
Puesta en marcha . . . . . . . . . . . . . . . . . . . . . . . . . . . . . . . . . . . . . . . . . . . . . . . . . . . .55
Aspirar . . . . . . . . . . . . . . . . . . . . . . . . . . . . . . . . . . . . . . . . . . . . . . . . . . . . . . . . . . . . .57
Tras el trabajo
. . . . . . . . . . . . . . . . . . . . . . . . . . . . . . . . . . . . . . . . . . . . . . . . . . . . . . . .60
Cambio del filtro
. . . . . . . . . . . . . . . . . . . . . . . . . . . . . . . . . . . . . . . . . . . . . . . . . . . . . .62
Cuidados
. . . . . . . . . . . . . . . . . . . . . . . . . . . . . . . . . . . . . . . . . . . . . . . . . . . . . . . . . . .65
Accesorios opcionales . . . . . . . . . . . . . . . . . . . . . . . . . . . . . . . . . . . . . . . . . . . . . . . . .66
Bestemmelsesmæssig anvendelse . . . . . . . . . . . . . . . . . . . . . . . . . . . . . . . . . . . . . . . .68
Sikkerhedsanvisninger . . . . . . . . . . . . . . . . . . . . . . . . . . . . . . . . . . . . . . . . . . . . . . . . .68
Anvisninger til bortskaffelse . . . . . . . . . . . . . . . . . . . . . . . . . . . . . . . . . . . . . . . . . . . . .69
Beskrivelse af støvsugeren . . . . . . . . . . . . . . . . . . . . . . . . . . . . . . . . . . . . . . . . . . . . . .70
Ibrugtagning . . . . . . . . . . . . . . . . . . . . . . . . . . . . . . . . . . . . . . . . . . . . . . . . . . . . . . . . .71
Støvsugning . . . . . . . . . . . . . . . . . . . . . . . . . . . . . . . . . . . . . . . . . . . . . . . . . . . . . . . . .73
Efter arbejdet . . . . . . . . . . . . . . . . . . . . . . . . . . . . . . . . . . . . . . . . . . . . . . . . . . . . . . . . .76
Filterskift . . . . . . . . . . . . . . . . . . . . . . . . . . . . . . . . . . . . . . . . . . . . . . . . . . . . . . . . . . . .78
Vedligeholdelse . . . . . . . . . . . . . . . . . . . . . . . . . . . . . . . . . . . . . . . . . . . . . . . . . . . . . . .81
Ekstra tilbehør / Reservedele . . . . . . . . . . . . . . . . . . . . . . . . . . . . . . . . . . . . . . . . . . . .82
en

3
sv
fi
pt
Tiltenkt bruk . . . . . . . . . . . . . . . . . . . . . . . . . . . . . . . . . . . . . . . . . . . . . . . . . . . . . . . . .84
Sikkerhetsanvisninger . . . . . . . . . . . . . . . . . . . . . . . . . . . . . . . . . . . . . . . . . . . . . . . . . .84
Informasjon om kassering . . . . . . . . . . . . . . . . . . . . . . . . . . . . . . . . . . . . . . . . . . . . . . .85
Beskrivelse av apparatet . . . . . . . . . . . . . . . . . . . . . . . . . . . . . . . . . . . . . . . . . . . . . . . .86
Ta støvsugeren i bruk . . . . . . . . . . . . . . . . . . . . . . . . . . . . . . . . . . . . . . . . . . . . . . . . . .87
Støvsuging . . . . . . . . . . . . . . . . . . . . . . . . . . . . . . . . . . . . . . . . . . . . . . . . . . . . . . . . . .89
Når jobben er gjort . . . . . . . . . . . . . . . . . . . . . . . . . . . . . . . . . . . . . . . . . . . . . . . . . . . .92
Bytte av filter . . . . . . . . . . . . . . . . . . . . . . . . . . . . . . . . . . . . . . . . . . . . . . . . . . . . . . . . .94
Vedlikehold . . . . . . . . . . . . . . . . . . . . . . . . . . . . . . . . . . . . . . . . . . . . . . . . . . . . . . . . . .97
Ekstra tilbehør / Reservedeler . . . . . . . . . . . . . . . . . . . . . . . . . . . . . . . . . . . . . . . . . . . .98
Föreskriven användning . . . . . . . . . . . . . . . . . . . . . . . . . . . . . . . . . . . . . . . . . . . . . . .100
Säkerhetsanvisningar . . . . . . . . . . . . . . . . . . . . . . . . . . . . . . . . . . . . . . . . . . . . . . . . .100
Råd beträffande avfallshanteringen . . . . . . . . . . . . . . . . . . . . . . . . . . . . . . . . . . . . . .101
Beskrivning av produkten . . . . . . . . . . . . . . . . . . . . . . . . . . . . . . . . . . . . . . . . . . . . . .102
Start av dammsugaren . . . . . . . . . . . . . . . . . . . . . . . . . . . . . . . . . . . . . . . . . . . . . . . .103
Dammsugning . . . . . . . . . . . . . . . . . . . . . . . . . . . . . . . . . . . . . . . . . . . . . . . . . . . . . . .105
Efter dammsugningen . . . . . . . . . . . . . . . . . . . . . . . . . . . . . . . . . . . . . . . . . . . . . . . . .108
Byta filter . . . . . . . . . . . . . . . . . . . . . . . . . . . . . . . . . . . . . . . . . . . . . . . . . . . . . . . . . . .110
Skötsel och vård . . . . . . . . . . . . . . . . . . . . . . . . . . . . . . . . . . . . . . . . . . . . . . . . . . . . .113
Extra tillbehör / Reservdelar . . . . . . . . . . . . . . . . . . . . . . . . . . . . . . . . . . . . . . . . . . . .114
Määräystenmukainen käyttö . . . . . . . . . . . . . . . . . . . . . . . . . . . . . . . . . . . . . . . . . . . .116
Turvaohjeet . . . . . . . . . . . . . . . . . . . . . . . . . . . . . . . . . . . . . . . . . . . . . . . . . . . . . . . . .116
Ohjeita jätehuollosta . . . . . . . . . . . . . . . . . . . . . . . . . . . . . . . . . . . . . . . . . . . . . . . . . .117
Laitteen kuvaus . . . . . . . . . . . . . . . . . . . . . . . . . . . . . . . . . . . . . . . . . . . . . . . . . . . . . .118
Käyttöönotto . . . . . . . . . . . . . . . . . . . . . . . . . . . . . . . . . . . . . . . . . . . . . . . . . . . . . . . .119
Imurointi . . . . . . . . . . . . . . . . . . . . . . . . . . . . . . . . . . . . . . . . . . . . . . . . . . . . . . . . . . .121
Työn jälkeen . . . . . . . . . . . . . . . . . . . . . . . . . . . . . . . . . . . . . . . . . . . . . . . . . . . . . . . .124
Suodattimen vaihto . . . . . . . . . . . . . . . . . . . . . . . . . . . . . . . . . . . . . . . . . . . . . . . . . . .126
Hoito . . . . . . . . . . . . . . . . . . . . . . . . . . . . . . . . . . . . . . . . . . . . . . . . . . . . . . . . . . . . . .129
Erikoisvarusteet / Varaosat . . . . . . . . . . . . . . . . . . . . . . . . . . . . . . . . . . . . . . . . . . . . .130
Descrição do aparelho . . . . . . . . . . . . . . . . . . . . . . . . . . . . . . . . . . . . . . . . . . . .132
Utilização indevida . . . . . . . . . . . . . . . . . . . . . . . . . . . . . . . . . . . . . . . . . . . . . . .132
Indicações de segurança . . . . . . . . . . . . . . . . . . . . . . . . . . . . . . . . . . . . . . . . . .133
Indicações relativas à eliminação . . . . . . . . . . . . . . . . . . . . . . . . . . . . . . . . . . . .134
Colocação em funcionamento . . . . . . . . . . . . . . . . . . . . . . . . . . . . . . . . . . . . . .135
Aspirar . . . . . . . . . . . . . . . . . . . . . . . . . . . . . . . . . . . . . . . . . . . . . . . . . . . . . . . . .137
Após o trabalho . . . . . . . . . . . . . . . . . . . . . . . . . . . . . . . . . . . . . . . . . . . . . . . . .140
Mudar o filtro . . . . . . . . . . . . . . . . . . . . . . . . . . . . . . . . . . . . . . . . . . . . . . . . . . .142
Manutenção . . . . . . . . . . . . . . . . . . . . . . . . . . . . . . . . . . . . . . . . . . . . . . . . . . . .145
Acessórios especiais . . . . . . . . . . . . . . . . . . . . . . . . . . . . . . . . . . . . . . . . . . . . .146
no

4
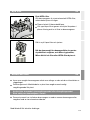
Congratulations on your purchase of a
Siemens VS06 vacuum cleaner.
This instruction manual describes various
VS06 models, which means that some of
the equipment features and functions
described may not be available on your
model.
You should only use original Siemens
accessories, which have been specially
developed for your vacuum cleaner to
achieve the best possible vacuuming
results.
Please keep this instruction manual in a
safe place. If you pass the vacuum
cleaner on to someone else, please also
pass on this instruction manual.
Intended use
This vacuum cleaner is intended for
domestic use only, not for commercial
use.
Only use this vacuum cleaner in
accordance with the instructions in this
instruction manual.
The manufacturer will not accept any
responsibility for damage caused by
improper use or incorrect operation.
Therefore, you must note the following
points.
The vacuum cleaner must only be
operated with:
Manufacturer's original dust bags
Manufacturer's original replacement
parts, accessories or special
accessories
Safety information
This vacuum cleaner complies with the
generally accepted standards of
technology and relevant safety
regulations.
Always observe the information on
the rating plate when using the
vacuum cleaner and connecting to
the power supply.
Never use the vacuum cleaner
without a dust bag fitted.
=> This can damage the appliance.
The appliance may be used by
children over the age of
8 years and by persons with
reduced physical, sensory or
mental capacity or by persons
with a lack of experience or
knowledge if they are
supervised or have been
instructed on the safe use of
the appliance and the have
understood the potential
dangers of using the appli-
ance.
Children must never play with
the appliance
Cleaning and user
maintenance must never be
carried out by children
without supervision.
The vacuum cleaner may not be used for:
cleaning persons or animals
vacuuming up:
– hazardous, sharp-edged, hot or red
hot substances.
– damp or liquid substances
– highly flammable or explosive
substances and gases
– ash, soot from tiled stoves and
central heating systems
– toner dust from printers and
copiers.
Keep suction away from your head
when using the handle, nozzles or
pipe. => Risk of injury.
Stand the appliance on a firm, secure
surface when vacuuming.
When vacuuming stairs, the appliance
must always be lower down than you.
In the following cases, stop using the
appliance immediately and contact
the after-sales
service:
en

5
– if the mains connection cable is
damaged.
– if you have accidentally vacuumed
up some liquid or liquid has entered
the inside of the appliance
– if the appliance has been dropped.
Do not use the power cord to carry
the vacuum cleaner.
Fully extend the power cord when
using the vacuum cleaner
continuously for several hours.
When disconnecting the appliance
from the mains, pull on the plug, not
the power cord.
Do not pull the power cord around
sharp corners or allow it to become
trapped.
Unplug the power cord from the
mains before carrying out any work
on the vacuum cleaner or its
accessories.
Do not use the vacuum cleaner if it
is damaged. Unplug the power cord
from the mains if a fault is detected.
For safety reasons, only authorised
after-sales service personnel are
permitted to carry out repairs and
fit replacement parts to the vacuum
cleaner.
Protect the vacuum cleaner from
outside weather conditions,
moisture and sources of heat.
The vacuum cleaner is not suitable
for use on building sites.
=> Vacuuming up building rubble
could damage the appliance.
Switch off the appliance when it is
not in use.
At the end of its life, the appliance
should be rendered unusable, then
disposed of in an appropriate
manner.
Plastic bags and films must be kept
out of the reach of children before
disposal (risk of suffocation).
do not pour any flammable
substances or substances
containing alcohol onto the filters
(filter bag, motor protective filter,
exhaust filter, etc.).
Disposal information
Packaging
The packaging is designed to protect
the vacuum cleaner from being
damaged during transportation. It is
made of environmentally friendly
materials and can be recycled.
Dispose of packaging that is no
longer required at an appropriate
recycling point.
Used vacuum cleaners
Used vacuum cleaners still contain
many valuable materials. Therefore,
please take your used vacuum cleaner
to your retailer or recycling centre to
be recycled. For current disposal
methods, please enquire at your
retailer or your local council.
Disposal of filters and dust bags
Filters and dust bags are made from
environmentally friendly materials.
As long as they do not contain
substances that are not permitted to
be disposed of in the household
rubbish, you can dispose of them
with your normal household rubbish.
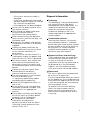
!
Please note
The mains socket must be protected
by at least a 16 amp fuse.
If a fuse should blow when you switch
on the appliance, this may be because
other electrical appliances which have
a high current draw are connected to
the same power circuit.
To prevent the fuse from blowing,
select the lowest power setting
before switching the appliance on,
and increase the power only once it
is running.
en

6
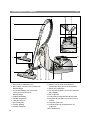
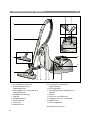
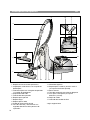
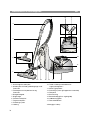
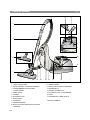
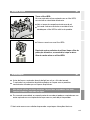
Your vacuum cleaner
en
1 Adjustable floor tool
2 Hard-floor brush with locking collar*
3 Telescopic tube with adjusting sleeve
and locking collar
4 Handle
5 Flexible tube
6 Upholstery nozzle*
7 Crevice nozzle*
8 Parking aid
9 Power cord
10 On/off button with electronic suction
regulator*
11 Micro-hygiene filter
12 Storage aid (on underside of unit)
13 Dust bag
14 Dust bag compartment lid
15 Carrying handles (on the front and back)
16 Exhaust grille
17 Dust bag change indicator*
*Depending on equipment
5
17* 1516 14
1213
1
3
6* 7*
4
8
9
10*
11
2*

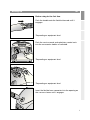
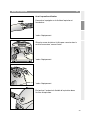
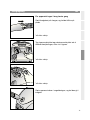
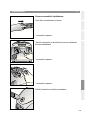
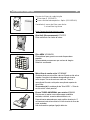
Setting up en
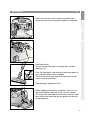
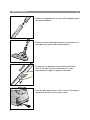
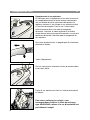
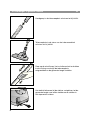
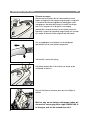
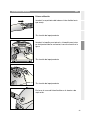
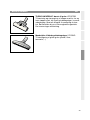
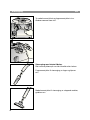
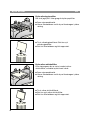
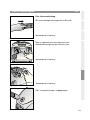
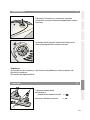
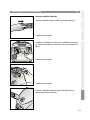
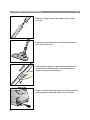
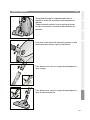
Before using for the first time
Push the handle onto the flexible tube and until it
engages.
*
Depending on equipment level
Push the crevice nozzle and upholstery nozzle back
into the accessories holder as indicated.
*
Depending on equipment level
*
Depending on equipment level
Insert the flexible hose connector into the opening on
the vacuum cleaner until it engages.
*
*
*
CLICK!
7

8
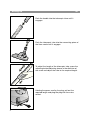
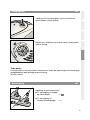
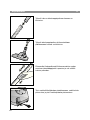
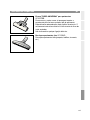
Setting up en
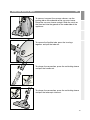
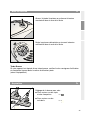
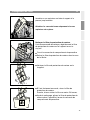
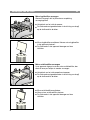
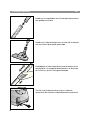
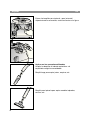
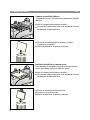
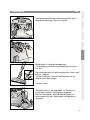
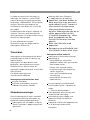
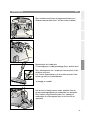
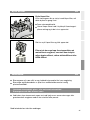
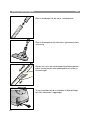
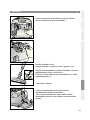
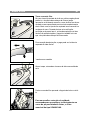
Push the telescopic tube into the connecting piece of
the floor nozzle until it engages.
To adjust the length of the telescopic tube, press the
adjusting button/adjusting sleeve in the direction of
the arrow and adjust the tube to the required length.
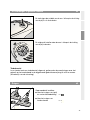
Push the handle into the telescopic tube until it
engages.
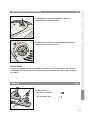
Holding the power cord by the plug, pull out the
required length and plug the plug into the mains
socket.

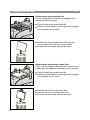
9
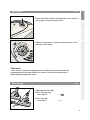
Vacuuming en
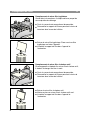
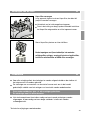
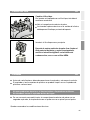
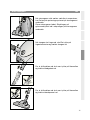
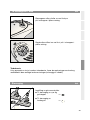
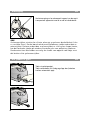
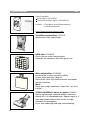
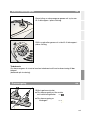
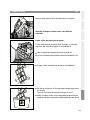
Adjusting the floor tool:
䡲
For cleaning rugs
and carpets =>
䡲
For cleaning
hard floors =>
Setting up en
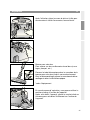
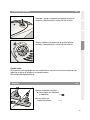
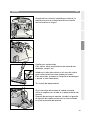
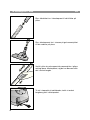
Press the on/off button in the direction of the arrow to
switch your vacuum cleaner on/off.
Adjust the suction by turning the on/off button in the
direction of the arrow.
Turbo brush
If your vacuum cleaner is equipped with a turbo brush, please consult the
accompanying instruction manual for notes on its use and maintenance.
(Depending on equipment level ).

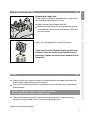
10
Vacuuming en
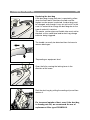
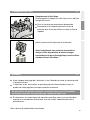
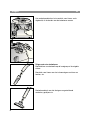
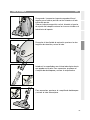
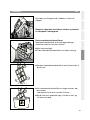
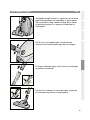
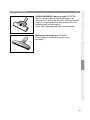
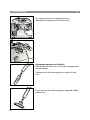
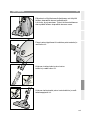
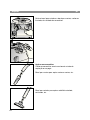
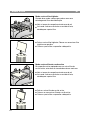
Remove the upholstery nozzle and crevice nozzle from
the accessories holder as illustrated.
Vacuuming with accessories
Attach the nozzles to the suction pipe or handle as
required:
Crevice nozzle for vacuuming crevices and corners,
etc.
Upholstery nozzle
for vacuuming upholstered furniture, curtains, etc.

11
Vacuuming en
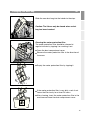
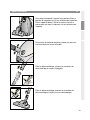
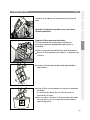
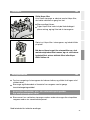
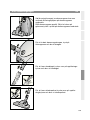
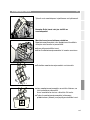
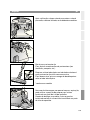
After use, push the crevice nozzle and upholstery
nozzle back into the accessories holder as indicated.
When stopping cleaning for a moment, you can use
the parking aid on the back of the vacuum cleaner.
Once you have switched off the vacuum cleaner, slide
the catch on the floor tool into the groove on the rear
of the appliance.
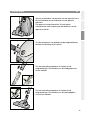
Hard-floor brush
For vacuuming hard floor coverings (tiles, parquet
flooring, etc.)
Push the telescopic tube into the connecting piece of
the hard-floor brush until it engages.
Press on the unlatching sleeve and pull out the tele-
scopic tube to disconnect.
*
Depending on equipment level
*

12
Unplug the vacuum cleaner.
Tug the power cord briefly and let go.
The cable then rewinds automatically.
When the work is done en
The appliance can also be carried using one of the two
handles when vacuuming steps, for example.
Vacuuming en
Caution!
Floor tools are subject to a certain amount of wear, depending on the type of
hard floors you have (e.g. rough, rustic tiles).
Therefore, you must check the underside of the floor tool at regular intervals.
Worn undersides of floor tools may have sharp edges that can damage sensitive
hard floors, such as parquet or linoleum. The manufacturer does not accept any
responsibility for damage caused by worn floor tools.

13
When the work is done en
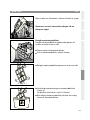
To release the connection, press the unlatching sleeve
and pull the handle out.
To release the connection, press the unlatching sleeve
and pull the telescopic tube out.
To remove the flexible tube, press the two lugs
together and pull the tube out.
To store or transport the vacuum cleaner, use the
parking aid on the underside of the vacuum cleaner.
Stand the vacuum cleaner upright. Slide the catch on
the floor tool into the groove on the underside of the
appliance.

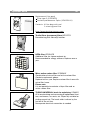
14
Changing the dust bag en
Replacing the dust bag
If the dust bag change indicator is completely yellow
when the floor tool is lifted from the floor and the
highest suction power is selected, the dust bag must
be changed, even though it may not yet be full. In this
case it is essential to change the dust bag due to the
type of material it contains.
The nozzle, suction pipe and flexible tube must not be
blocked, as this would also lead to dust bag change
indicator being triggered.
The handle can easily be detached from the hose to
remove blockages.
*
Depending on equipment level
Open the lid by moving the locking lever in the
direction of the arrow.
Seal the dust bag by pulling the sealing strip and then
remove it.
For increased uptake of dust, even if the dust bag
is already part-full, we recommend the use of
replacement filter type VZ41GPLUS.
*

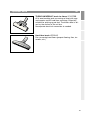
15
Changing the dust bag en
Slide the new dust bag into the holder to the stop.
Caution: The lid can only be closed when a dust
bag has been inserted.
Cleaning the motor protection filter
The motor protection filter should be cleaned at
regular intervals by tapping it or washing it out.
䡲
Open the dust compartment cover.
䡲
Remove the motor protection filter in the direction of
the arrow.
䡲
Empty the motor protection filter by tapping it.
䡲
If the motor protection filter is very dirty, wash it out.
Leave the filter to dry for at least 24 hours.
䡲
After cleaning, insert the motor protection filter in the
machine and close the dust compartment cover.

16
Changing the dust bag en
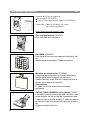
Replacing the micro-hygiene filter
The micro-hygiene filter should be changed: when
starting a newpack of bags
䡲
Open the dust bag compartment lid.
䡲
Release the filter holder by moving the locking lever
in the direction of the arrow.
䡲
Remove the micro-hygiene filter. Insert the new
micro-hygiene filter into the vacuum cleaner.
䡲
Reinsert the filter holder and clip into place.
Replacing the micro active carbon filter
If your vacuum cleaner is equipped with a micro active
carbon filter, this should be replaced every six months.
䡲
Open the dust bag compartment lid.
䡲
Release the filter holder by moving the locking lever
in the direction of the arrow.
䡲
Remove the micro active carbon filter.
䡲
Insert the new micro active carbon filter.
䡲
Reinsert the filter holder and clip into place.

17
Changing the dust bag en
Replacing the Hepa filter
If your vacuum cleaner is equipped with a Hepa filter,
this should be replaced once a year.
䡲
Open the dust bag compartment lid.
䡲
Release the Hepa filter by moving the locking lever
in the direction of the arrow and remove it from the
vacuum cleaner.
Insert the new Hepa filter and clip into place.
If you have used the vacuum cleaner for fine dust
particles, clean the motor protection filter and, if
necessary, replace the micro active carbon filter or
Hepa filter.
䡲
Always switch the vacuum cleaner off and disconnect the power cord from the
mains before cleaning the vacuum cleaner.
䡲
The vacuum cleaner and plastic accessories can be cleaned with a commercial
plasticcleaner.
Do not use abrasive, glass or all-purpose cleaners.
Never immerse the vacuum cleaner in water.
䡲
The dust compartment can, if necessary, be cleaned with a second vacuum
cleaner or simply wiped with a a dry cloth or dusting brush.
Subject to technical changes.
Care en

18
de
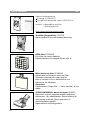
Optional extra
en
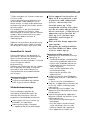
Replacement filter pack
Filter type G (
VZ41AFG)
For best performance: Gplus (VZ41GPLUS)
Contents: 4 filter bags with seal
1 micro-hygiene filter
http://www
.dust-bag-siemens.com
HEPA filter VZ153HFB
Additional filter for cleaner exhaust air.
Recommended for allergy sufferers. Replace once a
year.
Micro active carbon filter VZ192MAF
Combination of micro filter and active carbon filter.
Combats unpleasant odours.
Replace twice a year. Replace carbon filter frame with
micro filter frame.
Please note
It is not possible to combine a Hepa filter and an
active carbon filter.
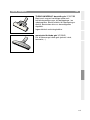
TURBO-UNIVERSAL
®
brush for upholstery VZ46001
All in one brushing and vacuuming of upholstered furni-
ture, mattresses, car seats, etc. Especially suitable for
picking up pet hair. The brush roller is driven by the
suction of the air flow.
No separate electrical connection is needed.
Textile filters (permanent filters) VZ10TFG
Reusable bag with Velcro(R) fastener.

19
Optional extra
en
TURBO-UNIVERSAL
®
brush for floors VZ102TBB
All in one brushing and vacuuming of short-pile rugs
and carpets and all hard floor coverings. Especially
suitable for picking up pet hair. The brush roller is dri-
ven by the suction of the air flow.
No separate electrical connection is needed.
Hard-floor brush VZ123HD
For vacuuming hard floors (parquet flooring, tiles, ter-
racotta, etc.)

20
Nous vous remercions d'avoir choisi un
aspirateur Siemens de la série VS06.
Cette notice d'utilisation présente différents
modèles VS06. Il est donc possible que les
caractéristiques et fonctions décrites ne
correspondent pas toutes à votre modèle.
Utilisez exclusivement les accessoires
d'origine Siemens. Ils sont spécialement
conçus pour votre aspirateur, afin d'obtenir
un résultat de nettoyage optimal.
Conservez cette notice d'utilisation. Si
vous remettez l'aspirateur à un tiers,
veuillez-y joindre sa notice d'utilisation.
Utilisation conforme aux
prescriptions et à l'emploi prévu
Cet aspirateur est destiné exclusivement à
l'emploi domestique et non pas à l'usage
industriel.
Utilisez l'aspirateur exclusivement selon
les indications figurant dans cette notice
d'utilisation.
Le fabricant n'est pas responsable
d'éventuels dommages résultant d'un
emploi non conforme ou d'un maniement
incorrect.
Veuillez donc respecter impérativement
les consignes suivantes!
L'aspirateur doit être utilisé uniquement
avec :
un sac aspirateur d'origine
des pièces de rechange, accessoires ou
accessoires spéciaux d'origine
Consignes de sécurité
Cet aspirateur répond aux règles
techniques reconnues et aux prescriptions
de sécurité applicables.
Raccorder et mettre l'aspirateur en
service uniquement selon les
indications figurant sur la plaque
signalétique..
Ne jamais aspirer sans sac aspirateur.
=> L'appareil peut être endommagé!
L'appareil peut tre utilisé par
des enfants à par-tir de 8 ans et
par des personnes ayant des
capa-cités physiques,
sensorielles ou mentales
restreintes ou ayant un manque
d'expérience et / ou de
connaissances s'ils sont sous
surveillance ou ont été
informés de la manipulation
sûre de l'appareil et ont
compris les dangers qui en
résultent.
Les enfants ne doivent pas
jouer avec l'appareil.
Le nettoyage et la maintenance
ne doivent pas tre effectués par
des enfants sans surveillance.
L'aspirateur ne doit pas être utilisé pour :
aspirer sur des personnes ou des
animaux
l'aspiration de :
– substances nocives, à arêtes vives,
chaudes ou incandescentes
– substances humides ou liquides
– substances et gaz facilement
inflammables ou explosifs
– cendres, suie des poêles et
d'installations de chauffage central
– poussières de toner provenant
d'imprimantes et de photocopieurs.
Eviter d'aspirer avec la poignée, les
suceurs et le tube à proximité de la
tête. => Il y a risque de blessures!
Lors de l'aspiration, placez l'appareil
sur un support ferme, sûr.
Lors de l'aspiration sur des escaliers,
l'appareil doit toujours se trouver
plus bas que l'utilisateur.
Dans les cas suivants, vous devez
immédiatement mettre l'appareil hors
service et contacter le service après-
vente :
– si le cordon électrique est
endommagé.
fr
La page est en cours de chargement...
La page est en cours de chargement...
La page est en cours de chargement...
La page est en cours de chargement...
La page est en cours de chargement...
La page est en cours de chargement...
La page est en cours de chargement...
La page est en cours de chargement...
La page est en cours de chargement...
La page est en cours de chargement...
La page est en cours de chargement...
La page est en cours de chargement...
La page est en cours de chargement...
La page est en cours de chargement...
La page est en cours de chargement...
La page est en cours de chargement...
La page est en cours de chargement...
La page est en cours de chargement...
La page est en cours de chargement...
La page est en cours de chargement...
La page est en cours de chargement...
La page est en cours de chargement...
La page est en cours de chargement...
La page est en cours de chargement...
La page est en cours de chargement...
La page est en cours de chargement...
La page est en cours de chargement...
La page est en cours de chargement...
La page est en cours de chargement...
La page est en cours de chargement...
La page est en cours de chargement...
La page est en cours de chargement...
La page est en cours de chargement...
La page est en cours de chargement...
La page est en cours de chargement...
La page est en cours de chargement...
La page est en cours de chargement...
La page est en cours de chargement...
La page est en cours de chargement...
La page est en cours de chargement...
La page est en cours de chargement...
La page est en cours de chargement...
La page est en cours de chargement...
La page est en cours de chargement...
La page est en cours de chargement...
La page est en cours de chargement...
La page est en cours de chargement...
La page est en cours de chargement...
La page est en cours de chargement...
La page est en cours de chargement...
La page est en cours de chargement...
La page est en cours de chargement...
La page est en cours de chargement...
La page est en cours de chargement...
La page est en cours de chargement...
La page est en cours de chargement...
La page est en cours de chargement...
La page est en cours de chargement...
La page est en cours de chargement...
La page est en cours de chargement...
La page est en cours de chargement...
La page est en cours de chargement...
La page est en cours de chargement...
La page est en cours de chargement...
La page est en cours de chargement...
La page est en cours de chargement...
La page est en cours de chargement...
La page est en cours de chargement...
La page est en cours de chargement...
La page est en cours de chargement...
La page est en cours de chargement...
La page est en cours de chargement...
La page est en cours de chargement...
La page est en cours de chargement...
La page est en cours de chargement...
La page est en cours de chargement...
La page est en cours de chargement...
La page est en cours de chargement...
La page est en cours de chargement...
La page est en cours de chargement...
La page est en cours de chargement...
La page est en cours de chargement...
La page est en cours de chargement...
La page est en cours de chargement...
La page est en cours de chargement...
La page est en cours de chargement...
La page est en cours de chargement...
La page est en cours de chargement...
La page est en cours de chargement...
La page est en cours de chargement...
La page est en cours de chargement...
La page est en cours de chargement...
La page est en cours de chargement...
La page est en cours de chargement...
La page est en cours de chargement...
La page est en cours de chargement...
La page est en cours de chargement...
La page est en cours de chargement...
La page est en cours de chargement...
La page est en cours de chargement...
La page est en cours de chargement...
La page est en cours de chargement...
La page est en cours de chargement...
La page est en cours de chargement...
La page est en cours de chargement...
La page est en cours de chargement...
La page est en cours de chargement...
La page est en cours de chargement...
La page est en cours de chargement...
La page est en cours de chargement...
La page est en cours de chargement...
La page est en cours de chargement...
La page est en cours de chargement...
La page est en cours de chargement...
La page est en cours de chargement...
La page est en cours de chargement...
La page est en cours de chargement...
La page est en cours de chargement...
La page est en cours de chargement...
La page est en cours de chargement...
La page est en cours de chargement...
La page est en cours de chargement...
La page est en cours de chargement...
La page est en cours de chargement...
La page est en cours de chargement...
La page est en cours de chargement...
La page est en cours de chargement...
La page est en cours de chargement...
La page est en cours de chargement...
La page est en cours de chargement...
La page est en cours de chargement...
La page est en cours de chargement...
La page est en cours de chargement...
La page est en cours de chargement...
La page est en cours de chargement...
La page est en cours de chargement...
-
 1
1
-
 2
2
-
 3
3
-
 4
4
-
 5
5
-
 6
6
-
 7
7
-
 8
8
-
 9
9
-
 10
10
-
 11
11
-
 12
12
-
 13
13
-
 14
14
-
 15
15
-
 16
16
-
 17
17
-
 18
18
-
 19
19
-
 20
20
-
 21
21
-
 22
22
-
 23
23
-
 24
24
-
 25
25
-
 26
26
-
 27
27
-
 28
28
-
 29
29
-
 30
30
-
 31
31
-
 32
32
-
 33
33
-
 34
34
-
 35
35
-
 36
36
-
 37
37
-
 38
38
-
 39
39
-
 40
40
-
 41
41
-
 42
42
-
 43
43
-
 44
44
-
 45
45
-
 46
46
-
 47
47
-
 48
48
-
 49
49
-
 50
50
-
 51
51
-
 52
52
-
 53
53
-
 54
54
-
 55
55
-
 56
56
-
 57
57
-
 58
58
-
 59
59
-
 60
60
-
 61
61
-
 62
62
-
 63
63
-
 64
64
-
 65
65
-
 66
66
-
 67
67
-
 68
68
-
 69
69
-
 70
70
-
 71
71
-
 72
72
-
 73
73
-
 74
74
-
 75
75
-
 76
76
-
 77
77
-
 78
78
-
 79
79
-
 80
80
-
 81
81
-
 82
82
-
 83
83
-
 84
84
-
 85
85
-
 86
86
-
 87
87
-
 88
88
-
 89
89
-
 90
90
-
 91
91
-
 92
92
-
 93
93
-
 94
94
-
 95
95
-
 96
96
-
 97
97
-
 98
98
-
 99
99
-
 100
100
-
 101
101
-
 102
102
-
 103
103
-
 104
104
-
 105
105
-
 106
106
-
 107
107
-
 108
108
-
 109
109
-
 110
110
-
 111
111
-
 112
112
-
 113
113
-
 114
114
-
 115
115
-
 116
116
-
 117
117
-
 118
118
-
 119
119
-
 120
120
-
 121
121
-
 122
122
-
 123
123
-
 124
124
-
 125
125
-
 126
126
-
 127
127
-
 128
128
-
 129
129
-
 130
130
-
 131
131
-
 132
132
-
 133
133
-
 134
134
-
 135
135
-
 136
136
-
 137
137
-
 138
138
-
 139
139
-
 140
140
-
 141
141
-
 142
142
-
 143
143
-
 144
144
-
 145
145
-
 146
146
-
 147
147
-
 148
148
-
 149
149
-
 150
150
-
 151
151
-
 152
152
-
 153
153
-
 154
154
-
 155
155
-
 156
156


Siemens Vacuum Cleaner Le manuel du propriétaire
- Catégorie
- Aspirateurs
- Taper
- Le manuel du propriétaire
dans d''autres langues
- español: Siemens Vacuum Cleaner El manual del propietario
- Nederlands: Siemens Vacuum Cleaner de handleiding
- português: Siemens Vacuum Cleaner Manual do proprietário
- dansk: Siemens Vacuum Cleaner Brugervejledning
- eesti: Siemens Vacuum Cleaner Omaniku manuaal
- svenska: Siemens Vacuum Cleaner Bruksanvisning
Documents connexes
Autres documents
-
Bosch BSG61666/03 Manuel utilisateur
-
Bosch BSG81266CH/14 Manuel utilisateur
-
-
-
-
-
Tristar SZ-2173 Manuel utilisateur
-
Tristar SZ-2190 Manuel utilisateur
-
Tristar SZ-1916 Manuel utilisateur
-
Princess Royal Jet Vac Le manuel du propriétaire