Roberts OrtusTime Mode d'emploi
- Catégorie
- Réveils
- Taper
- Mode d'emploi
Ce manuel convient également à

Please read this manual before use
DAB / DAB+ / FM RDS digital alarm clock radio
Ortus Time

Controls ...............................................................................2
8VLQJWKHFORFNUDGLRIRUWKH¿UVWWLPH .................................3
Operating your clock radio - DAB ........................................4
Using the buttons.................................................................4
Selecting a station - DAB.....................................................5
Secondary services - DAB...................................................5
Finding new stations - DAB .................................................5
Manual tuning - DAB ...........................................................6
'\QDPLFUDQJHFRQWURO'$% ..............................................6
Prune stations - DAB ...........................................................7
Operating your radio - FM ...................................................7
Manual tuning - FM..............................................................8
Scan sensitivity setting - FM ................................................8
Display options - DAB / FM .................................................9
Presetting stations .............................................................10
6HWWLQJDODUPWLPHV .......................................................11-12
&DQFHOOLQJDODUPV ..............................................................13
Snooze function .................................................................13
7RYLHZWKHDODUPVHWWLQJV .................................................13
Contents
Sleep function ....................................................................14
$XWRPDWLFDOO\XSGDWLQJWKHFORFN .......................................14
6HWWLQJWKHFORFNIRUPDW .....................................................15
6HWWLQJWKHFORFNPDQXDOO\ .................................................15
Software version ................................................................16
'LVSOD\EDFNOLJKWGLPPHU...................................................16
Language function .............................................................17
Equaliser function ........................................................ 17-18
86%VRFNHWIRUVPDUWSKRQHRUWDEOHWFKDUJLQJ ..................18
Headphone socket.............................................................19
Auxiliary input socket .........................................................19
6\VWHPUHVHW......................................................................20
(OHFWURPDJQHWLFFRPSDWLELOLW\DGYLFH ...............................20
3URGXFWPDUNLQJV...............................................................20
Safety notices ....................................................................21
6SHFL¿FDWLRQV ....................................................................22
Circuit features ..................................................................22
Guarantee.............................................................Back page
1

2
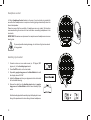
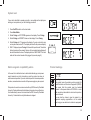
Controls
1. Alarm 1 / Volume Down button
2. On/Off / Sleep button
3. Preset / Dimmer button
4. Alarm 2 / Volume Up button
5. Tuning / Select / Info control
6. LCD display
7. Snooze / Menu / Mode button
8. Volume control
(Top)
9. Auxiliary input socket
10. Headphone socket
11. DAB / FM wire antenna
12. DC input socket
13. USB charging socket
14. Loudspeaker
15. Micro USB socket
(underneath the unit for service use only)
8
Sleep
Mode
Ant
57
1
23
4
(Rear)
9 10 12 1311
6
14

3
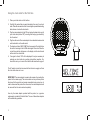
8VLQJWKHFORFNUDGLRIRUWKH¿UVWWLPH
3ODFH\RXUFORFNUDGLRRQDÀDWVXUIDFH
2. Carefully fully extend the wire aerial located on the rear of your clock
radio. Place the wire aerial so that it is as straight as possible extending
either above or below the clock radio.
3. Plug the mains adaptor into the DC input socket located on the rear of
your clock radio (marked 'DC') ensuring that the plug is pushed fully
into the socket.
4. Plug the other end of the mains adaptor into a standard mains socket
outlet and switch on the wall socket.
5. The display will show 'WELCOME' for a few seconds. During this time
WKHUDGLRLVVFDQQLQJWR¿QGD'$%UDGLRVLJQDO$IWHUDVKRUWWLPHWKH
current time and day will appear on the display and the clock hands
will be set to the correct time.
6. If no signal is found, '0:00' will be displayed. It may be necessary to
relocate your clock radio to a position giving better reception. You
VKRXOGWKHQFDUU\RXWDVFDQWR¿QGVWDWLRQVDVGHVFULEHGRQSDJH
7KH$&DGDSWRUVKRXOGEHGLVFRQQHFWHGIURPWKHPDLQVVXSSO\DQGIURP
the clock radio when not in use.
IMPORTANT: The mains adaptor is used as the means of connecting the
product to the mains supply. The mains socket and any multi-way mains
block used for the product must remain accessible during normal use. In
order to disconnect the product from the mains, the mains adaptor should
be removed from the mains socket completely.
Use only the mains adaptor provided with the product, or a genuine
replacement provided by Roberts Radio. The use of alternative adaptors
will invalidate the guarantee.
Ant

4
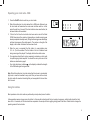
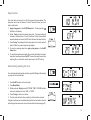
Operating your clock radio - DAB
1. Press the On/Off button to switch on your clock radio.
:KHQ¿UVWVZLWFKHGRQWKHFORFNUDGLRZLOOEHLQ'$%PRGH$IWHUHDFKXVH
the clock radio will remember the mode used and then switch on in that
mode the next time it is used. If the clock radio has been used before, the
last used station will be selected.
,I WKLVLV WKH ¿UVWWLPH WKHFORFNUDGLR KDVEHHQXVHG DVFDQRI WKH%DQG
III DAB channels will be carried out (depending on whether scanning was
already completed in standby mode). During the scanning process the display
will show the progress of the station search. The number on the right of the
display is the number of stations that have been found.
:KHQ WKH VFDQ LV FRPSOHWHG WKH ¿UVW VWDWLRQ LQ QXPHULFDOSKD RUGHU
$=ZLOOEHVHOHFWHG7KH ¿UVW VWDWLRQLQWKHOLVW RIVWDWLRQVIRXQG
during scanning will be played. The display will show the station name.
5. If no signals are found then it may be necessary to relocate your clock radio
WRDSRVLWLRQJLYLQJEHWWHUUHFHSWLRQ<RXVKRXOGWKHQFDUU\RXWDVFDQWR¿QG
stations as described on page 5.
• Your clock radio has an indicator
on the display to indicate the strength
of the DAB radio signal being received.
Note:KHQ¿UVWVZLWFKHGRQWKHFORFNUDGLRZLOOVHWWKHYROXPHWRDPRGHUDWHO\
high level, in case the broadcast is very quiet. After you have set the volume,
the clock radio will remember the setting that you have applied for the next time
that it is used.
Sleep
Using the buttons
Most operations on the clock radio are performed by a simple short press of a button.
A few operations require a longer press of a button. In this case the instructions will tell you to apply a long press, and the button should be held
down for 2 or 3 seconds, until the clock radio has responded. An example of this is applying a long press to the Menu / Mode button to change the
operating mode of the clock radio.

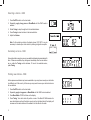
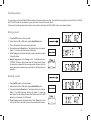
Selecting a station - DAB
1. Press On/Off to switch on the clock radio.
2. Repeatedly, apply a long press on Menu/Mode until the 'DAB' mode is
selected.
3. Rotate Tuning to step through the list of available stations.
4. Press Tuning to select and tune to the desired station.
5. Adjust the Volume.
Note: If after selecting a station the display shows 'OFF AIR' it may be
necessary to relocate your clock radio to a position giving better reception.
Secondary services - DAB
Some radio stations may have one or more additional broadcasts associated with
them. If these are available, they will appear immediately after the main station
as you rotate the Tuning control clockwise. To tune to the selected service,
press Tuning.
5
Mode
Sleep
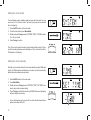
Finding new stations - DAB
As time passes new stations may become available or you may have moved your clock radio
to a different part of the country. In this case you may need to cause your clock radio to scan
for new stations.
1. Press On/Off to switch on the clock radio.
2. Repeatedly, apply a long press on Menu/Mode until the 'DAB' mode is selected.
3. Press Menu/Mode. 'SCAN' will show on the display.
4. Press Tuning. Your clock radio will perform a scan of the Band III DAB channels. As
new radio stations are found the station counter on the right-hand side of the display will
increase and the radio stations will be added to the list stored in the radio.

6
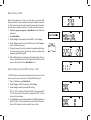
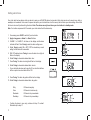
Manual tuning - DAB
Manual tuning allows you to tune your clock radio to a particular DAB
frequency in Band III. Any new stations found will be added to the station
list. This function can also be used to assist the positioning of the aerial or
WKHFORFNUDGLRWRRSWLPLVHUHFHSWLRQIRUDVSHFL¿FFKDQQHORUIUHTXHQF\
1. Repeatedly, apply a long press on Menu/Mode until the 'DAB' mode
is selected.
2. Press Menu/Mode.
3. Rotate Tuning until the display shows 'MANUAL'. Press Tuning.
4. Rotate Tuning to select the desired DAB channel. Press Tuning to
tune to the chosen frequency.
5. If a signal is present, this will be indicated on a signal strength display.
The minimum signal marker (
) shows the minimum signal strength
needed for good DAB reception.
6. When a DAB signal is found, as shown by the signal indicator chevrons,
any new radio stations found with this signal will be added to the list
stored in the clock radio. Press Menu/Mode to exit.
Dynamic Range Control (DRC) settings - DAB
The DRC facillity can make quieter sounds easier to hear when your clock
radio is used in a noisy environment. The default DRC setting is 0.
1. When in DAB mode, press Menu/Mode.
2. Rotate Tuning until 'DRC' is displayed. Press Tuning.
3. Rotate Tuning to select the required DRC setting.
DRC 0 - DRC is switched off, Broadcast DRC will be ignored. DRC
1/2 - DRC level is set to 1/2 that sent by broadcaster. DRC 1 - DRC is
set as sent by broadcaster.
4. Press Tuning WRFRQ¿UPWKHVHWWLQJNote: Not all DAB broadcasts use
the DRC function. If the broadcast does not provide DRC information,
then the DRC setting in the clock radio will have no effect.
Mode

7
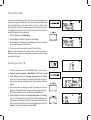
Operating your radio - FM
1. Carefully extend the wire aerial. Press On/Off to switch on the clock radio.
2. Repeatedly, apply a long press on Menu/Mode until 'FM' mode is selected.
3. Rotate Tuning clockwise and then apply a long press on the Tuning
control. Your clock radio will scan in an upwards direction (low frequency to
KLJKIUHTXHQF\DQGVWRSDXWRPDWLFDOO\ZKHQLW¿QGVDVWDWLRQRIVXI¿FLHQW
strength.
4. After a few seconds the display will update. The display will show the
frequency of the signal found. If the signal is strong enough and there is
RDS data present then the clock radio will display the station name.
5. Rotate Tuning anti-clockwise and then apply a long press on the Tuning
control. Your clock radio will scan the FM band in a downwards direction
(high frequency to low frequency). When the waveband end is reached your
radio will recommence tuning from the opposite waveband end. Adjust the
Volume. To switch off your clock radio press On/Off.
Mode
Mode
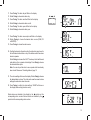
Prune stations - DAB
If you move to a different part of the country, some of the stations which were
listed may no longer be available. Also, from time to time, some DAB services
may stop broadcasting, or may change location or frequency. Stations which
cannot be found, or which have not been received for a very long time are shown
in the station list with a question mark. The Prune stations function will delete the
marked DAB stations from your station list.
1. When in DAB mode, press Menu/Mode.
2. Rotate Tuning until 'PRUNE' is displayed. Press Tuning.
3. Rotate Tuning until 'Y' is displayed. Press Tuning to cause the invalid station
names to be removed from the station list.
4. If you do not wish to prune stations choose 'N' in step 3 above.
Note: If you have moved your clock radio to a different part of the country you
should also carry out a search for new stations (please see the section 'Finding
new stations' on page 5).
Sleep

8
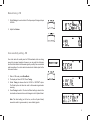
Manual tuning - FM
1. Rotate Tuning to tune to a station.The frequency will change in steps
of 50kHz.
2. Adjust the Volume.
Scan sensitivity setting - FM
Your clock radio will normally scan for FM broadcasts which are strong
enough to give good reception. However, you may wish the Auto-scan
IXQFWLRQWRDOVREHDEOHWR¿QGZHDNHUVLJQDOVSRVVLEO\IURPPRUHGLVWDQW
radio transmitters. Your clock radio includes a local / distant option for the
Auto-scan function.
1. When in FM mode, press Menu/Mode.
2. The display will show 'SCAN'. Press Tuning.
3. Rotate Tuning to choose either the 'LOCAL' or 'DISTANT' option.
7KH'LVWDQWRSWLRQZLOODOORZWKHUDGLRWR¿QGZHDNHUVLJQDOVZKHQ
scanning.
4. Press Tuning WRFRQ¿UP7KH/RFDORU'LVWDQWVHWWLQJLVVWRUHGLQWKH
clock radio and remains in force until changed or until a System Reset.
Note: The initial setting (out of the box, or after a System Reset)
causes the radio to ignore weaker (or more distant) signals.
Mode

9
Display options - DAB / FM
Your clock radio has a range of display options when in DAB and FM modes:-
1. Press Tuning to cycle through the various options. All displays except
the text display will revert to the clock display after about 10 seconds.
DAB display options
Your clock radio can display the following in DAB mode:-
Station name, scrolling text, program type, multiplex name, frequency,
bit rate, signal strength, time and date.
For the signal strength, the minimum signal marker (
) shows the minimum
signal strength needed for good DAB reception. The signal indicator
chevrons increase or decrease showing the changing signal strength as
you adjust the wire aerial or your clock radio position.
FM display options
In FM mode your clock radio can use the Radio Data System (RDS) to
display the radio station name and additional text when provided by the
EURDGFDVWHUDQGZKHUHWKHUDGLRVLJQDOLVVXI¿FLHQWO\FOHDU
Your clock radio can display the following in FM mode:-
Station name, frequency, scrolling text, program type, time and date.
Scrolling text (DAB and FM)
Signal strength (DAB only)
Frequency (DAB and FM)
Time and day (DAB and FM)

10
Presetting stations
You may store your preferred DAB and FM radio stations to the preset station memories. There are 20 memory presets in your clock radio, 10 for DAB
and 10 for FM. Presets are remembered by your clock radio in the event of a power failure.
The procedure for setting presets and using them to tune stations is the same for FM and DAB modes, and is described below.
Storing a preset
1. Press On/Off to switch on the clock radio.
2. Select either the FM or DAB mode using the Menu/Mode button.
3. Tune to the required station as previously described.
4. Press and release the Preset button. The display will show, for example,
(PSW\ if no station has been stored to that preset.
5. Rotate Tuning to select the desired preset number under which you wish
to store the station.
6. Apply a long press on the Tuning control. The display will show,
'STORED'. The station will be stored under the chosen preset. Repeat
this procedure as needed for the remaining presets. Stations which are
already stored in the presets may be overwritten by following the above
procedure.
Recalling a preset
1. Press On/Off to switch on the clock radio.
2. Select either the FM or DAB mode using the Menu/Mode button.
3. Press and release the Preset button. The display will show, for example,
(PSW\ if no station has been stored to that preset. If a preset has
been stored, then the display will show either the station name (for DAB
stations) or the frequency (for FM stations).
4. Rotate Tuning to select the desired station. Press Tuning. Your clock
radio will then tune to the station stored in the selected preset memory.
Mode
Mode

11
1. If necessary, press On/Off to switch off your clock radio.
2. Apply a long press on Alarm 1 or Alarm 2 buttons.
3. 'ALARM 1' or 'ALARM 2' will show on the display and the alarm
LQGLFDWRUZLOOÀDVK3UHVVTuning to enter the alarm setting menu.
4. Rotate Tuning to select ON or OFF. If OFF is selected any current
setting for that alarm will be cancelled.
5. With 'ON' selected press Tuning to cause the alarm hour digits to
ÀDVKRQWKHGLVSOD\
6. Rotate Tuning to choose the desired alarm hour.
7. Press Tuning7KHDODUPPLQXWHGLJLWVZLOOÀDVKRQWKHGLVSOD\
8. Rotate Tuning to choose the desired alarm minute.
• If your clock radio has been set to use the 12 hour clock format there
will be an option here to set either AM or PM.
9. Press Tuning7KHDODUPGD\RSWLRQZLOOÀDVKRQWKHGLVSOD\
10. Rotate Tuning to choose the desired alarm day option:
Daily - Will sound everyday
Once - Will sound at one time only
Weekends - Will sound only on weekends
Weekdays - Will sound only on weekdays
• If setting the alarm to once only, continue with step 11 overleaf.
Otherwise skip to step 17.
Setting alarm times
Your clock radio has two alarms which can be set to wake you to DAB, FM radio or buzzer alarm. Each alarm can be set to sound once, daily, on
weekdays or at weekends. In the event of a power interruption your clock radio has a built in memory that will retain your alarm settings. Ensure that
the time is set correctly before setting the alarms. Note: The alarms can only be set when your clock radio is in standby mode.
Note: If no buttons are pressed for 10 seconds, your clock radio will exit the alarm setup.
Sleep

12
11. Press Tuning7KHDODUPGD\ZLOOÀDVKRQWKHGLVSOD\
12. Rotate Tuning to choose the alarm day.
13. Press Tuning7KHDODUPPRQWKZLOOÀDVKRQWKHGLVSOD\
14. Rotate Tuning to choose the alarm month.
15. Press Tuning7KHDODUP\HDUZLOOÀDVKRQWKHGLVSOD\
16. Rotate Tuning to choose the alarm year.
17. Press Tuning7KHDODUPVRXUFHRSWLRQZLOOÀDVKRQWKHGLVSOD\
18. Rotate Tuning to choose the desired alarm source (DAB, FM
or BUZZER).
19. Press Tuning to choose the alarm source.
20. If setting the alarms to the radio option, the radio alarm may be set to
the last listened radio station or any of the stations which have been
stored as presets.
Rotate Tuning to choose either 'LAST' to wake up to the last listened
radio station or from a preset on the display. Press Tuning to choose
the desired station option.
Note: You can only set the alarm to use a preset which has already
been stored. Please see 'Presetting stations' page 10.
21. The volume setting will show on the display. Rotate Tuning to choose
the desired alarm volume. The clock radio uses the saved volume
settings for each alarm when it sounds.
22. Press TuningWRFRQ¿UPWKHDODUPVHWWLQJV'SAVED' will show on
the display before exiting the alarm setup.
Radio alarms are indicated in the display by the
symbol and the
corresponding alarm number. Buzzer alarms are indicated by the
symbol and the corresponding alarm number.

13
Cancelling alarms
1. Whilst an alarm is sounding, press On/Off to cancel the alarm.
Snooze function
1. When the radio or buzzer alarm sounds, press Snooze. This will silence the
alarm for 5 minutes.
When Snooze has been pressed during an alarm, the display will show the
Snooze symbol
. This sequence can be repeated as needed.
2. To cancel the Snooze function, press On/Off.
To view the alarm settings
1. Press On/Off to switch off the clock radio if needed.
2. Apply a long press on Alarm 1 or Alarm 2 button to enter the alarm setup.
3. Repeatedly, press Tuning to cycle through each of the settings for the chosen
alarm.
You may use the Tuning control to modify any particular setting if desired,
XVLQJWKH7XQLQJFRQWUROWRHQWHUWKHPRGL¿FDWLRQ
Mode
Sleep
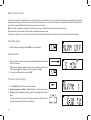
When the alarm sounds
7KHDODUPZLOOVRXQGDWWKHVHOHFWHGWLPHVIRUXSWRPLQXWHVXQOHVVFDQFHOOHG7KHYROXPHXVHGIRUWKHDODUPZLOOEHVSHFL¿HGGXULQJWKHDODUP
setting procedure. When your clock radio is set to wake by the radio alarm, your clock radio will switch to the selected radio station. If the radio cannot
FRQQHFWWRWKHVSHFL¿HG'$%UDGLRVWDWLRQWKHEX]]HUZLOOEHXVHGLQVWHDG
Note: If the radio is switched on because of a radio alarm you can control basic functions such as the volume control.
When the buzzer alarm activates it will start softly and gradually increase in level.
7KHDODUPLFRQZLOOÀDVKRQWKHVFUHHQDQGWKHFORFNUDGLRZLOODXWRPDWLFDOO\VZLWFKEDFNWRVWDQGE\PRGHZKHQWKHPLQXWHVKDYHHODSVHG
Sleep

14
Sleep function
Your clock radio can be set to turn off after a preset time has elapsed. The
sleep timer can be set to between 15 and 90 minutes. Ensure your clock
radio is switched on.
1. Apply a long press on the On/Off/Sleep button. The sleep symbol
ZLOOÀDVKRQWKHGLVSOD\
2. Rotate Tuning to select the desired sleep time. The sleep setting will
increase in increments from 15 up to 90 minutes. A further increment will
cause the sleep timer to be set to OFF which will cancel the sleep function.
3. Press Tuning. The display will exit the sleep options. Your clock radio will
switch off after the preset sleep time has elapsed.
4. To view the remaining sleep time, apply a long press on the On/Off/
Sleep button.
5. To cancel the sleep timer and switch off your clock radio before the chosen
sleep time has elapsed, press On/Off. To cancel the sleep timer without
switching off your clock radio, set the sleep timer to the OFF setting.
Sleep
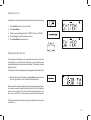
Automatically updating the clock
Your clock radio will usually set the clock time using the DAB signal. Alternatively
you may set the clock manually.
1. Press On/Off to switch on the clock radio.
2. Press Menu/Mode.
3. Rotate and press Tuning to select 'SYSTEM', 'TIME', 'UPDATE' and then
choose an update option from, 'DAB' or 'NONE'.
4. Press Tuning WRFRQ¿UP\RXUFKRLFH
5. The clock radio will set its time according to the information received.
If a signal is not found you should then either position the clock radio or its aerial
so that a signal can be received, or revert to manual clock mode (see page 15).
Mode
Sleep

15
Setting the clock format
The clock display used in standby mode and when the clock radio is in use
can be set to 12 or 24 hour format. The clock format can only be set while
the unit is playing.
1. Press On/Off to switch on the clock radio.
2. To set the clock format, press Menu/Mode.
3. Rotate and press Tuning to select 'SYSTEM', 'TIME', '12/24 HR' and then
12 or 24 hour format.
4. Press TuningWRFRQ¿UP
If the 12 hour clock format is chosen, the clock radio will then use the 12 hour
clock for the setting of alarms, and will display a 12 hour clock with an AM or
PM indicator on the display.
Mode
Sleep
Setting the clock manually
Normally your clock radio will set its clock automatically using the DAB radio
signal. If no DAB signal is available and you need to set the time manually,
please follow the procedure shown below.
1. Press On/Off to switch on the clock radio.
2. Press Menu/Mode.
3. Rotate and press Tuning to select 'SYSTEM', 'TIME', 'SET TIME', hour,
minute, day, month and year setting.
4. Press Tuning WRFRQ¿UPWKHWLPHVHWWLQJ'SAVED' will show on the display
before exiting the clock setup.
• If your radio has been set to use the 12 hour clock format there will be an
option to set either AM or PM.
Mode
Sleep

16
Software version
The software version display cannot be altered and is just for your reference.
1. Press On/Off to switch on the clock radio.
2. Press Menu/Mode.
3. Rotate and press Tuning to select 'SYSTEM' and then 'SW VER'.
4. Press Tuning to display the software version.
5. Press Menu/Mode as needed to exit.
Mode
Sleep
Display backlight dimmer
The brightness of the display can be adjusted for when the clock radio
is in standby. If you use the unit in the bedroom, you may prefer a lower
standby brightness level than the standard setting. There are four standby
brightness levels.
To change the current standby brightness setting please follow these steps.
1. When the clock radio is in Standby, press the Dimmer button to choose
from the High, Medium, Low or almost Off dimmer setting.
When the radio is in standby pressing any button (except the dimmer button)
or the rotary controls will cause the radio to switch to the 'High' brightness
level for a few seconds. This is so that if the standby brightness level is
set to Low or almost Off, it is still possible to see the time when needed.
The display backlight will always use the high setting whenever the radio
is switched on.

17
Language function
<RXUFORFNUDGLRVPHQXVFDQEHFRQ¿JXUHGWRDGLIIHUHQWODQJXDJH
1. Press On/Off to switch on the clock radio.
2. Press Menu/Mode.
3. Rotate and press Tuning to select 'SYSTEM', 'LANGUAGE' and then
select your desired language.
4. Press Tuning. The display will change to the chosen language.
5. Press Menu/Mode as needed to exit.
Equaliser function
The sound on your clock radio can be adjusted to suit your personal taste
for the material that you are listening to. The clock radio has six preset
equaliser options. Alternatively, you may set the treble and bass levels to
your own preferences.
1. Press On/Off to switch on the clock radio.
2. Press Menu/Mode.
3. Rotate Tuning until 'SYSTEM' appears on the display. Press Tuning.
4. Rotate Tuning until 'EQ' appears on the display. Press Tuning.
5. Rotate Tuning to cycle through various options until the desired option
is displayed. The options are as follows: Normal, Classic, Jazz, Pop,
Rock, and Speech.
6. Press Tuning WRFRQ¿UP\RXUFKRLFH
Mode
Sleep
Mode

18
My EQ
You may set the treble and bass levels to your own preferences using the
'My EQ' menu.
1. Follow steps 1-4 on the previous page to enter the Equaliser setup menu.
2. Rotate Tuning until 'My EQ,,,' shows on the display.
3. Press Tuning. Rotate Tuning until Treble or Bass is displayed.
4. Press Tuning. The current Bass or Treble level will be shown on the
display.
5. To adjust the Treble or Bass setting rotate Tuning until the desired level
(-7 and +7) is displayed.
6. Press Tuning WRFRQ¿UP\RXUFKRLFH
To cancel the effect of the 'My EQ'SUR¿OHFKRRVHWKH1RUPDO option from
the equaliser menu. Note: The treble and bass settings will be remembered
for the next time you wish to use the 'My EQ' setting.
The loudness setting in the 'EQ' menu increases the bass and treble at
low volume settings.
USB socket for smartphone or tablet charging
Your clock radio has a USB socket which can be used for charging a smart-
phone, tablet or other similar devices.
Charge time may vary and in some cases may take longer to charge than when
using the manufacturers charging unit supplied with the device.
1. Ensure your clock radio is plugged in.
2. Connect your device to the USB charging socket at the rear of your clock
radio.
3. Your device will begin to charge.
4. Once your device has charged remove the USB lead.
2

19
Headphone socket
A 3.5mm Headphone Socket located on the rear of your clock radio is provided for
use with either headphones or an earpiece. Inserting a plug automatically mutes the
internal loudspeaker.
Please be aware that the sensitivity of headphones can vary widely. We therefore
recommend setting the volume to a low level before connecting headphones to the
clock radio.
IMPORTANT: Excessive sound pressure from earphones and headphones can cause
hearing loss.
To prevent possible hearing damage, do not listen at high volume levels
for long periods.
Auxiliary input socket
1. Connect a stereo or mono audio source (i.e. CD player, MP3
player, etc.) to the Auxiliary input socket.
2. Press On/Off to switch on the clock radio.
3. Repeatedly, apply a long press on the Menu/Mode button until
the display shows 'AUX IN'.
4. Adjust the Volume control on your player and on the clock radio
for comfortable listening.
5. Remove the cable from the Auxiliary input socket or apply a
long press on the Menu/Mode button to cancel Auxiliary Input
mode.
Note that audio played via the auxiliary input will be played in mono
through the speaker and in stereo through stereo headphones.
Mode
Sleep
1
La page charge ...
La page charge ...
La page charge ...
La page charge ...
-
 1
1
-
 2
2
-
 3
3
-
 4
4
-
 5
5
-
 6
6
-
 7
7
-
 8
8
-
 9
9
-
 10
10
-
 11
11
-
 12
12
-
 13
13
-
 14
14
-
 15
15
-
 16
16
-
 17
17
-
 18
18
-
 19
19
-
 20
20
-
 21
21
-
 22
22
-
 23
23
-
 24
24


Roberts OrtusTime Mode d'emploi
- Catégorie
- Réveils
- Taper
- Mode d'emploi
- Ce manuel convient également à
dans d''autres langues
- English: Roberts OrtusTime User guide
Autres documents
-
Sangean DCR-200 Mode d'emploi
-
Perfectpro WORKTUBE Le manuel du propriétaire
-
Lenco PDR-040BAMBOOBK Le manuel du propriétaire
-
Hitachi HPS809E Le manuel du propriétaire
-
-
Philips DCB152/05 Manuel utilisateur
-
-
AIPTEK Mona Lisa Le manuel du propriétaire
-
Philips MCM330/12 Manuel utilisateur
-