La page est en cours de chargement...
La page est en cours de chargement...
La page est en cours de chargement...
La page est en cours de chargement...

5/90505919033 D
Y07552
M
M
Y01852
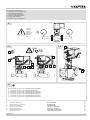
de Gilt nur für stetig Modus
fr S‘applique uniquement au
mode de régulation continue
en Applies for continuous mode only
it Vale solo per modo „continuo“
es Se aplica sólo para modo continuo
sv Gäller endast för kontinuerlig reglering
nl Geldt uitsluitend voor continu modus
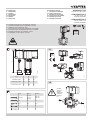
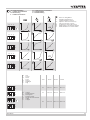
1 2 3 4
On
Off
1 2 3 4
On
Off
stroke
x
2
1 2 3 4
On
Off
stroke
Signal
stroke
Signal
lin
1 2 3 4
On
Off
stroke
stroke
1 2 3 4
On
Off
stroke
Signal
lin
de Hub
fr Course
en Stroke
it Corsa
es Carrera
sv Slaglängd
nl Slag
1 mm 14 mm 20 mm 40 mm
1 2 3 4
On
Off
de Laufzeit
fr Temps de march
en Running time
it Tempo di marcia
es Tiempo de funcionamiento
sv Löptid
nl Looptijd
2 s 28 s ± 1 40 s ± 1 80 s ± 4
1 2 3 4
On
Off
4 s 56 s ± 2 80 s ± 4 160 s ± 4
1 2 3 4
On
Off
1 2 3 4
On
Off
6 s 84 s ± 4 120 s ± 4 240 s ± 8
de Schalterkodierung
fr Codage de commutation
en Swith coding
it Codicadiintervento
es Codicacióndeconmutación
sv Kodomkopplare
nl Schakelcodering

6/9 0505919033 D
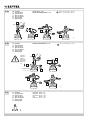
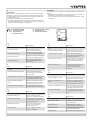
de Initialisierung
fr Initialisation
en Initialisation
it Inicialización
es Inizializzazione
sv Initialiseringsstart
nl Initialisatie
B10445
4
de
Automatisch
WenndasStellgerätdasersteMalunterSpannunggesetztwird,ndet
die automatische Ankopplung mit dem Ventil und eine Initialisierung
statt. Während diesem Vorgang blinken beide LEDs am Antrieb rot.
1. Die Spindel fährt aus, bis an den mechanischen Anschlag des
Stellantriebes.
2. Von dieser Stellung aus wird die Spindel bis zum mechanischen
Anschlag des Stellantriebes eingezogen.
3. Die Initialisierung ist beendet. Die Spindel fährt in die entsprechende
Position des Steuersignals.
Manuell
Die Initialisierung kann bei Bedarf jederzeit manuell ausgelöst werden.
• Die Handkurbel innerhalb von 4 Sekunden zwei Mal hintereinander
auf- und zuklappen (siehe Bild). Die Initialisierung beginnt.
• Durch erneutes Aufklappen der Handkurbel kann die Initialisierung
abgebrochen werden.
fr
Automatique
L‘accouplement de l‘appareil de réglage à la vanne ainsi que
l‘initialisation s‘effectuent de manière automatique dès que l‘appareil
est mis sous tension pour la première fois. Pendant cette procédure, les
deux témoins LED rouges sur le servomoteur clignotent.
1. La tige de la vanne sort jusqu‘en butée mécanique du servomoteur.
2. À partir de cette position, la tige rentre de nouveau jusqu‘en butée
mécanique du servomoteur.
3. L‘initialisation étant terminée, l‘appareil de réglage adapte la position
qui correspond au signal de commande.
Manuelle
Si nécessaire, l‘initialisation peut aussi être déclenchée à tout instant de
manière manuelle:
• Pour déclencher la procédure d‘initialisation, relever et rabattre la
manivelle 2 fois dans l‘espace de 4 secondes.
• Pour interrompre l‘initialisation, relever à nouveau la manivelle.
en
Automatic
Whenpowerisappliedtotheregulatingunitforthersttime,the
automatic coupling with the valve and an initialisation take place. During
thisprocess,bothLEDsonthedriveashinred.
1. The spindle extends until it reaches the mechanical stop of the
actuator.
2. From this position, the spindle retracts until it reaches the mechanical
stop of the actuator.
3. Initialisation is complete. The regulating unit moves to the position
dictated by the control signal.
Manual
If required, initialisation can always be triggered manually.
• Fold out and fold back the crank handle twice within 4 seconds (see
diagram). Initialisation begins.
• The initialisation can be aborted by folding out the crank handle again.
it
Automatico
La prima volta in cui il servomotore viene posto sotto tensione ha
luogo l‘accoppiamento automatico con la valvola e una inizializzazione.
Durante questa fase entrambi i LED del servomotore lampeggiano in
rosso.
1. Ilmandrinofuoriescenoallabattutameccanicadell’attuatore.
2. Daquestaposizione,ilmandrinovieneinseritonoallabattuta
meccanicadell’attuatore.
3. L‘inizializzazione è terminata. Il servomotore si porta nella posizione
corrispondente al segnale di comando.
Manovella
Se necessario, l‘inizializzazione può essere avviata manualmente in ogni
momento.
• Aprire e chiudere due volte di seguito entro 4 secondi la manovella
(vederegura).L‘inizializzazionecomincia.
• Aprendo di nuovo la manovella si può interrompere l‘inizializzazione.
es
Automático
Una vez que el órgano de regulación ha sido sometido a tensión,
tiene lugar el acoplamiento automático con la válvula así como. La
inicialización. Durante este proceso, parpadean ambos LED de color rojo
en el servomotor.
1. El husillo se extrae hasta el tope mecánico del servomotor.
2. Desde esta posición, el husillo se retrae hasta el tope mecánico del
servomotor.
3. Terminó la inicialización. El órgano de regulación avanza a la posición
indicada por la señal de mando.
Manual
La inicialización puede desencadenarse en forma manual en cualquier
momento y en caso de necesidad.
• Abrir y cerrar la manivela dos veces seguidas y dentro de 4 segundos
(véaselagura).Comienzalainicialización.
• Abriendo nuevamente la manivela puede interrumpirse la inicialización
sv
Automatiska
När ställdonet spänningsätts första gången, så sker den automatiska
kopplingen med ventilen och en initiering sker. Medan detta förlopp sker
blinkar bägge LED på ställdonet rött.
1. Spindeln körs ut till ställdonets mekaniska anslag.
2. Från detta läge dras spindeln in till ställdonets mekaniska anslag.
3. Initieringen är avslutad. Ställdonet ställer sig i det läge som anges av
styrsignalen.
Manuellt
Initieringen kan vid behov startas manuellt närsomhelst.
• Genom att trycka ned manöverhandtaget 2 gånger inom 4 sekunder
öppna- och stängläget (se bild). Initieringen startar.
• Genom att trycka ned manöverhandtaget igen så kan initieringen
avbrytas.

7/90505919033 D
nl
Automatisch
Wanneer het corrigerend orgaan voor de eerste maal onder spanning
wordt gezet, wordt zowel de automatische verbinding met de afsluiter
als de initialisatie uitgevoerd. Tijdens dit proces knipperen beide LED‘s
op de aandrijving rood.
1. Spindeln körs ut till ställdonets mekaniska anslag.
2. Från detta läge dras spindeln in till ställdonets mekaniska anslag.De
initialisatie is beëindigd. Het corrigerend orgaan gaat in de stand staan
die door het besturingssignaal is aangegeven.
Handmatig
De initialisatie kan zo nodig op elk moment handmatig in werking worden
gesteld.
• De handkruk tweemaal achtereenvolgens binnen 4 seconden open- en
dichtklappen (zie afbeelding). De initialisatie begint.
• Door de handkruk opnieuw open te klappen kan de initialisatie worden
onderbroken.
de Funktion der LEDs
fr Function des LEDs
en LED functions
it Funzioni di LED
es Functiones de los LEDs
sv LED funktioner
nl Funktie van de LEDs
B10446
LED Info
de
LED Beschreibung
Beide LEDs blinken rot. Initialisierung
Eine LED blinkt grün.
Antrieb führt einen Hub aus.
Richtung entsprechend LED
Eine LED leuchtet grün.
Antrieb in Ruhestellung. Letzte
Laufrichtung entsprechend LED
Eine LED leuchtet rot.
Endposition erreicht. Ventilstellung
(auf oder zu) entsprechend LED
Keine LED leuchtet.
Keine Spannungsversorgung
oder im 3-Punkt-Modus keine
Ansteuerung.
fr
LED Description
Les deux témoins LED clignotent
en rouge.
Initialisation
Un témoin LED clignote en vert. Le servomoteur effectue une
course, direction correspondant
au témoin LED.
Un témoin LED est allumé en vert. Servomoteur en position de repos,
dernier sens de déplacement
correspondant au témoin LED.
Un témoin LED est allumé en
rouge.
Positionnaleatteinte.Position
de la vanne (ouverte ou fermée)
correspondant au témoin LED.
Aucun témoin LED n‘est allumé. Pas d‘alimentation électrique ou
pas de commande en mode 3 pts.
en
LED Description
BothLEDsashred. Initialisation
OneLEDashesgreen. Actuator extends its stroke;
direction in accordance with LED.
One LED lights up green. Actuator is in the home position;
the last direction of operation is in
accordance with LED.
One LED lights up red. End position reached. Valve
position (open or closed) in
accordance with LED.
No LED lights up. No power supply or (in 3-pt.
mode) no modulation
it
LED Descrizione
Entrambi i LED lampeggiano in
rosso.
Inizializzazione
Un LED lampeggia in verde. Il servomotore fa una corsa in
direzione del LED corrispondente.
Un LED si illumina in verde. Servomotore in posizione di
riposo, ultima corsa in direzione
del LED corrispondente.
Un LED si illumina in rosso. Posizionedinecorsaraggiunta.
Posizione della valvola (aperta o
chiusa) corrispondentemente al
LED.
Nessun LED illuminato. Niente tensione di alimentazione
o, nel funzionamento a 3
posizioni, niente segnale di
comando.
es
LED Descripción
Ambos LEDs parpadean en rojo. inicialización
Un LED parpadea en verde. El servomotor extiende su carrera;
la dirección coincide con el LED
Un LED se enciende de color
verde.
El servomotor está en posición
de fábrica, la última dirección de
operación coincide con el LED.
Un LED se enciende de color rojo. Sehaalcanzadolaposiciónnal.
La posición de la válvula (abierta
o cerrada) coincide con el LED.
No se enciende el LED. No hay tensión de alimentación
o no hay modulación (en modo
3-pt.)
sv
LED Beskrivning
Båda LED blinkar rödt. Initialisering
En LED blinkar grönt. Ställdonet i drift i riktning med
motsvarande LED
En LED lyser grönt. Ställdonet står still. Senaste
riktning med motsvarande LED
En LED lyser rödt. Uppnådd ändläge motsvarande
LED (öppet eller stängd)
Ingen LED lyser. Ingen spänningsmatning (plint 21)
La page est en cours de chargement...

de Dokument aufbewahren
fr Ce document est à conserver
en Retain this document
it Conservare il documento
es Guardar el documento
sv Spara dokumenationen
nl Document bewaren
© Fr. Sauter AG
Im Surinam 55
CH-4016 Basel
Tel. +41 61 - 695 55 55
Fax +41 61 - 695 55 10
www.sauter-controls.com
Printed in Switzerland
9/90505919033 D
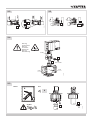
0 bar
B10449a
0 bar
6
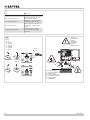
de Deinstallationsanweisung
fr Instructions pour de démontage
en De-installation instructions
it Istruzioni di disinstallazione
es Instrucción de desinstalación
sv Isärtagningsinstruktion
nl Instructie voor het verwijderen
Vorsicht
Attention
Caution
Attenzione
Attención
Observer
Let
B10450a
2
4
3
1
5
3
4
5
33
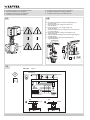
7.1
B10519b
2
1
7.2
8
de www.sauter-controls.com Produkte MD Datenblatt.
fr www.sauter-controls.com Produits Fiche MD.
en www.sauter-controls.com Products MD Datasheet.
it www.sauter-controls.com Products MD Datasheet.
es www.sauter-controls.com Products MD Datasheet.
sv www.sauter-controls.com Products MD Datasheet.
nl www.sauter-controls.com Products MD Datasheet.
1 /s
max.
-
 1
1
-
 2
2
-
 3
3
-
 4
4
-
 5
5
-
 6
6
-
 7
7
-
 8
8
-
 9
9


dans d''autres langues
- italiano: sauter BUD
- English: sauter BUD
- español: sauter BUD
- Deutsch: sauter BUD
- Nederlands: sauter BUD
- svenska: sauter BUD
Documents connexes
-
sauter BUD Assembly Instructions
-
sauter DSDU, DSDI Assembly Instructions
-
sauter AVM 322-R Assembly Instructions
-
-
-
-
-
-
sauter BUD Assembly Instructions
-