
Gebrauchsanweisung
für Standkühlschrank
Operating instructions
for upright refrigerators
Consignes d1utilisation
Réfrigérateurs
à
pose libre
DI
Ge · saa wijzing
D
Recyclingpapier Recycledpaper .Papierrecyclé Kringlooppapier Cartaecologica Papelreciclado
7081 858-00
KS ...0 1001

IG.~t"'a
e- e Blick
o
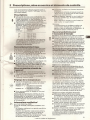
8edien- und
Kontrollelemente
Abb.A1
CD
Ein/Aus und Temperaturregler
1
=
warm
4
=
kalt
Empfehlenswert ist eine mittlere
Einstellung
CD
Ventilator-Taste* mit Leuchtanzeige für
Umluftkühlung*
o
.4
W
@"'··:,1
", , 0-. :
i~
':-t, •..
3 2
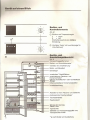
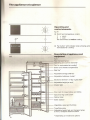
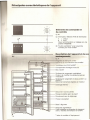
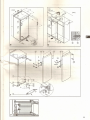
Gerate- und
Ausstattungsübersicht
Abb.A
r--------r------
Transporttragegriffe hinten
Ë~~~S~~~~~n--
Bedien- und Kontrollelemente*
~-t;~~:m1It----
Ventilator für Umluftkühlung*
L.....-+HH---
Butter- und Kasefach
1
~2'ZZZZ:i!Zïm:i:llil:c::m:~~
1
Eierablage*
Ai
limd:m:tt~~-,Ht-r---
versetzbare* Abstelltlàchen
k
.r.ttI.tm:m~~~ïf]ffir-
verschiebbarer Flaschen- und
Konservenhalter*
r--lH+--~II-Iil+--
teilbare Abstellflàchen" oder hochstellbare
Ablage* .
~mi'ii~~~;t!mlt--
hëhenverstellbarer Konservenabsteller
1--------+iI---ttiHIt----ttt----tt-tHt----
Innenbeleuchtung
,~e~I::~lt==
Absteller für hohe Flaschen und Getranke
E
platzsparende Flaschenablage*
+---++iIH---
Tauwasserablauf
--t++fI-+---~If--+It---ttflH---
Flaschenkorb*
+---Hl...•.--
Schalen für Gemüse,
Salate, Obst .
P===~f~~~~l!;~jtt==
Typenschild
1
StellfüBe und Transporttragegriffe vorn;
Transportrollen hinten .
*
je nach Modell und Ausstattung

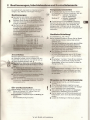
Wir gratulieren Ihnen zu Ihrem euen Gerât. Sie haben sich mit Ihrem Kauf für aile Vorteile
°ede • die Ihnen hochwertige Oualitàt, eine lange Lebensdauer und
n~'~n,noe .
6
â
es ermôqlicht Ihnen tàqlich h6chsten Bedienunqskorntort.
:l:
6
0
umweltfreundlichen Verfahren unter Verwendung recyclinggerechter
gemeinsam einen aktiven Beitrag zur Erhaltung unserer Umwelt.
â
es kennenzulernen, lesen Sie bitte die Hinweise in dieser
roh.
e neuen Geràt.
modernster Kaltetec
hohe Funktionssi e
Die Ausstattu
1::0
Mit diesem Go -
Material"
U
e
G
- - e e Ge rauchsanweisung sorgfaltig auf
Os
lese qeqebenentalls an den Nachbesit-
,
~ Energieoptimierter
â.
e eislauf
~ Energieeffiziente Isolierung
~ Niedriger Energieverbrauch
Die Gebrauchsanweisung ist für mehrere Modelle gültig,
Abweichungen sind daher m6glich.
Bequeme Bedienung durch die Anordnung
~ °e bords in der Gehàusefront
~ H ~ ung
~
Inhaltsverzeichnis
Seite
Gebrauchsanweisung
Gérât
auf einen Blick
o ••••••••••••••••••
2
Plus unkte, Inhaltsverzeichnis
3
- u d Wamhinweise
4
iSCrg~:''1gshinweis : 4
--....~••~._HI .•
e· e
4
le nahme und Kontrollelemente 5
3astirnmungen 5
n!i.::iUllIoeBen 4
d Ausschalten 5
Te peratur einstellen 5
Ventilator-Schaltung , 5
Energieeinsparung : 5
3
Einordnen, Ausstattung, Innenbeleuchtung 6
Einordnen der Lebensrnittel 6
Ausstattung verandern 6
Innenbeleuchtung 6
4 Abtauen, Reinigen 7
5 St6rungen - Probleme? 7
Kundendienst und Typenschild , 7
~
~ Variable un
praœsccs
2 Schalen für die getre
Obst und Gemüse
~ Teil- und unterschiebbare Glasplatte* oder
Ablage im Rost* für hohe Getaûe
~ Praxisorientierte Türaufteilung und Platz für
groBe Getrankeflaschen
~ Türgriff mit integrierter Offnungsmechanik*
~ Integrierte Transporttragegriffe
~ Transportrollen hinten
~ H6henverstellbare FüBe vorn
r
Aufstell- und Umbauanweisung
Aufstellrnaûe
8
Türanschlag wechseln 8
Einschub in die Küchenzeile : 8
Hinweis zur Dekorplattenmontage 8
~ Einfache Reinigung
~ Türanschlag wechselbar
~ Dekorrahmen lieferbar
3

~ltChe
eils- und Warnhinweise
Die Verpackung ais Transportschutz des Geràtes
und einzelner Teile ist aus wiederverwertbaren
~ Materialien hergestellt.
L \.-
Wellpappe/Pappe
.., - Formteile aus PS (qeschàumtes, FCKW-freies
Polystyrol)
- Folien und Beutel aus PE (Polyethylen)
- Urnrelfunqsbànder aus PP (Polypropylen)
• Verpackungsmaterial ist keln Spielzeug für
Kinder - Erstickungsgefahr durch Folien!
• Bringen Sie bitte das Verpackungsmaterial zur
nachstgelegenen offizlellen Sammelstelle, so
dass die verschiedenen Materialien wiederver-
wendel bzw. verwertet werden kbnnen.
Das ausgedienteGerat:
Es enthalt noch wertvolle Materialien, nicht einfach
mit dem Haus- oder Sperrmüll entsorgen.
• Ausgediente Gerate sofort unbrauchbar machen
Netzstecker ziehen und Anschlusskabel durch- '
trennen.
Schnapp- oder Riegelschloss entfernen,
damit spielende Kinder sich nicht selbst
. einschlieBen kônnen - sie ersticken.
• Achteh Sie darauf, dass das ausgediente Geràt
bis zum Abtransport zu einer Entsorgungs- bzw.
Sammeistelle am Kâlternittelkreislauf nicht
beschadigt wird. So ist sichergestellt, dass
das enthaltene Kàlternittel und
01
nicht unkon-
trolliert entweicht.
- Genaue Angaben über das verwendete Kâlternit-
tel finden Sie auf de e-
Technische Sicherheit
• Um Personen- und Sachschaden zu vermeiden,
das Geràt nur verpackt transportieren und mit
zwei Personen aufstellen.
• Das enthaltene Kalternittel R 600a ist umwelt-
J..... .
freundlich, aber brennbar.
ill •
R.ohrleitungen des Kaltekreislauts nicht bescha-
diqen. Herausspritzendes Kàltemittel kann zu
Augenverletzungen führen oder sich entzünden ..
• Wenn Kâlternittel entweicht, dann offenes Feuer
oder Zündquellen in der Nahe der Auslaufstelle
beseitigen, Netzstecker ziehen und den Raum
gut lüften.
• Bei Schàden am Gérât umgehend - vor dem
AnschlieBen - beim Lieferanten rückfragen.
• Zur Gewàhrleistunq eines sicheren Betriebes
Gerët nur nach den Angaben der Gebrauchsan-
weisung montieren und anschlieBen.
• lm Fehlerfall
Gérât
yom Netz trennen: Netzste-
cker ziehen (dabei nicht am Anschlusskabel zie-
hen) oder Sicherung auslbsen bzw. herausdre-
hen.
• Reparaturen und Eingriffe an dem Gerat nur
von dem Kundendienst ausführen lassen,
sonst kônnen erhebliche Gefahren für den
Benutzer entstehen. Gleiches gilt für das
Wechseln der Netzanschlussleitung.
4
Sicherheit beim Gebrauch
• Lagern Sie keine explosiven Stoffe oder Sprüh-
J.....
dosen mit brennbaren Treibmitteln, wie z. B.
ill
Butan, Propan, Pentan uSW.,im Gerat. Eventuell
austretende Gase kônnten durch elektrische
Bauteile entzündet werden. Sie erkennen solche
Sprühdosen an der aufgedruckten Inhaltsangabe
oder einem Flammensymbol.
• Hochprozentigen Alkohol nur dicht verschlossen
und stehend lagern.
• lm Geràteinnenraum nicht mit offenem Feuer
oder Zündquellen hantieren.
• Keine elektrischen Geràte innerhalb des Gerates
benutzen (z. B. Dampfreinigungsgerate, Heizge-
rate, Eisbereiter usw.).
• Sockel, Schubtàcher, Türen usw. nicht ais Tritt-
brett oder zum Aufstützen missbrauchen.
• Kinder nicht mit dem Gerat spielen lassen, z. B.
sich in Schubtacher setzen oder an die Tür han-
gen lassen.
• Verzehren Sie keine überlagerten Lebensmittel,
sie kbnnen zu einer Lebensmittelvergiftung füh-
ren.
Aufstellhinweise
• Beim Aufstellen/Einbauen darauf achten, dass
die Rohrleitungen des Kàltekrelslauts nicht be-
schâdigt werden.
• De s u gsraum Ihres Gerâtes muss laut
E 3
0
8 9 KaJtemittelfüllmenge
600a ein Volumen von 1 m
3
aufweisen, damit
im Falle einer Leckage des Kàlternittelkralslau-
fes kein zündtahtqes Gas-Luft-Gemisch im
Aufstellungsraum des Gerates entstehen kann,
Die Angabe der Kàttemittelrnenqe finden Sie auf
dem Typenschild im Geràteinnenraurn.
• Vermeiden Sie Standorte im Bereich direkter
Sonnenbestrahlung, neben Herd, Heizung und
dergleichen, sowie im Feuchte- und Spritzwas-
serbereich.
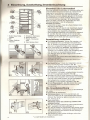
~. Gerat in der Nische mit dem beiliegenden Ga-
~~' belschlüssel 10 über die StellfüBe fest und
~ ebenstehend ausrichten.
l' •
Die Belüftungsgitter dürfen nicht verstellt
werden. Immer auf gute Be- und Entlüftung
achten! Dazu mehr Informationen in der Auf-
stell- und Umbauanweisung.
• Keine warmeabgebenden Gerate, z. B. Mikro-
wellenqerat, Toaster uSW.,auf das Kühl-/Ge-
trierqeràt stellen!
• Bei erster Türbffnung rastet der Griff von der
Transport- in die Gebrauchsstellung ein,hôrbar
durch ein leichtes Knacken.
• Alle Transportsicherungsteile entfernen,
- Klebeband oder Abstandsteile* von den Abstell-
tlachen abziehen und diese in die gewünschten .
Einschubhôhen versetzen.
- Alle Schutzfolien abziehen: an Zierleisten, Front-
und Seitenwanden*.

2 Bestimmungen, Inbetriebnahme und Kontrollelemente
Es empfiehlt sich, das Gerât vor Inbetriebnahme zu
reinigen, dazu Naheres unter Kapitel "Reinigen".
§
Bestimmungen .
• Das Gerat ist zum Kühlen von Lebensmitteln
. bestimmt. Es ist für die Verwendung im Haushalt
konzipiert. Beim Einsatz im ge e . e Be-
reich sind die für das Gewerbe ~- . e Bestim-
mungen zu beachten.
• Das Gerat ist je nach KW'nakïasss ür en Betrieb
bei begrenzten U oeraturen
ausgelegt. Sie
e -
oder über-
schritten we ara zutreffende
Klimaklasse --:;: . --- - ild aufge-
. druckt
t:::
KJlrnaio;J.E,s.:;ë
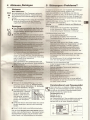
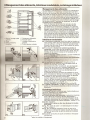
Temperatur einstellen
• Temperaturregler
CD
mit einer Münze drehen.
Die Stellunqen des Schlitzes bedeuten, Abb. A 1:
Stellung
"1"
=
wârrnste Temperatur,
kleinste Kühlleistung
Stellung "4"
=
kâlteste Temperatur,
groBte Kühlleistung
• Empfehlenswert ist eine mittlere Einstellung.
Beachten Sie bitte, dass die Innentemperaturen
von der Raumtemperatur, dem Aufstellort, der
Hàufiqkeit des Türôffnens und der Beschickung
beeinflusst werden. Eventuell den Temperaturregler
nachstellen.
Ventilator-Schaltung*
für Umluftkühlung, Abb. A1/cg)
Mit der Ventilator-Schaltung konnen Sie bei Bedarf
- groBe Mengen frischer Lebensmittel schnell
abkühlen .und
über aile Abstellebenen eine relativ gleichmaBige
Temperaturverteilung im Kühlraum erreichen.
o rch aine intensive Luftzirkulation heben sich
e erschiedlichen Temperaturbereiche auf.
e labensmittel sind gleich kühl.
'e 'en "Iator-Schaltung ist qrundsàtzhch
empfehlenswert:
- bei hoher Raumtemperatur (ab ca. 30 "C) oder
hoher Luftfeuchtigkeit, wie
Z.
B. an Sommerta-
gen.
• Einschalten: "Ventilator"-Taste cg) kurz drücken,
so dass die dazugehOrende Anzeige leuchtet.
- Ausschalten: erneut kurz drücken, so dass die
Anzeige dunkel ist.
Hinweis:
Bei eingeschaltetem "Ventilator" erhOht sich der
E erqieverbrauch, und im Kühlraum wird eine
~ e e eistung erreicht, die Temperatur sinkt,
er.
,
•
Mïl!'nAleisezur Energieeinsparung
• Achten Sie auf freie Be- und Entlüftungsquer-
schnitte.
• Ôffnen Sie die Geràtetür rnôqlichst nur kurz.
• Die Lebensmittel sortiert einordnen. Die angege-
bene Lagerdauer nicht überschreiten .
• Alle Lebensmittel gut verpackt und abgedeckt
aufbewahren; Reifbildung wird vermieden.
• Warme Speisen erst auf Zimmertemperatur ab-
kühlen lassen, bevor sie in das Gerat eingelegt
werden.
• Lassen Sie Tiefkühlgut im Kühlraum auftauen.
5
AnschlieBen
Stromart (Wechselstrom) und Spannung
am Aufstellort müssen mit den Angaben auf dem
Typenschild übereinstimmen. Es befindet sich an
der linken Geràteinnenseite, Abb. A.
• Das Gerat nur über eine vorschrlftsmàûlq in-
stallierte Schutzkontakt-Steckdose anschlie-
e-
e
rûckseite den Kabelhalter en" a
brationsgerausche!
Ein- und Ausschalten
• Einschalten: Temperaturregler
CD
mit einer
. Münze auf Stellung "2,5" drehen, Abb. A 1.
- Die Innenbeleuchtung brennt.
• Ausschalten: Temperaturregler auf Stellung "0"
drehen.
- Die Innenbeleuchtung ist dunkel.
* je nach Modell und Ausstattung

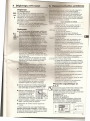
Einordnen der Lebensmittel
Durch die natürliche Luftzirkulation im Kühlraum stellen sich
unterschiedliche Temperaturbereiche ein, welche für die
Lagerung der verschiedenen Lebensmittel durchaus
günstig sind. Unmittelbar über den Gemüseschalen und an
der Rückwand ist es am kâltesten (günstig z. B. für Wurst-
und Fleischwaren); im oberen vorderen Bereich und in der
Tür ist es am wàrrnsten (günstig
"7..
B. für streichfàhiqe
Butter und
Kâse),
Deshalb die Lebensmittel nach dem
"Einordnungsbeispiel", Abb. B, aufbewahren.
Hinweise zum Kühlen
- Lebensmittel so lagern, dass die Luft gut zirkulieren kann,
also nicht zu dicht lagern.
- Lebensmittel, die leicht Geruch oder Geschmack abgeben
oder annehmen, sowie Flüssigkeiten, immer in geschlos-
senen GefaBen oder abgedeckt aufbewahren.
- Stark Ethylengas abgebende und empfindliche Lebensmit-
tel, wie Obst, Gemüse und Salat, immer trennen oder .
verpacken, um die Lagerdauer nicht zu reduzieren; z. B.
Tomaten nicht mit Kiwis oder Kohl zusammen
laqern,
Ausstattung verandern
• Den Konservenabsteller* kënnen Sie versetzen, und
aile Türabsteller sind zum Reinigen herausnehmbar,
Abb. C: Absteller hochschieben, nach vorn herausneh-
men und in umgekehrter Foige wieder einsetzen.
• Durch Verschieben des Flaschen- und Konservenhal-
ters kënnen Sie Flaschen gegen Umkippen beim
Türëffnen und -schlieBen sichern. Bei Ausstattung nach
Abb. C1 immer am Kunststofthalteteil fassen!
- Zum Reinigen kann der Halter abgenommen werden:
Bei Ausstattung
- nach Abb. C1: den unteren Rand des Halters nach vorn
ziehen und ausrasten,
- nach Abb. C2: den vorderen Rand des Halters hoch-
schieben und ausrasten.
rdnung,Ausstattung, Innenbeleuchtung
• Die Abstelttlâchen", Roste oder Glasplatten, kënnen
Sie je nach Kühlguthëheversetzen, Abb. 01:
- anheben, nach vorn ziehen und wegschwenken. Die
Abstellflàchen immer mit dem Anschlagrand hinten nach
oben zeigend einschieben, sonst kënnen Lebensmittel
an der Rückwand anfrieren ..
- Die Glasplatten* sind gegen unbeabsichtigtes Herauszie-
hen durch Auszugstopps gesichert, Abb. 02.
• Benëtigen Sie Platz für hohe Flaschen und GefaBe, dann
- die vordere halbe Glasplatte* leicht anheben und vorsichtig
unter die hintere Platte schieben, bis die Auszugstopps* in
den Auflagenlücken einrasten, Abb. E1, oder
- die Ablage* im Rost seitlich hochstellen, Abb. E2.
• Mit dem Flaschenkorb*, Abb. E3, kënnen Sie
zusàtz-
lich Getrânke kühlen und mehrere Flaschen leicht
transportieren.
Die Innenbeleuchtung
Wenn die Innenbeleuchtung nicht brennt, ist die Glühlampe
evtl. defekt.
Auswechseln der Glühlampe:
• Glühlampendaten: max. 25 W, die Stromart und
Spannung sollten mit der Typenschildangabe überein-
stimmen. Nur Glühbirnen gleicher Abmessung verwen-
den, Fassung: E 14.
• Gerat ausschalten.
Netzstecker ziehen bzw. Sicherung auslôsen oder
herausschrauben.
• Abb. F1: Die Lampenabdeckung seitlich zusammendrük-
ken 1, ausrasten und hinten aushànqen 2.
• Abb. F2: Die Glühlampe auswechseln. Beim Drehen etwas
mehr Kraft anwenden - Haftreibung der Dichtung überwin-
den. Beim Eindrehen auf sauberen Sitz der Dichtung im
Lampensockel achten.
• Die Abdeckung hinten wieder einhànqen und an den
Seiten einrasten lassen.
* je nach Modell und Ausstattung
Butter, Kàse; fertige
Speisen
2 Eier
3 Dosen,Getrânke,
Flaschen
5 Koriserven, Backwaren,
6 Molkereiprodukte
7 Fleisch~,Wurstwaren,
Fisch
8 Obst, Gemüse, Salat
Di
1
F2
Fi
6

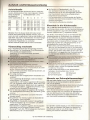
4 Abtauen,
Reinigen
Abtauen
Der Kühlraum
••• . taut aufomatisch ab. Das Tauwasser verdunstet
•• durch die Kornpressorwàrrne - Wassertropfen an
•
der Rückwand sind funktional bedingt und vôllig
normal.
• Achten Sie lediglich darauf, dass das Tauwasser
durch die Ablaufôffnung an der Rückwand
ungehindert abflieBen kann (Pfeil in Abb. A).
Ausstattungsteile
e as Spülmittel von
freinigungsgeraten
âdigungsge-
fiche Rein' e e erwEmc:en
- Achten Sie darauf, dass kein Reinigungswasser
in die Lüftungsgitter und élektrischen Teile dringt
und nur wenig in die Ablaufrinne.
Geràt trockenreiben.
- Das Typenschild an der Gerâteinnenseite nicht
beschadigen oder gar entfernen - es ist wichtig für
den Kundendienst.
erdose* kann in der Spülmaschine gerei-
~~~~~-'~P~~G ~ en und
'e
• Reinigen Sie die Ablaufôffnung an der Rück-
wand ôfters (Pfeil in Abb. A). Gegebenenfalls
mit einem dünnen Hilfsmittel, z. B. Wattestab~
chen oder âhnllchern, reinigen.
• Die Kâltemaschlne mit dem
1""1""="""""
-rrr----,
Warmetauscher - Metallgit-
ter an der Rückseite des
Gerates - sollte einmal im
Jahr gereinigt, entstaubt
werden. Staubablagerungen
erhôhen den Enerqiever-
brauch.
• Achten Sie darauf, dass keine Kabel oder andere
Bauteile abgerissen, geknickt oder beschadigt
werden.
• Danach Gerat wieder anschlieBen/einschalten.
Soli das
Gerât
lânqere Zeit auBer Betrieb gesetzt
werden, dann das Geràt leeren,Netzstecker ziehen,
wie beschrieben reinigen und die Geràtetür offen-
stehen lassen, um Geruchsbildung zu vermeiden.
5 Storungen. Probleme?
Ihr Geràt ist so konstruiert und hergestellt, dass Stôrungs-
freiheit und lange Lebensdauer gegeben sind .
Sollte dennoch wahrend des Betriebes eine Stôrung
auftreten, so prüten Sie bitte, ob die Stôrung evtl. auf einen
Bedienungsfehler zurückzuführen ist, denn in diesem Fall
müssen Ihnen auch wahrend der Garantiezeit die anfallen-
den Kosten berechnet werden.
Foigende Stôrungen kônnen Sie durch Prüfen der môgli-
chen Ursachen selbst beheben:
Stôrung môgliche Ursache und Behebung
Geràt arbeitet nicht
- Ist das Gerat ordnungsgemaB eingeschaltet?
- Ist der Netzstecker richtig in der Steckdose?
- Ist die Sicherung der Steckdose ln Ordnung?
Innenbeleuchtung brennt nicht
- Ist das Gerat eingeschaltet?
- Die Glühlampe ist defekt. Nach Abschnitt
"Innenbeleuchtung" die Lampe àuswechseln.
Geràusche sind zu laut
Steht das Geràt fest auf dem Boden, werden
ne enstehende Môbel oder Gegenstande von dem
e den Kühlaggregat in Vibration gesetzt?
E . aschen und GefaBe auseinanderrücken.
dUHI~t1J
sind: Stn5mungsgerausche, ein Blubbern
e Plâtschem, sie kommen vom Kâltemittel, das
Kâltekreislauf ftiE;lBt.
Ein kurzes Klicken. 'Es entsteht immer, wenn sich das
Kühlaggregat (der Motor) automatisch ein- oder
ausschaltet
Ein Motorbrummen. Es ist kurzfristig etwas lauter,
wenn sich das Aggregat einschaltet.
Temperatur ist nicht ausreichend kalt
Ist der Temperaturregler richtig eingestellt? Evtl.
kalter einstellen.
Separat eingelegtes Thermometer zeigt einen
falschen Wert an.
lieBt die Geràtetür richtig?
e Be- u. Entlüftung ausreichend?
ngsgitter frei machen.
e U gebungstemperatur zu warm?
s. schnitt "Bestirnrnunqen")
Vurde das Geràt zu haufig oder zu lange geôffnet?
Evtl. abwarten, ob sichdie erforderliche Temperatur
von allein wieder einstellt.
Kundendienst und Typenschild
~
Wenn keine der o. g. Ursachen vorliegt und Sie die
Stôrung nicht selbst beseitigen konnten, wenden Sie
\. sich bitte an die nachste Kundendienststelle (beilie-
gendes Verzeichnis). Teilen Sie die
Geratebezeichnung
CD
Service-
ev
und
Gerâtenummer ®
des Typenschildes mit. Dies ermôglicht einen schnel-
len.und zielgerichteten Service. Das Typenschild
befindet sich an der linken Gerateinnenseite.
G:}--!..mIllIlÎn
1 ;r:. 1 .
®J 1111111
!!!!!I~I-I
~.;_.I="I. ~
®
,_;:;,!,:,,,,.w ••••
nnl
l
'L- _
7

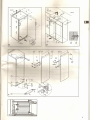
fstell· und Umbauanweisung
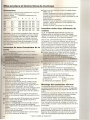
AufstelimaBe
Die Geràteauûenrnaûe entnehmen Sie der nebenste-
henden Abbildimg
S
und der unten folgenden Tabelle.
Gerat, Bruttoinhalt
GerateauBenmaBe [mm]
der Modelle
[1]
(siehe Typenschild)
A
B
C
0
E F
Il
258 (26..)
1250
600
631 614
643 1177
309 (31..) 1447
600
631 614
643 1177
362
(36..) 1644
600
631
614 643 1177
413
(42.,)
1841
600
631 614
643
1177
362 (36..) 1644
660
683
662
703 1285
413 (42..) 1841
660 683 662 703 1285
Hinweis: Wenn Sie dieses Gerat dicht neben einem
anderen Kühl-/Getriergerat aufstellen mbchten, dann nur
neben den dafür vorgesehenen 'side-by-slde-Gerâten', z.B.
GSD,BGN. Sie sind für die Kombination mit einem Kühlge-
rat konzipiert. Wichtig, um Kondenswasser und daraus
resultierende Foigeschaden zu vermeiden.
Genaue Auskunft erhalten Sie bei Ihrem Fachhàndler,
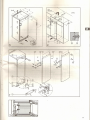
Türanschlag wechseln
Abb. T: Bei Bedarf kbnnen Sie den Anschlag wechseln:
• Bei gebffneter Tür Sockelblende(Ï) mit Schraubendre-
her ausrasten und weqschwenken.
- Abdeckung
ev
mit Schraubendreher ausrasten.
Tür schlieBen.
raube 5
®
herausdrehe .
tzen:
(},:)ere!il...a
erbolzen
®
herausdrehen und auf der
Gegenseite eindrehen. Dazu Innensechskant des beilie-
genden Gabelschlüssels verwenden.
- Unten: mit Schraubendreher Distanzteil CDabheben, auf
der Gegenseite einsetzen,
• Tür
wieder montieren: ,
- Stopfen ®aus den Türlagerbuchsen herausheben und
umsetzen.
- Tür in Lagerbolzen ® einhangen, dabei auf Distanz-
scheibe achten, Tür schlieBen.
- Lagerteil ® um 180
0
drehen, Lagerbolzen ® herauszie-
hen und umgekehrt wieder einsetzen. Beide Teile in den
Lagerbock ® montieren: Bolzen durch den Lagerbock
ins Türlager einschieben, Laa.erteileinschwenken, hoch-
schieben und mit Schraube
Q)
vormontieren.
• Die Tür über das Langloch im Lagerbock ® fluchtend
zum Gerâteqehàuse ausrichten, dann Schraube ® fest
anzlehen,
• Sockelblende
CD
aufschieben und durch Andrücken
einrasten lassen.
• Bei gebffneter Tür Abdeckung
ev
in die Sockelblende
vorn einsetzen, hinten einrasten.
• Türgriff ® und Stopfen ® umsetzen*. Bei gebffneter
Tür die Druckplatten* @ .vorn ausrasten und seitlich
wegschieben; Griff abschrauben, .
Beim Montieren umgekehrt vorgehen: die Druckplatten
aufschieben und auf richtiges Einrasten achten.
- Stangengriff* nach Abb. Til mit beiliegendem Sechskant-
Stiftschlüssel 2,5 ab- und anschrauben.
• Bei Gerâten mit Flaschenkorb*, Abb. T1:
Zum leichteren Entnehmen die Einschubseite des
Flaschenkorbs mit der der Gemüseschalen wechseln
(der Flaschenkorb muss immer griffseitig stehen):
- Flaschenkorb herausnehrnen.
- Die Gemüseschalen zur Scharnierseite des Geràtes
schieben; die obereSchale komplett mit den Führungs-
schienen verschieben,
- Flaschenkorb griffseitig neu einsetzen.
Einschub in die Küchenzeile
Abb. U: 600 mm breite Gerate kbnnen von der Küchen-
einrichtung umbaut werden. Um das
Gérât
der Küchenzei-
lenhbhe anzugleichen, kann über dem Gerat ein entspre-
chender Aufsatzschrank
CD
angebracht werden.
Für die Be- und Entlüftung muss an der Rückseite des
Aufsatzschrankes ein Abluftschacht von mindestens
50 mm Tiefe über die gesamte Aufsatzschrankbreite
vorhanden sein, Der Entlüftungsquerschnitt unter der
Raumdecke sollte mindestens 300 cm" betraqen. Grund-
sàtzlich gilt je grbBer der Lüftungsquer.schnitt, um so
energiesparender arbeitet das Geràt,
• Beim Umbau mit Norm-Küchenschranken (Tiefe max.
580 mm) und Dekorplatten bis max. 2 mm Dicke kann
das Gerat direkt neben demKüchenschrank aufgestellt
werden, Die Geratetür steht seitlich 34 mm und in der
Geràtemitte 51 mm gegenüber der Küchenschrankfront
vor, Sie lësst sich dadurch einwandfrei bffnen und
schlieBen.
• Be' . elle des Gerâtes neben einer Wand ® ist
e: va
min. 36 mm
~., e
and erforderfich (Griffüberstand
. 00-·
eter
Tür).
enn Sie Ihr
Gérât
an den angrenzenden Küchenmbbeln
befestigen oder ein Distanzteil zwischen
Geràt
und Wand
anbringen wollen, müssen Sie folgendes beachten:
- Funktion der Tür prüfen.
- Geràt mit Blechschrauben an den Küchenmbbeln
betestiqen, Einschraubtiefe max, 10 mm!
CD
Aufsatzschrank ® Mbbelwand
ev
Kühl-/Gefriergerat ® Wand
Hinweis zur Dekorplattenrnontage*
600 mm breite Gerate kbnnen Sie mit Dekorplatte und
Dekorrahmen der Küchenmbbelfront farblich anpassen
oder von ihr abheben:
Die Dekorplatten erhalten Sie bei Ihrem Küchenmôbelllete-
ranten. Die Dekorrahmen sind nachrüstbar über den
Fachhandler erhàltlich.
Wenn Sie die Dekorplattenmontage selbst vornehmen
wollen, benbtigen Sie zum Vorbohren der Befestigungslb-
cher eine Bohrmaschine oder einen Akku-Schrauber.
Weitere Montagehinweise und MaBe entnehmen Sie der
dem Nachrüstset beiliegenden Montageanleitung,
Der Hersteller arbeitet standlq an der Weiterentwicklung
aller Typen und Modelle. Bitte haben Sie deshalb Ver-
stàndnis dafür, dass wir uns Ànderungen in Form, Aus-
stattunq und Technik vorbehalten müssen.
8
* je nach Modell und Ausstattung

min.
300
cm
1
" 1
@f-----~
U
[mm]
5
T
G)~----
9

The appliance at a glance
o
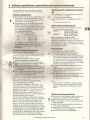
Operating and
control elements
fig.
A1
CD
On/off and temperature control
1
=
warm
4
=
cold
We recommend a medium setting.
@*
o
Œ)
Fan button* with indicator lamp showing
active
recirculated-air cooling*
A1
Description of appliance and
equipment
9·
A
ear transport grips
~F;;~~~~i~jR==
Operating and control elements*
'II ~
Fan for recirculated-air cooling*
L..--IHIt-I---
Butter andcheese compartment
I~~~~~~I Egg tray*
~d~~~--Htt-r---
Adjustable storage shelves*
...,:..I:~~oIfflrr---
Adjustable bottle/can holder*
~~11
~1+I---+t-Io!Joo+IH--
Sectioned shelves* or flap in grid shelf*
~iIiIil~~~~~It--
Adjustable-height jar rack*
~fM.------HiI---H-IH-----I:i+---+HH-+--
Interior light
,~e~I::~ttt==
Door rack for large bottles and drinks
~ Space-saving bottle shelf*
!H+----H-llHI---
Defrost drain
..•....-I+III-+---~If--+H---ttHH---
Bottle basket*
-f---Hllf-+--
Vegetable, salad and fruit bins
f
:;;::lt1~~~~~~jjU==Type/Data plate
Adjustable-heiqht feet and transport grips
at front, transport castors at back
A
10
*
Depending on model and options

Congratulations on your purchase. ln choosing this appliance you have opted for ail the benefits of
state-of-the-art refrigeration technology, guaranteeing you top quality, a long life span and excellent
reliability.
The features on your appliance ave been designed to ensure maximum convenience - day in, day lE])
out.
This appliance has bee ufactured with recyclable mate rials using an environmentally friendly
process, sa toge e are making an active contribution to the preservation of our environ-
ment.
To get to
s
of your new appliance, please read the information contained in these
operati
We . your new appliance.
c.netyy-oprti~.ÏS€;C
~ Energy-efficient insulation
~ Low energy consumption
~. User-friendly thanks to clearly arranged controls
on of appliance
~ Sri
~
~ Variable and pra' ea res, e.g. 2 bins for
storing fruit and vegetables separately
~ Sectioned glass shelf* or flap in grid shelf* for tall
containers
~ Practical door arrangement and space for tall
bottles
~ Door handle with integrated opening mechanism*
~ Integrated transport grips
~ Transport castors at back
~ Adjustable-height feet at front
~ Easy to clean
~ Door hinges can be changed over
~ Decor frames available
Keep ese operating instructions in a safe place and
oass em on to the next owner, where applicable.
e operating instructions apply to several models.
Differences may therefore occur.
Contents
Page
Operating instructions
The appliance at a glance 10
Additional benefits, contents 11
Safety instructions and warnings 12
Disposai notes 12
Se .
9
up 12
2 0 era 'on and control elements 13
Sa ety regulations 13
Co ecting to the mains 13
Switching the appliance on and off 13
Setting the temperature , 13
Fan switch 13
Energy savings 13
3 Storage, shelf arrangement, interior light 14
Arranging food in the refrigerator 14
Changing shelf arrangement 14
Interior light ; 14
4 Defrosting, cleaning 15
5 Troubleshooting 15
Customer service and type plate 15
Instructions for installation and modification
Dimensions 16
Changing over door hinges 16
1
nsertion into row of kitchen units 16
Notes on assembling decor panels 16
11

Safety during use
. • Do not store explosives or sprays using combus-
J.....,
tible prapellants such as butane, propane, pen-
~ tane, etc. in the appliance. Electrical compo-
nents might cause leaking gas to ignite. You can
identify such sprays by the printed contents or a
flame symbol.
• Only storehigh-percentage alcohol in tightly
sealed, upright containers.
• Do not allow naked flames or ignition sources to
enter the appliance.
• Do not use electrical appliances inside the ap-
pliance (e.g. steam cleaners, heaters, ice
makers, etc.).
• Do not stand on the plinth, drawers or doors or
use them to support anything else.
• Do not let children play with the appliance, e.g.
do not allow them to sit in the drawers or swing
on the door.
• Do not consume food which has been stored for
too long, as it could cause food poisoning.
instructions and warnings
Settingup
• When setting up/fitting ensure that the refrigerant
circuit pipes are not damaged.
• Standard EN 378 specifies that the raomin which
you install your appliance must have a volume of
1 m
3
per 8 9 of R 600a refrigerant used in the ap-
pliance, so as to avoid the formation of inflamma-
ble gas/air mixtures in the raom where the ap-
pIiance is located in the event of a leak in the re-
. eran circuit.. The quantity of retrigerant used in
your appliance is indicated on the type plate on
the inside of the appliance.
• Avoid positioning in direct sunlight or next to an
oyen, radiator or similar, in damp locations or near
.~ spraying water.
ss •
Once in position, use the 10 spanner provided to
~. ~. adjust the feet so that the appliance is level and
does not wobble.
• The ventilation grilles should not be ob-
structed. Always ensure that there is good
ventilation and that the outward flowing air is
able to escape. More information can be found
in the installation and modification instructions.
• Do not place heat-emitting appliances, e.g. micro-
wave oyen, toaster, etc., on top of the refrigerator
or freezer. .
• Wh en you open the door for the first time, the
handle switches from the transport position to the
operating position; you will hear a soft click.
• Remove ail transportation safety components:
- Remove sticky tape or spacers* fram shelves and
insert shelves in the required position.
- Remove ail pratective film: fram the decorative
trims, front walls and side walls*.
The packaging is designed to protect the appli-
ance and individual components during transport
~ and is made of recyclable materials. .
L\ -
Corrugated board/board
+J -
Moulded polystyrene (foamed, CFC-free
polystyrene)
- Polythene bags and sheets
- Polypropylene straps
• Keep packaging materials away from children -
polythene sheets and bags can suftocate!
• Please return the packaqlnq mate rial to your
nearest officiai collection point so that the
various materials can be reused or recycled as
far as possible.
Your old appliance:
This contains some reusable mate rials and should
not simply be disposed of with household or bulk
refuse.
• Disable discarded appliances immediately by
removing the plug and cutting thraugh the
connection cable.
Remove the spring-action or boit catch from
the appliance or render it unusable so that
cllildren cannot become trapped inside and
suffocate.
• Ensure that the refrigerant circuit is not damaged
before the appliance that is no longer needed is
taken away for disposaI. ln this way the refrig-
erant or oil will not escapeinto the environment. ..
- Exact details of the refrigerant used can be
e e
ear
i
or PU
Technical safety
• To prevent injury or da mage to the unit, the
appliance should only be transported wrapped
and set up by two people.
• The refrigerant R 600a is enviranmentally friendly
J.....
but flammable.
ill •
Do not damage the refrigerant circuit pipes.
Splashes of refrigerant can harm your eyes or
ignite.
• If refrigerant escapes, remove ail naked flames
or sources of ignition in the vicinity of the leak,
disconnect the appliance from the mains and
ventilate the area weil.
• ln the event that the appliance is damaged,
contact the supplierimmediately before
connecting to the mains.
• To guarantee safe operation, ensure that the
appliance is set up and connected as described
in these operating instructions.
• Disconnect the appliance from the mains if any
fault occurs. Pull out the plug (not by pulling on
the mains cable) or switch off or remove the
fuse;
• Any repairs and work on the appliance should
only be carried out by the customer service
department, as unauthorised work could
prove highly dangerous for the user. The
sarne applies to changing the mains power
cable.
12

Switching the appliance on and
off
o •
To switch on: Turn the temperature control
CD
'8' to "2.5" with a coin, fig.
A1.
. •- The interior light will switch on.
a • '.
To switch off: Set the temperature control to
2 Safety regulations, operation and control elements
e
ance with the folio .
9
cooe:
9
=
earth,
blue
=
neutral, brown
=
live.
Warning! This appliance must be earthed.
Non-rewireable plugs es
1363
If this machine or appliance is fitted with a non-
rewireable plug, the following information applies:
If the socket outlets are not suitable for the plug
supplied with this product, it must be eut off and an
appropriate plug fitted. The plug eut from the
flexible cord should be disposed of and on no
account be inserted into a 13 A socket elsewhere in
the house (electric shock hazard).
The fuse cover must be re-fitted when changing
the fuse, and if the fuse cover is lost the plug must
not be used until a suitable replacement is ob-
tained. The colour of the correct replacement
cover is that of the coloured insert in the base of
the plug, or the colour that is embossed in words
on the base of the plug (as applicable to the design
of the plug fitted). The correct rating of the replace-
ment fuses that are ASTA approved to BS 1362
should be fitted. Replacement fuse covers may be
purchased from your local electrical suppliers,
electricity showroom or approved service agent.
* Depending on model and options
You are advised to clean the appliance before
switching it on for the first time (see "Cleaning").
§
Safety regulations
• The appliance is intended for chilling food. It is
designedas a household appliance. If used
commercially, the relevant regulations on com-
mercial use must be observed.
• The appliance is set to operate within specifie
ambienttemperature limits according to its
climate rating. These temperature limits should
not be exceeded. The correct climate rating for
your appliance is indicated on the type plate.
This is explained as follows:
Climate rating Se for ambient
e peratures of
S -10°C to +32°C
-16"C
ta
+32°C
- -C ta +38°C
-~ =C
a
T43°C
'0 ---
oee es ed for leaks.
en safety
tEC
and
mams
P ers ,
at the operating poi
st
comply the details
on the type plate, which is located inside the ap-
pliance on the left, fig. A.
• Connect the appliance with a properly
earthed fused plug and socket only.
• The socket must be fused with a 10 A fuse or
higher; it must be away from the rear
of
the ap-
pliance and must be easily accessible,
co ec e appliance to the supply with
e e ion cable - risk
- The interior light will go out.
o
'~"L'
.
,
...
",
.
Nt
a
2
Setting the temperature .
• Turn the temperature control
CD
using a coin.
The slot positions mean, fig. A1:
. Setting
"1"
=
highest temperature,
lowest cooling setting
Setting
"4"
=
lowest temperature,
highest coolinq setting
• We recommend a medium setting.
Please note that the temperature inside your
appliance will depend on where you have put it, the
temperature in the room, how often you open the
door, and what you put in it. If necessary, re-adjust
the temperature control.
Fanswitch*
for recirculated-air cooling, fig.
A1/CV
You can use the.tan switch as required to:
chili large quantities of fresh food fast;
- keep the tempe rature evenly distributed through-
out the entire refrigerator compartment. The air
will circulate more intensively, thus keeping ail
the different areas in the appliance at the same
temperature and ensuring that ail the food inside
is chilied at the same temperature.
• You are recommended to always use the fan
switch:
when the ambient temperature
ishigh
(approx.
30°C or more) or the room is very humid, e.g.
during the summer. .
To switch on: Press the fan button
CV
briefly so
at the relevant indicator lamp lights up.
To switch off: Press the fan button again so that
the indicator lamp goes out.
NB:
When the fan is switched on, energy consump-
tion will increase and the .refrigerator will work '.
harder; the temperature will drop and it will be
colder.
Notes on energy saving
• Ensure that there is adequate space around the
'1
appliance for ventilation and air extraction.
• Avoid keeping the door open for too long.
• • Store food logically. Do not exceed the storage
period specified.
• Keep ail food properly packed and covered so
as to avoid condensation. .
• Always allow hot food to cool to room tempera-
ture before placing in theappliance.
'. Defrost frozen food in the refrigerator.
13

3 Storage, shelf arrangement, interior light
Arranging food in the refrigerator
The natural circulation of the air inside therefrigerator
results in different parts of the refrigerator having different
temperatures. This can have its advantages for different
. types of food. The refrigerator
IS
coldest just above the
vegetable bins and against the rear wall (suitable for
sausage and meat products etc.); it is warmest at the front
at the top and in the door (suitable for spreadable butter,
cheese etc.). See fig. B for food storage suggestions.
Notes on cooling
- Store food so that air can circulate properly around it.
Do not pack the refrigerator too full.
- Food which gives off or absorbs odours and flavours,
and liquids should always be stored covered or in
closed containers.
- Always store food which gives off or is sensitive to
ethylene gases such as fruit, vegetables and salads
separately or wrapped in order not to affect their storage
life; e.g. do not store tomatoes together with kiwis or
cabbage. . .
~
3
...•.
~';.
~
butter, cheese, pre-
cooked meals
2
eggs
3
cans, drinks, bottles
5
preserves, baked goods
6
dairy products
7
meat and sausage
products, fish
8 fruit, vegetables, salad
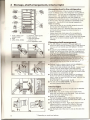
Changing shelf arrangement
• Vou can change the position of the jar rack* and
remove ail door racks for cleaning, fig. C: Siide the door
rack up, pull out towards you and replace in reverse
order.
• By adjusting the bottle/can holder you can protect the
bottles from falling over when the door is opened and
closed. If your àppliance has the equipment illustrated
in fig. C1, always hold by the plastic handle.
- The holder can be removed for cleaning:
- If
Y appIiancehas
the equipment iIIustrated in fig. C1:
s
edge
0
e
older up and lever out.
e equipment iIIustrated in fig. C2:
ont edge of the holder up and lever out.
• Shelves* (grids or glass shelves) can be adjusted in
height for different height items, fig. D1:
- Lift the shelf, slide forwards and remove. Always insert
shelves with the raised edge at the back pointing
upwards, otherwise food mayfreeze onto the rear wall.
- The glass shelves* are fitted with stops to prevent them
. being pulled out accidentally, fig. 02.
• If you require space for large bottles and containers,
- lift the front hait of the split glass shelf* and carefully
siide it under the back half until the stops* click into the
recesses, fig. E1, or
lift up the flap* in the grid shelf, fig. E2.
• Vou can use the bottle basket*, fig. E3, to chili drinks
and carry several bottles at once.
1
01
Interior light
If the interior light does not work, the bulb may be defective.
Changing the bulb:
• Bulb data: max. 25 W, voltage and current should
agree with the details on the type plate. Only use bulbs
of the same size. Bulb fitting: E 14.
• Switch off the appliance.
Pull out the plug or switch off/unscrew the fuse.
• Fig. F1: Press the light cover together at the sides (1), lift
out and unclip at the back (2).
• Fig. F2: Replace the bulb. Apply slight pressure when
turning the bulb to overcome the friction of the seal,
When inserting the new bulb, make sure the seal is
correctly positionedin the socket.
• Clip the back end of the coyer in and clip the sides into
place.
F2
F1
*
Depending on model and options
14

4 Defrosting, cleaning
•••
••
•
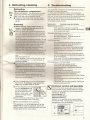
Defrosting
The refrigerator compartment
defrosts automatically. The defrost water is evapo-
rated by the heat from the compressor; drops of
water on the rear wall are perfectly normal.
e Ensure that the defrost water can flow freely
through the drain hole in the rear wall (arrow in
fig. A).
Cleaning
e Before cleaning, always switch off the ap-
pliance. Disconnect
trom
the mains or un-
screw or switch off the fuse.
eClean the outer valls, inside and equipment by
hand with luke ann
a
er and a little detergent.
Because
0
e ris
0
injury and damage to the
appliance, eam cleaning equipment should not
be used.
Never
use
e a
r
and keep
it
0
of
e
sible.
Wipe the appliance dry.
- Do not damage or remove the type plate on the
insideof the appliance. It is very important for
servicing purposes.
e The butter dish*can be washed in a dishwasher.
The racks, shelves and other components should
-~ eaned
y
hand as they are not dishwasher-
e Clean the drain hole on the rear wall frequently,
fig. A, arrow. If necessary, clean with a thin
object, e.g. a cotton swab or
slmllar,
e The dust should be removed
i""I'=:::r-...,....,.,..".,-----,
from the refrigeration unit
and heat exchanger - metal
grid at the pack of the ap-
pliance - once a year. Oust
deposits increase energy
consurnption.
e Ensure that none of the wires or other compo-
nents are dislodged, bent or damaged.
e Then connectlswitch on the appliance.
If the appliance is to be left switched off for any
length of time, empty the appliance, disconnect
from the mains, clean as described above and leave
the door open so as to avoid odours.
5 Troubleshooting
Your appliance is designed and manufactured for a long
life span and reliable operation .
If a malfunction nonetheless occurs during operation,
check whether it is due to an operating error. Please note
that even during the warranty period the resultant servicing
costs in this case will have to be borne by the owner.
You may be able to rectify the following faults by checking
the possible causes yourself:
Malfunction Possible cause and remedy
Appliance does not work
- Is the appliance switched on properly?
- Is the mains plug properly inserted in the socket?
- Is the socket fuse intact?
The interior light does not come on
- Is the appliance switched on?
- The bulb is defective. Change the bulb as
described in "Interior light".
Loud running noise
Is the appliancestanding firmly on the floor, or
does the compressor cause nearby items of
fumiture or objects to vibrate?
If necessary, move bottles and containers apart.
Burbling noises are normal. These are caused
by the refrigerant flowing round the refrigerant
circuit. .
A short c1ickihg sound: This will be heard when-
ever the refrigeration unit (the motor) switches on
or off automatically.
Motor noise: This will be slightly louder for a brief
period when the refrigeration unit switches on.
The temperature is not cold enough
- Is the temperature setting correct?
If necessary, set a lower temperature.
- Loose thermometer in appliance is showing a
wrong reading.
- Does the door close properly?
- Is the appliance sufficiently weil ventilated?
Clear ventilation grilles if necessary.
- Is the ambient temperature too hot? (See "Safety
regulations")
Has the appliance been opened too often or left
opentoolong?
- If applicable, wait until the appliance reaches the
required temperature itself.
I-t. 1
Customer service and type
-plate
" If none of the above causes apply and Voucannot
rectify the fault yourself, please contact your nearest
customer service department (see enclosed listfor
addresses). _State the:
type designation
CD,
service number
ev
and
appliance number
G)
as giv~n on the type plate so as to ensure rapid,
accurate servicinq. The type plate is located inside
the appliance on the left-hand side.
1
1
(!;'---Tt.m........
1 ;:r::-----'----
®-J
Innll
!!!!!!1~1-1
~, I::!!.. 1
L---:;:Y -
®
'::~.-·.",.w
/i
1
v';" '-' ••••
11II1
1
1
15

Im!rtruc
ionsfor installation and modification
• If your refrigerator has a bottle basket*, fig. T1, put the
vegetable bins on the other side (the bottle basket
should always be on the same side as the door handle)
to facilitate rernoval of the basket:
- Remove the bottle basket.
- Siide the vegetable bins to the hinge side of the ap-
pliance; move the top bin complete with its guide rails.
- Replace the bottle basket on the handle side.
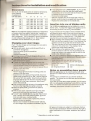
imensions
See fig. S and the table below for external dimensions.
Gross capacity External dimensions [mm]
of appliance
[1]
(see type plate) A
B C
0
E F
258 (26..) 1250
600 631 614 643 1177
309
.(31..)
1447
600 631 614 643 1177
362 (36..) 1644
600
631 614
643 1177
413 (42..)
1841 600 631 614 643 1177
362 (36..) 1644
660 683 662 703 1285
413 (42..) 1841
660 683 662 703 1285
Insertion into row of kitchen units
Fig. U: 600 mm appliances canbe installed in a row of
kitchen units. To adapt the height of the appliance to the
surrounding furniture
a
top unit
CD
can be added.
A gap of at least 50 mm depth must be provided behind
and along the entire width of this unit so as to ensure
sufficient ventilation. The area of ventilation underneath
the ceiling should be at least 300
ems,
The greater the
area the more economically the appliance will run.
• When installing with standard kitchen units (max. depth
580 mm) and decor panels of max. 2 mm thickness, the
appliance can be set up right next to the kitchen unit.
The door protrudes 34 mm from the side of the kitchen
unit and 51 mm at the front. This enables it to be
opened and closed without difficulty.
• When setting up the appliance next to a wall @, a
minimum distance of 36 mm must be provided on the
hinge side between the appliance and the wall (for the
handle when thedoor is open).
• If vou wish to attach the appliance to adjacent units or to
fit a spacer between the appliance and the wall, please
e <oIkJlwirlg
can
0
en and close properly.
app iance to kitchen units with self-tapping
screws (max. depth 10 mm).
CD
top unit
@
kitchen unit side panel
cg)
refrigerator/freezer
@
wall
Note: Do not install this appliance adjacent to refrigerators
or freezers other than special "side-by-side" models, e.g.
GSD, BGN. These models are designed for combination
with a refrigerator. This is important to prevent condensati-
on and consequential damage from it. More detailed
information can be obtained from your dealer.
Changing over door hinges
Fiq.T:
The door hinges can be changed from one side to
the other ifrequired.
• With the door open, lever out plinth panel
CD
with a
screwdriver and remove.
- . Lever out coyer
cg)
with a screwdriver.
Close door.
- Unscrew screw M5
@.
• Pull hinge compone nt
@
with hinge pin
@
out from
e ea and re ove.
Opj)()5;t.:,e e.
e- e span er provided.
.JUUVlIII:
Using a screwdriver, remove the spacer
(j)
and
replace on the other side.
• Re-attach the door:
- Remove plugs ®from the door mounting points and
replace on the other side.
- Suspend door with spacer in hinge pin
@,
close door.
- Rotate hinge component @ by 180°, remove hinge pin
@,
turn by 180° and replace. Mount both parts in the
hinge
(2):
slide the pin into the door mounting through
the hinge, tilt in the hinge component, siide up and
attach with screw
@.
• Align the door flush with the body of the appliance using
the slot on the hinge
(2),
then tighten screw
@.
• Attach the plinth panel
CD
and click into place by
pressing.
• With the door open, insert the coyer
cg)
in the plinth
panel at the front and click into place at the back.
• Transfer* door handle ® and plugs
@.
With the door
open, carefully lift out the pressure plates* @ at the
front and siide away; unscrew handle.
Reassemble in reverse order: replace the pressure
plates and click into position.
- Remove and re-attach the slimline handle* with the
2.5 mm hexagon key provided as illustrated in fig. Til.
Notes on assembling decor panels*
600 mm appliances can be colour-matched with other
elements of a fitted kitchen by attaching a decor panel and
frames.
The panels are available from your kitchen furniture
supplier. The frames can be fitted later and are available
from your dealer.
If Vou wish to fit the decor panels yourself, vou will need a
drill or a rechargeable screwdriver to pre-drill the retaining
holes. For further instructions and dimensions see the
installation instructions included in the retrofit kit.
. Ali types and models are subject to continuous improve-·
ment and-the manufacturer therefore reserves the right to
make modifications in the shape, equipment and technol-
ogy.
* Depending on model and options
16

JI.
Il
Il
Il
Il
Il
Il
Il
<,
Il
~
II
M4 .
\~~~
SW2,5
~
17

Principales caractéristiques de l'appareil
o
4®",1
*:
.
--
.
-
.
\ .:> -
>:,
~,
..
",
....,....
3 2
Eléments de commande et
de contrôle
fig.
A1
CD
Interrupteur Marche-Arrêt et thermostat
1
=
chaud
4
=
froid
Nous recommandons un réglage sur une
position moyenne.
o
Touche ventilation* avec voyant de
contrôle pour froid ventilé*
®*
o
Description de l'appareil et de ses
aménagements
g.A
_-------,------ Poignées de transport arrière
Ë~~~~~~~~~irr--
Eléments de commande et de contrôle*
;:J--"""é~:;;~~1t1I--
Ventilateur pour froid ventilé*
L...--+l-H---
Compartiment fromage et beurre
...----.,H!l-t----
Bac
à
œufs*
A1
1ïmlfl!!b:m:!:m!~r-1Ht1"--
Surfaces de rangement modulables*
Cloison de maintien bouteilles/conserves
~i!lliilll!i~i~~~n::::=
modulable *
~ Surfaces de rangement en deux parties* ou
abattant*
~:iIWw~~f;!;l~itr--
Balconnet consetves réglable en hauteur
1ra+------+.••.....
-.......,Hl-lt+-----+t+--If-IIo+---
Eclairage intérieur
'~eE;~~~tl==Balconnet rnaxi-boutellles
E
Hanqe-bouteilles gain de place*
+l---++-~I----
Ecoulement eau de dégivrage
:I+---++-+H-II---·~f-~I----H-Ht...•.----
Panier
à
boutetlles"
~~~~:",;!
~
liiïiii~~I,~!II[~~::rrJ~~~~~
Bacs
à
légumes
Plaquette signalétique
Pieds réglables et poignées de transport
avant, roulettes de transport
à
l'arrière
A
18
* selon le modèle et l'équipement

are-
Vous avez fait l'acquisition d'un nouvel appareil et nous vous en félicitons. Votre choix s'est porté sur
un appareil bénéficiant des techniques du froid les plus évoluées, qui garantissent
à
votre appareil une
longue durée de vie et une sécurité d'emploi irréprochable.
L'équipement de votre appareil vous offre un niveau de confort quotidien très élevé.
Par l'acquisition de cet appareil, fabriqué suivant des procédés sans danger pour l'environnement et
avec des matériaux recyclables, vous apportez également votre contribution active
à
la protection de
l'environnement.
Afin de connaître tous les avantages de votre nouvel appareil, veuillez lire attentivement les consignes
r=-
d'utilisation. ....-
.
Nous espéro e
0
e nouvel appareil vous donnera entière satisfaction.
eve.•.re a
ous vous prions de conserver soigneusement ces
consignes d'utilisation et, le cas échéant, de les remettre
au nouvel acquéreur de l'appareil si le dernier est cédé à
une 'erce personne. .
VII!\AJ11l
mg'
e
é
~ Isolation efficace
~ Faible consommation d'énergie
Ce mode d'emploi est valable pour plusieurs appareils,
des différences sont par conséquent possibles.
~ Manipulation facile grâce
à
un bandeau de
commande en façade
~ Eclairage intérieur très clair
~ Dégi a e
Sommaire
Page
Consignes d'utilisation
Principales caractéristiques de l'appareil ..; 18
Autres "plus", sommaire , 19
Recommandations et consignes de sécurité 20
Protection de l'environnement 20
ise en place 20
2 Mise en service et éléments de contrôle 21
Prescriptions 21
Raccordement électrique 21
Mise en marche et arrêt de l'appareil 21
Réglage de la température 21
Interrupteur ventilation 21
Economies d'énergie ; 21
3 Rangement des.aliments, intérieur
modulable, éclairage intérieur 22
Rangement des aliments 22
Intérieur modulable 22
Eclairage intérieur 22
4 Dégivrage, nettoyage 23.
5 Pannes éventuelles - problèmes 23
Plaquette signalétique et
SAV
23
~ Gr
éea
âti
'es
~ Equipement modulable e pratiq e p. ex. 2 bacs
pour la conservation séparée des fruits et des
légumes
~ Tablette en verre* en deux parties coulissant
l'une sous l'autre ou abattant de la clayette
à
fils* pour les récipients de grande taille
~ Compartimentage pratique de la porte et place
pour les grandes bouteilles
~ Poignée avec mécanique d'ouverture facile
intégrée*
~ Poignées de transport intégrées
~ Roulettes de transport
à
l'arrière
~ Pieds
à
hauteur réglable
à
l'avant
Mise en place et instructions de montage
Dimensions 24
Inversion du sens d'ouverture de la porte 24
Insertion entre deux éléments de cuisine 24
Montage des panneaux décors 24
~Nettoyage facile
~ Porte réversible
~ Cadres d'habillage disponibles en option
19

1 •
1 Recommandations et consignes de sécurité
Les matériaux d'emballage, de protection de
l'appareil et des pièces isolées sont fabriqués
à
,..... partir de matières recyclables.
~ ..-\. - Carton ondulé/carton
'-..., - Pièces moulées en polystyrène sans CFC
- Feuilles et sachets en polyéthylène
- Colliers de serrage en polypropylène
• Les matériaux d'emballage ne sont pas des
jouets pour les enfants! Danger
. d'étouffement avec les films plastiques!
• Veuillez apporter les matériaux d'emballage dans
la déchetterie la plus proche pour qu'ils puissent
être réutilisés ou recyclés.
Votre ancien appareil
contient encore des matériaux de valeur. Ne le jetez
pas avec les ordures ménagères ou dans une
décharge. . .
• Mettez immédiatement votre ancien appareil
hors service. Pour cela, le débrancher et couper
le câble d'alimentation électrique.
Veuillez détruire la fermeture à ressort ou à
verrou pour éviter que les enfants, en jouant,
puissent rester enfermés à l'intérieur de
l'appareil: ils risqueraient d'étouffer.
'. Veillez
à
ne pas détériorer le circuit frigorifique
de votre ancien appareil lors de son enlèvement
ou de son transport dans une déchetterie
appropriée. Vous éviterez ainsi que le réfrigérant
contenu dans le circuit frigorifique ou de l'huile
ne pollue accidentellement l'environnement.
- Pour tout renseignement détaillé sur le fluide
é .
éran e loyé. C?nsultez la plaquette
ne
Consignes de sécurité
• Afin
d'éviter
tout accident matériel ou 'corporel,
ne transportez l'appareil que dans son embal-
lage et faites appel à une deuxième personne
pour mettre en place l'appareil.
• Le réfrigérant R 600a utilisé ne présente pas de
danger pour l'environnement mais est intlarnrna-
ble.
• Veiller à ne pas endommager les tubes du circuit
frigorifique. Une projection de réfrigérant dans
les yeux peut provoquer des blessures. Le
réfrigérant peut aussi s'enflammer.
• En cas de fuite du réfrigérant, éloigner les
flammes vives ou les sources d'allumage de la
proximité de la fuite, débrancher la prise et bien
aérer la pièce.
• En cas de détérioration de l'appareil, contacter
immédiatement le fournisseur avant même de
brancher l'appareil.
• Pour garantir la sécurité de fonctionnement de
l'appareil, respecter scrupuleusement les
instructions de la notice concernant la mise en
place et le raccordement électrique.
• En cas de panne, mettre l'appareil hors service
en débranchant l'appareil (sans tirer sur le câble)
ou en ôtant (ou dévissant) le fusible.
• Afin d'éviter tout risque pour les utilisateurs
de l'appareil, les réparations et interventions
ne doivent être effectuées que par un Service
Après Vente agréé. Cette consigne s'applique
également au remplacement du câble
d'alimentation.
20
Recommandations d'utilisation
• Ne pas conserver de matières explosives ni de
f....
produits en bombe à gaz propulseur inflamma-
ill
ble (butane, propane, pentane, etc.) dans votre
appareil. En cas de fuite éventuelle, ces gaz
risquent en effet de s'enflammer au contact
d'éléments électriques de votre appareil. Les
produits en bombe concernés sont identifiés par
l'étiquette indiquant leur composition ou un sym-
bole représentant une flamme. .
• Veillez à ce que vos alcools forts soient bien
fermés et conservez les verticalement.
• Ne pas manipuler de flammes vives ou de
sources d'allumage à l'intérieur de l'appareil.
• Ne pas utiliser d'appareils électriques
à
l'intérieur de l'appareil (appareils de nettoyage à
vapeur; appareils de chauffage, appareils à
glace, etc.).
• Ne pas utiliser le socle, les portes, les tiroirs, etc.
comme marchepied ou comme support.
• Ne pas laisser les enfants jouer avec l'appareil
(par exemple, ne pas les laisser s'asseoir dans
les tiroirs ou se suspendre à la porte).
• Pour éviter tout risque d'intoxication alimentaire,
ne pas consommer des aliments stockés au-delà
de leur date limite de conservation.
Mise en place
j,
• Lors de l'installation/encastrement, veiller à ne pas
endommager les tubulures du circuit frigorifique.
• Le site d'installation de votre appareil doit impéra-
. être conforme
à
la norme EN 378,
à
sa-
voir un
volume de 1 m
3
pour 8 g de fluide réfri-
gérant type R 600a, pour interdire toute formation
de mélange gaz-air inflammable en cas de fuite
. dans le circuit frigorifique. Les données relatives à
la masse de réfrigérant sont indiquées sur la pla-
quette signalétique
à
l'intérieur de l'appareil.
• Evitez d'installer l'appareil à un endroit directe-
ment exposé aux rayons du soleil, près d'une
cuisinière, d'un chauffage ou de tout autre ap-
pareil chauffant ainsi que dans des lieux humides
et exposés à des projections d'eau.
~. Caler solidement l'appareil installé à l'ernplace-
••.~' ment voulu, en réglant la hauteur des pieds à
~ l'aide de la clé 10fournie.
• Ne pas déplacer les grilles de ventilation. Veiller
à une bonne ventilation de l'appareil. Pour en
savoir plus à ce sujet: voir les instructions du cha-
pitre "Mise en place et instructions de montage".
• Ne poser aucun appareil générateur de chaleur
(four à micro-ondes, grille-pain etc.) sur votre réfri-
gérateur ou congélateur!
• Lors de la première ouverture, la poignée
s'enclenche en position d'utilisation, ce qui est
perceptible au léger déclic. .
•. Oter toutes les sécurités de transport :
- Retirer les autocollants ou pièces d'écartement*
des surfaces de rangement et positionner ces
dernières à la hauteur souhaitée.
- Retirer tous les films de protection: sur les bordu-
res, la façade et les côtés*.
La page est en cours de chargement...
La page est en cours de chargement...
La page est en cours de chargement...
La page est en cours de chargement...
La page est en cours de chargement...
-
 1
1
-
 2
2
-
 3
3
-
 4
4
-
 5
5
-
 6
6
-
 7
7
-
 8
8
-
 9
9
-
 10
10
-
 11
11
-
 12
12
-
 13
13
-
 14
14
-
 15
15
-
 16
16
-
 17
17
-
 18
18
-
 19
19
-
 20
20
-
 21
21
-
 22
22
-
 23
23
-
 24
24
-
 25
25


Liebherr KSV4220 Le manuel du propriétaire
- Taper
- Le manuel du propriétaire
- Ce manuel convient également à
dans d''autres langues
- English: Liebherr KSV4220 Owner's manual
- Deutsch: Liebherr KSV4220 Bedienungsanleitung
Documents connexes
Autres documents
-
 De Dietrich SB3648F1 Le manuel du propriétaire
-
Castorama Cloison à poser modulable Atto Mode d'emploi
-
Avintage AVU8X Le manuel du propriétaire
-
AGAiT Technology Corporation 20120918103914 Manuel utilisateur
-
Hitachi HT-L55 Manuel utilisateur
-
Bosch KDR40420SA Manuel utilisateur
-
Siemens KG34NV03/07 Manuel utilisateur
-
 De Dietrich RG6234E20 Le manuel du propriétaire
-
Whirlpool AGB 626/WP Le manuel du propriétaire
-
Neff ki 345 sc k 5655 x2 Le manuel du propriétaire

