Wolf WGCO100S Manuel utilisateur
- Catégorie
- Mesure, test
- Taper
- Manuel utilisateur

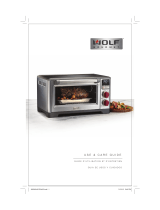
USE & CARE GUIDE
GUIDE D’UTILLISATION ET D’ENTRETIEN
GUIA DE USOS Y CUIDADOS
840249401 ENv02.indd 1840249401 ENv02.indd 1 12/23/14 1:01 PM12/23/14 1:01 PM

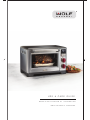
WOLF GOURMET COUNTERTOP OVEN
2
|
Wolf Gourmet Customer Care 800.222.7820
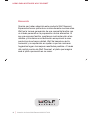
Welcome
Thank you for your purchase of this Wolf Gourmet product.
We look forward to being part of your kitchen for years to
come. Wolf is a third-generation family-owned company that
has a personal stake in the preparation of your food. With
family ownership comes a great attention to detail and an
uncompromised dedication to creating exceptional products.
Wolf built its business and reputation on helping home cooks
achieve the best results possible. With Wolf Gourmet's
precise control, the dish you envision will be the dish you
serve.
840249401 ENv02.indd 2840249401 ENv02.indd 2 12/23/14 1:01 PM12/23/14 1:01 PM

Contents
4
Safety Precautions
6
Wolf Gourmet Countertop Oven
Parts and Features
8
Getting Started
14
Using Cooking Modes
21
Care Recommendations
22
Troubleshooting
23
Wolf Gourmet Warranty
wolfgourmet.com
|
3
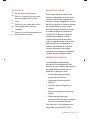
Customer Care
As a Wolf Gourmet owner, you can
count on our support. Our customer
care center is available 24 hours a
day, seven days a week and staffed by
product experts at our headquarters
in Madison, Wisconsin. Should the
need arise, simply call 800.222.7820
to speak with one of our product
experts. We are con dent this guide
will answer your questions about the
features, operation, and maintenance
of your Wolf Gourmet product. If you
have additional questions, please
contact us by phone or visit us online
at wolfgourmet.com.
Register Your Product
We strongly encourage you to register
your Wolf Gourmet appliance. It’s
important to us that you get the most out
of your products. By registering you will:
• Become a Wolf Gourmet culinary
insider.
• Have ongoing support from Wolf
Gourmet.
• Activate your warranty and record
your purchase.
• Be alerted to any service updates.
• Receive occasional emails to
help you maintain and enjoy your
appliances.
To register, visit wolfgourmet.com
/registration or call 800.222.7820.
840249401 ENv02.indd 3840249401 ENv02.indd 3 12/23/14 1:01 PM12/23/14 1:01 PM

SAFETY PRECAUTIONS
IMPORTANT INSTRUCTIONS
WARNING
Fire Hazard:
• Do not operate oven unattended.
• If contents ignite, do not open oven door. Unplug oven and allow contents to stop
burning and cool before opening door.
• Do not use oven cooking bags.
• Do not heat foods in plastic containers.
• Always allow at least 1 inch (2.5 cm) between food and heating element.
• Follow food manufacturer’s instructions.
• Regular cleaning reduces risk of fire hazard.
• Always unplug oven when not in use.
IMPORTANT SAFEGUARDS
When using electrical appliances, basic safety precautions should always
be followed to reduce the risk of re, electric shock, and/or injury to
persons, including the following:
• Read all instructions.
• This appliance is not intended for use by persons (including children) with reduced
physical, sensory, or mental capabilities, or lack of experience and knowledge,
unless they are closely supervised and instructed concerning use of the appliance
by a person responsible for their safety.
• Close supervision is necessary when any appliance is used by or near children.
Children should be supervised to ensure that they do not play with the appliance.
• Do not touch hot surfaces. Use handles or knobs.
• To protect against electrical shock, do not immerse cord, plug, or oven in water or
other liquid.
• Unplug from outlet when not in use and before cleaning. Allow to cool before
cleaning appliance and putting on or taking off parts.
• Do not operate any appliance with a damaged cord or plug, or after the appliance
malfunctions or is dropped or damaged in any manner. Call our customer care
center for information on examination, repair, or adjustment.
• The use of accessory attachments not recommended by the appliance
manufacturer may cause injuries.
• Do not use outdoors.
• Do not let cord hang over edge of table or counter or touch hot surfaces.
• Do not place on or near a hot gas or electric burner, or in a heated oven.
• Extreme caution must be used when moving an appliance containing hot oil or
other hot liquids.
• To disconnect, turn appliance OFF (press Start/Stop button until OFF (O) is
displayed); then remove plug from wall outlet.
• Use extreme caution when removing pan or disposing of hot grease.
4
|
Wolf Gourmet Customer Care 800.222.7820
840249401 ENv02.indd 4840249401 ENv02.indd 4 12/23/14 1:01 PM12/23/14 1:01 PM

IMPORTANT SAFEGUARDS continued
• Do not clean with metal scouring pads. Pieces can break off the pad and touch
electrical parts, creating a risk of electrical shock.
• Oversize foods or metal utensils must not be inserted in an oven as they may
create a re or risk of electric shock.
• A re may occur if the oven is covered, touching, or near ammable material,
including curtains, draperies, walls, and the like, when in operation. Do not store
any item on top of the appliance when in operation or before the appliance cools
down.
• Extreme caution should be exercised when using containers constructed
of materials other than metal or glass.
• Do not store any materials, other than manufacturer- recommended accessories, in
this oven when not in use.
• Do not place any of the following materials in the oven: paper, cardboard, plastic,
and the like.
• Do not cover crumb/drip tray or any part of the oven with metal foil. This will cause
overheating of the oven.
• To turn oven off, press Start/Stop button until OFF (O) is displayed. See “Wolf
Gourmet Countertop Oven Parts and Features” section.
• Do not place eyes or face in close proximity with tempered safety glass door, in the
event that the safety glass breaks.
• Always use appliance with crumb/drip tray securely in place.
• Do not use appliance for other than intended use.
• Clean oven interior carefully. Do not scratch or damage heating element tube.
SAVE THESE INSTRUCTIONS
This appliance is intended for household use only.
WARNING
Electrical Shock Hazard:
This product is provided with a
grounded (3-prong) plug to reduce the risk of electric shock. The plug fits only one way into a
grounded outlet. Do not defeat the safety purpose of the plug by modifying the plug in any way or
by using an adapter. If the plug does not fit into the outlet, have an electrician replace the outlet.
The length of the cord used on this appliance was selected to reduce the hazards of becoming
tangled in or tripping over a longer cord. If a longer cord is necessary, an approved extension
cord may be used. The electrical rating of the extension cord must be equal to or greater than the
rating of the appliance. The extension cord must be a grounding-type, 3-wire cord. Care must be
taken to arrange the extension cord so that it will not drape over the countertop or tabletop where
it can be pulled on by children or accidentally tripped over.
This appliance is equipped with a fully tempered safety glass door. The tempered glass is four
times stronger than ordinary glass and more resistant to breakage. Tempered glass can break;
however, it breaks into pieces with no sharp edges. Care must be taken to avoid scratching door
surface or nicking edges. If the door has a scratch or nick, call our customer care center.
Always unplug your oven from the outlet when not in use.
Other Consumer Safety Information
wolfgourmet.com
|
5
SAFETY PRECAUTIONS
840249401 ENv02.indd 5840249401 ENv02.indd 5 12/23/14 1:01 PM12/23/14 1:01 PM

LIGHT
DARK
SLICES
TIMER
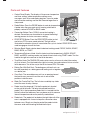
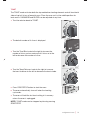
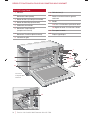
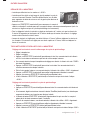
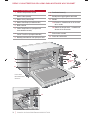
PARTS AND FEATURES
1
Control Panel Display
2
Probe Button
3
Convection Button
4
Start/Stop Button
5
Selector Bezel
6
Temperature/Darkness Knob
7
Time/Slice Knob
8
Baking Pan With Broil Rack
WOLF GOURMET COUNTERTOP OVEN PARTS AND FEATURES
Wolf Gourmet
Countertop Oven
11b
LIGHT
DARK
SLICES
TIMER
1
4
2
3
6
7
8
9
10
6
|
Wolf Gourmet Customer Care 800.222.7820
9
Oven Rack (1)
10
Slide-Out Crumb/Drip Tray
11
Probe
11a Plug End – Insert Into Probe Jack
11b Temperature Probe – Insert Into Food
12
Probe Jack
13
Rating Plate
12
11a
11
5
13
(on back)
840249401 ENv02.indd 6840249401 ENv02.indd 6 12/23/14 1:01 PM12/23/14 1:01 PM

wolfgourmet.com
|
7
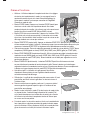
Parts and Features
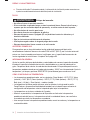
1. Control Panel Display: The display will show oven temperature
and timer settings, probe temperature settings, error
messages, toast slices and shade selections, icons for probe
and convection cooking, and the Wolf Gourmet logo when in
sleep mode.
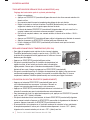
2. Probe Button: Press the PROBE button to cook by temperature.
A probe takes the guesswork out of knowing when food is
properly cooked in ROAST or BAKE mode.
3. Convection Button: Press CONV if convection heating is
desired. Convection uses forced hot air to speed the baking/
roasting process for faster, more even cooking.
4. START/STOP Button: Press the START/STOP button to start
and to turn OFF the oven mode selected. The light will be
illuminated in red and a chime will sound when the cycle is started. START/STOP also is
used to engage or turn off the timer.
5. Selector Bezel: Rotate selector bezel to desired cooking mode: PROOF, WARM, ROAST,
BAKE, BROIL, or TOAST.
6. Temperature/Darkness Knob: Use this knob to set the temperature in WARM, ROAST,
BAKE, and BROIL cooking modes and shade of toast when using TOAST mode. Turn the
knob to the right to increase or to the left to decrease.
7. Time/Slice Knob: The TIME/SLICE knob can be used as a timer or to select the number
of slices to toast. Turn the knob to the right to increase time and number of slices or to the
left to decrease. Turn all the way to the left to choose STAY ON mode.
8. Baking Pan With Broil Rack: The baking pan with broil rack can
be used separately as a baking pan and cooling rack or together
as a broiler pan.
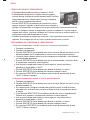
9. Oven Rack: The removable oven rack has an opening toward
the front for easy removal. Insert the rack in one of three
positions inside the oven.
10. Slide-Out Crumb/Drip Tray: The full-size crumb/drip tray slides
out of the oven for easy cleanup.
11. Probe: Insert the plug end (11a) into the probe jack located
on the wall of the oven. The long, thin pointed end of the
probe (11b) is the temperature probe which is inserted into the
thickest area of the food away from any bones or fat to measure
internal temperature and ensure perfectly cooked food.
12. Probe Jack: The probe jack located on the right side wall of the
oven is equipped with a cover to keep the connection clean
between uses. Simply use the plug end of the probe to slide
the cover aside while inserting the end into the jack.
840249401 ENv02.indd 7840249401 ENv02.indd 7 12/23/14 1:01 PM12/23/14 1:01 PM

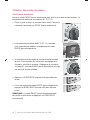
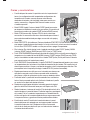
Getting Started
WARNING
Fire Hazard:
• Do not operate oven unattended.
• If contents ignite, do not open oven door. Unplug oven and allow contents to stop
burning and cool before opening door.
• Do not use oven cooking bags.
• Do not heat foods in plastic containers.
• Always allow at least 1 inch (2.5 cm) between food and heating element.
• Follow food manufacturer’s instructions.
• Regular cleaning reduces risk of re hazard.
• Always unplug oven when not in use.
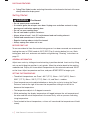
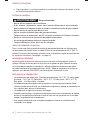
BEFORE FIRST USE
To ensure residual oil from the manufacturing process has been removed, we recommend
heating the oven in CONV mode at 450°F (232°C) for 5 minutes before first use. Wash
baking pan, broil rack, and oven rack before using following “Cleaning” instructions on
page 21.
8
|
Wolf Gourmet Customer Care 800.222.7820
GENERAL INFORMATION
Adjust oven racks by sliding out and reinserting in position desired. Insert rack by tilting
rack up and sliding into position in rack guides. Move the selector bezel to the cooking
mode desired. Display will show default temperature for the selected mode and “00:00”
on the timer. Adjust temperature and time, and press START/STOP to begin cycle.
SETTING THE TEMPERATURE
• The default temperatures are: Proof – 80°F (27°C), Warm – 140°F (60°C), Roast –
350°F (177°C), Bake – 350°F (177°C), Broil – HI, and Toast – medium.
• Oven temperature can be adjusted before or during the cycle by turning the Temp/
Darkness knob to the right to increase the temperature setting or to the left to
decrease the temperature.
• The temperature adjusts in 5-degree increments.
• While preheating, the display temperature will toggle between the set temperature of
the oven and the actual temperature in the oven cavity, with an up arrow indicating
rising temperature.
• Once heated to the set temperature, a chime will sound and the temperature will hold
steady.
PARTS AND FEATURES
13. Rating Plate: Model number and rating information can be found on the back of the oven
directly behind the display panel.
840249401 ENv02.indd 8840249401 ENv02.indd 8 12/23/14 1:01 PM12/23/14 1:01 PM

wolfgourmet.com
|
9
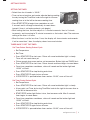
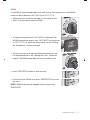
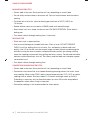
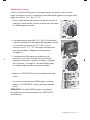
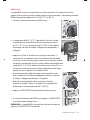
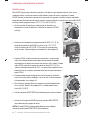
SETTING THE TIMER
• Default time for all modes is “00:00.”
• Time can be set anytime and can be adjusted during cooking
time by turning the Time/Slice knob to the right to increase
cooking time or to the left to decrease cooking time.
• Press START/STOP to begin timer countdown or wait
5 seconds and it will begin automatically to count down
(except if timer is set before preheat cycle begins).
• While setting the time, the timer adjusts in 1-minute increments, then in 5-minute
increments, and increasing to 15-minute increments as the knob is held. The maximum
setting of the timer is 4 hours.
• When the timer is set for less than 1 hour, the display will show minutes and seconds.
If set for more than 1 hour, the display shows hours and minutes.
Set Timer Before Starting Preheat Cycle
1. Set Temperature.
2. Press START/STOP to start oven. Chime will sound and button light is steady.
3. At any point, set Timer by turning Time/Slice knob to the right to increase time or
to the left to decrease time.
4. START/STOP button light flashes twice, then becomes solid. After 5 seconds,
timer begins to count down.
5. Once timer completes countdown, chime will sound and the button light and
“00:00” will flash.
6. Press START/STOP to stop flashing and chime.
7. Press START/STOP again to turn off oven.
8. If START/STOP is pressed before timer reaches “00:00,” oven will turn off.
1. Set Temperature.
2. Set Timer.
3. Press START/STOP to start oven. Chime will sound and button light is steady.
Timer will not count down yet.
4. Chime sounds when oven reaches set temperature. Button light and TIMER flash.
5. Press START/STOP to start timer. Chime sounds and timer begins to count down.
6. Once timer completes countdown, chime will sound and the button light and
“00:00” will flash.
7. Press START/STOP to stop flashing and chime.
8. Press START/STOP again to turn off oven.
9. If START/STOP is pressed before timer reaches “00:00,” oven will turn off.
Set Timer During Preheat Cycle
GETTING STARTED
THREE WAYS TO SET THE TIMER
LIGHT DARK
SLICES
TIMER
840249401 ENv02.indd 9840249401 ENv02.indd 9 12/23/14 1:01 PM12/23/14 1:01 PM

THREE WAYS TO SET THE TIMER (cont.)
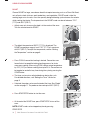
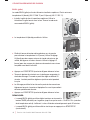
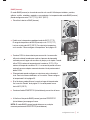
SETTING THE OVEN TO “STAY ON”
• To set the oven to stay on, turn the Time/Slice knob to the left
until “ON STAY ON” is displayed. No timer can be set.
• Press START/STOP to activate.
• Once the Stay On feature is set and activated, the oven will
stay on with the set temperature for 4 hours, then
automatically shut off. If desired, turn oven off before 4 hours
by pressing START/STOP.
• Once the Stay On feature is set, the oven defaults to Stay On for that mode. To cancel
Stay On, simply turn the Time/Slice knob to the right to set the timer.
USING START/STOP
• Press the START/STOP button to start the oven mode selected.
The light will be illuminated in red and a chime will sound when
the cycle is started.
• Press START/STOP to start the timer or wait 5 seconds for timer to start automatically.
• To stop the cycle at any point during the cycle, press START/STOP. “OFF” will be
displayed.
• At the end of the cooking time, the START/STOP light will flash and a chime will
sound. Press START/STOP to stop flashing and chime. Press START/STOP again to
turn off oven.
• If no action is taken or if only the timer is turned off, the oven will stay on for 4 hours
and then it will turn off automatically. “OFF” will blink and sound chimes; then “OFF”
will become solid.
10
|
Wolf Gourmet Customer Care 800.222.7820
1. Set Temperature.
2. Press START/STOP to start oven. Chime will sound and button light is steady.
3. Chime sounds when oven reaches set temperature.
4. Set Timer by turning Time/Slice knob to the right to increase time or to the left to
decrease time.
5. START/STOP button light flashes twice, then becomes solid. After 5 seconds,
timer begins to count down.
6. Once timer completes countdown, chime will sound and the button light and
“00:00” will flash.
7. Press START/STOP to stop flashing and chime.
8. Press START/STOP again to turn off oven.
9. If START/STOP is pressed before timer reaches “00:00,” oven will turn off.
Set Timer After Preheat Cycle
GETTING STARTED
840249401 ENv02.indd 10840249401 ENv02.indd 10 12/23/14 1:01 PM12/23/14 1:01 PM

wolfgourmet.com
|
11
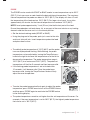
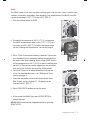
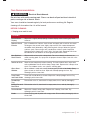
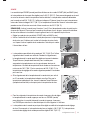
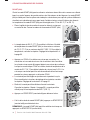
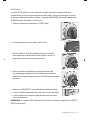
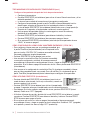
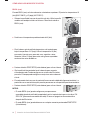
PROBE
The PROBE can be used with ROAST or BAKE modes in oven temperatures up to 450°F
(232°C). It lets you warm or cook food to the desired internal temperature. The maximum
internal temperature the probe can detect is 200°F (93°C). The display will show LO until
the temperature of the food reaches 100°F (38°C). For large cuts of meat, it may take
approximately 45 minutes for the internal temperature to rise above 100°F (38°C).
NOTE: Insert probe approximately 1 inch (25 mm) into the thickest part of the food.
Ensure the probe does not touch bone, fat, or any part of the oven interior or any heating
elements and that the oven rack is in the lowest position.
1. Set the desired cooking mode (ROAST or BAKE).
2. Using the plug end of the probe, push jack cover to the side
and insert into wall jack. Insert temperature probe into food
and place food in oven.
3. The default probe temperature of 155°F (68°C) and the probe
icon are displayed and ashing. While ashing, the probe
temperature can be adjusted by turning the Temp/Darkness
knob to the right to increase the temperature or to the left to
decrease the temperature. The probe temperature range is
100°F (38°C) to a maximum of 200°F (93°C). The probe set
temperature will ash for 3 seconds and then become solid.
4. If the ashing probe temperature is not activated within
10 seconds, it will become solid. Once the probe temp
becomes solid, turning the Temp/Darkness knob will only
adjust the oven temperature.
5. To make the probe temperature ash again to adjust the probe
temperature, press PROBE once to turn off the PROBE feature
and then press PROBE again to reactivate the PROBE feature
to the ashing display.
6. The probe temperature cannot be set higher than the set temperature of the oven. For
example, if the oven temperature is set to 180°F (82°C), the highest probe temperature
that can be set is 180°F (82°C).
LIGHT
DARK
SLICES
TIMER
840249401 ENv02.indd 11840249401 ENv02.indd 11 12/23/14 1:01 PM12/23/14 1:01 PM

SLEEP MODE
• While plugged in but not in use, the oven will be in sleep mode. The display will show
just the Wolf Gourmet logo.
• To bring oven out of sleep mode, press any button or turn any knob to reactivate the
oven.
• If the oven has not been started in 30 seconds after reactivating, the screen will go to
the sleep mode.
PROBE
NOTES:
• If the PROBE button is pressed, but the probe is not plugged in and the oven set
temperature is reached, the oven will chime to plug in the probe.
• When the probe temperature is reached, the oven will sound a long chime followed by
short chimes to unplug the probe and remove food. If no action is taken, the oven will
stay on for 4 hours.
• If the probe is plugged in while the oven is set on PROOF, WARM, BROIL, or TOAST,
an error message will appear. Remove the probe from the wall jack.
• Probe function can be stopped anytime by pressing START/STOP.
CONVECTION
CONV is the convection mode. Convection uses forced hot air to speed the baking/
roasting process for faster, more even cooking.
1. When using CONV, reduce recipe temperature by 25°F (14°C) or reduce cooking time
up to 25%. See “Convection Baking/Roasting Tips” on page 20 for more information.
2. Press CONV to activate the convection mode.
3. The convection button can be toggled on or off to provide
convection cooking at any time during the ROAST or BAKE modes.
NOTE: CONV mode can be stopped anytime by pressing the CONV button.
12
|
Wolf Gourmet Customer Care 800.222.7820
GETTING STARTED
840249401 ENv02.indd 12840249401 ENv02.indd 12 12/23/14 1:01 PM12/23/14 1:01 PM

wolfgourmet.com
|
13
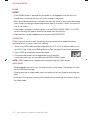
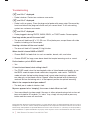
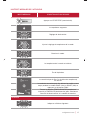
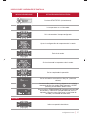
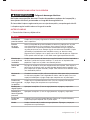
PROMPT/MESSAGE CONDITION/ACTION REQUESTED
Press START/STOP.
Temperature is rising.
Set time is reached.
SLICES
TIMER
Adjust probe temperature setting.
Plug in probe.
SLICES
TIMER
Probe temperature is reached.
Operation is completed.
STAY ON
Stay On feature is on.
Convection can be started and stopped at any time during
the BAKE and ROAST modes by pressing the CONV button.
LIGHT DARK
SLICES
TIMER
Turn TEMP/DARKNESS and TIME/SLICE knobs left or right
to select shade and number of slices.
DISPLAY PROMPTS AND MESSAGES
LEGEND
Indicates a flashing display.
840249401 ENv02.indd 13840249401 ENv02.indd 13 12/23/14 1:01 PM12/23/14 1:01 PM

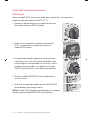
Using Cooking Modes
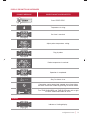
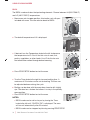
PROOF
Use the PROOF mode for raising bread and rolls. The default proof temperature is set at
80°F (27°C).
1. Move oven rack to lower position. Turn the selector bezel to
PROOF.
2. The default temperature of 80°F (27°C) is displayed.
Temperature cannot be adjusted in PROOF mode.
3. The timer can be set or adjusted before or during the cycle.
For detailed directions on setting the timer, see “Setting the
Timer” section on page 9. The PROOF mode does not have
a preheat cycle.
4. Press START/STOP button to start the oven.
14
|
Wolf Gourmet Customer Care 800.222.7820
5. At the end of the PROOF time, press START/STOP to turn
off the oven.
NOTE: PROOF mode can be stopped anytime by pressing
START/STOP.
840249401 ENv02.indd 14840249401 ENv02.indd 14 12/23/14 1:01 PM12/23/14 1:01 PM

wolfgourmet.com
|
15
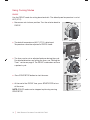
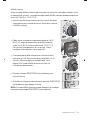
WARM
Use WARM to keep cooked foods warm until serving. The temperature in the WARM
mode can be set between 140°F (60°C) and 170°F (77°C).
1. Adjust oven rack to ensure the food is in the center of the
oven. Turn the selector bezel to WARM.
2. The default temperature of 140°F (60°C) is displayed. The
WARM temperature range is from 140°F (60°C) to a maximum
of 170°F (77°C). To adjust the temperature, see the “Setting
the Temperature” section on page 8.
3. The timer can be set or adjusted before or during the cycle.
For detailed directions, see “Setting the Timer” section on
page 9. The WARM mode does not have a preheat cycle.
4. Press START/STOP button to start the oven.
5. At the end of the WARM time, press START/STOP to turn off
the oven.
NOTE: WARM mode can be stopped anytime by pressing
START/STOP.
840249401 ENv02.indd 15840249401 ENv02.indd 15 12/23/14 1:01 PM12/23/14 1:01 PM

2. The default temperature of 350°F (177°C) is displayed. The
ROAST temperature range is from 170°F (77°C) to a maximum
of 450°F (232°C). To adjust the temperature, see the “Setting
the Temperature” section on page 8.
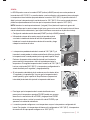
ROAST
Choose ROAST for large, more dense foods that require browning such as a Prime Rib Roast,
rack of lamb, whole chickens, pork tenderloins, and vegetables. ROAST mode is ideal for
cooking larger cuts of meats, since the specially designed heating system browns the exterior
while cooking the interior. The temperature in the ROAST mode can be set between 170°F
(77°C) and 450°F (232°C).
1. Adjust oven rack to ensure the food is in the center of the oven.
Turn the selector bezel to ROAST.
3. Press CONV if convection heating is desired. Convection uses
forced hot air to speed the baking/roasting process for faster,
more even cooking. When using CONV, reduce recipe temperature
by 25°F (14°C) or reduce cooking time up to 25%. Convection can
be toggled on and off at any time during the cycle by pressing the
CONV button.
4. The timer can be set or adjusted before or during the cycle.
For detailed directions, see “Setting the Timer” section on
page 9.
5. If desired, the probe can be used instead of the timer. See
“Probe”
section on page 11. The probe can be used up to 450
°
F (232
°
C).
6. Press START/STOP button to start the oven.
USING COOKING MODES
16
|
Wolf Gourmet Customer Care 800.222.7820
7. At the end of the ROAST time, press START/STOP to turn off the
oven.
NOTE: ROAST mode can be stopped anytime by pressing
START/STOP.
840249401 ENv02.indd 16840249401 ENv02.indd 16 12/23/14 1:01 PM12/23/14 1:01 PM

BAKE
The BAKE mode is the most versatile cooking mode. Use for tarts, cakes, cookies, pies,
souf es, casseroles, vegetables, and reheating. The temperature in the BAKE function
can be set between 170°F (77°C) and 450°F (232°C).
1. Turn the selector bezel to BAKE.
2. The default temperature of 350°F (177°C) is displayed.
The BAKE temperature range is from 170°F (77°C) to a
maximum of 450°F (232°C). To adjust the temperature,
see the “Setting the Temperature” section on page 8.
3. Press CONV if convection heating is desired. Convection
uses forced hot air to speed the baking/roasting process
for faster, more even cooking. When using CONV, reduce
recipe temperature by 25°F (14°C) or reduce cooking time
up to 25%. Convection can be toggled on and off at any
time during the cycle by pressing the CONV button.
4. The timer can be set or adjusted before or during the
cycle. For detailed directions, see “Setting the Timer”
section on page 9.
5. If desired, the probe can be used instead of the timer.
See “Probe” section on page 11.
The probe can be
used up to 450
°
F (232
°
C).
6. Press START/STOP button to start the oven.
wolfgourmet.com
|
17
7. At the end of the BAKE time, press START/STOP to
turn off the oven.
NOTE: BAKE mode can be stopped anytime by pressing
START/STOP.
840249401 ENv02.indd 17840249401 ENv02.indd 17 12/23/14 1:01 PM12/23/14 1:01 PM

BROIL
The BROIL mode activates the top heating elements. Choose between HI (550°F/288°C)
and LO (450°F/232°C) temperatures.
1. Move oven rack to upper position. Use broiler rack with pan
included with oven. Turn the selector bezel to BROIL.
2. The default temperature of HI is displayed.
3. If desired, turn the Temperature knob to the left to decrease
the temperature to LO. Use HI for thin cuts of meat, sh,
poultry, vegetables, or other foods. Use LO for thicker cuts
that need to be cooked through before browning.
4. Press START/STOP button to start the oven.
5. Turn the Timer knob to the right to increase broiling time. A
maximum of 20 minutes can be set for broiling. The time can
be adjusted before or during the cycle.
6. Broiling can be done with the oven door closed or left slightly
ajar. The door has a feature that allows it to stay in the partially
open position.
7. Press START/STOP button to start the oven.
NOTES:
• BROIL mode can be set to stay on by turning the Timer
knob to the left until “ON STAY ON” is displayed. The oven
will turn off automatically after 30 minutes.
• BROIL mode can be stopped anytime by pressing START/STOP.
USING COOKING MODES
18
|
Wolf Gourmet Customer Care 800.222.7820
840249401 ENv02.indd 18840249401 ENv02.indd 18 12/23/14 1:01 PM12/23/14 1:01 PM

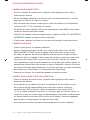
TOAST
The TOAST mode activates both the top and bottom heating elements and will toast both
sides of up to 6 slices of bread at once. Place the oven rack in the middle position for
best results. DARKNESS and SLICES can be adjusted at any time.
1. Turn the selector bezel to TOAST.
2. The default number of 4 slices is displayed.
3. Turn the Time/Slice knob to the right to increase the
number of slices up to a maximum of 6 slices or to the
left to decrease the number of slices.
4. Turn the Temp/Darkness knob to the right to increase
the toast shade or to the left to decrease the toast shade.
5. Press START/STOP button to start the oven.
6. The oven automatically turns off when the toasting
cycle ends.
7. The oven will hold the last toast setting in its memory
unless the oven is unplugged.
NOTE: TOAST mode can be stopped anytime by pressing
START/STOP.
wolfgourmet.com
|
19
840249401 ENv02.indd 19840249401 ENv02.indd 19 12/23/14 1:01 PM12/23/14 1:01 PM

BAKING/ROASTING TIPS
• Center food in the oven. Rack position will vary depending on size of food.
• Do not totally enclose foods in aluminum foil. Foil can insulate foods and slow down
heating.
• To reheat rolls or biscuits, place on baking pan and heat at 300°F (149°C) for
10 minutes.
• Reheat leftover roasts or casseroles in BAKE mode until heated through.
• Roast foods such as a whole chicken on the LOW RACK POSITION. Place food in
baking pan.
• Turn foods halfway through cooking time, if necessary.
CONVECTION BAKING/ROASTING TIPS
• Center food in the oven. Rack position will vary depending on size of food.
• Convection uses forced hot air to speed the baking/roasting process for faster, more
even cooking. When using CONV, reduce recipe temperature by 25°F (14°C) or reduce
cooking time as follows: thin items about 1–2 minutes and large meats up to 25%.
Preheating is necessary only for food that bakes less than 20 minutes and products
like popovers where steam rising is important.
• Convection cooking is not recommended for frozen pizzas.
BROILING TIPS
• Place oven rack in upper position.
• Use rack and baking pan included with oven. Place in oven. DO NOT PREHEAT
OVEN. Use HI for broiling thin cuts of meat, fish, and poultry to brown and cook
quickly. Use LO for thicker cuts that require longer to cook without overbrowning the
outside. Leaving the oven or broiler compartment door partially ajar during cooking
keeps the cooking environment from getting too hot or steamy. Too hot and the broiler
element could automatically shut off. Too steamy and the food won't develop a good
caramelized crust.
• Turn foods halfway through cooking time.
20
|
Wolf Gourmet Customer Care 800.222.7820
USING COOKING MODES
840249401 ENv02.indd 20840249401 ENv02.indd 20 12/23/14 1:01 PM12/23/14 1:01 PM
La page est en cours de chargement...
La page est en cours de chargement...
La page est en cours de chargement...
La page est en cours de chargement...
La page est en cours de chargement...
La page est en cours de chargement...
La page est en cours de chargement...
La page est en cours de chargement...
La page est en cours de chargement...
La page est en cours de chargement...
La page est en cours de chargement...
La page est en cours de chargement...
La page est en cours de chargement...
La page est en cours de chargement...
La page est en cours de chargement...
La page est en cours de chargement...
La page est en cours de chargement...
La page est en cours de chargement...
La page est en cours de chargement...
La page est en cours de chargement...
La page est en cours de chargement...
La page est en cours de chargement...
La page est en cours de chargement...
La page est en cours de chargement...
La page est en cours de chargement...
La page est en cours de chargement...
La page est en cours de chargement...
La page est en cours de chargement...
La page est en cours de chargement...
La page est en cours de chargement...
La page est en cours de chargement...
La page est en cours de chargement...
La page est en cours de chargement...
La page est en cours de chargement...
La page est en cours de chargement...
La page est en cours de chargement...
La page est en cours de chargement...
La page est en cours de chargement...
La page est en cours de chargement...
La page est en cours de chargement...
La page est en cours de chargement...
La page est en cours de chargement...
La page est en cours de chargement...
La page est en cours de chargement...
La page est en cours de chargement...
La page est en cours de chargement...
La page est en cours de chargement...
La page est en cours de chargement...
-
 1
1
-
 2
2
-
 3
3
-
 4
4
-
 5
5
-
 6
6
-
 7
7
-
 8
8
-
 9
9
-
 10
10
-
 11
11
-
 12
12
-
 13
13
-
 14
14
-
 15
15
-
 16
16
-
 17
17
-
 18
18
-
 19
19
-
 20
20
-
 21
21
-
 22
22
-
 23
23
-
 24
24
-
 25
25
-
 26
26
-
 27
27
-
 28
28
-
 29
29
-
 30
30
-
 31
31
-
 32
32
-
 33
33
-
 34
34
-
 35
35
-
 36
36
-
 37
37
-
 38
38
-
 39
39
-
 40
40
-
 41
41
-
 42
42
-
 43
43
-
 44
44
-
 45
45
-
 46
46
-
 47
47
-
 48
48
-
 49
49
-
 50
50
-
 51
51
-
 52
52
-
 53
53
-
 54
54
-
 55
55
-
 56
56
-
 57
57
-
 58
58
-
 59
59
-
 60
60
-
 61
61
-
 62
62
-
 63
63
-
 64
64
-
 65
65
-
 66
66
-
 67
67
-
 68
68


Wolf WGCO100S Manuel utilisateur
- Catégorie
- Mesure, test
- Taper
- Manuel utilisateur
dans d''autres langues
- English: Wolf WGCO100S User manual
- español: Wolf WGCO100S Manual de usuario
Documents connexes
-
Wolf WGCO150S Mode d'emploi
-
-
-
Sub-Zero DF36450GSP Mode d'emploi
-
-
Wolf SO30TM/S/TH Mode d'emploi
-
-
Wolf Range DF364CLP Le manuel du propriétaire
-
-
Wolf Gourmet WGTR122S Mode d'emploi
Autres documents
-
 Wolf Gourmet WGCO170SR Mode d'emploi
-
Hamilton Beach 31240 Mode d'emploi
-
-
Sub-Zero SO30TM/S/TH Mode d'emploi
-
Black & Decker TO1380SS Manuel utilisateur
-
-
-
 Wolf Gourmet WGTR104S Mode d'emploi
-
 Wolf Gourmet WGCU900W Manuel utilisateur
-
Bertazzoni MAST30FSEXT Guide de référence


