La page est en cours de chargement...

1
2
SEHR GEEHRTE KUNDIN, SEHR GEEHRTER KUNDE!
VIELEN DANK, DASS SIE SICH BEIM KAUF EINER TRAGEHILFE FÜ R DEN CYBEX u.GO ENTSCHIEDEN HABEN. EIN BABY
PROFITIERT IN VIELERLEI HINSICHT VOM GETRAGEN WERDEN. DIE KÖRPERLICHE NÄHE ZU DEN ELTERN STÄRKT DAS
URVERTRAUEN UND DIE POSITIVE SOZIALE ENTWICKLUNG WÄHREND EINE KORREKTE TRAGEHALTUNG DIE GESUNDE
NACHREIFUNG DER GELENKE FÖRDERT.
DEAR CUSTOMER!
THANK YOU FOR BUYING THE CYBEX
u
.GO SLING. IT IS VERY BENEFICIAL FOR THE BABY TO BE CARRIED IN THIS WAY.
THE CLOSE PHYSICAL CONTACT TO THE PARENT STRENGTHENS THE BABY’S BASIC SENSE OF TRUST AND
ENCOURAGES A POSITIVE SOCIAL BEHAVIOUR WHILE HELPING THE JOINTS DEVELOP IN A HEALTHY WAY.
CHER CLIENT!
NOUS VOUS REMERCIONS D‘AVOIR CHOISI L‘ÉCHARPE DE PORTAGE
u
.GO DE CYBEX. LE PORTAGE EST TRÈS
BÉNÉFIQUE POUR UN BÉBÉ. LE CONTACT PHYSIQUE AVEC SES PARENTS RENFORCE SA CONFIANCE ET ENCOURAGE
LES COMPORTEMENTS SOCIAUX POSITIFS, TOUT EN PERMETTANT À SES ARTICULATIONS DE SE DÉVELOPPER
SAINEMENT.

CYBEX u.GO ist ein Tragetuch aus 100% elastischer Baumwolle, das
– abhängig vom Alter des Kindes – viele verschiedene Tragepositionen
ermöglicht. In dieser Bedienungsanleitung werden Ihnen die folgenden
sechs Tragepositionen vorgestellt:
1. Wiegeposition fü r Neugeborene (0 - 3 M)
2. Känguruposition fü r Neugeborene (0 - 3 M)
3. Sitzposition mit Gesicht zum Körper des Trägers (3 M +)
4. Hü ftposition (3 M +)
5. Rü ckenposition (3 M +)
6. Sitzposition mit Gesicht in Tragerichtung (6 M +)
INHALT
I. Was sind die Vorteile des CYBEX u.GO Tragetuchs? ........................ 5
II. Vor dem ersten Gebrauch - Hinweise ............................................... 5
III. Trageanleitung .................................................................................... 7
1. Wiegeposition fü r Neugeborene (0 - 3 M) ........................................ 9
2. Känguruposition fü r Neugeborene (0 - 3 M) ................................... 11
3. Sitzposition mit Gesicht zum Körper des Trägers (3 M +) ................ 13
4. Hü ftposition (3 M +) ............................................................................ 15
5. Rü ckenposition (3 M +)
A) Mit Unterstützung einer zweiten Person ..................................................
17
B) Ohne Unterstützung einer zweiten Person ..............................................19
6. Sitzposition mit Gesicht in Tragerichtung (6 M +) ............................ 21
IV. Garantie ............................................................................................. 23
The CYBEX u.GO sling is made of 100% elastic cotton. A great number of
different go positions can be offered, depending on the age of the child. In
this manual we will show you the following six carrying positions:
1. Cradle position for newborns (0 - 3 M)
2. Kangaroo position for newborns (0 - 3 M)
3. Sitting position face to face (3 M +)
4. Hip position (3 M +)
5. Back position (3 M +)
6. Sitting position facing forward (6 M +)
CONTENT
I. What are the advantages of the CYBEX u.GO sling? ....................... 6
II. Please note before fi rst use ................................................................. 6
III. Carrying instructions ........................................................................... 8
1. Cradle position for newborns (0 - 3 M) ............................................ 10
2. Kangaroo position for newborns (0 - 3 M) ....................................... 12
3. Sitting position face to face (3 M +) ................................................. 14
4. Hip position (3 M +) ............................................................................ 16
5. Back position (3 M +)
A) Tied with the help of an extra person ......................................................
18
B) Tied without the help of an extra person .................................................20
6. Sitting position facing forward (6 M +) ............................................. 22
IV. GUARANTEE ...................................................................................... 24
L'écharpe de portage u.GO de Cybex est composée à 100% de coton souple.
Elle offre un grand nombre de positions de portage en fonction de l'âge de
l'enfant. Dans ce manuel, nous vous montrerons les six positions suivantes:
1. Position berceau pour les nouveau-nés (de 0 à 3 mois)
2. Position kangourou pour les nouveau-nés (0 à 3 mois)
3. Position assise face au porteur (dès 3 mois)
4. Sur la hanche (dès 3 mois)
5. Sur le dos (dès 3 mois)
6. Position assise vers l'avant (dès 6 mois)
SOMMAIRE
I. Quels sont les avantages de l'écharpe u.GO de Cybex? ............... 6
II. A lire avant la première utilisation ..................................................... 6
III. Instructions de portage ...................................................................... 8
1. Position berceau pour les nouveau-nés (de 0 à 3 mois) ............... 10
2. Position kangourou pour les nouveau-nés (0 à 3 mois) ................ 12
3. Position assise face au porteur (dès 3 mois) .................................. 14
4. Sur la hanche (dès 3 mois) ............................................................... 16
5. Sur le dos (dès 3 mois)
A) Nouer l'écharpe avec l'aide de quelqu'un ............................................18
B) Nouer l'écharpe sans aide ........................................................................20
6. Position assise vers l'avant (dès 6 mois) ..........................................22
IV. GARANTIE ........................................................................................... 24
DE
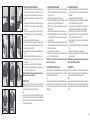
Abmessungen:
Länge: 540 cm, Breite: 60 cm
DE
Dimensions:
length: 540 cm, width: 60 cm
EN
Dimensions:
longuer: 540 cm, largeur: 60 cm
FR
EN FR
3
4

5
6
I. WAS SIND DIE VORTEILE DES CYBEX u.GO TRAGETUCHS?
– Bei richtiger Handhabung ist die Tragehaltung fü r Baby und Träger
ergonomisch optimal.
– Der Gebrauch eines Tragetuchs wirkt sich positiv auf die emotionale,
soziale und körperliche Entwicklung des Kindes aus.
– Die Gewichtsverteilung im CYBEX u.GO Tragetuch ist hervorragend und
belastet den Träger nicht – auch nicht bei stundenlangem Gebrauch.
– Ein Kind benötigt oft körperliche Nähe, schaukelnde Bewegung und
eine gewisse Enge, um sich zu beruhigen. Das Tragetuch bietet all diese
sensorischen Effekte gleichzeitig.
– Das CYBEX u.GO Tragetuch hat keine drü ckenden Schnallen und Knöpfe.
– Durch seine Kompaktheit ist das u.GO Tragetuch der perfekte Begleiter
auf Ausfl ü gen, Reisen oder auch beim Einkaufen.
II. VOR DEM ERSTEN GEBRAUCH - HINWEISE:
1. Bitte waschen Sie den u.GO vor dem ersten Gebrauch. Beachten Sie
hierzu die Pfl egehinweise.
2. Das Binden eines Tragetuchs ist denkbar einfach und erfordert nur wenig
Übung. Probieren Sie das Tuch zu Beginn in aller Ruhe zu Hause aus. Seien
Sie bei den ersten Versuchen nicht nervös und warten Sie einen gü nstigen
Zeitpunkt ab, an dem auch das Baby ruhig und gelassen ist (z.B. nach
einer Mahlzeit).
3. Wickeln Sie das Tragetuch eher etwas fester als zu locker.
4. Durch die Tuchbahnen und die körperliche Nähe zum Träger wird sehr
viel Wärme erzeugt. Achten Sie deshalb darauf, Ihr Kind nicht zu warm
anzuziehen und gewährleisten Sie eine ausreichende Luftzirkulation rund
um den Körper des Kindes. Sollte das Kind schwitzen, ist ihm zu warm.
5. Jedes Kind ist anders und hat eigene Vorlieben. Wenn eine Trageweise
dem Kind nicht gefällt, können Sie immer noch eine andere ausprobieren.
6. Rechnen Sie immer mit spontanen Bewegungen des Kindes, sonst
könnten Sie aus dem Gleichgewicht geraten.
7. Halten Sie das Kind immer fest, wenn Sie sich nach vorne beugen.
8. Das CYBEX u.GO Tragetuch ist nicht fü r sportliche Aktivitäten mit Kind
geeignet!
I. QUELS SONT LES AVANTAGES DE L'ÉCHARPE u.GO DE CYBEX?
– Utilisée correctement, l'écharpe u.GO offre un confort optimal à l'enfant
comme au porteur.
– Le portage en écharpe a des effets positifs sur le développement
émotionnel, social et physique de l'enfant.
– Elle permet une excellente distribution du poids, sans tension sur les
épaules et le dos du porteur, même lorsqu'elle est utilisée pendant de
longues périodes.
– Pour être calmes et se sentir en sécurité, les nouveau-nés ont besoin du
contact physique de leurs parents, d'être bercés et balancés. L'écharpe
offre simultanément toutes ces sensations.
– De plus, comme l'écharpe ne comporte ni boucles ni boutons, elle
supprime tout risque de blessure.
– Enfi n, elle permet une grande liberté de mouvement, ce qui la rend
idéale pour les vacances, les voyages ou shopping.
II. A LIRE AVANT LA PREMIÈRE UTILISATION:
1. Avant la permière utilisation, lavez l'écharpe de portage u.GO en suivant
les recommandations d'entretien.
2. Le nouage d'une écharpe est vraiment simple, et ne nécessite qu'un
peu de pratique. Au début, entraînez-vous tranquillement à la maison
à nouer votre écharpe. Une fois entraîné(e), soyez calme, et attendez le
moment où votre bébé est également calme et relaxé (par ex. après le
repas) pour l'essayer avec lui.
3. Assurez-vous que l'écharpe soit bien serrée, et non lâche.
4. L'écharpe, ainsi que le contact physique avec le porteur produisent de
la chaleur. N'habillez pas le bébé trop chaudement, et faites en sorte
que l'air circule suffi samment autour de lui. Si l'enfant transpire, il a trop
chaud.
5. Les préférences des bébés varient beaucoup. Si votre enfant n'est pas à
l'aise dans une position il suffi t d'en essayer une autre.
6. Gardez à l'esprit que votre bébé peut avoir des mouvements soudains,
soyez-y préparé(e) afi n de ne pas perdre l'équilibre.
7. Tenez votre enfant en permanence quand vous vous penchez vers
l’avant
8. L’écharpe u.GO de Cybex n’est en aucun cas adaptée aux activités
sportives !
I. WHAT ARE THE ADVANTAGES OF THE CYBEX u.GO SLING?
– When used correctly, carrying with the u.GO sling is ergonomically
optimal for both baby and user.
– The sling has positive effects on the emotional, social and physical
development of the child.
– When using the u.GO sling the weight distribution is excellent without
straining the user, even if used for longer periods.
– In order for babies to feel calm and secure, they need close body contact
such as rocking movements or being swaddled. The sling offers all of
these sensory sensations simultaneously.
– Also as the CYBEX u.GO sling does not contain buckles or buttons there is
no chance of injury.
– Due to its compact nature the u.GO sling is a perfect for to take on
holidays, travelling or shopping.
II. PLEASE NOTE BEFORE FIRST USE:
1. Please wash the u.GO before fi rst use, following the care instructions.
2. The tying of a sling is really simple and only requires a little bit of practice. In
the beginning please try the sling out in the comfort of your home. When
you have practised the tying try to be calm and wait for a convenient
moment when the baby is also calm and relaxed (e.g. after a meal).
3. Make sure the sling is rather tight, not loose.
4. Both the sling and the body contact with the carrying person produce
heat. Please make sure not to dress the child too warm and ensure there
is suffi cient air circulation around the child. If the child starts to sweat it is
too warm.
5. Different children prefer different things. If your child is not comfortable
with a carrying position you can always try a different one.
6. Always be prepared for sudden movements of the child in order not to
lose your balance.
7. Please hold on to your child whenever you bend forward.
8. The CYBEX u.GO sling is under no circumstances suitable for sporting
activities!

7
8
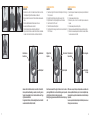
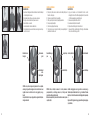
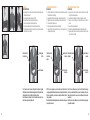
III. TRAGEANLEITUNG:
GRUNDSCHRITTE:
A) Nehmen Sie das u.GO Tuch in beide Hände und halten Sie sich den
Tuchmittelpunkt mittig auf Höhe des Nabels vor den Bauch.
B) Bringen Sie beide Tuchenden nach hinten zum Rü cken und kreuzen Sie
diese.
C) Fü hren Sie die Bänder ü ber die Schultern zurü ck nach vorne.
D) Kreuzen Sie die Bänder wieder vor der Brust.
E) Fü hren Sie beide Tuchenden unter dem Bauchband durch.
F) Bringen Sie die Tuchenden nun wieder hinter den Rü cken, ü berkreuzen
Sie diese noch einmal und machen Sie vor dem Bauch einen Knoten.
Hinweise: Achten Sie bitte immer darauf, dass das Tuch nicht verdreht ist.
Um eine perfekte Gewichtsverteilung zu erreichen, ist es wichtig, dass das
Tragetuch weit ausgebreitet ist und sich das Kreuz am Rü cken des Trägers
möglichst weit unten befi ndet.
So lange Sie das Tuch binden, achten Sie unbedingtdarauf, dass sich das Kind
an einem sicheren Platz befi ndet (z.B. Laufstall).
III. INSTRUCTIONS DE PORTAGE:
NŒUD DE BASE:
A) Tenez l'écharpe u.GO des deux mains, et placez son point central devant
votre nombril.
B) Croisez les deux pans dans votre dos.
C) Ramenez les pans vers l'avant en les faisant passer au-dessus des
épaules.
D) Croisez les deux pans devant votre poitrine.
E) Faites passez les deux extrémités de l'écharpe sous la bande ventrale.
F) Ramenez à nouveau les deux pans dans votre dos, croisez-les, et faites un
noeud au niveau de votre nombril.
NOTE: assurez-vous que l'écharpe ne soit pas enroulée sur elle-même. Pour
obtenir une parfaite distribution du poids, il est crucial de déplier l'écharpe
le plus possible, et que le point de croisement dans votre dos soit situé le plus
bas possible.
Assurez-vous que l'enfant est en sécurité pendant tout le temps où vous nouez
l'écharpe (par ex. dans son berceau).
III. CARRYING INSTRUCTIONS:
BASIC STEPS:
A) Take the u.GO sling in both hands and hold the midpoint of the sling in
front of your navel.
B) Bring both bands to the back and cross them over each other.
C) Bring them back to the front by leading them over the shoulders.
D) Cross the bands in front of the chest.
E) Thread both ends under the belly band.
F) Bring the ends to the back again cross them once more and tie a knot in
front of the navel.
Note: Please make sure that the sling is not twisted. In order to achieve a
perfect weight distribution it is crucial to unfold the sling as much as possible
and that the cross in the back is located as low as possible.
While tying the sling, please make sure that the child rests in a safe place (e.g.
crib).
Rechte Seite des
Bauchbandes
Partie droite de la
bande ventrale
Right part of the
belly band
Linkes Kreuzband Pan croisé gaucheLeft cross band
Tuchmittelpunkt Point central de
l'écharpe
Sling’s middle point
A
F
B/C D/E

9
10
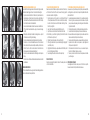
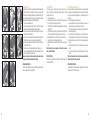
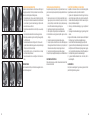
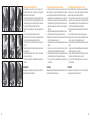
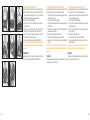
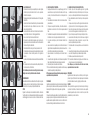
1. WIEGEPOSITION (FÜ R NEUGEBORENE BIS CA. 3 M)
Am wohlsten fü hlen sich Neugeborene nah am Herzen des Trägers, also links.
Trotzdem kann diese Trageposition auch auf der rechten Seite erfolgen.
1. Folgen Sie den Grundschritten A-F. Wenn der Kopf des Kindes auf der
Herzseite liegen soll, stellen Sie sicher, dass das innere (liegt direkt auf
Ihrem Brustkorb auf) Kreuzband ü ber die linke Schulter fü hrt. Schlü pfen
Sie mit dem Arm aus dem rechten Kreuzband.
2. Lockern Sie das linke Kreuzband, indem Sie es etwas an der Hü fte lösen.
3. Öffnen Sie das innere Kreuzband ein wenig, so dass eine Tuchwiege
entsteht.
4-5. Nehmen Sie nun das Baby in den linken Arm und legen Sie es – Kopf auf
Höhe des Herzens vorsichtig in die Tuchwiege.
6. Ziehen Sie das linke Kreuzband vorsichtig ü ber den Kopf des Kindes.
7. Nehmen Sie nun das rechte Kreuzband wieder auf die Schulter und
breiten Sie das Tuch etwas ü ber den Körper des Babys. Drehen Sie das
Kind leicht zu sich – achten Sie darauf, dass sich der rechte Arm des
Kindes bequem unterhalb seines Körpers befi ndet.
8. Ziehen Sie nun das äußere Kreuzband vollständig ü ber den Körper des
Babys.
9. Ziehen Sie nun noch das Bauchband ü ber die Kreuzbänder um das Kind
zu stabilisieren.
HERAUSNEHMEN DES KINDES:
Öffnen Sie die Kreuzbänder ein wenig, um das Kind aus der Wiegeposition zu
nehmen. Halten Sie das Kind zu jeder Zeit fest.
1. POSITION BERCEAU (POUR LES NOUVEAU-NÉS JUSQU'À 3 MOIS)
Les nouveau-nés sont plus à l'aise quand ils sont portés près du cœur (la tête
du côté gauche de votre poitrine). Il est cependant possible d'utiliser cette
position du côté droit.
1. Suivez les étapes du nœud de base de A à F. Si vous préférez porter votre
bébé sur la gauche, assurez-vous que la bande située sur la poitrine
passe par-dessus votre épaule gauche. Faites glisser la bande droite le
long de votre bras droit.
2. Relâchez la bande gauche en tirant légèrement depuis votre hanche.
3. Ouvrez cette bande sur la poitrine pour créer une sorte de berceau.
4-5. Soulevez le bébé avec votre bras gauche, et placez-le doucement dans
le berceau ainsi créé (sa tête proche de votre coeur).
6. Tirez doucement la bande gauche au-dessus de la tête de votre bébé.
7. Replacez la bande droite sur votre épaule en ajustant légèrement
l'écharpe sur le corps de l'enfant.
8. Attirez doucement votre bébé contre vous, en vous assurant que son
bras soit confortablement placé sous son corps.
9. Tirez avec précaution toute la bande centrale par-dessus votre bébé
pour l'envelopper.
SORTIR L'ENFANT DE L'ÉCHARPE:
Ouvrez légèrement la bande croisée pour sortir l'enfant de sa position
berceau. Tenez-bien l'enfant pendant toute la manœuvre.
1. CRADLE POSITION (FOR NEWBORNS UP TO 3 M)
Newborns are most comfortable when they are carried close to the heart (i.e.
with the head on the left side of the chest). However, this carrying position
can also be conducted on the right side.
1. Follow the basic steps A-F. If you prefer to carry the child with its head
on the left please make sure that the inner cross band (the one directly
located on the chest) leads over the left shoulder. Slide the right cross
band from your right arm.
2. Loosen the left cross band by releasing it slightly from your hip.
3. Open the inner cross band in order to create some kind of cradle.
4-5. Pick the baby on your left arm and gently lay the child into the cradle
(with its head close to your heart)
6. Pull the left cross band carefully over the head of the child.
7. Put the right cross band back on your shoulder adjusting the sling slightly
over the baby’s body.
8. Slightly pull the child towards you – please make sure that the baby’s arm
rests comfortably underneath its body.
9. Now carefully pull the entire cross band over the baby’s body.
TAKING OUT THE CHILD:
Open the cross band slightly to take the child out of the cradle position. Hold
on to the child at all times.
123
456
789

11
12
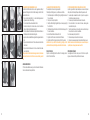
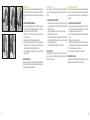
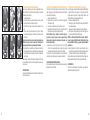
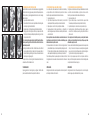
2. KÄNGURU POSITION (FÜ R NEUGEBORENE BIS CA. 3 M)
Die natü rliche Position der Beinchen bei einem neugeborenen Baby ist
angewinkelt. Die Känguru Position ist im Sitzen anzulegen, damit Sie Ihr Kind
jederzeit sichern können.
1. Folgen Sie den Grundschritten A-C , so dass die Bänder gerade und
ungekreuzt von den Schultern hängen.
2. Formen Sie einen Tuchbeutel aus dem Bauchband.
3. Nehmen Sie das Baby hoch und lassen Sie es von oben in den Beutel
gleiten – stü tzen Sie das Kind dabei immer am Po.
4. Ziehen Sie das Bauchband ü ber den kompletten Rü cken des Kindes, um
Wirbelsäule und Genick des Kindes Halt zu geben.
5-6. Legen Sie die beiden Brustbänder aufgebreitet und gekreuzt ü ber das
Kind.
7. Bringen Sie die beiden Enden nach hinten und kreuzen Sie diese hinter
dem Rü cken.
8. Bringen Sie die Tuchenden wieder nach vorne und verknoten Sie diese
gut vor dem Bauch.
Achtung: Halten Sie Ihr Kind während der Anlegens immer fest, da bei dieser
Position das Kind schon im Tuch sitzt noch bevor der erste Knoten gemacht
wird.
HERAUSNEHMEN DES KINDES:
Öffnen Sie die Kreuzbänder ein wenig, um das Kind aus dem Tuchbeutel zu
nehmen. Halten Sie das Kind zu jeder Zeit fest.
2. POSITION KANGOUROU (POUR LES NOUVEAU-NÉS JUSQU'À 3 MOIS)
La position „grenouille“ est la plus naturelle pour un nouveau-né. Préparez
cette position en étant assis(e) afi n que le bébé soit toujours en sécurité.
1. Suivez les étapes du nœud de base de A à C jusqu'à ce que les pans
tombent de vos épaules sans se croiser.
2. Formez une poche sur la bande centrale devant votre ventre.
3. Prenez votre bébé et, tout en soutenant ses fesses, laissez-le glisser
doucement dans la poche.
4. Tirez la bande ventrale sur toute la surface du dos de votre bébé pour
bien soutenir son cou et sa colonne vertébrale.
5-6. Croisez les deux pans à plat sur l'enfant.
7. Ramenez les deux pans dans votre dos et croisez-les.
8. Ramenez à nouveau les pans devant votre nombril et faites un noeud.
Attention: Tenez-bien votre enfant tout le temps où vous nouez l‘écharpe, car
il y est déjà assis avant que le premier nœud ne soit fait.
SORTIR L'ENFANT DE L'ÉCHARPE:
Ouvrez légèrement la bande croisée pour sortir l'enfant de sa position
kangourou. Tenez-bien l'enfant pendant toute la manœuvre.
2. KANGAROO POSITION (FOR NEWBORNS UP TO 3 M)
The natural position of a newborn’s legs is squatted.
Practise this position sitting down, so your child is secure at all times.
1. Follow the basic steps A-C until both lengths hang straight and uncrossed
from your shoulders.
2. Form a pouch out of your belly band.
3. Pick up the child and let it gently glide into the pouch – always supporting
the child’s bottom.
4. Pull the belly band over the entire back of the child in order to support to
the neck and vertebrae.
5-6. Cross both breast bands unfolded over the child.
7. Bring both ends to the back and cross them behind the back.
8. Bring both ends to the front again and tie a knot in front of your belly.
Attention: Hold on to your child at all times while tying the sling, as in this
position the child already sits in the sling even before the fi rst knot is made.
TAKING OUT THE CHILD:
Open the cross band slightly to take the child out of the kangaroo position.
Hold on to the child at all times.
123
456
78

13
14
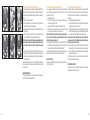
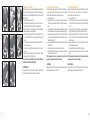
3. SITZPOSITION MIT GESICHT ZUM KÖRPER DES TRÄGERS (3 M +)
Ab einem gewissen Alter möchte das Kind mehr Bewegungsfreiheit und ein
größeres Sichtfeld. Dafü r eignet sich diese Trageposition hervorragend. Die
Spreiz-Anhock Stellung unterstü tzt zudem die Gelenke bei der Entwicklung
optimal.
1. Folgen Sie den Grundschritten A-F.
2. Ziehen Sie das Baby zu sich an die rechte Schulter und fädeln Sie das
rechte Bein des Kindes in das linke Kreuzband.
3. Wiederholen Sie den Schritt mit der anderen Schulter und dem anderen
Bein des Kindes.
4. Breiten Sie erst das innere Kreuzband aus, dann das Äußere. Achten Sie
darauf, dass die Bänder von Kniekehle zu Kniekehle reichen.
HINWEIS: Eine optimale Spreiz Anhock Stellung ist nur gewährleistet, wenn das
Tuch von Kniekehle zu Kniekehle des Kindes reicht. Überprü fen Sie auch ab
und zu während des Tragens, ob Ihr Kind noch in der Spreiz Anhock Stellung
sitzt.
5-6. Ziehen Sie nun das Bauchband sanft ü ber die Beinchen des Babys.
Beginnen Sie mit der Seite, die Sie auch beim Kreuzband zuerst benutzt
haben. Ziehen Sie nun das Bauchband ü ber den Rü cken des Babys, um
es zusätzlich zu stü tzen.
Bei kleinen Kindern die den Kopf noch nicht selbstständig halten können
sollten Sie das Bauchband bis ü ber den Kopf des Babys ziehen um dessen
Nacken zu stü tzen.
HERAUSNEHMEN DES KINDES:
Öffnen Sie die Kreuzbänder ein wenig, um das Kind aus der Sitzposition zu
nehmen. Halten Sie das Kind zu jeder Zeit fest.
3. POSITION ASSISE FACE AU PORTEUR (DÈS 3 MOIS)
A partir d'un certain âge, votre bébé aura besoin d'une plus grande liberté
de mouvement, et d'une meilleure perspective sur le monde adulte. De plus,
la position "grenouille" est très bénéfi que pour le développement de ses
articulations.
1. Suivez les étapes du nœud de base de A à F.
2. Soulevez votre bébé en l'attirant sur votre épaule droite, et tirez la bande
de gauche sur la jambre droite de l'enfant.
3. Répétez l'opération avec la bande droite et la jambre droite de l'enfant.
4. Dénouez d'abord la bande intérieure, puis la bande extérieure. Assurez-
vous que l'écharpe soutienne bien les genoux du bébé à l'arrière.
Note: La position "grenouille" n'est bénéfi que que si l'écharpe est bien placée
sous les genoux du bébé. Vérifi ez régulièrement pendant le portage que la
position "grenouille" du bébé soit correcte.
5-6. Placez doucement les deux côtés de la bande ventrale par-dessus les
jambes de votre bébé. Commencez par le côté que vous avez utilisé en
premier en tirant les pans. Placez la bande ventrale sur le dos du bébé
pour lui donner plus d'appui.
Si votre bébé ne peut pas encore soutenir sa tête seul, faites remonter la
bande ventrale jusqu'à la base de son cou.
SORTIR L'ENFANT DE L'ÉCHARPE:
Ouvrez doucement la bande ventrale pour dégager l'enfant de la position
assise. Tenez bien l'enfant en permanence.
3. SITTING POSITION FACING THE CARRYING PERSON (3 M +)
At a certain age your child wants more freedom of movement and a better
view. Additionally, the spread-squat position is benefi cial for a healthy
development of the joints.
1. Follow the basic steps A-F.
2. Pick the baby up pulling it to your right shoulder and pull the left cross
band over the right leg of the child.
3. Repeat this step with the other shoulder and the child’s other leg.
4. First unfold the inner cross band then the outer one. Please make sure
that the sling goes from the back of one knee to the other.
Note: A spread-squat seat is only benefi ciary when the sling reaches from the
back of one knee to the other. While carrying please regularly check that the
baby sits in the desired spread-squat seat.
5-6. Pull both sides of the belly band gently over the legs of the child. Start with
the side that you used fi rst when pulling up the cross bands. Pull the belly
band over the back of the child to provide additional support.
For small children that are not able to hold their head independently, please
pull the belly band over the babys head in order to support its head.
TAKING OUT THE CHILD:
Open the cross band slightly to take the child out of the sitting position. Hold
on to the child at all times.
123
456

15
16
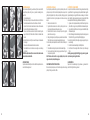
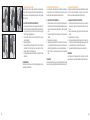
4. HÜ FTPOSITION (3 M +)
Diese Position kann auch schon frü her eingesetzt werden. Allerdings benötigt
das Kind dann immer eine unterstü tzende Hand. Ab einem gewissen Alter
möchte das Kind mehr Bewegungsfreiheit und ein größeres Sichtfeld. Dafü r
eignet sich diese Trageposition hervorragend. Die Spreiz-Anhock Stellung
unterstü tzt die Gelenke zudem bei der Entwicklung optimal.
1. Folgen Sie den Grundschritten A-F.
2. Heben Sie das Baby mit dem Bauch zu sich an die rechte Schulter und
fädeln Sie das rechte Bein des Babys in das linke Kreuzband.
3. Bringen Sie nun das Kind zur linken Schulter und fädeln Sie vorsichtig das
linke Bein in das rechte Kreuzband.
4. Breiten Sie nun das innere Kreuzband, das sich direkt auf dem Rü cken des
Kindes befi ndet, aus, so dass es von Kniekehle zu Kniekehle reicht.
5-6. Schieben Sie nun das Baby vorsichtig auf die rechte Hü fte. Lassen Sie das
Kreuzband mit wandern.
7. Breiten Sie nun auch das äußere Kreuzband in den Kniekehlen aus.
8. Ziehen Sie anschließend das Bauchband zuerst ü ber die Beine und dann
ü ber den kompletten Rü cken des Kindes.
Hinweis: Je nach Größe und Vorliebe des Kindes können die Arme des Kindes
sich innerhalb oder außerhalb des Bauchbands befi nden.
HERAUSNEHMEN DES KINDES:
Öffnen Sie die Kreuzbänder ein wenig, um das Kind aus der Sitzposition zu
nehmen. Halten Sie das Kind zu jeder Zeit fest.
4. POSITION SUR LA HANCHE (DÈS 3 MOIS)
A partir d'un certain âge, votre bébé aura besoin d'une plus grande liberté
de mouvement, et d'une meilleure perspective sur le monde adulte. De plus,
la position "grenouille" est très bénéfi que pour le développement de ses
articulations.
1. Suivez les étapes du nœud de base de A à F.
2. Soulevez votre bébé en l'attirant sur votre épaule droite, face à vous, et
tirez la bande de gauche sur la jambre droite de l'enfant.
3. Placez ensuite votre bébé sur votre épaule droite et tirez la bande de
droite sur sa jambe gauche.
4. Dépliez la bande croisée intérieure (celle qui en contact direct avec le
dos de l'enfant) jusqu'à ce qu'elle soutienne bien l'arrière de ses genoux.
5-6. Faites glisser l'enfant jusqu'à votre hanche droite. Laissez suivre la bande
croisée.
7. Dépliez maintenant la bande croisée extérieure entre les genoux de
l'enfant.
8. Tirez la bande ventrale d'abord sur les jambes puis sur tout le dos de
l'enfant.
NOTE: Selon l'âge et la préférence de l'enfant, ses bras peuvent être placés à
l'intérieur ou à l'extérieur de la bande ventrale
SORTIR L'ENFANT DE L'ÉCHARPE:
Ouvrez légèrement la bande croisée pour dégager l'enfant de la position
assise. Tenez bien l'enfant en permanence.
4. HIP POSITION (3 M +)
At a certain age your child wants more freedom of movement and a
better view. Additionally, the spread-squat position enhances a healthy
development of the joints.
1. Follow the basic steps A-F.
2. Pick up the baby and pull them to your right shoulder facing you and pull
the left cross band over the right leg of the child.
3. Shift the child to the left shoulder and gently pull the right cross band over
child’s left band.
4. Unfold the inner cross band (the one with immediate contact to the back
of the child) until it spreads from the back of one knee to the other.
5-6. Carefully shift the baby on to your right hip. Let the cross band follow.
7. Now unfold the outer cross band between the knees.
8. Pull the belly band over the legs fi rst and then over the entire back of the
child.
Note: Depending on the age and preference of the child the arms may be
inside or outside the belly band.
TAKING OUT THE CHILD:
Open the cross band slightly to take the child out of the sitting position. Hold
on to the child at all times.
123
456
78

17
18
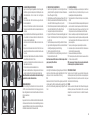
5. RÜ CKENPOSITION (3 M +)
Ab einem gewissen Alter möchte das Kind mehr Bewegungsfreiheit und ein
größeres Sichtfeld. Dafü r eignet sich diese Trageposition hervorragend. Die
Spreiz-Anhockstellung unterstü tzt die Gelenke zudem bei der Entwicklung
optimal.
A) MIT UNTERSTÜ TZUNG EINER ZWEITEN PERSON
1. Lassen Sie sich das Tuch binden wie in Grundschritten A-F beschrieben,
nur ist hier vom Rü cken als Mittelpunkt auszugehen. Die zweite Person
trägt das Kind und fü hrt die weiteren Schritte durch.
2. Fädeln Sie nun ein Bein des Kindes gleichzeitig in das Kreuz- und
Bauchband einer Seite.
3. Wiederholen Sie diesen Schritt mit dem anderen Beinchen.
4. Breiten Sie nun das innere Kreuzband, das sich direkt auf dem Rü cken
des Kindes befi ndet, aus, so dass es von Kniekehle zu Kniekehle reicht.
Wiederholen Sie den Schritt mit dem äußeren Kreuzband.
5. Ziehen Sie anschließend das Bauchband hoch ü ber den kompletten
Rü cken des Kindes.
HERAUSNEHMEN DES KINDES:
Lassen Sie sich beim Herausnehmen des Kindes helfen. Die zweite Person kann
das Kind durch leichtes Öffnen der Kreuzbänder problemlos herausheben.
Das Kind muss zu jeder Zeit festgehalten werden.
5. POSITION SUR LE DOS (DÈS 3 MOIS)
A partir d'un certain âge, votre bébé aura besoin d'une plus grande liberté
de mouvement, et d'une meilleure perspective sur le monde adulte. De plus,
la position "grenouille" est très bénéfi que pour le développement de ses
articulations.
A) NOUER L'ÉCHARPE AVEC L'AIDE DE QUELQU'UN
1. Faites-vous aider pour suivre les étapes du nœud de base de A à F, mais
en positionnant le milieu de l'écharpe au bas de votre dos. La seconde
personne tient l'enfant et mène les étapes à venir.
2. Tirez la pan croisé et la bande ventrale d'un côté par-dessus la jambe de
l'enfant.
3. Répétez cette étape avec l'autre jambe.
4. Dépliez la bande croisée intérieure (celle qui en contact direct avec le
dos de l'enfant) jusqu'à ce qu'elle soutienne bien l'arrière de ses genoux.
Répétez cette étape avec la bande extérieure.
5. Tirez maintenant la bande ventrale sur tout le dos de l'enfant.
SORTIR L'ENFANT DE L'ÉCHARPE:
Faites-vous aider pour sortir l'enfant de l'écharpe. La seconde personne peut
dégager l'enfant en ouvrant légèrement les bandes croisées.
5. BACK POSITION (3 M +)
At a certain age your child wants more freedom of movement and a better
view. Also, the spread-squat position enhances a healthy development of
the joints.
A) TIED WITH THE HELP OF AN EXTRA PERSON
1. Have somebody tie the sling following the basic steps A-F, but using the
lower back as the midpoint. Here, the second person holds the child and
leads the further steps.
2. Pull both cross and bellyband of one side over one leg of the child.
3. Repeat this step with the other leg.
4. Unfold the inner cross band (the one with direct contact with the back of
the child) until it spreads from the back of one knee to the other. Repeat
this step with the outer cross band.
5. Now pull up the belly band over the entire back of the child.
TAKING OUT THE CHILD:
Let somebody help you with taking the child out of the sling. The second
person can take the child out of the sling by slightly opening the cross bands.
Hold on to the child at all times.
123
45

19
20
B) OHNE UNTERSTÜ TZUNG EINER ZWEITEN PERSON
1. Legen Sie das u.GO Tragetuch ausgebreitet auf eine sichere, gerade
Oberfl äche. Legen Sie nun das Baby auf den Tuchmittelpunkt, so dass
die Schultern des Kindes mit dem oberen Rand des Tragetuchs
abschließen.
2. Ziehen Sie den unteren Rand des Tuches ein wenig zwischen den
Beinchen des Kindes hoch.
3. Stellen Sie sich mit dem Rü cken zum Kind und nehmen Sie die beiden
Tuchenden in eine Hand. Stü tzen Sie mit der anderen Hand das Genick
des Kindes.
4. Bringen Sie das Kind zu sich auf den Rü cken. Beugen Sie sich dabei nach
vorne und ziehen Sie mit der einen Hand am Tuch während Sie mit der
anderen Hand den Po des Babys halten.
5. Verknoten Sie das Tuch unter der Brust. Bleiben Sie dabei nach vorne
gebeugt.
6. Bringen Sie ein Tuchende ü ber die Schulter nach hinten, fü hren Sie es
gekreuzt ü ber den Rü cken des Kindes und unter dem Beinchen wieder
nach vorne.
7. Klemmen Sie sich dieses Tuchende zwischen die Knie und fü hren Sie die
andere Bahn ü ber die Schulter nach hinten.
8. Kreuzen Sie auch dieses Band ü ber den Rü cken des Kindes und unter
dem anderen Bein nach vorne.
9. Richten Sie sich auf und ziehen Sie beide Enden fest an.
10-11. Kreuzen Sie die Bänder am Bauch, bringen Sie diese nach hinten und
verknoten Sie die Enden hinter Ihrem Rü cken (unterhalb des Kindes).
Hinweis: Bitte achten Sie darauf, dass die Bänder nicht verdreht und stets gut
ausgebreitet sind, vor allem am Rü cken des Kindes.
HERAUSNEHMEN DES KINDES:
Halten Sie das Kind gut fest, während Sie das Tuch bis zum ersten Knoten
(Schritt 5). Lockern Sie diesen Knoten, bis das Tuch lose genug ist, um das
Baby vorsichtig unter dem Arm durch auf die Hü fte zu ziehen. Sie können das
Kind nun herausnehmen.
ODER:
Beugen Sie sich nach vorne und halten Sie das Kind fest. Wickeln Sie das Tuch
ab bis Sie zum ersten Knoten kommen. Setzen Sie das Kind langsam auf einer
geeigneten Oberfl äche ab, indem Sie mit einer Hand dem Kind Halt geben,
während die andere Hand das Tuch immer weiter lockert.
B) NOUER L'ÉCHARPE SANS AIDE
1. Placez l'écharpe u.GO dépliée sur une surface plane et sûre. Placez
doucement l'enfant sur le point central de l'écharpe, son cou et ses
épaules alignés sur le bord supérieur de l'écharpe.
2. Tirez légèrement le bord inférieur de l'écharpe entre les jambes de
l'enfant.
3. Positionnez-vous dos à l'enfant et tenez les deux pans de l'écharpe devant
vous dans une main. Soutenez la nuque de votre enfant de l'autre main.
4. Attirez l'enfant dans votre dos. Penchez-vous vers l'avant tout en tirant
l'écharpe d'une main et en soutenant les fesses de l'enfant de l'autre.
5. Faites un noeud simple sous votre poitrine. Restez penché(e) vers l'avant.
6. Faites passer l'un des pans sur votre dos par-dessus votre épaule. Guidez-
le en travers du dos de l'enfant et ramenez-le vers l'avant en le faisant
passer sous sa jambe.
7. Tenez ce pan entre vos genoux, et passez l'autre pan sur votre dos.
8. Guidez le second pan en travers du dos de l'enfant, et ramenez-le vers
l'avant en le faisant passer sous sa jambe.
9. Relevez-vous et tirez les deux pans de l'écharpe.
10-11. Croisez les pans sur votre ventre, ramenez-les à nouveau sur votre dos
et faites-un noeud (sous l'enfant).
NOTE: Assurez-vous que l'écharpe ne soit pas enroulée sur elle-même. Elle
doit être toujours à plat, en particulier sur le dos de l'enfant.
SORTIR L'ENFANT DE L'ÉCHARPE:
Tenez-bien votre enfant pendant que vous relâchez l'écharpe jusqu'à
atteindre le premier noeud. (étape 5). Relâchez ce noeud jusqu'à pouvoir
faire glisser l'enfant vers l'avant en passant sous votre bras. Vous pouvez
maintenant sortir l'enfant de l'écharpe.
OU BIEN:
Penchez-vous vers l'avant, et tenez-bien l'enfant. Dénouez l'écharpe jusqu'à
atteindre le premier nœud. Placez lentement l'enfant sur une surface
adéquate tout en le soutenant d'une main et en relâchant le nœud de
l'autre main.
B) TIED WITHOUT THE HELP OF AN EXTRA PERSON
1. Spread the u.GO sling unfolded on a safe and straight surface. Now
gently lay the child on the sling’s midpoint ,so the neck and shoulders are
in line with the upper rim of the sling.
2. Slightly pull the lower edge of the sling up between the legs of the child.
3. Stand with your back towards the child and take both ends of the sling in
one hand. With the other hand support the neck of your child.
4. Pull the child towards your back. Bend forward while pulling the sling with
one hand and holding the bottom of the child with the other.
5. Tie a single knot under your chest. Remain bent forward.
6. Bring one band to the back over the shoulder. Guide it diagonally across
the back of the child and lead it back to the front by pulling it under the
leg of the child.
7. Tuck this end between your knees and bring the other band to the back.
8. Again cross this band diagonally over the fi rst one, across the child’s back
and bring it forward by pulling it under the child’s leg.
9. Straighten up and pull at both ends of the sling.
10-11. Cross both bands at the belly, bring the back again and tie a knot
behind your back (below the child).
Note: Please make sure that the bands are not twisted and always unfolded
properly especially at the child’s back.
TAKING OUT THE CHILD:
Hold on tight to the child while loosening the sling until you reach the fi rst knot.
(step 5). Loosen this knot until you are able to pull the baby to the front from
under your arm. You can now take the child out of the sling.
OR:
Bend forward and hold on to the child. Untie the sling until you reach the fi rst
knot. Slowly lower the child onto a suitable surface by supporting the child
with one hand at all times while gradually loosening the sling with the other
hand.
123
456
789
10 11

21
22
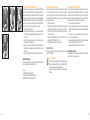
6. SITZPOSITION MIT GESICHT IN TRAGERICHTUNG (6 M +)
Manche Kinder werden unruhig, wenn Sie ein eingeschränktes Sichtfeld
haben. Probieren Sie zunächst die Hü ft- und Rü ckenposition aus. Warten Sie
unbedingt mit dieser Trageposition bis das Kind 6 Monate alt ist. Vorher ist diese
Trageposition ergonomisch nicht vertretbar. Auch ist die Überstimulation
ohne Rü ckzugsmöglichkeit ein Grund so lange wie möglich auf diese Position
zu verzichten. So lange Sie das Tuch binden, achten Sie unbedingt darauf,
dass sich das Kind an einem sicheren Ort befi ndet (z.B. Laufstall).
1. Folgen Sie den Grundschritten A-F.
2. Heben Sie das Baby mit dem Rü cken zu sich an eine Schulter und fädeln
Sie nun das Bein des Babys gleichzeitig in das Kreuz- und Bauchband der
anderen Seite.
3. Ziehen Sie das Kind ein wenig zur anderen Schulter und fädeln Sie das
andere Bein in Kreuz- und Bauchband.
4. Breiten Sie nun das innere Kreuzband, das sich direkt auf dem Bauch des
Kindes befi ndet, aus und wiederholen Sie diesen Schritt mit dem anderen
Kreuzband.
5. Ziehen Sie anschließend das Bauchband ü ber den Bauch des Kindes.
HERAUSNEHMEN DES KINDES:
Öffnen Sie die Kreuzbänder ein wenig, um das Kind aus der Sitzposition zu
nehmen. Halten Sie dabei das Kind zu jeder Zeit fest.
KONTAKT
c/o COLUMBUS Trading-Partners GmbH,
Alte Forstlahmer Str. 22, 95326 Kulmbach, Germany
Tel.: +49(0)9221 - 973114, Fax.: +49(0)9221 - 973117
6. POSITION ASSISE VERS L'AVANT (DÈS 6 MOIS)
Certains enfant s'agitent si leur perspective est restreinte. Les positions sur la
hanche et sur le dos sont particulièrement utiles dans ce cas. Cependant,
attendez que votre enfant atteigne au moins l'âge de 6 mois pour utiliser
cette position. Celle-ci est déconseillée avant cet âge d'un point de vue
ergonomique, et aussi pour éviter tout risque de sur-stimulation.
1. Suivez les étapes du nœud de base de A à F.
2. Soulevez votre bébé et placez son dos contre votre épaule. Faites passer
la bande croisée et la bande ventrale d'un côté sur l'une des jambes de
l'enfant.
3. Faites glisser l'enfant vers l'autre épaule, et passez bande croisée et
bande ventrale sur l'autre jambe.
4. Dépliez les deux bandes croisées en commençant par la bande intérieure
(celle en contact direct avec le ventre de l'enfant).
5. Tirez doucement la bande ventrale sur le ventre de l'enfant.
SORTIR L'ENFANT DE L'ÉCHARPE:
Ouvrez légèrement la bande croisée pour dégager l'enfant de la position
assise. Tenez bien l'enfant en permanence.
6. SITTING POSITION FACING FORWARD (6 M +)
Some children get restless when their view is restricted. The hip and back
position is useful especially for these cases. However, please wait with this
position until your child is at least 6 months old. Before that age this carrying
position should be avoided from an ergonomical point of view and to avoid
possible overstimulation.
1. Follow the basic steps A-F.
2. Pick up the child and bring them with their back towards one shoulder
and pull both cross and belly band of one side over one leg of the child.
3. Shift the child to the other shoulder and pull the other cross and belly
band over the other leg.
4. Unfold both cross bands starting with the inner one (the one with
immediate contact to the belly of the child).
5. Pull the belly band gently over the belly of the child.
TAKING OUT THE CHILD:
Open the cross band slightly to take the child out of the sitting position. Hold
on to the child at all times.
123/4
4
UK – AFTER SALES SERVICE:
If you need assistance, spare parts or you are unhappy with any aspect
of the goods please contact Customer Care on: +44 (0)845 268 2000,
or e-mail us at: customer[email protected].
Visit our website at www.mamasandpapas.com for the latest product
information.

23
24
IV. GARANTIEBEDINGUNGEN
Die nachfolgenden Garantiebestimmungen gelten nur in dem Land,
in dem dieses Produkt erstmalig über den Einzelhandel an einen
Verbraucher verkauft wurde. Die Garantie deckt sämtliche Herstellungs-
und Materialfehler ab, die im Zeitpunkt des Kaufs bestanden haben oder
die innerhalb von zwei (2) Jahren nach dem Erstverkauf dieses Produkts
über den Einzelhandel an einen Verbraucher in Erscheinung getreten
sind (Herstellergarantie). Tritt während der Garantiezeit ein Herstellungs-
und Materialfehler auf, wird das Produkt kostenlos repariert oder – nach
unserem freien Ermessen– gegen ein neues ausgetauscht. Um Leistungen
im Rahmen dieser Garantie in Anspruch nehmen zu können, muss das
Produkt an den Einzelhändler zurückgegeben werden, der es erstmalig
verkauft hat und ein Nachweis über den Kauf (Kaufbeleg oder Rechnung)
im Original vorgelegt werden, welcher das Kaufdatum, den Namen des
Händlers sowie die Produktbezeichnung aufzeigt. Der Anspruch aus diesem
Garantieversprechen besteht nicht, wenn das Produkt an den Hersteller oder
irgendeine andere Person als den Einzelhändler, der es erstmalig verkauft
hat, zum Zweck der Inanspruchnahme der Garantieleistung geschickt wird.
Die Garantie gilt nur, wenn das Produkt nach dem Kauf umgehend auf
Vollständigkeit, Herstellungs- und Materialfehler überprüft wurde. Wurde
das Produkt im Versandhandel gekauft, ist es umgehend nach Erhalt
auf Vollständigkeit, Herstellungs- und Materialfehler zu überprüfen. Falls
Schäden vorhanden sind, darf das Produkt nicht mehr benutzt werden
und muss umgehend an den Händler, der es erstmalig verkauft hat, zurück
gegeben werden. Im Garantiefall muss das Produkt in einem vollständigen
und sauberen Zustand zurückgegeben werden. Bitte lesen Sie vor einer
Kontaktaufnahme mit dem Händler sorgfältig die Gebrauchsanleitung. Die
Garantie deckt keine Schäden ab, die durch Fehlgebrauch, äußere Einfl üsse
(Wasser, Feuer, Verkehrsunfälle o.ä.) oder normalen Verschleiß entstanden
sind. Die Garantie wird nur gewährt, wenn das Produkt in Übereinstimmung
mit der Gebrauchsanweisung behandelt und benutzt wurde, Reparaturen
oder Veränderungen ausschließlich durch Personen vorgenommen wurden,
die hierzu befugt waren und stets nur Original Bau- und Zubehörteile
verwendet wurden. Durch diese Garantie werden weder die auf Grundlage
der jeweils anwendbaren Gesetze bestehenden Verbraucherrechte noch
Rechte gegen den Verkäufer wegen der Vertragswidrigkeit des Produkts
ausgeschlossen, begrenzt oder in anderer Weise eingeschränkt.
IV. GUARANTEE
The following warranty applies solely in the country where this product was
initially sold by a retailer to a customer. The warranty covers all manufacturing
and material defects, existing and appearing, at the date of purchase or
appearing within a term of two (2) years from the date of purchase from
the retailer who initially sold the product to a consumer (manufacturer’s
warranty). In the event that a manufacturing or material defect should
appear, we will – at our own discretion – either repair the product free of
charge or replace it with a new product. To obtain such warranty it is required
to take or ship the product to the retailer, who initially sold this product to a
customer and to submit an original proof of purchase (sales receipt or invoice)
that contains the date of purchase, the name of the retailer and the type
designation of this product. This warranty shall not apply in the event that this
product is taken or shipped to the manufacturer or any other person other
than the retailer who initially sold this product to a consumer. Please check
the product with respect to completeness and manufacturing or material
defects immediately at the date of purchase or, in the event that the product
was purchased in distance selling, immediately after receipt. In case of a
defect stop using the product and take or ship it immediately to the retailer
who initially sold it. In a warranty case the product has to be returned in a
clean and complete condition. Prior to contacting the retailer, please read
this instruction manual carefully. This warranty does not cover any damages
caused by misuse, environmental infl uence (water, fi re, road accidents etc.)
or normal wear and tear. It does solely apply in the event that the use of the
product was always in compliance with the operating instructions, if any and
all modifi cations and services were performed by authorized persons and
if original components and accessories were used. This warranty does not
exclude, limit or otherwise affect any statutory consumer rights, including
claims in tort and claims with respect to a breach of contract, which the
buyer may have against the seller or the manufacturer of the product.
IV. GARANTIE
La garantie suivante s'applique uniquement dans le pays où ce produit a
été vendu la première fois par un détaillant à un client. La garantie couvre
tous les défauts matériels et de fabrication, existants ou apparaissants à
la date de l'achat ou dans un délai de deux (2) ans à compter de la date
d'achat au détaillant qui l'a vendu la première fois au consommateur
(garantie fabricant). Dans le cas où un défaut de fabrication ou de matériau
apparaîtrait, le produit sera, au choix du fabricant, soit réparé gratuitement
soit remplacé par un produit neuf. Pour obtenir cette garantie il est
nécessaire de retourner le produit au détaillant qui l'a initialement vendu au
consommateur et produire l'original de la preuve d'achat (facture ou reçu)
qui comporte la date d'achat, le nom du détaillant et la désignation du
produit. La garantie ne s'appliquera pas dans le cas où le produit est envoyé
au fabricant ou à toute personne autre que le détaillant ayant effectué la
première vente de ce produit.

25
26
GEACHTE KLANT!
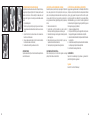
DANK U VOOR HET AANKOPEN VAN DE CYBEX u.GO BABYDRAAGDOEK. UW BABY ONDERVINDT VEEL
VOORDELEN VAN DEZE DRAAGMETHODE. HET DICHTE FYSISCHE CONTACT MET DE OUDERS VERGROOT HET
BASISVERTROUWEN VAN DE BABY EN STIMULEERT EEN POSITIEF SOCIAAL GEDRAG ALSOOK EEN GEZONDE
ONTWIKKELING VAN DE GEWRICHTEN.
TISZTELT VÁSÁRLÓ!
KÖSZÖNJÜK, HOGY A CYBEX
u
.GO HORDOZÓKENDŐT VÁLASZTOTTA. A KISBABA SZÁMÁRA NAGYON ELŐNYŐS
AZ ILYEN ÚTON TÖRTÉNŐ HORDOZÁS. A SZÜLŐVEL VALÓ SZOROS FIZIKAI KONTAKTUS ERŐSÍTI A KISBABA BIZALMI
ÉRZETÉT ÉS POZITÍVAN HAT A SZOCIÁLIS FEJLŐDÉSÉRE, MÍG A HELYES HORDOZÁSI HELYZET ELŐSEGÍTI AZ ÍZÜLETEK
TOVÁBBI FEJLŐDÉSÉT.
26
25
SPOŠTOVANI KUPEC!
ZAHVALJUJEMO SE VAM ZA NAKUP CYBEX u.GO NARAMNE RUTE - ŠTORKLJE. PRENAŠANJE MALČKA NA TAK
NAČIN JE IZJEMNO UDOBNO. TESEN TELESNI STIK S STARŠI POVEČA MALČKOV OSNOVNI OBČUTEK ZAUPANJA IN
VZPODBUJA POZITIVEN SOCIALNI RAZVOJ, MEDTEM KO PRAVILEN NAČIN PRENAŠANJA POMAGA PRI ZDRAVEM
RAZVOJU MALČKOVIH SKLEPOV.

De CYBEX u.GO babydraagdoek is gemaakt uit 100% elastische katoen.
Afhankelijk van de leeftijd van het kind zijn er verschillende draagposities
mogelijk. In deze handleiding beschrijven we de volgende 6 draagposities.
1. Wiegpositie voor pasgeborenen (0-3M)
2. Kangoeroepositie voor pasgeborenen (0-3M)
3. Zittende positie met zicht naar de moeder (vanaf 3M)
4. Heuppositie (vanaf 3M)
5. Rugpositie (vanaf 3M)
6. Zittende positie met zicht naar voren (vanaf 6M)
INHOUD
I. Wat zijn de voordelen van de CYBEX u.GO babydraagdoek ..... 29
II. Gelieve te noteren vóór het eerste gebruik .................................. 29
III. Draagaanwijzingen ......................................................................... 31
1. Wiegpositie voor pasgeborenen (0-3M) ....................................... 33
2. Kangoeroepositie voor pasgeborenen (0-3M) ............................ 35
3. Zittende positie met zicht naar de moeder (vanaf 3M) ............... 37
4. Heuppositie (vanaf 3M) ................................................................... 39
5. Rugpositie (vanaf 3M)
A) Vastgemaakt met behulp van een extra persoon ............................... 41
B) Vastgemaakt met behulp van een extra persoon ...............................43
6. Zittende positie met zicht naar voren (vanaf 6M) .........................45
IV. Garantie ............................................................................................ 47
A CYBEX u.GO hordozókendő 100% elasztikus pamutból készül, és - a gyermek
életkorától függően - sok különböző hordozási helyzetet tesz lehetővé. Ez a
kezelési utasítás az alábbi hat hordozási helyzetet mutatja be.
1. Bölcsőhelyzet újszülötteknek (1-3 hó),
2. kenguruhelyzet újszülötteknek (1-3 hó),
3. ülő helyzet arccal a hordozó teste felé (3 hónaptól),
4. csípőhelyzet (3 hónaptól),
5. háti helyzet (3 hónaptól),
6. ülő helyzet arccal a hordozási irányba (6. hónaptól).
T A R T A L O M J E G Y Z É K
I. Mik a CYBEX u.GO hordozókendő előnyei? ................................... 30
II. Az első használat előtt - utasítások ................................................. 30
III. Hordozási utasítás ............................................................................. 32
1. Bölcsőhelyzet újszülötteknek (1-3 hó) ............................................. 34
2. Kenguruhelyzet újszülötteknek (1-3 hó) ......................................... 36
3. Ülő helyzet arccal a hordozó teste felé (3 hónaptól) ..................... 38
4. Csípőhelyzet (3 hónaptól) ................................................................40
5. Háti helyzet (3 hónaptól)
A) Második személy segítségével .................................................................42
B) Másik személy segítsége nélkül ................................................................44
6. Ülő helyzet arccal a hordozási irányba (6. hónaptól) ....................46
IV. Garanzia ...........................................................................................................48
NL HU
27
28
CYBEX u.GO štorklja je izdelana iz 100% elastičnega bombaža. Odvisno do
malčkove starosti, ponuja številne različne položaje za prenašanje. V teh
navodilih vam bomo predstavili naslednjih šest položajev za prenašanje:
1. Zibelka za novorojenčke (0-3M)
2. Kengurujček za novorojenčke (0-3M)
3. Sedeč položaj - malček je obrnjen proti staršu (od 3M dalje)
4. Položaj na boku (od 3M dalje)
5. Hrbtni položaj (od 3M dalje)
6. Sedeč položaj - malček je obrnjen naprej (od 6M dalje)
VSEBINA
I. Kakšne so prednosti CYBEX u.GO štorklje? ..................................... 30
II. Pred prvo uporabo ne pozabite na naslednje ............................... 30
III. Navodila za prenašanje ................................................................... 32
1. Zibelka za novorojenčke (0-3M) ......................................................34
2. Kengurujček za novorojenčke (0-3M) ............................................ 36
3. Sedeč položaj - malček je obrnjen proti staršu (od 3M dalje) ..... 38
4. Položaj na boku (od 3M dalje) ......................................................... 40
5. Hrbtni položaj (od 3M dalje)
A) Povezovanje s pomočjo druge osebe ....................................................
42
B) Povezovanje brez pomoči druge osebe .................................................44
6. Sedeč položaj - malček je obrnjen naprej (od 6M dalje) ............. 46
IV. GARANCIJA ......................................................................................................48
SL
Afmetingen:
lengte: 540 cm, breedte: 60 cm
NL
Dimenzije:
dolžina: 540 cm, širina: 60 cm
SL
Méretek:
hosszúság: 540 cm, szélesség: 60 cm
HU
La page est en cours de chargement...
La page est en cours de chargement...
La page est en cours de chargement...
La page est en cours de chargement...
La page est en cours de chargement...
La page est en cours de chargement...
La page est en cours de chargement...
La page est en cours de chargement...
La page est en cours de chargement...
La page est en cours de chargement...
La page est en cours de chargement...
La page est en cours de chargement...
La page est en cours de chargement...
La page est en cours de chargement...
La page est en cours de chargement...
La page est en cours de chargement...
La page est en cours de chargement...
La page est en cours de chargement...
La page est en cours de chargement...
La page est en cours de chargement...
La page est en cours de chargement...
La page est en cours de chargement...

73
74
-
 1
1
-
 2
2
-
 3
3
-
 4
4
-
 5
5
-
 6
6
-
 7
7
-
 8
8
-
 9
9
-
 10
10
-
 11
11
-
 12
12
-
 13
13
-
 14
14
-
 15
15
-
 16
16
-
 17
17
-
 18
18
-
 19
19
-
 20
20
-
 21
21
-
 22
22
-
 23
23
-
 24
24
-
 25
25
-
 26
26
-
 27
27
-
 28
28
-
 29
29
-
 30
30
-
 31
31
-
 32
32
-
 33
33
-
 34
34
-
 35
35
-
 36
36
-
 37
37
-
 38
38


dans d''autres langues
- italiano: CYBEX U.GO Manuale utente
- English: CYBEX U.GO User manual
- español: CYBEX U.GO Manual de usuario
- Deutsch: CYBEX U.GO Benutzerhandbuch
- Nederlands: CYBEX U.GO Handleiding
- português: CYBEX U.GO Manual do usuário
Documents connexes
Autres documents
-
 Love Radius 97866210 Mode d'emploi
-
mothercare Amazonas Soft Carrier_0725178 Mode d'emploi
-
Baby K’tan Baby Carrier Manuel utilisateur
-
AMAZONAS Carry Sling Instructions Manual
-
-
-
-
-
-
 Moby HIP SEAT Instructions Manual

