
HT5.0

2
3 ENGLISH
16 FRANÇAIS
29 ESPAÑOL

3
ENGLISH
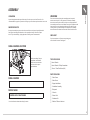
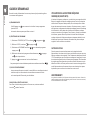
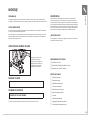
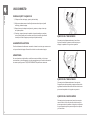
SERIAL NUMBER LOCATION
ASSEMBLY
UNPACKING
Unpack the equipment where you will be using it. Place the carton on a level at surface. It is
recommended that you place a protective covering on your oor. Never open box when it is on its side.
IMPORTANT NOTES
During each assembly step, ensure that ALL nuts and bolts are in place and partially threaded.
Several parts have been pre-lubricated to aid in assembly and usage. Please do not wipe
this off. If you have diculty, a light application of lithium grease is recommended.
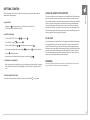
TOOLS INCLUDED:
F 6mm L-Wrench
F 6mm L-Wrench / Phillips Screwdriver
F 13mm / 17mm Flat Wrench (x2)
PARTS INCLUDED:
F 1 Main Frame
F 1 Base Frame
F 2 Upper Handlebars
F 1 Handlebar Assembly
F 2 Footpads
F 1 Console
F 1 Power Cord
F 1 Hardware Kit
F 1 Bottle of Silicone Lubricant
WARNING!
There are several areas during the assembly process that special
attention must be paid. It is very important to follow the assembly
instructions correctly and to make sure all parts are rmly tightened. If
the assembly instructions are not followed correctly, the equipment could
have parts that are not tightened and will seem loose and may cause
irritating noises. To prevent damage to the equipment, the assembly
instructions must be reviewed and corrective actions should be taken.
NEED HELP?
If you have questions or if there are any missing parts,
contact Horizon Customer Tech Support.
Before proceeding, nd your
equipment’s serial number
located on a barcode sticker
and enter it in the space
provided below.
SERIAL NUMBER
MODEL NAME
HORIZON HT5.0 PEAK TRAINER
* Use the information above when calling for service.

4
ENGLISH
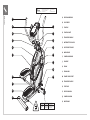
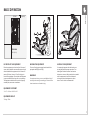
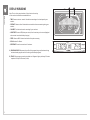
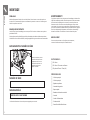
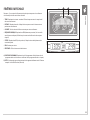
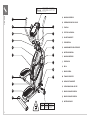
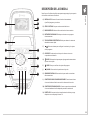
A) UPPER HANDLEBAR
B) PULSE GRIPS
C) CONSOLE
D) CONSOLE MAST
E) TRANSPORT HANDLE
F) WATER BOTTLE HOLDER
G) ACCESSORY STORAGE
H) MAIN FRAME
I) LOWER HANDLEBAR
J) FAN VENT
K) CRANK
L) CRANK ARM
M) POWER CORD SOCKET
N) TRANSPORT WHEELS
O) FOOT PADS
P) UPPER LINK ARM
Q) LOWER LINK ARM
R) BASE FRAME
A
C
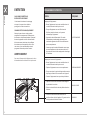
WARNING AVERTISSEMENT PRECAUCIÓN
UNPLUG BEFORE CLEANING
OR SERVICING TO REDUCE
THE RISK OF ELECTRIC
SHOCK OR INJURY FROM
MOVING PARTS.
DÉBRANCHEZ L'APPAREIL AVANT
NETTOYAGE OU ENTRETIEN AFIN DE
RÉDUIRE LE RISQUE
D'ÉLECTROCUTION OU DE BLESSURE
PAR DES PIÈCES EN MOUVEMENT.
DESENCHUFE LA MÁQUINA ANTES DE
LIMPIARLA O DE SOMETERLA A
MANTENIMIENTO PARA REDUCIR EL RIESGO DE
QUE SE PRODUZCAN DESCARGAS ELÉCTRICAS
O LESIONES POR PIEZAS MÓVILES.
B
D
F
G
J
P
O
E
H
I
K
L
M
N
Q
R
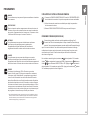
- KEEP CHILDREN UNDER THE AGE OF 14 AWAY FROM MACHINE.
- HEART RATE MONITORING SYSTEMS MAY BE INACCURATE.
OVER-EXERCISING MAY RESULT IN SERIOUS INJURY OR DEATH.
IF YOU FEEL FAINT, STOP EXERCISING IMMEDIATELY.
- READ USER MANUAL BEFORE USE.
- USE THIS EQUIPMENT FOR ITS INTENDED
PURPOSE ONLY.
- CONSULT A PHYSICIAN BEFORE USING THIS
EQUIPMENT.
- THIS EQUIPMENT IS FOR CONSUMER USE ONLY.
WARNING
RISK OF PERSONAL INJURY:

5
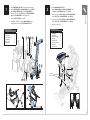
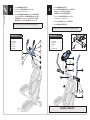
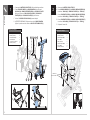
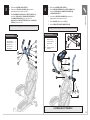
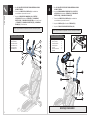
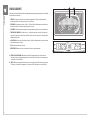
A Open HARDWARE FOR STEP 1. Remove outer packaging.
B Attach BASE FRAME (2) to MAIN FRAME (1) using 4 BOLTS
(A), 4 SPRING WASHERS (B) and 4 FLAT WASHERS (C)
from the top and 2 longer BOLTS (E), 2 SPRING WASHERS
(B) and 2 FLAT WASHERS (C) from the bottom.
C Insert 2 BOLT COVERS (D) as shown.
D REQUIRES 2 PEOPLE: Lift and tip MAIN FRAME (1) into
upright position. Remove STYROFOAM BLOCKS (3).
3
A
B
C
A
B
C
C
B
E
1
2
D
4
Hardware For Step 1
Description Qty
A
B
C
D
E
Bolt (55 mm)
Spring Washer
Flat Washer
Bolt Covers
Bolt (65 mm)
4
6
6
2
2
1 2
J
5
6
7
8
F
C
G
H
K
I
ENGLISH
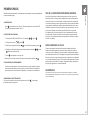
A Open HARDWARE FOR STEP 2.
B Attach CRANK ARM (5) to UPPER LINK ARM (6) using
1 BOLT (F), 2 FLAT WASHERS (C) and 1 NUT (G).
C Attach the front of FOOT PAD (8) to UPPER LINK ARM (6)
using 1 BOLT (H), 2 FLAT WASHERS (I) and 1 NUT (J).
D Attach the rear of FOOT PAD (8) to LOWER LINK ARM (7)
using 1 BOLT (K), 2 FLAT WASHERS (I) and 1 NUT (J).
E Repeat on other side.
Hardware For Step 2
Description Qty
F
C
G
H
I
J
K
Bolt (50 mm)
Flat Washer (M8)
Nut (M8)
Bolt (130 mm)
Flat Washer (M10)
Nut (M10)
Bolt (100 mm)
2
4
2
2
8
4
2
Remove
twist ties

6
9
P
12
129
O
B
N
13
11
A Open HARDWARE FOR STEP 3.
B Connect the CONSOLE WIRES (9) and carefully
tuck them into the console mast.
C Attach HANDLEBAR ASSEMBLY (10) to the CONSOLE MAST
(11) using 2 BOLTS (L), 2 SPRING WASHERS (B) and 2 ARC
WASHERS (M) from the front and 2 BOLTS (N), 2 SPRING
WASHERS (B) and 2 FLAT WASHERS (O) from the sides.
Note: Be careful not to pinch wires while attaching the mast.
4
9
10
M
B
L
11
O
B
N
3
ENGLISH
ASSEMBLY COMPLETE!
Hardware For Step 3
Description Qty
L
B
M
N
O
Bolt (45 mm)
Spring Washer
Arc Washer
Bolt (20 mm)
Flat Washer
2
4
2
2
2
A Open HARDWARE FOR STEP 4.
B Attach UPPER HANDLEBARS (12) to the CONSOLE
MAST (11) using 8 BOLTS (N), 8 SPRING
WASHERS (B) and 8 FLAT WASHERS (O).
C Connect the CONSOLE WIRES (9) and carefully
tuck them into the console mast.
D Attach the CONSOLE (13) using 4 SCREWS (P).
E Attach CRANK ARM CAPS (129).
Note: Be careful not to pinch wires while attaching the console.
Hardware For Step 4
Description Qty
N
B
O
P
129
Bolt (20 mm)
Spring Washer
Flat Washer
Screw
Crank Arm Caps
8
8
8
4
2

7
ENGLISH
BASIC OPERATION
FREE AREA
0.6 m (2 ft)
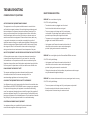
LOCATION OF THE EQUIPMENT
Place the equipment on a level surface. For ease of
access, there should be an accessible space on both
sides and behind the equipment that is at least 0.6
meters (24 inches). Leave a 15 cm (6 inch) gap in
front of the equipment. Do not place the equipment
in any area that will block any vent or air openings.
The equipment should not be located in a garage,
covered patio, near water or outdoors.
EQUIPMENT FOOTPRINT
118 × 71 × 168 cm / 46.5 × 28 × 68”
EQUIPMENT WEIGHT
70.4 kg / 155 lbs.
1
2
LEVELING THE EQUIPMENT
It is extremely important that the levelers are
correctly adjusted for proper operation. Turn
leveling foot clockwise to lower and counter-
clockwise to raise unit. Adjust each side as needed
until the equipment is level. An unbalanced
unit may cause belt misalignment or other
issues. Use of a level is recommended.
MOVING THE EQUIPMENT
To move, firmly grasp transport handle and tilt the
equipment back (1) and roll (2).
WARNING!
Our equipment is heavy, use care and additional help if
necessary when moving or standing up. Failure to follow
these instructions could result in injury.
15 cm (6 in)fROnt

8
ENGLISH
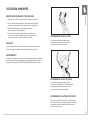
PROPER USAGE
MOUNTING AND DISMOUNTING THE EQUIPMENT
1) Stand on the side of the equipment next to the lowest foot pedal.
2) While holding both of the stationary handlebars, place your foot on
the lowest foot pedal and pull yourself up onto the equipment.
3) Wait until the equipment finds its resting place and then
place your other foot on the opposite pedal
4) To dismount, wait until pedals come to a complete stop, remove
foot from highest foot pedal, and step down onto the ground on
the side of the equipment next to the lowest foot pedal.
POWER
The power cord must be plugged into the power socket, which is located
in the front of the equipment. Unplug cord when not in use.
WARNING!
Never operate product if it has a damaged cord or plug, if it is not working
properly, if it has been damaged, or immersed in water. Please reference
contact information on the INFORMATION CARD for assistance.
LOWER BODY WORKOUT
To exercise primarily the lower body: Hold onto
the stationary handlebars while using your feet
to push the foot pedals along their path.
UPPER BODY WORKOUT
To exercise primarily the upper body: While standing on the
foot pedals, push each of the movable handlebars using the
muscles in your arms to move the foot pedals along their path.
FULL BODY WORKOUT
To exercise the combined total body (both upper body
and lower body): Use both arm and leg muscles to
move the foot pedals along their path, or alternate
between exercising your lower and upper body.

9
ENGLISH
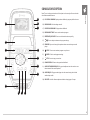
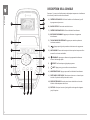
CONSOLE DESCRIPTION
Note: There is a thin protective sheet of clear plastic on the overlay of the console that
should be removed before use.
A) LCD DISPLAY WINDOW: Displays workout feedback, program profile and more.
B) READING RACK : Holds reading material.
C) LED DISPLAY WINDOWS: Display workout feedback.
D) PROGRAM BUTTONS: Press to select workout program.
E) RESISTANCE QUICK KEYS: Press to reach desired resistance quickly.
F)
: Press to adjust resistance and program settings.
G) SPEAKERS: Play music through the speakers when connected to your media
player.
H) START : Press to start workout program or quick start.
I) ENTER : Confirm each program setting.
J) STOP : Press to stop your workout.
K) CHANGE DISPLAY: Press to change workout feedback.
L) AUDIO OUT/HEADPHONE JACK: Plug your headphones into the console to use
them instead of the console speakers.
M) AUDIO IN JACK: Plug your media player into the console using the included
audio adaptor cable.
N) USB PORT: Used for software updates and device charging up to 2 amps.
C
I
D
A
M
C
K
F
F
E
E
B
H J
G
N
L

10
DISPLAY WINDOWS
Note: There is a thin protective sheet of clear plastic on the overlay
of the console that should be removed before use.
• TIME: Shown as minutes : seconds. View the time remaining or the time elapsed in your
workout.
• DISTANCE: Shown as miles. Indicates distance traveled or distance remaining during your
workout.
• CALORIES: Total calories burned or remaining for your workout.
• HEART RATE: Shown as BPM (beats per minute). Used to monitor your heart rate (displayed
when contact is made with both pulse grips).
• SPEED: Shown as MPH. Indicates how fast the foot pads are moving.
• RPM: Rotations Per Minute.
• RESISTANCE: Shows the current level of resistance.
A) PROGRAM PROFILE: Represents the profile of the program being used (resistance during
resistance based programs and incline during incline based programs).
B) TRACK: Follows progress around a simulated track. Segments light up with every 50 meters
completed. One lap is 400 meters (¼ mile).
ENGLISH
A B

11
ENGLISH
GETTING STARTED
Plug in the power cord. Check to make sure no objects are nearby that will hinder the
movement of the equipment.
A) QUICK START
Simply press to begin working out. Time will count up from 0:00.
The resistance level will default to level 1.
B) SELECT A PROGRAM
1) Select USER, GUEST 1-5 using
and press
.
2) Set WEIGHT, using
and press
.
3) Select a PROGRAM using
or program button and press
.
4) Set workout program information using
and press
after each selection.
5) Press to begin workout.
You can adjust the resistance level during your workout using
.
C) FINISHING YOUR WORKOUT
When your workout is complete, the console will display “workout complete” and beep.
Your workout information will stay displayed on the console for 30 seconds and then
reset.
TO CLEAR CURRENT SELECTION
To clear the current program selection or screen, press and hold
for 3 seconds.
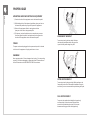
USING THE HEART RATE FUNCTION
The heart rate function on this product is not a medical device. While heart rate
grips can provide a relative estimation of your actual heart rate, they should
not be relied on when accurate readings are necessary. Some people, including
those in a cardiac rehab program, may benefit from using an alternate heart
rate monitoring system like a chest or wrist strap. Various factors, including
movement of the user, may affect the accuracy of your heart rate reading. The
heart rate reading is intended only as an exercise aid in determining heart rate
trends in general. Please consult your physician.
PULSE GRIPS
Place the palm of your hands directly on the grip pulse handlebars. Both hands
must grip the bars for your heart rate to register. It takes 5 consecutive heart
beats (15-20 seconds) for your heart rate to register. When gripping the pulse
handlebars, do not grip tightly. Holding the grips tightly may elevate your blood
pressure. Keep a loose, cupping hold. You may experience an erratic readout
if consistently holding the grip pulse handlebars. Make sure to clean the pulse
sensors to ensure proper contact can be maintained.
WARNING!
Heart rate monitoring systems may be inaccurate. Over exercising may result in serious
injury or death. If you feel faint, stop exercising immediately.

12
ENGLISH
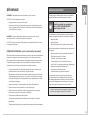
PROGRAMS
MANUAL
A workout that allows you to manually adjust the machine at anytime.
WEIGHT LOSS
Promotes weight loss by raising and lowering the resistance level, while
keeping you in your fat burning zone. Time based program with 10
levels to choose from. User sets time and level using +/-.
DISTANCE
A workout that allows you to select a specific distance you would like to
travel during your workout. Increasing the distance goal of the workout
will increase the duration of the workout based on your speed.
CALORIE
A workout that allows you to select a specific number of calories you
would like to burn during your workout. Increasing the calorie goal of
the workout will increase the duration of the workout based on your
speed and resistance.
SPRINT 8
A 20-minute HIIT workout proven to burn up to 27% body fat in only 8
weeks.
*
After warm-up, the program will lead you through 8 rounds of
intervals. Short 30-second intervals should be performed at your peak
intensity effort. During the 90-second active recovery periods, keep
moving and allow your intensity and heart rate to come down. If you
feel recovered in less than 90-seconds, work harder in the next sprint
to realize the full impact of the program. Cool down to finish.
* Individual results vary. Sprint 8 is designed for healthy adults at all levels of fitness.
It is highly recommended that individuals get an examination by a physician before
attempting any fitness training program, including Sprint 8.
USING YOUR MEDIA PLAYER
1) Connect the included AUDIO ADAPTOR CABLE to the AUDIO IN JACK on the right
of the console and the headphone jack on your media player.
2) Use your media player buttons to adjust song settings and volume.
3) Remove the AUDIO ADAPTOR CABLE when not in use.
ENERGY SAVER (STANDBY MODE)
This machine has a special feature called Energy Saver
™
mode. This mode is
NOT automatically activated. When Energy Saver mode is activated, the display
will automatically enter standby mode (Energy Saver mode) after 15 minutes of
inactivity. This feature saves energy by disabling most power to the machine until a key is
pressed on the console. This feature can be turned on or off in the engineering menu.
for 3-5 seconds. Use to
To enter the engineering menu, press and hold
navigate through the menu to ENG 2. Press
to select. Use to select ENRGY SVE
ON or OFF. Press and hold
for 3-5 seconds to exit ENG 2
. Press and hold again for
3-5 seconds to exit the engineering menu.

13
ENGLISH
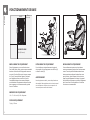
COMMON PRODUCT QUESTIONS
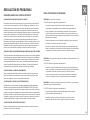
ARE THE SOUNDS MY EQUIPMENT MAKES NORMAL?
This equipment is one of the quietest available because it uses a belt drive
and friction free magnetic resistance. We use the highest grade bearings and
belts to minimize noise. However, because the resistance system itself is so
quiet, you will occasionally hear other slight mechanical noises. Unlike older,
louder technologies, there are no fans, friction belts, or alternator noises to
mask these sounds on our equipments. These mechanical noises, which may
or may not be intermittent, are normal and are caused by the transfer of
significant amounts of energy to a rapidly spinning flywheel. All bearings, belts
and other rotating parts will generate some noise which will transmit through
the casing and frame. It is also normal for these sounds to change slightly
during a workout and over time because of thermal expansion of the parts.
WHY IS THE EQUIPMENT I HAD DELIVERED LOUDER THAN THE ONE AT THE STORE?
All fitness products seem quieter in a large store showroom because there
is generally more background noise than in your home. Also, there will be
less reverberation on a carpeted concrete floor than on a wood overlay floor.
Sometimes a heavy rubber mat will help reduce reverberation through the floor.
If a fitness product is placed close to a wall, there will be more reflected noise.
HOW LONG WILL THE DRIVE BELT LAST?
The computer modeling we have done indicated virtually thousands
of maintenance free hours. Belts are now commonly used in far
more demanding applications such as motorcycle drives.
CAN I MOVE THE EQUIPMENT EASILY ONCE IT IS ASSEMBLED?
Your Equipment has a pair of transport wheels built into the front stabilizer tube.
Please follow the MOVING THE EQUIPMENT section to transport your equipment.
It is important that you place your equipment in a comfortable and inviting
room. Your equipment is designed to use minimal floor space. Many people will
place their equipment facing the TV or a picture window. If at all possible, avoid
putting your equipment in an unfinished basement. To make exercise a desirable
daily activity for you, the equipment should be in a comfortable setting.
CAN I PEDAL BACKWARDS ON MY EQUIPMENT?
Your equipment allows you to pedal both forward and backwards
to exercise and strengthen a wider range of muscles.
TROUBLESHOOTING
BASIC TROUBLESHOOTING
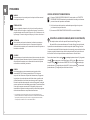
PROBLEM: The console does not light up.
SOLUTION: Verify the following:
• The outlet the machine is plugged into is functional.
Double check that the breaker has not tripped.
• The correct power cord is being used. Only use the power
cord included. Test the voltage on the power cord to verify it
provides the specified output voltage from the label.
• The power cord is not pinched or damaged and is properly
plugged into the outlet AND the machine.
• Unplug power cord. Remove the console and check that all
connections to the console are secure and not damaged or
pinched. Unplug and reconnect the console cable.
PROBLEM: The console lights up but the Distance/Watts/RPMs do not count.
SOLUTION: Verify the following:
• Unplug power cord. Remove the console and check that all
connections to the console are secure and not damaged or
pinched. Unplug and reconnect the console cable.
• If doing the above does not fix the problem, the speed sensor and/or magnet
may have become dislodged or damaged.
PROBLEM: The resistance levels seem to be incorrect, seeming too hard or too easy.
SOLUTION: Verify the following:
• The correct power cord is being used. Only use the power cord provided.
• Reset the console and allow the resistance to reset to the
default position. Restart and retry the resistance levels.

14
ENGLISH
NEED ASSISTANCE?
If this troubleshooting section does not remedy the
problem, discontinue use and turn the power off.
Please reference contact
information on the INFORMATION
CARD for assistance.
The following information may be asked of you when
you call. Please have these items readily available:
• Model Name
• Serial Number
• Proof of Purchase (receipt or credit card statement)
Some common troubleshooting questions
that may be asked are:
• How long has this problem been occurring?
• Does this problem occur with every
use? With every user?
• If you are hearing a noise, does it come from
the front or the back? What kind of noise is it
(thumping, grinding, squeaking, chirping etc.)?
• Has the machine been maintained per
the MAINTENANCE schedule?
Answering these and other questions will
give the technicians the ability to send proper
replacement parts and the service necessary to
get you and your equipment running again!
You may find more troubleshooting suggestions
on the customer support section of our website.
PROBLEM: The equipment makes a squeaking or chirping noise.
SOLUTION: Verify the following:
• The equipment is on a level surface.
• Loosen all bolts attached during the assembly process, grease
the joints, grease the threads and re-tighten. If bolts become
loose, apply blue thread-locker and re-tighten.
PROBLEM: When an audio device is connected, there is no sound
coming from the speakers or the speakers sound fuzzy.
SOLUTION: Make sure audio cable is plugged in securely
to both the console and audio device.
HEART RATE (GRIP-PULSE ONLY)
Check your exercise environment for sources of interference such as fluorescent
lights, computers, underground fencing, home security systems or appliances
containing large motors. These items may cause erratic heart rate readouts.
You may experience an erratic readout under the following conditions:
• Gripping the heart rate handlebars too tight. Try to maintain moderate
pressure while holding onto the heart rate handlebars.
• Constant movement and vibration due to constantly holding the heart rate
handlebars while exercising. If you are receiving erratic heart rate readouts,
try to only hold the grips long enough to monitor your heart rate.
• When you are breathing heavily during a workout.
• When your hands are constricted by wearing a ring.
• When your hands are dry or cold. Try to moisten your
palms by rubbing them together to warm.
• Anyone with heavy arrhythmia.
• Anyone with arteriosclerosis or peripheral circulation disorder.
• Anyone whose skin on the measuring palm is especially thick.
TROUBLESHOOTING

15
ENGLISH
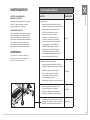
MAINTENANCE SCHEDULE
ACTION FREQUENCY
Clean the equipment:
• Turn off the equipment by unplugging
the power cord from the wall outlet.
• Wipe down the equipment with a damp
cloth. Never use solvents, as they can
cause damage to the equipment.
• Inspect the power cord. If the power
cord is damaged, reference contact
information on the back cover of the
INFORMATION CARD for a replacement.
• Make sure the power cord is not
underneath the equipment or in
any other area where it can become
pinched or cut during storage or use.
DAILY
Clean underneath the equipment:
• Turn off the equipment by unplugging
the power cord from the wall outlet.
• Move the equipment to a remote location.
• Wipe or vacuum any dust particles or
other objects that may have accumulated
underneath the equipment.
• Return the equipment
to its previous position.
WEEKLY
• Inspect and tighten all assembly
bolts and pedals on the machine.
• Clean any debris off of the
pedal arms and link arms.
MONTHLY
• Lubricate the link arm joint with Silicone
lubricant (included). Apply 1-2 drops on
left and right side of link arm joints.
BI-MONTHLY
MAINTENANCE
WHAT KIND OF ROUTINE
MAINTENANCE IS REQUIRED?
Minimal maintenance and cleaning is
required. Adhering to this schedule will
extend the life of your machine.
HOW DO I CLEAN MY EQUIPMENT?
Clean with soap and water cleaners only. Never
use solvents on plastic parts. Cleanliness of
your equipment and its operating environment
will keep maintenance problems and service
calls to a minimum. For this reason, it is
recommended that the following preventive
maintenance schedule be followed.
WARNING
To remove power from the equipment, the power
cord must be disconnected from the wall outlet.

16
EMPLACEMENT DU NUMÉRO DE SÉRIE
MONTAGE
DÉBALLAGE
Déballez l'équipement à l'endroit où vous allez l'utiliser. Placez le carton sur une surface plane et
de niveau. Il est recommandé de placer un revêtement de protection sur votre sol. N'ouvrez jamais
la boîte lorsqu'elle est sur le côté.
REMARQUES IMPORTANTES
Lors de chaque étape d'assemblage, assurez-vous que TOUS les écrous et boulons sont en place et
partiellement letés.
Plusieurs pièces ont été pré-lubriées pour faciliter l'assemblage et l'utilisation. Veuillez ne pas enlever
la lubrication. Si vous avez des dicultés, une légère application de graisse au lithium est recommandée.
OUTILS INCLUS :
F Clé L 6mm
F Clé L 6mm / Tournevis cruciforme
F Clé plate de 13mm / 17mm (x2)
PIÈCES INCLUSES :
F 1 châssis principal
F 1 châssis principal
F 2 guidons supérieurs
F 1 ensemble de guidon
F 2 repose-pieds
F 2 embouts de bras de manivelle
F 1 console
F 1 cordon d'alimentation
F 1 kit de matériel
F 1 bouteille de lubrifiant silicone
AVERTISSEMENT !
Il y a plusieurs points au cours du processus d'assemblage qui doivent faire
l'objet d'une attention particulière. Il est très important de suivre correctement
les instructions d'assemblage et de s'assurer que toutes les pièces sont
fermement serrées. Si les instructions d'assemblage ne sont pas suivies
correctement, il se pourrait que certaines pièces de l'équipement ne soient
pas serrées correctement, semblent lâches et provoquent des bruits agaçants.
Pour éviter d'endommager l'équipement, les instructions d'assemblage
doivent être vériées et des mesures correctives doivent être prises.
BESOIN D'AIDE ?
Si vous avez des questions ou si des pièces sont manquantes,
contactez l'assistance technique à la clientèle Horizon.
Avant de continuer, trouvez
le numéro de série de votre
équipement situé sur une
étiquette à code barres et
entrez-le dans l'espace
prévu ci-dessous.
NUMÉRO DE SÉRIE
NOM DU MODÈLE
HORIZON HT 5.0 PEAK TRAINER
* Utilisez les informations ci-dessus lorsque vous appelez pour un service.
FRANÇAIS

17
FRANÇAIS
A) GUIDON SUPÉRIEUR
B) CAPTEUR DE POULS
C) CONSOLE
D) MÂT DE CONSOLE
E) POIGNÉE DE TRANSPORT
F) PORTE-BIDON
G) RANGEMENT DES ACCESSOIRES
H) CHÂSSIS PRINCIPAL
I) GUIDON INFÉRIEUR
J) ÉVENT VENTILATEUR
K) MANIVELLE
L) BRAS DE MANIVELLE
M) PRISE DE CORDON D'ALIMENTATION
N) ROUES DE TRANSPORT
O) COUSSINETS DE PIEDS
P) BRAS DE LIAISON SUPÉRIEUR
Q) BRAS DE LIAISON INFÉRIEUR
R) CHÂSSIS PRINCIPAL
WARNING AVERTISSEMENT PRECAUCIÓN
UNPLUG BEFORE CLEANING
OR SERVICING TO REDUCE
THE RISK OF ELECTRIC
SHOCK OR INJURY FROM
MOVING PARTS.
DÉBRANCHEZ L'APPAREIL AVANT
NETTOYAGE OU ENTRETIEN AFIN DE
RÉDUIRE LE RISQUE
D'ÉLECTROCUTION OU DE BLESSURE
PAR DES PIÈCES EN MOUVEMENT.
DESENCHUFE LA MÁQUINA ANTES DE
LIMPIARLA O DE SOMETERLA A
MANTENIMIENTO PARA REDUCIR EL RIESGO DE
QUE SE PRODUZCAN DESCARGAS ELÉCTRICAS
O LESIONES POR PIEZAS MÓVILES.
- MAINTENEZ LES ENFANTS ÂGÉS DE MOINS DE 14 ANS
À L'ÉCART DE LA MACHINE.
- LES SYSTÈMES DE MESURE DE LA FRÉQUENCE CARDIAQUE PEUVENT
MANQUER DE PRÉCISION. UN ENTRAÎNEMENT EXCESSIF PEUT
OCCASIONNER DES BLESSURES GRAVES OU MÊME LA MORT. SI
VOUS VOUS SENTEZ FAIBLE, ARRÊTEZ L'EXERCICE IMMÉDIATEMENT.
AVERTISSEMENT
RISQUE DE BLESSURE PERSONNELLE:
- LISEZ LE GUIDE D'UTILISATION AVANT D'UTILISER LA MACHINE.
- N’UTILISEZ CET APPAREIL QUE POUR L’USAGE AUQUEL
IL EST DESTINÉ.
- CONSULTEZ VOTRE MÉDECIN AVANT D'UTILISER CET APPAREIL.
- CET APPAREIL CONVIENT À UN USAGE PAR LES
UTILISATEURS UNIQUEMENT.
A
CB
D
F
G
J
P
O
E
H
I
K
L
M
N
Q
R

18
A Ouverture du MATÉRIEL POUR L'ÉTAPE 1. Retirez l'emballage extérieur.
B Fixez LE CADRE DE BASE (2) au CADRE PRINCIPAL (1) en utilisant 4
BOULONS (A), 4 RONDELLES ÉLASTIQUES (B) et 4 RONDELLES PLATES
(C) à partir du haut et 2 BOULONS PLUS LONGS (E), 2 RONDELLES
ÉLASTIQUES (B) et 2 RONDELLES PLATES (C) à partir du bas.
C Insérez 2 COUVERCLES DE BOULON (D) comme indiqué.
D NÉCESSITE 2 PERSONNES : Soulevez et basculez le CADRE PRINCIPAL
(1) dans la position verticale. Retirez les BLOCS DE STYROMOUSSE (3).
3
A
B
C
A
B
C
C
B
E
1
2
D
4
Matériel pour l'étape 1
Description Qt2
A
B
C
D
E
Boulon (55 mm)
Rondelle élastique
Rondelle plate
Couvercles de boulon
Boulon (65 mm)
4
6
6
2
2
1 2
J
5
6
7
8
F
C
G
H
K
I
A Ouverture du MATÉRIEL POUR L'ÉTAPE 2.
B Fixez le BRAS DE MANIVELLE (5) au BRAS DE LIAISON SUPÉRIEUR (6)
en utilisant 1 BOULON (F), 2 RONDELLES PLATES (C) et 1 ÉCROU (G).
C Fixez le COUSSINET DE PIED (8) au BRAS DE LIAISON SUPÉRIEUR (6)
en utilisant 1 BOULON (H), 2 RONDELLE PLATE (I) et 1 ÉCROU (J).
D Fixez le COUSSINET DE PIED (8) au BRAS DE LIAISON INFÉRIEUR (7)
en utilisant 1 BOULON (K), 2 RONDELLE PLATE (I) et 1 ÉCROU (J).
E Répétez de l'autre côté.
Retirez les
liens torsadés
FRANÇAIS
Matériel pour l’étape 2
Description Qty
F
C
G
H
I
J
K
Boulon (50 mm)
Rondelle plate (M8)
Écrou (M8)
Bolt (130 mm)
Rondelle plate (M10)
Écrou (M10)
Boulon (100 mm)
2
4
2
2
8
4
2

19
9
P
12
129
O
B
N
13
11
A Ouverture du MATÉRIEL POUR L'ÉTAPE 3.
B Connectez les CÂBLES DE LA CONSOLE (9) et glissez-les
soigneusement dans le mât de la console.
C Fixez L'ENSEMBLE DE GUIDON (10) au MÂT DE CONSOLE (11)
en utilisant 2 BOULONS (L), 2 RONDELLES ÉLASTIQUES (B)
et 2 RONDELLES EN ARC (M) à partir de l'avant et 2
BOULONS (N), 2 RONDELLES ÉLASTIQUES (B) et 2 RONDELLES
PLATES (O) à partir des côtés.
Remarque : Veillez à ne pas pincer les fils lors de la fixation du mât.
4
9
10
M
B
L
11
O
B
N
3
L'ASSEMBLAGE EST TERMINÉ !
Matériel pour l'étape 3
Description Qty
L
B
M
N
O
Boulon (45 mm)
Rondelle élastique
Rondelle en arc
Boulon (20 mm)
Rondelle plate
2
4
2
2
2
A Ouverture du MATÉRIEL POUR L'ÉTAPE 4.
B Fixez les GUIDONS SUPÉRIEURS (12) au MÂT DE CONSOLE (11)
en utilisant 8 BOULONS (N), 8 RONDELLES ÉLASTIQUES (B)
et 8 RONDELLES PLATE (O).
C Connectez les CÂBLES DE LA CONSOLE (9) et glissez-les
soigneusement dans le mât de la console.
D Fixez la CONSOLE (13) en utilisant 4 VIS (P).
E Fixez les EMBOUTS DE BRAS DE MANIVELLE (129).
Remarque : Veillez à ne pas pincer les fils lors de la fixation de la console.
Matériel pour l’étape 4
Description Qty
N
B
O
P
129
Boulon (20 mm)
Rondelle élastique
Rondelle plate
Vis
Embouts de bras de
manivelle
8
8
8
4
2
FRANÇAIS

20
FONCTIONNEMENT DE BASE
SUPERFICIE LIBRE
0,6 m (24 pOuces)
EMPLACEMENT DE L'ÉQUIPEMENT
Placez l'équipement sur une surface de niveau.
Pour faciliter l’accès, il doit y avoir un espace accessible
des deux côtés et derrière l’équipement mesurant
au moins 0,6 mètre (24 pouces). Laissez un espace
de 15 cm (6 pouces) devant l’appareil. Ne placez
pas l'équipement dans un endroit où il serait
susceptible de bloquer les ouvertures d'aération
ou de ventilation. L'équipement ne doit pas être situé
dans un garage, sur une terrasse couverte, près de
l'eau ou à l'extérieur.
EMPREINTE DE L'ÉQUIPEMENT
118 × 71 × 168 cm / 46,5 × 28 × 68 pouces
POIDS DE L'ÉQUIPEMENT
70,4 kg / 155 livres
1
2
NIVELLEMENT DE L'ÉQUIPEMENT
Il est extrêmement important que les niveleurs
soient correctement ajustés pour un fonctionnement
correct. Tournez le pied de nivellement dans le sens
horaire pour abaisser l'appareil et dans l'autre sens
pour le relever. Ajustez chaque côté si nécessaire
jusqu'à ce que l'équipement soit à niveau. Un appareil
non équilibré peut provoquer un défaut d'alignement
de la courroie ou d'autres problèmes. L'utilisation
d'un niveau est recommandée.
DÉPLACEMENT DE L'ÉQUIPEMENT
Pour le déplacer, saisissez fermement la poignée
de transport, inclinez l'équipement vers l'arrière (1)
et faites-le rouler (2).
AVERTISSEMENT !
Notre équipement est lourd ; prenez des précautions et
demandez de l'aide supplémentaire si nécessaire quand
vous le déplacez ou le relevez. Le non-respect de ces
instructions peut entraîner des blessures.
15 cm
(6 pOuces)
AVAnt
FRANÇAIS
La page est en cours de chargement...
La page est en cours de chargement...
La page est en cours de chargement...
La page est en cours de chargement...
La page est en cours de chargement...
La page est en cours de chargement...
La page est en cours de chargement...
La page est en cours de chargement...
La page est en cours de chargement...
La page est en cours de chargement...
La page est en cours de chargement...
La page est en cours de chargement...
La page est en cours de chargement...
La page est en cours de chargement...
La page est en cours de chargement...
La page est en cours de chargement...
La page est en cours de chargement...
La page est en cours de chargement...
La page est en cours de chargement...
La page est en cours de chargement...
La page est en cours de chargement...
La page est en cours de chargement...
La page est en cours de chargement...
La page est en cours de chargement...
-
 1
1
-
 2
2
-
 3
3
-
 4
4
-
 5
5
-
 6
6
-
 7
7
-
 8
8
-
 9
9
-
 10
10
-
 11
11
-
 12
12
-
 13
13
-
 14
14
-
 15
15
-
 16
16
-
 17
17
-
 18
18
-
 19
19
-
 20
20
-
 21
21
-
 22
22
-
 23
23
-
 24
24
-
 25
25
-
 26
26
-
 27
27
-
 28
28
-
 29
29
-
 30
30
-
 31
31
-
 32
32
-
 33
33
-
 34
34
-
 35
35
-
 36
36
-
 37
37
-
 38
38
-
 39
39
-
 40
40
-
 41
41
-
 42
42
-
 43
43
-
 44
44


