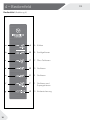
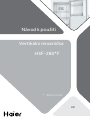
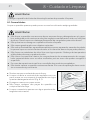
Haier H3F-280WF Le manuel du propriétaire
- Taper
- Le manuel du propriétaire

EN
User Manual
Upright Freezer
H3F-280*F
* - Colour code

Thank You
EN
2
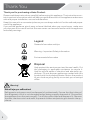
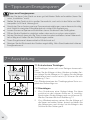
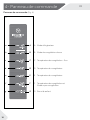
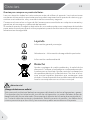
Legend
General information and tips
Warning – Important Safety information
Environmental information
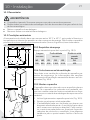
Disposal
Help protect the environment and human health. Put
the packaging in applicable containers to recycle it.
Help to recycle waste of electrical and electronic ap-
pliances. Do not dispose appliances marked with this
symbol with the household waste. Return the product
to your local recycling facility or contact your municipal
oce.
Thank you for purchasing a Haier Product.
Please read these instructions carefully before using this appliance. The instructions con-
tain important information which will help you get the best out of the appliance and ensure
safe and proper installation, use and maintenance.
Keep this manual in a convenient place so you can always refer to it for the safe and proper
use of the appliance.
If you sell the appliance, give it away, or leave it behind when you move house, make sure
you also pass this manual so that the new owner can become familiar with the appliance
and safety warnings.
Warning!
Risk of injury or suocation!
Refrigerants and gases must be disposed of professionally. Ensure that the tubing of
the refrigerant circuit is not damaged before being properly disposed of. Disconnect
the appliance from the mains supply. Cut o the mains cable and dispose of it. Remove
the door, the door catch and seals, to prevent children and pets to get closed in the ap-
pliance.

EN
Content
3
1 - Safety .................................................................................................................................................4
2 - Intended Use .................................................................................................................................... 8
3 - Product Description .......................................................................................................................9
4 - Control panel ................................................................................................................................. 10
5 - Use ................................................................................................................................................... 11
6 - Energy saving ................................................................................................................................ 11
7 - Equipment ..................................................................................................................................... 11
8 - Care and Cleaning ........................................................................................................................ 15
9 - Troubleshooting ........................................................................................................................... 17
10 - Installation ................................................................................................................................... 20
11 - Technical Data ............................................................................................................................ 24
12 - Customer Service...................................................................................................................... 25

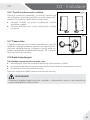
1 - Safety
EN
4
WARNING!
Before rst use
▶ Make sure there is no transport damage.
▶ Remove all packaging and keep out of children´s reach.
▶ Wait at least six hours before installing the appliance in order to
ensure the refrigerant circuit is fully ecient.
▶ Handle the appliance always with at least two persons because it
is heavy.
Installation
▶ The appliance should be placed in a well-ventilated place. Ensure
a space of at least 10 cm above and around the appliance.
▶ Do not cover air vent openings.
▶ Never place the appliance in a damp area or location where it
might be splashed with water. Clean and dry water splashes and
stains with a soft clean cloth.
▶ Do not install the appliance in direct sunlight or in the near of heat
sources(e.g. stoves, heaters).
▶ Install and level the appliance in an area suitable for its size and use.
▶ Keep ventilation openings in the appliance or in the in-built struc-
ture clear of obstruction.
▶ Make sure that the electrical information on the rating plate agrees
with the power supply. If it does not, contact an electrician.
▶ The appliance is operated by a 220-240 VAC/50 Hz power sup-
ply. Abnormal voltage uctuation may cause the appliance to fail
to start, or damage to the temperature control or compressor, or
there may be an abnormal noise when operating. In such case, an
automatic regulator shall be mounted.
▶ Use a separate earthed socket for the power supply which is ea-
syly accessible during cleaning. The appliance must be earthed.
▶ Only for UK: The appliance’s power cable is tted with 3-cord
(grounding) plug that ts a standard 3-cord (grounded) socket.
Never cut o or dismount the third pin (grounding). After the ap-
pliance is installed, the plug should be accessible.
▶ Do not use multi-plug adapters and extension cables.
▶ Ensure that the power cable is not trapped by the freezer. Do not
step on the power cable.
▶ Do not damage the refrigerant circuit.
Before switching on the appliance for the rst time, read the following safety
hints!:

EN
1 - Safety
5
WARNING!
Daily use
▶ This appliance can be used by children aged from 8 years and
above and persons with reduced physical, sensory or mental ca-
pabilities or lack of experience and knowledge if they have been
given supervision or instruction concerning use of the appliance
in a safe way and understand the hazards involved.
▶ Keep away children under 3 years of age from the appliance un-
less they are constantly supervised.
▶ Children shall not play with the appliance.
▶ If cool gas or other inammable gas is leaking in the vicinity of the
appliance, turn o the valve of the leaking gas, open the doors
and windows and do not unplug a plug in the power cable of the
freezer or any other appliance.
▶ Notice that the appliance is set for operation at a specic ambient
range between 10 and 43 °C. The appliance may not work prop-
erly if it is left for a long period at a temperature above or below
the indicated range.
▶ Do not place unstable articles (heavy objects, containers lled
with water) on top of the freezer, to ovoid personal injury caused
by falling or electric shock caused by contact with water.
▶ Open and close the doors only with the handles. The gap between
the doors and between the doors and the cabinet is very narrow.
Do not extend your hands in these areas to avoid pinching your
ngers. Open or close the freezer doors only when there are no
children standing within the range of door movement.
▶ Do not store or use inammable, explosive or corrosive materials
in the appliance or in the vicinity.
▶ Do not store medicines, bacteria or chemical agents in the ap-
pliance. This appliance is a household appliance. It is not recom-
mended to store materials that require strict temperatures.
▶ Never store liquids in bottles or cans (besides high percentage
spirits) especially carbonated beverages in the freezer, as these
will burst during freezing.
▶ Check the condition of food if a warming in the freezer has taken place.
▶ Do not set unnecessarily low temperature in the freezer com-
partment. Attention: Bottles can burst.

1 - Safety
EN
6
WARNING!
Daily use
▶ Do not touch frozen goods with wet hands (wear gloves). Espe-
cially do not eat ice lollies immediately after removal from the
freezer compartment. There is the risk to freeze or the formation
of frost blisters. FIRST aid: keep immediately under running cold
water. Do not pull away!
▶ Do not touch the inside surface of the freezer when in operation,
especially with wet hands. Your hands may freeze onto the sur-
face.
▶ Unplug the appliance in the event of a power interruption or be-
fore cleaning. Allow at least 5 minutes before restarting the appli-
ance, as frequent starting may damage the compressor.
▶ Do not use electrical devices inside the food storage compart-
ments of the appliance, unless they are of the type recommend-
ed by the manufacturer.
Maintenance/cleaning
▶ Make sure children are supervised if they carry out cleaning and
maintenance.
▶ Disconnect the appliance from the electrical supply before un-
dertaking any routine maintenance. Allow at least 5 minutes be-
fore restarting the appliance, as frequent starting may damage
the compressor.
▶ Hold the plug, not the cable, when unplugging the appliance.
▶ Do not scrape o frost and ice with sharp objects. Do not use
sprays, electric heaters like heater, hair dryer, steam cleaners or
other sources of heat in order to avoid damage to the plastic parts.
▶ Do not use mechanical devices or other means to accelerate the
defrosting process, other than those recommended by the man-
ufacturer.
▶ Do not spray or ush the appliance during cleaning.
▶ Do not use water spray or steam to clean the appliance.
▶ If the supply cord is damaged, it must be replaced by the manu-
facturer, its service agent or similarly qualied persons in order to
avoid a hazard.
▶ Do not try to repair, disassemble or modify the appliance by your-
self. In case of repair please contact our customer service.

EN
1 - Safety
7
WARNING!
The appliance contains the ammable refrigerant ISOBUTHANE
(R600a). Make sure the refrigerant circuit is not damaged during
transportation or installation. Leaking refrigerant may cause eye
injuries or ignite. If a damage has occurred, keep away open re
sources, thoroughly ventilate the room, do not plug or unplug the
power cords of the appliance or any other appliance. Inform the
customer service.
In case of eyes get into contact with the refrigerant, rinse immedi-
ately it under running water and call immediately the eye specialist.
Refrigerant gas information
WARNING!
▶ Taking care to avoid causing a re by igniting ammable material.
▶ WARNING: When positioning the appliance, ensure the supply
cord is not trapped or damaged.
▶ WARNING: Do not locate multiple portable socket-outlets or
portable power supplies at the rear of the appliance.
▶ Do not store explosive substances such as aerosol cans with a
ammable propellant in this appliance.
▶ For ammable refrigerants is used in the freezer, please be care-
ful when installing, handling, serving and recycling the appliance.
▶ Please contact to the service agent to dispose the appliance be-
cause the ammable blowing gas was used.

2 - Intended use
EN
8
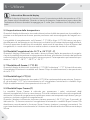
2.1 Intended Use
“This appliance is intended to be used in household and similar applications such as
– sta kitchen areas in shops, oces and other working environments;
– farm houses and by clients in hotels, motels and other residential type environments;
– bed and breakfast type environments;
– catering and similar non-retail applications.
This appliance is intended for freezing food. It has been designed exclusively for use in dry-
interior house-holds. It is not intended for commercial or industrial use. On demand this
appliance can be used as fresh food compartment.
Changes or modications to the device are not allowed. Unintended use may cause haz-
ards and loss of warranty claims.
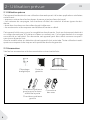
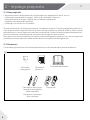
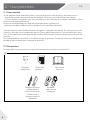
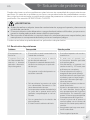
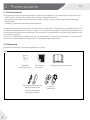
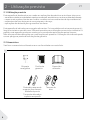
2.2 Accessories
Check the accessories and literature in accordance with this list:
User manualWarranty cardEnergy
label
Axe covers
Upper left
hinge for door
reversibility
Upper left
hinge cover
2.2

EN
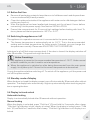
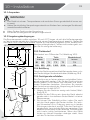
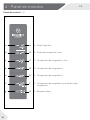
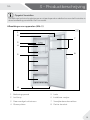
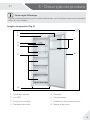
3 - Product description
9
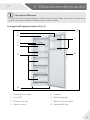
Notice: Dierences
Due to technical changes and dierent models, some of the illustrations in this manual
may dier from your model.
Picture of appliance (Fig. 3)
1 Control panel
2 LED light
3 Multi-air ow
4 Glass shelves
5 Drawers
6 Adjustable feet
7 Removable door racks
8 Door handle
3
7
8
2
1
3
6
4
5

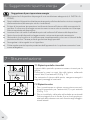
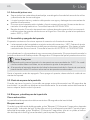
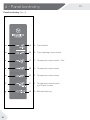
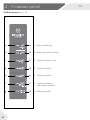
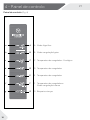
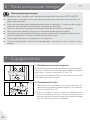
4 - Control panel
EN
10
Control panel
(Fig. 4)
A Fridge mode
B Soft freeze mode
C Freeze temperature - Eco
D Freeze temperature
E Freeze temperature
F Freeze temperature and
Super freeze mode
G Child lock
4
A
a
D
d
C
c
B
b
G
g
E
e
F
f

EN
5 - Use
11
5.1 Before rst Use
▶ Remove all packaging materials, keep them out of childrens reach and dispose them
in an environmentally friendly manner.
▶ Clean the inside and outside of the appliance with water and a mild detergent before
putting any food in it.
▶ After the appliance has been levelled and cleaned, wait for at least 6 hours before
connecting it to the power supply. See Section INSTALLATION.
▶ Precool the compartment for 2 hours at high settings before loading with food. To
do so, please set the temperature to -20 °C or -24 °C.
5.2 Switching the appliance on /o
The appliance is in operation as soon as it is connected to the power supply.
▶ The freezer temperature is automatically set to -18 °C. This is the recommended
setting and the ideal temperature for frozen goods. If desired, you can change the
temperatures manually. Please see ADJUSTING THE TEMPERATURE.
Indicators (a-g) will ash once consequtively. If the door is closed, the display switches o
after 30 seconds. The panel lock might be active.
Notice: Presettings
▶ The appliance is preset to the recommended temperature of -18 °C. Under normal
ambient condition you don´t need to set a temperature.
▶ When the appliance is switched on after being disconnected from the main power
supply, it may take up to 12 hours for the correct temperature to be reached.
Empty the appliance before switching o. To switch o the appliance, pull the power cord
out o the power socket.
5.3 Standby-mode of display
When the door is closed the display screen turns o automatically 30 seconds after without
operation. The display locks automatically. It lights up automatically when touching any but-
ton or opening the door.
5.4 Display lock and unlock
Automatic locking
Display is automatically locked after 30 seconds without operation.
Manual locking
When the display is unlocked, press “Child lock” (G) and hold for 3 seconds, after a beep,
“Child lock”(g) indicator is light, display is locked. When the display is locked, press “Child
lock” (G) and hold for 3 seconds, after a beep, “Child lock”(g) indicator is o, display is un-
locked.

5 - Use
EN
12
Notice: Display lock
When display is locked, functions such as temperature setting or super freeze are di-
sabled. When above operation is attempted, Child lock indicator will blink for 3 times, to
remind that the display is locked.
5.5 Temperature setting
When display is unlocked, by touching dierent temperature buttons, dierent tempera-
ture could be set, this process will be accompanied by beeps.
Freeze, soft freeze(-7°C)(B) and Fridge(4°C)(A) mode has big dierence in temperature,
and is for dierent food storage. Prior to making any mode change, please make sure to
change the food inside the freezer, so that food will not be damaged because of mode
change.
5.6 Freeze mode (-16°C to -24°C) (C - F)
When display is unlocked, by touching dierent freeze temperature buttons, dierent
temperature could be set, indicators on left of the touch button will be light and others
will be o. Temperature could be set to “-16°C”,“-18°C”, “-20°C” and “-24°C”.
5.7 Soft freeze mode (-7°C) (B)
When display is unlocked, by touching (-7°C) (B), indicator “-7°C” (b) will be light, the free-
zer works in soft freeze mode. After stabilization, temperature is around -7°C.
5.8 Fridge mode(4°C) (A)
When display is unlocked, by touching (4°C) (A) and hold for 3 seconds, indicators “4°C”(a)
will be light, the freezer works in fridge mode. After stabilization, temperature is around
4°C.
5.9 Super freeze mode (F)
Super freeze mode is optimal for preserving food nutrition, it could freeze food in less
time. Before putting lots of food inside the freezer, activate super freeze function to have
lower temperature, to make sure better freeze result.
When display is unlocked, touch and hold (-24°C) (F) for 3 seconds, indicators (b - f) will
be light, the freezer works in super freeze mode. To deactivate manually super freeze
function, repeat steps above. If not deactivated manually, the function will be deactivated
automatically after 50 hours.
If you have a large amount of food to freeze at one time, it is recommended that the
function is activated 24 hours before inserting food. Function will stop automatically af-
ter 50 hours or manually. Power consumption will increase when this function is on.
Notice: Super freeze
In super freeze mode, temperature could not be adjusted. If you do so, super freeze
indicator will blink for 3 times to remind that the freezer is in super freeze mode.

EN
5 - Use
13
5.10 Eco mode (-16°C) (C)
When display is unlocked, by touching (-16°C) (C) the appliance is set into Eco mode. In
this mode the energy consumption is lower, while apropriate freezing performance is still
guaranteed. To exit the Eco mode select other temperature.
5.11 Power-o memory
This freezer has power-o memory, settings before power-o will be memorized. When
power is back on, freezer will return to settings before power-o and continue to func-
tion. Child lock is not memorized, after power back on, display is unlocked.
5.12 Door open alarm
When freezer is kept open for more than 1 minute, beeper will make 3 beeps with interval
of 0.5 second. The beeps will be repeated every 30 seconds if door is kept open. The
beeps will stop until door is closed or after 7 mins of door opening. The beeper stops
beeping and freezer light goes o.
5.13 High temperature alarm
This freezer is equipped with high temperature alarm. In freeze mode or super freeze
mode, if current temperature setting indicator blinks with beeps, touch any button, the
beep will stop, but current temperature setting indicator keeps blinking, that means tem-
perature in the freezer is too high. Please check if freezer door is tightly closed or if large
amount of warm food is put inside the freezer. After a period, current temperature in-
dicator will stop blinking. If it does not stop blinking for a long period, and beeps that are
manually cancelled come back, please contact aftersales service.
5.14 Error indication
This freezer is equipped with error indication. When an error is encountered, display will
blink every 1/4 second dierent codes for dierent errors. In this situation, the freezer
could still freeze but user should contact aftersales service as soon as possible for opti-
mal control of the freezer.

6 - Energy saving tips
EN
7 - Equipment
14
Energy saving tips
▶ Make sure the appliance is properly ventilated (see INSTALLATION).
▶ Do not install the appliance in direct sunlight or in the near of heat sources (e.g.
stoves, heaters).
▶ Avoid unnecessarily low temperature in the appliance. The energy consumption in-
creases the lower the temperature in the appliance is set.
▶ Allow warm food to cool down before placing it in the appliance.
▶ Open the appliance door as little and as briey as possible.
▶ Make sure the door always closes correctly and unimpaired by food position. Keep
door seals clean.
▶ Defreeze frozen food in a fridge.
▶ Clean the rear of the appliance regularly. Dust increases energy consumption.
7.1 Removable door racks
The door rack can be removed for cleaning:
Place hands on each side of the rack, lift it upwards (1)
and pull it out (2) (Fig. 7.3).
In order to insert the door rack, the above steps are
carried out in reverse order.
7.2 Glass shelves
1. To take out a shelf, remove it rst by uplifting its hind
edge (1) and pulling it out (2) (Fig. 7.2).
2. To reinstall it, put it on the lugs on both sides and
push it to the most rearward position until the rear
of the shelf is xed inside the slots in the sides
1
2
1
7.1
7.2

EN
8- Care and Cleaning
15
WARNING!
Disconnect the appliance from the power supply before cleaning.
8.1 General
Clean the appliance when only little or no food is stored.
WARNING!
▶ Do not clean the appliance with hard brushes, wire brushes, detergent powder, petrol,
amyl acetate, acetone and similar organic solutions, acid or alkaline solutions. Please
clean with special freezer detergent to avoid damage.
▶ Do not spray or ush the appliance during cleaning.
▶ Do not scrape o frost and ice with sharp objects.
▶ Do not use sprays, electric heaters like heater, hair dryer, steam cleaners or other
sources of heat in order to avoid damage to the plastic parts.
▶ Do not clean the cold glass shelves with hot water. Sudden temperature change may
cause the glass to break .
▶ Do not touch the inside surface of the freezer storage compartment, especially with
wet hands, as your hands may freeze onto the surface.
▶ In case of heating check the condition of frozen goods.
▶ Do not try to repair the appliance by yourself. In case of repair please contact our
customer service.
▶ Always keep the door gasket clean.
▶ Clean the inside and housing of the appliance with a
soft cloth or sponge dampened in warm water and
neutral detergent (Fig. 8.1).
▶ Rinse and dry with soft cloth.
▶ Do not clean any of the parts of the appliance in a
dishwasher.
▶ Clean the accessory only with warm water and mild
neutral detergent.
8.1

8- Care and Cleaning
EN
16
8.2 Non-use for a longer period
If the appliance is not used for an extended period of time:
▶ Take out the food.
▶ Unplug the power cord.
▶ Clean the appliance as described above.
▶ Keep the door and freezer drawers open to prevent the creation of bad odours inside.
Remove the door of the appliance (open the door and hold it before removing the screws)
to avoid children entering into the appliance and getting locked in.
Notice: Switch o
To ensure the service life of the appliance, only turn it o only if strictly necessary.
8.3 Moving the appliance
1. Remove all food and unplug the appliance.
2. Secure shelves and other moveable parts in the freezer with adhesive tape.
3. Close the door and secure it with tape.
4. Do not tilt the freezer more than 45° to avoid damaging the refrigerating system.
5. Wrap the feet of the freezer to avoid scratching the oor. Never move the freezer
forcefully.
WARNING!
▶ Do not lift the appliance by its handles.
▶ Never place the appliance horizontally on the ground.

EN
9 - Troubleshooting
17
Many occuring problems could be solved by yourself without specic expertise. In case
of a problem please check all shown possibilities and follow below instructions before you
contact an after sales service. See CUSTOMER SERVICE.
WARNING!
▶ Before maintenance, deactivate the appliance and disconnect the mains plug from
the mains socket.
▶ Electrical equipment should be serviced only by qualied electrical experts, because
improper repairs can cause considerable consequential damages.
▶ A damaged supply should only be replaced by the manufacturer, its service agent or
similarly qualied persons in order to avoid a hazard.
The acoustic alarm can be switched o by pressing any button..
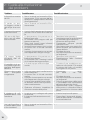
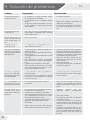
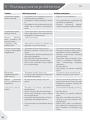
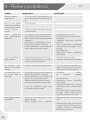
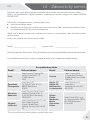
9.1 Troubleshooting
Problem Possible Cause Possible Solution
The compressor
does not work.
• Mains plug is not connected in the
mains socket.
• Connect the mains plug.
The appliance runs
frequently or for a
too long period of
time.
• The indoor or outdoor tempera-
ture is too high.
• The appliance has been o power
for a period of time.
• The door of the appliance is not
tightly closed.
• The door has been opened too
frequently or for too long.
• The temperature setting is too low.
• The door gasket is dirty, worn,
cracked or mis-matched.
• The required air circulation is not
guaranteed.
• The interior is covered in ice.
• In this case, it is normal for the
appliance to run longer.
• Normally, it takes 8 to 12 hours
for the appliance to cool down
completely.
• Close the door and ensure the
appliance is located on a level
ground and there is no food or
container jarring the door.
• Do not open the door too fre-
quently.
• Set the temperature higher un-
til a satisfactory temperature is
obtained. It takes 24 hours for
the temperature to become
stable.
• Clean the door gasket or re-
place them by the customer
service.
• Ensure adequate ventilation.
• Defrost the appliance.
The appliance
makes abnormal
sounds.
• The appliance is not located on
level ground.
• The appliance touches an object
close to it.
• The appliance stands on a wooden
oor or near wooden walls.
• Level the appliance.
• Remove objects around the
appliance.
• Wood amplies the sound. Set
the appliance somewhere else.

9 - Troubleshooting
EN
18
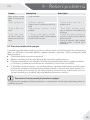
Problem Possible Cause Possible Solution
The appliance
makes a clicking
sound
• This is normal. It is caused by the
refrigeration unit switching on or
o.
• -
A slight sound is to
be heard similar to
that of owing wa-
ter.
• This is normal. • -
The appliance makes a
motor sound
• The refrigeration unit has just
turned itself on. This is normal
• -
It is not cold enough
inside th
e appli-
ance.
• The temperature is set too high.
• Goods that are too warm have
been stored.
• Too much food has been stored at
a time.
• The goods are too close to each
other.
• The door is not tightly closed.
• The door has been opened too
frequently or for too long.
• Reset the temperature.
• Always cool down goods be-
fore storing them.
• Always store small quantities of
food.
• Leave a gap between several
foods allowing air owing.
• Close the door.
• Do not open the door too fre-
quently.
It is too cold
inside
th
e appliance.
• The temperature is set too low.
• The Fast-freezing function is ac-
tivated or has been running too
long.
• Reset the temperature.
• Switch o the Fast-freezing
function.
Moist
ure accumu-
lates on the surface
of the appliance
.
• The climate is too warm and too
damp.
• This is normal in damp climate
and will change when the hu-
midity decreases. Wipe dry with
a cloth.
Strong ice and frost
in the freezer com-
partment.
• The goods were not adequately
packaged .
• The door is not tightly closed.
• The door has been opened too
frequently or for too long.
• The door gasket is dirty, worn,
cracked or mis-matched.
• Something on the inside prevents
the door from closing properly.
• Always pack the goods well.
• Close the door.
• Do not open the door too fre-
quently.
• Clean the door gasket or re-
place them by the customer
service.
• Reposition the shelves, door
racks, or internal containers to
allow the door to close.
Th
e cooling system
does n
ot work.
• Mains plug is not connected to the
mains socket.
• The power supply is not intact.
• Connect the mains plug.
• Check the electrical supply to
the room. Call the local elec-
tricity company!

EN
9 - Troubleshooting
19
Problem Possible Cause Possible Solution
The sides of the
cabinet and door
strip get warm.
• This is normal. • -
You hear an alarm
signal.
• The door is open
• The temperature inside product is
too high
• Close the door or silence the
alarm manually.
The door is diucult
to open.
• Once the appliance runs, it has an
internal vacuum.
• Open the door seal gently to let
air enter the appliacne.
The door can’t be
closed properly. It
always leaves a gap.
• Because of the appliances’s low
temperature, the door seal can
easily get hard and deformed.
• Use a hair dryer or put a hot
towel on the spot where the
gasket is deformed.
• When the gasket is soft once
again, close the door and com-
press it tightly.
9.2 Power Interruption
In the event of a power cut, food should remain safely cold for about 18 hours. Follow
these tips during a prolonged power interruption, especially in summer:
▶ Open the door as few times as possible.
▶ Do not put additional food into the freezer during a power interruption.
▶ If prior notice of a power interruption is given and the interruption duration is longer
than 15 hours, make some ice and put it in a container in the top of the freezer com-
partment.
▶ As temperature in the freezer will rise during a power interruption or other failure,
the storage period and edible quality of food will be reduced. Any food that defrosts
should be either consumed, or cooked and refrozen (where suitable) soon after-
wards in order to prevent health risks.
Notice: Memory function during power interruption
After restoration of power the appliance continues with the settings that were set be-
fore the power failure.

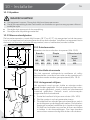
10 - Installation
EN
20
10.1 Unpacking
▶
WARNING!
▶ The appliance is heavy. Always handle with at least two persons.
▶ Keep all packaging materials out of childrens reach and dispose them in an environ-
mentally friendly manner.
Take the appliance out of the packaging.
▶ Remove all packaging materials.
10.2 Environmental conditions
The room temperature should always be between 18 °C and 43 °C, since it can inuence
the temperature inside the appliance and its energy consumption. Do not install the appli-
ance near other heat-emitting appliances (ovens, refrigerators) without isolation.
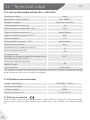
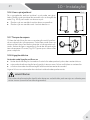
10.3 Space requirements
Required space to open the door (Fig. 10.3):
Width
in mm
Depth
in mm
Distance to wall
in mm
W1 W2 D1 D2 D3 D4
595 955 592 1105 1215 100
10.4 Ventilaton cross-section
To achieve sucient ventilation of the appliance for
safety reasons, the information of the required ventila-
tion cross sections must be observed (Fig. 10.4).
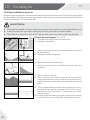
10.5 Aligning the appliance
The appliance should be placed on a at and solid sur-
face. If the appliance is placed on a pedestal, strong and
re-resistant materials must be used. Never use the
foam packing material as a pedestal.
1. Tilt the appliance slightly backwards (Fig. 10.5).
2. Set the feet to the desired level.
3. The stability can be checked by alternately bump-
ing on the diagonals. The slight swaying should be
the same in both directions. Otherwise the frame
can warp; possible leaking door seals are the result.
A low tendency to the rear eases the closing of the
door.
W2
D1
D3
D2
W1
D4
10.3
10 cm
10 cm
10 cm
10 cm
10.4
max 45°
1.
2.
3.
10.5
La page charge ...
La page charge ...
La page charge ...
La page charge ...
La page charge ...
La page charge ...
La page charge ...
La page charge ...
La page charge ...
La page charge ...
La page charge ...
La page charge ...
La page charge ...
La page charge ...
La page charge ...
La page charge ...
La page charge ...
La page charge ...
La page charge ...
La page charge ...
La page charge ...
La page charge ...
La page charge ...
La page charge ...
La page charge ...
La page charge ...
La page charge ...
La page charge ...
La page charge ...
La page charge ...
La page charge ...
La page charge ...
La page charge ...
La page charge ...
La page charge ...
La page charge ...
La page charge ...
La page charge ...
La page charge ...
La page charge ...
La page charge ...
La page charge ...
La page charge ...
La page charge ...
La page charge ...
La page charge ...
La page charge ...
La page charge ...
La page charge ...
La page charge ...
La page charge ...
La page charge ...
La page charge ...
La page charge ...
La page charge ...
La page charge ...
La page charge ...
La page charge ...
La page charge ...
La page charge ...
La page charge ...
La page charge ...
La page charge ...
La page charge ...
La page charge ...
La page charge ...
La page charge ...
La page charge ...
La page charge ...
La page charge ...
La page charge ...
La page charge ...
La page charge ...
La page charge ...
La page charge ...
La page charge ...
La page charge ...
La page charge ...
La page charge ...
La page charge ...
La page charge ...
La page charge ...
La page charge ...
La page charge ...
La page charge ...
La page charge ...
La page charge ...
La page charge ...
La page charge ...
La page charge ...
La page charge ...
La page charge ...
La page charge ...
La page charge ...
La page charge ...
La page charge ...
La page charge ...
La page charge ...
La page charge ...
La page charge ...
La page charge ...
La page charge ...
La page charge ...
La page charge ...
La page charge ...
La page charge ...
La page charge ...
La page charge ...
La page charge ...
La page charge ...
La page charge ...
La page charge ...
La page charge ...
La page charge ...
La page charge ...
La page charge ...
La page charge ...
La page charge ...
La page charge ...
La page charge ...
La page charge ...
La page charge ...
La page charge ...
La page charge ...
La page charge ...
La page charge ...
La page charge ...
La page charge ...
La page charge ...
La page charge ...
La page charge ...
La page charge ...
La page charge ...
La page charge ...
La page charge ...
La page charge ...
La page charge ...
La page charge ...
La page charge ...
La page charge ...
La page charge ...
La page charge ...
La page charge ...
La page charge ...
La page charge ...
La page charge ...
La page charge ...
La page charge ...
La page charge ...
La page charge ...
La page charge ...
La page charge ...
La page charge ...
La page charge ...
La page charge ...
La page charge ...
La page charge ...
La page charge ...
La page charge ...
La page charge ...
La page charge ...
La page charge ...
La page charge ...
La page charge ...
La page charge ...
La page charge ...
La page charge ...
La page charge ...
La page charge ...
La page charge ...
La page charge ...
La page charge ...
La page charge ...
La page charge ...
La page charge ...
La page charge ...
La page charge ...
La page charge ...
La page charge ...
La page charge ...
La page charge ...
La page charge ...
La page charge ...
La page charge ...
La page charge ...
La page charge ...
La page charge ...
La page charge ...
La page charge ...
La page charge ...
La page charge ...
La page charge ...
La page charge ...
La page charge ...
La page charge ...
La page charge ...
La page charge ...
La page charge ...
La page charge ...
La page charge ...
La page charge ...
La page charge ...
La page charge ...
La page charge ...
La page charge ...
La page charge ...
La page charge ...
La page charge ...
La page charge ...
La page charge ...
La page charge ...
La page charge ...
La page charge ...
La page charge ...
-
 1
1
-
 2
2
-
 3
3
-
 4
4
-
 5
5
-
 6
6
-
 7
7
-
 8
8
-
 9
9
-
 10
10
-
 11
11
-
 12
12
-
 13
13
-
 14
14
-
 15
15
-
 16
16
-
 17
17
-
 18
18
-
 19
19
-
 20
20
-
 21
21
-
 22
22
-
 23
23
-
 24
24
-
 25
25
-
 26
26
-
 27
27
-
 28
28
-
 29
29
-
 30
30
-
 31
31
-
 32
32
-
 33
33
-
 34
34
-
 35
35
-
 36
36
-
 37
37
-
 38
38
-
 39
39
-
 40
40
-
 41
41
-
 42
42
-
 43
43
-
 44
44
-
 45
45
-
 46
46
-
 47
47
-
 48
48
-
 49
49
-
 50
50
-
 51
51
-
 52
52
-
 53
53
-
 54
54
-
 55
55
-
 56
56
-
 57
57
-
 58
58
-
 59
59
-
 60
60
-
 61
61
-
 62
62
-
 63
63
-
 64
64
-
 65
65
-
 66
66
-
 67
67
-
 68
68
-
 69
69
-
 70
70
-
 71
71
-
 72
72
-
 73
73
-
 74
74
-
 75
75
-
 76
76
-
 77
77
-
 78
78
-
 79
79
-
 80
80
-
 81
81
-
 82
82
-
 83
83
-
 84
84
-
 85
85
-
 86
86
-
 87
87
-
 88
88
-
 89
89
-
 90
90
-
 91
91
-
 92
92
-
 93
93
-
 94
94
-
 95
95
-
 96
96
-
 97
97
-
 98
98
-
 99
99
-
 100
100
-
 101
101
-
 102
102
-
 103
103
-
 104
104
-
 105
105
-
 106
106
-
 107
107
-
 108
108
-
 109
109
-
 110
110
-
 111
111
-
 112
112
-
 113
113
-
 114
114
-
 115
115
-
 116
116
-
 117
117
-
 118
118
-
 119
119
-
 120
120
-
 121
121
-
 122
122
-
 123
123
-
 124
124
-
 125
125
-
 126
126
-
 127
127
-
 128
128
-
 129
129
-
 130
130
-
 131
131
-
 132
132
-
 133
133
-
 134
134
-
 135
135
-
 136
136
-
 137
137
-
 138
138
-
 139
139
-
 140
140
-
 141
141
-
 142
142
-
 143
143
-
 144
144
-
 145
145
-
 146
146
-
 147
147
-
 148
148
-
 149
149
-
 150
150
-
 151
151
-
 152
152
-
 153
153
-
 154
154
-
 155
155
-
 156
156
-
 157
157
-
 158
158
-
 159
159
-
 160
160
-
 161
161
-
 162
162
-
 163
163
-
 164
164
-
 165
165
-
 166
166
-
 167
167
-
 168
168
-
 169
169
-
 170
170
-
 171
171
-
 172
172
-
 173
173
-
 174
174
-
 175
175
-
 176
176
-
 177
177
-
 178
178
-
 179
179
-
 180
180
-
 181
181
-
 182
182
-
 183
183
-
 184
184
-
 185
185
-
 186
186
-
 187
187
-
 188
188
-
 189
189
-
 190
190
-
 191
191
-
 192
192
-
 193
193
-
 194
194
-
 195
195
-
 196
196
-
 197
197
-
 198
198
-
 199
199
-
 200
200
-
 201
201
-
 202
202
-
 203
203
-
 204
204
-
 205
205
-
 206
206
-
 207
207
-
 208
208
-
 209
209
-
 210
210
-
 211
211
-
 212
212
-
 213
213
-
 214
214
-
 215
215
-
 216
216
-
 217
217
-
 218
218
-
 219
219
-
 220
220
-
 221
221
-
 222
222
-
 223
223
-
 224
224
-
 225
225
-
 226
226
-
 227
227
-
 228
228
-
 229
229
-
 230
230
-
 231
231
-
 232
232
-
 233
233
-
 234
234


Haier H3F-280WF Le manuel du propriétaire
- Taper
- Le manuel du propriétaire
dans d''autres langues
- italiano: Haier H3F-280WF Manuale del proprietario
- English: Haier H3F-280WF Owner's manual
- español: Haier H3F-280WF El manual del propietario
- Deutsch: Haier H3F-280WF Bedienungsanleitung
- Nederlands: Haier H3F-280WF de handleiding
- português: Haier H3F-280WF Manual do proprietário
- polski: Haier H3F-280WF Instrukcja obsługi
- čeština: Haier H3F-280WF Návod k obsluze
Documents connexes
-
Haier H3F-320WSAAU1 Manuel utilisateur
-
Haier H3F330WDH1 Manuel utilisateur
-
Haier H3R-330WNA Manuel utilisateur
-
-
-
Haier HF-220SSAA Le manuel du propriétaire
-
-
-
Haier H2F-255FSAA Manuel utilisateur
-
Autres documents
-
Arthur_Martin AN6086JOX Manuel utilisateur
-
 De Dietrich DKD1145S Le manuel du propriétaire
-
 CANDY HOOVER Rosieres RN5D 84GN Manuel utilisateur
-
Electrolux LUT7NE28X1 Manuel utilisateur
-
Hisense RF20N6ASE Manuel utilisateur
-
Hisense RS694N4BC1 Le manuel du propriétaire
-
Siemens KAI93VBFP/01 Le manuel du propriétaire
-
Brandt BFD561YNW Le manuel du propriétaire
-
Candy CHTF 544IXHN Manuel utilisateur
-
Cecotec SBS 592 Bolero CoolMarket Stainless Steel Fridge Manuel utilisateur

