
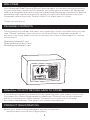
Read this manual carefully and never store inside the safe!
User Guide
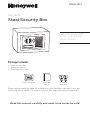
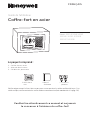
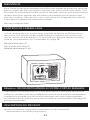
Steel Security Box
Package Includes
Please carefully check the above list to confirm all items have been received. If any items
are missing, please contact Consumer Assistance. (see page 6 for contact information).
1 - Steel Security Box
1 - Operation Manual
2 - Override Access Keys
1 Steel Security Box 1 Operation
Manual
2 - Override
Access Keys
ENGLISH
Models 5005, 5005B, 5005P,
5005W / 5005G, 5005GB,
5005GP, 5005GW

WELCOME / PACKAGE CONTENTS ...............................................PAGE 1
OVERRIDE ACCESS KEY / INSTALL BATTERIES........................PAGE 2
TESTING DIGITAL LOCK / PROGRAMMING NEW USER CODE...PAGE 3
TESTING NEW USER CODE / SECURE LOCKOUT.....................PAGE 4
PERIOD / LOST OR FORGOTTEN USER CODES ........................PAGE 4
CARE AND MAINTENANCE ......................................................... .......PAGE 4
ANCHORING YOUR SAFE....................................................................PAGE 5
CONSUMER ASSISTANCE...................................................................PAGE 6
ORDERING ADDITIONAL OVERRIDE ACCESS KEYS ................PAGE 7
SAFE IDENTIFICATION RECORD / DIGITAL USER CODE .......PAGE 7
RECORD.....................................................................................................PAGE 7
NOTES........................................................................................................PAGE 8
WARRANTY INFORMATION................................................................PAGE 9
For Your Protection
• Do not remove the Serial Number tag from the safe.
• Never Store Override Access Keys inside safe.
• Record all Safe Identification Numbers on Safe Identification Record (page 7).
• Save this manual and NEVER keep it inside the safe.
INDEX

The following list outlines the items and quantities of each included with your new
safe. Please carefully check the list to confirm all items have been received. If
any item is missing, please contact Consumer Assistance (See page 6 for contact
information).
Operation Manual (1 ea.)
Override Access Keys (2 ea.)
Mounting Hardware (1 set)
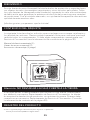
Your Honeywell Steel Security Box will provide years of safe and secure protection
for your valuables, important documents and other personal items. All Honeywell
safes are designed and built using the highest manufacturing standards to ensure
maximum user satisfaction under a variety of conditions. With proper care, your
Honeywell safe will provide “Peace of Mind” for many years to come.
Thank you and enjoy!
Attention: DO NOT RETURN SAFE TO STORE
If you are missing parts or have difficulty operating your safe, please contact our
Consumer Assistance Department by telephone. Store will not accept returned
products without prior authorization. You must first contact our consumer
assistance department. (See page 6 for contact information)
WELCOME
PACKAGE CONTENTS
1
Please go to the following webpage to register your product:
www.hymaninc.com/product-registration/
PRODUCT REGISTRATION

The batteries must be installed before using your safe. The battery compartment is located inside
the safe on the lock cover panel.
Note:
If both green and red LED’s are on, it is an indicator that the batteries are weak and must be
changed immediately. The User Code will not be erased if power is restored by replacing the
batteries within 30 minutes. After 30 minutes, the User Code will be erased and will need to be
reprogrammed. Weak or dead batteries should be replaced immediately and all 4 batteries should
be changed. To replace the batteries please follow STEPS 1 - 3. Remember to always remove
batteries from safe if not using for an extended period of time. If your batteries are completely dead
and you cannot open the safe by using the digital keypad, use the override access key to open safe
and access the battery compartment. The use of Non-alkaline or rechargeable batteries is NOT
RECOMMENDED.
1. Remove battery compartment cover and insert 4 “AA” batteries. Make sure that the
batteries are installed in the correct direction with regard to polarity (+ and -).
(Figure 1 & Figure 2).
2. Replace the battery cover (Figure 3).
3. Proceed to the “Testing Digital Lock” section on next page.
INSTALL BATTERIES
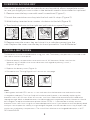
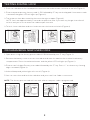
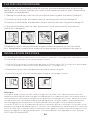
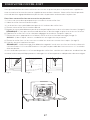
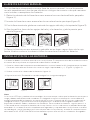
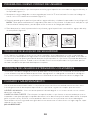
OVERRIDE ACCESS KEY
Your safe is equipped with an override access key which allows immediate access
in case you forget your user codes or the batteries need to be installed or replaced.
1. Remove override key cover with small screwdriver (Figure 1).
2. Insert the override access key into the lock until it stops (Figure 2).
3. With the key inserted turn counter clockwise to the left (Figure 3).
4. Turn knob clockwise to the right and pull safe door open (Figure 4).
5. Remove override access key and store it in a safe place away from the
safe. Replace the cover over the key lock and proceed to “Install Batteries”.
Figure 1
Figure 1
Figure 2
Figure 2
Figure 3
Figure 3
Figure 4
2

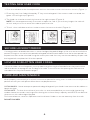
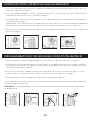
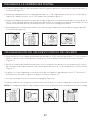
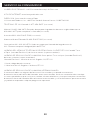
1. Push the safe door to the closed position and turn the knob counter clockwise to the left (Figure 1).
2. Enter the preset primary factory code “1 5 9” followed by “E” key into the keypad. If the correct code
is entered, the green LED will light up (Figure 2).
3. The knob can then be turned clockwise to the right to open (Figure 3).
NOTE: You have approximately 5 seconds to open the safe. If you wait any longer, the safe will
re-lock and you must re-enter the code to open the safe.
4. To lock, close safe door and turn knob counter clockwise to the left (Figure 4).
PROGRAMMING NEW USER CODE
TESTING DIGITAL LOCK
Figure 1
Figure 1
Figure 2
Figure 2
Figure 3
Figure 3
Figure 4
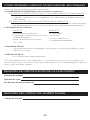
1. Open door using the factory preset code of 159 followed by the “E” key (Figure 1).
2. Remove the battery cover to access the red reset button located on the inside of the battery
compartment. Press the red reset button and the yellow LED will light up (Figure 2).
3. Enter a new 38 digit Primary user code followed by the “E” key. Press “C” to clear entry if wrong
digit is entered (Figure 3).
4. Safe will beep and yellow light will turn off (Figure 4).
5. You can now close and lock the safe door and your new User Code is now active.
NOTE: The factory pre-set code will not work after a new pass code is programmed.
Figure 4
3
3
6
9
E
2
5
8
0
1
4
7
C
5
9
E
Green LED
3
6
9
E
2
5
8
0
1
4
7
C
5
9
E
3
6
9
E
2
5
8
0
1
4
7
C
Green LED Yellow LED
Beep

SECURE LOCKOUT PERIOD
If a wrong code is entered three times in a row, the digital keypad will begin a five-minute secure lockout
period. During this secure lockout period the keypad will become disabled. Once the lockout period has
expired, the safe can be unlocked using the correct passcode. You may use the override key to open safe,
but keypad will complete the full lockout period.
LOST OR FORGOTTEN USER CODES
If the user code is lost or forgotten, you may open the safe using the Override Access key and use the
red reset button to reprogram the 38 digit user code. The instructions for opening the safe with the
override access key are located on page 2.
CARE AND MAINTENANCE
When properly maintained, your safe will continue to operate for many years. In order to ensure optimum
performance of your safe, please follow these simple precautions:
CLEAN HANDS - Never attempt to operate the digital keypad if your hands have excessive dirt, debris or
liquids on them.
CLEAN SAFE – To clean the surface of your safe, it is recommended that you use a mild cleaner (e.g.,
window cleaner) to avoid scratching or discoloring the surface. Always wipe dry and NEVER use abrasive
cleansers on the safe or digital keypad.
For future reference, store this Operation and Installation Guide in a secure area away from the safe.
DO NOT DISCARD!
TESTING NEW USER CODE
1. Push the safe door to the closed position and turn the knob counter clockwise to the left (Figure 1).
2. Enter the new User Code followed by “E” key into the keypad. If the correct code is entered, the
green LED will light up (Figure 2).
3. The knob can then be turned clockwise to the right to open (Figure 3).
NOTE: You have approximately 5 seconds to open the safe. If you wait any longer, the safe will
re-lock and you must re-enter the code to open the safe.
4. To lock, close safe door and turn knob counter clockwise to the left (Figure 4).
Figure 1 Figure 2 Figure 3 Figure 4
4
3
6
9
E
2
5
8
0
1
4
7
C
5
9
E
Green LED

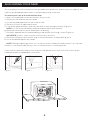
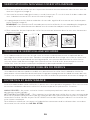
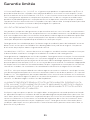
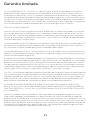
ANCHORING YOUR SAFE
Figure 1 Figure 2 Figure 3
You may bolt your safe to the wall or floor for added theft protection and resistance to tipping. Your
safe has pre-drilled bolt-down holes in the back panel and in the floor.
To secure your safe to the wall and/or floor:
1. Select a suitable and convenient location for your safe.
2. Empty the safe and remove the carpet.
3. Locate the predrilled holes on the inside of safe.
4. Place your safe in the desired location.
5. Line up the predrilled holes and mark the floor or wall through the holes (Figure 1).
NOTE: It is not recommended to attempt to bolt to both floor and wall.
6. Move the safe aside to clear marked spots for drilling.
7. Drill holes appropriate for hardware being used and the mounting surface (Figure 2).
INCLUDED: (2 each – bolts, washers and masonry anchors).
8. Place the safe back over the holes and install the fasteners as required (Figure 3).
9. Once completed, replace the carpet.
NOTE: Bolting/unbolting of the unit is at the consumer’s expense and discretion. LH Licensed
Products is not responsible for any costs incurred if the unit is to be replaced.
If you have any questions about mounting the safe, please check with your local home center/
hardware retailer or independent contractor.
5
3
6
9
E
2
5
8
0
1
4
7
C
5
9
E

EMAIL: LHLPCustomerSer[email protected]
WEBSITE:www.honeywellsafes.com
ADDRESS: Consumer Assistance Dept.
LH Licensed Products, Inc., 860 East Sandhill Avenue Carson, CA 90746 USA
TELEPHONE: US/Canada 18773545457 (Toll Free)
Mexico 018002882872 After English voice recording stops you must then enter
8008601677 to complete your call. (Toll Free)
Australia 001180053257000 (Toll Free)
Germany/New Zealand 0080053257000 (Toll Free)
Other Countries XX*3103235722 (Toll Charges Apply)
XX*- Dial U.S. Country Code first
CALL CENTER HOURS: US/Canada 7am – 5pm (Pacific**) Mon – Fri (Subject to change)
CALL BACK HOURS: Other Countries 7am – 8pm (Pacific**) Mon – Fri (Subject to change)
Pacific**- Local time in Los Angeles, CA, USA
* Insert correct Country Code
** Local Time based on Los Angeles California USA
INTERNATIONAL CALL BACK HOURS:
If you need to speak with a consumer assistant and cannot contact us during the Call
Center hours above, please send an email or leave a telephone message, including your Name,
Telephone Number and the best time for us to contact you during the Call Back hours above and
we will make every effort to contact you and help answer any of your questions or concerns.
CONSUMER ASSISTANCE
6

The following information is required to order keys:
1. PROOF OF OWNERSHIP (1 of 2 Options Below)
A) SALES RECEIPT & IDENTIFICATION – INTERNATIONAL ORDERS ONLY!
• Copy of sales receipt showing Store, Date & Product Description.
• Copy of your picture I.D. (Drivers license, passport, regular I.D.).
B) PRODUCT OWNERSHIP VERIFICATION FORM
If sales receipt is not available, contact us by email or telephone to request a “Product
Ownership Verification Form”.
2. ORDER INFORMATION
CONTACT
• Name & Shipping Address
• E-mail address (If Available)
• Telephone Number
• Best Time to Contact You
3. PLACING AN ORDER
• To begin the order process, contact us by telephone, email, or mail
4. METHOD OF PAYMENT
• Visa, MasterCard, Check or Money Order
NOTE: For pricing please contact Consumer Assistance. Contact information is located on the back
cover of this manual. Payment method and pricing subject to change.
Model Number:
Serial Number:
Override Access Key Number:
User Code:
ORDERING ADDITIONAL OVERRIDE ACCESS KEYS
SAFE IDENTIFICATION RECORD
DIGITAL USER CODE RECORD
PRODUCT
• Model #
• Serial #
• Lock Key #
• Quantity of Keys Ordered
7

NOTES
8

LH Licensed Products, Inc., (“LHLP, Inc.”) warrants that for a period of five (5) years from the
date of purchase, this product will be free from structural or mechanical defects resulting from
materials or workmanship. LHLP, Inc., at its sole option and as the purchaser’s sole remedy
under this warranty, will repair or replace this product or any component of the product found
to be defective during the warranty period. Replacement or repair will be made with a new or
remanufactured product or component. If the product is no longer available, replacement may be
made with a similar product of equal or greater value.
THIS IS YOUR EXCLUSIVE WARRANTY.
Our goods come with guarantees that cannot be excluded under the Australian Consumer Law.
You are entitled to a replacement or refund for a major failure and for compensation for any
other reasonably foreseeable loss or damage. You are also entitled to have the goods repaired or
replaced if the goods fail to be of acceptable quality and the failure does not amount to a major
failure.
This warranty is only valid for the original retail purchaser from the date of initial retail purchase
and is not transferable. You must keep the original sales receipt. Proof of purchase is required to
obtain warranty service.
LHLP, Inc. dealers, service centers, or retail stores selling this product do not have the right to
alter, modify or in any way change the terms and conditions of this warranty.
This warranty does not apply to the finish on the product. This warranty does not cover normal
wear and tear of parts or damage resulting from any of the following: negligent use or misuse
of the product, use contrary to the operating instructions, disassembly, repair or alteration by
anyone other than LHLP, Inc. or an authorized service center, improper installation, or exposure to
extremes of heat or humidity. Further, the warranty does not cover Acts of God, such as fire, flood,
earthquakes, hurricanes and tornadoes.
LHLP, Inc. shall not be liable for any incidental or consequential damages caused by the breach
of any express or implied warranty or otherwise relating to the sale of this product. LHLP, Inc. is
also not responsible for: costs associated with removing or installing the product; damage or loss
of the contents of the product; nor for the unauthorized removal of the contents; or damages
incurred during shipment.
THE ABOVE WARRANTY IS IN LIEU OF ALL OTHER WARRANTIES, EXPRESS OR IMPLIED,
INCLUDING ANY WARRANTIES OF MERCHANTABILITY OR FITNESS FOR A PARTICULAR
PURPOSE, AND LHLP, INC. DISCLAIMS ANY AND ALL OTHER COVENANTS AND WARRANTIES.
Except to the extent prohibited by applicable law, any implied warranty of merchantability or
fitness for a particular purpose is limited in duration to the duration of the above warranty period.
Some states, provinces or jurisdictions do not allow the exclusion or limitation of incidental
or consequential damages or limitations on how long an implied warranty lasts, so the above
limitations or exclusion may not apply to you. This warranty gives you specific legal rights, and you
may also have other rights that vary from state to state, or province to province, or jurisdiction to
jurisdiction.
Limited Warranty
9

Manufactured by:
LH Licensed Products, Inc.
860 East Sandhill Avenue
Carson, CA 90746
www.honeywellsafes.com
The Honeywell Trademark is used under
license from Honeywell International Inc.
Honeywell International Inc. makes no
representations or warranties with respect
to this product.

Veuillez lire attentivement ce manuel et ne jamais
le conserver à l'intérieur du coffre-fort!
Guide de l'utilisateur
Coffre-fort en acier
Le paquet comprend :
Vérifiez soigneusement la liste ci-dessus pour vous assurer que tous les articles ont bien été reçus. Si un
article manque, veuillez contacter le service d’aide au consommateur (voir coordonnées à la page 18).
1 - Coffre-fort en acier
1 - Manuel d’utilisation
2 - Clé d'accès prioritaire
1 Coffre-fort en
acier
1 Manuel
d’utilisation
2 - Clé d'accès
prioritaire
FRANÇAIS
Models 5005, 5005B, 5005P,
5005W / 5005G, 5005GB,
5005GP, 5005GW

BIENVENUE / CONTENU DE L'EMBALLAGE .............................. PAGE 13
CLÉ D'ACCÈS PRIORITAIRE / INSTALLER LES BATTERIES ... PAGE 14
TESTER LE VERROUILLAGE NUMÉRIQUE /
PROGRAMMER UN NOUVEAU CODE D'UTILISATEUR ........... PAGE 15
TESTER LE NOUVEAU CODE D'UTILISATEUR /
VERROUILLAGE SÉCURISÉ ............................................................... PAGE 16
PÉRIODE / CODES D'UTILISATEUR PERDUS
OU OUBLIÉS ............................................................................................ PAGE 16
ENTRETIEN ET MAINTENANCE ....................................................... PAGE 16
ANCRAGE DE VOTRE COFFREFORT ............................................ PAGE 17
AIDE AU CONSOMMATEUR ............................................................... PAGE 18
COMMANDER DES CLÉS D'ACCÈS PRIORITAIRE SUPPLÉMEN
TAIRES ....................................................................................................... PAGE 19
FICHE D’IDENTIFICATION DU COFFREFORT /
CODE D'UTILISATEUR NUMÉRIQUE .............................................. PAGE 19
ENREGISTREMENT .............................................................................. PAGE 19
NOTES ....................................................................................................... PAGE 20
INFORMATIONS SUR LA GARANTIE .............................................. PAGE 21
Pour votre protection
• Ne pas enlever l’étiquette du numéro de série du coffre-fort.
• Ne jamais ranger la clé d’accès prioritaire à l’intérieur du coffre-fort.
• Inscrire tous les numéros d’identification du coffre-fort sur la Fiche d’identifica-
tion du coffre-fort (page 19).
• Garder ce manuel et NE JAMAIS le conserver à l’intérieur du coffre-fort.
SOMMAIRE

La liste suivante décrit les articles et les quantités de chacun inclus avec le nou-
veau coffre-fort. Veuillez vérifier soigneusement la liste pour vous assurer que
tous les articles ont bien été reçus. Si un article vous manque, veuillez contacter
l’aide au consommateur (voir coordonnées à la page 18).
Manuel d'utilisation (1)
Clés d'accès prioritaire (2)
Matériel de montage (1 kit)
Votre Coffre-fort en acier Honeywell vous offrira des années de protection sécurisée
pour vos objets de valeur, documents importants et autres articles personnels. Tous
les coffres-forts Honeywell ont été conçus et fabriqués selon les plus hautes normes
de fabrication pour apporter aux utilisateurs un maximum de satisfaction dans
diverses conditions. Avec les bons soins, votre coffre-fort Honeywell vous offrira la
« paix d’esprit » pendant de nombreuses années.
Merci et profitez-en bien!
Attention : NE PAS RETOURNER LE COFFREFORT AU MAGASIN
Si des pièces sont manquantes ou si vous éprouvez de la difficulté à utiliser votre
coffre-fort, veuillez contacter par téléphone notre service d’aide au consommateur.
Le magasin n’acceptera pas les produits retournés sans autorisation préalable.
Vous devez d’abord contacter notre service d’aide au consommateur. (Voir page 18
pour les coordonnées)
BIENVENUE
CONTENU DE L’EMBALLAGE
13
Veuillez vous rendre à la page web suivante pour inscrire votre produit :
www.hymaninc.com/product-registration/
INSCRIPTION DU PRODUIT

Les piles doivent être installées avant l’utilisation du coffre-fort. Le compartiment des piles est situé
à l’intérieur du coffre-fort sur le couvercle de la serrure.
Remarque :
Si les deux diode lumineuses DEL verte et rouge sont allumées, ceci indique que les piles sont
faibles et qu'elles doivent être changées immédiatement. Le code d'utilisateur ne sera pas effacé si
l'alimentation est restaurée en remplaçant les piles dans un délai de 30 minutes. Après 30 minutes,
le code d'utilisateur sera effacé et devra être reprogrammé. Les piles faibles ou épuisées doivent
être immédiatement remplacées. Les 4 piles doivent être changées. Pour remplacer les piles,
suivez les ÉTAPES 1 à 3. N’oubliez pas de toujours retirer les piles du coffre-fort s’il n’est pas utilisé
pendant une longue période de temps. Si vos piles sont complètement à plat et que vous ne pouvez
ouvrir le coffre-fort à l’aide du clavier numérique, faites appel à la clé d’accès prioritaire pour l'ouvrir
et pour accéder au compartiment des piles. L'utilisation de piles rechargeables ou non alcalines
N'EST PAS RECOMMANDÉE.
1. Enlevez le couvercle du compartiment des piles et insérez 4 piles “AA”. Assurez-vous que les piles
sont installées dans le bon sens selon la polarité (+ et -). (Image 1 et 2).
2. Remettez le couvercle du compartiment des piles en place (Image 3).
3. Passez à la section « Test du verrouillage numérique » à la page suivante.
INSTALLATION DES PILES
CLÉ D'ACCÈS PRIORITAIRE
Votre coffre-fort est équipé d'une clé d'accès prioritaire permettant un accès im-
médiat au cas où vous oubliez vos codes d'utilisateur ou que les piles doivent être
installées ou remplacées.
1. Retirez le cache de la clé d’accès prioritaire avec un petit tournevis (Image 1).
2. Insérez la clé d'accès prioritaire dans la serrure jusqu'au fond (Image 2).
3. Une fois la clé insérée, tournez dans le sens anti-horaire vers la gauche (Image 3).
4. Tournez le bouton dans le sens horaire vers la droite et ouvrez la porte du
coffre-fort (Image 4).
5. Retirez la clé d'accès prioritaire et rangez-la dans un endroit sûr, loin du coffre-
fort. Remettez le couvercle sur le verrou à clé et passez à « Installation des piles ».
Image 1
Image 1
Image 2
Image 2
Image 3
Image 3
Image 4
14

3
6
9
E
2
5
8
0
1
4
7
C
5
9
E
3
6
9
E
2
5
8
0
1
4
7
C
1. Poussez la porte du coffre-fort vers la position fermée et tournez le bouton dans le sens anti-ho-
raire vers la gauche (Image 1).
2. Saisissez le code préréglé « 1 5 9 », suivi de la touche « E » sur le clavier. Si le bon code a été saisi,
la diode lumineuse DEL verte s'allumera (Image 2).
3. La poignée pourra alors être tournée dans le sens des aiguilles d'une montre vers la droite pour
ouvrir la porte (Image 3).
REMARQUE : Vous avez environ 5 secondes pour ouvrir le coffre-fort. Si vous attendez plus longtemps,
le coffre-fort se re-vérrouillera et vous devrez saisir à nouveau le code pour ouvrir le coffre-fort.
4. Pour verrouiller, fermez la porte du coffre-fort et tournez le bouton dans le sens anti-horaire vers la
gauche (Image 4).
PROGRAMMATION D'UN NOUVEAU CODE D'UTILISATEUR
VERIFICATION DU VERROUILLAGE NUMÉRIQUE
Image 1
Image 1
Image 2
Image 2
Image 3
Image 3
Image 4
1. Ouvrez la porte à l’aide du code préréglé en usine 159 suivi de la touche « E » (image 1).
2. Enlever le couvercle des piles pour accéder au bouton rouge de réinitialisation situé à l’intérieur
du compartiment des piles. Appuyez sur le bouton rouge de réinitialisation et la diode lumineuse
LED jaune s’allumera (image 2).
3. Saisissez un nouveau code d’utilisateur principal de 3 à 8 chiffres, suivi de la touche « E ». Ap-
puyez sur le « C » pour effacer les saisies si le mauvais chiffre a été saisi (image 3).
4. Le coffre émettra alors un bip et la lumière jaune s’éteindre (image 4).
5. Vous pouvez maintenant fermer et verrouiller la porte de votre coffre et votre nouveau code d’uti-
lisateur est désormais activé.
REMARQUE : Le code préréglé à l’usine ne fonctionnera pas une fois que le nouveau code secret
est programmé.
Image 4
15
3
6
9
E
2
5
8
0
1
4
7
C
5
9
E
Voyant DEL vert
Voyant DEL vert Voyant DEL jaune
Bip so-
nore

3
6
9
E
2
5
8
0
1
4
7
C
5
9
E
PERIODE DE VERROUILLAGE SÉCURISÉ
Si un code erroné est saisi trois fois de suite, le clavier numérique amorcera une période de ver-
rouillage sécurisé de cinq minutes. Pendant cette période de verrouillage sécurisée, le clavier sera
désactivé. Une fois la période de verrouillage expirée, vous pouvez déverrouiller le coffre-fort en
utilisant le bon code de verrouillage. Vous pouvez utiliser la clé d’accès prioritaire pour ouvrir le
coffre-fort, mais le clavier numérique complétera la pleine période de verrouillage.
CODES D'UTILISATEUR OUBLIÉS OU PERDUS
Si le code d'utilisateur est perdu ou oublié, vous pouvez ouvrir le coffre-fort à l'aide de la clé d’accès
prioritaire et utiliser le bouton de réinitialisation rouge pour reprogrammer le code d'utilisateur de 3 à 8
chiffres. Les instructions pour ouvrir le coffre-fort avec la clé d'accès prioritaire se trouvent à la page 14.
ENTRETIEN ET MAINTENANCE
Si vous entretenez bien votre coffre-fort, il pourra vous servir pendant longtemps. Pour vous assurez
du meilleur rendement de votre coffre-fort, veuillez respecter les précautions suivantes :
MAINS PROPRES - Ne jamais utiliser le clavier numérique quand vous avez les mains sales avec
des déchets ou des liquides.
NETTOYER LE COFFRE-FORT – Pour nettoyer la surface de votre coffre-fort, on vous recommande
d'utiliser un produit nettoyant doux (par ex. nettoyeur de vitres) pour éviter des rayures ou la décolo-
ration de la surface. Séchez toujours et NE JAMAIS utiliser des nettoyeurs abrasifs sur le coffre-fort
ou le clavier numérique.
Pour référence ultérieure, conservez ce Guide de fonctionnement et d'installation dans un endroit
sécuritaire, loin du coffre-fort. NE PAS JETER!
VERIFICATION DU NOUVEAU CODE D'UTILISATEUR
1. Poussez la porte du coffre-fort vers la position fermée et tournez le bouton dans le sens anti-ho-
raire vers la gauche (Image 1).
2. Saisissez le nouveau code d'utilisateur, suivi de la touche « E » sur le clavier. Si le bon code a été
saisi, la diode lumineuse DEL verte s'allumera (Image 2).
3. La poignée pourra alors être tournée dans le sens des aiguilles d'une montre vers la droite pour
ouvrir la porte (Image 3).
REMARQUE : Vous avez environ 5 secondes pour ouvrir le coffre-fort. Si vous attendez plus longtemps,
le coffre-fort se re-vérrouillera et vous devrez saisir à nouveau le code pour ouvrir le coffre-fort.
4. Pour verrouiller, fermez la porte du coffre-fort et tournez le bouton dans le sens anti-horaire vers
la gauche (Image 4).
Image 1 Image 2 Image 3 Image 4
Voyant DEL vert
16

FIXER VOTRE COFFREFORT
Image 1 Image 2 Image 3
Vous pouvez boulonner votre coffre-fort au mur ou au plancher pour une protection supplémen-
taire contre le vol et une résistance supplémentaire au basculement. Votre coffre-fort dispose de
trous de boulonnage préalablement percés dans le panneau arrière et dans le plancher.
Pour fixer votre coffre-fort au mur et/ou au plancher :
1. Choisissez un endroit pratique et qui convient à votre coffre-fort.
2. Videz le coffre-fort et enlevez le tapis.
3. Localisez les trous préalablement percés à l’intérieur du coffre-fort.
4. Placez votre coffre-fort à l’endroit désiré.
5. Alignez les trous préalablement percés et marquez le plancher ou le mur à travers les trous (Image 1).
REMARQUE : Il n’est pas recommandé de tenter un boulonnage au plancher et au mur à la fois.
6. Déplacez le coffre-fort sur le côté pour dégager les endroits marqués à percer.
7. Percez des trous appropriés au matériel utilisé et à la surface de montage (Image 2).
INCLUS : (2 de chaque : verrous, rondelles et ancrages de maçonnerie).
8. Placez le coffre-fort sur les trous et installez les attaches comme il est requis (Image 3).
9. Une fois terminé, replacez le tapis.
REMARQUE : Le boulonnage et le déboulonnage de l’unité sont aux frais et à la discrétion du
consommateur. LH Licensed Products n’est pas responsable des frais encourus si l’unité doit
être remplacée.
Si vous avez des questions sur l’assemblage du coffre-fort, veuillez vous adresser au détaillant de
matériel informatique/d'équipements ménagers ou à l'entrepreneur indépendant de votre région.
17
3
6
9
E
2
5
8
0
1
4
7
C
5
9
E

COURRIEL : LHLPCustomerSer[email protected]
SITE WEB : www.honeywellsafes.com
ADRESSE : Service d’aide au consommateur
LH Licensed Products, Inc., 860 East Sandhill Avenue Carson, CA 90746 USA
TÉLÉPHONE : ÉtatsUnis 18773545457 (sans frais)
Mexique 018002882872 Après l'arrêt de l'enregistrement vocal en anglais, vous devez compo-
ser le 8008601677 pour compléter votre appel. (Sans frais)
Australie 001180053257000 (Sans frais)
Allemagne/NouvelleZélande 0080053257000 (Sans frais)
Autres pays XX*3103235722 (des frais s’appliquent)
XX*- Composez d’abord le préfixe du code des ÉtatsUnis
HEURES DU CENTRE D’APPEL : É. U./Canada de 7 h à 17 h (Pacifique**) du lundi au vendredi
(assujetti au changement)
HEURES DE RAPPEL : Autres pays de 7 h à 20 h (Pacifique**) du lundi au vendredi (assujetti au
changement)
Pacifique**- Heure locale de Los Angeles, Californie, É.U.
* Insérer le bon préfixe du code de pays
** Heure locale de Los Angeles, Californie aux ÉtatsUnis
HEURES DE RAPPEL INTERNATIONAL :
Si vous devez parler à un assistant au consommateur et que vous ne pouvez nous contacter
durant les heures du Centre d'appel indiquées ci-dessous, veuillez envoyer un courriel ou laisser
un message téléphonique, avec votre nom, numéro de téléphone et la meilleure heure pour vous
contacter pendant les heures de rappel indiquées ci-dessous, et nous ferons de notre mieux pour
répondre à vos questions ou préoccupations.
SERVICE D'AIDE AU CONSOMMATEUR
18
La page est en cours de chargement...
La page est en cours de chargement...
La page est en cours de chargement...
La page est en cours de chargement...
La page est en cours de chargement...
La page est en cours de chargement...
La page est en cours de chargement...
La page est en cours de chargement...
La page est en cours de chargement...
La page est en cours de chargement...
La page est en cours de chargement...
La page est en cours de chargement...
La page est en cours de chargement...
La page est en cours de chargement...
La page est en cours de chargement...
La page est en cours de chargement...
-
 1
1
-
 2
2
-
 3
3
-
 4
4
-
 5
5
-
 6
6
-
 7
7
-
 8
8
-
 9
9
-
 10
10
-
 11
11
-
 12
12
-
 13
13
-
 14
14
-
 15
15
-
 16
16
-
 17
17
-
 18
18
-
 19
19
-
 20
20
-
 21
21
-
 22
22
-
 23
23
-
 24
24
-
 25
25
-
 26
26
-
 27
27
-
 28
28
-
 29
29
-
 30
30
-
 31
31
-
 32
32
-
 33
33
-
 34
34
-
 35
35
-
 36
36


dans d''autres langues
- English: Honeywell 5005 User guide
- español: Honeywell 5005 Guía del usuario
- português: Honeywell 5005 Guia de usuario
Documents connexes
Autres documents
-
SentrySafe TC8-331 Le manuel du propriétaire
-
SentrySafe QAP2BELNAF Mode d'emploi
-
Sentry T6-331 Le manuel du propriétaire
-
-
-
-
Sentry GM3659E Le manuel du propriétaire
-
Homak HS40135505 Manuel utilisateur