Nilfisk-Advance GW 4512 Manuel utilisateur
- Catégorie
- Scrubber
- Taper
- Manuel utilisateur


1 - FORM NO. 56041431 / GW 4512, GW 6016
A
B
1
2
3
4
5
6
7
8
9
10
11 12
13
14
A
B
IMPORTANT SAFETY INSTRUCTIONS .......................................2
IMPORTANTES CONSIGNES DE SÉCURITÉ .............................3
120VAC GROUNDING INSTRUCTIONS ......................................4
INSTRUCTIONS VISANT LA MISE À LA TERRE (120VAC) ........4
Introduction ....................................................................................5
Machine Assembly .........................................................................5
Know Your Machine .......................................................................5
To Pick Up Water ...........................................................................5
To Pick Up Dust And Dirt ...............................................................5
After Use-Wet Pick Up ...................................................................6
After Use-Dry Pick Up ....................................................................6
Lubrication .....................................................................................6
Vacuum Motor Brushes .................................................................6
Maintenance Schedule ..................................................................6
Technical Specifications ................................................................6

FORM NO. 56041431 / GW 4512, GW 6016 - 2
IMPORTANT SAFETY INSTRUCTIONS
This machine is only suitable for commercial use, for example in hotels, schools, hospitals, factories, shops and offices other than normal
residential housekeeping purposes.
When using an electrical appliance, basic precautions should always be followed, including the following:
Read all instructions before using.
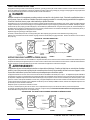
WARNING!
To reduce the risk of fire, electric shock, or injury:
*Do not leave the appliance when it is plugged in. Unplug the unit from the outlet when not in use and before servicing.
*Do not expose to rain. Store indoors.
*Do not allow to be used as a toy. Close attention is necessary when used by or near children.
*Use only as described in this manual. Use only the manufacturer’s recommended attachments.
*Do not use with damaged cord or plug. If the appliance is not working as it should be, has been dropped, damaged, left outdoors
or dropped into water, return it to a service center.
*Do not pull or carry by the cord, use the cord as a handle, close a door on the cord, or pull the cord around sharp edges or corners.
Do not run the appliance over the cord. Keep the cord away from heated surfaces.
*Do not unplug by pulling on the cord. To unplug, grasp the plug, not the cord.
*Do not handle the plug, cord or appliance with wet hands.
*Do not put any object into openings. Do not use with any opening blocked; keep free of dust, lint, hair, and anything that may reduce
air flow.
*Keep loose clothing, hair, fingers, and all parts of body away from openings and moving parts.
*Do not pick up anything that is burning or smoking, such as cigarettes, matches, or hot ashes, or any hazardous dusts.
*This machine is not suitable for picking up health endangering dust.
*Always install float before any wet pick-up operation.
*If using for dry pickup, Do not use without dustbag and/or filters in place.
*Turn off all controls before unplugging.
*Avoid vacuuming hard or sharp objects.
*Use extra care when cleaning on stairs.
*Do not use to pick up flammable or combustible liquids such as gasoline or use in areas where they may be present.
*If foam / liquid comes out, switch off immediately.
*Connect to a properly grounded outlet only. See Grounding Instructions. (120V)
*This appliance is provided with double insulation. Use only identical replacement parts. (100V, 220-240V)
SAVE THESE INSTRUCTIONS

3 - FORM NO. 56041431 / GW 4512, GW 6016
IMPORTANTES CONSIGNES DE SÉCURITÉ
Cette machine ne convient qu´à un usage industriel, par exemple dans les hotels, les écoles, les hôpitaux, les usines, les boutiques
et bureaux et tout ce qui n´est pas pour l´entretien domestique résidentiel normal.
Lors de l’utilisation d’un appareil électrique, suivez toujours les précautions d’usage, y compris celles qui suivent :
Lisez toutes les instructions avant de faire fonctionner l’aspirateur.
ATTENTION !
Pour réduire tout risque d’incendie, de choc électrique ou de blessure :
*Ne quittez pas l´appareil alors qu´il est branché. Débranchez l´unité de la prise quand il n´est pas en service et avant l´entretien.
*Ne l´exposez pas à la pluie. Emmagasinez le à l´intérieur.
*Ne le laissez pas être utilisé comme un jouet. Une attention particulière est nécessaire lorsque la machine est utilisée par ou à
côté d´enfants.
*Ne l´utilisez que comme décrit dans ce manuel. N´utlisez que les attachements recommandés par le fabricant.
*Ne l´utlisez pas avec des cordons ou des prises électriques défectueuses. Si l´appareil ne fonctionne pas comme il le devrait,
est tombé, endommagé, a été laissé à l´extérieur ou a été laissé tomber dans l´eau, retournez le au centre d´entretien.
*Ne le tirez ou portez pas par le cordon électrique, n´utilisez pas le cordon comme poignée, ne fermez pas une porte sur le cordon,
ou ne tirez pas le cordon sur des rebords ou des coins pointus. Ne faites pas passer l´appareil sur le cordon. Gardez le cordon
à l´écart de toutes surfaces chaudes.
*Ne débranchez pas l´appareil en tirant sur le cordon. Pour débrancher, empoignez la prise, pas le cordon.
*Ne touchez pas à la prise, au cordon ou à l´appareil avec des mains mouillées.
*Ne placez aucun objet dans les ouvertures. Ne l´utilisez pas quand une des ouvertures est bloquée, gardez les à l´abri de la
poussière, de la charpie, des cheveux, et tout ce qui pourrait réduire le flux d´air.
*Gardez tout vêtement ample, cheveux, doigts, et toutes parties du corps loin des ouvertures et des parties mouvantes.
*Ne ramassez pas ce qui brûle ou fume, comme des cigarettes, allumettes, ou cendres incandescentes, ou toutes poussières
hasardeuses.
*Cette machine n´est pas destinée au ramassage de poussière dangereuse pour la santé.
*Installez toujours le flotteur avant chaque opération de ramassage d´eau.
*Si vous l´utilisez pour un ramassage à sec, Ne l´utilisez pas sans que le sac à poussière et / ou les filtres ne soient en place.
*Eteignez tous les contrôles avant de débrancher.
*Evitez d´aspirer des objets durs ou pointus.
*Faites preuve d´un soin supplémentaire lorsque vous nettoyez des escaliers.
*Ne l´utilisez pas pour ramasser des liquides inflammables ou combustibles comme l´essence ou ne l´utlisez pas dans des zones
où ils pourraient être présents.
*Si de la mousse / du liquide ressort, éteignez immédiatement la machine.
*Branchez l’appareil uniquement sur une prise de courant avec terre. Lisez les instructions sur la mise à la terre. (120V)
*Cet appareil est fournie avec une double isolation. N´utilisez que des pièces de rechange semblables. (220-240V)
CONSERVEZ CES INSTRUCTIONS

FORM NO. 56041431 / GW 4512, GW 6016 - 4
120VAC GROUNDING INSTRUCTIONS
This appliance must be grounded. If it should electrically malfunction, grounding provides a path of least resistance for electric current to reduce the risk of electric
shock. This appliance is equipped with a cord having an equipment-grounding conductor and grounding plug. The plug must be plugged into an appropriate outlet
that is properly installed and grounded in accordance with all local codes and ordinances.
DANGER!
Improper connection of the equipment-grounding conductor can result in a risk of electric shock. Check with a qualified electrician or
service person if you are in doubt as to whether the outlet is properly grounded. Do not modify the plug provided with the appliance.
If it will not fit the outlet, have a proper outlet installed by a qualified electrician.
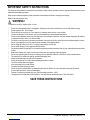
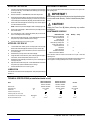
This appliance is for use on a nominal 120-volt circuit, and has a grounding plug that looks like the plug illustrated in Figure 1 below. A temporary adapter illustrated
in Figures 2 and 3 may be used to connect this plug to a 2-pole receptacle as shown in Figure 2 if a properly grounded outlet is not available. The temporary adapter
should be used only until a properly grounded outlet (Figure 1) can be installed by a qualified electrician. The green-colored rigid ear, tab, or the like extending from
the adapter must be connected to a permanent ground such as a properly grounded outlet box cover. Whenever the adapter is used, it must be held in place by a
metal screw. Grounding adapters are not approved for use in Canada.
Replace the plug if the grounding pin is damaged or broken.
The Green (or Green/Yellow) wire in the cord is the grounding wire. When replacing a plug, this wire must be attached to the grounding pin only.
Extension cords connected to this machine should be 12 gauge, three-wire cords with three-prong plugs and outlets. DO NOT use extension cords more than 50
feet (15 m) long.
PLEASE NOTE: FOR NORTH AMERICA ONLY
INSTRUCTIONS VISANT LA MISE À LA TERRE (120VAC)
Cet appareil doit être mis à la terre. En cas de défaillance ou de panne éventuelles, la mise a la terre fournit au courant un chemin de moindre résistance qui réduit
le risque de choc électrique. Cet appareil est pourvu d’un cordon muni d’un conducteur de terre et d’une fiche avec broche de terre. La fiche doit être branchée dans
une prise appropriee correctement installée et mise à la terre conformément aux règlements et ordonnances municipaux.
AVERTISSEMENT !
Un conducteur de terre mal raccordé peut entraîner un risque de choc électrique. Consulter un électricien ou un technicien d’entretien
qualifié si vous n’êtes pas certain que la prise est correctement mise à la terre. Ne pas modifier la fiche fournie avec l’appareil - si elle
ne peut être insérée dans la prise, faire installer une prise adéquate par un électricien qualifié.
Cet appareil est destiné à un circuit de 120 V et est muni d’une fiche de terre semblable à celle illustrée par le croquis 1. Un adaptateur temporaire semblable à
celui illustré par le croquis 2 et C peut être utilisé pour brancher cette fiche à une prise bipolaire comme l’illustre le croquis 2 si une prise avec mise à la terre n’est
pas disponible. L’adaptateur temporaire devrait etre utilisé seulement jusqu’à ce qu’une prise avec mise à la terre soit installée par un électricien qualifié. L’oreille
rigide ou le crochet ou autre dispositif semblable, de couleur verte, prolongeant l’adaptateur doit Iêtre raccordé à un élément correctement mis à la terre comme le
couvercle d’une boîte de sortie mise à la terre. L’adaptateur doit être fixé par une vis métallique. Note: Au Canada, I’utilisation d’un adaptateur temporaire n’est
pas autorisée par le Code canadien de l’électricité.
Remplacez la prise si la prise de terre est abîmée ou cassée.
Le fil Vert (ou Vert/Jaune) dans la ganse est le fil de terre. Lors du remplacement d´une prise, ce fil doit être raccordé à la prise de terre uniquement.
Les ralonges connectées à cette machine doivent avoir 12 mesures, trois ganses de fil ayant trois fiches masculines féminines tree-prong plugs and outlets.
N´UTILISEZ PAS de ralonge de plus de 15 m (50 pieds) de long.
VEUILLEZ NOTER: CES INSTRUCTIONS CONCERNENT UNIQUEMENT L’AMÉRIQUE DU NORD

5 - FORM NO. 56041431 / GW 4512, GW 6016
INTRODUCTION
This manual will help you get the most from your Advance GW 4512/6016.
Read it thoroughly before operating the machine.
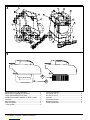
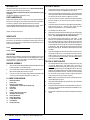
Note: Bold numbers in parentheses indicate an item illustrated on page
1 (Figure A).
This product is intended for commercial use only.
PARTS AND SERVICE
Repairs, when required, should be performed by your Authorized Advance
Service Center, who employs factory trained service personnel, and maintains
an inventory of Advance original replacement parts and accessories.
Call the ADVANCE DEALER named below for repair parts or service. Please
specify the Model and Serial number when discussing your machine.
(Dealer, affix service sticker here.)
NAME PLATE
The Model and Serial Number of your machine are shown on the Nameplate on
the machine. This information is needed when ordering repair parts for the
machine. Use the space below to note the Model and Serial Number of your
machine for future reference.
MODEL
SERIAL NUMBER
UNCRATING
When the machine is delivered, carefully inspect the shipping carton and the
machine for damage. If damage is evident, save the shipping carton so that it
can be inspected. Contact the Advance Customer Service Department
immediately to file a freight damage claim.
MACHINE ASSEMBLY
1After uncrating, loosen the Handle Adjustment Knobs (12) and swing the
Handle (7) upright to a comfortable position.
2If you have an Air Scoop model, install the Squeegee (9), Recovery Hose
(8) and Hose Adapter (13) as shown in Figure A.
3If you have a non Air Scoop model, simply install the Hose Adapter (13)
a recovery hose and whatever attachments you wish to use.
A - KNOW YOUR MACHINE
1 Main Power Switch
2 Power Head
3 Recovery Tank / Chassis
4 Squeegee Raise / Lower Pedal (Air Scoop only)
5 Drain Hose
6 Power Cord
7 Handle
8 Recovery Hose (Air Scoop only)
9 Squeegee (Air Scoop only)
10 Power Head Handle
11 Power Head Latches
12 Handle Adjust Knobs
13 Hose Adapter
14 Bucket (100V only)
TO PICK UP WATER
1If the machine has been used for dry pick-up, remove the Dry Pick-Up
Filter (A) and re-install the Float (B) (See Figure B, page 1).
2Place the Power Head (2) on top of the Recovery Tank / Chassis (3) and
Latch (11) into place. Make sure that the Main Power Switch (1) is in the
OFF position, then plug the Power Cord (6) into a wall outlet.
3If you have an Air Scoop model, re-attach the Squeegee (9) and the
Recovery Hose (8). If you have a non Air Scoop model, re-attach the
recovery hose.
4Connect the other end of the Recovery Hose (8) to the Squeegee (9) or
wand and wet pick-up tool. Accessory hoses, wands and other
attachments are available from your local Advance Dealer.
5Turn the Main Power Switch (1) ON.
6Release the Squeegee Raise/Lower Pedal (4) to lower the Squeegee
(9) to the floor. The Squeegee will pick up while moving forward or in
reverse. (This step applies to the Air Scoop model only).
7Add a defoamer chemical when picking up soapy water. To add
defoamer, first turn the Main Power Switch (1) OFF. Then remove the
Power Head (2) and pour the defoamer chemical into the Recovery
Tank / Chassis (3), Bucket (14) on 100V model. See the manufacturer’s
recommendations for the proper amount. Put the Power Head (2) back
on the Recovery Tank / Chassis (3), Latch (11) into place and turn the
Main Power Switch (1) ON. Add defoamer each time the tank (bucket)
is emptied.
8The Power Head (2) has an automatic float shutoff to block the vacuum
system when the tank is full. You can tell when the float closes by the
sudden change in the sound of the vacuum motor. When the float
closes, the tank (bucket) must be emptied. The machine will not pick up
water with the float closed.
TO PICK UP DUST AND DIRT
1If the machine has been used for wet pick-up, empty the Recovery Tank
/ Chassis (3), Bucket (14) on 100V model, rinse it out and dry it
completely and install the Dry Pick-Up Filter (See Figure B). To install
the Dry Pick-Up Filter, first pull the Float (B) (Figure B) off of the Power
Head (2). The Float (B) is held in place by rubber retainers and can be
pulled off and pushed back on easily. Push the Dry Pick-Up Filter (A)
onto the vacuum motor housing as shown in Figure B (the filter fits
snugly over the vacuum motor housing, friction fit).
NOTE: DO NOT use the machine for dry pick-up without the Dry Pick-
Up Filter (A) (Figure B) in place.
2Re-install the Power Head (2) on top of the Recovery Tank / Chassis (3)
and Latch (11) into place.
3Connect the other end of the hose to a wand fitted with a dry pick-up tool.
Accessory hoses, wands and other attachments are available from your
local Advance Dealer.
4Plug the Power Cord (6) into a wall outlet and turn the Main Power Switch
(1) ON.
revised 5/99

FORM NO. 56041431 / GW 4512, GW 6016 - 6
AFTER USE - WET PICK UP
1Step down on the Squeegee Raise/Lower Pedal (4) to raise the Squeegee
(Air Scoop model only). Turn the Main Power Switch (1) OFF and unplug
the Power Cord (6).
2Move the machine to a “DESIGNATED” waste water disposal site.
3Remove the Drain Hose (5) from its hanger, direct the end of the hose to
a proper disposal area and remove the plug. On 100V model, remove the
Power Head (2), lift out the Bucket (14), empty and rinse with warm water.
4Remove the Power Head (2) from the Recovery Tank / Chassis (3) and
rinse the tank with warm water.
NOTE: Clean and inspect the Float (B) for debris or damage (Figure B).
5Remove the Squeegee (9) or Wand and Recovery Hose (8) and rinse
them in warm water.
6Dry out the Recovery Tank / Chassis (3), Bucket (14) on 100V model,
before re-installing the Power Head (2).
7Wipe the machine with a damp cloth. Check the Maintenance Schedule
and perform any required maintenance before storage.
8Store the machine indoors in a clean, dry place.
AFTER USE - DRY PICK UP
1Turn the Main Power Switch (1) OFF and unplug the Power Cord (6).
Remove the Power Head (2) from the Recovery Tank / Chassis (3).
2Remove the Dry Pick-up Filter and shake out, brush off and vacuum out
for normal up keep.
3Reinstall the Dry Pick-up Filter on the Power Head (2).
4Empty the debris from the Recovery Tank / Chassis (3), Bucket (14) on
100V model, rinse the tank (bucket) clean and dry it out.
5Reinstall the Power Head (2) on the Recovery Tank / Chassis (3) and
Latch (11) into place.
6Wipe the machine with a damp cloth. Check the Maintenance Schedule
and perform any required maintenance before storage.
7Store the machine indoors in a clean, dry place.
LUBRICATION
Lubricate the caster swivels and the squeegee raise / lower pivot points with light
machine oil.
VACUUM MOTOR BRUSHES
Have your Advance Dealer check the carbon motor brushes once a year or after
500 operating hours.
IMPORTANT !
Motor damage resulting from failure to service the carbon brushes
is not covered under warranty. See the Limited Warranty State-
ment.
CAUTION !
Unplug the Power Cord (6) before performing any machine
maintenance.
MAINTENANCE SCHEDULE
Maintenance Item Daily Monthly Yearly
Clean the Recovery Tank (Bucket) X
Clean the Power Head X
Clean the Float X
Clean the Squeegee X
Clean the Dry Pick-Up Filter X
Inspect Tank and Hoses X
**Inspect Power Cord X
Lubrication X
Inspect and Clean
Vac Motor Outlet Filter X
*Check Vacuum Motor Brushes X
*Have Advance check the carbon motor brushes once a year or after 500
operating hours.
** If the supply cord is damaged, it must be replaced by the manufacturer or its
service agent or a similarly qualified person in order to avoid a hazard.
TECHNICAL SPECIFICATIONS (as installed and tested on unit)
GW 4512 / GW 4512 AS GW 4512 / GW 4512 AS
Model GW 6016 / GW 6016 AS GW 6016 / GW 6016 AS GW 4512
56209801 / 56209806 56209803 / 56209809
Model Number 56209802 / 56209807 56209805 / 56209813 56210000
Voltage/frequency V/Hz 120V / 50/60Hz 220-240V / 50/60Hz 100V / 50/60Hz
Rated Power W 800 1,100 1,200
Protection Class (electrical)
Protection grade (mec, moist, dust) N/A IP 34 N/A
Sound Pressure Level (at operator’s ear) dB(A)/20µPa 75 75 75
Vibration at the Hand Controls m/s2<2.5m/s2<2.5m/s2<2.5m/s2
-
 1
1
-
 2
2
-
 3
3
-
 4
4
-
 5
5
-
 6
6
-
 7
7


Nilfisk-Advance GW 4512 Manuel utilisateur
- Catégorie
- Scrubber
- Taper
- Manuel utilisateur
dans d''autres langues
- English: Nilfisk-Advance GW 4512 User manual
Autres documents
-
Windsor Compass 2 Le manuel du propriétaire
-
Nobles V-WD-15S Mode d'emploi
-
Windsor Chariot 2 iScrub 20 Deluxe Le manuel du propriétaire
-
-
-
Nobles V-WD-16B Mode d'emploi
-
Clarke 56265505 Manuel utilisateur
-
Windsor Chariot 3 iScrub 26 10061500 Operating Instructions Manual