Epson EMP-TW10 Le manuel du propriétaire
- Catégorie
- Projecteurs de données
- Taper
- Le manuel du propriétaire


1
User's Guide
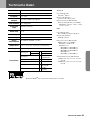
Contents
Unpacking the Projector ..................................................................................................................... 2
Meaning of Symbols............................................................................................................................ 2
Features............................................................................................................................. 3
Before Using the Projector
Part Names and Functions .............................................................................................. 4
Front/Top.............................................................................................................................................. 4
Control panel........................................................................................................................................ 4
Rear....................................................................................................................................................... 5
Base ...................................................................................................................................................... 5
Remote Control.................................................................................................................................... 6
Installation......................................................................................................................... 8
Installation method.............................................................................................................................. 8
Projection distance and screen size.................................................................................................. 8
Other installation methods ................................................................................................................. 9
Connecting Equipment
Connecting a Computer ................................................................................................. 10
Compatible computers...................................................................................................................... 10
Outputting images and audio from a computer.............................................................................. 11
Adjusting computer generated images ........................................................................................... 11
Configuration Menus
Menu operation ............................................................................................................... 12
Function list .................................................................................................................... 13
Troubleshooting
When You Suspect a Problem....................................................................................... 16
Power indicator.................................................................................................................................. 16
Warning indicator .............................................................................................................................. 16
When the indicators provide no help............................................................................................... 17
Appendices
Projector Care ................................................................................................................. 20
Cleaning.............................................................................................................................................. 20
Replacing consumables.................................................................................................................... 21
Glossary .......................................................................................................................... 24
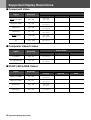
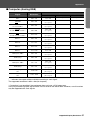
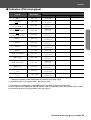
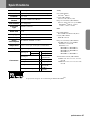
Supported Display Resolutions .................................................................................... 26
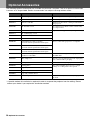
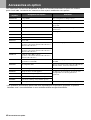
Optional Accessories ..................................................................................................... 28
Specifications ................................................................................................................. 29
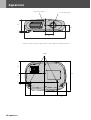
Appearance ..................................................................................................................... 30
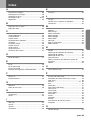
Index ................................................................................................................................ 31

2-
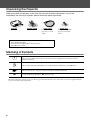
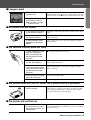
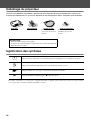
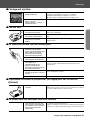
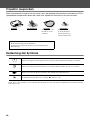
Unpacking the Projector
When you unpack the projector, make sure that you have all these components. If any of the
components are missing or incorrect, please contact the place of purchase.
Meaning of Symbols
The terms "this unit" and "this projector" which appear in this manual may also refer to the accessories supplied with the
projector and other optional products.
Projector Remote control Power cable
For connecting the
projector to a wall
outlet.
Rubber feet
Attach when installing
the projector upside
down.
Documentation
User's Guide (this guide)
Safety Instructions/World-Wide Warranty Terms
Quick Reference Guide
c
Indicates the possibility that people may be injured or the equipment may be damaged if these
symbols are ignored.
p
Indicates important related information or useful information and things you should know.
s
Indicates related topics and pages which contain more detailed information.
g
Provides terminology definitions. s "Glossary" P.24

Features-3
Features
fColour mode
Image quality can be selected according to the type of
scene. s "Selecting a colour mode" Quick Reference
Guide
fCompact and lightweight
The projector's compact body is easy to carry.
Dimensions: 29.4(d) × 40.2(w) × 11.4(h) cm
Weight : approx. 3.6kg
fAuto setup
(Computer connections)
The projector analyses the signal of the computer to
which it is connected and automatically makes
adjustments to ensure optimal projection results.
s "Auto setup (Computer connections)" P.11
fClear, vivid, images
The projector's high resolution and high luminance
achieves a legible display. Project sharp, detailed images,
even in bright places.
fEase of use
Various projector operations can be easily performed
using the included remote control, as follows:
• using the configuration menus
• recalling your favourite settings
• pausing projection

4-Part Names and Functions
Before Using the Projector
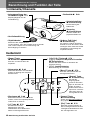
Part Names and Functions
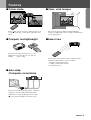
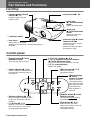
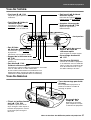
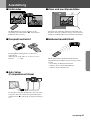
Front/Top
Control panel
• remote control infrared
receiver s P. 7
Receives signals from the
remote control.
• ventilation outlet
• lens cover
Attach when not using the
projector to prevent the lens from becoming dirty or
damaged.
• focus ring
s Quick Reference
Guide
Adjusts the image focus.
• front foot (left) s Quick
Reference Guide
Another front foot is located
on the right side.
Extend and retract to adjust
the projection angle.
• control panel s P.4
•zoom ring
s Quick Reference
Guide
Adjusts the size of the
projected image.
• [Power] button s Quick
Reference Guide
Turns the projector on and off.
• Power indicator s P. 1 6
Flashes or lights in different colours
to indicate the operating status of
the projector.
•[u][d][l][r] buttons s P.12
•[w][v]: keystone correction buttons
s Quick Reference Guide
Press to correct keystone distortion in images.
•[a][b]: volume buttons
Adjusts the volume.
• Warning indicator s P.16
Flashes or lights in different colours
to alert you to problems with the
projector.
• [Menu] button s P. 12
Displays or hides the
configuration menus.
• [Source] button
s Quick
Reference Guide
Switches the input
source between the
Input A port, S-Video
port, Video port and
Input B port each
time the button is
pressed.
•[e] button s P.12
Accepts a menu item or advances
to the next screen or menu when
viewing configuration menus.
• [Esc] button s P. 1 2
Stops the current function.
Displays the previous screen or
menu when viewing
configuration menus.
• [Aspect] button s Quick
Reference Guide
Changes the Aspect ratiog of
the projected image.

Part Names and Functions-5
Before Using the Projector
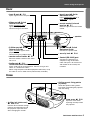
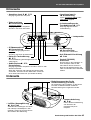
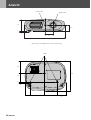
Rear
Base
• Input B port s P.11
Inputs signals from a computer.
• remote control infrared
receiver s P. 7
Receives signals from the remote
control.
• power inlet s Quick
Reference Guide
Connects the power cable.
• Video port s Quick
Reference Guide
Inputs Composite Videog
signals to the projector.
Connect using an A/V cable.
• S-Video port s Quick
Reference Guide
Inputs S-Videog signals to the
projector.
Connect using an S-Video cable.
• security lock s P. 2 4
• Audio port s P.11,
Quick Reference Guide
Inputs audio signals to the projector. Connect using an A/V
cable, or a stereo RCA cable.
When using computer and video equipment alternately, swap
the cable or use an audio switch (commercially available).
• Control (RS-232C) port
Connects the projector to a
computer using an RS-232C
cable. This port is for control use
and should not be used by the
customer.
• remote control holder s P. 7
Store the remote control in here when
not in use.
• Input A port s Quick
Reference Guide
Inputs Component Videog or
RGB-Video
g signals.
• speaker
• Ceiling mount fixing points
(3 points)
Install the optional ceiling mount
here when suspending the projector
from the ceiling.
• lamp cover s P.22
Open this cover when
replacing the lamp inside
the projector.
• air filter (air intake vent)
s P.20, P.21
Prevents dust and other foreign
particles from being drawn into
the projector. Open the cover
when changing the air filter.

6-Part Names and Functions
Before Using the Projector
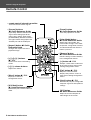
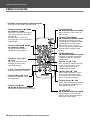
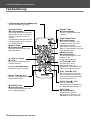
Remote Control
• remote control infrared transmitter
Transmits remote control signals.
• [Aspect] button s Quick
Reference Guide
Changes the aspect ratio of the
projected image.
• [Source] buttons
s Quick Reference Guide
[Input A/B]: Switches between the
signal source being input to the
Input A port, and the Input B port.
[S-Video/Video]: Switches between
the signal source being input to the
S-Video port and the Video port.
• [Esc] button s P.12
Stops the current function.
Displays the previous screen or
menu when viewing configuration
menus.
•[e] button s P.12
Accepts a menu item or advances
to the next screen or menu when
viewing configuration menus.
•[u][d][l][r] buttons
s P.12
Selects menu items and setting
values.
• [Power] button
s Quick Reference Guide
Turns the projector on and off.
• [A/V Mute] button
s Quick Reference Guide
Momentarily turns off the audio and
video.
• [Still] button
s Quick Reference Guide
Keeps the current computer or
video image on the screen.
• [Auto] button s P.1 1
Automatically adjusts analog RGB
computer signals to their optimum
settings.
• [Color Mode] button
s Quick Reference Guide
Selects the colour mode. The
colour mode changes in the order
of Dynamic, Living Room, Theatre
and Theatre Black each time the
button is pressed.
•[a][b]: volume buttons
Adjusts the volume.
• [Menu] button s P.1 2
Displays or hides the
configuration menus.
• [Memory] button
s Quick Reference Guide
Recalls settings saved to memory
in the configuration menus.

Part Names and Functions-7
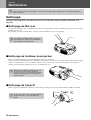
Before Using the Projector
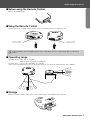
fBefore using the Remote Control
Remove the insulating tape.
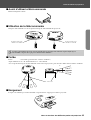
fUsing the Remote Control
Operate the remote control by aiming it at the remote control infrared receiver on the projector.
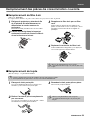
fOperating range
Operable distance: Max. approx. 6m (20ft.)
(May be shorter depending on conditions.)
Operable angle : approx. 30° horizontally, 15° vertically
* The remote control infrared receiver on the back of the projector can also be used under the same conditions.
fStorage
When not using the remote control, please store it in the remote control holder on the projector.
remote control
infrared receiver
remote control
infrared receiver
p
If direct sunlight or fluorescent lighting hits the remote control infrared receiver, you may not be able to use the remote
control.
15°
15°
30° 30°
Max 6m

8-Installation
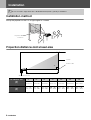
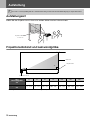
Installation
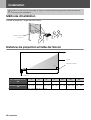
Installation method
Set up the projector so that it is at right angles to a screen.
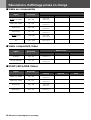
Projection distance and screen size
The values should be used as a guide for setting the projector.
c
Be sure to read the "Safety Instructions / World-Wide Warranty Terms" guide before installation.
Projection distance:
73-1165cm
90°
Centre of lens
Screen
Projection distance
20cm(7.9in.)or more
16:9 Screen size
cm
(ft.)
30" 40" 60" 80" 100" 200" 300"
66 × 37
(2.1 × 1.2)
89 × 50
(2.8 × 1.6)
130 × 75
(4.2 × 2.4)
180 × 100
(5.7 × 3.2)
220 × 120
(7.2 × 4.1)
440 × 250
(14.4 × 8.2)
660 × 370
(21.6 × 12.1)
Projection distance
cm
(ft.)
73 − 114
(2.4 − 3.7)
98 − 153
(3.2 − 5.0)
149 − 231
(4.9 − 7.6)
200 − 309
(6.6 − 10.1)
251 − 387
(8.2 − 12.7)
504 − 776
(16.5 − 25.5)
758 − 1165
(24.9 − 38.2)

Installation-9
Before Using the Projector
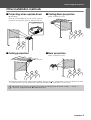
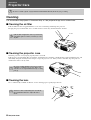
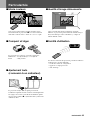
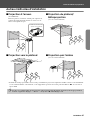
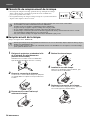
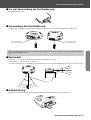
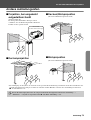
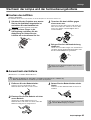
Other installation methods
fProjecting when upside down
(Front/Ceiling)
Attach the enclosed rubber feet to prevent the operation
panel from contacting the surface on which it is placed.
fCeiling projection
fCeiling/Rear projection
(Using a translucent screen)
fRear projection
(Using a translucent screen)
*The optional ceiling mount is required when installing the projector from a ceiling. Please contact your dealer if you wish
to use this method, as special equipment is required for installation. s "Optional Accessories" P.28
Rubber feet
(Attach In 3 places)
p
When using rear projection, or projecting from a ceiling, select the appropriate mode in the "Setting"
→
"Screen"
→
"Projection" configuration menu. s "Setting menu" P.14

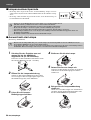
10-Connecting a Computer
Connecting Equipment
Connecting a Computer
See the "Quick Reference Guide" for instructions on connecting to video equipment.
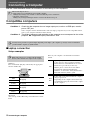
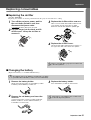
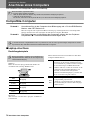
Compatible computers
fLaptop connection
Setup examples
Windows:
Press and hold the [Fn] key, followed by the appropriate
function number key.
Macintosh:
After start up enable "Mirroring" in the Monitors Control
Panel.
Refer to your computer’s documentation for further
details.
c
When connecting, be sure to:
• Turn off the power for both the projector and the computer.
Damage may result if you try to make a connection when the power is switched on.
• Check the connector types.
Damage may result if you attempt to insert a connector into the incorrect port.
Condition 1: Check that the computer has an image output port, such as an RGB port, monitor
port or CRT port.
Some computers with an in-built monitor and some laptop computers may not be compatible. Please
refer to your computer manual for further details.
Condition 2: The display frequency and resolution of the computer must correspond to that of the
projector. s "Supported Display Resolutions" P.26
p
You may need to purchase a separate adapter depending on the shape of the computer's port. Refer to the documentation
provided with the computer for further details.
p
When using a laptop or a computer with an in-built
monitor, select external video output on the computer.
NEC
[Fn]+[F3]
Panasonic
Toshiba
[Fn]+[F5]
IBM
[Fn]+[F7]
SONY
Fujitsu
[Fn]+[F10]
Win
Depending on your version of Windows, a dialog
box may appear to alert you that new display
hardware has been found. Follow the on-screen
instructions to proceed. If you have any
problems, please contact the nearest address
provided in the "International Warranty
Conditions" section in the "Safety Instructions /
World-Wide Warranty Terms" guide.
Win/
Mac
• It may take a few moments until the computer
image is projected.
• Depending on the computer, the monitor may
go blank when using the external video output
on the computer.

Connecting a Computer-11
Connecting Equipment
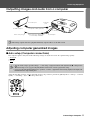
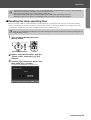
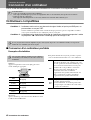
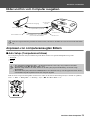
Outputting images and audio from a computer
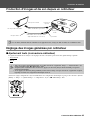
Adjusting computer generated images
fAuto setup (Computer connections)
The computer signal is analysed and the following settings are adjusted to ensure the optimum image quality.
• Tracking
g
• Position
•Sync.
g
Adjust the Tracking and Sync settings manually if Auto setup cannot be performed. ([Menu] button → "Image" → "Picture
Quality" → "Tracking", "Sync.") s "Image menu" P.13
Computer cable (optional)
To monitor port To Input B
port
stereo mini jack
To audio out port
stereo mini jack - 2RCA cable
(commercially available)
To Audio port
RCA jack
p
When using computer and video equipment alternately, swap the cable or use an audio switch.
p
• You can set Auto setup to off in the "Image"
→
"Auto Setup" configuration menu. (The default is ON) s "Image menu"
P. 1 3
• When Auto setup is set to off, press the [Auto] button on the remote control to perform auto setup.
• If you press the [Auto] button during Freeze operation, or when a configuration menu is being displayed, the display will
be halted and auto setup will take place.

12-Menu operation
Configuration Menus
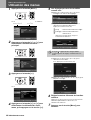
Menu operation
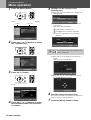
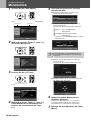
1
Press the [Menu] button.
The top configuration menu is displayed.
2
Press the [u] or [d] buttons to select
the Top Menu item.
3
Press the [e] button.
A Sub Menu is displayed.
4
Press the [u] or [d] buttons to select
the Sub Menu items, then press the
[e] button.
5
Settings can be changed in the
follwing ways:
(a)Press the [l] or [r] buttons to change the
setting values.
(b)Press the [u] or [d] buttons to select the
menu item.
Then press the [e] button.
(Green): Item currently set.
(Orange): Item currently selected.
Press the [e] button to confirm the
selection.
(c)Press the [l] or [r] buttons to select the
value.
Then, press the [e] button.
(d)Press the [u] [d] [l] [r] buttons to move
the image display position.
6
Set other items in the same way.
Press the [Esc] button to return to the previous
item or menu, or select "Return".
7
Press the [Menu] button to finish.
Top Menu
Sub Menu
p
The mark is displayed after items which perform a
setting or lead to a sub menu.

Function list-13
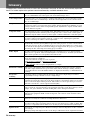
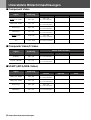
Function list
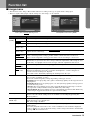
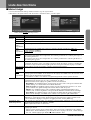
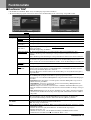
fImage menu
• The functions in the "Image" Menu will be different according to the type of signal which is being input.
• When no signal is being input, only the settings for "Auto Setup" can be adjusted.
Video (Video/S-Videog/Component)
RGB (RGB-Video/Analog RGB)
Sub menu Function
Picture
Quality
Brightness Adjusts the brightness of the image.
Contrast
g Adjusts the contrast of the image.
Sharpness Adjusts the sharpness of the image.
Saturation
(Video only)
Adjusts the colour depth.
Tint
(Video only)
(Adjustment is only possible when Component Video
g or NTSC signals are being input)
Adjusts the tint of the image.
Color
Temperatureg
Adjusts bright colours from a reddish tinge to a bluish tinge.
Lower colour temperature settings produce redder colours and softer colour tones.
Higher colour temperature settings produce bluer colours and sharper colour tones.
Flesh Tone Adjusts the green colour level.
The intensity of green tones becomes stronger when the adjustment value is high as does
the intensity of red/purple tones become stronger when the adjustment value is low.
Tracking
g
(RGB only)
Adjusts the image when vertical stripes appear in the image.
Sync.
g
(RGB only)
Adjusts the image when flickering, fuzziness or interference occur in the image.
Flickering and fuzziness may also occur when the brightness, contrast, sharpness or
keystone correction settings are adjusted.
Best results can be obtained by adjusting the tracking before the sync.
Color Mode Corrects the vividness of the image colour. The settings can be saved separately for each
type of source (computer or video).
Select from 4 different quality settings depending on the type of scene.
• Dynamic: Best for projecting video games. Vivid image quality can be enjoyed even in
bright places.
•Living Room: Best for projecting sports, etc. TV style image quality can be projected,
even in the living room.
•Theatre: Best for watching movies with a generally bright feel. The range of colours
are expressed vividly without lowering the luminosity of the lamp.
• Theatre Black: Best for watching movies in a pitch black environment. The luminosity
of the lamp is dropped and colours are expressed more subtly.
Memory Saves image adjustment values. Select "Memory1" or "Memory2" and press the [e]
button to save the current settings. You can recall the saved settings by pressing the
[Memory] button.
Auto Setup
(RGB only)
ON: When the input source is switched to a computer signal, the projector automatically
adjusts the image to its optimal state.
OFF: Auto Setup is disabled.
Reset Resets all the adjustment values within the "Image" menu (except for "Memory") to their
default settings.
• Press the [e] button and select "Yes" on the confirmation screen which is displayed.
• Select "All Reset" to restore all menu settings, such as image and sound, to their default
settings. s "Reset menu" P.15

14-Function list
Configuration Menus
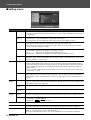
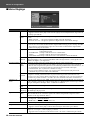
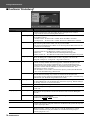
fSetting menu
Sub menu Function
Screen Position Moves the image display position vertically and horizontally.
• Press the [e] button and adjust the display area on the Position adjustment screen which
is displayed.
Zoom
Caption
Adjustment is possible only when the Zoom aspect function has been selected.
• Vertical size : You can adjust the vertical size of the image.
• Zoom Position: You can adjust the vertical movement of the display position.
Keystone Corrects vertical keystone distortion in the image.
• The projected image changes when keystone correction is carried out.
• If the images become uneven in appearance after keystone correction has been carried
out, decrease the sharpness setting.
Projection • Front : Image is displayed, as is. No vertical/horizontal reversal performed.
• Front/Ceiling: The image is displayed vertically reversed.
• Rear : The image is displayed horizontally reversed.
• Rear/Ceiling : The image is displayed vertically and horizontally reversed.
Setup Level You can select one of two preset black levels.
(When the image source is an NTSC Video/S-Video signal, or when the image source has
been set to Input A, "Component".)
Operation Sleep Mode Sets the energy saving option for when no signal is being input.
• When a Sleep Mode interval has been set, the projector will enter Sleep Mode when no
operation has been carried out for the set time (5, 10 and 30 minutes). Projection will shut
down and the projector enters a standby state after cooling down. (The power indicator
lights orange).
• Projection starts again when the [Power] button is pressed on the projector's contol panel
or the remote control.
Child Lock Sets child lock to ON or OFF.
When child lock is set to "ON", the power will not come on unless you press and hold the
[Power] button on the control panel for at least 3 seconds. (The remote control functions as
normal.)
On Screen
Display
Message When set to "OFF", messages such as "No Signal.", and the name of the selected input
source or colour mode will no longer be displayed. Warning messages such as "Replace the
lamp" will continue to be displayed.
Background
Color
Sets the background colour to black or blue.
Startup
Screen
Sets whether or not the "EPSON" logo will be displayed during projector startup.
Input
Signal
Video
Signal
Selects the colour system of the video signal being input.
(Changes in signal format will only be noticeable when the input source is Video/S-Video.)
Input A You can switch between the sources connected to Input A.
• Component: YCbCr
g/YPbPrg
• RGB-Video: SCART
g, Sync on Green
Volume Adjusts the volume setting
Language Selects the language in which on-screen messages are displayed.
• Press the [e] button and select the desired language from the list which is displayed.
Reset Resets all the adjustment values within the "Setting" menu (except for "Child Lock",
"Input A" and "Language") to their default settings.
• Press the [e] button and select "Yes" on the confirmation screen which is displayed.

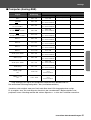
Function list-15
Configuration Menus
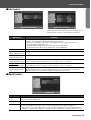
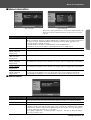
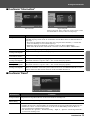
fInfo menu
fReset menu
Video/S-Video Input A/Input B
When component video is being input into the Input A port,
the Refresh Rate and Sync Info will not be displayed.
Sub menu Function
Lamp Hours Displays the cumulative lamp operating time. From 0 to 10 hours, 0H is displayed. After
10 hours, the usage time is displayed in hourly increments.
• When the accumulated usage time of the lamp reaches the appropriate time (*), a
warning will be displayed in red.
* If Theatre Black has been used continuously: About 2900 hours
If other modes have been used continuously: About 1900 hours
Source Displays the input source being projected.
Input Signal
(Input A/Input B only)
Displays the input signal settings.
Video Signal
(Video/S-Video only)
Displays the Video signal format.
Resolution
(Input A/Input B only)
Displays the input resolution.
(Does not appear when the input source is composite video or S-Video.)
Refresh Rate
g
(Input A/Input B only)
Displays the refresh rate
(Does not appear when the input source is composite video or S-Video.)
Sync Info
(Input A/Input B only)
Displays picture signal information.
In the event that you are having problems with your projector and need to contact an
EPSON dealer, please quote the information displayed on this screen.
Sub menu Function
Lamp-Hours
Reset
Resets the lamp operating time. When this command is selected, the cumulative lamp operating
time is reset to the default value.
Memory Reset Resets all settings stored in Memory.
All Reset Resets all items in the configuration menus to their default settings.
• Press the [e] button and select "Yes" on the confirmation screen which is displayed.
• Select "Reset" in an individual menu to reset only the settings for the items in that sub menu.
• "Memory", "Child Lock", "Input A", "Language" and "Lamp Hours" settings will not be reset.

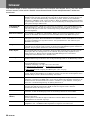
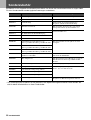
16-When You Suspect a Problem
Troubleshooting
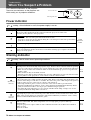
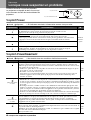
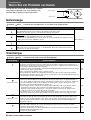
When You Suspect a Problem
First, check the indicators on the projector.
There are two indicators on the projector unit
which notify you of projector conditions.
Power indicator
lit flashing •If the indicator is not lit, the power supply is not on.
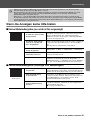
Warning indicator
lit flashing •Not lit under normal operating conditions.
Condition Cause/Remedy s
Orange
Standby state (Not abnormal)
The power cable should only be disconnected when the projector is in this state.
Press the [Power] button to start projection.
Quick
Reference
Guide
Orange
Cool-downg in progress (Not abnormal)
• Please wait. The cool-down period lasts about 20 seconds.
• You cannot operate the [Power] button during the cool-down period. Press the power button
again after cool-down has finished.
Green
Projection in progress (Not abnormal)
Green
Warming-up (Not abnormal)
Please wait. Warming up takes about 40 seconds. When warming up is complete, the indicator
changes to steady green.
Condition Cause/Remedy s
Red
High internal temperature (overheating)
The lamp turns off automatically and projection stops. Wait for about 5 minutes without operating
the projector. After about 5 minutes have passed, unplug the power cable and check the following:
• Make sure the air filter and ventilation outlet are clear and that the projector is not positioned
against a wall.
• If the air filter is dirty, it should be cleaned.
When the power cable is plugged back in, the projector will return to its previous state. Press the
[Power] button on the projector or on the remote control to turn it back on.
P.8
P.2 0
Red
(0.5 second
interval)
Lamp problem
• Disconnect the power cable from the electrical outlet. Remove the lamp and check that it is not
broken. If the lamp is not broken, re-install it. Reconnect the power cable and press the [Power]
button on the projector or the remote control to turn it back on.
• If the lamp is broken, please contact your dealer or the nearest address provided in the
"International Warranty Conditions" in the "Safety Instructions/World-Wide Warranty Terms"
guide (You will not be able to use the projector until the lamp is replaced).
• Check that the lamp and lamp cover are securely installed. If the lamp or lamp cover are not
securely installed, the lamp will not switch on.
P.2 2
Red
(1 second
interval)
Internal problem
Stop using the projector, disconnect the power cable from the electrical outlet and contact your
dealer or the nearest address provided in the "International Warranty Conditions" in the "Safety
Instructions/World-Wide Warranty Terms" guide.
Orange
High-speed cooling in progress
(This is not abnormal, but, if the temperature rises too high again, projection will stop
automatically.)
Set up the projector in a place which is well ventilated and ensure the air filter and ventilation
outlet are clear.
Clean the air filter.
P.8
P.2 0
Power indicator
Warning indicator

When You Suspect a Problem-17
Troubleshooting
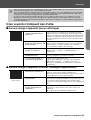
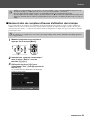
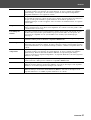
When the indicators provide no help
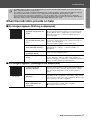
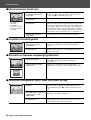
fNo images appear (Nothing is displayed)
fNo images appear (Messages are displayed)
p
• If problems with projection do occur, but the indicators do not show any abnormal conditions, please refer to the section
below, "When the indicators provide no help".
• If a condition occurs which is not listed in this table, please consult your dealer or contact the nearest address provided in
the "International Warranty Conditions" in the "Safety Instructions/World-Wide Warranty Terms" guide.
• If you follow the above steps and are still unable to correct the problem, please cease using the projector, unplug the
projector from the electrical outlet and request repairs from your dealer or nearest address provided in the "International
Warranty Conditions" in the "Safety Instructions/World-Wide Warranty Terms" guide.
• Was the power turned off
and then straight back on
again?
You cannot begin projecting again for at least a minute
after projection has been stopped, even if you press the
[Power] button on the control panel or remote control.
Allow the projector to cool-down completely before
projecting again.
• Has a Sleep Mode interval
(5, 10 or 30 minutes) been
set?
When a Sleep Mode interval has been set, the lamp cuts
out after no operations have been carried out for the set
time (5, 10 or 30 minutes).
The power indicator lights orange at this time.
• Has the image brightness
been adjusted correctly?
Adjust the brightness in the following way.
[Menu] button → "Image" → "Picture Quality" →
"Brightness".
• Is the projected image
completely black?
Some images being displayed, including some screen
savers, may be completely black.
• Is an image signal being
input?
Check if a picture signal is being input.
Set the "Message" option to "ON" in the "Setting" →
"On Screen Display" → "Message" configuration menu, in
order to view the picture signal information.
"No Signal."
• Is the input source
properly selected?
Press the [Source] button on the Control panel until the
correct input source is selected. For the remote control,
press the [Input A/B] button or the [S-Video/Video]
button.
• Are the cables connected
properly?
Check that the cables are securely connected.
Depending on the equipment you are using, some settings
may need to be made on the video equipment. Refer to the
User's guide of your video equipment.
• Has external video output
been selected on the
computer?
When using a laptop or a PC with an in-built monitor,
select external video output on the computer.
s "Laptop connection" P.10

18-When You Suspect a Problem
Troubleshooting
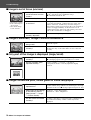
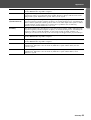
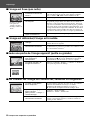
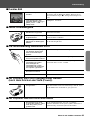
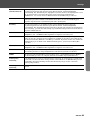
fImage is out of focus (unclear)
fImage is distorted / Image contains interference
fOnly part of the image is displayed (large/small)
fImage colours are poor, tinted green or tinted red/purple
• The image is fuzzy
• Part of the image is
out of focus
• The whole image
is out of focus
• Is the projector at the
correct distance from the
screen?
The optimum range for projection is 73-1165cm (2.4-
38.2ft.). Set the projector within this range.
s "Installation method" P.8
• Is the lens dirty? s "Cleaning the lens" P.20
• Has condensation formed
on the lens?
If the projector is suddenly taken from a cold environment
to a warm environment, condensation may form on the
surface of the lens, and this may cause the images to
appear fuzzy. Set the projector up in the room in which it
is to be used approximately one hour before use. If
condensation forms on the lens, turn off the power and
wait for the condensation to disappear.
• Has the focus been
correctly adjusted?
Turn the focus ring to adjust the focus.
• Is an extension cable
being used?
If using an extension cable, electrical interference may
affect the signals.
• Are the cables connected
correctly?
Check that the cables are securely connected.
Interference may occur if the cables are not connected
securely.
• Is the aspect ratio set
correctly?
Press the [Aspect] button to change the aspect ratio.
s "Changing aspect ratio" Quick Reference Guide
• Has the "Position" been
adjusted correctly?
Use the "Setting" → "Screen" → "Position"
configuration menu to correctly adjust the display
position.
• Does the lamp need
replacement?
When the lamp is due for replacement, colours will
weaken and the image will become dark. Replace the lamp
when this is the case. s "Lamp replacement period" P.22
• Adjust each of the settings
in the following menus.
[Menu] button → "Image"
→ "Picture Quality"
"Contrast", "Color Temperature"
"Saturation", "Tint", "Brightness"
• Are the cables connected
correctly?
If cables connecting to component video equipment are
not connected securely, certain colours may not be
displayed.
La page charge ...
La page charge ...
La page charge ...
La page charge ...
La page charge ...
La page charge ...
La page charge ...
La page charge ...
La page charge ...
La page charge ...
La page charge ...
La page charge ...
La page charge ...
La page charge ...
La page charge ...
La page charge ...
La page charge ...
La page charge ...
La page charge ...
La page charge ...
La page charge ...
La page charge ...
La page charge ...
La page charge ...
La page charge ...
La page charge ...
La page charge ...
La page charge ...
La page charge ...
La page charge ...
La page charge ...
La page charge ...
La page charge ...
La page charge ...
La page charge ...
La page charge ...
La page charge ...
La page charge ...
La page charge ...
La page charge ...
La page charge ...
La page charge ...
La page charge ...
La page charge ...
La page charge ...
La page charge ...
La page charge ...
La page charge ...
La page charge ...
La page charge ...
La page charge ...
La page charge ...
La page charge ...
La page charge ...
La page charge ...
La page charge ...
La page charge ...
La page charge ...
La page charge ...
La page charge ...
La page charge ...
La page charge ...
La page charge ...
La page charge ...
La page charge ...
La page charge ...
La page charge ...
La page charge ...
La page charge ...
La page charge ...
La page charge ...
La page charge ...
La page charge ...
La page charge ...
La page charge ...
La page charge ...
La page charge ...
La page charge ...
La page charge ...
La page charge ...
-
 1
1
-
 2
2
-
 3
3
-
 4
4
-
 5
5
-
 6
6
-
 7
7
-
 8
8
-
 9
9
-
 10
10
-
 11
11
-
 12
12
-
 13
13
-
 14
14
-
 15
15
-
 16
16
-
 17
17
-
 18
18
-
 19
19
-
 20
20
-
 21
21
-
 22
22
-
 23
23
-
 24
24
-
 25
25
-
 26
26
-
 27
27
-
 28
28
-
 29
29
-
 30
30
-
 31
31
-
 32
32
-
 33
33
-
 34
34
-
 35
35
-
 36
36
-
 37
37
-
 38
38
-
 39
39
-
 40
40
-
 41
41
-
 42
42
-
 43
43
-
 44
44
-
 45
45
-
 46
46
-
 47
47
-
 48
48
-
 49
49
-
 50
50
-
 51
51
-
 52
52
-
 53
53
-
 54
54
-
 55
55
-
 56
56
-
 57
57
-
 58
58
-
 59
59
-
 60
60
-
 61
61
-
 62
62
-
 63
63
-
 64
64
-
 65
65
-
 66
66
-
 67
67
-
 68
68
-
 69
69
-
 70
70
-
 71
71
-
 72
72
-
 73
73
-
 74
74
-
 75
75
-
 76
76
-
 77
77
-
 78
78
-
 79
79
-
 80
80
-
 81
81
-
 82
82
-
 83
83
-
 84
84
-
 85
85
-
 86
86
-
 87
87
-
 88
88
-
 89
89
-
 90
90
-
 91
91
-
 92
92
-
 93
93
-
 94
94
-
 95
95
-
 96
96
-
 97
97
-
 98
98
-
 99
99
-
 100
100


Epson EMP-TW10 Le manuel du propriétaire
- Catégorie
- Projecteurs de données
- Taper
- Le manuel du propriétaire
dans d''autres langues
- English: Epson EMP-TW10 Owner's manual
- Deutsch: Epson EMP-TW10 Bedienungsanleitung
Documents connexes
Autres documents
-
Yamaha LPX-500 Manuel utilisateur
-
-
-
Panasonic PTL780U Manuel utilisateur
-
-
Yamaha DPX-1200 Le manuel du propriétaire
-
-
Sony SDM-V72W Manuel utilisateur
-
Mi лазерный проектор Smart Projector mini (M055MGN) Manuel utilisateur
-
Itel PJH431 Manuel utilisateur