Itel PJH431 Manuel utilisateur

Catégorie
Projecteurs de données
Taper
Manuel utilisateur
GC 007 传音英法文说明书
2022-07-22
USERS
MANUAL
PJH431
1
Note
Do not open the enclosure to avoid electric shock.No components in the
projector can be repaired by customers.Please entrust qualied professional
maintenance personnel for repair.
The identication warns users of the voltage without insulating treatment
in the projector,which may cause electric shock via surface magnetic eld.
Therefore,its very dangerous to contact with any component inside the
projector.
The identication reminds users to be very careful and cautious in the
operation and maintenance.Therefore,carefully read the manual to
avoid any failures.
Do not expose the projector to rain or moisture to avoid re or electric shock;
do not open the enclosure.
Warning
Important Safety Considerations
2
Identication [Electronic information product pollution control identication requirements]
(1) Name, content and component of 6 hazardous substances included
The name, content and component of 6 hazardous substances included in the product
are as follows:Name and content of toxic and hazardous substances in the product
Toxic and Hazardous Substances or Element
Component Name
Lead
(Pb)
Mercury
(Hg)
Cadmium
(Cd)
Hexavalent
Chromium
(Cr6+ )
Polybrominated
Biphenyls
(PBB)
Polybrominated
Diphenyl Ethers
(PBDE)
Real Equipment
Base Plate
Framework
Light source
Connecting Wires
between Machines
Note (meaning of or ×)
.
1."Framework" of component name, including the external framework and internal components .
(2) Electronic Information Product Pollution Control Identication
The national [Electronic Information Product Pollution Control Management Method] published on
Feb 28th, 2006, identies the environmental protection service life of this product.
It will not have a profound impact on the environment pollution, human body and property within the
age limit from the production date as long as complying with the safety and use considerations. The
electronic information products shall be recycled and reused as required in the laws and regulations
of various regions when they complete the normal use and are abandoned.
(3)
Package Recycling Marks (GB 18455-2001)
Various package materials are identied according to the package recycling marks (GB184552001).
Package materials
shall be abandoned as required in the legal provisions in terms of package
material recycling and reusing.
indicates the content of the toxic and hazardous substances in the component
is below the limitation required in SV 1363-2006 standard.
indicates the content of some toxic and hazardous substances in the component
is above the limitation required in SJ n 1363-2006 standard.
Important Safety Considerations
3
Important Safety Considerations
4
Important Safety Considerations
Return
Power LED Light
5
Keypad
Keystone Correction
Focusing Ring
Lens
Infrared Receiver
Air Outlet
Right
Up
Left
Ok
Down
ATV In
Nut
6
AC Port
Maintenance Window
Adjusting Knob
Air Inlet
Audio Output
AV Input
USB Port 1
HD Port
Loudspeaker
Infrared Receiver
USB Port 2
Dust Cover
7
Phone
TV Signal
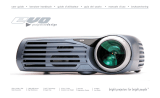
Equipment Connection and Equipment
Blue Ray Players and
Other HD Devices
Computer
HDMI Cable
USB Disk
Video
Switch Cable
Headsets
Loudspeaker
DVD/VCD
Players and Others
Yel low
(Vi deo )
Whi te
(Le ft
Cha nne l)
Red
(Ri ght
Cha nne l)
Attentions:
Technical Points
:Signal Flow Direction
Attentions:
Noise or image quality degradation may
occur due to using a cable longer than that
supplied with the product,or extending the
RGB cable.We recommend to use a noise
eliminator or other devices for long cables.
Please consult with the installer or other
professionals.
To obtain the clearest video,set the personal
computer’s output frequency to 60 Hz.
What ' s RGB Port ?
The Port sends the video signal to a monitor
or other devices . Three colors , R ( Red ), G
( Green ) and B ( Blue ), are respectively
independent and transmitted as analog
signals by the system . What the personal
computer displays is represented by RGB
color space . All colors can be reproduced
by the combination of the three colors .
These Ports mainly use mini D - Sub 15-core
standard , which stipulates their shapes ,
while the control signals and others for
signal synthesis are in synchronous
transmission with RGB color signals .
What frequency are supported ?
The supported frequency is a term , indicating
the scanning frequency width supported by
the projector . Scanning frequency is the speed
of the display drawing the screen . The number
of lines drawn in a second is called horizontal
scanning frequency , and the number of
screens redrawn in a second is called vertical
scanning frequency . The more the scanning
frequency , the higher the resolution , the more
the number of colors expressed at the same
time , and the less liable the display ickers .
For example , the display With the vertical
scanning frequency of 70 Hz can draw 70
times of screen in a second .
The projection image may be incorrect though
the image on LCD is correct as both the laptop
LCD and the projector are displaying images .
Please stop the synchronous display of the
laptop and try only external output display
in this case .
8
Equipment Connection and Materials
Attentions:
Note: The contents in the
above table was last updated
in April 2016, refer to the
actual contents in the
computer manual.
There are various output modes of external output signals,
depending on the personal computer manufacturer. See the
following table for details.
Manufacturer
Acer
Dell
Epson
Fujitsu
Hewlett-Packard
IBM
Lenovo
NEC
Panasonic
Sharp
Sony
Zotac
Toshiba
Keys
Fn+F5
Fn+F8
Fn+F8
Fn+F10
Fn+F4
Fn+F7
Fn+F10
Fn+F3
Fn+F3
Fn+F5
Fn+F7
Fn+F3/F5
Fn+F5
+
+
9
Play/Pause
IR Transmitter
Power Switch
Input Source
Menu
OK
Move Left Move Right Move Up Move Down
Volume Down Volume Up
Return
Mute
Remote Control
Attentions:
Please be careful when operating the remote control .
Do not drop or tread on the remote control , or splash
any kind of liquid into the remote control .
Do not place the remote control near a heat source ,
in a place exposed to direct sunlight or in a
damp room .
10
Keystone Correction Ring
Focusing Ring
You can choose to place the projector on the horizontal place or
attach it to a hanging bracket.
The hanging bracket is an
accessory that is not supplied.
Horizontal Placement Hanging Bracket Installation
Attentions:
Adjust the Focal Length
Distortion Image Diagram
Keystone Distortion
Blurred Image
Adjust the projector's keystone correction ring
and the focusing ring to obtain a satisfactory image .
It is recommended to adjust the keystone correction
ring in case of keystone distortion in the image
( Figure l on the right ).
When the screen image is blurred ( Figure 2 on the
right ), it is recommended to adjust the focus
ring to improve the picture denition .
Please move forward or backward proportionally
in case the adjustment is unable to obtain
the satisfactory denition .
11
Adjust the image projected on the screen
Attentions:
Check the horizontal and vertical screen settings
Change the projection mode in
case the projector is hanging
from the ceiling, or in a rear
projection system.
(1) Please move the project to one side in case of left
or right screen offsets .( Align the screen center to
the projector lens center )
(2) Please adjust with front adjuster for vertical offsets .
(3) Please place the projector on a horizontal place
for angle offsets
(4) The projection screen as shown in the gure indicates
the projector is not align to the screen . Please adjust
the projector ` s location to align to the screen .
(1) Use the key on the remote control to shutdown
the projector .
(2) Press and hold the key on the control panel
to shutdown the projector .
(3) Press the soft key on the Port and shutdown
the projector according to the prompts ( only
effective for smart Android version ).
(4) Please unplug the power cord after the projector
shutdowns to save energy . Press and hold the
key on the control panel to shutdown the projector .
12
Safe Shutdown
Correct Shutdown and Storage
Do not place the projector
in direct sunlight.
Attentions:
The projector can be shutdown and be stored safely
in the following steps .
1. Press the key on the operation panel or
the remote control of the projector and shutdown
the projector according to system prompts .
2. Screw in the focusing ring to ensure the
lens fully stored inside the projector .
3.Cover the dust proof lens to the lens, and store the
device in a dry and cool place.
32
65
100
150
1.1
2.0
3.0
4.5
0.71 * 0.40
1.44 * 0.81
2.21 * 1.25
3.32 * 1.87
13
Date is for reference only.
Projection Distance and Size
Unit:meter
Host Lens Surface
Screen Size Identication(Inch)
Screen Size
Measurement
(Inch)
Screen Size
WidthxHeight
(Meter)
Projection Distance
(Meter)
Width
Height
Screen Size
(Diagonal)
Design Allowable Error:+/-8%.
Measuring points in this form
a re top - most and center
positions of the lens ,
and assume the projector is
placed horizontally ( front
and rear adjusters re
completely removed ).
14
Maintenance
Cleaning Method
Make sure to unplug the power plug from the power outlet before cleaning .
Do not use insecticides or other volatile chemicals on the projector or lens .
Also do not allow the projector in long contact with the rubber or vinyl products .
It will result in a damaged or peeling coating .
Clean the Projector
Wipe the projector with a soft and dry cotton cloth . Wipe using a soft cloth
with diluted neutral detergent and wipe up with a dry cloth for very serious
smudges . Please comply with the attentions for wiping with a chemical ber cloth .
Do not use thinner , benzene or other solvents to avoid lower quality or spraying
coating peeling off .
A brush can be inserted in the front of the cleaner for cleaning the air vent .
Avoid direct use of the cleaner without any joints or nozzles ,
Do not scrap the projectors main part with nails or other rigid objects to avoid
scratching .
Lens Smudges
Clean with the same method as the camera lens : use the cleaning web roller for
professional air blowers or glasses lens . Be careful not to scrap the lens .
Cleaning the inlet and outlet
Dust at the inlet and outlet prevents the air ventilation , resulting in temperature
rise and causing failure . Cleaning guideline : clean once at least every 10,000
hours of use . Turn off the power and disconnect the power cord .
Clean the external with an electric dust collector . Install a brush head converter
on the cleaner . Please note that do not use the cleaner without a converter or
an adapter without a brush head .
CAUTION No components that can be repaired by users exist in the projector. Do not
open the projector without authorization to avoid electric shock.
Contact your authorized professionals for repair as needed.
MANUEL
D'UTILISATION
PJH431
1
Consignes de Sécurité Importantes
Attention :
Merci d'avoir acheté cette gamme de projecteur numérique.
Veuillez lire le présent manuel avant d'utiliser l'appareil pour la premre fois.
Veuillez conserver ce manuel avec la carte de garantie dans un endroit sûr pour
pouvoir y revenir au besoin après la lecture.
Veuillez lire ce "MANUEL D'UTILISATION" pour trouver les informations nécessaires
pour la bonne utilisation ou pour le dépannage de l'appareil.
Remarque :
N'essayez en aucun cas de démonter l'appareil pour éviter l'électrocution.
Aucun composant du projecteur ne peut être réparé par les clients. Conez les
opérations d'entretien et de réparation à un technicien qualié.
Le symbole avertit l'utilisateur de la présence de tensions dangereuses
non isolées dans le projecteur qui peuvent provoquer des chocs
électriques. Par conséquent, il est très dangereux d'entrer en contact
avec un composant à l'intérieur du projecteur.
Le symbole rappelle aux utilisateurs d'être très prudents pendant
l'utilisation et la maintenance de l'appareil. Par conséquent, lisez
attentivement le manuel pour éviter toute défaillance.
Attention
Pour éviter un incendie ou une électrocution, n'exposez pas le projecteur à la
pluie ou à l'humidité; évitez de le démonter.
2
.
Consignes de Sécurité Importantes
Identication [Exigence d'identication pour le contrôle de la pollution
causée par les produits électroniques d'information]
(1) Nom, contenu et composant de 6 substances dangereuses incluses
Les nom, contenu et composant des 6 substances dangereuses
incluses dans le produit sont les suivants: Nom et contenu des
substances toxiques et dangereuses dans le produit
Substances ou Éléments Toxiques et Dangereux
Nom du
Composant
Plomb
(Pb)
Mercure
(Hg)
Cadmium
(Cd)
Chrome
Hexavalent
6+
(Cr )
Biphényles
polybromés
(PBB)
Éthers
diphényliques
Polybromés
(PBDE)
Équipement Réel
Plaque de Base
Cadre
Source lumineuse
Cables de Connexion
entre Machines
Remarque (signication de ou ×)
indique que le contenu des substances toxiques et dangereuses dans le composant
est inférieur à la limitation requise dans la norme SV 1363 -2006.
× indique que le contenu des substances toxiques et dangereuses dans le composant
est supérieur à la limitation requise dans la norme SJ n 1363 -2006.
1. "Cadre" du nom du composant, y compris le cadre externe et les composants internes.
(2) Identication Produits Electroniques d'Information pour Contrôle Pollution
La [Méthode National e de Gest io n de la Po llution Causée par le s Produi ts
Electroniques] publiée le 28 Février 2006, identie la durée de vie écologique de ce
produit.
Il n'aura pas d'impact profond sur la pollution de l'environnement, le corps humain et
les biens dans la limite d'âge à compter de la date de production tant qu'il respecte les
considérations de curi et d'utilisation. Les produits d'information électroniques
doivent être recycs et réutilisés conformément aux lois et glements des différentes
régions lorsqu'ils deviennent obsolètes et sont abandonnés.
(3) Marques de recyclage des emballages (GB 18455-2001)
Divers matériaux d'emballage sont identiés en fonction des marques de recyclage des
emballages (Gb184552001).
  • Page 1 1
  • Page 2 2
  • Page 3 3
  • Page 4 4
  • Page 5 5
  • Page 6 6
  • Page 7 7
  • Page 8 8
  • Page 9 9
  • Page 10 10
  • Page 11 11
  • Page 12 12
  • Page 13 13
  • Page 14 14
  • Page 15 15
  • Page 16 16
  • Page 17 17
  • Page 18 18
  • Page 19 19
  • Page 20 20
  • Page 21 21
  • Page 22 22
  • Page 23 23
  • Page 24 24
  • Page 25 25
  • Page 26 26
  • Page 27 27
  • Page 28 28
  • Page 29 29
  • Page 30 30
  • Page 31 31
  • Page 32 32
  • Page 33 33
  • Page 34 34
  • Page 35 35

Itel PJH431 Manuel utilisateur

Catégorie
Projecteurs de données
Taper
Manuel utilisateur

dans d''autres langues