Brennenstuhl LED spotlights AL 1050 P with infrared motion detector 10W, 1010lm, IP44 Manuel utilisateur
- Taper
- Manuel utilisateur

LED Strahler
LED Light
AL 1050 / AL 2050 / AL 3050
AL 1050 P / AL 2050 P / AL 3050 P
Bedienungsanleitung . . . . . . . . . . . . . . . . . . . . . . . . . . . . . . . . . . . . . . . . . . 3
Operating instructions . . . . . . . . . . . . . . . . . . . . . . . . . . . . . . . . . . . . . . . . 7
Mode d‘emploi . . . . . . . . . . . . . . . . . . . . . . . . . . . . . . . . . . . . . . . . . . . . . . . . . .11
Gebruikshandleiding . . . . . . . . . . . . . . . . . . . . . . . . . . . . . . . . . . . . . . . . .15
Istruzioni per l’uso . . . . . . . . . . . . . . . . . . . . . . . . . . . . . . . . . . . . . . . . . . . . .19
Bruksanvisning . . . . . . . . . . . . . . . . . . . . . . . . . . . . . . . . . . . . . . . . . . . . . . . . .23
Manual de instrucciones . . . . . . . . . . . . . . . . . . . . . . . . . . . . . . . . . . . . .27
Instrukcja obsługi . . . . . . . . . . . . . . . . . . . . . . . . . . . . . . . . . . . . . . . . . . . . . .31
Návod k obsluze . . . . . . . . . . . . . . . . . . . . . . . . . . . . . . . . . . . . . . . . . . . . . . . .35
Kezelési útmutató . . . . . . . . . . . . . . . . . . . . . . . . . . . . . . . . . . . . . . . . . . . . . .39
. . . . . . . . . . . . . . . . . . . . . . . . . . .43
Kullanım kılavuzu . . . . . . . . . . . . . . . . . . . . . . . . . . . . . . . . . . . . . . . . . . . . . .47
Käyttöohje . . . . . . . . . . . . . . . . . . . . . . . . . . . . . . . . . . . . . . . . . . . . . . . . . . . . . . . .51
Οδηγίε χρήση . . . . . . . . . . . . . . . . . . . . . . . . . . . . . . . . . . . . . . . . . . . . . . . . .55
Manual de instruções . . . . . . . . . . . . . . . . . . . . . . . . . . . . . . . . . . . . . . . . .59
Kasutusjuhend . . . . . . . . . . . . . . . . . . . . . . . . . . . . . . . . . . . . . . . . . . . . . . . . . .63
Návod na používanie . . . . . . . . . . . . . . . . . . . . . . . . . . . . . . . . . . . . . . . . .67
Navodila za uporabo . . . . . . . . . . . . . . . . . . . . . . . . . . . . . . . . . . . . . . . . . .71
Naudojimo instrukcija . . . . . . . . . . . . . . . . . . . . . . . . . . . . . . . . . . . . . . . .75
Lietošanas instrukcija . . . . . . . . . . . . . . . . . . . . . . . . . . . . . . . . . . . . . . . .79
20P123 Mobiler LED Strahler AL 0533153 210423.indd 120P123 Mobiler LED Strahler AL 0533153 210423.indd 1 23.04.2021 13:44:3823.04.2021 13:44:38

1 2 3
5 6
9
10
7 8
4
1
2
2
1
4
3
!
!
20P123 Mobiler LED Strahler AL 0533153 210423.indd 220P123 Mobiler LED Strahler AL 0533153 210423.indd 2 23.04.2021 13:44:3923.04.2021 13:44:39

3
Bedienungsanleitung
LED Strahler
AL 1050 / AL 2050 / AL 3050
AL 1050 P / AL 2050 P / AL 3050 P
Achtung: Lesen Sie vor Gebrauch des Produktes diese Gebrauchsanweisung bitte aufmerksam
durch und bewahren Sie sie anschließend gut auf!
SICHERHEITSHINWEISE
1. Überprüfen Sie vor jeder Benutzung das Produkt auf etwaige Beschädigungen. Benutzen Sie
das Produkt niemals, wenn Sie irgendwelche Beschädigungen feststellen. Wenden Sie sich in
diesem Fall an eine Elektrofachkraft oder an die angegebene Serviceadresse des Herstellers.
Bei Nichtbeachtung besteht Lebensgefahr durch elektrischen Schlag!
2. Verwenden Sie das Produkt nicht in explosionsgefährdeter Umgebung, Lebensgefahr!
3. Halten Sie Kinder von dem Strahler fern. Kinder können die Gefahr durch den elektrischen
Strom nicht einschätzen.
4. Bitte niemals direkt in das Licht schauen.
5. Eine zerstörte Schutzabdeckung kann nicht ersetzt werden. Der Strahler muss entsorgt
werden.
6. Die äußere exible Leitung dieser Leuchte kann nicht ausgetauscht werden; falls die Leitung
beschädigt ist, muss die Leuchte verschrottet werden.
7. Die Installation und Wartung des Strahlers muss durch eine qualizierte Fachkraft erfolgen.
8. Elektroinstallationen dürfen nur unter Einhaltung der Sicherheitsvorschriften (VDE 0100 für
Deutschland) durchgeführt werden.
9. Zum Anschluss muss eine VDE-zertizierte Anschlussleitung verwendet werden.
10. Der Strahler muss ordnungsgemäß geerdet werden (bei Schutzklasse I).
11. Wenn die Anschlussbox beschädigt wird, muss sie durch eine qualizierte Fachkraft ersetzt
werden.
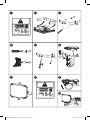
12. Schalten Sie vor der Installation stets die Spannungsversorgung ab (Abb. 1).
Vorsicht elektrischer Schlag.
13. Beachten Sie die empfohlenen Montagehöhen (siehe unter Montage).
Heiße Oberäche
Nicht geeignet für den Betrieb mit externen Dimmern.
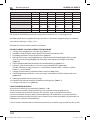
TECHNISCHE DATEN
Schutzklasse: I
Schutzart (Versionen ohne Bewegungsmelder): IP 54
Schutzart (Versionen mit Bewegungsmelder): IP 44
Temperaturbereich: -10°C bis +40°C
20P123 Mobiler LED Strahler AL 0533153 210423.indd 320P123 Mobiler LED Strahler AL 0533153 210423.indd 3 23.04.2021 13:44:3923.04.2021 13:44:39

44
Bedienungsanleitung AL X050, AL X050 P
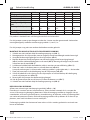
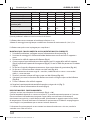
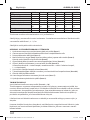
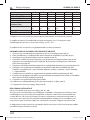
Typ AL 1050 AL 2050 AL 3050 AL 1050 P AL 2050 P AL 3050 P
Bewegungsmelder Nein Nein Nein Ja Ja Ja
Nenn-Leistung (W) 10 20 30 10 20 30
Strom 0,09 A 0,16 A 0,135 A 0,09 A 0,16 A 0,135 A
Leistungsfaktor 0,5 0,5 0,9 0,5 0,5 0,9
Maße Schutzabdeckung
(mm) 118 x 76 171 x 117 204 x 140 118 x 76 171 x 117 204 x 140
Maße L x B x H (mm) 93 x 124 x
101 180 x 135 x
111 216 x 165 x
136 150 x 124 x
107 180 x 194 x
117 216 x 220 x
136
Gewicht (g) 331 523,8 754 399,6 594,2 843
Max. projizierte Fläche (m²) 0,0116 0,0243 0,0357 0,0186 0,0350 0,0476
Dieses Produkt ist für Beleuchtungszwecke im Innen- und Außenbereich geeignet.
Der Strahler muss in einer Höhe von weniger als 3 m montiert werden.
Empfohlene Montagehöhe bei Modellen mit Bewegungsmelder 1,8 bis 2,5 m.
Der Strahler darf nicht für andere Zwecke eingesetzt werden.
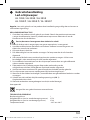
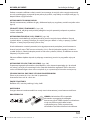
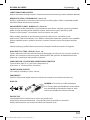
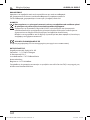
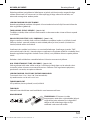
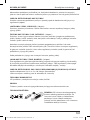
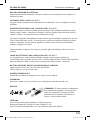
MONTAGE UND ANSCHLUSS AN STROMVERSORGUNG
1. Schalten Sie vor der Installation stets die Spannungsversorgung ab (Abb. 1).
2. Montage-Position: Der Strahler sollte idealer Weise mit der Wandhalterung befestigt werden.
3. Entfernen Sie den Haltebügel von dem Strahler (Abb. 2).
4. Markieren Sie die Position der Bohrlöcher für die Befestigung des Haltebügels (Abb. 3)
und bohren Sie entsprechende Löcher in die Wand (Abb. 4). Befestigen Sie den Bügel mit
geeigneten Schrauben an der Wand (Abb. 5).
5. Führen Sie die Anschlussleitung durch die mit einer Dichtung versehenen Kabeltülle
(Abb. 6.1).
6. Führen Sie die 3 Drähte in die Lüsterklemme und schrauben alle fest (Abb. 6.2).
Achten Sie auf die Kennzeichnungen N = blaues Kabel, Erdungszeichen = grün / gelbes
Kabel, L = braunes Kabel.
7. Stecken Sie die Lüsterklemme in den Strahler Kabeleingang (Abb. 6.3).
8. Schieben Sie die Kabeltülle in Richtung Strahler und schrauben diese am Strahler
Kabeleingang fest (Abb. 6.4).
9. Befestigen Sie den Strahler am Haltebügel.
10. Stellen Sie die gewünschte Position der Lampe ein und ziehen Sie die Schrauben fest
(Abb. 7).
11. Schalten Sie die Spannungsversorgung wieder ein (Abb. 8).
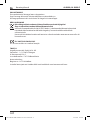
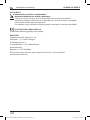
FUNKTIONSBESCHREIBUNG
(nur für Versionen mit Bewegungsmelder) (Abb. 9 + 10)
Diese Lampe ist mit einem Infrarot-Sensor ausgestattet. Sie schaltet sich automatisch an,
wenn der Sensor im Umfeld Bewegungen feststellt. Richten Sie den Bewegungsmelder
möglichst nicht auf Schwimmbecken, Heizluftabzüge, Klimaanlagen oder Objekte, die starken
Temperaturschwankungen ausgesetzt sind. Vermeiden Sie, den Bewegungsmelder auf Bäume
oder Büsche zu richten oder auf Plätze, an denen sich oft Haustiere aufhalten könnten.
20P123 Mobiler LED Strahler AL 0533153 210423.indd 420P123 Mobiler LED Strahler AL 0533153 210423.indd 4 23.04.2021 13:44:3923.04.2021 13:44:39

55
AL X050, AL X050 P Bedienungsanleitung
Der Bewegungsmelder kann horizontal nach rechts und links, sowie vertikal nach oben und
unten gedreht werden.
Beachten Sie bei der Anbringung des Strahlers, dass der Bewegungsmelder am
empndlichsten auf Bewegungen reagiert, die quer durch sein Erfassungsfeld laufen und am
wenigsten empndlich bei Bewegungen, die direkt auf das Gerät zulaufen.
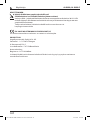
BEWEGUNGSMELDER EINSTELLEN
Drehen Sie die den montierten Strahler nach oben. Es erscheinen drei Regler an der Unterseite
des Bewegungsmelders (Abb. 9).
EMPFINDLICHKEIT SENS, MITTE: (Abb. 10)
Die Empndlichkeit bestimmt, ab welcher maximalen Distanz der Sensor durch die Bewegung
eines Menschen einschaltet.
LICHTEINSTELLUNG LUX, RECHTS: (Abb. 10)
Die Lichteinstellung bestimmt, ab welcher Helligkeit der Sensor des Strahlers einschaltet. Die
Position (Symbol Sonne - rechts) zeigt an, dass der Sensor am Tag und in der Nacht arbeitet, in
der Position (Symbol Mond - links) arbeitet der Sensor nur bei Nacht.
Zum Einstellen warten Sie, bis die gewünschte Umgebungshelligkeit erreicht ist. Stellen Sie
den Zeitsensor (TIME) auf minimale Zeit (10 sek.). Drehen Sie den Lichteinstellungsregler ganz
auf das Symbol (Mond). Drehen Sie den Regler langsam in Richtung Symbol (Sonne), bis sich
der Strahler durch Bewegung einschaltet.
Der Strahler wird sich nun ab der eingestellten Helligkeit beim Erkennen einer Bewegung
einschalten.
ZEITEINSTELLUNG TIME, LINKS: (Abb. 10)
Mit diesem Regler können Sie eine beliebige Einschaltzeit zwischen ca. 10 Sekunden und
4 Minuten wählen, nachdem die letzte Bewegung erfasst wurde. Durch Drehen des TIME-
Reglers im Uhrzeigersinn nimmt die Zeitspanne zu, gegen den Uhrzeigersinn nimmt sie ab.
BEWEGUNGSMELDER: PASSIVER INFRAROTSENSOR
Erfassungsbereich: bis zu 12 m / bis zu 180° (horizontal)
Zeiteinstellung: ca. 10 sek. bis 4 min.
LIEFERUMFANG
Strahler, Bedienungsanleitung, Schrauben, Dübel.
ZUBEHÖR
Passendes Zubehör nden Sie auf unserer Homepage www.brennenstuhl.com.
20P123 Mobiler LED Strahler AL 0533153 210423.indd 520P123 Mobiler LED Strahler AL 0533153 210423.indd 5 23.04.2021 13:44:3923.04.2021 13:44:39

66
Bedienungsanleitung AL X050, AL X050 P
WARTUNG ACHTUNG: Die LED-Leuchte enthält keine
Komponenten, die gewartet werden müssen.
Die Lichtquelle dieser Leuchte ist nicht ersetzbar;
wenn die Lichtquelle ihr Lebensdauerende
erreicht hat, ist die gesamte Leuchte zu ersetzen.
Die Leuchte darf nicht geönet werden.
REINIGUNG
Trennen Sie den Strahler vor der Reinigung von der Netzspannung.
Verwenden Sie keine Lösungsmittel, ätzende Reinigungsmittel oder ähnliches.
Benutzen Sie zur Reinigung nur ein trockenes oder leicht angefeuchtetes Tuch.
ENTSORGUNG
Elektrogeräte umweltgerecht entsorgen!
Elektrogeräte gehören nicht in den Hausmüll!
Gemäß Europäischer Richtlinie 2012/19/EU über Elektro- und Elektronikaltgeräte
müssen verbrauchte Elektrogeräte getrennt gesammelt und einer umweltgerechten
Wiederverwertung zugeführt werden. Möglichkeiten zur Entsorgung des ausgedienten
Geräts erfahren Sie bei Ihrer Gemeinde- oder Stadtverwaltung.
EUKONFORMITÄTSERKLÄRUNG
Die EU-Konformitätserklärung ist beim Hersteller hinterlegt.
HERSTELLER
Hugo Brennenstuhl GmbH & Co. KG
Seestraße 1 – 3 · D-72074 Tübingen
H. Brennenstuhl S.A.S.
4 rue de Bruxelles ∙ F-67170 Bernolsheim
lectra technik ag
Blegistrasse 13 · CH-6340 Baar
Für weitere Informationen empfehlen wir den Bereich Service/FAQ’s auf unserer Homepage
www.brennenstuhl.com.
20P123 Mobiler LED Strahler AL 0533153 210423.indd 620P123 Mobiler LED Strahler AL 0533153 210423.indd 6 23.04.2021 13:44:3923.04.2021 13:44:39

7
Operating Instructions
LED Spotlight
AL 1050 / AL 2050 / AL 3050
AL 1050 P / AL 2050 P / AL 3050 P
Attention: Before using the product, please carefully read the operating instructions and store
them in a proper location!
SAFETY INSTRUCTIONS
1. Always check the product for damage before use. Never use the product in case of any
damage. If this is the case, please refer to an electrician or the manufacturer’s service address.
Non-compliance poses a risk of fatal injury from electrical current!
2. Do not use the product in potentially explosive atmospheres – danger of death!
3. Keep the oodlight away from children. Children are not aware of the risks imposed by
electric current.
4. Please never look directly into the light.
5. A destroyed protective cover cannot be replaced. The oodlight has to be disposed of.
6. The external exible cable of this lamp cannot be exchanged; if the cable is damaged,
the lamp has to be scrapped.
7. The spotlight must be installed and serviced by a qualied technician.
8. Electrical installations may be performed only in compliance with safety regulations
(VDE 0100 for Germany).
9. A VDE-certied connection line must be used for the connection.
10. The spotlight must be properly grounded (with protection class I).
11. If the connection box is damaged, it has to be replaced by a qualied expert.
12. Always switch o the power supply before installation (Fig. 1). Caution: electric shock.
13. Observe the recommended mounting heights (see under Mounting).
Hot surface
Not suitable for applications with external dimmers.
TECHNICAL DATA
Protection class: I
Protection type (versions without motion detector): IP 54
Protection type (versions with motion detector): IP 44
Temperature range: -10 °C to +40 °C
20P123 Mobiler LED Strahler AL 0533153 210423.indd 720P123 Mobiler LED Strahler AL 0533153 210423.indd 7 23.04.2021 13:44:4023.04.2021 13:44:40

88
Operating Instructions AL X050, AL X050 P
Type AL 1050 AL 2050 AL 3050 AL 1050 P AL 2050 P AL 3050 P
Motion detector No No No Yes Yes Yes
Nominal power (W) 10 20 30 10 20 30
Power 0.09 A 0.16 A 0.135 A 0.09 A 0.16 A 0.135 A
Power factor 0.5 0.5 0.9 0.5 0.5 0.9
Dimensions of protective cover
(mm) 118 x 76 171 x 117 204 x 140 118 x 76 171 x 117 204 x 140
Dimensions L x W x H (mm) 93 x 124 x
101 180 x 135 x
111 216 x 165 x
136 150 x 124 x
107 180 x 194 x
117 216 x 220 x
136
Weight (g) 331 523.8 754 399.6 594.2 843
Max projected area (m²) 0.0116 0.0243 0.0357 0.0186 0.0350 0.0476
This product is suitable for indoor and outdoor lighting purposes.
The spotlight must be installed at a height of less than 3 m. Recommended installation height
for models with motion detector 1.8 to 2.5 m.
The spotlight must not be used for other purposes.
INSTALLATION AND CONNECTION TO POWER SUPPLY
1. Always switch o the power supply before installation (Fig. 1).
2. Installation position: The spotlight should ideally be fastened with the wall bracket.
3. Remove the retaining bracket from the spotlight (Fig. 2).
4. Mark the position of the drill holes for fastening the retaining bracket (Fig. 3) and drill the
corresponding holes in the wall (Fig. 4). Fasten the bracket to the wall with suitable screws
(Fig. 5).
5. Bring the connection line in through a cable sleeve with a seal (Fig. 6.1).
6. Guide the 3 wires into the screw terminal and screw them all tight (Fig. 6.2).
Pay attention to the markings N = blue wire, earthing symbol = green / yellow wire,
L = brown wire.
7. Plug the screw terminal into the spotlight's cable entrance (Fig. 6.3).
8. Push the cable sleeve in toward the spotlight and screw it to the spotlight cable entrance
(Fig. 6.4).
9. Fasten the spotlight to the retaining bracket.
10. Adjust the lamp into the desired position and tighten the screws (Fig. 7).
11. Switch the power supply back on (Fig. 8).
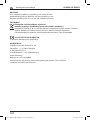
DESCRIPTION OF FUNCTION
(only for versions with motion detector) (Fig. 9 + 10)
This lamp is equipped with an infrared sensor. It switches on automatically when the
sensor detects movements in the area. If possible, do not point the motion detector toward
swimming pools, heating air extractors, air conditioners or objects subject to strong
temperature variations. Avoid directing the motion detector at trees or buses or places where
pets frequently are.
The motion detector can be rotated horizontally right and left as well as vertically up and
down.
20P123 Mobiler LED Strahler AL 0533153 210423.indd 820P123 Mobiler LED Strahler AL 0533153 210423.indd 8 23.04.2021 13:44:4023.04.2021 13:44:40

99
AL X050, AL X050 P Operating Instructions
When attaching the spotlight, make sure that the motion detector reacts most sensitively to
movements that run across the detection eld and least to movements directly toward the
device.
ADJUST MOTION DETECTOR
Rotate the mounted spotlight upward. You will see three controls on the bottom of the motion
detector (Fig. 9).
SENSITIVITY SENS, MIDDLE: (Fig. 10)
The sensitivity determines the maximum distance at which the sensor switches on due to a
person's movements.
LIGHT SETTING LUX, RIGHT: (Fig. 10)
The light setting determines the brightness at which the spotlight's sensor switches on. The
position (sun symbol - right) shows that the sensor works during the day and at night, in the
other position (moon symbol - left), the sensor works only at night.
To set, wait until the desired brightness is reached in the surroundings. Set the time sensor
TIME to the minimum time (10 sec.). Turn the light setting control completely to the symbol
(moon). Turn the control slowly toward the symbol (sun) until the spotlight switches on from
movement.
The sensor will not switch on when detecting a motion beginning with the set brightness.
TIME SETTING TIME, LEFT: (Fig. 10)
With this control, you can select any switch-on time between approx. 10 seconds and 4
minutes after the last movement has been detected. Turning the TIME control in the clockwise
direction increases the time period, and reduces it in the anti-clockwise direction.
MOTION DETECTOR: PASSIVE INFRARED SENSOR
Detection range: up to 12 m / up to 180° (horizontal)
Time setting: approx. 10 sec. to 4 min.
SCOPE OF DELIVERY
LED-spotlight, operating instructions, screws, dowels.
ACCESSORIES
Suitable accessories are available on our homepage www.brennenstuhl.com.
MAINTENANCE ATTENTION: The LED lamp does not contain
components that require maintenance. The light
source in this lamp cannot be replaced; if the
light source has reached the end of its service
life, the entire lamp has to be replaced. The lamp
may not be opened.
20P123 Mobiler LED Strahler AL 0533153 210423.indd 920P123 Mobiler LED Strahler AL 0533153 210423.indd 9 23.04.2021 13:44:4023.04.2021 13:44:40

1010
Operating Instructions AL X050, AL X050 P
CLEANING
Before cleaning, disconnect the oodlight from the mains power.
Do not use solvents, caustic cleaning agents or similar products.
Only use a dry or slightly moistened cloth for cleaning.
DISPOSAL
Dispose of electric appliances in an environmentally friendly manner!
Electric appliances must not be disposed of in household waste!
The European Directive 2012/19/EU on Waste Electrical and Electronic Equipment
rules that used electric appliances should be collected separately and recycled in an
environmentally friendly manner.
For possibilities of disposal of the used appliance, please contact your local or municipal
administration.
EU DECLARATION OF CONFORMITY
The EU Declaration of Conformity is deposited with manufacturer.
ADRESSES
Hugo Brennenstuhl GmbH & Co. KG
Seestraße 1 – 3 · D-72074 Tübingen
H. Brennenstuhl S.A.S.
4 rue de Bruxelles ∙ F-67170 Bernolsheim
lectra technik ag
Blegistrasse 13 · CH-6340 Baar
For more information please visit the Service/FAQ section on our homepage,
www.brennenstuhl.com.
20P123 Mobiler LED Strahler AL 0533153 210423.indd 1020P123 Mobiler LED Strahler AL 0533153 210423.indd 10 23.04.2021 13:44:4023.04.2021 13:44:40

11
Mode d’emploi
Projecteur LED
AL 1050 / AL 2050 / AL 3050
AL 1050 P / AL 2050 P / AL 3050 P
Attention : Veuillez lire attentivement le présent mode d‘emploi avant d‘utiliser le produit et
conservez-le ensuite soigneusement.
CONSIGNES DE SÉCURITÉ
1. Avant chaque utilisation, vériez que le produit ne présente aucun dommage. N’utilisez
jamais le produit si l’appareil est endommagé. Dans ce cas, adressez-vous à un électricien
qualié ou au service après-vente du fabricant.
Danger de mort par électrocution en cas de non-respect de ces consignes !
2. N’utilisez jamais le produit dans des environnements présentant des risques d’explosion :
danger de mort !
3. Tenez le produit hors de portée des enfants. Les enfants ne sont pas en mesure d’évaluer les
dangers liés au courant électrique.
4. Ne regardez jamais directement dans le faisceau lumineux.
5. Un capuchon d’étanchéité endommagé ne peut pas être remplacé. Le projecteur doit être
mis au rebut.
6. Le câble de ce projecteur ne peut pas être remplacé. Si le câble est endommagé, le projecteur
doit être mis au rebut.
7. L‘installation et l‘entretien du projecteur doivent être eectués par un professionnel habilité.
8. Les installations électriques doivent être eectuées uniquement dans le respect des
consignes de sécurité (pour l‘Allemagne : VDE 0100).
9. Pour le raccordement, un câble certié VDE doit être utilisé.
10. Le projecteur doit être relié à la terre selon les règles en vigueur (classe de protection I).
11. Si le boîtier de raccordement est endommagé, il doit être remplacé par un professionnel.
12. Avant de commencer l‘installation, coupez l‘alimentation en tension (illustration 1).
Risques d‘électrocution.
13. Respectez les hauteurs de montage recommandées (voir sous Montage).
Surface Chaude
Ne convient pas à une utilisation avec des variateurs externes.
CARACTÉRISTIQUES TECHNIQUES :
Classe de protection : I
Indice de protection (versions sans détecteur de mouvements) : IP 54
Indice de protection (versions avec détecteur de mouvements) : IP 44
Plages de température : -10° C à +40° C
20P123 Mobiler LED Strahler AL 0533153 210423.indd 1120P123 Mobiler LED Strahler AL 0533153 210423.indd 11 23.04.2021 13:44:4023.04.2021 13:44:40

1212
Mode d’emploi AL X050, AL X050 P
Type AL 1050 AL 2050 AL 3050 AL 1050 P AL 2050 P AL 3050 P
Détecteur de mouvements non non non Oui Oui Oui
Puissance nominale (W) 10 20 30 10 20 30
Courant 0,09 A 0,16 A 0,135 A 0,09 A 0,16 A 0,135 A
Facteur de puissance 0,5 0,5 0,9 0,5 0,5 0,9
Dimensions du capuchon
d‘étanchéité (mm) 118 x 76 171 x 117 204 x 140 118 x 76 171 x 117 204 x 140
Dimensions L x l x h (mm) 93 x 124 x
101 180 x 135 x
111 216 x 165 x
136 150 x 124 x
107 180 x 194 x
117 216 x 220 x
136
Poids (g) 331 523.8 754 399.6 594.2 843
Surface de projection maximale
(m²) 0,0116 0,0243 0,0357 0,0186 0,0350 0,0476
Ce produit est idéal pour l‘éclairage en intérieur et en extérieur.
Le projecteur doit être installé à une hauteur inférieure à 3 m. Installation recommandée à une
hauteur entre 1,8 m et 2,5 m pour les modèles avec détecteur de mouvements.
Le projecteur ne doit pas être utilisé à d‘autres ns.
INSTALLATION ET BRANCHEMENT ÉLECTRIQUE
1. Avant de commencer l‘installation, coupez l‘alimentation en tension (illustration 1).
2. Installation : Le projecteur doit être installé idéalement sur le support mural.
3. Retirez le support de maintien du projecteur (illustration 2).
4. Marquez l‘emplacement des trous de xation du support de maintien (illustration 3) et
percez les trous correspondants dans le mur (illustration 4). Fixez le support au mur à l‘aide
de vis appropriées (illustration 5).
5. Passez le câble de raccordement dans le presse-étoupe muni d‘un joint d‘étanchéité
(illustration 6.1).
6. Insérez les 3 ls dans le domino et vissez-les (illustration 6.2).
Faites attention aux repères : N = l bleu, symbole Mise à la terre = l vert/jaune,
L = l marron.
7. Insérez le domino dans l‘entrée de câble du projecteur (illustration 6.3).
8. Avancez le presse-étoupe jusqu’au domino et vissez-le au projecteur (illustration 6.4).
9. Fixez le projecteur sur son support de maintien.
10. Placez le projecteur dans la position choisie et serrez les vis (illustration 7).
11. Remettez l‘alimentation du courant en marche (illustration 8).
DESCRIPTION DU FONCTIONNEMENT
(uniquement pour les versions avec détecteur de mouvements) (illustrations 9 et 10)
Ce projecteur est équipé d‘un capteur infrarouge. Il s‘allume automatiquement si le capteur
détecte des mouvements aux alentours. Si possible, ne dirigez pas le détecteur de
mouvements vers des bassins, des ventilations à air chaud, des systèmes de climatisation
ou des objets exposés à de fortes variations de température. Évitez de diriger le détecteur
de mouvements vers des arbres ou des buissons, ou vers des endroits abritant souvent des
animaux domestiques.
20P123 Mobiler LED Strahler AL 0533153 210423.indd 1220P123 Mobiler LED Strahler AL 0533153 210423.indd 12 23.04.2021 13:44:4023.04.2021 13:44:40

1313
AL X050, AL X050 P Mode d’emploi
Le détecteur de mouvements peut être pivoté horizontalement vers la droite ou la gauche
mais également verticalement de haut en bas.
Lors de l‘installation du projecteur, veillez à ce que le détecteur de mouvements soit le plus
sensible aux mouvements traversant son champ de détection et le moins sensible à ceux
arrivant directement sur l‘appareil.
RÉGLAGE DU DÉTECTEUR DE MOUVEMENTS
Tournez le projecteur installé vers le haut. Trois régulateurs apparaissent sur la partie inférieure
du détecteur de mouvements (illustration 9).
SENSIBILITÉ SENS, AU MILIEU : illustration 10
La sensibilité détermine la distance maximale à laquelle le mouvement d‘une personne
déclenche le capteur.
RÉGLAGE DE LA LUMIÈRE LUX, À DROITE : illustration 10
Le réglage de l‘éclairage détermine le degré de luminosité à partir duquel le capteur du
projecteur s‘allume. La position (symbole du soleil, à droite) indique que le capteur fonctionne
la journée et la nuit. En position (symbole de la lune, à gauche), le capteur ne fonctionne que la
nuit.
Pour le réglage, attendez que votre environnement atteigne la luminosité ambiante souhaitée.
Réglez le capteur de temps (TIME, à gauche) au temps minimum (10 secondes). Tournez
complètement la commande de réglage de l‘éclairage sur le symbole (lune). Tournez lentement
la commande de réglage vers le symbole (soleil) jusqu‘à ce que le projecteur s‘allume suite à
un mouvement.
Le projecteur s‘allumera dorénavant lorsqu‘il détectera un mouvement, à partir du degré
deluminosité conguré.
RÉGLAGE DE LA DUREE TIME, À GAUCHE : illustration 10
Ce régulateur vous permet de choisir une durée d‘éclairage de 10 secondes à 4 minutes
environ, après la détection du dernier mouvement. En tournant le régulateur de temps dans
le sens des aiguilles d‘une montre, l‘intervalle de temps augmente. Dans le sens inverse des
aiguilles d‘une montre, il diminue.
DÉTECTEUR DE MOUVEMENTS : CAPTEUR INFRAROUGE PASSIF
Plage de détection : jusqu‘à 12 m à 180° (horizontal)
Durée de fonctionnement : de 10 secondes environ à 4 minutes.
CONTENU DU COLIS
Projecteur LED, mode d‘emploi, vis, chevilles.
ACCESSOIRES
Les accessoires adaptés sont disponibles sur notre page d’accueil www.brennenstuhl.com.
20P123 Mobiler LED Strahler AL 0533153 210423.indd 1320P123 Mobiler LED Strahler AL 0533153 210423.indd 13 23.04.2021 13:44:4023.04.2021 13:44:40

1414
Mode d’emploi AL X050, AL X050 P
MAINTENANCE ATTENTION : le projecteur ne contient aucun
composant nécessitant un entretien. La
source lumineuse de ce projecteur n’est pas
remplaçable. Lorsque la source lumineuse a
atteint la n de sa durée de vie, remplacez
l’intégralité du projecteur. Le projecteur ne doit
pas être ouvert.
NETTOYAGE
Avant tout nettoyage, débranchez le projecteur de la prise de courant.
N’utilisez aucun solvant, produit de nettoyage abrasif ou autres produits similaires.
Pour le nettoyage, utilisez uniquement un chion sec ou légèrement humide.
MISE AU REBUT
Les appareils électriques doivent être mis au rebut conformément aux normes
environnementales !
Les appareils électriques ne doivent pas être mis dans les ordures ménagères !
Selon la directive européenne 2012/19/CE relative aux appareils électriques et
électroniques usagés, les appareils électriques doivent être collectés séparément et
recyclés de manière respectueuse de l’environnement.
Pour connaître les solutions de mise au rebut d’un appareil usagé, adressez-vous à votre
administration locale ou communale.
DÉCLARATION DE CONFORMITÉ UE
La déclaration de conformité UE est disponible auprès du fabricant.
FABRICANT
Hugo Brennenstuhl GmbH & Co. KG
Seestraße 1 – 3 · D-72074 Tübingen
H. Brennenstuhl S.A.S.
4 rue de Bruxelles ∙ F-67170 Bernolsheim
lectra technik ag
Blegistrasse 13 · CH-6340 Baar
Pour plus d’informations, nous vous recommandons de consulter la rubrique Service/FAQ
sur notre site Web www.brennenstuhl.com.
20P123 Mobiler LED Strahler AL 0533153 210423.indd 1420P123 Mobiler LED Strahler AL 0533153 210423.indd 14 23.04.2021 13:44:4023.04.2021 13:44:40

15
Gebruikshandleiding
Led-schijnwerper
AL 1050 / AL 2050 / AL 3050
AL 1050 P / AL 2050 P / AL 3050 P
Opgelet: Lees vóór gebruik van het product deze handleiding zorgvuldig door en bewaar ze
voor toekomstige naslag!
VEILIGHEIDSINSTRUCTIES
1. Controleer het product vóór elk gebruik op schade. Gebruik het product nooit wanneer
u enige schade opmerkt. Neem bij schade contact op met een elektricien of met de
klantenservice van de fabrikant.
Zo niet, bestaat er levensgevaar door elektrische schok!
2. Gebruik de lamp niet in omgevingen met gevaar op explosies. Levensgevaar!
3. Houd de werklamp buiten het bereik van kinderen. Kinderen kunnen het gevaar van
elektrische stroom niet inschatten.
4. Kijk nooit direct in het licht.
5. Een defect dekglas kan niet worden vervangen. De lamp moet dan als afval worden
afgevoerd.
6. Het externe exibele snoer van deze lamp kan niet worden vervangen. Als het snoer
beschadigd is, dan moet de lamp als afval worden afgevoerd.
7. De installatie en het onderhoud van de schijnwerper moeten door een gekwaliceerde
vakman worden uitgevoerd.
8. Elektrotechnische installaties mogen alleen onder aanhouding van de
veiligheidsvoorschriften (VDE 0100 voor Duitsland) worden uitgevoerd.
9. Voor het aansluiten moet een VDE-gecerticeerde aansluitkabel worden gebruikt.
10. De schijnwerper moet correct worden geaard (bij beschermingsklasse I).
11. Wanneer de aansluitbox beschadigd is, moet deze door een gekwaliceerd technicus worden
vervangen.
12. Schakel voor de installatie altijd de voedingsspanning uit (afb. 1).
Opgelet elektrische schok.
13. Neem de aanbevolen montagehoogten in acht (zie onder Montage).
Heet oppervlak
niet geschikt voor gebruik met een externe dimmer.
TECHNISCHE GEGEVENS
Beschermingsklasse: I
Veiligheidsklasse (versies zonder bewegingssensor): IP 54
Veiligheidsklasse (versies met bewegingssensor): IP 44
Temperatuurbereik: -10°C tot +40°C
20P123 Mobiler LED Strahler AL 0533153 210423.indd 1520P123 Mobiler LED Strahler AL 0533153 210423.indd 15 23.04.2021 13:44:4023.04.2021 13:44:40

1616
Gebruikshandleiding AL X050, AL X050 P
Type AL 1050 AL 2050 AL 3050 AL 1050 P AL 2050 P AL 3050 P
Bewegingsmelder Nee Nee Nee Ja Ja Ja
Nominaal vermogen (W) 10 20 30 10 20 30
Stroom 0,09 A 0,16 A 0,135 A 0,09 A 0,16 A 0,135 A
Vermogensfactor 0,5 0,5 0,9 0,5 0,5 0,9
Afmetingen veiligheidsglas
(mm) 118 x 76 171 x 117 204 x 140 118 x 76 171 x 117 204 x 140
Afmetingen L x B x H (mm) 93 x 124 x
101 180 x 135 x
111 216 x 165 x
136 150 x 124 x
107 180 x 194 x
117 216 x 220 x
136
Gewicht (g) 331 523,8 754 399,6 594,2 843
Max. lichtoppervlakte (m²) 0,0116 0,0243 0,0357 0,0186 0,0350 0,0476
Dit product is bedoeld voor verlichting binnenshuis en buitenshuis.
De schijnwerper moet op een hoogte minder dan 3 meter worden gemonteerd. Aanbevolen
montagehoogte bij modellen met bewegingsmelder 1,8 tot 2,5 m.
De schijnwerper mag niet voor andere doeleinden worden gebruikt.
MONTAGE EN AANSLUITING OP DE VOEDINGSSPANNING
1. Schakel voor de installatie altijd de voedingsspanning uit (afb. 1).
2. Montagepositie: de schijnwerper moet zo mogelijk met de wandbeugel worden bevestigd.
3. Verwijder de bevestigingsbeugel van de schijnwerper (afb. 2).
4. Markeer de positie van de boorgaten voor de bevestiging van de bevestigingsbeugel
(afb. 3) en boor de betreende gaten in de wand (afb. 4). Bevestig de beugel met passende
schroeven aan de wand (afb. 5).
5. Leid de aansluitkabel door de kabeltule welke is voorzien van een afdichting (afb. 6.1).
6. Plaats de 3 aders in de kroonsteen en schroef deze vast (afb. 6.2).
Let op de markeringen N = blauwe ader, aardingssymbool = groen/gele ader, L = bruine ader.
7. Plaats de kroonsteen in de kabelingang van de schijnwerper (afb. 6.3).
8. Schuif de kabeltule in de richting van de schijnwerper en schroef deze op de kabelingang
van de schijnwerper vast (afb. 6.4).
9. Bevestig de schijnwerper aan de bevestigingsbeugel.
10. Stel de gewenste positie van de lamp in en draai de bouten vast (afb. 7).
11. Schakel voor de installatie altijd de voedingsspanning uit (afb. 8).
BESCHRIJVING WERKING
(alleen voor uitvoeringen met bewegingsmelder) (afb. 9 + 10)
Deze lamp is voorzien van een infraroodsensor. Deze schakelt automatisch in, wanneer de
sensor in de omgeving beweging detecteert. Richt de bewegingsmelder zo mogelijk niet op
zwembaden, verwarmingsluchtafvoeren, airconditionings of objecten, welke zijn blootgesteld
aan sterke temperatuurvariaties. Richt de bewegingsmelder niet op bomen of struiken of op
plaatsen, waar vaak huisdieren kunnen verblijven.
De bewegingsmelder kan horizontaal naar rechts en links worden gedraaid en verticaal naar
boven en beneden.
20P123 Mobiler LED Strahler AL 0533153 210423.indd 1620P123 Mobiler LED Strahler AL 0533153 210423.indd 16 23.04.2021 13:44:4023.04.2021 13:44:40

1717
AL X050, AL X050 P Gebruikshandleiding
Let er bij het monteren van de schijnwerper op, dat de bewegingsmelder het meest gevoelig
reageert op bewegingen, die dwars door de detectiezone lopen en het minst gevoelig op
bewegingen, welke direct op het apparaat toekomen.
BEWEGINGSMELDER INSTELLEN
Draai de gemonteerde schijnwerper naar boven. Er zijn drie regelaars te zien aan de onderzijde
van de bewegingsmelder (afb. 9).
GEVOELIGHEID SENS, MIDDEN: (afb. 10)
De gevoeligheid bepaalt, vanaf welke maximale afstand de sensor door de beweging van een
mens inschakelt.
LICHTINSTELLING LUX, RECHTS: (afb. 10)
De lichtinstelling bepaalt, vanaf welke helderheid de sensor de schijnwerper inschakelt. De
positie (symbool zon - rechts) geeft aan, dat de sensor overdag en 's nachts werkt, in de positie
(symbool maan - links) werkt de sensor alleen 's nachts.
Wacht met instellen, tot de gewenste omgevingshelderheid aanwezig is. Stel de tijdsensor
TIME in op de minimale tijd (10 sec.). Draai de lichtinstellingsregelaar geheel naar het symbool
(maan). Draai de regelaar langzaam in de richting van het symbool (zon), tot de schijnwerper
door beweging inschakelt.
De schijnwerper zal nu inschakelen vanaf de ingestelde helderheid bij het detecteren van een
beweging.
TIJDINSTELLING TIME, LINKS: (afb. 10)
Met deze regelaar kunt u een willekeurige inschakeltijd tussen circa 10 seconden en 4 minuten
kiezen, nadat de laatste beweging is gedetecteerd. Door het rechtsom draaien van de TIME-
regelaar neemt de tijdsperiode toe, door linksom draaien af.
BEWEGINGSMELDER: PASSIEVE INFRAROODSENSOR
Detectiebereik: tot 12 m / tot 180° (horizontaal)
Tijdinstelling: circa 10 sec tot 4 min.
INHOUD
Led-schijnwerper, gebruikshandleiding, schroeven, pluggen.
TOEBEHOREN
Gepaste toebehoren vindt u op onze website www.brennenstuhl.com.
ONDERHOUD OPGELET: De LED-lamp bevat geen
componenten die moeten worden
onderhouden. De lichtbron van deze werklamp
kan niet worden vervangen. Wanneer de
levensduur van de lichtbron vervallen is, moet
de volledige werklamp worden vervangen. De
werklamp mag niet worden geopend.
20P123 Mobiler LED Strahler AL 0533153 210423.indd 1720P123 Mobiler LED Strahler AL 0533153 210423.indd 17 23.04.2021 13:44:4123.04.2021 13:44:41

1818
Gebruikshandleiding AL X050, AL X050 P
REINIGING
Trek voordat u de lamp reinigt, de stekker uit het stopcontact.
Gebruik geen oplosmiddelen, bijtende reinigingsmiddelen of gelijksoortige middelen.
Gebruik voor het schoonmaken van de lamp alleen een droge of licht bevochtigde doek.
WEGGOOIEN
Elektrische apparaten milieuvriendelijk weggooien!
Elektrische apparaten horen niet bij het huisvuil!
Volgens Europese Richtlijn 2012/19/EU betreende elektrische en elektronische
apparatuur moeten afgedankte elektrische apparaten apart ingezameld en op een
milieuvriendelijke manier gerecycleerd worden.
U kan informatie vragen bij uw gemeente of stadsbestuur over de mogelijkheden voor
het weggooien van afgedankte apparaten.
EUCONFORMITEITSVERKLARING
De EU-conformiteitsverklaring ligt bij de fabrikant ter inzage.
FABRIKANT
Hugo Brennenstuhl GmbH & Co. KG
Seestraße 1 – 3 · D-72074 Tübingen
H. Brennenstuhl S.A.S.
4 rue de Bruxelles ∙ F-67170 Bernolsheim
lectra technik ag
Blegistrasse 13 · CH-6340 Baar
Meer informatie vindt u in de rubriek “Service/FAQ’s” van onze website www.brennenstuhl.
com.
20P123 Mobiler LED Strahler AL 0533153 210423.indd 1820P123 Mobiler LED Strahler AL 0533153 210423.indd 18 23.04.2021 13:44:4123.04.2021 13:44:41

19
Istruzioni per l’uso
Riettore LED
AL 1050 / AL 2050 / AL 3050
AL 1050 P / AL 2050 P / AL 3050 P
Attenzione: Leggere attentamente le presenti istruzioni per l’uso prima di utilizzare il prodotto
e conservarle in un luogo sicuro!
INDICAZIONI DI SICUREZZA
1. Prima di ogni utilizzo controllare eventuali danni al faretto. Non utilizzare mai il prodotto, se
si riscontrano danni di qualsiasi tipo. In tal caso rivolgetevi a un elettricista specializzato o agli
indirizzi di assistenza indicati.
In caso di inosservanza sussiste pericolo di morte da scossa elettrica!
2. Non usare il prodotto in ambienti potenzialmente esplosivi. Pericolo di morte!
3. Tenere i bambini lontano dal faretto. I bambini non sono in grado di valutare il pericolo
dovuto alla corrente elettrica.
4. Non guardare mai direttamente verso la luce.
5. Una copertura di protezione danneggiata non può essere sostituita. Il faretto deve essere
smaltito.
6. Il cavo essibile esterno di questa lampada non può essere sostituito; se il cavo è
danneggiato, la lampada deve essere rottamata.
7. L'installazione e la manutenzione del riettore devono essere eettuate da specialisti
qualicati.
8. Le installazioni elettriche devono essere eseguite solo nel rispetto delle disposizioni di
sicurezza (VDE 0100 per Germania).
9. Per l'allacciamento deve essere utilizzato un cavo di collegamento certicato VDE.
10. Il riettore deve essere messo a terra correttamente (per la classe di protezione I).
11. Qualora la scatola di collegamento sia danneggiata, è necessario farla sostituire da personale
specializzato.
12. Prima dell'installazione, scollegare sempre l'alimentazione di tensione (Fig. 1).
Cautela per scossa elettrica.
13. Rispettare le altezze di montaggio raccomandate (vedere sotto Montaggio).
Supercie calda
Non adatto al funzionamento con dimmer esterni.
DATI TECNICI
Classe di protezione: I
Tipo di protezione (versioni senza il sensore di movimento): IP 54
Tipo di protezione (versioni con il sensore di movimento): IP 44
Intervallo di temperatura: Da -10°C a +40°C
20P123 Mobiler LED Strahler AL 0533153 210423.indd 1920P123 Mobiler LED Strahler AL 0533153 210423.indd 19 23.04.2021 13:44:4123.04.2021 13:44:41

2020
Istruzioni per l’uso AL X050, AL X050 P
Tipo AL 1050 AL 2050 AL 3050 AL 1050 P AL 2050 P AL 3050 P
Sensore di movimento No No No Sì Sì Sì
Potenza nominale (W) 10 20 30 10 20 30
Corrente 0,09 A 0,16 A 0,135 A 0,09 A 0,16 A 0,135 A
Coeciente di rendimento 0,5 0,5 0,9 0,5 0,5 0,9
Dimensioni copertura di
protezione (mm) 118 x 76 171 x 117 204 x 140 118 x 76 171 x 117 204 x 140
Dimensioni l x p x a 93 x 124 x
101 180 x 135 x
111 216 x 165 x
136 150 x 124 x
107 180 x 194 x
117 216 x 220 x
136
Peso (g) 331 523,8 754 399,6 594,2 843
Max. supercie proiettata (m²) 0,0116 0,0243 0,0357 0,0186 0,0350 0,0476
Questo prodotto è adatto a illuminare interni ed esterni.
Il riettore deve essere montato ad un'altezza inferiore a 3 m.
Altezza di montaggio consigliata per modelli con rilevatore di movimento da 1,8 a 2,5 m.
Il riettore non può essere impiegato per scopi diversi.
MONTAGGIO E COLLEGAMENTO ALL'ALIMENTAZIONE DI CORRENTE
1. Prima dell'installazione, scollegare sempre l'alimentazione di tensione (Fig. 1).
2. Posizione di montaggio: Il riettore dovrebbe idealmente essere ssato con il supporto a
muro.
3. Rimuovere la staa di supporto dal riettore (Fig. 2).
4. Contrassegnare la posizione dei punti da trapanare per il ssaggio della staa di supporto
(Fig. 3) e perforare la parete di conseguenza (Fig. 4). Fissare la staa alla parete con viti adatte
(Fig. 5).
5. Far passare il cavo di collegamento attraverso al passacavi dotato di guarnizione (Fig. 6.1).
6. Far passare i 3 li nel morsetto isolante e avvitarli tutti (Fig. 6.2).
Prestare attenzione ai contrassegni N = cavo blu, simbolo di messa a terra = cavo verde /
giallo, L = cavo marrone.
7. Inserire il morsetto isolante nell'ingresso per cavi del riettore (Fig. 6.3).
8. Spingere il passacavi in direzione del riettore e avvitarlo sull'ingresso per cavi del riettore
(Fig. 6.4).
9. Fissare il riettore sulla staa di supporto.
10. Regolare la posizione desiderata della lampada e stringere le viti (Fig. 7).
11. Attivare di nuovo l'alimentazione di correte (Fig. 8).
DESCRIZIONE DEL FUNZIONAMENTO
(solo per versioni con rilevatore di movimento) (Fig. 9 + 10)
Questa lampada è dotata di un sensore a infrarossi. Si accende automaticamente se il sensore
rileva movimenti nell'ambiente circostante. Se possibile, non indirizzare il rilevatore di
movimento verso piscine, scarichi dell'aria calda, climatizzatori o oggetti esposti a forti sbalzi
di temperatura. Evitare di indirizzare il rilevatore di movimento verso alberi o cespugli oppure
verso luoghi in cui potrebbero spesso trovarsi animali domestici.
Il rilevatore di movimento può essere ruotato in orizzontale a destra e a sinistra, nonché in
verticale verso l‘alto e il basso.
20P123 Mobiler LED Strahler AL 0533153 210423.indd 2020P123 Mobiler LED Strahler AL 0533153 210423.indd 20 23.04.2021 13:44:4123.04.2021 13:44:41
La page est en cours de chargement...
La page est en cours de chargement...
La page est en cours de chargement...
La page est en cours de chargement...
La page est en cours de chargement...
La page est en cours de chargement...
La page est en cours de chargement...
La page est en cours de chargement...
La page est en cours de chargement...
La page est en cours de chargement...
La page est en cours de chargement...
La page est en cours de chargement...
La page est en cours de chargement...
La page est en cours de chargement...
La page est en cours de chargement...
La page est en cours de chargement...
La page est en cours de chargement...
La page est en cours de chargement...
La page est en cours de chargement...
La page est en cours de chargement...
La page est en cours de chargement...
La page est en cours de chargement...
La page est en cours de chargement...
La page est en cours de chargement...
La page est en cours de chargement...
La page est en cours de chargement...
La page est en cours de chargement...
La page est en cours de chargement...
La page est en cours de chargement...
La page est en cours de chargement...
La page est en cours de chargement...
La page est en cours de chargement...
La page est en cours de chargement...
La page est en cours de chargement...
La page est en cours de chargement...
La page est en cours de chargement...
La page est en cours de chargement...
La page est en cours de chargement...
La page est en cours de chargement...
La page est en cours de chargement...
La page est en cours de chargement...
La page est en cours de chargement...
La page est en cours de chargement...
La page est en cours de chargement...
La page est en cours de chargement...
La page est en cours de chargement...
La page est en cours de chargement...
La page est en cours de chargement...
La page est en cours de chargement...
La page est en cours de chargement...
La page est en cours de chargement...
La page est en cours de chargement...
La page est en cours de chargement...
La page est en cours de chargement...
La page est en cours de chargement...
La page est en cours de chargement...
La page est en cours de chargement...
La page est en cours de chargement...
La page est en cours de chargement...
La page est en cours de chargement...
La page est en cours de chargement...
La page est en cours de chargement...
La page est en cours de chargement...
La page est en cours de chargement...
-
 1
1
-
 2
2
-
 3
3
-
 4
4
-
 5
5
-
 6
6
-
 7
7
-
 8
8
-
 9
9
-
 10
10
-
 11
11
-
 12
12
-
 13
13
-
 14
14
-
 15
15
-
 16
16
-
 17
17
-
 18
18
-
 19
19
-
 20
20
-
 21
21
-
 22
22
-
 23
23
-
 24
24
-
 25
25
-
 26
26
-
 27
27
-
 28
28
-
 29
29
-
 30
30
-
 31
31
-
 32
32
-
 33
33
-
 34
34
-
 35
35
-
 36
36
-
 37
37
-
 38
38
-
 39
39
-
 40
40
-
 41
41
-
 42
42
-
 43
43
-
 44
44
-
 45
45
-
 46
46
-
 47
47
-
 48
48
-
 49
49
-
 50
50
-
 51
51
-
 52
52
-
 53
53
-
 54
54
-
 55
55
-
 56
56
-
 57
57
-
 58
58
-
 59
59
-
 60
60
-
 61
61
-
 62
62
-
 63
63
-
 64
64
-
 65
65
-
 66
66
-
 67
67
-
 68
68
-
 69
69
-
 70
70
-
 71
71
-
 72
72
-
 73
73
-
 74
74
-
 75
75
-
 76
76
-
 77
77
-
 78
78
-
 79
79
-
 80
80
-
 81
81
-
 82
82
-
 83
83
-
 84
84


Brennenstuhl LED spotlights AL 1050 P with infrared motion detector 10W, 1010lm, IP44 Manuel utilisateur
- Taper
- Manuel utilisateur
dans d''autres langues
Documents connexes
-
Brennenstuhl LED Light JARO 5000 4770lm, 50W, IP65 Manuel utilisateur
-
-
-
-
-
-
-
Brennenstuhl NL 01 QD Manuel utilisateur
-
Brennenstuhl Chip LED L CN 130 PIR IP44 Mode d'emploi
-
Autres documents
-
LIVARNO 309794 Le manuel du propriétaire
-
-
KS VERLICHTING 7767 Manuel utilisateur
-
 LIVARNO LUX 43174 Operation and Safety Notes
-
-
Chacon 34310 Manuel utilisateur
-
Perel LEDA5002NW-BM Manuel utilisateur
-
IMG Stage Line LED-10SPOT Manuel utilisateur
-
 PERFORMANCE iN LIGHTING TYK+ 20 LED Adjustable Die Cast Aluminium Outdoor Floodlight Mode d'emploi

