JennAir JES1450ML 30 Inch Electric Slide In Range Le manuel du propriétaire
- Catégorie
- Cuisinières
- Taper
- Le manuel du propriétaire

W11602517A
SLIDE-IN ELECTRIC RANGE OWNER’S MANUAL
MANUEL D’UTILISATION DE LA CUISINIÈRE
ÉLECTRIQUE ENCASTRÉE
Table of Contents/Table des matières
RANGE SAFETY..............................................................2
Range Safety................................................................2
RANGE MAINTENANCE AND CARE...................................4
Clean Cycle..................................................................4
General Cleaning...........................................................5
INSTALLATION INSTRUCTIONS ........................................6
REQUIREMENTS.............................................................6
Tools and Parts .............................................................6
Location Requirements ...................................................6
Electrical Requirements - U.S.A. Only ................................8
Electrical Requirements - Canada Only ..............................8
INSTALLATION ...............................................................9
Unpack Range ..............................................................9
Install Anti-Tip Bracket ....................................................9
Adjust Leveling Legs .................................................... 10
Level Range ............................................................... 11
Electrical Connection - U.S.A. Only.................................. 11
Verify Anti-Tip Bracket Is Installed and Engaged ................. 12
Remove/Replace Drawer............................................... 13
Oven Door.................................................................. 14
Complete Installation .................................................... 14
Moving the Range........................................................ 15
SÉCURITÉ DE LA CUISINIÈRE ........................................ 16
Sécurité de la cuisinière ................................................ 16
ENTRETIEN ET RÉPARATION DE LA CUISINIÈRE.............. 19
Programme de nettoyage .............................................. 19
Nettoyage général........................................................ 20
INSTRUCTIONS D’INSTALLATION ................................... 21
SPÉCIFICATIONS .......................................................... 21
Outils et pièces............................................................ 21
Exigences d’emplacement ............................................. 22
Spécifications électriques – É.-U. seulement...................... 24
Spécifications électriques – Canada seulement .................. 24
INSTALLATION ............................................................. 25
Déballage de la cuisinière.............................................. 25
Installation de la bride antibasculement ............................ 25
Réglage des pieds de nivellement ................................... 26
Réglage de l’aplomb de la cuisinière ................................ 27
Raccordement électrique – É.-U. seulement ...................... 27
Vérifier que la bride antibasculement est bien installée et
engagée .................................................................... 29
Enlever/replacer le tiroir ................................................ 29
Porte du four............................................................... 30
Achever l’installation..................................................... 30
Déplacement de la cuisinière.......................................... 31
IMPORTANT:
Save for local electrical inspector's use.
IMPORTANT :
À conserver pour consultation par l'inspecteur local des installations électriques.

2
RANGE SAFETY
Your safety and the safety of others are very important.
We have provided many important safety messages in this manual and on your appliance. Always read and obey all safety
messages.
This is the safety alert symbol.
This symbol alerts you to potential hazards that can kill or hurt you and others.
All safety messages will follow the safety alert symbol and either the word “DANGER” or “WARNING.” These
words mean:
DANGER You can be killed or seriously injured if you don't
immediately follow instructions.
WARNING You can be killed or seriously injured if you don’t follow
instructions.
All safety messages will tell you what the potential hazard is, tell you how to reduce the chance of injury, and tell you what can
happen if the instructions are not followed.
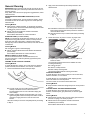
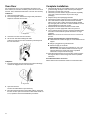
The range will not tip during normal use. However, the range can tip if you apply too much force or weight to the open door without having
the anti-tip bracket fastened down properly.
WARNING
Tip Over Hazard
A child or adult can tip the range and be killed.
Install anti-tip bracket to floor or wall per installation instructions.
Slide range back so rear range foot is engaged in the slot of the anti-tip bracket.
Re-engage anti-tip bracket if range is moved.
Do not operate range without anti-tip bracket installed and engaged.
Failure to follow these instructions can result in death or serious burns to children and adults.
To verify the anti-tip bracket is properly installed and engaged:
•Slide range forward.
•Look for the anti-tip bracket securely attached to floor or wall.
•Slide range back so rear range foot is under the anti-tip bracket.
•See Installation Instructions for details.
IMPORTANT SAFETY INSTRUCTIONS
WARNING: To reduce the risk of fire, electric shock, or injury to persons when using the appliance, follow basic precautions,
including the following:
�WARNING: TO REDUCE THE RISK OF TIPPING OF
THE RANGE, THE RANGE MUST BE SECURED BY
PROPERLY INSTALLED ANTI-TIP DEVICES. TO CHECK
IF THE DEVICES ARE INSTALLED PROPERLY, SLIDE
RANGE FORWARD, LOOK FOR ANTI-TIP BRACKET
SECURELY ATTACHED TO FLOOR OR WALL, AND
SLIDE RANGE BACK SO REAR RANGE FOOT IS
UNDER ANTI-TIP BRACKET.
�CAUTION: Do not store items of interest to children in
cabinets above an appliance or on the backguard of an
appliance - children climbing on the appliance to reach
items could be seriously injured.
�Never Use Your Appliance for Warming or Heating the
Room.
�Do Not Leave Children Alone - Children should not be left
alone or unattended in area where appliance is in use.
They should never be allowed to sit or stand on any part of
the appliance.
SAVE THESE INSTRUCTIONS

3
IMPORTANT SAFETY INSTRUCTIONS
WARNING: To reduce the risk of fire, electric shock, or injury to persons when using the appliance, follow basic precautions,
including the following:
�Proper Installation - The appliance, when installed, must be
electrically grounded in accordance with local codes, or in
the absence of local codes, with the National Electrical
Code, ANSI/NFPA 70 or the Canadian Electrical Code, CSA
C22.1-02. In Canada, the appliance must be electrically
grounded in accordance with Canadian Electrical Code. Be
sure your appliance is properly installed and grounded by a
qualified technician.
�Wear Proper Apparel – Loose-fitting or hanging garments
should never be worn while using the appliance.
�User Servicing – Do not repair or replace any part of the
appliance unless specifically recommended in the manual.
All other servicing should be referred to a qualified
technician.
�Storage in or on Appliance – Flammable materials should
not be stored in an oven or near surface units.
�This appliance is not intended for storage.
�Do Not Use Water on Grease Fires – Smother fire or flame
or use dry chemical or foam-type extinguisher.
�Do not use replacement parts that have not been
recommended by the manufacturer (e.g. parts made at
home using a 3D printer).
�Use Only Dry Potholders – Moist or damp potholders on hot
surfaces may result in burns from steam. Do not let
potholder touch hot heating elements. Do not use a towel or
other bulky cloth.
�DO NOT TOUCH SURFACE UNITS OR AREAS NEAR
UNITS – Surface units may be hot even though they are
dark in color. Areas near surface units may become hot
enough to cause burns. During and after use, do not touch,
or let clothing or other flammable materials contact surface
units or areas near units until they have had sufficient time
to cool. Among these areas are the coil elements, the
cooktop, and surfaces facing the cooktop.
�Use Proper Pan Size – This appliance is equipped with one
or more surface units of different size. Select utensils
having flat bottoms large enough to cover the surface unit
heating element. The use of undersized utensils will expose
a portion of the heating element to direct contact and may
result in ignition of clothing. Proper relationship of utensil to
burner will also improve efficiency.
�Never Leave Surface Units Unattended at High Heat
Settings – Boilover causes smoking and greasy spillovers
that may ignite.
�Make Sure Reflector Pans or Drip Bowls Are in Place –
Absence of these pans or bowls during cooking may
subject wiring or components underneath to damage.
�Protective Liners – Do not use aluminum foil to line surface
unit drip bowls or oven bottoms, except as suggested in the
manual. Improper installation of these liners may result in a
risk of electric shock, or fire.
�Glazed Cooking Utensils – Only certain types of glass,
glass/ceramic, ceramic, earthenware, or other glazed
utensils are suitable for range-top service without breaking
due to the sudden change in temperature.
�Do Not Soak Removable Heating Elements – Heating
elements should never be immersed in water.
�Utensil Handles Should Be Turned Inward and Not Extend
Over Adjacent Surface Units – To reduce the risk of burns,
ignition of flammable materials, and spillage due to
unintentional contact with the utensil, the handle of a utensil
should be positioned so that it is turned inward, and does
not extend over adjacent surface units.
�Do Not Cook on Broken Cook-Top – If cook-top should
break, cleaning solutions and spillovers may penetrate the
broken cook-top and create a risk of electric shock. Contact
a qualified technician immediately.
�Clean Cooktop With Caution – If a wet sponge or cloth is
used to wipe spills on a hot cooking area, be careful to
avoid steam burn. Some cleaners can produce noxious
fumes if applied to a hot surface.
�Use Care When Opening Door – Let hot air or steam
escape before removing or replacing food.
�Do Not Heat Unopened Food Containers – Build-up of
pressure may cause container to burst and result in injury.
�Keep Oven Vent Ducts Unobstructed.
�Placement of Oven Racks – Always place oven racks in
desired location while oven is cool. If rack must be moved
while oven is hot, do not let potholder contact hot heating
element in oven.
�DO NOT TOUCH HEATING ELEMENTS OR INTERIOR
SURFACES OF OVEN – Heating elements may be hot
even though they are dark in color. Interior surfaces of an
oven become hot enough to cause burns. During and after
use, do not touch, or let clothing or other flammable
materials contact heating elements or interior surfaces of
oven until they have had sufficient time to cool. Other
surfaces of the appliance may become hot enough to cause
burns – among these surfaces are oven vent openings and
surfaces near these openings, oven doors, and windows of
oven doors.
�Care must be taken to prevent aluminum foil and meat
probes from contacting heating elements.
For self-cleaning ranges
�CAUTION: DO NOT LEAVE FOOD OR COOKING
UTENSILS, ETC., IN OVEN DURING THE PYROLYTIC
SELF-CLEANING MODE OF OPERATION.
�Do Not Clean Door Gasket – The door gasket is essential
for a good seal. Care should be taken not to rub, damage,
or move the gasket.
�Do Not Use Oven Cleaners – No commercial oven cleaner
or oven liner protective coating of any kind should be used
in or around any part of the oven.
�Clean Only Parts Listed in Manual.
�Before Self-Cleaning the Oven – Remove broiler pan and
other utensils.
For units with ventilating hood
�Clean Ventilating Hoods Frequently – Grease should not be
allowed to accumulate on hood or filter.
�When flaming foods under the hood, turn the fan on.
For smart enabled ranges and ovens
�Remote operation – This appliance is configurable to allow
remote operation at any time. Do not store any flammable
materials or temperature sensitive items inside, on top or
near surface units of the appliance.
SAVE THESE INSTRUCTIONS

4
RANGE MAINTENANCE AND
CARE
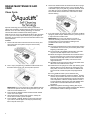
Clean Cycle
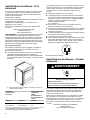
AquaLift®Technology is an innovative cleaning solution that
utilizes heat and water to release baked-on spills from the oven in
less than 1 hour. This new cleaning technology is a low-heat,
odor-free alternative to traditional self-cleaning options.
Allow the oven to cool to room temperature before using the Clean
cycle. If your oven cavity is above 200°F (93°C), it will appear in
the display, and the Clean cycle will not be activated until the oven
cavity cools down.
To Clean:
1. Remove all racks and accessories from the oven cavity, and
wipe excess soil. Use a plastic scraper to remove easily
removed soils.
2. Pour 2 cups (16 oz [500 mL]) of distilled or filtered water onto
the bottom of the empty oven, and close the oven door.
IMPORTANT: Do not use chemicals or other additives with the
water. Do not open the oven door during the Clean cycle. The
water on the oven bottom is hot.
3. Press CLEAN or AQUALIFT SELF CLEAN and then START
on the oven control panel.
4. Allow 40 minutes for cleaning and cool down. A beep will
sound when the Clean cycle is complete.
5. Press CANCEL, CANCEL UPPER or OFF at the end of the
cycle. Cancel, Cancel Upper or Off may be pressed at any
time to stop the Clean cycle.
6. Remove the residual water and loosened soils with a sponge
or cloth immediately after the Clean cycle is complete. Much
of the initial 2 cups (16 oz [500 mL]) of water will remain in the
oven after the cycle is completed. If additional soils remain,
leave a small amount of water in the oven bottom to assist
with the cleaning.
7. If any soils remain, remove them with a non-scratch scrubbing
sponge or plastic scraper. Additional Clean cycles may be run
to help remove the stubborn soils.
IMPORTANT: Do not use oven cleaners. The use of
chemicals, including commercial oven cleaners or metal
scouring pads, may cause permanent damage to the
porcelain surface of the oven interior.
NOTES:
�The range should be level to ensure that the entire surface
of the bottom of the oven cavity is covered by water at the
beginning of the Clean cycle.
�For best results, use distilled or filtered water. Tap water
may leave mineral deposits on the oven bottom.
�Before removing the residual water and loosened soils at
the end of the Clean cycle, insert a cloth or paper towel
between the lower edge of the oven door and the front
frame to keep water from spilling onto the front of the
range and the floor.
�Soil baked on through several cooking cycles will be more
difficult to remove with the Clean cycle.
�Nonabrasive scrub sponges or eraser style cleaning pads
(without cleaners) can be effective for cleaning the oven
cavity walls, oven door and oven bottom for difficult soils.
For best results, moisten the pads and sponges before
use.
�Run an additional Clean cycle for stubborn soils.
�Affresh®Kitchen Appliance Cleaner and affresh®Cooktop
Cleaner may be used to clean the oven bottom, walls, and
door when the oven has finished the cycle and returned to
room temperature. If affresh®Cooktop Cleaner is used, it
is recommended to wipe out the cavity with distilled water
as well. Refer to the Quick Start Guide for ordering
information.
�Additional AquaLift®Technology Cleaning Kits may be
obtained by ordering Part Number W10423113RP. Refer to
the Quick Start Guide for ordering information.

5
General Cleaning
IMPORTANT: Before cleaning, make sure all controls are off and
the oven and cooktop are cool. Always follow label instructions on
cleaning products.
Soap, water, and a soft cloth or sponge are suggested first, unless
otherwise noted.
EXTERIOR PORCELAIN ENAMEL SURFACES (on some
models)
Food spills containing acids, such as vinegar and tomato, should
be cleaned as soon as the entire range is cool. These spills may
affect the finish.
Cleaning Method:
�Glass cleaner, mild liquid cleaner, or nonabrasive scrubbing
pad: Gently clean around the model/serial/rating plate because
scrubbing may remove numbers.
�Affresh®Kitchen and Appliance Cleaner Part Number
W10355010 (not included):
See the Quick Start Guide for contact information.
STAINLESS STEEL (on some models)
NOTE: To avoid damage to stainless steel surfaces, do not use
soap-filled scouring pads, abrasive cleaners, Cooktop Cleaner,
steel-wool pads, gritty washcloths, or abrasive paper towels.
Damage may occur to stainless steel surfaces, even with one-time
or limited use.
Cleaning Method:
Rub in direction of grain to avoid damaging.
�Affresh®Stainless Steel Cleaner Part Number W10355016
(not included):
See the Quick Start Guide for contact information.
METALLIC PAINT (on some models)
Do not use abrasive cleaners, cleaners with bleach, rust
removers, ammonia, or sodium hydroxide (lye) because paint
surface may stain.
CERAMIC GLASS COOKTOP CLEANING
Cleaning Method:
To avoid damaging the cooktop, do not use steel wool, abrasive
powder cleansers, chlorine bleach, rust remover, or ammonia.
1. Remove food/residue with the Cooktop Scraper.
�For best results, use the Cooktop Scraper while the
cooktop is still warm but not hot to the touch. It is
recommended to wear an oven mitt while scraping the
warm cooktop.
�Hold the Cooktop Scraper at approximately a 45° angle
against the glass surface and scrape the residue. It will be
necessary to apply pressure in order to remove the
residue.
Allow the cooktop to cool down completely before proceeding
to Step 2.
2. Apply a few dime-sized drops of Cooktop Cleaner to the
affected areas.
�Rub affresh®Cleaner onto the cooktop surface with the
blue Cooktop Cleaning Pad. Some pressure is needed to
remove stubborn stains.
�Allow the cleaner to dry to a white haze before proceeding
to Step 3.
3. Polish with a clean, dry cloth or a clean, dry paper towel.
�Repeat steps 1 through 3 as necessary for stubborn or
burned-on stains.
The Complete Cooktop Cleaner Kit is available for order
including the following:
�Cooktop Scraper
�Affresh®Cooktop Cleaner
�Blue Cooktop Cleaning Pads
See the Quick Start Guide for ordering information.
COOKTOP CONTROLS
To avoid damage to the cooktop controls, do not use steel wool,
abrasive cleansers, or oven cleaner.
To avoid damage, do not soak knobs. When replacing knobs,
make sure knobs are in the Off position.
On some models, do not remove seals under knobs.
Cleaning Method:
�Soap and water: Pull knobs straight away from control panel to
remove
CONTROL PANEL AND OVEN DOOR EXTERIOR
To avoid damage to the control panel, do not use abrasive
cleaners, steel-wool pads, gritty washcloths, or abrasive paper
towels.
Cleaning Method:
�Glass cleaner and soft cloth or sponge: Apply glass cleaner to
soft cloth or sponge, not directly on panel.
�Affresh®Kitchen and Appliance Cleaner Part Number
W10355010 (not included):
See the Quick Start Guide for contact information.

6
OVEN RACKS
Cleaning Method:
�Steel-wool pad
�For racks that have discolored and are harder to slide, a light
coating of vegetable oil applied to the rack guides will help
them slide.
�Dishwasher (steam rack water reservoir only, not racks):
Although the water reservoir is durable, it may lose its shine
and/or discolor when washed in a dishwasher.
STORAGE DRAWER OR WARMING DRAWER (on some
models)
Check that storage drawer or warming drawer is cool and empty
before cleaning.
Cleaning Method:
�Mild detergent
BAKING DRAWER (on some models)
Check that baking drawer is cool and empty before cleaning.
Food spills should be cleaned when oven cools. At high
temperatures, foods react with porcelain. Staining, etching, pitting,
or faint white spots can result.
Cleaning Method:
�Mild detergent
OVEN CAVITY
Depending on your model, use AquaLift® Technology or
Self-Clean cycle regularly to clean oven spills.
Do not use oven cleaners
Food spills should be cleaned when oven cools. At high
temperatures, foods react with porcelain. Staining, etching, pitting,
or faint white spots can result.
Cleaning Method:
�Clean cycle: See “Clean Cycle” first.
INSTALLATION INSTRUCTIONS
REQUIREMENTS
Tools and Parts
Gather the required tools and parts before starting installation.
Read and follow the instructions provided with any tools listed
here.
Tools needed
�Tape measure
�Flat-blade screwdriver
�Phillips screwdriver
�Level
�Hammer
�Hand or electric drill
�Wrench or pliers
�Marker or pencil
�Flashlight
�Torque Wrench
�Masking tape
�1/4" (6.4 mm) drive ratchet
�1/4" (6.4 mm) nut driver
�3/8" (9.5 mm) and 5/16"
(8 mm) nut driver
�1/8" (3.2 mm) drill bit (for
wood floors)
�Tin snips or large wire
cutters (for cutting ground
strap if necessary)
Parts supplied
Check that all parts are included.
�10-32 hex nuts (attached to terminal block) (3)
�Direct wire lugs (3)
�#10 x 15/8" (4.1 cm) screws (for mounting anti-tip bracket) (2)
�Anti-tip bracket (inside oven cavity)
Anti-tip bracket must be securely mounted to the back wall or
floor. Thickness of flooring may require longer screws to
anchor bracket to subfloor. Longer screws are available from
your local hardware store.
Parts needed
If using a power supply cord kit:
�A UL listed power supply cord kit marked for use with ranges.
The cord should be rated at 250 V minimum, 40 A or 50 A that
is marked for use with nominal 13/8" (3.5 cm) diameter
connection opening and must end in ring terminals or
open-end spade terminals with upturned ends.
�A UL listed strain relief.
Check local codes. Check existing electrical supply. See the
appropriate “Electrical Requirements” section.
It is recommended that all electrical connections be made by a
licensed, qualified electrical installer.
NOTE: Be sure to purchase only Whirlpool factory-certified parts
and accessories for your appliance. Your installation may require
additional parts. To order, refer to the contact information
referenced in your Quick Start Guide.
Optional Parts
To purchase side trim kits, backsplash kits, or any other
accessories see the Quick Start Guide for ordering information.
NOTE: Be sure to purchase only Whirlpool factory-certified parts
and accessories for your appliance. Your installation may require
additional parts. To order, refer to the contact information
referenced in your Quick Start Guide.
Location Requirements
IMPORTANT: Observe all governing codes and ordinances.
�It is the installer’s responsibility to comply with installation
clearances specified on the model/serial/rating plate. The
model/serial/rating plate is located behind the oven door on the
top right-hand side of the oven frame.
�To eliminate the risk of burns or fire by reaching over the
heated surface units, cabinet storage space located above the
surface units should be avoided. If cabinet storage is to be
provided, the risk can be reduced by installing a range hood or
microwave hood combination that projects horizontally a
minimum of 5" (12.7 cm) beyond the bottom of the cabinets.
�The range should be located for convenient use in the kitchen.
�Recessed installations must provide complete enclosure of the
sides and rear of the range.
�All openings in the wall or floor where range is to be installed
must be sealed.
�Cabinet opening dimensions that are shown must be used.
Given dimensions are minimum clearances.
�The anti-tip bracket must be installed. To install the anti-tip
bracket shipped with the range, see the “Install Anti-Tip
Bracket” section.
�Grounded electrical supply is required. See the appropriate
“Electrical Requirements” section.
�Contact a qualified floor covering installer to check that the
floor covering can withstand at least 200°F (93°C).
�Use an insulated pad or 1/4" (6.4 mm) plywood under range if
installing range over carpeting.
IMPORTANT: To avoid damage to your cabinets, check with your
builder or cabinet supplier to make sure that the materials used
will not discolor, delaminate, or sustain other damage. This oven
has been designed in accordance with the requirements of UL
and CSA International and complies with the maximum allowable
wood cabinet temperatures of 194°F (90°C).

7
Mobile Home - Additional Installation Requirements
The installation of this range must conform to the Manufactured Home Construction and Safety Standard, Title 24 CFR, Part 3280
(formerly the Federal Standard for Mobile Home Construction and Safety, Title 24, HUD Part 280). When such standard is not applicable,
use the Standard for Manufactured Home Installations, ANSI A225.1/NFPA 501A or with local codes.
In Canada, the installation of this range must conform with the current standards CAN/CSA-Z240.1-latest edition, or with local codes.
Mobile Home Installations Require:
�When this range is installed in a mobile home, it must be secured to the floor during transit. Any method of securing the range is
adequate as long as it conforms to the standards listed above.
�Four-wire power supply cord or cable must be used in a mobile home installation.
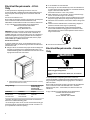
Cabinet Dimensions
Cabinet opening dimensions shown are for 25" (64.0 cm) countertop depth, 24" (61.0 cm) base cabinet depth and 36" (91.4 cm)
countertop height.
IMPORTANT: If installing a range hood or microwave hood combination above the range, follow the range hood or microwave hood
combination installation instructions for dimensional clearances above the cooktop surface.
Range may be installed next to combustible walls with zero clearance.
NOTE: When installed in a slide-in cutout, the front of oven door may protrude beyond the base cabinet.
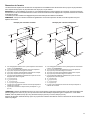
Slide-In Cutout Freestanding Cutout
K
A
B
C
D
E
G
H
I
J
F
I
L
K
A
B
C
D
E
G
H
I
J
F
I
A. For minimum clearance to top of cooktop, see NOTE*
B. 13" (33 cm) maximum upper cabinet depth
C. 30" (76.2 cm) minimum opening width
D. 18" (45.7 cm) upper side cabinet to countertop
E. 30" (76.2 cm) minimum opening width
F. The shaded area is recommended for installation of grounded outlet
G. 131/8" (33.3 cm)
H. 711/16" (19.5 cm)
I. 413/16" (12.2 cm)
J. 311/16" (9.4 cm) plus measurement of L
K. Cabinet door or hinges should not extend into the cutout.
L. Remaining counter depth should not exceed 21/4" (5.7 cm)
A. For minimum clearance to top of cooktop, see NOTE*
B. 13" (33 cm) maximum. upper cabinet depth
C. 30" (76.2 cm) minimum opening width
D. 18" (45.7 cm) upper side cabinet to countertop
E. 30" (76.2 cm) minimum opening width
F. The shaded area is recommended for installation of grounded outlet
G. 131/8" (33.3 cm)
H. 711/16" (19.5 cm)
I. 413/16" (12.2 cm)
J. 311/16" (9.4 cm)
K. Cabinet door or hinges should not extend into the cutout
*NOTE: 24" (61.0 cm) minimum when bottom of wood or metal cabinet is shielded by not less than 1/4" (0.64 cm) flame retardant
millboard covered with not less than No. 28 MSG sheet steel, 0.015" (0.4 mm) stainless steel, 0.024" (0.6 mm) aluminum or
0.020" (0.5 mm) copper.
30" (76.2 cm) minimum clearance between the top of the cooking platform and the bottom of an uncovered wood or metal cabinet.

8
Electrical Requirements - U.S.A.
Only
If codes permit and a separate ground wire is used, it is
recommended that a qualified electrical installer determine that
the ground path and wire gauge are in accordance with local
codes.
Do not use an extension cord.
Be sure that the electrical connection and wire size are adequate
and in conformance with the National Electrical Code,
ANSI/ NFPA 70-latest edition and all local codes and ordinances.
A copy of the above code standards can be obtained from:
National Fire Protection Association
1 Batterymarch Park
Quincy, MA 02169-7471
WARNING: Improper connection of the equipment-grounding
conductor can result in a risk of electric shock. Check with a
qualified electrician or service technician if you are in doubt as to
whether the appliance is properly grounded. Do not modify the
power supply cord plug. If it will not fit the outlet, have a proper
outlet installed by a qualified electrician.
Electrical Connection
To properly install your range, you must determine the type of
electrical connection you will be using and follow the instructions
provided for it here.
�Range must be connected to the proper electrical voltage and
frequency as specified on the model/serial/rating plate. The
model/serial/rating plate is located behind the oven door on the
top right-hand side of the oven frame.
A. Model/serial/rating plate (located behind the oven door on the top
right-hand side of the oven frame)
Range Rating* Specified Rating of
Power Supply
Cord Kit and
Circuit Protection
120/240 V 120/208 V Ampere
8.8-16.5 kW 7.8-12.5 kW 40 or 50**
16.6-22.5 kW 12.6-18.5 kW 50
*The NEC calculated load is less than the total connected load
listed on the model/serial/rating plate.
**If connecting to a 50 A circuit, use a 50 A rated cord with kit. For
50 A rated cord kits, use kits that specify use with a nominal 13/8"
(3.5 cm) diameter connection opening.
�A circuit breaker is recommended.
�The range can be connected directly to the circuit breaker box
(or fused disconnect) through flexible or nonmetallic sheathed,
copper or aluminum cable. See the
“Electrical Connection -U.S.A. Only” section.
�Allow at least 6 ft (1.8 m) of slack in the line so that the range
can be moved if servicing is ever necessary.
�A UL listed conduit connector must be provided at each end of
the power supply cable (at the range and at the junction box).
�Wire sizes and connections must conform with the rating of the
range.
�The tech sheet is available online, and the wiring diagram is
located on the back of the range in a plastic bag.
�This range is equipped with a CSA International Certified
Power Cord intended to be plugged into a standard 14-50R
wall receptacle. Be sure the wall receptacle is within reach of
range’s final location.
�Do not use an extension cord.
Electrical Requirements - Canada
Only
WARNING
Electrical Shock Hazard
Electrically ground appliance.
Failure to do so could result in death, fire, or electrical
shock.
If codes permit and a separate ground wire is used, it is
recommended that a qualified electrical installer determine that
the ground path is adequate and wire gauge are in accordance
with local codes.
Be sure that the electrical connection and wire size are adequate
and in conformance with CSA Standard C22.1, Canadian
Electrical Code, Part 1 - latest edition, and all local codes and
ordinances.
A copy of the above code standards can be obtained from:
Canadian Standards Association
178 Rexdale Blvd.
Toronto, ON M9W 1R3 CANADA

9
�Check with a qualified electrical installer if you are not sure the
range is properly grounded.
Range Rating* Specified Rating of
Power Supply Cord
Kit and Circuit
Protection
120/240 V 120/208 V Ampere
8.8-16.5 KW 7.8-12.5 KW 40 or 50**
16.6-22.5 KW 12.6-18.5 KW 50
* The NEC calculated load is less than the total connected load
listed on the model/serial/rating plate.
**If connecting to a 50 A circuit, use a 50 A rated cord with kit.
For 50 A rated cord kits, use kits that specify use with a
nominal 13/8" (34.9 mm) diameter connection opening.
�When a 4-wire, single phase 250 V, 60 Hz, AC-only electrical
supply is available, a 40 A minimum circuit protection is
required on 30" (76.2 cm) ranges, fused on both sides of the
line.
�A circuit breaker is recommended.
�This range is equipped with a UL or CSA International Certified
Power Cord intended to be plugged into a standard 14-50R
wall receptacle. Be sure the wall receptacle is within reach of
range’s final location.
�Do not use an extension cord.
INSTALLATION
Unpack Range
WARNING
Excessive Weight Hazard
Use two or more people to move and install or uninstall
appliance.
Failure to do so can result in back or other injury.
1. Remove shipping materials, tape and film from the range.
Keep cardboard bottom under range. Do not dispose of
anything until the installation is complete.
2. Remove oven racks and parts package from oven and
shipping materials.
3. To remove cardboard bottom, first take 4 cardboard corners
from the carton. Stack one cardboard corner on top of
another. Repeat with the other 2 corners. Place them
lengthwise on the floor behind the range to support the range
when it is laid on its back.
4. Using 2 or more people, firmly grasp the range and gently lay
it on its back on the cardboard corners.
5. Remove cardboard bottom.
The leveling legs can be adjusted while the range is on its
back. See the “Adjust Leveling Legs” section.
NOTE: To place range back up into a standing position, put a
sheet of cardboard or hardboard on the floor in front of range
to protect the flooring. Using 2 or more people, stand range
back up onto the cardboard or hardboard.
Install Anti-Tip Bracket
WARNING
Tip Over Hazard
A child or adult can tip the range and be killed.
Install anti-tip bracket to floor or wall per installation
instructions.
Slide range back so rear range foot is engaged in the
slot of the anti-tip bracket.
Re-engage anti-tip bracket if range is moved.
Do not operate range without anti-tip bracket installed
and engaged.
Failure to follow these instructions can result in death or
serious burns to children and adults.
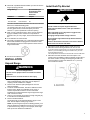
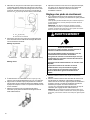
1. Remove the anti-tip bracket from the inside of the oven.
2. Determine which mounting method to use: floor or wall.
If you have a stone or masonry floor, you can use the wall mounting
method. If you are installing the range in a mobile home, you must
secure the range to the floor.
This anti-tip bracket and screws can be used with wood or metal studs.
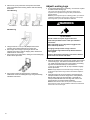
3. Determine and mark centerline of the cutout space. The
mounting can be installed on either the left-side or right-side of
the cutout. Position mounting bracket against the wall in the
cutout so that the V-notch of the bracket is 121/2" (31.8 cm)
from centerline as shown.
A. 121/2" (31.8 cm)
B. Bracket V-notch

10
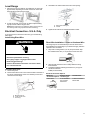
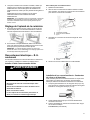
4. Drill two 1/8" (3 mm) holes that correspond to the bracket
holes of the determined mounting method. See the following
illustrations.
Floor Mounting
Rear Position Front Position Diagonal (2 options)
Wall Mounting
5. Using the two #10 x 15/8" (4.1 cm) Phillips-head screws
provided, mount anti-tip bracket to the wall or floor.
6. Move range close enough to opening to allow for final
electrical connections. Remove shipping base, cardboard or
hardboard from under range.
7. Move range into its final location, making sure rear leveling leg
slides into anti-tip bracket.
8. Move range forward onto shipping base, cardboard or
hardboard to continue installing the range using the following
installation instructions.
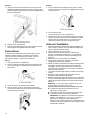
Adjust Leveling Legs
1. If range height adjustment is necessary, use a wrench or pliers
to loosen the four leveling legs.
This may be done with the range on its back or with the range
supported on two legs after the range has been placed back to a
standing position.
NOTE:To place range back up into a standing position, put a sheet of
cardboard or hardboard in front of range. Using two or more people,
stand range back up onto the cardboard or hardboard.
WARNING
Tip Over Hazard
A child or adult can tip the range and be killed.
Install anti-tip bracket to floor or wall per installation
instructions.
Slide range back so rear range foot is engaged in the
slot of the anti-tip bracket.
Re-engage anti-tip bracket if range is moved.
Do not operate range without anti-tip bracket installed
and engaged.
Failure to follow these instructions can result in death or
serious burns to children and adults.
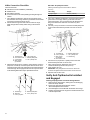
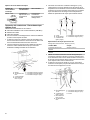
2. Measure the distance from the top of the counter to the floor.
3. Measure the distance from the top of the cooktop to the bottom
of the leveling legs. This distance should be the same. If it is
not, adjust the leveling legs to the correct height. The leveling
legs can be loosened to add up to a maximum of
1" (2.5 cm). A minimum of 3/16" (5 mm) is needed to engage
the anti-tip bracket.
NOTE:If height adjustment is made when range is standing, tilt the
range back to adjust the front legs, and then tilt forward to adjust the
rear legs.
4. When the range is at the correct height, check that there is
adequate clearance under the range for the anti-tip bracket.
Before sliding range into its final location, check that the
anti-tip bracket will slide under the range and onto the rear
leveling leg prior to anti-tip bracket installation.
NOTE:If a Trim Kit will be used, the top of the cooktop should be
higher than the counter. See the Installation Instructions included with
the Trim Kit for the correct height.

11
Level Range
1. Place level on the oven bottom, as indicated in one of the two
figures below, depending on the size of the level. Check with
the level side to side and front to back.
2. If range is not level, use a wrench or pliers to adjust leveling
legs up or down until the range is level.
NOTE:Range must be level for satisfactory baking performance and
best cleaning results using AquaLift®Self-Clean Technology.
Electrical Connection - U.S.A. Only
If your home has a 4-wire direct connection, go to “Install Using
Direct Wire”.
Install Using Direct Wire
WARNING
Electrical Shock Hazard
Disconnect power before servicing.
Use 8 gauge copper or 6 gauge aluminum wire.
Electrically ground range.
Failure to follow these instructions can result in death,
fire, or electrical shock.
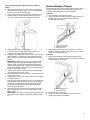
Direct Wire Strain Relief
1. Disconnect power.
2. Remove the lower access cover screws located on the back of
the range. Pull the bottom of the cover toward you and out to
remove cover from range.
A
B
C
A. Mounting tabs (3)
B. Lower access cover
C. Screws (2)
3. Assemble a UL listed conduit connector in the opening.
A
B
A. Removable retaining nut
B. Conduit
4. Tighten strain relief screw against the flexible conduit.
Direct Wire Installation: Copper or Aluminum Wire
This range may be connected directly to the fuse disconnect or
circuit breaker box. Depending on your electrical supply, make the
required 4-wire connection.
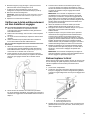
1. Strip outer covering back 3" (7.6 cm) to expose wires. Strip
the insulation back 3/8" (1.0 cm) from the end of each wire.
2. Allow enough slack in the wire to easily attach the wiring
terminal block.
3. Complete installation following instructions for your type of
electrical connection:
4-wire (recommended)
Electrical Connection Options
Electrical
Connection Options And you will be
connecting to: Go to Section:
4-wire direct A circuit breaker
box or fused
disconnect
4-Wire Connection:
Direct Wire
3/8"
(7.6 cm)
3"
3/8"
(1.0 cm)
(12.7 cm)
5"
1.0 cm

12
4-Wire Connection: Direct Wire
Use this method for:
�New branch-circuit installations (1996 NEC)
�Mobile homes
�Recreational vehicles
�In an area where local codes prohibit grounding through the
neutral
1. Use a Phillips screwdriver to remove the ground-link screw
from the back of the range. Save the ground-link screw and the
end of the ground link under the screw.
2. Pull the wires through the strain relief on bottom of range.
Allow enough slack to easily attach wiring to the terminal
block.
A
B
D
F
E
G
c
A. Terminal block
B. Ground-link screw
C. Cord/conduit
D. Bare (green)
ground wire
E. Line 2 (red) wire
F. Nautral (white) wire
G. Line 1 (black) wire
3. Attach terminal lugs to line 1 (black), neutral (white), and line 2
(red) wires. Loosen (do not remove) the setscrew on the front
of the terminal lug and insert exposed wire end through bottom
of terminal lugs. Securely tighten setscrew to torque as shown
in the following Bare Wire Torque Specifications chart.
A
B
CDE
A. Terminal lug
B. Setscrew
C. Line 2 (red) wire
D. Natural (white) wire
E. Line 1 (black) wire
Bare Wire Torque Specifications
Attaching terminal lugs to the terminal block - 20 lbs-in
(2.3 N-m).
Wire Awg Torque
8 gauge copper 25 lbs-in (2.8 N-m)
6 gauge aluminium 35 lbs-in (4.0 N-m)
4. Use a hex or Phillips screwdriver to connect the bare (green)
ground wire to the range with the ground-link screw and
ground-link section. The ground wire must be attached over
the ground-link section and must not contact any other
terminal.
5. Use 3/8" (1.0 cm) nut driver to connect the neutral (white) wire
to the center terminal block post with one of the 10-32 hex
nuts.
A
B
C
DE
F
G
A. 10-32 hex nut
B. Line 2 (red) wire
C. Bare (green)
ground wire
D. Ground-link screw
E. Neutral (white) wire
F. Line 1 (black) wire
G. Terminal lug
6. Connect line 2 (red) and line 1 (black) wires to the outer
terminal block posts with 10-32 hex nuts.
7. Using a torque wrench, tighten the hex nuts to a
recommended torque of 20 in-lbs (2.3 N-m).
8. Firmly tighten hex nuts.
IMPORTANT:Verify the tightness of the hex nuts. Ensure all
harnesses are tightened to the terminal block and are not loose.
9. Replace lower access cover.
Verify Anti-Tip Bracket Is Installed
and Engaged
On Ranges Equipped with a Premium Storage Drawer:
1. Slide range into final location, making sure rear leveling leg
slides into anti-tip bracket.
2. Remove the premium storage drawer. See the
“Remove/Replace Drawer” section.
3. Use a flashlight to look underneath the bottom of the range.
4. Visually check that the rear range foot is inserted into the slot
of the anti-tip bracket.

13
On Ranges Equipped with a Warming Drawer or Baking
Drawer:
1. Slide range into final location, making sure rear leveling leg
slides into anti-tip bracket. Leave a 1" (2.5 cm) gap between
the back of the range and the back wall.
2. Place the outside of your foot against the bottom front of the
warming drawer or baking drawer to keep the range from
moving, and then grasp the back of the range as shown.
3. Slowly attempt to tilt the range forward.
If you encounter immediate resistance, the range foot is
engaged in the anti-tip bracket. Go to Step 8.
4. If the rear of the range lifts more than 1/2" (1.3 cm) off the floor
without resistance, stop tilting the range and lower it gently
back to the floor. The range foot is not engaged in the anti-tip
bracket.
IMPORTANT: If there is a snapping or popping sound when
lifting the range, the range may not be fully engaged in the
bracket. Check to see if there are obstructions keeping the
range from sliding to the wall or keeping the range foot from
sliding into the bracket. Verify that the bracket is held securely
in place by the mounting screws.
5. Slide the range forward, and verify that the anti-tip bracket is
securely attached to the floor or wall.
6. Slide range back so the rear range foot is inserted into the slot
of the anti-tip bracket.
7. Repeat steps 1 and 2 to ensure that the range foot is engaged
in the anti-tip bracket.
If the rear of the range lifts more than 1/2" (1.3 cm) off the floor
without resistance, the anti-tip bracket may not be installed
correctly. Do not operate the range without anti-tip bracket
installed and engaged. Please reference the Quick Start
Guide for contact information.
8. Move the range into its final location. Check that the range is
level by placing a level on the oven bottom. See the “Level
Range” section.
IMPORTANT: If the range is moved to adjust the leveling legs,
verify that the anti-tip bracket is engaged by repeating steps 1
to 8.
Remove/Replace Drawer
Remove all items from inside the baking drawer, warming drawer
or premium storage drawer, and then allow the range to cool
completely before attempting to remove the drawer.
To Remove:
1. Open the drawer to its fully open position.
2. Using a flat-blade screwdriver, gently loosen the drawer from
the glide alignment notch, and then lift up the drawer
alignment tab from the glide.
A. Flat-blade screwdriver
B. Drawer alignment tab
C. Drawer glide notch
3. Repeat Step 2 on the other side. The drawer is no longer
attached to the drawer glides. Using both hands, pick up the
drawer to complete the removal.
To Replace:
1. Align the forward drawer notches with the notches in the
drawer glides on both sides. Place the rear alignment tabs into
the drawer glides on both sides.
A. Drawer alignment tab
B. Drawer glide notch
2. Push the drawer in all the way.
3. Gently open and close the drawer to ensure it is seated
properly on the glides on both sides.

14
Oven Door
For normal range use, it is not suggested to remove the oven
door. However, if removal is necessary, make sure the oven is off
and cool. Then, follow these instructions. The oven door is heavy.
To Remove:
1. Open oven door all the way.
2. Pinch the hinge latch between two fingers and pull forward.
Repeat on other side of oven door.
A. Hinge latch
3. Close the oven door as far as it will shut.
4. Lift the oven door while holding both sides.
Continue to push the oven door closed and pull it away from
the oven door frame.
To Replace:
1. Insert both hanger arms into the door. Be sure that the hinge
notches are engaged in the oven door frame.
A. Hinge notch
2. Open the oven door.
The door should be able to open all the way.
3. Move the hinge levers back to the locked position. Check that
the door is free to open and close and is level while closed. If it
is not, repeat the removal and installation procedures.
Complete Installation
1. Check that all parts are now installed. If there is an extra part,
go back through the steps to see which step was skipped.
2. Check that you have all of your tools.
3. Check that you have all of the range accessories, especially
oven racks. These accessories may be in the range
packaging.
4. Dispose of/recycle all packaging materials.
5. Check that the range is level. See the “Level Range” section.
6. Use a mild solution of liquid household cleaner and warm
water to remove waxy residue caused by shipping material.
Dry thoroughly with a soft cloth. For more information, see the
“Range Maintenance and Care” section.
7. Read the Quick Start Guide and online Control Guide.
8. Plug power cord into appropriate outlet. Turn power on.
9. Turn on surface burners and oven. See the Quick Start Guide
and online Control Guide for specific instructions on range
operation.
NOTE:Odors and smoke are normal when the oven is used the first
few times.
If Range Does Not Operate, Check the Following:
�Household fuse is intact and tight; or circuit breaker has not
tripped.
�Range is plugged into a grounded outlet.
�Electrical supply is connected.
IMPORTANT: If the range control displays an “F9” or “F9,
E0” error code, the electrical outlet in the home may be
miswired. Disconnect power and contact a qualified
electrician to verify the electrical supply.
10. When the range has been on for 5 minutes, check for heat. If
the range is cold, turn off the range and contact a qualified
electrician.
If You Need Assistance or Service:
Please reference the Quick Start Guide for contact information.

15
Moving the Range
WARNING
Tip Over Hazard
A child or adult can tip the range and be killed.
Install anti-tip bracket to floor or wall per installation
instructions.
Slide range back so rear range foot is engaged in the
slot of the anti-tip bracket.
Re-engage anti-tip bracket if range is moved.
Do not operate range without anti-tip bracket installed
and engaged.
Failure to follow these instructions can result in death or
serious burns to children and adults.
When moving range, slide range onto cardboard or hardboard to
avoid damaging the floor covering.
If removing the range is necessary for cleaning or maintenance:
For power supply cord-connected ranges:
1. Slide range forward.
2. Unplug the power supply cord.
3. Complete cleaning or maintenance.
4. Plug in power supply cord.
5. Check that the anti-tip bracket is installed and engaged. See
the “Verify Anti-Tip Bracket Is Installed and Engaged” section.
6. Check that range is level.
For direct-wired ranges:
WARNING
Electrical Shock Hazard
Disconnect power before servicing.
Replace all parts and panels before operating.
Failure to do so can result in death or electrical shock.
1. Disconnect power.
2. Slide range forward.
3. Complete cleaning or maintenance.
4. Check that the anti-tip bracket is installed and engaged. See
the “Verify Anti-Tip Bracket Is Installed and Engaged” section.
5. Check that range is level.
6. Reconnect power.

16
SÉCURITÉ DE LA CUISINIÈRE
Votre sécurité et celle des autres sont très importantes.
Nous donnons de nombreux messages de sécurité importants dans ce manuel et sur votre appareil. Assurez-vous de toujours lire
tous les messages de sécurité et de vous y conformer.
Voici le symbole d’alerte de sécurité.
Ce symbole d’alerte de sécurité vous signale les dangers potentiels de décès et de blessures graves.
Tous les messages de sécurité suivront le symbole d’alerte de sécurité et le mot « DANGER » ou
« AVERTISSEMENT ». Ces mots signifient :
DANGER Risque possible de décès ou de blessure grave si vous ne
suivez pas immédiatement les instructions.
AVERTISSEMENT Risque possible de décès ou de blessure grave si vous ne
suivez pas les instructions.
Tous les messages de sécurité vous diront quel est le danger potentiel, comment réduire le risque de blessure et ce qui peut se
produire en cas de non-respect des instructions.
La cuisinière ne basculera pas pendant une utilisation normale. Cependant, la cuisinière peut basculer, si vous appliquez trop de force ou
de poids à la porte de la cuisinière, sans avoir adéquatement fixé la bride antibasculement.
AVERTISSEMENT
Risque de basculement
Une personne, enfant ou adulte, peut faire basculer la cuisinière et subir des blessures mortelles.
Fixer la bride antibasculement au plancher ou au mur, conformément aux instructions
d’installation.
Faire glisser de nouveau la cuisinière de façon à ce que le pied arrière de la cuisinière se trouve
dans la fente de la bride antibasculement.
Réengager la bride antibasculement si la cuisinière a été déplacée.
Ne pas faire fonctionner la cuisinière si la bride antibasculement n’est pas installée et engagée.
Le non-respect de ces instructions peut causer un décès ou des brûlures graves aux enfants et
aux adultes.
Pour vérifier que la bride antibasculement est bien installée et engagée :
•Faire glisser la cuisinière vers l’avant.
•Vérifier que la bride antibasculement est bien fixée au plancher ou au mur.
•Faire glisser de nouveau la cuisinière de façon à ce que le pied arrière de la cuisinière
se trouve sous la bride antibasculement.
•Voir les directives d’installation pour obtenir de plus amples renseignements.

17
INSTRUCTIONS IMPORTANTES DE SÉCURITÉ
AVERTISSEMENT : Afin de réduire le risque d’incendie, de décharge électrique ou de blessures corporelles lors de l’utilisation
de cet appareil, observer certaines précautions fondamentales, notamment :
�AVERTISSEMENT : POUR RÉDUIRE LES RISQUES
DE BASCULEMENT DE LA CUISINIÈRE, LA CUISINIÈRE
DOIT ÊTRE FIXÉE EN INSTALLANT CORRECTEMENT
LE DISPOSITIF ANTIBASCULEMENT. POUR VÉRIFIER
SI LES APPAREILS SONT BIEN INSTALLÉS, FAIRE
GLISSER DE NOUVEAU LA CUISINIÈRE VERS L’AVANT,
S’ASSURER QUE LE DISPOSITIF ANTIBASCULEMENT
EST BIEN FIXÉ AU MUR OU AU PLANCHER, PUIS
FAIRE GLISSER LA CUISINIÈRE VERS L’ARRIÈRE DE
FAÇON À CE QUE LE PIED ARRIÈRE DE LA
CUISINIÈRE SE TROUVE SOUS LA BRIDE
ANTIBASCULEMENT.
�ATTENTION : Ne pas entreposer de produits d’intérêt
pour les enfants dans les armoires au-dessus d’un appareil
ou dans le dosseret de l’appareil – Les enfants grimpant
sur l’appareil pour attraper ces objets pourraient gravement
se blesser.
�Bonne installation – L’appareil, lorsqu’il est installé, doit être
relié à la terre conformément aux codes locaux, ou en
l’absence de codes locaux, au National Electrical Code,
ANSI/NFPA 70 ou le Code canadien de l’électricité
CSA C22.1-02. Au Canada, la cuisinière doit être reliée à la
terre en respectant le Code canadien de l’électricité.
S’assurer que l’appareil est bien installé et que la mise à la
terre est réalisée par un technicien qualifié.
�Ne jamais utiliser l’appareil pour chauffer ou réchauffer la
pièce.
�Ne pas laisser les enfants seuls – Les enfants ne doivent
pas être laissés seuls ou sans surveillance dans la zone où
l’appareil est utilisé. Ils ne doivent jamais être autorisés à
s’asseoir ou à se tenir debout sur une partie quelconque de
l’appareil.
�Porter des vêtements adaptés – Les vêtements pendants
ou non ajustés ne doivent jamais être portés lorsqu’on
utilise l’appareil.
�Entretien par l’utilisateur – Ne pas réparer ou remplacer
une quelconque pièce de l’appareil sans recommandation
spécifique du manuel. Toutes les autres tâches d’entretien
doivent être effectuées par un technicien qualifié.
�Entreposage dans ou sur l’appareil – Les matières
inflammables ne doivent pas être entreposées dans un four
ou près de la surface de la table.
�Cet appareil n’est pas conçu pour servir d’espace de
rangement.
�Ne pas utiliser d’eau sur les feux de friture – Étouffer le feu
ou la flamme ou utiliser un extincteur avec agent chimique
sec ou mousseux.
�Ne pas utiliser de pièces de remplacement qui n’ont pas
été recommandées par le fabricant (c.-à-d., pièces
fabriquées à la maison à l’aide d’une imprimante 3D).
�Utiliser uniquement des mitaines sèches – Les mitaines
humides ou trempées sur les surfaces chaudes peuvent
provoquer des brûlures dues à la vapeur. Ne pas laisser les
mitaines toucher des éléments chauffants et chauds. Ne
pas utiliser un chiffon ou tout autre tissu encombrant.
�NE PAS TOUCHER LES UNITÉS DE SURFACE OU LES
ZONES PRÈS DES UNITÉS DE SURFACE – Les unités de
surface peuvent être chaudes même si elles sont de
couleur foncée. Les zones près des unités de surface
peuvent être suffisamment chaudes pour provoquer des
brûlures. Pendant et après l’utilisation, ne pas toucher ou
laisser des vêtements ou d’autres matériaux inflammables
en contact avec les unités de surface ou les zones près des
unités de surface tant qu’elles n’ont pas suffisamment
refroidi. Parmi ces zones, on compte les éléments, la table
de cuisson et les zones face à la table de cuisson.
�Utiliser des ustensiles de taille appropriée – Cet appareil
est équipé d’une ou plusieurs unités de surface de
différentes tailles. Choisir des ustensiles ayant des fonds
plats suffisamment grands pour couvrir l’élément chauffant
de surface. L’utilisation d’ustensiles sous-dimensionnés
exposera une partie de l’élément chauffant à un contact
direct et peut entraîner l’inflammation des vêtements. Un
bon contact entre l’ustensile et le brûleur améliorera
l’efficacité de la table.
�Ne jamais laisser les surfaces de cuisson sans surveillance
à des réglages de chaleur élevée – Les ébullitions
provoquent de la fumée et des éclaboussures graisseuses
qui peuvent s’enflammer.
�S’assurer que les réflecteurs ou cuvettes ramasse-gouttes
sont en place – L’absence de ces éléments pendant la
cuisson peut endommager les conducteurs et composants
se trouvant en dessous.
�Revêtements de protection – Ne pas utiliser de papier
aluminium pour recouvrir la surface des cuvettes ramasse-
gouttes ou le fond du four, sauf si le manuel le suggère.
Une mauvaise installation de ces protecteurs peut entraîner
un risque de décharge électrique ou d’incendie.
�Ustensiles de cuisson émaillés – seuls certains types
d’ustensiles en verre, vitrocéramique, céramique, terre
cuite ou autre émaillage peuvent être utilisés sur la surface
de la cuisinière sans briser en raison du changement de
température soudain.
�Les poignées des ustensiles doivent être tournées vers
l’intérieur et ne doivent pas dépasser au-dessus des unités
de surface de cuisson – Pour éviter le risque de brûlures,
d’inflammation des matières inflammables et
d’éclaboussures dues à un contact non intentionnel avec
l’ustensile, la poignée d’un ustensile doit toujours être
positionnée vers l’intérieur et ne doit pas dépasser au-
dessus des surfaces de cuisson adjacentes.
�Ne pas tremper les éléments chauffants – Les éléments
chauffants ne devraient jamais être immergés.
�Ne pas cuire sur une table de cuisson brisée – Si la table
de cuisson est cassée, les agents de nettoyage et les
éclaboussures peuvent pénétrer dans la table de cuisson
brisée et créer un risque de décharge électrique. Contacter
un électricien qualifié immédiatement dans ce cas.
CONSERVER CES INSTRUCTIONS

18
INSTRUCTIONS IMPORTANTES DE SÉCURITÉ
AVERTISSEMENT : Afin de réduire le risque d’incendie, de décharge électrique ou de blessures corporelles lors de l’utilisation
de cet appareil, observer certaines précautions fondamentales, notamment :
�Nettoyer la table de cuisson avec précaution – Si une
éponge ou un linge humide est utilisé pour nettoyer les
éclaboussures sur une zone de cuisson chaude, faire
attention aux brûlures dues à la vapeur. Certains nettoyants
peuvent produire des fumées toxiques si appliqués sur une
surface chaude.
�Ouvrir la porte lentement – Laisser la chaleur ou la vapeur
s’échapper avant de retirer ou de remettre en place un plat.
�Ne pas faire chauffer un contenant qui n’a pas été ouvert
– L’accumulation de pression pourrait faire éclater le
contenant et causer des blessures.
�Garder dégagés les conduits de ventilation du four.
�Position des grilles du four – toujours placer les grilles à la
position souhaitée lorsque le four est froid. Si une grille doit
être déplacée pendant que le four est chaud, ne pas laisser
la poignée entrer en contact avec l’élément chaud du four.
�NE PAS TOUCHER LES ÉLÉMENTS CHAUFFANTS OU
LES SURFACES INTÉRIEURES DU FOUR – Les
éléments chauffants peuvent être chauds même s’ils sont
de couleur foncée. Les surfaces intérieures du four peuvent
être suffisamment chaudes pour provoquer des brûlures.
Pendant et après l’utilisation, ne pas toucher ou laisser des
vêtements ou d’autres matériaux inflammables en contact
avec les éléments chauffants ou les surfaces intérieures
tant qu’ils n’ont pas suffisamment refroidi. Les autres
surfaces de l’appareil peuvent devenir suffisamment
chaudes pour causer des brûlures – les ouvertures de
ventilation et les surfaces autour de ces ouvertures, les
portes du four et les hublots de portes font partie de ces
surfaces.
�Il faut faire attention de ne pas laisser le papier aluminium
et la sonde de cuisson entrer en contact avec les éléments
chauffants.
Pour les cuisinières autonettoyantes
�AVERTISSEMENT : NE PAS LAISSER D’ALIMENTS OU
D’USTENSILES DE CUISSON, ETC., DANS LE FOUR
PENDANT LE FONCTIONNEMENT DU MODE
D’AUTONETTOYAGE PYROLYTIC.
�Ne pas nettoyer le joint de la porte – Le joint de la porte est
essentiel pour une bonne étanchéité. Faire attention à ne
pas frotter, endommager ou déplacer le joint.
�Ne pas utiliser de nettoyants à four – Aucun nettoyant
commercial ou revêtement de protection pour four
d’aucune sorte ne devrait être utilisé dans le four ou près
de ses parties.
�Ne nettoyer que les pièces indiquées dans le manuel.
�Avant de mettre en marche l’autonettoyage – Enlever la
lèchefrite et les autres ustensiles.
Pour les appareils avec hotte de ventilation
�Nettoyer régulièrement les hottes de ventilation – Ne pas
laisser la graisse s’accumuler dans la hotte ou le filtre.
�Lorsque des aliments sont flambés sous la hotte, mettre le
ventilateur en marche.
Pour les cuisinières et fours intelligents
�Utilisation à distance – cet appareil peut être configuré pour
permettre l’utilisation à distance en tout temps. Ne pas
ranger de matériaux inflammables ou sensibles à la
température sur le dessus ou près de la surface de
l’appareil.
CONSERVER CES INSTRUCTIONS

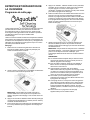
19
ENTRETIEN ET RÉPARATION DE
LA CUISINIÈRE
Programme de nettoyage
La technologie AquaLift®est une formule de nettoyage innovante
qui utilise l’eau et la chaleur pour désincruster les traces de
renversements du four en moins d’une heure. Cette nouvelle
technologie de nettoyage à faible niveau de chaleur représente
une alternative inodore aux options traditionnelles
d’autonettoyage.
Laisser la cuisinière refroidir et atteindre la température ambiante
avant d’utiliser le programme de nettoyage. Si la température de
la cavité du four est supérieure à 200 °F (93 °C), elle apparaît sur
l’affichage et le programme de nettoyage à la vapeur ne s’active
pas avant que la cavité ait refroidi.
Nettoyage :
1. Retirer tous les accessoires et grilles de la cavité du four.
Essuyer les saletés. Utiliser un grattoir en plastique pour
enlever les saletés faciles à enlever.
2. Verser 2 tasses (16 oz [500 mL]) d’eau distillée ou filtrée dans
le fond du four vide et fermer la porte du four.
IMPORTANT : Ne pas utiliser de produits chimiques ou
d’autres additifs avec l’eau. Ne pas ouvrir la porte du four
durant le programme de nettoyage. L’eau au fond du four est
chaude.
3. Appuyer sur CLEAN ou AQUALIFT SELF-CLEAN (nettoyage
ou autonettoyage Aqualift) puis sur START (mise en marche)
au tableau de commande du four.
4. Prévoir 40 minutes pour le nettoyage et le refroidissement du
four. Un bip retentit lorsque le programme de nettoyage est
terminé.
5. Appuyer sur CANCEL, CANCEL UPPER ou OFF (annulation,
annulation du four supérieur ou arrêt) à la fin du programme.
On peut appuyer sur Cancel, Cancel Upper ou Off
(annulation, annulation four supérieur ou arrêt) à tout moment
pour arrêter le programme de nettoyage.
6. Retirer l’excédent d’eau et les saletés désincrustées avec une
éponge ou un linge une fois le programme de nettoyage
terminé. La plus grande partie de l’eau initiale contenue dans
2 tasses (16 oz [500 mL]) d’eau restera dans le four après la
fin du programme de nettoyage. S’il reste encore des saletés,
laisser une petite quantité d’eau dans le fond du four pour
faciliter le nettoyage.
7. Utiliser une éponge douce ou un grattoir en plastique pour
éliminer les saletés qui restent. On peut faire fonctionner
d’autres programmes de nettoyage pour favoriser l’élimination
des saletés tenaces.
IMPORTANT : Ne pas utiliser de nettoyants à four. L’utilisation
de produits chimiques, y compris de nettoyants commerciaux
pour four ou de tampons à récurer métalliques, peut
endommager définitivement la surface en émail de l’intérieur
du four.
REMARQUES :
�La cuisinière doit être d’aplomb afin que toute la surface
du fond de la cavité du four soit recouverte par l’eau au
début du programme de nettoyage.
�Pour de meilleurs résultats, utiliser de l’eau distillée ou
filtrée. Une eau du robinet pourrait laisser des dépôts
minéraux sur le fond du four.
�Avant d’éliminer l’excédent d’eau et les saletés
désincrustées à la fin du programme de nettoyage, insérer
un chiffon ou un essuie-tout entre le bord inférieur de la
porte du four et le châssis avant pour empêcher l’eau de
couler sur l’avant de la cuisinière et sur le plancher.
�De la saleté qui aura adhéré pendant plusieurs
programmes de cuisson sera plus difficile à éliminer avec
le programme de nettoyage.
�Une éponge douce ou un tampon à récurer de type doux
(sans nettoyant) peut être efficace pour le nettoyage des
parois de la cavité du four de la porte et du fond du four
lorsque les saletés sont difficiles à nettoyer. Pour des
résultats optimaux, humidifier le tampon ou l’éponge avant
utilisation.
�Faire fonctionner un programme de nettoyage
supplémentaire pour les saletés tenaces.

20
�Affresh®Un nettoyant pour appareils ménagers de cuisine
et un nettoyant pour table de cuisson affresh®peuvent être
utilisés pour nettoyer le fond du four, ses parois et sa porte
lorsque le four a terminé le programme de nettoyage et
que sa température est redevenue ambiante. Si l’on utilise
le nettoyant pour table de cuisson affresh®, il est
recommandé d’essuyer aussi la cavité avec de l’eau
distillée. Consulter le Guide de démarrage rapide pour les
informations de commande.
�On peut obtenir des ensembles de nettoyage à
technologie AquaLift®supplémentaires en commandant la
pièce numéro W10423113RP. Consulter le Guide de
démarrage rapide pour les informations de commande.
Nettoyage général
IMPORTANT : Avant le nettoyage, s’assurer que toutes les
commandes sont éteintes et que le four et la table de cuisson sont
froids. Toujours suivre les instructions figurant sur les étiquettes
des produits de nettoyage.
L’usage de savon, d’eau et d’un chiffon doux ou d’une éponge est
suggéré en priorité, sauf indication contraire.
SURFACES EN ÉMAIL VITRIFIÉ UNIQUEMENT (sur certains
modèles)
Les éclaboussures alimentaires acides, telles que vinaigre et
tomate, doivent être nettoyées dès que la cuisinière a refroidi. Ces
salissures peuvent endommager le fini.
Méthode de nettoyage :
�Nettoyant à vitre, nettoyant doux liquide ou tampon à récurer
non abrasif : Nettoyer délicatement autour de la plaque
signalétique, car le frottement pourrait en effacer les chiffres.
�Nettoyant affresh®pour cuisine et appareils ménagers –
numéro de pièce W10355010 (vendu séparément) :
Consulter le Guide de démarrage rapide pour obtenir les
coordonnées.
ACIER INOXYDABLE (sur certains modèles)
REMARQUE : Afin d’éviter d’endommager les surfaces en acier
inoxydable, ne pas utiliser de tampons à récurer savonneux, de
nettoyants abrasifs, de tampons en laine d’acier, de chiffons de
lavage rêches ou d’essuie-tout abrasifs. Ils peuvent endommager
les surfaces en acier inoxydable, même après une seule
application ou quelques-unes.
Méthode de nettoyage :
Frotter dans la direction du grain pour éviter les dommages.
�Nettoyant affresh®pour acier inoxydable – numéro de
pièce W10355016 (vendu séparément) :
Consulter le Guide de démarrage rapide pour obtenir les
coordonnées.
PEINTURE MÉTALLIQUE (sur certains modèles)
Ne pas utiliser de nettoyants abrasifs, de nettoyants avec agent
de blanchiment, de produits antirouille, d’ammoniaque ou
d’hydroxyde de sodium (soude), car la surface peinte pourrait se
tacher.
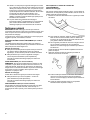
NETTOYAGE DE LA TABLE DE CUISSON EN
VITROCÉRAMIQUE
Méthode de nettoyage :
Afin d’éviter d’endommager la table de cuisson, ne pas utiliser de
laine d’acier, de nettoyants en poudre abrasifs, d’eau de Javel, de
produit antirouille ou d’ammoniaque.
1. Éliminer les salissures alimentaires avec le grattoir pour table
de cuisson.
�Pour faciliter le nettoyage, utiliser le grattoir pendant que la
table de cuisson est encore tiède, mais non brûlante au
toucher. Il est recommandé de porter des mitaines de four
pour gratter la table de cuisson tiède.
�Tenir le grattoir pour table de cuisson à un angle d’environ
45° par rapport à la surface de verre et gratter les
salissures. Il convient d’appuyer fermement pour éliminer
les salissures.
Laisser la table de cuisson refroidir complètement avant de
passer à l’étape 2.
2. Appliquer quelques gouttes de nettoyant pour table de
cuisson sur les zones concernées.
�Frotter le nettoyant affresh®sur la surface de la table de
cuisson avec le tampon bleu à nettoyer les tables de
cuisson. Il convient d’appuyer fermement pour éliminer les
taches rebelles.
�Laisser le produit nettoyant sécher en une pellicule
blanchâtre avant de passer à l’étape 3.
La page charge ...
La page charge ...
La page charge ...
La page charge ...
La page charge ...
La page charge ...
La page charge ...
La page charge ...
La page charge ...
La page charge ...
La page charge ...
La page charge ...
-
 1
1
-
 2
2
-
 3
3
-
 4
4
-
 5
5
-
 6
6
-
 7
7
-
 8
8
-
 9
9
-
 10
10
-
 11
11
-
 12
12
-
 13
13
-
 14
14
-
 15
15
-
 16
16
-
 17
17
-
 18
18
-
 19
19
-
 20
20
-
 21
21
-
 22
22
-
 23
23
-
 24
24
-
 25
25
-
 26
26
-
 27
27
-
 28
28
-
 29
29
-
 30
30
-
 31
31
-
 32
32


JennAir JES1450ML 30 Inch Electric Slide In Range Le manuel du propriétaire
- Catégorie
- Cuisinières
- Taper
- Le manuel du propriétaire
dans d''autres langues
Documents connexes
Autres documents
-
KitchenAid W11652320A Le manuel du propriétaire
-
Whirlpool WFE775H0HZ Mode d'emploi
-
-
-
KitchenAid YKSEB900ESS0 Le manuel du propriétaire
-
Jenn-Air JES1450FB Mode d'emploi
-
KitchenAid KSEB900ESS Manuel utilisateur
-
-
-
Whirlpool WFI910H0AS Le manuel du propriétaire