Mee Audio EARBOOST EB1 Bluetooth Wireless Adaptive Audio Enhancement Earphones Manuel utilisateur
- Taper
- Manuel utilisateur

MUSIC ENJOYMENT FOR EVERYONE
SMART AUDIO ENHANCEMENT
GET THE EARBOOST APP:
Our app is now available on the App Store and Google Play. Scan
the appropriate QR code, then download and install the app.
USER MANUAL
Model: EB1
www.MEEaudio.com/EarBoost
BLUETOOTH WIRELESS
Adaptive Audio Enhancement Earphones

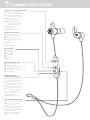
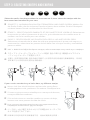
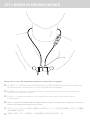
PRODUCT OVERVIEW
Volume down /
previous track button
Taste für Lautstärke
runter/vorherige Spur
Bouton Diminuer le
volume/piste précédente
Botón bajar el
volumen/pista anterior
/
ヴォリュームダウン /
前の曲へ戻る
减少音量 / 上一曲
de
fr
es
ru
ja
zh
Multifunction button
Multifunktionstaste
Bouton multifonction
Botón multifunción
マルチファンクション
ボタン
多功能按钮
de
fr
es
ru
ja
zh
Microphone
Mikrofon
Microphone
Micrófono
マイク
麦克风
de
fr
es
ru
ja
zh
Status indicator light
Statusanzeige
Voyants d’état
Luz indicadora de estado
ステータス・インジケーター
状态指示灯
de
fr
es
ru
ja
zh
Micro-USB charging port
Micro-USB-Anschluss
Port micro-USB de
chargement
Puerto micro USB para
cargar el dispositivo
-USB
Micro-USB 充電ポート
Micro-USB充电口
de
fr
es
ru
ja
zh
Volume up / skip track button
Taste für Lautstärke
hoch/Spur überspringen
Bouton Augmenter le
volume/piste suivante
Botón subir el
volumen/saltar pista
/
ヴォリュームアップ /
次の曲へ送る
增加音量 / 下一曲
de
fr
es
ru
ja
zh

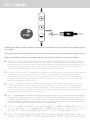
STEP 1: CHARGING
2
hrs
Connect the Micro-USB charging cable to any powered USB port and to the charging port
of the EB1.
The status indicator light will turn blue once the earphones are charged and ready for use.
Close the USB port cover completely after charging for maximum sweat resistance.
DE
FR
ES
RU
JA
ZH
SCHRITT 1 - AUFLADEN: Verbinden Sie das Mikro-USB-Kabel mit dem EB1-Ladeport
und einem eingeschalteten Computer oder einem USB-Ladegerät. Die Statusanzeige
am rechten Hörer leuchtet blau, sobald das Gerät aufgeladen und betriebsbereit ist. Für
maximale Schweißabweisung, stellen Sie sicher, dass die Abdeckung des USB-An-
schlusses nach dem Aufladen des Headsets geschlossen wird.
ÉTAPE 1 - RECHARGE: Connectez le câble micro-USB au port de charge du EB1 et à un
ordinateur allumé ou à un chargeur USB. Le voyant d’état sur l’oreillette de droite
deviendra bleu une fois qu’ils sont chargés et prêts à l’emploi. Pour une résistance
optimale à la transpiration, assurez-vous de bien refermer le couvercle du port USB
après avoir chargé les écouteurs.
PASO 1 - CARGA: Conecte el cable micro-USB al puerto de carga de EB1 y a un PC
encendido o un cargador USB. La luz indicadora de estado en el auricular derecho
cambiará a azul una vez que estén cargados y listos para usarse. Para una mayor
resistencia al sudor, asegúrese de que la cubierta del puerto USB esté completamente
cerrada después de cargar los audífonos.
1 : -USB
, USB- USB
. ,
.
.
步骤1 - 充电: 用微型USB充电线连接EB1耳罩上的USB插孔至电脑或USB充电器进行充电。 电
池充满后,红色指示灯变蓝。 充电完成后请关闭USB充电口保护盖,否则将会失去防水性能。

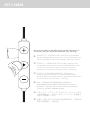
STEP 2: PAIRING
Press and hold the Multifunction button for about 5
seconds until you hear the headset say “Pairing”.
DE
FR
ES
RU
JA
ZH
SCHRITT 2 - KOPPELUNG: Drücken und Halten
Sie die Multifunktionstaste für ca. 5 Sekunden, bis
Sie im Kopfhörer die Durchsage "Pairing" hören.
ÉTAPE 2 - JUMELAGE EN COURS: Appuyez et
maintenez enfoncé le bouton Multifonction pour
environ 5 secondes jusqu'à ce que vous en
entendiez le casque d'écoute dire « Pairing ».
PASO 2 - EMPAREJAMIENTO: Presione y
mantenga presionado el botón Multifunción
durante aproximadamente 5 segundos hasta que
escuche el auricular decir "Pairing".
2 :
5 ,
“Pairing” ( ).
步骤2 - 配对: 按下并按住多功能按键约5秒。直到你听
到耳机语音提示“Pairing”。

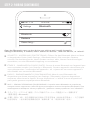
STEP 2: PAIRING (CONTINUED)
Open the Bluetooth menu on the device you wish to pair (usually located in
Settings > Bluetooth). If needed, select “search for devices”, “add new device”, or “refresh”.
AT&T LTE
12:26 PM
95%
Bluetooth
Settings
Searching...
Bluetooth
Devices
DE
FR
ES
RU
JA
ZH
SCHRITT 2 - KOPPELUNG (FORTSETZUNG): Öffnen Sie das Bluetooth-Menü auf dem
zu koppelnden Gerät (siehe Settings > Bluetooth-Menü). Bei manchen Geräten
müssen Sie den Menüpunkt „Nach Geräten suchen“ oder „Neues Gerät hinzufügen“
auswählen, um eine Bluetooth-Kopplung zu veranlassen.
ÉTAPE 2 - JUMELAGE EN COURS (SUITE): Ouvrez le menu Bluetooth sur l’appareil que
vous souhaitez coupler (voir Settings > Bluetooth). Certains appareils nécessitent que
vous sélectionniez « rechercher les appareils » ou « ajouter de nouveaux appareils »
afin d’établir une connexion Bluetooth.
PASO 2 - EMPAREJAMIENTO (CONTINUACIÓN): Abra el menú Bluetooth del
dispositivo que desea emparejar (vea Settings > Bluetooth). Algunos dispositivos
requieren seleccionar la opción “buscar dispositivos” o “añadir nuevos dispositivos”
para poder generar emparejamiento Bluetooth.
2 : Bluetooth ,
( >Bluetooth).
“ ”, “ ” "”.
步骤2 - 配对(续): 在你将要配对的设备中打开蓝牙菜单(请找出蓝牙菜单)。 为了创建新
的蓝牙配对,一些设备可能需要你选择“搜索设备”或“添加新设备”选项。

STEP 2: PAIRING (CONTINUED)
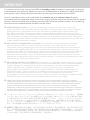
Select “MEE audio EB1” and allow pairing to complete. Use “0000” if a pin is required.
Visit the Bluetooth Support Page at MEEaudio.com/Bluetooth for additional Bluetooth
pairing and setup information.
AT&T LTE
12:26 PM
95%
Bluetooth
Settings
MEE audio EB1
Bluetooth
DE
FR
ES
RU
JA
ZH
SCHRITT 2 - KOPPELUNG (FORTSETZUNG): Wählen Sie „MEE audio EB1“ auf Ihrem
Gerät aus und folgen Sie den Anweisungen, um die Kopplung abzuschließen. Geben
Sie „0000“ ein, falls ein Pin erforderlich ist. Besuchen Sie die Bluetooth Support Seite
auf MEEaudio.com/Bluetooth für Anleitungsvideos zum Koppeln und
Problemlösungs-Vorschläge.
ÉTAPE 2 - JUMELAGE EN COURS (SUITE): Sélectionnez « MEE audio EB1 » sur votre
appareil et suivez tous les autres messages pour effectuer le couplage. Utilisez « 0000
» si un NIP est nécessaire. Consultez la page d’assistance Bluetooth sur
MEEaudio.com/Bluetooth pour des vidéos d’instruction sur le couplage et des
informations sur la résolution des problèmes.
PASO 2 - EMPAREJAMIENTO (CONTINUACIÓN): Seleccione “MEE audio EB1” en su
dispositivo y siga las instrucciones siguientes para emparejar. Si requiere una clave,
introduzca 0000. Visite la página de asistencia técnica de Bluetooth en
MEEaudio.com/Bluetooth donde encontrará videos instructivos sobre asociación e
información sobre solución de problemas.
2 : “MEE audio EB1”
. pin-, “0000”.
Bluetooth MEEaudio.com/Bluetooth,
.
MEEaudio.com/Bluetooth
步骤2 - 配对(续): 在你的设备上选择 ”MEE audio Matrix EB1”,按照进一步提示完成配
对。如果需要密码,请输入“0000”。 如果经过多次尝试依然配对失败,请参阅用户手册或
登陆MEEaudio.com/Bluetooth蓝牙支持页面查看配对教学视频和故障诊断信息。

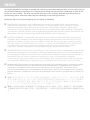
STEP 3: SELECTING EARTIPS AND EARFINS
Select the earfin size that provides the most secure fit, then select the eartips with the
best sound and comfort for your ears.
If your music sounds tinny or lacks bass, try different eartips.
DE
FR
ES
RU
JA
ZH
SCHRITT 3 - AUSWÄHLEN VON POLSTERKAPPEN UND OHRFLOSSEN: Wählen Sie
die Earfin-Größe, die die sicherste Passform bietet, dann wählen Sie die Ohrstöpsel
mit dem besten Sound und Komfort für Ihre Ohren.
ÉTAPE 3 - SÉLECTION DES EMBOUTS ET DES AILETTES DE 'LOREILLE: Sélectionnez
le tournevis qui offre l'ajustement le plus sûr, puis sélectionnez les oreilles avec le
meilleur son et le confort pour vos oreilles.
PASO 3 - SELECCIÓN DE LAS PUNTAS DEL OÍDO Y LAS ALETAS DEL OÍDO:
Seleccione el tamaño de la aleta de oído que proporciona el ajuste más seguro, a
continuación, seleccione las puntas de los oídos con el mejor sonido y comodidad
para sus oídos.
3 : , .
步骤3 - 选择耳套和耳翼: 选择合适的耳翼尺寸以获得良好的舒适度与佩戴稳固性,然后选
择耳套尺寸以获得良好的密闭性和舒适度。
DE
FR
ES
RU
JA
ZH
Wenn sich Ihre Musik blechern anhört oder wenig Bass
wiedergegeben wird, probieren Sie andere Ohrstöpsel aus.
Si votre musique sonne métallique ou manque de basses,
essayez différents embouts.
Si la música tiene un sonido metálico o carece de bajo,
intente usar otras puntas de oído de silicio.
,
.
如果音乐听起来刺耳或低音量感不足,请尝试更换其他耳套。
L
L
L
L
L

Identify the right and left earpieces.
R L
DE
FR
ES
RU
JA
ZH
SCHRITT 4 - TRAGEN DER KOPFHÖRER: Identifizieren Sie den rechten und linken
Kopfhörer.
ÉTAPE 4 - EN PORTANT LE CASQUE D'ÉCOUTE: Identifiez l’écouteur droit et gauche.
PASO 4 - USAR LOS AURICULARES: Identifique los auriculares derecho e izquierdo.
4 : , .
步骤4 - 佩戴耳机: 确定左右耳机。
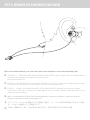
STEP 4: WEARING THE EARPHONES

Place the cable behind your neck and put each earpiece in the corresponding ear.
DE
FR
ES
RU
JA
ZH
SCHRITT 4 - TRAGEN DER KOPFHÖRER (FORTSETZUNG): Legen Sie das Kabel hinter
den Hals und legen Sie jedes Ohrstück in das
entsprechende Ohr.
ÉTAPE 4 - EN PORTANT LE CASQUE D'ÉCOUTE (SUITE): Placez le câble derrière votre
cou et placez chaque écouteur dans l'oreille correspondante.
PASO 4 - USAR LOS AURICULARES (CONTINUACIÓN): Identifique los auriculares
izquierdo y derecho. Coloque el cable detrás de su cuello y poner cada auricular en la
oreja correspondiente.
4 :
.
步骤4 - 佩戴耳机(续): 把线缆挂在脖子后边,将耳机固定在耳朵合适的位置。
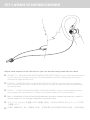
STEP 4: WEARING THE EARPHONES (CONTINUED)

Adjust each earpiece until it fits flush in your ear and the eartip seals the ear canal.
DE
FR
ES
RU
JA
ZH
SCHRITT 4 - TRAGEN DER KOPFHÖRER (FORTSETZUNG): Führen Sie beide Ohrhörer
so ein, dass sie bündig mit Ihrem Ohr abschließen und der Gehörgang durch den
Ohrstöpsel abgedichtet wird.
ÉTAPE 4 - EN PORTANT LE CASQUE D'ÉCOUTE (SUITE): Ajustez chaque oreillette
pour qu’elle affleure votre oreille et de façon à ce que l’embout ferme complètement
le canal auditif.
PASO 4 - USAR LOS AURICULARES (CONTINUACIÓN): Ajuste cada audífono hasta
que quede bien ajustado en su oído y la cubierta selle en el canal auditivo.
4 : ,
, .
步骤4 - 佩戴耳机(续): 调整每个耳机,直到耳套与你的耳道形成良好的密闭,并保持舒适。
STEP 4: WEARING THE EARPHONES (CONTINUED)

SCHRITT 2 - KOPPELUNG (FORTSETZUNG): Wählen Sie „MEE audio EB1“ auf Ihrem
Gerät aus und folgen Sie den Anweisungen, um die Kopplung abzuschließen. Geben
Sie „0000“ ein, falls ein Pin erforderlich ist. Besuchen Sie die Bluetooth Support Seite
auf MEEaudio.com/Bluetooth für Anleitungsvideos zum Koppeln und
Problemlösungs-Vorschläge.
ÉTAPE 2 - JUMELAGE EN COURS (SUITE): Sélectionnez « MEE audio EB1 » sur votre
appareil et suivez tous les autres messages pour effectuer le couplage. Utilisez « 0000
» si un NIP est nécessaire. Consultez la page d’assistance Bluetooth sur
MEEaudio.com/Bluetooth pour des vidéos d’instruction sur le couplage et des
informations sur la résolution des problèmes.
PASO 2 - EMPAREJAMIENTO (CONTINUACIÓN): Seleccione “MEE audio EB1” en su
dispositivo y siga las instrucciones siguientes para emparejar. Si requiere una clave,
introduzca 0000. Visite la página de asistencia técnica de Bluetooth en
MEEaudio.com/Bluetooth donde encontrará videos instructivos sobre asociación e
información sobre solución de problemas.
2 : “MEE audio EB1”
. pin-, “0000”.
Bluetooth MEEaudio.com/Bluetooth,
.
MEEaudio.com/Bluetooth
步骤2 - 配对(续): 在你的设备上选择 ”MEE audio Matrix EB1”,按照进一步提示完成配
对。如果需要密码,请输入“0000”。 如果经过多次尝试依然配对失败,请参阅用户手册或
登陆MEEaudio.com/Bluetooth蓝牙支持页面查看配对教学视频和故障诊断信息。
Tighten the sliding cable cinch for the most secure fit.
DE
FR
ES
RU
JA
ZH
SCHRITT 4 - TRAGEN DER KOPFHÖRER (FORTSETZUNG): Verengen Sie die
Kabelschlaufe, um den Halt der Kopfhörer weiterhin zu verbessern.
ÉTAPE 4 - EN PORTANT LE CASQUE D'ÉCOUTE (SUITE): Poussez le serre-câble
coulissant pour bien fixer les écouteurs en place et en assurer un port en toute
sécurité.
PASO 4 - USAR LOS AURICULARES (CONTINUACIÓN): Apriete la cincha del
cable deslizable para poner los auriculares en su lugar y obtener un ajuste más
seguro.
4 :
.
步骤4 - 佩戴耳机(续): 收紧线缆滑块,将耳机固定在最稳固舒适的地方,
并防止线缆干扰。
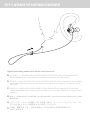
STEP 4: WEARING THE EARPHONES (CONTINUED)

When not in use, clip earphones together using built-in magnets.
DE
FR
ES
RU
JA
ZH
SCHRITT 4 - TRAGEN DER KOPFHÖRER (FORTSETZUNG): Wenn nicht in Gebrauch,
clip die Ohrhörer zusammen mit den eingebauten Magneten.
ÉTAPE 4 - Lorsqu'ils ne sont pas utilisés, faites glisser les écouteurs ensemble en
utilisant des aimants intégrés.
PASO 4 - Cuando no esté en uso, conecte los auriculares utilizando imanes
incorporados.
4 : ,
.
步骤4 - 配对(续): 不使用时,用内置磁铁将耳机吸附连接在一起。
STEP 4: WEARING THE EARPHONES (CONTINUED)

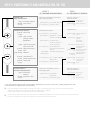
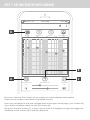
STEP 5: FUNCTIONALITY AND CONTROLS (EN, DE, FR)
DE
FR
* Um die Medienwiedergabe zu beginnen kann es erforderlich sein, dass Sie Ihre bevorzugte
Medienwiedergabe-Anwendung auf dem Bildschirm öffnen.
** Nicht alle Geräte unterstützen diese Funktionalität.
* Vous devrez peut-être ouvrir votre lecteur multimédia préféré à l’écran pour que la lecture démarre.
** Tous les appareils ne prennent pas en charge cette fonctionnalité.
* You may need to bring your music player application up on the screen for media playback to start
** Not all devices support this functionality
Volume Down /
Previous Track button
- Decrease
Volume
- Previous Track
Volume Up /
Skip Track button
[TAP]
[HOLD
1 sec]
- Increase Volume
- Next Track
Taste für Lautstärke erhöhen /
Spur überspringen
DE |
[DRÜCKEN]
[1 s HALTEN]
- Lautstärke erhöhen
- Nächste Spur
Multifunction button Multifunktionstaste
[HOLD
2 sec]
[TAP]
[TAP]
[HOLD
2 sec]
[TAP twice]
[HOLD
2 sec]
[HOLD
3 sec]
- Power On
- Play / Pause
(during media
playback*)
- Answer Incoming
Call / End Call
- Reject Incoming
Call
- Redial**
- Activate Siri
®
/
Voice Command**
- Power Off
[2 s HALTEN]
[DRÜCKEN]
[DRÜCKEN]
[2 s HALTEN]
[ZWEIMAL
DRÜCKEN]
[2 s HALTEN]
[3 s HALTEN]
- Einschalten
- Abspielen / Pause
(bei der Wiedergabe*)
- Eingehenden
Anruf annehmen /
Anruf beenden
- Anruf ablehnen
(bei der Eingehenden
Anruf)
- Wahlwiederholung**
- Siri
®
/ Sprachbefehl
aktivieren**
- Ausschalten
[TAP]
[HOLD
1 sec]
Taste für Lautstärke runter /
vorherige Spur
[DRÜCKEN]
[1 s HALTEN]
- Lautstärke
reduzieren
- Vorherige Spur
Bouton volume - /
Piste précédente
Bouton volume + /
Piste suivante
FR |
[UN APPUI]
[MAINTENIR
1 s]
- Augmenter
le volume
- Piste suivante
Multifonction
[MAINTENIR
2 s]
[UN APPUI]
[UN APPUI]
[MAINTENIR
2 s]
[DOUBLE
APPUI]
[MAINTENIR
2 s]
[MAINTENIR
3 s]
- Alimentation en
cours
- Lecture /
pause
(pendant
la lecture*)
- Répondre à
l’appel entrant /
Fin Appel
- Rejeter un appel
(pendant un
appel entrant)
- Resignaler**
- Activer Siri
®
/
commande
vocale**
- Arrêt
[UN APPUI]
[MAINTENIR
1 s]
- Baisser le
volume
- Piste
précédente
FUNKTIONEN UND BEDIENELEMENTE FONCTIONNALITÉ ET CONTRÔLES
SCHRITT 5: ÉTAPE 5:

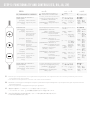
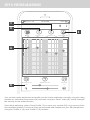
STEP 5: FUNCTIONALITY AND CONTROLS (ES, RU, JA, ZH)
ES
RU
JA
ZH
* Puede que requiera abrir en la pantalla su aplicación de reproducción de medios preferida para iniciar
la reproducción de medios.
** No todos los dispositivos cuentan con esta funcionalidad.
* ,
.
** .
*
* *
* 您有可能需要把你的媒体播放器/手机/平板电脑的媒体播放程序打开。
** 并非所有设备都支持此功能。
Botón bajar el volumen /
Pista anterior
Botón subir el volumen /
Saltar pista
ES |
[TOQUE]
[SOSTENER
1 seg]
- Subir volumen
- Siguiente pista
[SOSTENER
2 seg]
[TOQUE]
[TOQUE]
[SOSTENER
2 seg]
[DOBLE
TOQUE]
[SOSTENER
2 seg]
[SOSTENER
3 seg]
- Encendido
- Reproducir /
pausa (durante
reproducción
de medios*)
- Responder
llamada
entrante /
Terminar llamada
- Rechazar
llamada
(durante llamada
entrante)
- Remarcado**
- Activar Siri
®
/
comando de
voz **
- Apagado
[TOQUE]
[SOSTENER
1 seg]
- Bajar volumen
- Pista anterior
ヴォリュームダウ
ン / 前の曲へ戻る
ヴォリュームアッ
プ / 次の曲へ送る
JA |
[タップ]
[長押し
1秒]
- ヴォリュー
ムアップ
- 次の曲
マルチファンクショ
ンボタン
[長押し
2秒]
[タップ]
[タップ]
[長押し
2秒]
[2度タ
ップ]
[長押し
2秒]
[長押し
3秒]
- 電源オン
- 再生/停止
(メディア
の再生時)
- かかって
きた電話に
出る/電話
を終える
- 着信を拒
否する
- リダイ
ヤル**
- Siri/ボイス
コマンド/
ボイスダイ
アリング**
- 電源オフ
[タップ]
[長押し
1秒]
- ヴォリュー
ムダウン
- 前の曲
Multifunción
/
/
RU |
[]
[
1 ]
-
-
[
2 ]
[]
[]
[
2 ]
[
]
[
2 ]
[
3 ]
-
- /
(
*)
-
/
-
/
-
**
-
SIRI /
/
**
-
[]
[
1 ]
-
-
FUNCIONAMIENTO Y CONTROLES
機能とコント
ロール
音量减少 /
上一曲
增加音量 /
跳过曲目
ZH |
[短按
1次]
[按住
1秒]
- 增加
音量
- 下一曲
多功能按键
[按住
2秒]
[短按
1次]
[短按
1次]
[按住
2秒]
[双击]
[按住
2秒]
[按住
3秒]
- 电源开
- 播放 /
暂停
(音乐播
放过
程中* )
- 接听
来电 /
结束
通话
- 拒绝
来电
(在通
话中 )
- 重新
拨号**
- 激活
Siri
®
/
语音命
令**
- 关电
[短按
1次]
[按住
1秒]
- 减少
音量
- 上一曲
功能和控制
PASO 5: 5: 5: 步骤 5:

- 增加
音量
- 下一曲
- 电源开
- 播放 /
暂停
(音乐播
放过
程中* )
- 接听
来电 /
结束
通话
- 拒绝
来电
(在通
话中 )
- 重新
拨号**
- 激活
Siri
®
/
语音命
令**
- 关电
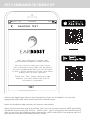
Note: the EarBoost app requires an internet connection.
Note: the first time the app is launched, you may see a popup saying “MEE audio EB1
would like to pair with your device”. Select “pair” - this is necessary for transferring EQ
data to and from the EarBoost app. Afterwards, “MEE audio EB1” may appear twice in
your phone or tablet’s Bluetooth devices menu.
STEP 6: DOWNLOADING THE EARBOOST APP
AT&T LTE
12:26 PM
95%
Test
HEARING TEST
Test your hearing to create your
personalized adaptive audio profile.
You only have to test your ears once.
Your personal tuning data will be saved
to your headphones and you will be able
to use it when streaming music and other
media from all your devices.
Press the “Test” button below to get
started. The test takes less than 5
minutes to complete.
Search the Apple App Store or the Google Play Store for “EarBoost” or scan the
appropriate QR code, then download and install the app.

DE
FR
ES
RU
JA
ZH
SCHRITT 6 - HERUNTERLADEN DER EARBOOST APP:
Durchsuchen Sie den Google Play Store oder Apple App Store nach "EarBoost", oder scannen Sie den
QR code, und laden anschließend die App herunter und installieren diese.
Anmerkung: Die EarBoost App benötigt eine Internet-Verbindung.
Anmerkung: Wenn Sie die App zum ersten mal benutzen, sollte ein Pop-Up mit der Nachricht "MEE
audio EB1 would like to pair with your device" erscheinen. Wählen Sie "Pair" aus - dies ist notwendig um
EQ Daten von und zu der EarBoost App zu übertragen.
ÉTAPE 6 - TÉLÉCHARGEZ L'APPLI EARBOOST:
CinemaEAR est une fonction de rehaussement audio avancée laquelle permet un ajustement audio
sur-le-vif ayant quatre modes d'écoute et sonores différents.
Remarque : EarBoost requière une connexion Internet.
Remarque : il est possique qu'une bulle disant « MEE audio EB1 aimerait se jumeler à votre
périphérique » apparaîsse la première fois que l'Appli est lancé. Choisissez « jumeler » - ceci est
nécessaire afin que les données EQ soient transférées vers et provenant de l'Appli EarBoost. Ensuite, il
est possible que « MEE audio EB1» apparaîsse à deux reprises sur votre cellulaire ou dans le menu de
votre tablette Bluetooth.
PASO 6 - DESCARGAR LA APLICACIÓN EARBOOST:
Busque Apple App Store o Google Play Store para obtener "EarBoost" o escanee el código QR
apropiado, luego descargue e instale la aplicación.
Nota: la aplicación EarBoost requiere una conexión a Internet.
Nota: la primera vez que se inicia la aplicación, puede ver una ventana emergente que dice "MEE audio
EB1 desea vincularse con su dispositivo". Seleccione "pair" (par): esto es necesario para transferir datos
de EQ hacia y desde la aplicación EarBoost. Después, "MEE audio EB1" puede aparecer dos veces en
el menú de dispositivos Bluetooth de su teléfono o tableta.
6 EARBOOST:
"EarBoost" Apple App Store Google Play Store,
QR-, .
: .
: ,
"MEE audio EB1" . -
. «MEE audio EB1»
Bluetooth .
6 - EarBoost
QR Apple app Google Play "EarBoost"
EarBoost app
"MEE audio EB1 would like to pair with your device"
"pair" EQ EarBoost app Bluetooth
"MEE audio EB1"
下ステップ 6 - 载 EARBOOST耳机APP:
在苹果或谷歌的官方应用商店搜索“Earboost”或扫描相应二维码,然后下载并安装应用程序。
注意:下载“Earboost”应用程序需要设备连接网络。
注意:第一次启动应用程序时,你可能会看到弹窗提示“MEE audio EB1需要配对你的设备”选择“连接”-这
是传递EQ应用数据所必须的步骤。然后,“MEE audio EB1”可能会两次出现在你的手机或平板电脑的蓝牙设
备列表里。
STEP 6: DOWNLOADING THE EARBOOST APP (DE, FR, ES, RU, JA, ZH)

SCHRITT 4 - TRAGEN DER KOPFHÖRER (FORTSETZUNG): Wenn nicht in Gebrauch,
clip die Ohrhörer zusammen mit den eingebauten Magneten.
ÉTAPE 4 - Lorsqu'ils ne sont pas utilisés, faites glisser les écouteurs ensemble en
utilisant des aimants intégrés.
PASO 4 - Cuando no esté en uso, conecte los auriculares utilizando imanes
incorporados.
4 : ,
.
步骤4 - 配对(续): 不使用时,用内置磁铁将耳机吸附连接在一起。
STEP 7: GETTING STARTED WITH EARBOOST
AT&T LTE
12:26 PM
95%
MY EQ
P ROFILE 1 P ROFILE 2 S A V E P ROFILE
6.0dB 6.0dB 3.0dB 2.0dB 4.0dB
64.0 250.0 1.0k 4.0k 12.0k
H EARING T EST
L EVEL
1.0
P REVIEWE AR B OOS T O N
c
d
a
b
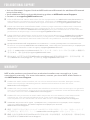
Press the "Hearing Test" button (A) to create your initial adaptive audio profile.
Follow the on-screen instructions to complete the test.
Once you complete the test and navigate back to the app’s home page, your custom EQ
curve will be available under the “My EQ” preset (B).
Press the “Preview” button (C) or play a music track in a background app and toggle the
“EarBoost on/off” button (D) to test the difference.

DE
FR
ES
RU
JA
ZH
SCHRITT 7 - EINRICHTEN DES EARBOOST:
Drücken Sie den "Hearing Test" Knopf (A) um ein erstes adaptives Audio Profil zu erstellen. Folgen Sie
den Hinweisen auf dem Bildschirm um den Test abzuschließen.
Wenn Sie den Test abgeschlossen haben und zurück zum Home-Screen der App navigieren, wird Ihre
EQ Kurve unter "My EQ" verfügbar sein (B).
Drücken Sie den "Preview" Knopf (C) oder spielen Sie Musik in einer anderen App im Hintergrund ab
und bewegen Sie den "EarBoost on/off" Knopf (D), um den Unterschied zu spüren.
ÉTAPE 7 - DÉMARRER AVEC EARBOOST:
Appuyez sur le bouton « Test d'écoute » (A) afin de créer votre profile adaptatif audio initial. Suivez les
directives affichées à l'écran afin de compléter le test.
Une votre test complété, revenez à la page d'accueil de l'Appli, votre courbe EQ personnalisée sera
disponible sous le pré-réglage « Mon EQ » (B).
Appuyez sur le bouton « Aperçu » (C ) ou lisez une piste de musique en retrait et alternez le bouton «
EarBoost Allumé/Éteint » (D) afin de tester la différence.
PASO 7 - COMENZANDO CON EARBOOST:
Presione el botón "Hearing Test" (Prueba de audición) (A) para crear su perfil de audio adaptativo
inicial. Siga las instrucciones en pantalla para completar la prueba.
Una vez que complete la prueba y vuelva a la página de inicio de la aplicación, su curva de EQ
personalizada estará disponible en el preajuste "My EQ" (Mi EQ) (B).
Presione el botón "Preview" (Vista previa) (C) o toque una pista de música en una aplicación de fondo y
active el botón "EarBoost on/off" (D) para probar la diferencia.
7 EARBOOST:
"Hearing Test" (« ») ()
. .
"My EQ" (« ») (B).
“Preview” (« ») (C)
“EarBoost on/off” (« / EarBoost») (D)
.
7 - EARBOOST
"Hearing Test" A)
Home EQ"My EQ"(B)
”Preview" (C) "Earboost on/off" (D)
ステップ 7 - 开始使用EARBOOST:
按下“听力测试”按钮(A)创建初始自适应音频资料,按照屏幕上的指令完成余下测试。
当你按照步骤完成测试和操作回到应用程序的主页上,您的自定义EQ曲线可以在“My EQ”预设(B)。
按下“试听”按钮(C)在后台应用程序上播放音乐,并在APP上切换“EarBoost开/关”按钮(D)测试播放区别。
STEP 7: GETTING STARTED WITH EARBOOST (DE, FR, ES, RU, JA, ZH)

Your custom audio enhancement profile can be further adjusted manually using the drag
handles on individual frequencies (A) and also using the “Level” slider (B), which changes
the severity of the enhancement.
Once done adjusting, select “Save Profile” (C) to save your custom EQ curve to one of the
two available profiles. These can then be accessed and loaded into your EB1 earphones
using the “Profile 1” (D) and “Profile 2” (E) buttons.
STEP 8: FURTHER ADJUSTMENT
AT&T LTE
12:26 PM
95%
MY EQ
P ROFILE 1 P ROFILE 2 S A V E P ROFILE
6.0dB 6.0dB 3.0dB 2.0dB 4.0dB
64.0 250.0 1.0k 4.0k 12.0k
H EARING T EST
L EVEL
1.0
P REVIEWE AR B OOS T O N
a
b
e
d
c

DE
FR
ES
RU
JA
ZH
SCHRITT 8 - WEITERE ANPASSUNG:
Ihr personalisiertes Audio-Verstärkungs-Profil kann noch weiter eingestellt werden indem Sie die Balken
der individuellen Frequenzen (A) und der verschiedenen "Level" (B) verschieben, was den Grad der
Verstärkung einstellt. Wenn Sie fertig mit den gewünschten Einstellungen sind, wählen Sie "Save Profile"
(C) aus, um Ihre personalisierte EQ Kurve in eines der beiden Profile zu speichern.
Wenn Sie fertig mit dem Einstellen sind, wählen Sie "Save Profile" (C) aus, um Ihre personalisierte Kurve
in eines der Profile zu speichern. Auf diese können Sie sodann zugreifen und sie in Ihre EB1 Kopfhörer
laden, indem Sie die "Profile 1" (D) oder "Profile 2" (E) Knöpfe drücken.
ÉTAPE 8 - AUTRES AJUSTEMENTS:
Votre profile de rehaussement audio personnalisé peut être ajusté manuellement à l'aide des boutons
d'ajustement des fréquences individuelles (A) ainsi qu'en utilisant le « glisseur du niveau » (B), ce qui
modifiera le rehaussement.
Une fois l'ajustement effectué, sélectionnez la « Sauvegarde du profile » (C) afin de sauvegarder votre
courbe EQ personnalisée à un des deux profiles disponibles. Ceux-ci peuvent être atteints et
téléchargés dans votre casque d'écoute EB1 à l'aide des touches « Profile 1 » (D) et « Profile 2 » (E).
PASO 8 - AJUSTE ADICIONAL:
El perfil de mejora de audio personalizado puede ajustarse aún más manualmente utilizando los
controles de arrastre en frecuencias individuales (A) y también utilizando el control deslizante "Level"
(Nivel) (B), que cambia la gravedad de la mejora.
Una vez hecho el ajuste, seleccione "Save Profile" (Guardar perfil) (C) para guardar su curva de EQ
personalizada en uno de los dos perfiles disponibles. A continuación, se puede acceder y cargar en sus
auriculares EB1 utilizando los botones "Profile 1" (Perfil 1) (D) y "Profile 2" (Perfil 2)(E).
8 :
(A), “Level” («») (B),
.
“Save Profile” (« ») (C),
.
“Profile 1” (« 1») (D) “Profile 2” (« 2») (E).
”Level" (B)
"Save Profile" C) ,
"Profile1"(D) "Profile2"(E) EB1
步骤8 - 进一步调整:
你的自定义音频增强配置文件可以通过使用单个频率(A)上的按钮手动拖放调整,也可以使用频率“水平”滑
块(B),从而改变的不合适的频率提升。
完成调整后,选择“保存配置文件”(C)将自定义的均衡器曲线保存到两个可用配置文件中的一个中。你可以
使用“自定义 1”(D)和“自定义2”(E)按钮随时访问和加载到您的耳机中。
STEP 8: FURTHER ADJUSTMENT (DE, FR, ES, RU, JA, ZH)
La page charge ...
La page charge ...
La page charge ...
La page charge ...
-
 1
1
-
 2
2
-
 3
3
-
 4
4
-
 5
5
-
 6
6
-
 7
7
-
 8
8
-
 9
9
-
 10
10
-
 11
11
-
 12
12
-
 13
13
-
 14
14
-
 15
15
-
 16
16
-
 17
17
-
 18
18
-
 19
19
-
 20
20
-
 21
21
-
 22
22
-
 23
23
-
 24
24


Mee Audio EARBOOST EB1 Bluetooth Wireless Adaptive Audio Enhancement Earphones Manuel utilisateur
- Taper
- Manuel utilisateur
dans d''autres langues
Documents connexes
-
Mee Audio X6 Wireless In-Ear Stereo Headset Manuel utilisateur
-
-
-
-
-
-
-
Mee Audio Bluetooth Wireless Media Headphones Manuel utilisateur
-
-