
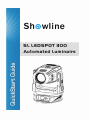
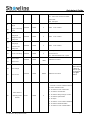
Shwline
SL LEDSPOT 300
Automated Luminaire

SL LEDSPOT 300 Luminaire Quickstart Guide
SL LEDSPOT 300 QuickStart Guide 1
Showline Offices
Dallas Auckland
10911 Petal Street 19-21 Kawana Street
Dallas, TX 75238 Northcote, Auckland 0627
Tel: +1 214-647-7880 New Zealand
Fax: +1 214-647-8030 Tel: +64 9 481 0100
Fax: +64 9 481 0101
Asia Europe
Unit C, 14/F, Roxy Industrial Centre Rondweg zuid 85
No. 41-49 Kwai Cheong Road Winterswijk 7102 JD
Kwai Chung, N.T., Hong Kong The Netherlands
Tel: +852 2796 9786 Tel: +31 (0) 543-542516
Fax: +852 2798 6545
www.philips.com/showline
The material in this manual is for information purposes only and is subject to change without notice. Showline assumes no responsibility for any
errors or omissions which may appear in this manual. For comments and suggestions regarding corrections and/or updates to this manual, please
contact your nearest Showline office.
El contenido de este manual es solamente para información y está sujeto a cambios sin previo aviso. Showline no asume responsabilidad por errores
o omisiones que puedan aparecer. Cualquier comentario, sugerencia o corrección con respecto a este manual, favor de dirijirlo a la oficina de
Showline más cercana.
Der Inhalt dieses Handbuches ist nur für Informationszwecke gedacht, Aenderungen sind vorbehalten. Showline uebernimmt keine Verantwortung
für Fehler oder Irrtuemer, die in diesem Handbuch auftreten. Für Bemerkungen und Verbesserungsvorschlaege oder Vorschlaege in Bezug auf
Korrekturen und/oder Aktualisierungen in diesem Handbuch, moechten wir Sie bitten, Kontakt mit der naechsten Showline-Niederlassung
aufzunehmen.
Le matériel décrit dans ce manuel est pour information seulement et est sujet à changements sans préavis. La compagnie Showline n'assume aucune
responsibilité sur toute erreur ou ommission inscrite dans ce manuel. Pour tous commentaires ou suggestions concernant des corrections et/ou les
mises à jour de ce manuel, veuillez s'il vous plait contacter le bureau de Showline le plus proche.
SL LEDSPOT 300 Luminaire QuickStart Guide
©2016 Vari-Lite. All rights reserved.
Special Product Information
In addition to the information contained in “Warnings and Notices” on page4, please read the special product information below.
Note: Information contained
in this document may not be duplicated in full or in part by any person without prior written approval of Vari-Lite. Its
sole purpose is to provide the user with conceptual information on the equipment mentioned. The use of this document for all other purposes is
specifically prohibited.
CAUTION: Replace the lenses if they have become visibly damaged to such an extent that their effectiveness has become impaired, for example
by cracks or deep scratches.
CAUTION: Risk Group 3. Possible hazardous optical radiation may be emitted from the products described herein. Do not stare directly into light
sources. May be harmful to the eyes.
Note: The light source contained in this luminaire shall only be replaced by the manufacturer, authorized service center or similar qualified person
CAUTION: Replace the lenses if they have become visibly damaged to such an extent that their effectiveness has become impaired, for example
by cracks or deep scratches.

2 SL LEDSPOT 300 QuickStart Guide
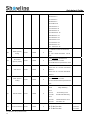
Table of Contents
Showline Offices ................................................................................................................................................................................................. 1
Special Product Information ................................................................................................................................................................................ 1
Introduction ......................................................................................................................................................................................................... 3
About Quickstart Guide ....................................................................................................................................................................................... 3
Included Items ..................................................................................................................................................................................................... 3
Warnings and Notices .......................................................................................................................................................................................... 3
Service and Maintenance ..................................................................................................................................................................................... 3
Power Requirements ............................................................................................................................................................................................ 3
AC Power Operation ............................................................................................................................................................................................ 3
Connecting Power ................................................................................................................................................................................................ 4
AC and DMX Input / Output Connections .......................................................................................................................................................... 5
Connecting to the DMX Network ........................................................................................................................................................................ 5
Mounting Luminaire ............................................................................................................................................................................................ 5
Floor .................................................................................................................................................................................................................... 5
Floor Mounting .................................................................................................................................................................................................... 5
Menu System ....................................................................................................................................................................................................... 6
LCD Display Menu ............................................................................................................................................................................................. 6
LCD Display and Menu System Operation ......................................................................................................................................................... 6
Menu Settings ...................................................................................................................................................................................................... 6
DMX CONTROL ................................................................................................................................................................................................ 8
SL LEDSPOT 300 Luminaire DMX Mapping .................................................................................................................................................... 8
Product Specifications ....................................................................................................................................................................................... 14
Features ............................................................................................................................................................................................................. 14
Color System ..................................................................................................................................................................................................... 14
Gobos / Effects .................................................................................................................................................................................................. 14
Prisms ................................................................................................................................................................................................................ 14
Zoom: ................................................................................................................................................................................................................ 14
Power Consumption........................................................................................................................................................................................... 14
Movement .......................................................................................................................................................................................................... 15
Safety distance ................................................................................................................................................................................................... 15
Weight ............................................................................................................................................................................................................... 15
AC Power Input ................................................................................................................................................................................................. 15
Luminaire Dimensions ....................................................................................................................................................................................... 16

SL LEDSPOT 300 Luminaire Quickstart Guide
SL LEDSPOT 300 QuickStart Guide 3
Introduction
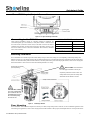
Included Items
Each SL LEDSPOT 300 includes the following items:
Figure 1: Included Items
Warnings and Notices
When using electrical equipment, basic safety precautions should always be followed including the following:
READ AND FOLLOW ALL SAFETY INSTRUCTIONS.
· Do not use outdoors.
· Do not mount near gas or electric heaters.
· Equipment should be mounted in locations and at heights where it will not readily be subjected to tampering by unauthorized personnel.
· The use of accessory equipment not recommended by the manufacturer and may cause an unsafe condition..
· Do not use this equipment for other than intended use.
· Refer service to qualified personnel.
SAVE THIS DOCUMENT FOR FUTURE REFERENCE! READ COMPLETELY BEFORE INSTALLING AND USING PRODUCT!
WARNING: You must have access to a main circuit break error other power disconnect device before installing any wiring. Be sure that power is
disconnected by removing fuses or turning the main circuit breaker off before installation. Installing the device with power on may expose you to
dangerous voltages and damage the device. A qualified electrician must perform this installation.
WARNING: Refer to National Electrical Code® and local codes for cable specifications. Failure to use proper cable can result in damage to
equipment or danger to personnel.
WARNING: This equipment is intended for installation in accordance with the National Electric Code® and local regulations. It is also intended for
installation in indoor applications only. Before any electrical work is performed, disconnect power at the circuit breaker or remove the fuse to avoid
shock or damage to the control. It is recommended that a qualified electrician perform this installation.
Service and Maintenance
For all service and maintenance issues, please contact your local Showline office or an Authorized Service Center.
Power Requirements
The SL LEDSPOT 300 operates on AC input voltages from 100 to 240 V AC.
WARNING: This unit does not contain an ON/OFF switch. Always disconnect power input cable to completely remove power from unit when
not in use.
AC Power Operatio
n
When connected to an AC source, the unit operates on 100 to 240 volts AC (+/- 10%, auto-ranging). The luminaire contains an auto-ranging power
supply.
Each luminaire can draw up to 450 Watts.
About Quickstart Guide
This Quickstart Guide is intended for a knowledgeable user to unpack, install, and use SL LEDSPOT 300 in a short time period. For the complete
manual in PDF format, please visit our web site at :www.philips.com/showline and click the user manual download link on the product page. The
complete manual provides you all information related to accessories, menu structures, DMX channel mapping/modes, and care for your new
luminaire.

4 SL LEDSPOT 300 QuickStart Guide
WARNI
NG:Maximum amount of units that may be daisy-chained is (A) 2 units AC 100V~(5.3Amps) or (B) 4 units AC 240V~ (2.08
Amps).Refer to Table1 for detailed information at various voltages.
Note:
For wiring of AC input connector, refer to Connecting SL LEDSPOT 300 to AC Power.
Table 1: SL LEDSPOT 300 Voltage vs. Current
Voltage(AC) Total Current(A) Maximum Number of units that can be linked together*
100 4.199 2
110 3.784 2
120 3.446 2
220 1.869 4
230 1.793 4
240 1.724 4
W
ARNING: *These figures are based on the Maximum Allowable Input Current of each fixture (and the Maximum power supply limit of
450 Watts ). Do not overload circuits!
IMPORTANT AC POWER CONNECTION NOTES:
· When using the daisy-chain connection method, only connect the SL LEDSPOT 300 to the AC Output connection of another SL LEDSPOT
300 luminaire.
· DO NOT CONNECT OTHER TYPES OF LUMINAIRES OR DEVICES!
· Only use approved cable types.
· Do not overload circuits!
· Do not connect the SL LEDSPOT 300 to dimmed circuits.
Connecting Power
Units can be powered in one of two ways:
·Direct connection to a AC power source using an AC input cable. For wiring of AC input connector, refer to Connecting SL LEDSPOT 300 to AC
Power
.
·Connection from the AC output of another SL LEDSPOT 300. When using this method, it is very important not to connect any other type of
equipment.
WARNING: Only connect other SL LEDSPOT 300 luminaires to the AC Output (Thru) connector of another SL LEDSPOT 300.
Connecting SL LEDSPOT 300 Luminaires to AC Power
Table 2, AC Input Connections describes how to connect power to your SL LEDSPOT 300. Field wiring of the SL LEDSPOT 300 is straight-forward.
A total of 3 wires/conductors is supplied to this unit.
Table 2: AC Input Connections
Wire Color Purpose
Black Main/Line(100 to 240 VAC)
White Neutral
Green Ground(Earth)

SL LEDSPOT 300 Luminaire Quickstart Guide
SL LEDSPOT 300 QuickStart Guide 5
AC and DMX Input / Output Connections
Figure 2: AC Input and Output connection
Connecting to the DMX Networ
k
Basic DMX512 installation consists of connecting multiple SL LEDSPOT 300
Luminaires together (up to 32 luminaires) in "daisy-chain" fashion. A cable runs from
the control console (or DMX512 control source) to the DMX connector on the first SL
LEDSPOT 300 Luminaire. Another cable runs from the other DMX connector on the
first unit to a DMX connector on the next SL LEDSPOT 300 Luminaire (or DMX512
device to be controlled).
Table 3: DMX512 Connections
DMX512 Signal XLR Pin
Common (Drain) 1
DMX512- 2
DMX512 + 3
Note: Remaining pins on each connector are not used.
Mounting Luminaire
The SL LEDSPOT 300 Luminaire is provided with the ability to hang via truss hooks, clamps, etc. (sold separately). Install Omega Clamps and
attach hook, clamp, etc. to the Omega Clamps in the provided mounting holes. It is recommended (and may be required by local and national safety
codes) to use and install a safety cable (included with unit) in the safety cable anchor point. When hanging the fixture, be sure to leave enough space
around the luminaire to allow for free movement and uninterrupted airflow for cooling.
Figure 3:
Mounting
Luminaire
Floor
F
loor Mounting
The SL LEDSPOT 300 Luminaire is designed to sit directly on its base (Omega Clamps must be removed) in a floor installation application. When
used in this type of application, be sure to leave enough space around the luminaire to allow proper, uninterrupted airflow for cooling and movement.
SAFETY CABLE: Recommended
for all hanging installations and may be
required by national and local codes. Use
safety cable anchor points for safety cable
attachment for this fixture as shown.
PAN AND TILT LOCKS:
This unit is supplied with
pan and tilt lock. Be sure
to DISENGAGE pan and
tilt locks before putting
the unit into use.
Figure 3: Mounting Luminaire

6 SL LEDSPOT 300 QuickStart Guide
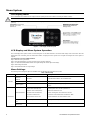
Menu System
LCD Display Menu
The SL LEDSPOT 300 Luminaire’s LCD Display and Menu System provides local control for accessing the fixture’s settings:
Note: If there are multiple luminaires in a system, changes would need to be made at each LCD Menu as desired.
Upon power up, the LCD will display the main screen showing the product name. If DMX is enabled, the programmed address will appear after
power up.
Figure 4: LCD Display and Menu System
LCD Display and Menu System Operation
The LCD Display Menu system consists of several categories. Use the Menu Buttons to access and make changes to the menu items. When the
desired menu item is reached, press the desired Menu Button to display the menu options and to navigate and configure the menu options as
required.
To navigate and access menu settings/selections:
Step 1. Make sure unit is powered on.
Step 2. Press the desired button ( as shown in Figure 4) to access menu categories.
Step 3. Use UP/DOWN/LEFT/RIGHT buttons to navigate through the various options and settings.
Step 4. Make changes as desired.
Step 5. Press RETURN button to accept changes.
Menu Settings
The following menu settings and options are available in the SL LEDSPOT 300 Luminaire menu system.
Table 4: Menu Setting
First Level Second Level Third Level Description
Function
Set Dmx
Address
001~XXX Sets the DMX Address. 001 is default value.
Dmx Value ALL:or Control Displays DMX values for various parameters. ALL: is default.
Auto Program
Simple ten step Factory pre-programmed colour and movement
chase.
Information
Time Information
Current Time XXXX(Hours)
Total Run Time XXXX(Hours)
Last Run Time XXXX(Hours)
Last Run Password XXX
Clear Last Run ON or OFF
Running time since unit was powered on.
Total hours fixture has run.
Fixture running time since last clear of hours.
Entered to clear fixture timer. Password is “038”
Clears fixture last run time. Default is OFF.
Temperature
Info
Head Temperature XXX℃/℉ Displays current temperature of the luminaire head.
Ethernet IP
Ethernet IP xxx.xxx.xxx.xxx Displays luminaire’s IP address.

SL LEDSPOT 300 Luminaire Quickstart Guide
SL LEDSPOT 300 QuickStart Guide 7
Fan Info
Fan Info
2U01_Fan1: XXXRPM
2U01_Fan1: XXXRPM
:
Displays fans RPM / status
Software
Version
1U01:V1.0.0
2U01:V1.0.0
:
Displays software installed in luminaire.
Personality
Status Settings
No DMX Status CLOSE / HOLD /
AUTO
Pan Reverse ON or OFF
Tilt Reverse ON or OFF
Feedback ON or OFF
Hibernation OFF / 1 to 99 Minutes
Defines fixture behaviour on los
s of DMX signal. Default is
HOLD.
Setting to reverse the pan movement. Default is OFF.
Setting to reverse the tilt movement. Default is OFF.
Pan & Tilt motor position feedback. Default is ON.
Sets standby mode. Default is 15 minutes.
Service Setting
Password XXX Password for RDM PID editing. Password is “050”
RDM PID XXXXXX Displays RDM PID Code.
Fans Control
Auto
High
This setting sets the fans speed. Default is Auto.
Display Setting
Shutoff Time 2 to 60 minutes
Sets the amount of time the LCD display will stay on after last
button press. Default is 5 minutes.
Display Reverse AUTO / ON / OFF
This menu option flips the LCD Display 180 degrees. Default is
AUTO (automatic flips according to luminaire orientation).
Key Lock ON or OFF
This option can be set to prevent unauthorized changes (locks
display). Default is OFF.
Temperature C/F Celsius or Fahrenheit Displays temperature values in the set scale. Default is Celsius.
Initial Status Control =XXX Selection and manual adjustment of fixture parameters for initial
power up preset.
Select Signal
DMX Only / Art-Net On IP2 / Art-Net
On IP10
Selects the control system the luminaire will operate. Default is
DMX Only.
Set Universe 000~255 Sets the Art-Net Universe.
Reset Default ON or OFF Restores the fixture to factory defaults. Default is OFF.
Reset
Function
Reset All Resets (re-calibrates) all motors in the luminaire.
Reset Pan&Tilt Resets (re-calibrates) Pan and Tilt.
Reset CMY&Colors Resets (re-calibrates) CMY wheels and color wheels.
Reset Gobos Resets (re-calibrates) gobos.
Blade Reset Resets (re-calibrates) Blade.
Reset Others Resets (re-calibrates) Zoom, Prism, Frost and Focus.
Effect Adjust
Test Channel
Control = XXX Manual selection of fixture parameters for ramping up and down.
Manual Control
Control = XXX Select and adjust fixture parameters for local control.
Calibration
Calibrate Password Password is “050”
Pan=XXX Sets centre points for parameter ranges.

8 SL LEDSPOT 300 QuickStart Guide
DMX CONTROL
This section contains information for operating the luminaire using DMX control.
Note: This table assumes a DMX start address of 1. When a different starting address is used, this address
b
ecomes channel 1 function and othe
r
functions follow in se
q
uence.
SL LEDSPOT 300 Luminaire DMX Mapping
Table 5 provides DMX channel mapping of all DMX512 control values for the SL LEDSPOT 300 Luminaire.
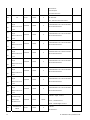
Table 5: SL LEDSPOT 300 Luminaire DMX Channel Mapping
DMX Parameter
Range
DMX
Range % Defaults* Description Notes
1 Pan High
0-65535 0-100% 32767
Fixture Pan -
2 Pan Low
3 Tilt High
0-65535 0-100% 32767
Fixture Tilt -
4 Tilt Low
5 Intensity High
0-65535 0-100% 0 16 Bit Dimming
6 Intensity Low
7 Shutter / Strobe 0-255 0-100% 0
0-31 Closed
32-63 Open
64-95 Strobe Slow to Fast
96-127 Open
128-159 Pulse
160-191 Open
192-223 Random Strobe Slow to fast
224 - 255 Shutter Open
8 Color Wheel 0-255 0-100%
0-15 Open
16-25 Color 1
26-35 Color 2
36-45 Color 3
46-55 Color 4
56-65 Color 5
66-75 Color 6
76-85 Color 7
86-95 Open
96-105 open + Color 1 Split
106-115 Color 1 + Color 2 Split
116 - 125 Color 2 + Color 3 Split
126 - 135 Color 3 + Color 4 Split
136 - 145 Color 4 + Color 5 Split
146 - 155 Color 5 + Color 6 Split
156 - 165 Color 6 + Color 7 Split
166 - 175 Color 7 + open Split
176 - 185 open
186 - 216 Scroll Clockwise fast to

SL LEDSPOT 300 Luminaire Quickstart Guide
SL LEDSPOT 300 QuickStart Guide 9
slow
217 - 247 Scroll counter Clockwise
slow to fast
248 - 255 Open
9
Cyan Color Flag
High
0-65535 0-100% 0 16 Bit Color Control
10
Cyan Color Flag
Low
11
Magenta Color
Flag High
0-65535 0-100% 0 16 Bit Color Control
12
Magenta Color
Flag Low
13
Yellow Color
Flag High
0-65535 0-100% 0 16 Bit Color Control
14
Yellow Color
Flag Low
15 CTO Color Flag 0-65535 0-100% 0
0 - 50 open
51-100 CTO on
101 - 255 reserved for use - Open
16 Zoom High
0-65535 0-100%
3840
16 Bit Zoom control
17 Zoom Low
18 Focus High
0-65535 0-100%
29440 16 Bit Focus Control
19 Focus Low
20
Gobo Wheel 1
(Rotating Gobo
Wheel)
0-255 0-100% 0
0-
5 Open
6 - 10 Gobo 1 Circles of Holes Index 11
- 15 Gobo 2 Blades Index
16 - 20 Gobo 3 Punch Card Index
21 - 25 Gobo 4 Sliced Index
26 - 30 Gobo 5 Wavy Triangle Index
31 - 35 Gobo 6 Spiral Index
36 - 40 Open
41 - 45 Gobo 1 Circle of Holes Rotation
46 - 50 Gobo 2 Blades Rotation
51 - 55 Gobo 3 Punch Card Rotation
Default should
be fixture in
focus as open
spot in default
zoom @6m
distance

10 SL LEDSPOT 300 QuickStart Guide
56 - 60 Gobo 4 Sliced Rotation
61 - 65 Gobo 5 Wavy Triangle
Rotation
66 - 70 Gobo 6 Spiral Rotation
71 - 85 Open
86 - 90 Circle of Holes Shake
(Rotation available as well) Fast to
Slow
91 - 95 Blades (Rotation available as
well) Fast to Slow
96 - 100 Punch Card Shake
(Rotation available as well) Fast to
Slow
101 - 105 Sliced Shake (Rotation
available as well) Fast to Slow
106 - 110 Wavy Triangle Shake
(Rotation available as well) Fast to
Slow
111 - 115 Spiral Shake (Rotation
available as well) Fast to Slow
116 -120 Open
121 - 180 Gobo Wheel Scroll fast
to slow clockwise
181 - 185 Open
186 - 246 Gobo Wheel Scroll slow to
fast counter clockwise
247 - 255 Open
21
Gobo Wheel 1
Index / Rotation
High
0-65535 0-100% 32767
0-32756 Fast to Slow rotation / Index
Counter Clockwise direction
22
Gobo Wheel 1
Index Rotation
Low
32757 - 32780 Home (Stop)
32781 - 65
535 Forwards gobo
rotation from slow to fast
23
Gobo Wheel 2
(Fixed Gobo
Wheel)
0-255 0-100% 0
0-10 Open
11-20 Gobo 1 Night Sky
21-30 Gobo 2 Leafy Breakup
31-40 Gobo 3 Swirl
41-50 Gobo 4 Lattice
51-60 Gobo 5 Bricked Out
61-70 Gobo 6 Tribal
71-80 Gobo 7 Alpha Rays
81-90 Gobo 8 Grid

SL LEDSPOT 300 Luminaire Quickstart Guide
SL LEDSPOT 300 QuickStart Guide
11
91-100 Gobo 9 Honeycomb
101-110 OPEN
111-120 Gobo 1 Night Sky Slow to
fast
121-130 Gobo 2 Leafy Breakup
Shake Slow to fast
131-140 Gobo 3 Swirl Shake Slow to
fast
141-150 Gobo 4 Lattice Shake Slow
to fast
151-160 Gobo 5 Bricked Out Shake
Slow to fast
161-170 Gobo 6 Tribal Shake Slow
to fast
171-180 Gobo 7 Alpha Rays Shake
Slow to fast
181-190 Gobo 8 Grid Shake Slow to
fast
191-200 Gobo 9 Honeycomb Slow to
fast
201-215 Open
216-230 Gobo Wheel Scroll fast
to slow clockwise
231-235 Open
236-250 Gobo wheel scroll slow to
fast
251-255 Open
24 Prism 0-255 0-100% 0
0-30 Open
31-60 Prism Index
61-90 Open
91-120 Prism Rotation
121-150 Open
151-255 Future use
25
Prism
Index/Rotation
High
0-65535 0-100% 32767
0-32756 Fast to Slow rotation / Index
Counter Clockwise direction
26
Prism
Index/Rotation
Low
32757 - 32780 Home (Stop)
32781 - 65
535 Forwards prism
rotation from slow to fast
27 Frost 0-255 0-100% 0 0-50 Open

12 SL LEDSPOT 300 QuickStart Guide
51-100 Frost
100-150 Open
151-255 Future use
28 Iris 0-255 0-100% 0
0-200 Max. diameter to
Min.diameter
201 - 255 Iris Pulse slow to fast
29
Blade 1 A Insert
High
0-65535 0-100% 0
0-655535 blade out or beam to blade
full inserted into beam
30
Blade 1 A insert
Low
31
Blade 1 B Insert
High
0-65535 0-100% 0
0-655535 blade out or beam to blade
full inserted into beam
32
Blade 1 B Insert
Low
33
Blade 2 A Insert
High
0-65535 0-100% 0
0-655535 blade out or beam to blade
full inserted into beam
34
Blade 2 A insert
Low
35
Blade 2 B Insert
High
0-65535 0-100% 0
0-
655535 blade out or beam to blade
full inserted into beam
36
Blade 2 B Insert
Low
37
Blade 3 A Insert
High
0-65535 0-100% 0
0-655535 blade out or beam to blade
full inserted into beam
38
Blade 3 A insert
Low
39
Blade 3 B Insert
High
0-65535 0-100% 0
0-655535 blade out or beam to blade
full inserted into beam
40
Blade 3 B Insert
Low
41
Blade 4 A Insert
High
0-65535 0-100% 0
0-655535 blade out or beam to blade
full inserted into beam
42
Blade 4 A insert
Low
43
Blade 4 B Insert
High
0-65535 0-100% 0
0-655535 blade out or beam to blade
full inserted into beam
44
Blade 4 B Insert
Low
45
Blade Gate
Rotation High
0-65535 0-100% 32767
0-32756 angle - from 0°
46
Blade Gate
Rotation Low
32757 - 32780 Home 0°
32781 - 65535 angle + fr
om 0°
47
Blade Macro
effects
0-255 0-100% 0
0-15 Off
16-30 Macro 1

SL LEDSPOT 300 Luminaire Quickstart Guide
SL LEDSPOT 300 QuickStart Guide
13
31-45 Macro 2
46-60 Macro 3
61-75 Macro 4
76-90 Macro 5
91-105 Macro 6
106-120 Macro 7
121-135 Macro 8
136-150 Macro 9
151-165 Macros 10
166-180 Macro 11
181-195 Macro 12
196-210-Macro 13
211-225 Macro 14
226-240 Macro 15
241 - 255 Macro 16
48
Blade speed /
timing
0-255 0-100% 0
0 - 20 Blade at most accurate fast
speed
21 - 255 Blade movement fast to
slow
49
Movement
Speed / Timing
0-255 0-100% 0
0-20 Smoothest
movement all
fixtures match & accurate
21-255 Movement speed fast to slow
50 Auto Focus 0-255 0-100% 0
Auto Focus Off = 0 - 50
Auto Focus On = 51-150 7.5m throw
distance
Auto Focus On = 51-150 15m throw
distance
51
CMY Speed /
Timing
0-255 0-100% 0
0-20 smoothest
color movement all
fixtures match & accurate
21-255 color Movement speed fast to
slow
52 Dimmer Mode 0-255 0-100% 0
0-40 Standard Dimming
41-80 Stage Dimming
curve
81-120 TV Dimming curve
121-160 Architectural Dimming
curve
161-200 Theatre Dimmer curve
201-255 For future use
53 Control Channel 0-255 0-100% 0
0-39 Idle
To execute a
command,
the control
40-59 No Function
60-79 No Function

14 SL LEDSPOT 300 QuickStart Guide
80-84 Full Reset
channel
must be set
to idle (DMX
0)
then
changed to a
particular
value and
held for 3
seconds
then restored
to DMX 0.
Upon
completion
of this
routine, the
desired
command
will be
executed by
the
luminaire.
85-87 Pan / Tilt reset
88-90 Color reset
91-93 Gobo Reset
94-96 Blade Iris reset
97-99 Prism & Frost Other
motor reset
100-119 Internal Program 1
120-139 Internal Program 2
140-159 Internal Program 3
160-179 Internal Program 4
180-199 Internal Program 5
200-219 Internal Program 6
220-239 Internal Program 7
240-255 Reserved
Product Specifications
Features
Color System
One fixed color wheel with 7 colors and one open slot. Color system allows for split color mode and
color scroll effects.
Gobos / Effects
One fixed gobo / Static gobo wheel with 9 indexing gobos plus open.Optional gobo shaking mode.
One rotating gobo / Rotation gobo wheel with 6 interchangeable and indexing gobos plus open.Optional
gobo shaking mode.
Prisms
One (3) facet linear prism.
Zoom:
10°~45° linear zoom
Power Consumption
450 Watts

SL LEDSPOT 300 Luminaire Quickstart Guide
SL LEDSPOT 300 QuickStart Guide
15
Movement
Pan 540°
Tilt 255°
Safety distance
Minimum hang distance between fixture centers is 600mm
Weight
Net weight: 28 kg / 61.73 lbs
Gross weight: 34 kg / 74.96 lbs
AC Power Input
100 to 240 VAC
Note: Information contained herein is subject to change without prior notice. Refer to the current luminaire
s
p
ecification sheet for com
p
lete and u
p
-to date information.

16 SL LEDSPOT 300 QuickStart Guide
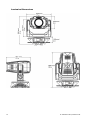
Luminaire Dimensions

SL LEDSPOT 300 Luminaire Quickstart Guide
SL LEDSPOT 300 QuickStart Guide
17

18 SL LEDSPOT 300 QuickStart Guide

SL LEDSPOT 300 Luminaire Quickstart Guide
SL LEDSPOT 300 QuickStart Guide
19
Dallas
1
091
1 Petal Street
Dallas, TX 75238
Tel : +1214- 647- 7880
Fax: +1214- 647- 8031
Asia
Unit C, 14/ F, Roxy Industrial Centre
No. 41- 49 Kwai Cheong Road
Kwai Chung, N. T , Hong Kong
Tel : +852 2796 9786
Fax: +852 2798 6545
Auckland
19- 21 Kawana Street
Northcote, Auckland 0627
New Zealand
Tel : +64 9 481 0100
Fax: +64 9 481 0101
Europe
Rondwegzuid 85
Winterswijk 7012 JD
The Netherlands
Tel : +31 ( 0) 543- 542516
©2016 Vari-Lite.
-
 1
1
-
 2
2
-
 3
3
-
 4
4
-
 5
5
-
 6
6
-
 7
7
-
 8
8
-
 9
9
-
 10
10
-
 11
11
-
 12
12
-
 13
13
-
 14
14
-
 15
15
-
 16
16
-
 17
17
-
 18
18
-
 19
19
-
 20
20


