
Product Category
1
IMPORTANT:
IMPORTANT:
Go to www.extron.com for the complete
user guide, installation instructions, and
specifications before connecting the
product to the power source.
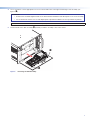
Replacing the Quantum Ultra
®
Disk Drives and
System Board Computer Assembly
The Quantum Ultra has two solid state hard disk drives:
• C: drive — Contains the internal operating system and hardware drivers.
• D: drive — Contains system configuration data. This drive can also store local source content, such as image files.
One or both of these drives can be removed and replaced if they should fail during operation.
The System Board Computer (SBC) assembly contains the two disk drives and the system computer. This entire assembly can be
removed and replaced if necessary.
NOTE: It is not necessary to remove the entire SBC in order to replace only the disk drives.
Replacing a Disk Drive
ATTENTION:
• The disk drives are NOT hot-swappable and cannot be switched while the unit is operating. Always power off the
Quantum Ultra before removing a drive.
• Ces disques NE sont PAS interchangeables à chaud et il est impossible de les changer durant le fonctionnement de
l’unité. Mettez toujours hors tension le Quantum Ultra avant de retirer un disque.
NOTE: Before replacing a disk drive, confirm you have copies of the following files related to your Quantum Ultra system:
• Project file currently loaded on the device
• Picture files currently loaded on the device
• Commissioning Report
Use VCS to connect to the unit and obtain the project le and commissioning report. Picture les can be downloaded
from the D: drive of the unit using the System HDMI and USB connections (see the Quantum Ultra User Guide, available at
www.extron.com, for more information.

Replacing the Quantum Ultra Disk Drives and SBC (Continued)
2
To replace a disk drive:
1. Shut down the unit and disconnect the power.
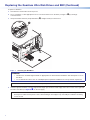
2. Use a screwdriver or other appropriate tool to loosen the thumbscrew on the drive (see figure1,
1
) by rotating it
counterclockwise.
3. Grasp the thumbscrew firmly and pull the drive (
2
) straight toward you until it is free.
2
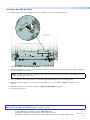
1
Figure 1. Removing the Disk Drive
ATTENTION:
• Thumbscrews should be tightened with an appropriate tool after both initial installation and subsequent access to
the drives.
• Les vis doivent être serrées avec un outil adapté après la première installation et l’accès postérieur au panneau.
NOTE: The thumbscrews cannot be removed completely.
4. Insert the replacement drive so that the right and left edges pass under the inside edges of the three screws on the right and
left sides of the drive (see figure2,
1
, on the next page).
NOTE: You are not able to see the second and third pairs of screws. However, if you press the drive straight back
after it passes under the first pair of screws, without letting its front edge rise up, it should pass under the remaining
screws as well.
1

Product Category
3
33
Ridges
Insert both ridges under the screw heads.
11
2
2
Figure 2. Inserting the Hard Drives
5. Continue pressing the drive into its space until it stops. The pins on the back edge of the drive (see figure2,
2
) should insert
into the receptacles on the board at the back of the compartment (
3
).
6. Use a tool to tighten the thumbscrew and secure the drive in place.
7. Power the system back on. New firmware is automatically installed before you are able to proceed.
8. After the firmware is successfully loaded, perform a device reset, using the Quantum Ultra Control Panel as follows (see the
Quantum Ultra User Guide at www.extron.com to access the Control Panel):
a. On the Control Panel, click the Reset Device button.
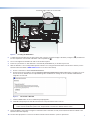
b. On the Reset Device window, select the Reset All Settings and Delete All Files radio button (see figure3) to reset
the unit to factory defaults. All user-uploaded image files are deleted, IP settings are reset to default, and the default
image files are restored.
Figure 3. Reset Device Window
c. Click the Reset button. A reset confirmation prompt appears.
d. Click OK on the prompt. The unit reboots and resets. The password is reset to extron.
NOTE: The factory configured passwords for all accounts on this device have been set to the device serial number.
In the event of an absolute system reset, the passwords convert to the default, which is extron.
9. Set the IP address of the device using the Control Panel, SIS commands, or VCS (see the Quantum Ultra User Guide or the
Quantum Ultra VCS Help File).
10. Use the latest project file to connect to the device with VCS and confirm the system is operational.
2
3

Replacing the Quantum Ultra Disk Drives and SBC (Continued)
4
Replacing the System Board Computer Assembly
ATTENTION:
• The SBC assembly is NOT hot-swappable and cannot be switched while the unit is operating. Always power off the
unit before removing the SBC assembly.
• L’ensemble de composants SBC N’EST PAS interchangeable à chaud et il est impossible de le changer durant le
fonctionnement de l’unité. Mettez toujours hors tension le Quantum Ultra avant de retirer l’ensemble SBC.
Removing the SBC Assembly
1. Shut down the unit and disconnect the power.
2. Remove the two hard drives from the SBC assembly and set them aside. They will be used with the new assembly (see
Replacing a Disk Drive on page1).
NOTE: It is not necessary to replace the disk drives whenever you replace the SBC. If either or both drives are
functioning adequately, remove them first, then reinstall them after installing the new SBC.
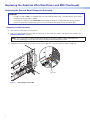
3. Unplug the lower fan cable from the 3-pin connector at the right front corner of the SBC assembly (see figure4).
Fan Cable
Figure 4. Unplugging the Fan Cable
4

Product Category
5
4. Use a screwdriver or other appropriate tool to loosen the thumbscrews at the right and left edges of the assembly (see
figure5,
1
).
ATTENTION:
• Thumbscrews should be tightened with a tool after both initial installation and subsequent access to the assembly.
• Les vis doivent être serrées avec un outil adapté après la première installation et l’accès postérieur au panneau.
NOTE: The thumbscrews cannot be removed completely.
5. Pull the handle on the SBC assembly (
2
) toward you until the assembly is free of the chassis.
1
1
1
1
1
1
2
2
2
Figure 5. Removing the SBC Assembly
5

6
For information on safety guidelines, regulatory compliances, EMI/EMF compatibility, accessibility, and related topics, see the
Extron Safety and Regulatory Compliance Guide on the Extron website.
© 2017-2020 Extron — All rights reserved. www.extron.com
All trademarks mentioned are the property of their respective owners.
Worldwide Headquarters: Extron USA West, 1025 E. Ball Road, Anaheim, CA 92805, 800.633.9876
68-3177-01 Rev. B
08 20
Installing a New SBC Assembly
1. Align the edges of the new assembly with the tracks inside the chassis on the right and left sides.
Figure 6. Tracks to Insert the SBC Assembly
2. Slide the assembly into the chassis and press it firmly into place, so that the pins on the back of the SBC board are plugged
into their receptacles on the chassis.
NOTE: The SBC assembly is not completely in place until you hear or feel it snap. If you do not feel it snap into position,
press on it more firmly until you do.
3. Use a screwdriver or other appropriate tool to tighten the right and left thumbscrews on the SBC assembly.
4. Attach the lower fan cable to the 3-pin connector in the right front corner of the SBC (see figure3 on page3 for the
location).
5. Reinstall the hard drives on the SBC assembly (see Replacing a Disk Drive on page1).
6. Power the system back on.
6
-
 1
1
-
 2
2
-
 3
3
-
 4
4
-
 5
5
-
 6
6


Extron Quantum Ultra Le manuel du propriétaire
- Taper
- Le manuel du propriétaire
- Ce manuel convient également à
dans d''autres langues
- English: Extron Quantum Ultra Owner's manual
Documents connexes
-
Extron TLP Pro 1525TG Manuel utilisateur
-
Extron TLP 710TV Manuel utilisateur
-
Extron TLP 1000TV Manuel utilisateur
-
-
-
Extron TLP Pro 1520MG Manuel utilisateur
-
Extron TLP 700MV Manuel utilisateur
-
-