LG LGM320G Le manuel du propriétaire
- Catégorie
- Téléphones portables
- Taper
- Le manuel du propriétaire
Ce manuel convient également à


1
About this user guide
Thank you for choosing this LG product. Please carefully read this user
guide before using the device for the first time to ensure safe and proper
use.
• Always use genuine LG accessories. The supplied items are designed
only for this device and may not be compatible with other devices.
• This device is not suitable for people who have a visual impairment due
to the touchscreen keyboard.
• Descriptions are based on the device default settings.
• Default apps on the device are subject to updates, and support for
these apps may be withdrawn without prior notice. If you have any
questions about an app provided with the device, please contact an
LG Service Centre. For user-installed apps, please contact the relevant
service provider.
• Modifying the device’s operating system or installing software from
unofficial sources may damage the device and lead to data corruption
or data loss. Such actions will violate your LG licence agreement and
void your warranty.
• Some content and illustrations may differ from your device, depending
on the area, service provider, software version, or OS version, and are
subject to change without prior notice.
• Software, audio, wallpaper, images, and other media supplied with
your device are licensed for limited use. If you extract and use these
materials for commercial or other purposes, you may be infringing
copyright laws. As a user, you are fully responsible for the illegal use of
media.
• Additional charges may incur for data services, such as messaging,
uploading, downloading, auto-syncing and location services. To void
additional charges, select a data plan suitable to your needs. Contact
your service provider to obtain additional details.
ENGLISH

2
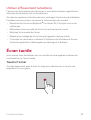
Instructional notices
WARNING: Situations that could cause injury to the user and third parties.
CAUTION: Situations that may cause minor injury or damage to the device.
NOTE: Notices or additional information.

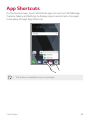
3
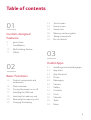
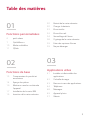
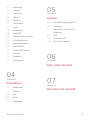
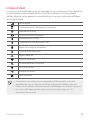
Table of contents
01
Custom-designed
Features
6 quick share
7 QuickMemo+
10 Multi-tasking feature
11 QSlide
02
Basic Functions
13 Product components and
accessories
14 Parts overview
16 Turning the power on or off
17 Installing the SIM card
19 Inserting the memory card
20 Removing the memory card
20 Charging the battery
22 Touch screen
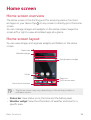
26 Home screen
34 Screen lock
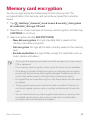
38 Memory card encryption
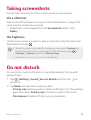
39 Taking screenshots
39 Do not disturb
03
Useful Apps
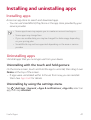
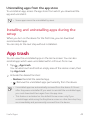
41 Installing and uninstalling apps
42 App trash
43 App Shortcuts
44 Phone
48 Messaging
49 Camera
57 Gallery
61 Contacts
63 Clock
65 Calendar
65 Tasks
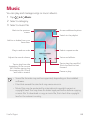
66 Music

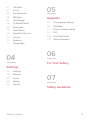
4Table of contents
67 Calculator
67 E-mail
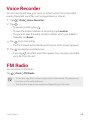
68 Voice Recorder
68 FM Radio
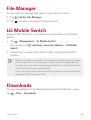
69 File Manager
69 LG Mobile Switch
69 Downloads
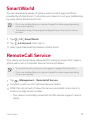
70 SmartWorld
70 RemoteCall Service
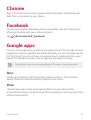
71 Chrome
71 Facebook
71 Google apps
04
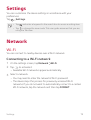
Settings
75 Settings
75 Network
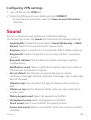
84 Sound
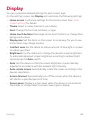
85 Display
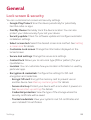
86 General
05
Appendix
96 LG Language Settings
96 LG Bridge
97 Phone software update
99 FAQ
103 Anti-Theft Guide
104 More information
06
For Your Safety
07
Safety Guidelines

Custom-designed
Features
01

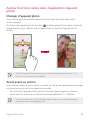
Custom-designed Features 6
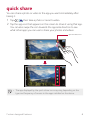
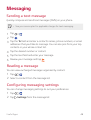
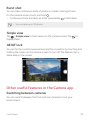
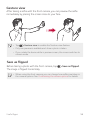
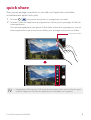
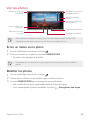
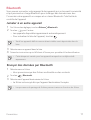
quick share
You can share a photo or video to the app you want immediately after
taking it.
1
Tap , then take a photo or record a video.
2
Tap the app icon that appears on the screen to share it using that app.
You can also swipe the icon towards the opposite direction to see
what other apps you can use to share your photos and videos.
quick share icon
• The app displayed by the quick share icon may vary, depending on the
type and frequency of access to the apps installed on the device.

Custom-designed Features 7
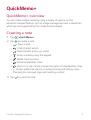
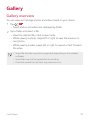
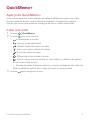
QuickMemo+
QuickMemo+ overview
You can make creative notes by using a variety of options on this
advanced notepad feature, such as image management and screenshots,
which are not supported by the conventional notepad.
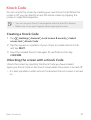
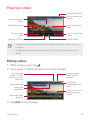
Creating a note
1
Tap QuickMemo+.
2
Tap to create a note.
•
: Save a note.
•
: Undo the last action.
•
: Redo the last action you undid.
•
: Enter a note by using the keypad.
•
: Write notes by hand.
•
: Erase handwritten notes.
•
: Zoom in or out, rotate or erase the parts of a handwritten note.
•
: Access additional options, including sharing and locking notes,
changing the note pad style and inserting content.
3
Tap to save the note.

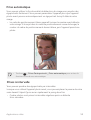
Custom-designed Features 8
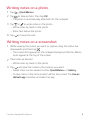
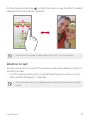
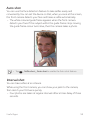
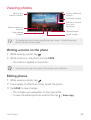
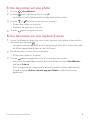
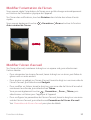
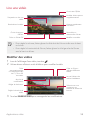
Writing notes on a photo
1
Tap QuickMemo+.
2
Tap to take a photo, then tap OK.
• The photo is automatically attached into the notepad.
3
Tap or to write notes on the photo.
• Write notes by hand on the photo.
• Enter text below the photo.
4
Tap to save the note.
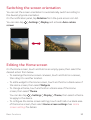
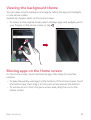
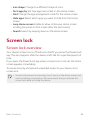
Writing notes on a screenshot
1
While viewing the screen you want to capture, drag the status bar
downwards and then tap
.
• The screenshot appears as the notepad background theme. Memo
tools appear at the top of the screen.
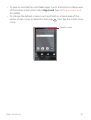
2
Take notes as desired.
• Write notes by hand on the photo.
3
Tap and save the notes to the location you want.
• Saved notes can be viewed in either QuickMemo+ or Gallery.
• To save notes in the same location all the time, select the Use as
default app checkbox and select an app.

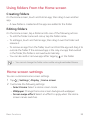
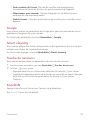
Custom-designed Features 9
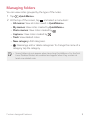
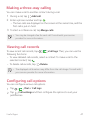
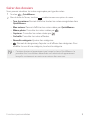
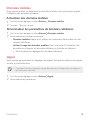
Managing folders
You can view notes grouped by the type of the notes.
1
Tap QuickMemo+.
2
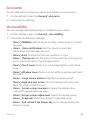
At the top of the screen, tap and select a menu item:
• All memos: View all notes saved in QuickMemo+.
• My memos: View notes created by QuickMemo+.
• Photo memos: View notes created by
.
• Capture+: View notes created by
.
• Trash: View deleted notes.
• New category: Add categories.
•
: Rearrange, add or delete categories. To change the name of a
category, tap the category.
• Some folders do not appear when launching QuickMemo+ for the first
time. Disabled folders are enabled and appear when they contain at
least one related note.

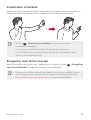
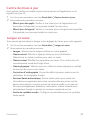
Custom-designed Features 10
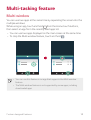
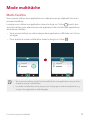
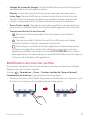
Multi-tasking feature
Multi window
You can use two apps at the same time by separating the screen into the
multiple windows.
While using an app, touch and hold
from the Home touch buttons,
then select an app from the recently used apps list.
• You can use two apps displayed on the main screen at the same time.
• To stop the Multi window feature, touch and hold
.
• You can use this feature in an app that supports the Multi window
feature.
• The Multi window feature is not supported by some apps, including
downloaded apps.

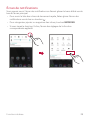
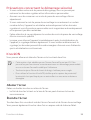
Custom-designed Features 11
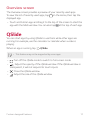
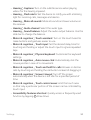
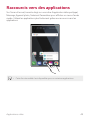
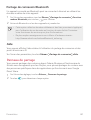
Overview screen
The Overview screen provides a preview of your recently used apps.
To view the list of recently used apps, tap
on the Home, then tap the
displayed app.
• Touch and hold an app and drag it to the top of the screen to start the
app with the Multi window. You can also tap
at the top of each app.
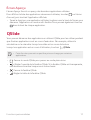
QSlide
You can start apps by using QSlide to use them while other apps are
running. For example, use the calculator or calendar when a video is
playing.
When an app is running, tap
QSlide.
• This feature may not be supported by some apps.
• : Turn off the QSlide mode to switch to full-screen mode.
•
: Adjust the opacity of the QSlide window. If the QSlide window is
transparent, it will not respond to touch inputs.
•
: Close the QSlide window.
•
: Adjust the size of the QSlide window.

Basic Functions
02

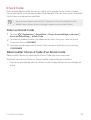
Basic Functions 13
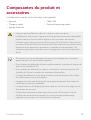
Product components and
accessories
The following items are included with your device.
• Device
• Fast charger
• Ejection pin
• USB cable
• Quick Start Guide
• The items described above may be optional.
• The items supplied with the device and any available accessories may
vary depending on the area and service provider.
• Always use genuine LG Electronics accessories. Using accessories made
by other manufacturers may affect your device's call performance or
cause malfunctions. This may not be covered by LG's repair service.
• If any of these basic items are missing, contact the dealer from which
you purchased your device.
• To purchase additional basic items, contact an LG Customer Service
Centre.
• To purchase optional items, contact an LG Customer Service Centre for
available dealers.
• Some items in the product box are subject to change without notice.
• The appearance and specifications of your device are subject to change
without notice.
• Device specifications may vary depending on the area or service provider.
• Be sure to use authentic accessories provided by LG Electronics. Using
third-party accessories may damage the device or cause malfunctions.

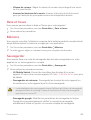
Basic Functions 14
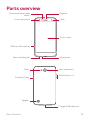
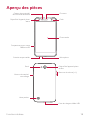
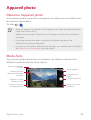
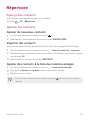
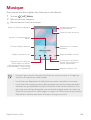
Parts overview
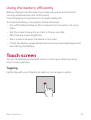
Touch screen
Microphone
Proximity/Ambient light
sensor
Flash
Front camera lens
SIM/microSD card tray
Earpiece
Stereo headset jack
Charger/USB cable port
Power/Lock key
Flash
Speaker
Rear camera lens
Volume keys (+/-)

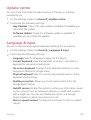
Basic Functions 15
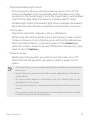
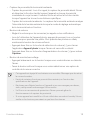
• Proximity/Ambient light sensor
- Proximity sensor: During a call, the proximity sensor turns off the
screen and disables touch functionality when the device is in close
proximity to the human body. It turns the screen back on and enables
touch functionality when the device is outside a specific range.
- Ambient light sensor: The ambient light sensor analyzes the ambient
light intensity when the auto-brightness control mode is turned on.
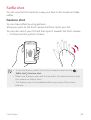
• Volume keys
- Adjust the volume for ringtones, calls or notifications.
- While using the Camera, gently press a Volume key to take a photo.
To take continuous shots of photos, press and hold the Volume key.
- Press the Volume Down (-) key twice to launch the Camera app
when the screen is locked or turned off. Press the Volume Up (+) key
twice to launch Capture+.
• Power/Lock key
- Briefly press the key when you want to turn the screen on or off.
- Press and hold the key when you want to select a power control
option.
• This device has a non-removable battery. Do not attempt to remove the
back cover.
• Some functions may be restricted for access, depending on the device
specifications.
• Do not put heavy objects on the device or sit on it. Failure to do so may
damage the touch screen.
• Screen-protective film or accessories may interfere with the proximity
sensor.
• If your device is wet or is being used in a humid place, the touch screen
or buttons may not function properly.

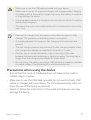
Basic Functions 16
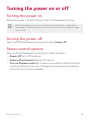
Turning the power on or off
Turning the power on
When the power is turned off, press and hold the Power/Lock key.
• When the device is turned on for the first time, initial configuration
takes place. The first booting time for the smart phone may be longer
than usual.
Turning the power off
Press and hold the Power/Lock key, then select Power off.
Power control options
Press and hold the Power/Lock key, then select an option.
• Power off: Turn off the device.
• Power off and restart: Restart the device.
• Turn on Airplane mode: Block telecommunication-related functions,
including making phone calls, messaging and browsing the Internet.
Other functions remain available.

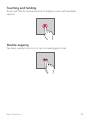
Basic Functions 17
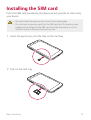
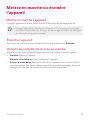
Installing the SIM card
Insert the SIM card provided by the device service provider to start using
your device.
• Be careful with the ejection pin since it has a sharp edge.
• Do not insert a memory card into the SIM card slot. If a memory card
happens to be lodged in the SIM card slot, take the device to an LG
Service Centre to remove the memory card.
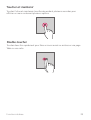
1
Insert the ejection pin into the hole on the card tray.
2
Pull out the card tray.

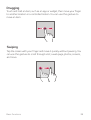
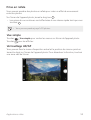
Basic Functions 18
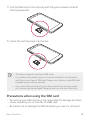
3
Put the SIM card on the card tray with the gold-coloured contacts
facing downwards.
4
Insert the card tray back into the slot.
• This device supports only Nano SIM cards.
• For problem-free performance, it is recommended to use the phone
with the correct type of SIM card. Always use a factory-made SIM card
supplied by your service provider.
• If you insert the card tray into your device while the card tray is wet,
your device may be damaged. Always make sure the card tray is dry.
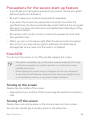
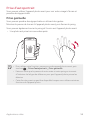
Precautions when using the SIM card
• Do not lose your SIM card. LG is not responsible for damage and other
issues caused by loss or transfer of a SIM card.
• Be careful not to damage the SIM card when you insert or remove it.

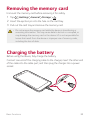
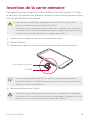
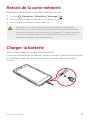
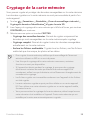
Basic Functions 19
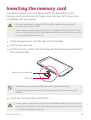
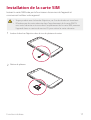
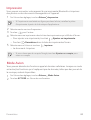
Inserting the memory card
The device supports up to a 2 TB microSD card. Depending on the
memory card manufacturer and type, some memory cards may not be
compatible with your device.
• It is recommended to use exFAT file system when using external
memory more than 32GB.
• Some memory cards may not be fully compatible with the device. If you
use an incompatible card, it may damage the device or the memory card,
or corrupt the data stored in it.
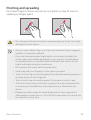
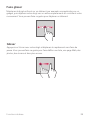
1
Insert the ejection pin into the hole on the card tray.
2
Pull out the card tray.
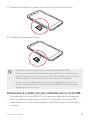
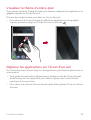
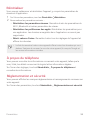
3
Put the memory card on the card tray with the gold-coloured contacts
facing downwards.
Memory card (optional)
SIM card
• The memory card is an optional item and is sold separately.
• Frequent writing and erasing of data may shorten the memory card
lifespan.
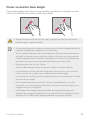
4
Insert the card tray back into the slot.
• Some memory cards may not be fully compatible with the device. If you
use an incompatible card, it may damage the device or the memory card,
or corrupt the data stored in it.
La page charge ...
La page charge ...
La page charge ...
La page charge ...
La page charge ...
La page charge ...
La page charge ...
La page charge ...
La page charge ...
La page charge ...
La page charge ...
La page charge ...
La page charge ...
La page charge ...
La page charge ...
La page charge ...
La page charge ...
La page charge ...
La page charge ...
La page charge ...
La page charge ...
La page charge ...
La page charge ...
La page charge ...
La page charge ...
La page charge ...
La page charge ...
La page charge ...
La page charge ...
La page charge ...
La page charge ...
La page charge ...
La page charge ...
La page charge ...
La page charge ...
La page charge ...
La page charge ...
La page charge ...
La page charge ...
La page charge ...
La page charge ...
La page charge ...
La page charge ...
La page charge ...
La page charge ...
La page charge ...
La page charge ...
La page charge ...
La page charge ...
La page charge ...
La page charge ...
La page charge ...
La page charge ...
La page charge ...
La page charge ...
La page charge ...
La page charge ...
La page charge ...
La page charge ...
La page charge ...
La page charge ...
La page charge ...
La page charge ...
La page charge ...
La page charge ...
La page charge ...
La page charge ...
La page charge ...
La page charge ...
La page charge ...
La page charge ...
La page charge ...
La page charge ...
La page charge ...
La page charge ...
La page charge ...
La page charge ...
La page charge ...
La page charge ...
La page charge ...
La page charge ...
La page charge ...
La page charge ...
La page charge ...
La page charge ...
La page charge ...
La page charge ...
La page charge ...
La page charge ...
La page charge ...
La page charge ...
La page charge ...
La page charge ...
La page charge ...
La page charge ...
La page charge ...
La page charge ...
La page charge ...
La page charge ...
La page charge ...
La page charge ...
La page charge ...
La page charge ...
La page charge ...
La page charge ...
La page charge ...
La page charge ...
La page charge ...
La page charge ...
La page charge ...
La page charge ...
La page charge ...
La page charge ...
La page charge ...
La page charge ...
La page charge ...
La page charge ...
La page charge ...
La page charge ...
La page charge ...
La page charge ...
La page charge ...
La page charge ...
La page charge ...
La page charge ...
La page charge ...
La page charge ...
La page charge ...
La page charge ...
La page charge ...
La page charge ...
La page charge ...
La page charge ...
La page charge ...
La page charge ...
La page charge ...
La page charge ...
La page charge ...
La page charge ...
La page charge ...
La page charge ...
La page charge ...
La page charge ...
La page charge ...
La page charge ...
La page charge ...
La page charge ...
La page charge ...
La page charge ...
La page charge ...
La page charge ...
La page charge ...
La page charge ...
La page charge ...
La page charge ...
La page charge ...
La page charge ...
La page charge ...
La page charge ...
La page charge ...
La page charge ...
La page charge ...
La page charge ...
La page charge ...
La page charge ...
La page charge ...
La page charge ...
La page charge ...
La page charge ...
La page charge ...
La page charge ...
La page charge ...
La page charge ...
La page charge ...
La page charge ...
La page charge ...
La page charge ...
La page charge ...
La page charge ...
La page charge ...
La page charge ...
La page charge ...
La page charge ...
La page charge ...
La page charge ...
La page charge ...
La page charge ...
La page charge ...
La page charge ...
La page charge ...
La page charge ...
La page charge ...
La page charge ...
La page charge ...
La page charge ...
La page charge ...
La page charge ...
La page charge ...
La page charge ...
La page charge ...
La page charge ...
La page charge ...
La page charge ...
La page charge ...
La page charge ...
La page charge ...
La page charge ...
La page charge ...
La page charge ...
La page charge ...
La page charge ...
La page charge ...
La page charge ...
La page charge ...
La page charge ...
La page charge ...
La page charge ...
La page charge ...
La page charge ...
La page charge ...
La page charge ...
La page charge ...
La page charge ...
La page charge ...
La page charge ...
La page charge ...
La page charge ...
La page charge ...
La page charge ...
La page charge ...
La page charge ...
La page charge ...
La page charge ...
La page charge ...
La page charge ...
La page charge ...
La page charge ...
La page charge ...
La page charge ...
La page charge ...
La page charge ...
La page charge ...
La page charge ...
-
 1
1
-
 2
2
-
 3
3
-
 4
4
-
 5
5
-
 6
6
-
 7
7
-
 8
8
-
 9
9
-
 10
10
-
 11
11
-
 12
12
-
 13
13
-
 14
14
-
 15
15
-
 16
16
-
 17
17
-
 18
18
-
 19
19
-
 20
20
-
 21
21
-
 22
22
-
 23
23
-
 24
24
-
 25
25
-
 26
26
-
 27
27
-
 28
28
-
 29
29
-
 30
30
-
 31
31
-
 32
32
-
 33
33
-
 34
34
-
 35
35
-
 36
36
-
 37
37
-
 38
38
-
 39
39
-
 40
40
-
 41
41
-
 42
42
-
 43
43
-
 44
44
-
 45
45
-
 46
46
-
 47
47
-
 48
48
-
 49
49
-
 50
50
-
 51
51
-
 52
52
-
 53
53
-
 54
54
-
 55
55
-
 56
56
-
 57
57
-
 58
58
-
 59
59
-
 60
60
-
 61
61
-
 62
62
-
 63
63
-
 64
64
-
 65
65
-
 66
66
-
 67
67
-
 68
68
-
 69
69
-
 70
70
-
 71
71
-
 72
72
-
 73
73
-
 74
74
-
 75
75
-
 76
76
-
 77
77
-
 78
78
-
 79
79
-
 80
80
-
 81
81
-
 82
82
-
 83
83
-
 84
84
-
 85
85
-
 86
86
-
 87
87
-
 88
88
-
 89
89
-
 90
90
-
 91
91
-
 92
92
-
 93
93
-
 94
94
-
 95
95
-
 96
96
-
 97
97
-
 98
98
-
 99
99
-
 100
100
-
 101
101
-
 102
102
-
 103
103
-
 104
104
-
 105
105
-
 106
106
-
 107
107
-
 108
108
-
 109
109
-
 110
110
-
 111
111
-
 112
112
-
 113
113
-
 114
114
-
 115
115
-
 116
116
-
 117
117
-
 118
118
-
 119
119
-
 120
120
-
 121
121
-
 122
122
-
 123
123
-
 124
124
-
 125
125
-
 126
126
-
 127
127
-
 128
128
-
 129
129
-
 130
130
-
 131
131
-
 132
132
-
 133
133
-
 134
134
-
 135
135
-
 136
136
-
 137
137
-
 138
138
-
 139
139
-
 140
140
-
 141
141
-
 142
142
-
 143
143
-
 144
144
-
 145
145
-
 146
146
-
 147
147
-
 148
148
-
 149
149
-
 150
150
-
 151
151
-
 152
152
-
 153
153
-
 154
154
-
 155
155
-
 156
156
-
 157
157
-
 158
158
-
 159
159
-
 160
160
-
 161
161
-
 162
162
-
 163
163
-
 164
164
-
 165
165
-
 166
166
-
 167
167
-
 168
168
-
 169
169
-
 170
170
-
 171
171
-
 172
172
-
 173
173
-
 174
174
-
 175
175
-
 176
176
-
 177
177
-
 178
178
-
 179
179
-
 180
180
-
 181
181
-
 182
182
-
 183
183
-
 184
184
-
 185
185
-
 186
186
-
 187
187
-
 188
188
-
 189
189
-
 190
190
-
 191
191
-
 192
192
-
 193
193
-
 194
194
-
 195
195
-
 196
196
-
 197
197
-
 198
198
-
 199
199
-
 200
200
-
 201
201
-
 202
202
-
 203
203
-
 204
204
-
 205
205
-
 206
206
-
 207
207
-
 208
208
-
 209
209
-
 210
210
-
 211
211
-
 212
212
-
 213
213
-
 214
214
-
 215
215
-
 216
216
-
 217
217
-
 218
218
-
 219
219
-
 220
220
-
 221
221
-
 222
222
-
 223
223
-
 224
224
-
 225
225
-
 226
226
-
 227
227
-
 228
228
-
 229
229
-
 230
230
-
 231
231
-
 232
232
-
 233
233
-
 234
234
-
 235
235
-
 236
236
-
 237
237
-
 238
238
-
 239
239
-
 240
240
-
 241
241
-
 242
242
-
 243
243
-
 244
244
-
 245
245
-
 246
246
-
 247
247
-
 248
248
-
 249
249
-
 250
250
-
 251
251
-
 252
252
-
 253
253
-
 254
254
-
 255
255
-
 256
256
-
 257
257
-
 258
258
-
 259
259
-
 260
260
-
 261
261
-
 262
262
-
 263
263


LG LGM320G Le manuel du propriétaire
- Catégorie
- Téléphones portables
- Taper
- Le manuel du propriétaire
- Ce manuel convient également à
dans d''autres langues
- English: LG LGM320G Owner's manual