
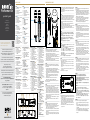
RX-DESK – Back Panel
7. Cable Management System
8. Antenna Terminal
9. Power Terminal
10. Micro USB Socket (for
rmware updates only)
11. Mic/Line Switch
12. XLR output (Mic/Line level
available)
13. 1/4” Unbalanced Output
14. Antenna Terminal
15.
Antennas, Micro USB Cable and
DC Power Pack (not shown)
RX-DESK (Rückseite)
7. Kabelmanagement
8. Antennenanschluss
9. Versorgungsanschluss
10. Micro-USB-Buchse (nur für
Firmware-Updates)
11. Mic/Line-Umschalter
12. XLR-Ausgang (für Mic- oder
Line-Pegel)
13. 6,3-mm-Klinkenbuchse
(unsymmetrisch)
14. Antennenanschluss
15. Antennen, Micro-USB-Kabel,
DC-Netzteil (nicht abgebildet)
RX-DESK – Face arrière
7.
Système de gestion des câbles
8. Prise antenne
9. Prise d’alimentation (Power)
10. Port Micro USB (pour mise à
jour du rmware uniquement)
11. Sélecteur Mic/Line
12. Sortie XLR (niveau commut-
able Micro/Ligne)
13. Sortie asymétrique sur jack
6,35 mm (1/4”)
14. Prise antenne
15. Antennes, câble Micro USB
et DC Power Pack (non
représentés)
RX-DESK – Panel trasero
7. Sistema de gestión de cable
8. Terminal para antena
9. Terminal de alimentación
10. Puerto micro USB (para
actualizaciones de rmware
exclusivamente)
11. Conmutador de micro/línea
12. Salida XLR (nivel de micro/
línea disponible)
13. Salida no balanceada de
6,35 mm
14. Terminal para antena
15. Antenas, cable micro USB
y convertidor de corriente
continua (no mostrados)
RX-DESK – Pannello posteriore
7. Sistema di gestione cavi
8. Terminale antenna
9. Terminale alimentazione
10. Presa Micro USB (solo per
aggiornamento rmware)
11. Interruttore Mic/Line
12. Uscita XLR (disponibilità
livello Mic/Line)
13. Uscita sbilanciata da 1/4”
14. Terminale antenna
15.
Antenne, cavo Micro USB e
Power Pack in c.c. (non mostrati)
RX-DESK – 背面
7. 线控系统
8. 天线终端
9. 电源终端
10. MicroUSB插口(仅限固件更新)
11. 麦克风/音频线转换开关
12. XLR输出(麦克风/音频线可用)
13. 1/4“非平衡输出
14. 天线终端
15. 天线、MicroUSB连接线和DC
电源组件(未显示)
RX-DESK – 背面パネル
7.
ケ ーブルマ ネ ー ジメントシ ステム
8. アンテナ端子
9. 電源端子
10. マイクロUSBソケット(ファーム
ウェア更新専用)
11. マイク/ラインスイッチ
12. XLR出力(マイクおよびライン
レベルで使用可能)
13. 1/4”アンバランス出力
14. アンテナ端子
15. アンテナ、マイクロUSBケーブ
ル、DC電源パック(図には未掲載)
RX-DESK – 후면 패널
7. 케이블관리시스템
8. 안테나터미널
9. 전원터미널
10. 마이크로USB소켓(펌웨어
업데이트전용)
11. 마이크/라인스위치
12. XLR출력(마이크/라인레벨사용
가능)
13. 1/4”언밸런스출력
14. 안테나터미널
15. 안테나,마이크로USB케이블및
DC전원팩(표시되지않음)
RX-DESK – Front Panel
1. Pair Button
2. Mute Button
3. Channel Selection Button
4. Multifunction Display
5. Input Gain Control
(+/-20dB)
6. Power Button/Status LED
RX-DESK (Vorderseite)
1. Kopplungstaste
2. Stummtaste
3. Kanalauswahltaste
4. Multifunktionsanzeige
5. Input-Gain-Taste
(±20 dB)
6. Ein/Aus-Taste mit Status-LED
RX-DESK – Face avant
1. Bouton Pair
2. Bouton Mute
3. Bouton de sélection de canal
4. Écran multifonction
5. Réglage de gain d’entrée
(+/-20 dB)
6. Bouton Power / Indicateur
LED
RX-DESK – Panel frontal
1. Botón de interconexión
2. Botón de silenciador
3. Botón de selección de canal
4. Pantalla multifunción
5. Control de ganancia de
entrada (+/-20 dB)
6. Botón de encendido/
Indicador de estado
RX-DESK – Pannello frontale
1. Pulsante di associazione
dispositivo
2. Pulsante Mute
3. Pulsante di selezione canale
4. Display multifunzione
5. Controllo del guadagno in
ingresso (+/-20 dB)
6. Pulsante di accensione/LED
di stato
RX-DESK – 正面
1. 配对按钮
2. 静音按钮
3. 频道选择按钮
4. 多功能显示屏
5. 输入增益控制(-/+20dB)
6. 电源按钮/LED指示灯
RX-DESK – 前面パネル
1. ペア ボタン
2. ミュートボタン
3. チャンネル 選 択 ボタン
4. マル チファンク ション 画 面
5. 入 力 ゲ インコ ント ロ ー ル
(+/-20dB)
6. 電源ボタン/状態LED
RX-DESK – 전면 패널
7. 페어버튼
8. 음소거버튼
9. 채널선택버튼
10. 다기능디스플레이
11. 입력게인제어(+/-20dB)
12. 전원버튼/상태 LED
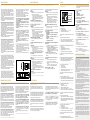
TX-M2
1. Power Button/Status LED
2. Mute Switch
3. Charging Contact
4. Pair Button
5. Micro USB Charging Socket
6. Digital Display
TX-M2
1. Ein/Aus-Taste mit Status-LED
2. Stummschalter
3. Ladekontakt
4. Kopplungstaste
5. Ladebuchse (Micro-USB)
6. Digitalanzeige
TX-M2
1. Bouton Power /
Indicateur LED
2. Commutateur Mute
3. Contact de charge
4. Bouton Pair
5. Port de charge (Micro USB)
6. Écran numérique
TX-M2
1. Botón de encendido/
Indicador de estado
2. Silenciador
3. Contacto de carga
4. Botón de interconexión
5. Puerto de carga micro USB
6. Pantalla digital
TX-M2
1. Pulsante di accensione/LED
di stato
2. Interruttore Mute
3. Terminale di carica
4. Pulsante di associazione
dispositivo
5. Presa Micro USB per la ricarica
6. Display digitale
TX-M2
1. 电源按钮/LED显示灯
2. 静音开关
3. 充电接口
4. 配对按钮
5. MicroUSB充电插口
6. 数码显示屏
TX-M2
1. 電源ボタン/状態LED
2. ミュートスイッチ
3. 充電端子
4. ペア ボタン
5. マイクロUSB充電ソケット
6. デジタル画面
TX-M2
1. 전원버튼/상태LED
2. 음소거스위치
3. 충전접촉
4. 페어버튼
5. 마이크로USB충전소켓
6. 디지털디스플레이
Kurzanleitung
Guide de prise en main
Guía rápida
Guida rapida
快速入门指南
クイックスタートガイド
퀵스타트가이드
quickstart guide
Hinweise für eine optimale Einrichtung und
eine efziente Handhabung nden Sie unter
rode.com/wireless/performer. Alternativ können Sie mit
Ihrem Smartphone den QR-Code scannen.
Vous trouverez des conseils de conguration et
d’utilisation à l’adresse rode.com/wireless/performer ou
vous pouvez scanner le code QR avec votre smartphone.
Para pautas óptimas de uso,
visitar rode.com/wireless/performer
o escanear el código QR con el teléfono.
Per le impostazioni ottimali e le indicazioni di utilizzo,
visitare il sito rode.com/wireless/performer, oppure
leggere il codice QR con il telefono cellulare.
如想获取最佳设置和使用指南,
请访问rode.com/wireless/performer或者用您的手机扫
一扫上方的二维码。
適切な設定と使用方法に関するガイドラインは、
rode.com/wireless/performerを開くか
スマ ートフォンでこ の Q R コ ードをスキャンして
ご覧くだ さい 。
For optimal setup and usage guidelines,
visit rode.com/wireless/performer or scan
the QR code with your phone.
PARTS GUIDE POWERING THE UNITS
Performer Kit
TX-M2
The RØDELink TX-M2 can be powered by the included LB-1
Lithium-Ion Rechargeable Battery or 2 x AA Batteries.
• To insert the battery, rotate the TX-M2 sleeve anti-clockwise and
slide it down to reveal the battery compartment.
• Press the top tab of the battery safety cover down and pull it away
from the microphone to open the battery compartment.
• Once you have inserted the battery, slide up the TX-M2 sleeve and
turn it clockwise until tight.
• Press and hold the Power Button/Status LED (1) at the base of the
microphone until the Status LED turns GREEN.
Note that when your battery reaches low level, the Status LED will ash.
TX-M2
Das RØDELink TX-M2 kann wahlweise über den im Lieferumfang
enthaltenen Lithium-Ionen-Akku LB-1 oder zwei AA-Batterien/-Akkus
betrieben werden.
• Zum Einsetzen des Akkus oder der Batterien drehen Sie den
Schaft des TX-M2 gegen den Uhrzeigersinn und schieben ihn dann
nach unten, um das Batteriefach zugänglich zu machen.
• Drücken Sie die obere Lasche der Batterieschutzabdeckung nach
unten und ziehen Sie sie vom Mikrofon weg, um das Batteriefach
zu öffnen.
• Nach dem Einsetzen des Akkus oder der Batterien schieben
Sie den Schaft des TX-M2 nach oben und drehen ihn dann im
Uhrzeigersinn fest.
• Drücken Sie die Ein/Aus-Taste mit der Status-LED (1) am
Mikrofonsockel, bis die Status-LED GRÜN leuchtet.
Wenn der Akku oder die Batterien schwach werden, beginnt die
Status-LED zu blinken.
TX-M2
Le RØDELink TX-M2 peut s’alimenter via l’accumulateur rechargeable
lithium-ion LB-1 livré, ou via 2 piles LR06 [AA].
• Pour mettre en place la batterie, tournez le manchon du TX-M2
dans le sens inverse des aiguilles d’une montre, puis faites-le
coulisser vers le bas an de faire apparaître le compartiment à piles.
• Appuyez sur la languette de verrouillage du capot de sécurité des
batteries, puis tirez sur ce dernier an d’ouvrir le compartiment à piles.
• Une fois la batterie ou les piles en place, faites glisser le manchon
du TX-M2 vers le haut, puis resserrez-le en le tournant dans le sens
des aiguilles d’une montre.
• Maintenez enfoncé le bouton Power/indicateur LED (1) jusqu’à ce
que la LED passe au vert.
Notez que lorsque le niveau de la batterie faiblit, la LED se met à
clignoter.
TX-M2
El RØDELink TX-M2 puede ser alimentado mediante la batería
recargable de iones de litio LB-1 incluida o con 2 pilas AA.
• Para introducir la batería, girar la carcasa del TX-M2 en dirección
contraria a las agujas del reloj y deslizarla hacia abajo para
descubrir el compartimento de las baterías.
• Presionar hacia abajo la lengüeta de la cubierta de protección de
la batería y separarla del micrófono para abrir el compartimento
de la batería.
• Una vez introducida la batería, deslizar hacia arriba la carcasa del
TX-M2 y girar en dirección de las agujas del reloj hasta que quede
bien cerrada.
RX-DESK
The RØDELink RX-DESK is powered by the included DC Power Pack.
• Attach the two included Antennas to the Antenna Terminals on the
rear of the unit (8 & 14).
• Insert the included power cable into the Power Terminal (9) on the
rear of the RX-DESK. Next, connect the correct adapter for your
region to the DC Power Pack and plug it into a power socket.
• To power on the RX-DESK, press and hold the Power Button/
Status LED (6) until the multifunction display illuminates and the
Status LED displays GREEN.
• Use the Mic/Line Switch (11) to select the output level that suits
your input device.
Vorstellung/Guide des appareils/Descripción de componentes/Descrizione dei componenti/
配件指南
/
パ ー ツ ガイド
/
부픔가이드
Stromspeisung/Alimentation des appareils/Activación de las unidades/Accensione delle unità/设备供电/
電源を入れる
/
유닛에전원공급하기
www.rode.com
FRONT VIEW
SCALE 1:1
1 2 3 4 5 6
7 8 9
10 11 12 13 14
FRONT VIEW
SCALE 1:1
2
4
5
6
3
1
• Mantener presionado el botón de encendido/indicador de estado
(1) en la base del micrófono hasta que el indicador de estado se
ilumine en VERDE.
El indicador de estado comenzará a parpadear si la batería tiene un
nivel de carga bajo.
TX-M2
L’unità RØDELink TX-M2 può essere alimentata dalla batteria LB-1 agli
ioni di litio ricaricabile inclusa oppure da due batterie in formato AA.
• Per inserire la batteria, ruotare in senso antiorario la mascherina
del TX-M2 e farla scorrere per rivelare il comparto batterie.
• Per accedere all’alloggiamento delle batterie, premere la linguetta
superiore del coperchio dello scomparto delle batterie per
toglierlo.
• Una volta inserita la batteria, scorrere la mascherina dell’unità
TX-M2 e ruotarla in senso orario per ssarla.
• Tenere premuto il pulsante di accensione/LED di stato (1) alla base
del microfono no a che il LED di stato diventa VERDE.
Nota: quando il livello di carica della batteria è insufciente, il LED
di stato lampeggia.
TX-M2
RØDELinkTX-M2可由内置LB-1可充电锂电池或2节AA电池供电。
•需要插入电池时,请逆时针旋转TX-M2套筒,并将其向下滑动以显
示电池仓。
•按下电池安全盖的顶端,并将其从麦克风上拉出,以打开电池仓。
•插入电池后,向上滑动TX-M2套筒,并顺时针转动直至拧紧。
•按住麦克风底部的电源按钮/LED显示灯(1),直到LED显示灯变
为绿色。
请注意,当电池电量不足时,LED显示灯将闪烁。
TX-M2
RØDELinkTX-M2は付属するLB-1充電式リチウムイオンバッテリーまたは
単2電池2本で動作します。
• バッテリーを挿入するには、TX-M2のスリーブを反時計回りに回し、下に
ス ラ イ ド し て バ ッ テ リ ー 収 納 を 開 き ま す 。
• バッテリー安全カバーの上部にあるタブを下向きに押し、マイクロフォ
ンから引き離 すようにしてバッテリー 収 納を開きます。
• バッテリーを挿入したら、TX-M2のスリーブを上にスライドし、時計回り
に回して 締 めます。
• 状態LEDが緑色になるまでマイクロフォンの底面にある電源ボタン/状
態LED(1)を押し続けます。
注:バッテリーの残量が低下すると状態LEDが点滅します。
TX-M2
RØDELinkTX-M2는포함된LB-1충전용리튬이온배터리또는AA배터리2
개로전원을공급받을수있습니다.
•배터리를넣으려면TX-M2슬리브를반시계방향으로돌리고아래로밀어
배터리함을표시하십시오.
•배터리안전덮개의상단탭을아래로누른다음마이크에서당겨서배터리
함을여십시오.
•배터리를삽입했으면TX-M2슬리브를위로밀고시계방향으로돌려단단히
조입니다.
•상태표시등이녹색이될때까지마이크밑면의전원버튼/상태표시LED(1)
을길게누릅니다.
배터리가부족하면상태LED가깜박합니다.
RX-DESK
Das RØDELink RX-DESK wird über das beiliegende DC-Netzteil mit
Spannung versorgt.
• Schließen Sie die beiden im Lieferumfang enthaltenen Antennen an
den Antennenanschlüssen (8 und 14) auf der Geräterückseite an.
• Verbinden Sie das beiliegende Netzkabel mit dem Netzanschluss
(9) auf der Rückseite des RX-DESK. Setzen Sie nun den für Ihr Land
geeigneten Adapter in das DC-Netzteil ein und verbinden Sie
dieses dann mit einer Netzsteckdose.
• Zum Einschalten des RX-DESK drücken Sie die Ein/Aus-Taste mit
der Status-LED (6) so lange, bis die Multifunktionsanzeige sich
einschaltet und die Status-LED GRÜN leuchtet.
• Stellen Sie mit dem Mic/Line-Umschalter (11) den für das ange-
schlossene Gerät geeigneten Ausgangspegel ein.
RX-DESK
Le RØDELink RX-DESK s’alimente par le DC Power Pack livré.
• Raccordez les deux antennes livrées aux prises prévues à cet effet
à l’arrière de l’appareil (8 & 14).
• Insérez le câble d’alimentation livré dans la prise d’alimentation (9)
située sur la face arrière du RX-DESK. Reliez ensuite l’adaptateur
correspondant à votre région au DC Power Pack, et branchez-le
sur une prise secteur.
• Pour mettre sous tension le RX-DESK, maintenez enfoncé le bou-
ton Power/indicateur LED (6) jusqu’à ce que l’écran multifonction
s’allume et que la LED passe au vert.
• Sélectionnez ensuite le niveau de sortie approprié via le sélecteur
Mic/Line (11).
RX-DESK
El RØDELink RX-DESK es alimentado por el convertidor de corriente
directa incluido.
• Conectar las dos antenas incluidas en los terminales para antena
en la parte trasera de la unidad (8 y 14).
• Insertar el cable de corriente incluido en el terminal de alimen-
tación (9) en la parte trasera del RX-DESK. Después, conectar el
adaptador correcto para su región en el convertidor de corriente
directa y conectar a la toma de corriente.
• Para encender el RX-DESK, mantener presionado el botón de
encendido/indicador de estado (6) hasta que la pantalla multifun-
ción se ilumine y el indicador de estado se ilumine en VERDE.
• Usar el conmutador de micro/línea (11) para seleccionar el nivel de
salida adecuado para el dispositivo de entrada.
RX-DESK
L’unità RØDELink RX-DESK è alimentata dal Power Pack in c.c. incluso.
• Montare le due antenne in dotazione sui terminali Antenna posti
sul retro dell’unità (8 e 14).
• Inserire il cavo di alimentazione fornito nel terminale di alimenta-
zione (9) sul retro dell’unità RX-DESK. Quindi, collegare al Power
Pack in c.c. l’adattatore adatto alla propria regione e connetterlo
a una presa elettrica.
• Per accendere l’unità RX-DESK, tenere premuto il pulsante di
accensione/LED di stato (6) no a quando il display multifunzione
si accende e il LED di stato si illumina di VERDE.
• Utilizzare l’interruttore Mic/Line (11) per selezionare il livello di
uscita ottimale per il dispositivo in ingresso.
RX-DESK
RØDELinkRX-DESK是由内置的DC电源组件供电。
• 将两个内置天线连接到设备背面的天线终端口(8和14)
• 插入内置的电源线到机身背后的电源终端插口(9),然后连接上您所
在区域的匹配电源插头并将其插入电源插座。
• 如需打开设备,请按住机身正面的电源按钮(6)直到多功能显示屏上
有显示并且电源指示灯呈绿色。
• 使用麦克风/音频线转换开关(11),选择输出的等级来匹配你的输
入设备。
RX-DESK
RØDELinkRX-DESKは付属のDC電源パックから給電します。
• 付属する2本のアンテナをユニット背面のアンテナ端子に取り付けま
す(8と14)。
• 付属の電源ケーブルをRX-DESKの背面にある電源端子(9)に接続しま
す。次に、お住まいの地域に対応したアダプターをDC電源パックに接続
し、電源コンセントに接続します。
• RX-DESKの電源を入れるには、電源ボタン/状態LED(6)をマルチファン
クション画面が点灯し、状態LEDが緑色に光るまで押し続けます。
• マイク/ラインスイッチ(11)を使用して利用する入力デバイスに適した
出力レベルを選択します。
RX-DESK
RØDELinkRX-DESK는포함된DC전원팩으로전원이공급됩니다.
• 포함된두개의안테나를장치후면의안테나터미널(8&14)에연결하
십시요.
• 포함된전원케이블을RX-DESK후면의전원터미널(9)에끼웁니다.그
런다음해당지역의올바른어댑터를DC전원팩에연결하고전원소켓
에연결하십시오.
• RX-DESK의전원을켜려면다기능디스플레이가켜지고상태LED가녹색
으로나타날때까지전원버튼/상태LED(6)를
누르고있습니다.
• 마이크/라인스위치(11)를사용하여입력장치에적합한출력레벨을선
택하십시요.
For optimal setup and usage guidelines,
visit rode.com/wireless/performer or scan
the QR code with your phone.

The Multifunction Display on the RX-DESK shows:
1. Channel Number
2. Connection Strength
3. Signal Meter/Mute Status
4. Output Level Setting (in dB: -20, -10, 0, +10, +20)
5. Link Status/Paired TX-M2 Battery Level
The Digital Display (6) on the TX-M2 indicates link status and channel
number.
If the TX-M2 and RX-DESK become disconnected
• TX-M2 - The Channel Number on the Digital Display (6) will ash
• RX-DESK - The Link Status/Paired TX-M2 Battery indicator will
disappear and the Connection Strength indicator will animate upwards
Die Multifunktionsanzeige am RX-DESK stellt folgende Informationen dar:
1. Kanalnummer
2. Verbindungsqualität
3. Signalpegelanzeige/Stummschaltungsstatus
4. Ausgangspegel (in dB: –20, –10, 0, +10, +20)
5. Kopplungsstatus/Akkukapazität des verkoppelten TX-M2
Die Digitalanzeige (6) am TX-M2 zeigt den Kopplungsstatus und die
Kanalnummer an.
Wenn die Verbindung zwischen TX-M2 und RX-DESK unterbrochen wird
• TX-M2: Die Kanalnummer in der Digitalanzeige (6) blinkt
• RX-DESK: Die Kopplungsstatusanzeige erlischt, und die Anzeige
für die Verbindungsqualität bewegt sich nach oben
L’écran multifonction du RX-DESK indique :
1. Le numéro de canal
2. L’intensité de réception
3. Le niveau du signal / Mute
4. Le réglage de gain de sortie (en dB : -20, -10, 0, +10, +20)
5. L’appairage / le niveau de batterie du TX-M2
L’écran numérique (6) du TX-M2 indique le statut d’appairage et le
numéro de canal.
Si le TX-M2 et le RX-DESK perdent leur liaison
• TX-M2 – le numéro de canal sur l’afcheur numérique (6) clignote
• RX-DESK – l’indicateur d’appairage / niveau de batterie du TX-M2
disparaît et l’indicateur d’intensité de réception bouge vers le haut
La pantalla multifunción del RX-DESK indica:
1. Número de canal
2. Potencia de la señal de conexión
3. Medidor de señal/Estado del silenciador
4. Ajuste del nivel de salida (en dB: -20, -10, 0, +10, +20)
5. Estado de interconexión/Nivel de batería del TX-M2 conectado
La pantalla digital (6) del TX-M2 indica el estado de interconexión y el
número de canal.
Si el TX-M2 y el RX-DESK se desconectan
• TX-M2 - El número de canal parpadeará en la pantalla digital (6)
• RX-DESK - El indicador de estado de interconexión/batería del
TX-M2 conectado desparecerá y el indicador de la potencia de la
señal de conexión aumentará
Il display multifunzione dell’unità RX-DESK indica:
1. Numero del canale
2. Intensità del segnale
3. Indicatore di segnale / Stato di mute
4. Impostazione del livello di uscita (in dB: -20, -10, 0, +10, +20)
5. Stato di associazione / Livello di batteria dell’unità TX-M2
Il display digitale (6) dell’unità TX-M2 indica lo stato di associazione
e il numero di canale
Se le unità TX-M2 e RX-DESK perdono la connessione
• sul Display digitale (6) del TX-M2 lampeggia il numero del canale
ROSSO di associazione del dispositivo (4) per abilitare la modalità
associazione. Sul display lampeggia l’icona “P” a indicare che
l’unità è in modalità di associazione.
• Le unità eseguiranno l’associazione in modo automatico. Al
termine del processo di associazione, entrambe le unità TX-M2 e
RX-DESK indicano lo stesso numero di canale.
• Il LED di stato (1) dell’unità TX-M2 lampeggia di colore ARAN-
CIONE quando non è connesso all’unità RX-DESK.
• 将RX-DESK调至配对模式,请按REDPair按钮(1)。显示的频道号将
会闪烁,表示它已进入配对模式。随后,请按下频道选择按钮(3)直
至显示出您所需的频道号。
• 打开TX-M2电源并打开电池套,直至能看到显示屏。长按REDPair
按钮(4)启动配对模式。此时显示屏会显示闪烁的‘P’,表示该设备
已进入配对模式。
• 该设备将会自动进行配对,当配对成功后,TX-M2和RX-DESK将会
显示同一个频道号。
• 当TX-M2与RX-DESK断开频道连接时,TX-M2的LED显示灯(1)
将闪烁橙色灯光。
• RX-DESKのペアリングモードを有効にするには、赤色のペアボタン(1)
を押します。表示されているチャンネル番号が点滅してペアリングモー
ドになっていることが示されます。次に、目的のチャンネル番号が表示さ
れるまでチャンネル選択ボタン(3)を押します。
• TX-M2の電源を入れ、バッテリースリーブを開いて画面を確認できるよ
うにします。赤色のペアボタン(4)を長押ししてペアリングモードを有効
にします。画面に点滅する「P」が表示され、ペアリングモードになってい
ることが示されます。
• ユニットは自動的にペアリングされます。手順が完了すると、TX-M2と
RX-DESKの両方に同じチャンネル番号が表示されます。
• RX-DESKとの接続が切れるとTX-M2の状態LED(1)がオレンジ色に
点滅します。
• RX-DESK에서페어링모드를사용하려면빨간페어버튼(1)을누릅니다.표시
된채널번호가깜박이면서페어링모드임을나타냅니다.원하는채널번호가
표시될때까지채널선택버튼(3)을누릅니다.
• TX-M2의전원을켜고디스플레이에접근할수있도록배터리슬리브를엽니
다.페어링모드를사용하려면빨간페어버튼(4)을누르고있습니다.디스플레
이에깜박이는‘P’가표시되어페어링모드임을나타냅니다.
• 유닛들이자동으로페어링됩니다.프로세스가완료되면TX-M2와RX-DESK
가동일한채널번호를표시합니다.
• TX-M2상태LED(1)는RX-DESK에서분리될때주황색으로깜박입니다.
• To enable pairing mode on the RX-DESK, press the RED Pair
Button (1). The Channel Number displayed will ash to indicate it
is in pairing mode. Next, press the Channel Selection Button (3)
until the desired Channel Number is displayed.
• Power on the TX-M2 and open the battery sleeve to allow access
to the display. Press and hold the RED Pair Button (4) to enable
pairing mode. The display will show a ashing ‘P’ to indicate it is
in pairing mode.
• The units will pair automatically. When the process is complete, both
the TX-M2 and RX-DESK will display the same Channel Number.
• The TX-M2 Status LED (1) will ash ORANGE when disconnected
from the RX-DESK.
• Zum Aktivieren des Kopplungsmodus am RX-DESK drücken Sie
die ROTE Kopplungstaste (1). Der aktivierte Kopplungsmodus
wird durch die blinkende Kanalnummer angezeigt. Nun drücken
Sie wiederholt auf die Kanalauswahltaste (3), bis die gewünschte
Kanalnummer angezeigt wird.
• Schalten Sie das TX-M2 ein und öffnen Sie den Batteriefachschaft,
um die Anzeige zugänglich zu machen. Drücken Sie die ROTE
Kopplungstaste (4) länger, um den Kopplungsmodus zu aktivieren.
In der Anzeige erscheint ein blinkendes „P“ zur Signalisierung des
aktivierten Kopplungsmodus.
• Die Kopplung der Geräte erfolgt automatisch. Nach Abschluss
des Vorgangs zeigen sowohl das TX-M2 als auch das RX-DESK
dieselbe Kanalnummer an.
• Die Status-LED am TX-M2 (1) blinkt ORANGEFARBEN, wenn die
Verbindung zum RX-DESK getrennt wurde.
• Pour activer le mode d’appairage sur le RX-DESK, appuyez sur
le bouton ROUGE Pair (1). Le numéro de canal afché se met
à clignoter, ce qui indique que le mode d’appairage est activé.
Appuyez ensuite sur le bouton de sélection de canal (3) jusqu’à
faire apparaître le numéro de canal désiré.
• Allumez le TX-M2 et ouvrez le compartiment à piles, de façon à accéder
à l’afcheur. Activez le mode d’appairage en maintenant enfoncé le
bouton d’appairage ROUGE (4). L’écran afche alors un « P » clignotant,
conrmant l’activation du mode d’appairage (P comme Pairing).
• Les appareils s’appairent alors automatiquement. Une fois le
processus terminé, le TX-M2 et le RX-DESK afchent tous deux le
même numéro de canal.
• La LED (1) du TX-M2 clignote en ORANGE lors de la déconnexion
du RX-DESK.
• Para activar el modo de interconexión del RX-DESK, presionar el
botón de interconexión ROJO (1). El número de canal parpadeará en
la pantalla para indicar que está en modo de interconexión. Ahora,
presionar el botón de selección de canal (3) hasta que el número de
canal deseado aparezca en pantalla.
• Encender el TX-M2 y abrir la cubierta de la batería para permitir el
acceso a la pantalla. Para activar el modo de interconexión, mantener
presionado el botón de interconexión ROJO (4). El parpadeo de la
letra «P» en pantalla indica que está en modo de interconexión.
• Las unidades se interconectarán automáticamente. Cuando el
proceso se haya completado, el TX-M2 y el RX-DESK indicarán el
mismo número de canal.
• El indicador de estado (1) del TX-M2 parpadeará en NARANJA
cuando pierda la conexión con el RX-DESK.
• Per abilitare la modalità di associazione sull’unità RX-DESK,
premere il pulsante ROSSO di associazione dispositivo (1). Il
numero di canale indicato lampeggia per indicare che l’unità è in
modalità di associazione. Quindi, premere il pulsante di selezione
canale (3) no a visualizzare il numero del canale desiderato.
• Accendere l’unità TX-M2 e aprire la mascherina dello scomparto
delle batterie per accedere al display. Tenere premuto il pulsante
DISPLAYS
AUDIO CONNECTIONS
There are 2 analogue audio connections on the back panel of the
RX-DESK:
XLR (Mic/Line)
• Use the Mic/Line Switch (11) on the back panel of the unit to
select microphone or line level output.
• When Mic is selected, the XLR output will provide
microphone level to a standard microphone input.
• When Line is selected, the XLR output will provide line
level signal (+30dB). This should only be used with a
line level input.
Unbalanced output – ¼” Unbalanced TS (Tip-Sleeve)
• The 1/4” Line level output provides instrument level signal.
Auf der Rückseite des RX-DESK sind zwei analoge
Audioanschlüsse vorhanden:
XLR (Mic/Line)
• Wählen Sie mit dem Mic/Line-Umschalter (11) auf der Gerä-
terückseite den passenden Ausgangspegel (Mikrofon- oder
Line-Pegel) aus.
• Bei Auswahl von „Mic“ wird über den XLR-Ausgang
ein Signal mit Mikrofonpegel an einen normalen
Mikrofoneingang ausgegeben.
• Bei Auswahl von „Line“ hingegen liegt am XLR-Ausgang
ein Signal mit Line-Pegel (+30 dB) an. In diesem Fall darf der
Ausgang nur mit einem Line-Eingang verbunden werden.
Unsymmetrischer Ausgang (6,3mm, TS-Klinke)
• Am 6,3-mm-Line-Ausgang liegt ein Signal mit Instrumen-
tenpegel an.
La face arrière du RX-DESK accueille 2 connecteurs audio
analogiques :
XLR (micro/ligne)
• Pour choisir le niveau de sortie (micro ou ligne) de l’appareil,
utilisez le sélecteur Mic/Line (11).
• En position Mic, la sortie XLR est au niveau ligne (pour
entrée micro standard).
• En position Line, la sortie XLR est au niveau ligne
(+30 dB) Pour utilisation sur une entrée au niveau ligne.
Sortie asymétrique – jack 6,35mm 2points asymétrique
(TS,pointe/corps)
• La sortie ligne sur jack 6,35 mm est au niveau instrument.
RX-DESK:
XLR (micro/línea)
• Usar el conmutador de micro/línea (11) en el panel trasero de
la unidad para seleccionar nivel de micrófono o de línea.
• Cuando Mic está seleccionado, la salida XLR
proporciona nivel de micrófono a una entrada de
micrófono estándar.
• Cuando Line está seleccionado, la salida XLR
proporciona una señal de nivel de línea (+30 dB). Esta
opción debe usarse exclusivamente con una entrada de
nivel de línea.
Salida no balanceada – Jack mono (TS) de 6,35 mm
nobalanceado
• La salida de línea de 6,35 mm proporciona una señal de nivel
de instrumento.
FRONT VIEW
SCALE 1:1
Sul pannello posteriore dell’unità RX-DESK sono presenti due tipi
di connessioni audio analogiche:
XLR (Mic/Line)
• Utilizzare l’interruttore Mic/Line (11) sul pannello posteriore
dell’unità per selezionare il livello di uscita del microfono
o di linea.
• Selezionando Mic, l’uscita XLR invia all’esterno un
segnale di livello microfonico a un eventuale ingresso
standard per microfono.
• Selezionando Line, l’uscita XLR invia all’esterno un
segnale con livello di linea (+30 dB). Questa opzione
deve essere selezionata esclusivamente per il
collegamento di un ingresso con livello di linea.
Uscita sbilanciata – Connettore sbilanciato da ¼” TS (Tip-
Sleeve)
• L’uscita di linea con connettore da 1/4” fornisce un segnale
con livello per uno strumento.
RX-DESK机身背面有两个模拟音频连接:
XLR(麦克风/音频线)
• 用机身背后的麦克风/音频线转换开关(11)来选择麦克风或者
音频线的线路输出。
• 当选中麦克风后,XLR将为麦克风输入提供标准麦克风级
别输出。
• 当选中音频线后,XLR将提供音频线(+30dB)输出,这只能
用于音频线输入。
非平衡输出-1/4“非平衡TS(直插头)
• 1/4“音频线输出提供乐器电平信号。
RX-DESKの背面パネルには2つのアナログオーディオ端子があります:
XLR (マイク/ライン)
• ユニット背面パネルのマイク/ラインスイッチ(11)を使用してマイ
クまたはラインレベルの出力を選択します。
• Micが選択されている場合、XLR出力は標準マイクロフォン
入力用のマイクロフォンレベルの信号を送ります。
• Lineが選択されている場合、XLR出力はラインレベルの信
号(+30dB)を送ります。この出力はラインレベルの入力に対
しての み使用してくだ さい。
アンバランス出力 - ¼” アンバランスTS(チップ-スリーブ)
• 1/4”ラインレベル出力はインストゥルメントレベルの信号を
提供します。
RX-DESK의후면패널에는2개의아날로그오디오연결이있습니다:
XLR (미이크/라인)
• 마이크또는라인레벨출력을선택하려면장치의후면
패널에있는마이크/라인스위치(11)를사용하십시요.
• Mic를선택하면XLR출력은표준마이크입력에마이크레벨을
제공합니다.
• Line을선택하면XLR출력은라인레벨신호(+30dB)를
제공합니다.이것은라인레벨입력과함께사용해야합니다.
언밸런스 출력 - 1/4 “언밸런스 TS (팁 - 슬리브)
• 1/4”라인레벨출력은장비레벨신호를제공합니다.
PAIRING THE UNITS
Einheiten Koppeln/Appairage Émetteur / Récepteur/Interconexión De Unidades/Associazione Delle Unità/ 配对设备/
ユ ニット の ペ ア リン グ
/
유닛페
어링
Anzeigen/Écrans/Indicaciones En Pantalla/Schermo Multi Funzione/多
功能显示屏/
画面
/다기는시현기/
Audioverbindungen/Branchements audio/Conexiones de audio/Connessioni audio/音频连接/オー ディオ接 続 /
오디오연결
1
2
3
4
5
CHARGING THE LB-1 BATTERY
The LB-1 Battery can be charged while inserted into the TX-M2 by
opening the battery sleeve and connecting the included Micro USB
Cable. A ‘C’ will ash on the Digital Display (6) of the TX-M2 to indicate it
is charging. When the TX-M2 is fully charged, the ‘C’ will no longer ash.
While the TX-M2 can be powered by standard AA Batteries, these
cannot be charged in the unit.
Um das Batteriefach zu erreichen, muss der Schaft geöffnet werden.
Zudem muss das im Lieferumfang enthaltene Micro-USB-Kabel
angeschlossen werden. In der Digitalanzeige (6) des TX-M2 erscheint
ein blinkendes „C“ zur Signalisierung des laufenden Ladevorgangs.
Nach Abschluss des Ladevorgangs erlischt das „C“ in der Anzeige
des TX-M2.
Zwar kann das TX-M2 alternativ auch mit zwei AA-Akkus betrieben
werden, doch können diese mit dem Gerät nicht aufgeladen werden.
TX-M2 : il suft d’ouvrir le compartiment batterie et de brancher le
câble Micro USB livré. Un « C » clignote alors sur l’écran numérique
(6) du TX-M2 pour indiquer la charge en cours. Une fois la charge du
TX-M2 terminée, le « C » cesse de clignoter.
Lorsque le TX-M2 est alimenté sur accumulateurs LR06 [AA]
standard, il est impossible de les charger dans l’appareil.
La batería LB-1 puede ser cargada dentro del TX-M2 abriendo la
cubierta de la batería y conectando el cable micro USB incluido. La
letra «C» comenzará a parpadear en la pantalla digital (6) del TX-M2
para indicar que está cargando. Cuando el TX-M2 esté plenamente
cargado, la «C» dejará de parpadear.
Si bien el TX-M2 puede ser alimentado mediante pilas AA estándar,
estas no pueden recargarse dentro de la unidad.
Aprendo la mascherina dello scomparto delle batterie e collegando
il cavo Micro USB in dotazione è possibile ricaricare la batteria LB-1
inserita nell’unità TX-M2. Quando la batteria è in carica, sul Display
digitale (6) dell’unità TX-M2 lampeggia una “C”. Al completamento
della ricarica, la “C” smette di lampeggiare.
Sebbene l’unità TX-M2 possa essere alimentata da due batterie AA
standard, queste non possono essere caricate nell’unità.
RØDELB-1可在插入TX-M2同时进行充电,只需打开电池套并连接附
带的MicroUSB线即可。正在充电时,一个字母“C”将在TX-M2的数字
显示屏(6)上闪烁。当TX-M2充满电时,“C”将不再闪烁。
虽然TX-M2可由标准AA电池供电,但这些电池不能在本机中充电。
LB-1バッテリーはTX-M2に挿入された状態で充電することができます。充
電するにはTX-M2のバッテリースリーブを開き、付属のマイクロUSBケー
ブルを接続します。TX-M2のデジタル画面(6)で「C」が点滅し、充電中である
ことが示されます。TX-M2がフル充電されると、「C」が点滅しなくなります。
TX-M2は標準的な単2電池でも動作しますが、ユニット内で充電すること
はできません。
LB-1배터리는배터리슬리브를열고포함된마이크로USB케이블을연결하여
TX-M2에삽입하는동안충전할수있습니다.TX-M2의디지털디스플레이(6)
에서‘C’가깜박거리면서충전중임을나타냅니다.TX-M2가완전히충전되면‘C’
가더이상깜박이지않습니다.
TX-M2는표준AA배터리로전원을공급할수있지만장치에충전할수는
없습니다.
Auaden Des Akkus Lb-1/Charge De La Batterie Lb-1/Recarga De La Batería Lb-1/ Ricarica Della Batteria Lb-1/充电LB-1/
Lb-1バ
ッテリーの充 電
/LB-1
충전하기
MUTE FUNCTION
The TX-M2 features a Mute Switch (2). To activate the Mute
Switch push the switch down to expose the Mute Icon. To turn
the Mute Switch off, push the switch upward to cover the Mute
Icon.
Der TX-M2 bietet einen Mute-Schalter (2). Um den Mute-Schalter
(die Stummschaltung) zu aktivieren, drücken Sie den Schalter hinein,
so dass das Mute-Symbol sichtbar ist. Um die Stummschaltung zu
deaktivieren, drücken Sie den Mute-Schalter erneut, so dass er
herausspringt und das Mute-Symbol verborgen ist.
Le TX-M2 est doté d’un interrupteur de coupure audio (2). Pour
activer l’interrupteur de coupure, poussez-le vers le bas pour faire
apparaître l’icône de coupure audio. Pour désactiver l’interrupteur
de coupure, poussez-le vers le haut pour couvrir l’icône de coupure
audio.
El TX-M2 cuenta con un silenciador (2). Para activar el silenciador,
mover el conmutador hacia abajo para dejar al descubierto el icono
del silenciador. Para desactivar el silenciador, mover el conmutador
hacia arriba para tapar el icono del silenciador.
Stummschalter/ Fonction Mute/Función De Silenciador/Funzione Mute/
静音功能/
ミュート機 能
/음소거기능/
L’unità TX-M2 dispone di un interruttore Mute (2). Per attivare
l’interruttore Mute, spingerlo verso il basso per visualizzare l’icona
Mute. Per disattivare l’interruttore Mute, spingerlo verso l’alto per
nascondere l’icona Mute.
TX-M2设有静音开关(2)。要激活静音开关,向下按按钮,就会出
现静音图标。要关闭静音开关,向上推按钮,盖住静音图标。
TX-M2にはミュートスイッチ(2)が搭載されています。ミュートスイッチ
をオンにするには、スイッチを押し下げてミュートアイコンが現れるよう
にします。ミュートスイッチをオフにするには、スイッチを押し上げてミュ
ートアイコンが隠れるようにします。
TX-M2에는뮤트스위치(2)가제공됩니다.뮤트스위치를작동하려면
스위치를아래로눌러뮤트아이콘이나타나도록합니다.뮤트스위치를
끄려면스위치를위쪽으로눌러뮤트아이콘이가려지도록합니다.
• RX-DESK: l’indicatore di stato dell’associazione / Livello di batteria
dell’unità TX-M2 scompare e l’indicatore di potenza del segnale si
muove verso l’alto.
RX-DESK上的多功能显示屏显示:
1. 频道号码
2. 连接强度
3. 信号表/静音状态
4. 输出量设置(单位dB:-20,-10,0,+10,+20)
5. 连接状态/配对的TX-M2电池电量
TX-M2上的数字显示屏(6)显示连接状态和频道号。
如果TX-M2和RX-DESK断开连接
• TX-M2-数字显示屏(6)上的频道号将闪烁
• RX-DESK–显示连接/配对状态的TX-M2电池指示灯将消失,连接
强度指示灯将向上跳动
RX-DESKのマルチファンクション画面には以下の情報が表示されます:
1. チャンネル 番 号
2. 接続強度
3. 信号メーター/ミュート状態
4. 出力レベルの設定(dB表示:-20、-10、0、+10、+20)
5. 接続状態/ペアリングされたTX-M2のバッテリーレベル
TX-M2のデジタル画面(6)には接続状態とチャンネル番号が表示されます。
TX-M2とRX-DESKの接続が切れた場合:
• TX-M2-デジタル画面(6)のチャンネル番号が点滅
• RX-DESK-接続状態/ペアリングされたTX-M2バッテリーのインジケ
ーターが消え、接続強度インジケーターが上に向かって動きます
RX-DESK의다기능디스플레이에다음내용이표시됩니다.
6. 채널번호
7. 연결강도
8. 신호측정기/음소거상태
9. 출력레벨설정(dB:-20,-10,0,+10,+20)
10. 링크상태/페어링된TX-M2배터리레벨
TX-M2의디지털디스플레이(6)는링크상태와채널번호를표시합니다.
TX-M2및RX-DESK의연결이끊어지면
• TX-M2-디지털디스플레이(6)의채널번호가깜박합니다.
• RX-DESK-링크상태/페어링된TX-M2배터리표시기가사라지고연결
강도표시기가 위쪽으로움직입니다
RF EXPOSURE STATEMENT
This transmitter must not be co-located or operated in conjunction with any
other antenna or transmitter.
NOTE: This equipment has been tested and found to comply with the limits
for a Class B digital device, pursuant to Part 15 of the FCC Rules. These limits
are designed to provide reasonable protection against harmful interference
in a residential installation. This equipment generates, uses and can radiate
radio frequency energy and, if not installed and used in accordance with
the instructions, may cause harmful interference to radio communications.
However, there is no guarantee that interference will not occur in a particular
installation.
If this equipment does cause harmful interference to radio or television
reception, which can be determined by turning the equipment off and on,
the user is encouraged to try to correct the interference by one or more of
the following measures:
1. Reorient or relocate the receiving antenna.
2. Increase the separation between the equipment and receiver.
3. Connect the equipment into an outlet on a circuit different from that
to which the receiver is connected.
4. Consult the dealer or an experienced radio/TV technician for help.
This device complies with Part 15 of the FCC Rules. Operation is subject to the
following two conditions: (1) this device may not cause harmful interference,
and (2) this device must accept any interference received, including
interference that may cause undesired operation.
This device complies with Industry Canada license-exempt RSS standard(s).
Operation is subject to the following two conditions:
(1) this device may not cause interference,
(2) this device must accept any interference, including interference that may
cause undesired operation of the device.
Le présent appareil est conforme aux CNR d’Industrie Canada applicables
aux appareils radio exempts de licence. L’exploitation est autorisée aux deux
conditions suivantes :
(1) l’appareil ne doit pas produire de brouillage,
(2) l’utilisateur de l’appareil doit accepter tout brouillage radioélectrique subi,
même si le brouillage est susceptible d’en compromettre le fonctionnement.
This Class B digital apparatus complies with Canadian ICES-003. Cet appareil
umerique de la classe B est conforme a la norme NMB-003 du Canada.
Changes or modications to the equipment not expressly approved by the
party responsible for compliance could void the user’s authority to operate
the equipment.
Only use this product with authorised RØDE attachments and accessories.
To comply with FCC and ISED Canada RF exposure compliance requirements,
a separation distance of at least 20 cm must be maintained between the
antenna of this device and all nearby persons. This device must not be co-
located or operating in conjunction with any other antenna or transmitter.
Pour se conformer aux exigences de conformité de l’exposition RF de la FCC
et de l’ISED Canada, une distance de séparation d’au moins 20 cm doit être
maintenue entre l’antenne de cet appareil et toutes les personnes proches.
Cet appareil ne doit pas être localisé ou fonctionner avec d’autres L’antenne
ou l’émetteur.
-
 1
1
-
 2
2


RODE Microphones RØDELink Performer Kit Mode d'emploi
- Taper
- Mode d'emploi
- Ce manuel convient également à
dans d''autres langues
Documents connexes
-
RODE Microphones Newsshooter Manuel utilisateur
-
RODE Microphones RØDELink Filmmaker Kit Guide de démarrage rapide
-
-
-
-