Whirlpool SW8 AM2Q W 2 Daily Reference Guide
- Taper
- Daily Reference Guide

FR
Lisez attentivement la notice d'utilisation avant
d'utiliser l'appareil.
GUIDE DE DÉMARRAGE
TABLEAU DES ALARMES
TYPE D'AVERTISSEMENT Signal Cause Solution
Alarme de porte ouverte Le voyant du réfrigérateur clignote La porte est restée ouverte plus de 5 minutes. Fermez la porte
Alarme de porte ouverte La lumière du réfrigérateur est éteinte La porte est restée ouverte plus de 8 minutes. Fermez la porte
Défaillance Un des voyants de température clignote Mauvais fonctionnement de l'appareil. Contactez le Service après-vente
Imprimé en Italie 01/16 - Whirlpool® Marque déposée/TM Marque déposée du groupe Whirlpool - © Tous contenus Whirlpool Europe s.r.l. 2014. Tous droits réservés - http://www.whirlpool.eu
6
th
SENSE (6ÈME SENS) FRESH
CONTROL
La fonction se met
automatiquement en marche pour
garantir des conditions optimales
pour la conservation des aliments.
VENTILATEUR
Le ventilateur assure une diffusion homogène de la température à l'intérieur du réfrigérateur, garantissant ainsi une meilleure conservation des aliments. Le ventilateur est activé par
défaut.
Désactivation/réactivation du ventilateur: Par défaut, le ventilateur est activé.
Pour désactiver/réactiver le ventilateur, procédez comme suit:
- Appuyez sur le bouton d'éclairage, conformément à l'illustration2: l'éclairage s'éteint.
- Sans relâcher le bouton d'éclairage, appuyez sur la touche Température et maintenez-la enfoncée, conformément à l'illustration3: l'éclairage clignote une seule fois si le ventilateur
est désactivé ou trois fois s'il est activé.
Remarque: L'arrêt du ventilateur entraîne la désactivation de la fonction 6th Sense (6ème Sens) Fresh Control dans le réfrigérateur.
ÉCLAIRAGE DU RÉFRIGÉRATEUR
Le système d'éclairage à l'intérieur du compartiment réfrigérateur utilise une
ampoule DEL, ce qui permet un meilleur éclairage ainsi qu'une consommation
d'énergie plus faible.
Si le système d'éclairage DEL ne fonctionne pas, contactez le Service Après-vente
pour le remplacer.
Important : L'éclairage du compartiment réfrigérateur s'allume à l'ouverture
de la porte. Si la porte est laissée ouverte pendant plus de 8 minutes, l'ampoule
s'éteint automatiquement.
Voyants à LEDs affichant le point de réglage actuel de la température ou la
fonction Froid rapide.
Fonction REFROIDISSEMENT RAPIDE
L'utilisation de la fonction Froid rapide est recommandée:
- pour augmenter la capacité de refroidissement du compartiment
réfrigérateur lorsque vous y placez une très grande quantité
d'aliments.
Pour activer la fonction Refroidissement rapide, appuyez de manière
cyclique sur la touche Température sur le panneau de commande
jusqu'à ce que les 3 voyants DEL clignotent et restent allumés.
Led ON Led OFFLed ON Led OFF
high temp.
med-high temp.
medium temp.
med-low temp.
low temp.
La fonction est automatiquement désactivée après 6 heures et
retourne au point de réglage sélectionné précédent. La fonction
peut être désactivée manuellement en appuyant sur la touche
Température sur le bandeau de commandes.
Touche ON/STANDBY.
Touche TEMPERATURE
Fonction ON/STANDBY
Pour mettre l'appareil en veille,
appuyez sur la touche On/Standby
et maintenez-la enfoncée pendant
3 secondes. Tous les voyants de
température s'éteignent. Appuyez
de nouveau sur ce bouton pour
réactiver l'appareil. (voir la notice
d'utilisation)
Réglage DE LA TEMPÉRATURE
Appuyez sur la touche Température sur le panneau de
commandes pour régler la température de la plus chaude à la
plus froide.
En appuyant sur la touche Température, le réglage de la
température changera de manière cyclique.
Lors du premier branchement, la valeur préréglée de la
température est à la position moyenne (réglage en usine).
Le tableau suivant indique les valeurs préréglées de
température :
Led ON Led OFFLed ON Led OFF
high temp.
med-high temp.
medium temp.
med-low temp.
low temp.
Fast Cooling
Remarque: Les points de réglage affichés correspondent
à la température moyenne dans tout le réfrigérateur.
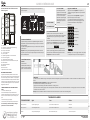
1. Ventilateur*
2. Panneau de commande électronique/éclairage
3. Zone d'air froid Multi-flow*
4. Galerie porte-bouteilles*
5. Couvercle du capteur
6. Zone à clayettes
7. Étiquette signalétique avec nom commercial
8. Bac à fruits et légumes
9. Séparateur bac à fruits et légumes*
10. Kit pour l'inversion du sens d'ouverture de la porte*
11. Plateau à œufs*
12. Séparateur à bouteilles*
13. Balconnets
14. Joint du hublot
* Disponible sur certains modèles
MISE EN MARCHE DE L'APPAREIL
L'appareil se met automatiquement en marche une fois
branché. Une fois l'appareil en marche, attendez au moins 4
à 6 heures avant d'y placer des aliments. Lorsque l'appareil
est branché à l'alimentation électrique, l'afficheur s'illumine
et toutes les icônes s'illuminent pendant environ 1 seconde.
Les valeurs par défaut (réglées en usine) du compartiment
réfrigérateur s'illuminent.
COMMENT INVERSER LE SENS D'OUVERTURE DE LA
PORTE
- voir la notice d'utilisation jointe
Il est recommandé que deux personnes effectuent
l'opération d'inversement du sens d'ouverture de la porte.
L'inversion du sens d'ouverture de porte n'est pas prévu
pour:
- les modèles avec poignée intégrée
- les modèles de porte comportant un panneau en verre.
Les caractéristiques, données techniques et images
peuvent varier en fonction du modèle
13
14
400010863472
195141439.00
GB
FR

EN
Read the Instructions for Use carefully before using
the appliance.
400010863472
195141439.00
QUICK START GUIDE
ALARMS TABLE
ALARM TYPE Signal Cause Cure
Door open alarm Refrigerator Light blinks The door has remained open for more than 5 minutes. Close the door
Door open alarm Refrigerator Light OFF The door has remained open for more than 8 minutes. Close the door
Malfunction Any temperature indicators blinks Product malfunction. Contact the After-sales Service
Printed in Italy 01/16 - Whirlpool® Registered trademark/TM Trademark of Whirlpool, group of companies - © Copyright Whirlpool Europe s.r.l. 2014. All rights reserved - http://www.whirlpool.eu
6
th
SENSE FRESH CONTROL
This function automatically works
to ensure the optimal conditions
to preserve the stored food.
FAN
The Fan improves temperature distribution inside the refrigerator compartment, allowing better preservation of stored food. By default, the fan is switched on.
Fan deactivation/reactivation: Fan is active by default.
To deactivate/reactivate the fan follow the process described below:
- Push the Light Button as indicated in picture 2: the light will switch off;
- Without releasing the Light button, keep pressed the Temperature button too as indicated in picture 3: the light will blink once if the fan has been deactivated (OFF) , or it will blink
three times if the fan has been activated (ON).
Note: Deactivation of the fan switches off function 6th Sense Fresh Control in the fridge.
REFRIGERATOR LIGHT
The light system inside the refrigerator compartment uses LEDs light, allowing a
better lightning as well as a very low energy consumption.
If the LED light system does not work, please contact the Service to replace it.
Important: The refrigerator compartment light switches on when the
refrigerator door is opened. If the door is kept open for more then 8 minutes the
light will be automatically switched off.
Indicator LEDs to display the current temperature setpoint or the Fast Cooling
function.
FAST COOLING function
The use of the Fast Cooling function is recommended:
- to increase the cooling capacity of the refrigerator compartment
when placing a very high quantity of food within it,
To activate the Fast Cooling function, press the Temperature
button cyclically on the control panel till all the 3 LEDs blink and
remain on.
Led ON Led OFFLed ON Led OFF
high temp.
med-high temp.
medium temp.
med-low temp.
low temp.
The function is automatically deactivated after 6 hours and return
to previous selected set point. The function can be manually
deactivated by press Temperature button on the control panel.
ON/STANDBY button.
TEMPERATURE button
ON/STANDBY function
To put the product in Stand-by,
press and hold the On/Standby
button for 3 seconds. All the
temperature indicators turn off.
Press again to reactivate the
appliance. (see the Instructions
for Use)
TEMPERATURE setting
Press the Temperature button on the control panel to adjust
the temperature from the warmest through the lower to the
coldest level.
Pressing the Temperature button, the temperature setting will
change cyclically.
At first plug-in of appliance temperature setpoint is present at
medium position (factory setting).
Following table shows temperature setpoints:
Note: Displayed set points correspond to the average
temperature throughout the whole refrigerator.
Led ON Led OFFLed ON Led OFF
high temp.
med-high temp.
medium temp.
med-low temp.
low temp.
Fast Cooling
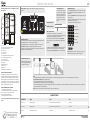
1. Fan*
2. Electronic control panel / light unit
3. Multi-flow cold air area*
4. Bottle rack *
5. Sensor cover
6. Area shelves
7. Rating plate with commercial name
8. Fruits and vegetables crisper
9. Crisper divider*
10. Door reversibility kit*
11. Egg tray*
12. Bottle separator*
13. Door trays
14. Door seal
* Available on selected models
HOW TO START THE APPLIANCE
After plugging the appliance to the mains, it starts the
operation automatically. After starting the appliance, wait
at least 4-6 hours before placing food into the appliance.
When the appliance is connected to the power supply, the
display lights up and all the icons appear on the display for
approximately 1 second. The default (factory) values of the
fridge compartment settings light-up.
HOW TO REVERSE THE DOOR SWING
- see enclosed Instructions for Use
Is recommended to reverse door swing by two persons.
There is not foreseen door reversibility for:
- models with integrated handle
- models with glass panel on the door.
Specifications, technical data and images may vary from
model
13
14
FR
GB
-
 1
1
-
 2
2


Whirlpool SW8 AM2Q W 2 Daily Reference Guide
- Taper
- Daily Reference Guide
dans d''autres langues
- English: Whirlpool SW8 AM2Q W 2
Documents connexes
-
Whirlpool SW6 A2Q W Mode d'emploi
-
HOTPOINT/ARISTON SH6 1Q RW Mode d'emploi
-
HOTPOINT/ARISTON SH6 1Q XRD Mode d'emploi
-
Whirlpool SI8 1Q WD Mode d'emploi
-
HOTPOINT/ARISTON ZHS6 1Q WRD Mode d'emploi
-
Whirlpool SW8 1Q WHR 1 Daily Reference Guide
-
-
Whirlpool SW8 AM2 D XR 2 Daily Reference Guide
-
Bauknecht KGE PLATINUM 4 A++ IL Program Chart
-
Whirlpool WBE3333 A+NFCXF Program Chart